文章目录
1. Vue的 绑定class样式
1.1 Vue 的 三种绑定class的样式方式
Vue绑定class样式效果,就使用v-bind:class 或 :class来操作:
效果一,使用字符串方式绑定:
使用Math.random 和 Math.floor来随机变化class样式:
<!DOCTYPEhtml><html><head><metacharset="utf-8"><title></title><scripttype="text/javascript"src="./js/vue.js"></script><styletype="text/css">.basic{width: 300px;height: 100px;border: 1px solid black;}.normal{background-color: cornflowerblue;border: 2px solid red;}.happy{background-color: red;border: 2px solid yellowgreen;}.sad{background-color: gray;border: 2px solid sandybrown;}</style></head><body><divid="root"><!--
                绑定class样式,字符串写法,适用于:样式的类名不确定,需要动态指定。

                正常我们这里写两个class,它会默认读取第一个class,不会读取第二个class的。

                我们使用Vue绑定的话,使用的就是v-bind来绑定,就不用担心这个问题了!
            --><divclass="basic":class="mood"@click="changeMood">{{name}}</div></div><scripttype="text/javascript">
            Vue.config.productionTip =false;newVue({
                el:"#root",
                data:{
                    name:'张三',
                    mood:'normal'},
                methods:{changeMood(){const arr =['happy','sad','normal'];//Math.random()生成的随机数,随机生成[0,1)的数字,会生成0,但是不会生成1。let i = Math.random()*3;//Math.floor()是向下取整。let down = Math.floor(i);this.mood = arr[down];}}})</script></body></html>
效果二,绑定class样式,数组写法 ,使用数组来绑定多个class样式:
<!DOCTYPEhtml><html><head><metacharset="utf-8"><title></title><scripttype="text/javascript"src="./js/vue.js"></script><styletype="text/css">.basic{width: 300px;height: 100px;border: 1px solid black;}.style1{background-color: cornflowerblue;}.style2{border: 2px solid yellowgreen;}.style3{font-size: 40px;}</style></head><body><divid="root"><!--
                绑定class样式,数组写法,适用于:要绑定的样式个数不确定,名字也不确定。
            --><divclass="basic":class="arr">{{name}}</div></div><scripttype="text/javascript">
            Vue.config.productionTip =false;newVue({
                el:"#root",
                data:{
                    name:'张三',
                    arr:['style1','style2','style3']}})</script></body></html>
这种方式很好,我们可以直接通过操作arr数组,就可以改变样式的相关操作了。
效果三,绑定class样式,对象写法,适用于:要绑定的样式个数确定,名字也确定,但要动态决定用不用。
<!DOCTYPEhtml><html><head><metacharset="utf-8"><title></title><scripttype="text/javascript"src="./js/vue.js"></script><styletype="text/css">.basic{width: 300px;height: 100px;border: 1px solid black;}.style1{background-color: cornflowerblue;}.style2{border: 2px solid yellowgreen;}.style3{font-size: 40px;}</style></head><body><divid="root"><!--效果三,绑定class样式,对象写法,适用于:要绑定的样式个数确定,名字也确定,但要动态决定用不用。--><divclass="basic":class="obj">{{name}}</div></div><scripttype="text/javascript">
            Vue.config.productionTip =false;newVue({
                el:"#root",
                data:{
                    name:'张三',
                    obj:{
                        style1:false,
                        style2:false,
                        style3:false,}}})</script></body></html>
数组写法和对象写法的style样式绑定是最常用的!
1.2 Vue 的class绑定样式 改变数值
像下面这种方式,想要通过data中的参数动态修改值的话,如果按照之前的写法就写成这种样子:
:style="font-size: sizeNumpx;"
但是,这种不对!Vue无法识别!因此可以改成下面的方式:
:style="{fontSize: sizeNum+‘px’}" 。
这种方式太麻烦,了解就好。
<!DOCTYPEhtml><html><head><metacharset="utf-8"><title></title><scripttype="text/javascript"src="./js/vue.js"></script><styletype="text/css">.basic{width: 300px;height: 100px;border: 1px solid black;}.style1{background-color: cornflowerblue;}.style2{border: 2px solid yellowgreen;}.style3{font-size: 40px;}</style></head><body><divid="root"><!--
                如果按照之前的写法就写成这种样子:
                    :style="font-size: sizeNumpx"
                但是,这种不对!Vue无法识别!因此可以改成下面的方式:
                    :style="{fontSize: sizeNum+'px'}" 。
            --><divclass="basic":style="{fontSize: sizeNum+'px'}">{{name}}</div></div><scripttype="text/javascript">//上面的样子就像下面的对象样式一样!// let test = {fontSize: sizeNum+'px'};

            Vue.config.productionTip =false;newVue({
                el:"#root",
                data:{
                    name:'张三',
                    sizeNum:40}})</script></body></html>
通过样式对象写法来确定值的效果:
这里有个规律,就是两个单词组成的就小驼峰法连接起来就可以了。
例如:background-color 就可以写为 backgroundColor。
<!DOCTYPEhtml><html><head><metacharset="utf-8"><title></title><scripttype="text/javascript"src="./js/vue.js"></script><styletype="text/css">.basic{width: 300px;height: 100px;border: 1px solid black;}.style1{background-color: cornflowerblue;}.style2{border: 2px solid yellowgreen;}.style3{font-size: 40px;}</style></head><body><divid="root"><!--
                能够修改数值的vue绑定对象的写法:

                这里有个规律,就是两个单词组成的就小驼峰法连接起来就可以了。
                例如:background-color 就可以写为 backgroundColor
            --><divclass="basic":style="[styleObj , styleObj2]">{{name}}</div></div><scripttype="text/javascript">

            Vue.config.productionTip =false;newVue({
                el:"#root",
                data:{
                    name:'张三',
                    styleObj:{
                        fontSize:'40px',
                        backgroundColor:'red'},
                    styleObj2:{
                        color:"green",
                        border:"2px solid yellow"}}})</script></body></html>
上面的方式我们还可以简写一下! 就直接通过数组,数组中存储样式对象的内容,就可。
<!DOCTYPEhtml><html><head><metacharset="utf-8"><title></title><scripttype="text/javascript"src="./js/vue.js"></script><styletype="text/css">.basic{width: 300px;height: 100px;border: 1px solid black;}.style1{background-color: cornflowerblue;}.style2{border: 2px solid yellowgreen;}.style3{font-size: 40px;}</style></head><body><divid="root"><!--

        能够修改数值的vue绑定对象的写法:

        这里有个规律,就是两个单词组成的就小驼峰法连接起来就可以了。
        例如:background-color 就可以写为 backgroundColor
    --><divclass="basic":style="arrObj">{{name}}</div></div><scripttype="text/javascript">

    Vue.config.productionTip =false;newVue({
        el:"#root",
        data:{
            name:'张三',
            arrObj:[{
                    fontSize:'40px',
                    backgroundColor:'red'},{
                    color:"green",
                    border:"2px solid yellow"}]}})</script></body></html>
2. 条件渲染
v-if , v-else-if , v-else的用法和后台if语句一样的效果。有条件判别,true显示标签,false移除标签内容。
注意:这三个指令必须连续使用,不然报错!
v-if的指令语句一般和template标签使用!
v-show的用法,如果是true显示当前标签内容,false不显示(display:none), 。
v-if和v-show的区别?
- v-if是通过删节点来达到效果。而v-show是通过定义display来显示或隐藏的。
<!DOCTYPEhtml><htmllang="en"><head><metacharset="UTF-8"><title>Title</title><scriptsrc="./js/vue.js"></script></head><body><divid="root"><!--
       对于多个标签元素内容需要判断,我们可以使用div来操作,但是添加一个div影响结构,不推荐!
    --><divv-if="n === 1"><h2>你好</h2><h2>hello, world</h2><h2>早上好</h2></div><hr><!--
       最好的情况就是使用template标签来实现,它就不会多余的添加什么标签!
    --><templatev-if="n === 1"><h2>你好</h2><h2>hello, world</h2><h2>早上好</h2></template></div><script>
    Vue.config.productionTip =false;newVue({
      el:"#root",
      data:{
        n:1}})</script></body></html>
3. Vue的 列表渲染
记住!Vue的 v-for指令和:key的作用效果!
其中的遍历数组和遍历对象是最常用的!
遍历数组:
<!DOCTYPEhtml><htmllang="en"><head><metacharset="UTF-8"><title>Title</title><scriptsrc="./js/vue.js"></script></head><body><divid="root"><ul><!--
        v-for指令,格式就是像下面的p in persons。

        v-for指令遍历数组:

        :key的作用:相当于每一个节点的标识。因此key的值,在同一节点内,不能重复!

        key 的特殊 attribute 主要用在 Vue 的虚拟 DOM 算法,在新旧 nodes 对比时辨识 VNodes。

        下方:key可以使用persons中的p.id来作为唯一标识,还可以使用参数index来定义。
      --><liv-for="(p,index) in persons":key="index">
        {{p.name}} - {{p.age}} - 索引:{{index}}
      </li></ul></div><script>
    Vue.config.productionTip =false;const vm =newVue({
      el:"#root",
      data:{
        persons:[{id:"001",name:"张三",age:18},{id:"002",name:"李四",age:100},{id:"003",name:"王五",age:1},]}})</script></body></html>
遍历对象:
<!DOCTYPEhtml><htmllang="en"><head><metacharset="UTF-8"><title>Title</title><scriptsrc="./js/vue.js"></script></head><body><divid="root"><ul><!-- 使用v-for遍历对象: --><liv-for="(value,key) in car">
        {{key}} - {{value}}
      </li></ul></div><script>
    Vue.config.productionTip =false;const vm =newVue({
      el:"#root",
      data:{
        car:{
            name:"奥迪",
            price:"70w",
            color:"黑色"}}})</script></body></html>
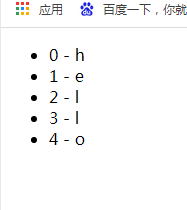
v-for也是可以遍历字符串的:
<!DOCTYPEhtml><htmllang="en"><head><metacharset="UTF-8"><title>Title</title><scriptsrc="./js/vue.js"></script></head><body><divid="root"><ul><!-- 使用v-for遍历对象: --><liv-for="(s,index) in str":key="index">
        {{index}} - {{s}}
      </li></ul></div><script>
    Vue.config.productionTip =false;const vm =newVue({
      el:"#root",
      data:{
        str:"hello"}})</script></body></html>
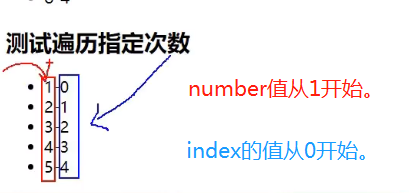
还有一种就是遍历指定次数:

4. key的作用和原理
需要我们注意的是,在我们定义key时,使用index和id的这种作法有什么区别,什么使用用index?什么使用用id?
注意事项:
如果没有定义key属性,默认就是index作为key的值,作为唯一标识。
4.1 index作为key 的效果和问题
一定理解好虚拟DOM和真实DOM,以及中间的虚拟DOM对比算法。
上图对比虚拟DOM时,对比了三部分,第一个key,第二个内容(张三–18),第三个input标签。大体上就这样一步步对比,在这key作为唯一标识,内容不同就会覆盖。注意这里我们添加的时真实DOM中的input,在虚拟dom中input还是一样的,因此直接会使用真实DOM中的内容。
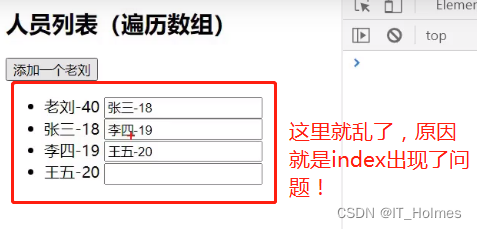
这里使用index来操作的话,就会出现这种问题:
<!DOCTYPEhtml><htmllang="en"><head><metacharset="UTF-8"><metahttp-equiv="X-UA-Compatible"content="IE=edge"><metaname="viewport"content="width=device-width, initial-scale=1.0"><title>列表渲染</title><scriptsrc="https://cdn.jsdelivr.net/npm/[email protected]/dist/vue.js"></script></head><body><divid="root"><h2>人员列表(遍历数组)</h2><buttonv-on:click.once="add">添加个人</button><ul><liv-for="(p,index) in persons":key="index">
                {{p.name}}-{{p.age}} ---索引值:{{index}}
                <inputtype="text"></li></ul></div><script>
        Vue.config.productionTip =false;newVue({
            data:{
                persons:[{id:"001",name:"张三",age:18},{id:"002",name:"李四",age:19},{id:"003",name:"王五",age:20}]},
            methods:{add(){const p ={id:'004',name:'老李',age:"30"};this.persons.unshift(p);//unshift(xxx),将xxx插入 arrayObject 的头部,并将已经存在的元素顺次地移到较高的下标处,以便留出空间}},}).$mount('#root');</script></body></html>
4.2 id作为key 的效果(最佳)
id对于单个元素而言,是一直绑定在一起的!
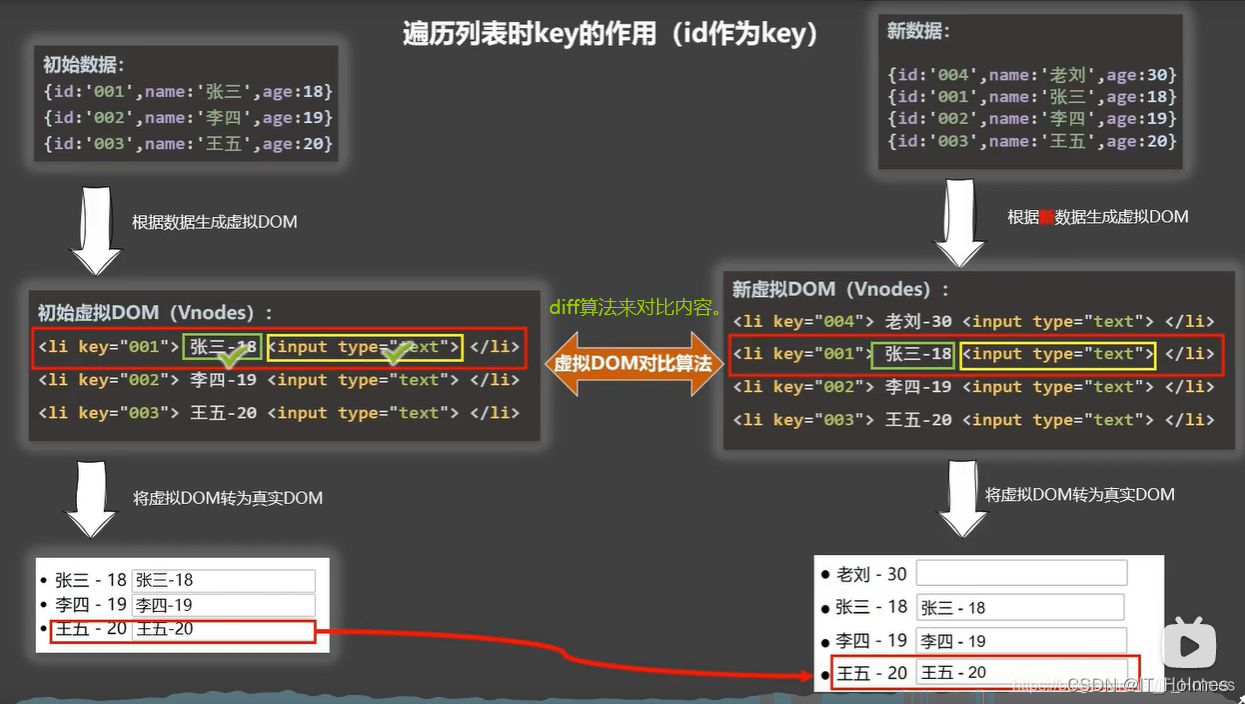
使用id来实现,就可以避免上面index所出现的问题。
<!DOCTYPEhtml><htmllang="en"><head><metacharset="UTF-8"><metahttp-equiv="X-UA-Compatible"content="IE=edge"><metaname="viewport"content="width=device-width, initial-scale=1.0"><title>列表渲染</title><scriptsrc="https://cdn.jsdelivr.net/npm/[email protected]/dist/vue.js"></script></head><body><divid="root"><h2>人员列表(遍历数组)</h2><buttonv-on:click.once="add">添加个人</button><ul><liv-for="(p,index) in persons":key="p.id">
                {{p.name}}-{{p.age}} ---索引值:{{index}}
                <inputtype="text"></li></ul></div><script>
        Vue.config.productionTip =false;newVue({
            data:{
                persons:[{id:"001",name:"张三",age:18},{id:"002",name:"李四",age:19},{id:"003",name:"王五",age:20}]},
            methods:{add(){const p ={id:'004',name:'老李',age:"30"};this.persons.unshift(p);//unshift(xxx),将xxx插入 arrayObject 的头部,并将已经存在的元素顺次地移到较高的下标处,以便留出空间}},}).$mount('#root');</script></body></html>
3.3 面试题:react , vue中的key有什么作用?

5. 列表过滤
5.1 #region 和 #endregion
#region 和 #endregion是来折叠代码使用的。
5.2 使用watch 和 vue中的filter方法来 过滤列表
注意:filter方法是返回了一个新的数组,并不是修改了原来的数组!
在watch中,创建对应的属性方法,在属性方法的handler函数中创建filter方法,filter方法的使用,在filter添加函数,返回符合条件的返回值。
<!DOCTYPEhtml><htmllang="en"><head><metacharset="UTF-8"><title>Title</title><scriptsrc="./js/vue.js"></script></head><body><divid="root"><h2>人员列表</h2><inputtype="text"placeholder="请输入名字"v-model="keyWord"/><ul><liv-for="(p,index) in filterPersons":key="p.id">
        {{p.name}} -  {{p.sex}} - {{p.age}}
      </li></ul></div><script>
    Vue.config.productionTip =false;const vm =newVue({
      el:"#root",
      data:{
        keyWord:"",
        persons:[{id:'001',name:'马冬梅',age:18,sex:"女"},{id:'002',name:'周冬雨',age:19,sex:"女"},{id:'003',name:'周杰伦',age:20,sex:"男"},{id:'004',name:'温兆伦',age:20,sex:"男"},],
        filterPersons:[]},
      watch:{
          keyWord:{
              immediate:true,handler(newVal){this.filterPersons =this.persons.filter((p)=>{//a.indexOf(b)可以得到b在a的那个索引位置,如果没有返回-1.//indexOf()可以作为判别a是否包含b的字符串。return p.name.indexOf(newVal)!==-1;})}}}})</script></body></html>
5.3 使用 computed和 vue中的filter方法 来 过滤列表(推荐,方便简单)
定义好computed属性,进而使用filter方法来过滤列表:
<!DOCTYPEhtml><htmllang="en"><head><metacharset="UTF-8"><title>Title</title><scriptsrc="./js/vue.js"></script></head><body><divid="root"><h2>人员列表</h2><inputtype="text"placeholder="请输入名字"v-model="keyWord"/><ul><liv-for="(p,index) in filterPersons":key="p.id">
        {{p.name}} -  {{p.sex}} - {{p.age}}
      </li></ul></div><script>
    Vue.config.productionTip =false;const vm =newVue({
      el:"#root",
      data:{
        keyWord:"",
        persons:[{id:'001',name:'马冬梅',age:18,sex:"女"},{id:'002',name:'周冬雨',age:19,sex:"女"},{id:'003',name:'周杰伦',age:20,sex:"男"},{id:'004',name:'温兆伦',age:20,sex:"男"},]},
      computed:{filterPersons(){//这里的p,就是this.persons中数组一个个的元素。returnthis.persons.filter((p)=>{return p.name.indexOf(this.keyWord)!=-1;})}}})</script></body></html>
6. 列表排序
通过使用 js中的sort函数 来对列表进行排序。
<!DOCTYPEhtml><htmllang="en"><head><metacharset="UTF-8"><title>Title</title><scriptsrc="./js/vue.js"></script></head><body><divid="root"><h2>人员列表</h2><inputtype="text"placeholder="请输入名字"v-model="keyWord"/><button@click="sortType = 2">年龄升序</button><button@click="sortType = 1">年龄降序</button><button@click="sortType = 0">原顺序</button><ul><liv-for="(p,index) in filterPersons":key="p.id">
        {{p.name}} -  {{p.sex}} - {{p.age}}
      </li></ul></div><script>
    Vue.config.productionTip =false;const vm =newVue({
      el:"#root",
      data:{
        keyWord:"",
        sortType:0,
        persons:[{id:'001',name:'马冬梅',age:18,sex:"女"},{id:'002',name:'周冬雨',age:19,sex:"女"},{id:'003',name:'周杰伦',age:20,sex:"男"},{id:'004',name:'温兆伦',age:20,sex:"男"},]},
      computed:{filterPersons(){const arr =this.persons.filter((p)=>{return p.name.indexOf(this.keyWord)!=-1;})//sort函数进行排序的时候,会受到两个数据项obj1,obj2 ,我们可以通过 '-' 来对obj1和obj2进行一个排序。注意这里的排序是给arr数组排序。if(this.sortType){
                  arr.sort((obj1,obj2)=>{returnthis.sortType ==1? obj2.age-obj1.age : obj1.age-obj2.age;})}return arr;}}})</script></body></html>
7. Vue 监测数据的原理
7.1 Vue 如何监测 对象 中数据的改变 原理
Vue开发者工具在显示上面有一定的小问题,就是我们修改了data中的值,有时开发者工具没有变化或者更新。
_data中响应页面的reactive的get和set方法:
自己写的Object.defineProperty()属性中,不能调用自身的自己的属性!会死循环。
写一个简易版的Vue底层监测原理:
<!DOCTYPEhtml><html><head><metacharset="utf-8"><title></title><scripttype="text/javascript"src="./js/vue.js"></script></head><body><script>

            Vue.config.productionTip =false;let data ={
                name:"北京大学",
                address:"北京"}const obs =newObserver(data);functionObserver(obj){const keys = Object.keys(obj);//console.log(keys);//forEach()作用就是给keys中的每一个属性k进行一个函数操作。
                keys.forEach((k)=>{
                    Object.defineProperty(this,k,{get(){return obj[k];},set(val){//Vue框架要比我们写的完善的多,这里是展示一下,实际上vue在这要进行很多操作,就像下面输出的内容一样。
                            console.log(`${k}被修改了,需要解析模板,生成虚拟DOM,对比不同 ... 然后,生成页面内容。`)
                            obj[k]= val;}})})}</script></body></html>

这里我们简易写的监测原理,实际上对应vue中的reactiveGetter和reactiveSetter。
7.2 Vue.set()方法 和 vm.$set()方法 使用
7.2.1 Vue 的两个注意事项
在Vue中的差值语法中,undefined是不会在页面上面显示的。
<!DOCTYPEhtml><html><head><metacharset="utf-8"><title></title><scripttype="text/javascript"src="./js/vue.js"></script></head><body><divid="root"><!-- 这里的obj.c没有c!那么它这里就是undefined,也就是不显示。 --><p>内容:{{undefined}} , {{name}} , {{obj.c}}</p></div><scripttype="text/javascript">
            Vue.config.productionTip =false;newVue({
                el:"#root",
                data:{
                    name:undefined,
                    obj:{
                        a:'1',
                        b:'2'}}})</script></body></html>
Vue的实例对象的中内容,是从 _data中数据代理出来的!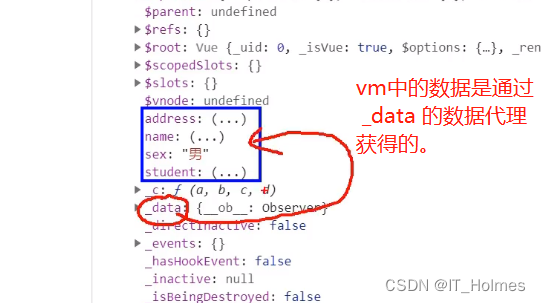
7.2.2 Vue 如何实现后添加数据
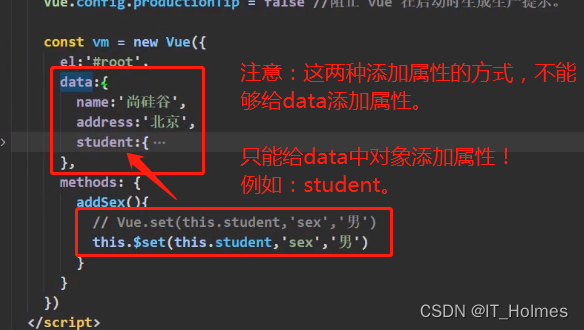
对于data中的数据,我们设计好了,如果还想添加新的数据,就需要一个Vue api来操作,就是Vue.set(target , key , value)。
通过是用Vue.set(target , key , value);来添加对应的属性,这个的target要指定对象的!

通过是用vm.$set(target , key , value);来添加对应的属性,这个的target也要指定对象的!

代码展示:
<!DOCTYPEhtml><html><head><metacharset="utf-8"><title></title><scripttype="text/javascript"src="./js/vue.js"></script></head><body><divid="root"><!-- 设计一个添加性别的按钮button --><buttontype="button"@click="addSex">添加性别</button><!-- 使用v-if判断student.sex是否存在,有返回true显示,没有返回false不显示。 --><h2v-if="student.sex">学生性别:{{student.sex}}</h2><h2>学生年龄:真实:{{student.age.rAge}} , 对外:{{student.age.sAge}}</h2><h2>朋友们</h2><ul><liv-for="(f,index) in student.friends":key="index">
                    {{f.name}} -- {{f.age}}
                </li></ul></div><script>

            Vue.config.productionTip =false;const vm =newVue({
                el:"#root",
                data:{
                    student:{
                        name:'tom',
                        age:{
                            rAge:40,
                            sAge:29},
                        friends:[{name:'jerry',age:35},{name:'tony',age:36},]}},
                methods:{//给sutdent添加一个sex属性。addSex(){// 两个可以使用!//Vue.set(this.student,"sex","男");this.$set(this.student,'sex','女');}}})</script></body></html>
注意:这两种添加属性方式,不能给data添加属性。只能给data中对象添加属性!

7.3 Vue 如何监测 数组 中数据的改变 原理
7.3.1 对比对象 和 数组 的监视
对比一下,对象和数组:

也就是说数组没有对应的reactiveGetter和reactiveSetter方法,也就是修改数组中的内容,Vue是没有办法动态监测的!
7.3.2 js中操作数组的几个api方法 和 Vue中操作数组的几个vue方法
js中操作数组的几个api方法:
Array.prototype.push():
push() 方法将一个或多个元素添加到数组的末尾,并返回该数组的新长度。
Array.prototype.pop():
pop()方法从数组中删除最后一个元素,并返回该元素的值。此方法更改数组的长度。
Array.prototype.shift():
shift() 方法从数组中删除第一个元素,并返回该元素的值。此方法更改数组的长度。
Array.prototype.unshift():
unshift() 方法将一个或多个元素添加到数组的开头,并返回该数组的新长度(该方法修改原有数组)。
更多的方法,可以通过控制台查看:
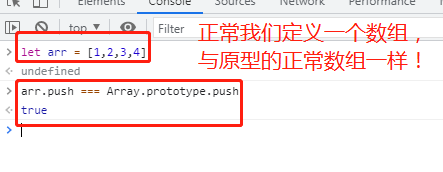
但是,在Vue中也有这些同名的方法。注意不要与上面搞混了!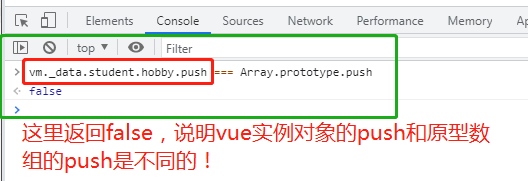
Vue中的push等等方法就添加了一系列什么对比虚拟DOM,重新解析页面模板等操作,因为,这些操作,所以我们通过方法操作数组才会更新模板页面。
7.3.3 使用方法来给数组 添加数据
- 使用索引修改,虽然 _data 中的值改变了,并不会改变页面,因为数组内部的元素是没有reactive的getter和setter方法!
- 可以通过方法的方式来触发页面响应。
<!DOCTYPEhtml><html><head><metacharset="utf-8"><title></title><scripttype="text/javascript"src="./js/vue.js"></script></head><body><divid="root"><h2>学生姓名:{{student.name}}</h2><h2>学生年龄:真实:{{student.age.rAge}} , 对外:{{student.age.sAge}}</h2><buttontype="button"@click="updateData1">修改索引按钮</button><buttontype="button"@click="updateData2">通过方法</button><ul><liv-for="(h,index) in student.hobby":key="index">
                    {{h}}
                </li></ul></div><script>

            Vue.config.productionTip =false;const vm =newVue({
                el:"#root",
                data:{
                    student:{
                        name:'tom',
                        age:{
                            rAge:40,
                            sAge:29},
                        hobby:['打篮球','玩游戏','睡觉']}},
                methods:{updateData1(){//使用索引修改,虽然 _data 中的值改变了,并不会改变页面,因为数组内部的元素是没有reactive的getter和setter方法!this.student.hobby[0]='踢足球';},updateData2(){//可以通过方法的方式来触发页面响应。this.student.hobby.push('吃东西');}}})</script></body></html>

7.4 总结

数据劫持就是将原来data内的数据,加工成了vm._data这样的数据的过程叫做数据劫持,因为中间给它添加了很多Vue方面的功能。
版权归原作者 IT_Holmes 所有, 如有侵权,请联系我们删除。