win11 wsl子系统centos7安装docker(2024年无坑版)
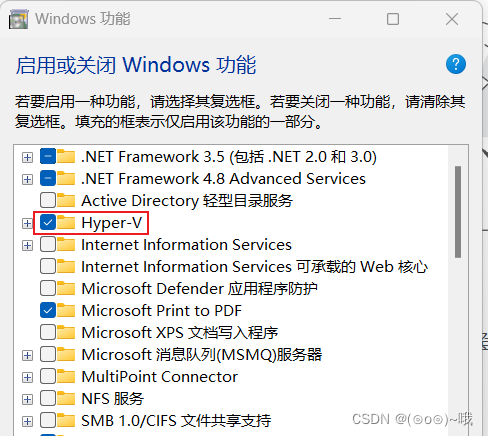
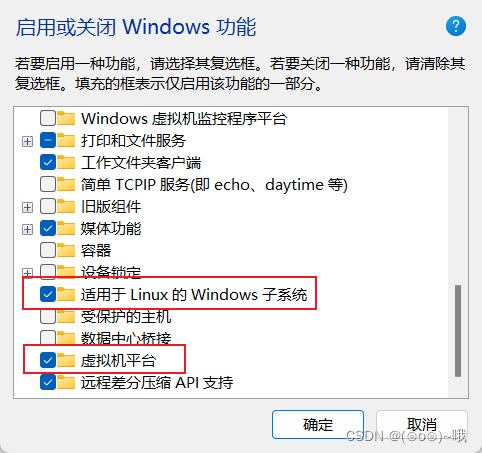
1、使用前需打开window功能


2、安装或更新wsl
wsl --install
wsl --update
3、下载镜像包
centos7镜像安装包:
https://github.com/mishamosher/CentOS-WSL
下载解压,双击exe文件执行安装,安装完会在同目录下生产镜像文件,所以在哪里执行这个安装包,你的子系统就会被安装在哪。
接着打开cmd,输入
wsl
即可进入系统。如果想进入指定发行版,
wsl -d 发行版名字
如:
wsl -d CentOS792
4、启用 systemd 管理 Linux 服务
echo-e"[boot]\nsystemd=true"|sudotee-a /etc/wsl.conf
然后通过 PowerShell 使用
wsl.exe --shutdown
来关闭 WSL 发行版以重启 WSL 实例,其实叉掉cmd界面再打开也可以。
参考官方文档:https://learn.microsoft.com/zh-cn/windows/wsl/systemd
5、重新设置密码
passwd root
6、软件源配置
先备份一下
cp-rv /etc/yum.repos.d /etc/yum.repos.d_bak
配置:
配置CentOS 软件国内源仓库
方法一:
主要是替换http://mirror.centos.org为https://mirrors.tuna.tsinghua.edu.cn/
下面是替换的脚本sed-e's|^mirrorlist=|#mirrorlist=|g'\-e's|^#baseurl=http://mirror.centos.org/centos|baseurl=https://mirrors.tuna.tsinghua.edu.cn/centos-vault|g'\-i.bak\ /etc/yum.repos.d/CentOS-*.repo提示: 也可以使用vim打开页面手动替换
方法二:
sed-e's|^mirrorlist=|#mirrorlist=|g'\-e's|^#baseurl=http://mirror.centos.org/centos|baseurl=http://mirrors.aliyun.com/centos|g'\-i.bak\
    /etc/yum.repos.d/CentOS-*.repo
方法三(推荐):
wget-O /etc/yum.repos.d/CentOS-Base.repo https://mirrors.aliyun.com/repo/Centos-7.repo或者
curl-o /etc/yum.repos.d/CentOS-Base.repo https://mirrors.aliyun.com/repo/Centos-7.repo然后运行
yum makecache生成缓存
7、安装docker
升级软件包
yum update
卸载旧版本(如果之前安装过的话)
yum remove docker docker-common docker-selinux docker-engine
安装需要的软件包, yum-util 提供yum-config-manager功能,另两个是devicemapper驱动依赖
yum install-y yum-utils device-mapper-persistent-data lvm2
添加docker-ce安装源
yum-config-manager --add-repo http://download.docker.com/linux/centos/docker-ce.repo(中央仓库)
yum-config-manager --add-repo http://mirrors.aliyun.com/docker-ce/linux/centos/docker-ce.repo(阿里仓库)(推荐)
如果不可用,可以自己手动创建一个docker-ce.repo文件
vim /etc/yum.repos.d/docker-ce.repo
填入:
[docker-ce-stable]name=Docker CE Stable - x86_64
baseurl=https://mirrors.tuna.tsinghua.edu.cn/docker-ce/linux/centos/7.9/x86_64/stable
enabled=1gpgcheck=1gpgkey=https://mirrors.tuna.tsinghua.edu.cn/docker-ce/linux/centos/gpg

[docker-ce-stable-debuginfo]name=Docker CE Stable - Debuginfo x86_64
baseurl=https://mirrors.tuna.tsinghua.edu.cn/docker-ce/linux/centos/7.9/debug-x86_64/stable
enabled=0gpgcheck=1gpgkey=https://mirrors.tuna.tsinghua.edu.cn/docker-ce/linux/centos/gpg

[docker-ce-stable-source]name=Docker CE Stable - Sources
baseurl=https://mirrors.tuna.tsinghua.edu.cn/docker-ce/linux/centos/7.9/source/stable
enabled=0gpgcheck=1gpgkey=https://mirrors.tuna.tsinghua.edu.cn/docker-ce/linux/centos/gpg

[docker-ce-test]name=Docker CE Test - x86_64
baseurl=https://mirrors.tuna.tsinghua.edu.cn/docker-ce/linux/centos/7.9/x86_64/test
enabled=0gpgcheck=1gpgkey=https://mirrors.tuna.tsinghua.edu.cn/docker-ce/linux/centos/gpg

[docker-ce-test-debuginfo]name=Docker CE Test - Debuginfo x86_64
baseurl=https://mirrors.tuna.tsinghua.edu.cn/docker-ce/linux/centos/7.9/debug-x86_64/test
enabled=0gpgcheck=1gpgkey=https://mirrors.tuna.tsinghua.edu.cn/docker-ce/linux/centos/gpg

[docker-ce-test-source]name=Docker CE Test - Sources
baseurl=https://mirrors.tuna.tsinghua.edu.cn/docker-ce/linux/centos/7.9/source/test
enabled=0gpgcheck=1gpgkey=https://mirrors.tuna.tsinghua.edu.cn/docker-ce/linux/centos/gpg

[docker-ce-nightly]name=Docker CE Nightly - x86_64
baseurl=https://mirrors.tuna.tsinghua.edu.cn/docker-ce/linux/centos/7.9/x86_64/nightly
enabled=0gpgcheck=1gpgkey=https://mirrors.tuna.tsinghua.edu.cn/docker-ce/linux/centos/gpg

[docker-ce-nightly-debuginfo]name=Docker CE Nightly - Debuginfo x86_64
baseurl=https://mirrors.tuna.tsinghua.edu.cn/docker-ce/linux/centos/7.9/debug-x86_64/nightly
enabled=0gpgcheck=1gpgkey=https://mirrors.tuna.tsinghua.edu.cn/docker-ce/linux/centos/gpg

[docker-ce-nightly-source]name=Docker CE Nightly - Sources
baseurl=https://mirrors.tuna.tsinghua.edu.cn/docker-ce/linux/centos/7.9/source/nightly
enabled=0gpgcheck=1gpgkey=https://mirrors.tuna.tsinghua.edu.cn/docker-ce/linux/centos/gpg
选择docker版本并安装,查看可用版本有哪些
yum list docker-ce --showduplicates|sort-r
安装(这里默认最新)
sudo yum install docker-ce docker-ce-cli \
containerd.io \
docker-buildx-plugin \
docker-compose-plugin
启动服务并设置开机自启:
systemctl start docekr
systemctl enable docekr
如果报错:
Failed to start docker.service: Unit not found.
则直接新建一个 Docker 服务文件:
创建一个新的 Docker 服务文件:
sudovim /usr/lib/systemd/system/docker.service
在文件中添加以下内容:
[Unit]Description=Docker Application Container Engine
Documentation=https://docs.docker.com
After=network-online.target firewalld.service
Wants=network-online.target

[Service]Type=notify
ExecStart=/usr/bin/dockerd -H fd:// --containerd=/run/containerd/containerd.sock
ExecReload=/bin/kill -s HUP $MAINPIDTimeoutSec=0RestartSec=2Restart=always

# Note that StartLimit* options were moved from "Service" to "Unit" in systemd 229.# Both the old, deprecated, and new location are accepted by systemd 229 and up, so using the old location# to make them work for either version of systemd.StartLimitBurst=3# Note that StartLimitInterval was renamed to StartLimitIntervalSec in systemd 230.StartLimitInterval=60s

# Having non-zero Limit*s causes performance problems due to accounting overhead# in the kernel. We recommend using cgroups to do container-local accounting.LimitNOFILE=infinity
LimitNPROC=infinity
LimitCORE=infinity

# Comment TasksMax if your systemd version does not support it.# Only systemd 226 and above support this option.TasksMax=infinity
TimeoutStartSec=0# set delegate yes so that systemd does not reset the cgroups of docker containersDelegate=yes

# kill only the docker process, not all processes in the cgroupKillMode=process

[Install]WantedBy=multi-user.target
或者
[Unit]Description=Docker Application Container Engine
Documentation=https://docs.docker.com
After=network-online.target docker.socket firewalld.service containerd.service time-set.target
Wants=network-online.target containerd.service
Requires=docker.socket

[Service]Type=notify
# the default is not to use systemd for cgroups because the delegate issues still# exists and systemd currently does not support the cgroup feature set required# for containers run by dockerExecStart=/usr/bin/dockerd -H fd:// --containerd=/run/containerd/containerd.sock
ExecReload=/bin/kill -s HUP $MAINPIDTimeoutStartSec=0RestartSec=2Restart=always

# Note that StartLimit* options were moved from "Service" to "Unit" in systemd 229.# Both the old, and new location are accepted by systemd 229 and up, so using the old location# to make them work for either version of systemd.StartLimitBurst=3# Note that StartLimitInterval was renamed to StartLimitIntervalSec in systemd 230.# Both the old, and new name are accepted by systemd 230 and up, so using the old name to make# this option work for either version of systemd.StartLimitInterval=60s

# Having non-zero Limit*s causes performance problems due to accounting overhead# in the kernel. We recommend using cgroups to do container-local accounting.LimitNOFILE=infinity
LimitNPROC=infinity
LimitCORE=infinity

# Comment TasksMax if your systemd version does not support it.# Only systemd 226 and above support this option.TasksMax=infinity

# set delegate yes so that systemd does not reset the cgroups of docker containersDelegate=yes

# kill only the docker process, not all processes in the cgroupKillMode=process
OOMScoreAdjust=-500

[Install]WantedBy=multi-user.target
重新加载 systemd 配置以使新创建的服务文件生效:
sudo systemctl daemon-reload
启动 Docker 并将其设置为开机自启动:
sudo systemctl start dockersudo systemctl enabledocker
如果还报错,就仔细看看上方的docker.service配置是不是漏了错了
可以用这个手动启动命令看看能不能启动,要是能启动,就证明docker安装成功但docker.service搞错了,重新检查一下
dockerd
运行以下命令验证 Docker 是否安装成功:
systemctl status docker.service
至此,docker安装完毕!
-------------其他---------------:
①. 安装 OpenSSH 服务(如果尚未安装):
sudo yum install openssh-server
②. 启动 SSH 服务:
sudo systemctl start sshd
③. 确保 SSH 服务在系统启动时自动启动:
sudo systemctl enable sshd
④看状态
sudo systemctl status sshd
配置加速镜像:
vim /etc/docker/daemon.json
填入如下内容:
个人专属加速镜像,自己去阿里云申请
{"registry-mirrors":["https://mirror.ccs.tencentyun.com",
            "https://nyxpemm4.mirror.aliyuncs.com",
            "https://registry.docker-cn.com",
            "https://docker.mirrors.ustc.edu.cn",
            "http://hub-mirror.c.163.com",
            "https://cr.console.aliyun.com/"]}
要是需要代理,填自己的地址:
exporthttp_proxy="http://192.168.1.104:10809"exporthttps_proxy="http://192.168.1.104:10809"
验证:
curl-I http://www.google.com
curl cip.cc
curl ip.sb
安装docker管理工具portainer-ce中文版:
docker pull 6053537/portainer-ce:latest
wsl的一些常用命令:
wsl配置
vim /etc/wsl.conf
wsl清单(cmd)
wsl --list
卸载某一版本(cmd)
wsl --unregister CentOS793
设置某一版本为默认版本(cmd)
wsl --set-default CentOS7
版权归原作者 (⊙o⊙)~哦 所有, 如有侵权,请联系我们删除。