💧 概述
Swagger是一个用于设计、构建和文档化 RESTful API 的开源框架。它提供了一组工具,使得开发人员能够更轻松地定义、描述和测试API接口。
具体来说,Swagger包含以下几个核心组件:
- Swagger规范(Swagger Specification): 定义了一种格式化的API规范,使用YAML或JSON格式,用于描述API的各种细节,包括路由、参数、返回值等。
- Swagger编辑器(Swagger Editor): 提供了一个交互式的编辑界面,让开发人员能够方便地编写和验证Swagger规范文件。
- Swagger UI: 一个动态生成的HTML文件,可以将Swagger规范文件渲染成一个美观易用的API文档网页。通过Swagger UI,开发人员可以直观地查看API接口的详细信息,包括请求示例、响应模型和参数说明。
- Swagger Codegen: 一个自动生成API客户端代码的工具,根据Swagger规范文件,它可以生成多种编程语言的代码框架,帮助开发人员快速集成和调用API接口。
利用Swagger,开发团队可以在项目早期就定义和设计好API接口,并且在整个开发过程中保持与API文档的同步更新。这样做的好处包括:
- 方便的API文档自动生成和维护。
- 更好的API可读性和可测试性。
- 简化与前端开发团队或第三方开发者之间的协作。
- 提高API的可靠性和版本管理能力。
总的来说,Swagger是一个强大的工具,可以帮助开发人员更好地构建、测试和文档化RESTful API,并提供了一系列的工具和库,支持在不同的编程语言和框架中使用。
💧 与 spring boot整合
🌀 引入依赖
<!-- 引入 Swagger 依赖 --><dependency><groupId>io.springfox</groupId><artifactId>springfox-swagger2</artifactId><version>2.9.2</version></dependency><!-- swagger2-UI --><dependency><groupId>io.springfox</groupId><artifactId>springfox-swagger-ui</artifactId><version>2.9.2</version></dependency>
🌀 添加配置
自定义
Swagger
配置文件:
SwaggerConfig
importjava.util.ArrayList;importjava.util.List;importorg.springframework.beans.factory.annotation.Autowired;importorg.springframework.beans.factory.annotation.Value;importorg.springframework.context.annotation.Bean;importorg.springframework.context.annotation.Configuration;importio.swagger.annotations.ApiOperation;importspringfox.documentation.builders.ApiInfoBuilder;importspringfox.documentation.builders.PathSelectors;importspringfox.documentation.builders.RequestHandlerSelectors;importspringfox.documentation.service.*;importspringfox.documentation.spi.DocumentationType;importspringfox.documentation.spi.service.contexts.SecurityContext;importspringfox.documentation.spring.web.plugins.Docket;importspringfox.documentation.swagger2.annotations.EnableSwagger2;/**
 * Swagger2的接口配置
 *
 * @author alited
 */@Configuration@EnableSwagger2//标记项目启用 Swagger API 接口文档publicclassSwaggerConfig{/** 是否开启swagger */@Value("${swagger.enabled}")privateboolean enabled;/** 设置请求的统一前缀 */@Value("${swagger.pathMapping}")privateString pathMapping;/**
     * 创建API
     */@BeanpublicDocketcreateRestApi(){// 创建Docket对象returnnewDocket(DocumentationType.SWAGGER_2)// 文档类型,使用Swagger2// 是否启用Swagger.enable(enabled)// 用来创建该API的基本信息,展示在文档的页面中(自定义展示的信息)// 设置Api信息.apiInfo(apiInfo())// 设置哪些接口暴露给Swagger展示.select()// 扫描所有有注解的api,用这种方式更灵活.apis(RequestHandlerSelectors.withMethodAnnotation(ApiOperation.class))// 扫描指定包中的swagger注解// .apis(RequestHandlerSelectors.basePackage("com.project.tool.swagger"))// 扫描所有 .paths(PathSelectors.any())// 构建出 Docket 对象.build()/* 设置安全模式,swagger可以设置访问token */.securitySchemes(securitySchemes()).securityContexts(securityContexts()).pathMapping(pathMapping);}/**
     * 安全模式,这里指定token通过Authorization头请求头传递
     */privateList<SecurityScheme>securitySchemes(){List<SecurityScheme> apiKeyList =newArrayList<SecurityScheme>();
        apiKeyList.add(newApiKey("Authorization","Authorization","header"));return apiKeyList;}/**
     * 安全上下文
     */privateList<SecurityContext>securityContexts(){List<SecurityContext> securityContexts =newArrayList<>();
        securityContexts.add(SecurityContext.builder().securityReferences(defaultAuth()).forPaths(PathSelectors.regex("^(?!auth).*$")).build());return securityContexts;}/**
     * 默认的安全上引用
     */privateList<SecurityReference>defaultAuth(){AuthorizationScope authorizationScope =newAuthorizationScope("global","accessEverything");AuthorizationScope[] authorizationScopes =newAuthorizationScope[1];
        authorizationScopes[0]= authorizationScope;List<SecurityReference> securityReferences =newArrayList<>();
        securityReferences.add(newSecurityReference("Authorization", authorizationScopes));return securityReferences;}/**
     * 添加摘要信息
     */privateApiInfoapiInfo(){// 用ApiInfoBuilder进行定制returnnewApiInfoBuilder()// 设置标题.title("标题:管理系统_接口文档")// 描述.description("描述:用于管理集团旗下公司的人员信息,具体包括XXX,XXX模块...")// 作者信息.contact(newContact("Wen先森",null,null))// 版本.version("版本号:1.0").build();}}
💧 接口使用
可以在Controller类及方法上添加Swagger相关注解,自动生成API文档。
/**
 * swagger 用户测试方法
 *
 * @author alited
 */@Api("用户信息管理")@RestController@RequestMapping("/test/user")publicclassTestController{privatefinalstaticMap<Integer,UserEntity> users =newLinkedHashMap<Integer,UserEntity>();{
        users.put(1,newUserEntity(1,"admin","admin123","15888888888"));
        users.put(2,newUserEntity(2,"ry","admin123","15666666666"));}@ApiOperation("获取用户列表")@GetMapping("/list")publicAjaxResultuserList(){List<UserEntity> userList =newArrayList<UserEntity>(users.values());returnAjaxResult.success(userList);}@ApiOperation("获取用户详细")@ApiImplicitParam(name ="userId", value ="用户ID", required =true, dataType ="int", paramType ="path")@GetMapping("/{userId}")publicAjaxResultgetUser(@PathVariableInteger userId){if(!users.isEmpty()&& users.containsKey(userId)){returnAjaxResult.success(users.get(userId));}else{returnAjaxResult.error("用户不存在");}}@ApiOperation("新增用户")@ApiImplicitParam(name ="userEntity", value ="新增用户信息", dataType ="UserEntity")@PostMapping("/save")publicAjaxResultsave(UserEntity user){if(StringUtils.isNull(user)||StringUtils.isNull(user.getUserId())){returnAjaxResult.error("用户ID不能为空");}returnAjaxResult.success(users.put(user.getUserId(), user));}@ApiOperation("更新用户")@ApiImplicitParam(name ="userEntity", value ="新增用户信息", dataType ="UserEntity")@PutMapping("/update")publicAjaxResultupdate(UserEntity user){if(StringUtils.isNull(user)||StringUtils.isNull(user.getUserId())){returnAjaxResult.error("用户ID不能为空");}if(users.isEmpty()||!users.containsKey(user.getUserId())){returnAjaxResult.error("用户不存在");}
        users.remove(user.getUserId());returnAjaxResult.success(users.put(user.getUserId(), user));}@ApiOperation("删除用户信息")@ApiImplicitParam(name ="userId", value ="用户ID", required =true, dataType ="int", paramType ="path")@DeleteMapping("/{userId}")publicAjaxResultdelete(@PathVariableInteger userId){if(!users.isEmpty()&& users.containsKey(userId)){
            users.remove(userId);returnAjaxResult.success();}else{returnAjaxResult.error("用户不存在");}}}@ApiModel("用户实体")classUserEntity{@ApiModelProperty("用户ID")privateInteger userId;@ApiModelProperty("用户名称")privateString username;@ApiModelProperty("用户密码")privateString password;@ApiModelProperty("用户手机")privateString mobile;publicUserEntity(){}publicUserEntity(Integer userId,String username,String password,String mobile){this.userId = userId;this.username = username;this.password = password;this.mobile = mobile;}publicIntegergetUserId(){return userId;}publicvoidsetUserId(Integer userId){this.userId = userId;}publicStringgetUsername(){return username;}publicvoidsetUsername(String username){this.username = username;}publicStringgetPassword(){return password;}publicvoidsetPassword(String password){this.password = password;}publicStringgetMobile(){return mobile;}publicvoidsetMobile(String mobile){this.mobile = mobile;}}
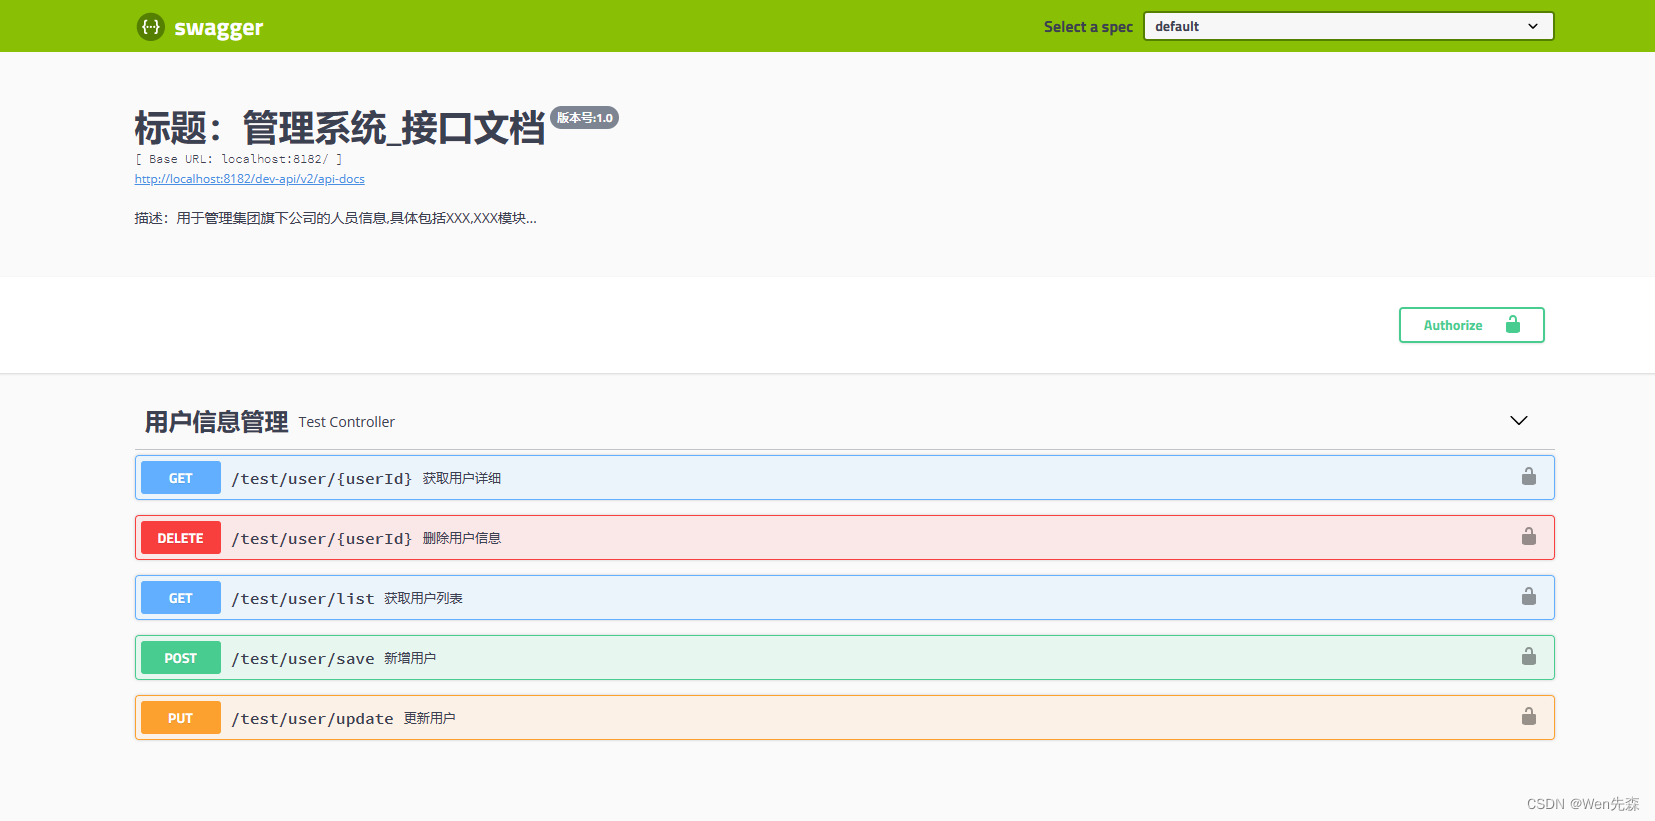
启动项目。然后浏览器访问 http://127.0.0.1:8080/swagger-ui.html (
8080是你项目端口
)地址,就可以看到 Swagger 生成的 API 接口文档。效果如下:
💧 Swagger相关注解
Swagger 提供了一套注解,用于在代码中标记和描述 API 接口的各种细节,帮助生成准确、详细的 API 文档。以下是 Swagger 常用的一些注解:
🌀 @Api
@Api
注解是 Swagger 中用于标记控制器类(Controller)的注解,表示该类包含了 API 接口。它具有以下常用属性:
value:指定 API 分组或分类的名称。tags:设置 API 接口的标签,用于对 API 进行分组和分类。[]数组,可以填写多个。 - 可以在一个 Controller 上的 @Api 的 tags 属性,设置多个标签,那么这个 Controller 下的 API 接口,就会出现在这两个标签中。- 如果在多个 Controller 上的 @Api 的 tags 属性,设置一个标签,那么这些 Controller 下的 API 接口,仅会出现在这一个标签中。- 本质上,tags 就是为了分组 API 接口,和 Controller 本质上是一个目的。所以绝大数场景下,我们只会给一个 Controller 一个唯一的标签。description:对 API 接口的描述信息。(现已废弃)
@Api
注解的不常用属性,如下:
- produces 属性:请求请求头的可接受类型( Accept )。如果有多个,使用 , 分隔。
- consumes 属性:请求请求头的提交内容类型( Content-Type )。如果有多个,使用 , 分隔。
- protocols 属性:协议,可选值为 “http”、“https”、“ws”、“wss” 。如果有多个,使用 , 分隔。
- authorizations 属性:授权相关的配置,[] 数组,使用 @Authorization 注解。
- hidden 属性:是否隐藏,不再 API 接口文档中显示。
@RestController@Api(value ="User API", tags ="User Management", description ="APIs for managing users")@RequestMapping("/api/users")publicclassUserController{// API 接口方法...}
🌀 @ApiOperation
@ApiOperation
注解是 Swagger 中用于标记Controller类中方法的注解,表示该方法是一个 API 操作,并可以添加说明和备注信息。
@ApiOperation
注解具有以下常用属性:
value:指定 API 操作的简要描述或者说操作名。notes:提供 API 操作的详细描述和注释。tags:设置 API 操作所属的标签,用于对 API 进行分组和分类。和@API注解的 tags 属性一致。
@ApiOperation
不常用属性:
nickname属性:API 操作接口的唯一标识,主要用于和第三方工具做对接。httpMethod属性:请求方法,可选值为 GET、HEAD、POST、PUT、DELETE、OPTIONS、PATCH 。因为 Swagger 会解析 SpringMVC 的注解,所以一般无需填写。produces属性:和 @API 注解的 produces 属性一致。consumes属性:和 @API 注解的 consumes 属性一致。protocols属性:和 @API 注解的 protocols 属性一致。authorizations属性:和 @API 注解的 authorizations 属性一致。hidden属性:和 @API 注解的 hidden 属性一致。response属性:响应结果类型。因为 Swagger 会解析方法的返回类型,所以一般无需填写。responseContainer属性:响应结果的容器,可选值为 List、Set、Map 。responseReference属性:指定对响应类型的引用。这个引用可以是本地,也可以是远程。并且,当设置了它时,会覆盖 response 属性。说人话,就是可以忽略这个属性,哈哈哈。responseHeaders属性:响应头,[] 数组,使用 @ResponseHeader 注解。code属性:响应状态码,默认为 200 。extensions属性:拓展属性,[] 属性,使用 @Extension 注解。ignoreJsonView属性:在解析操作和类型,忽略 JsonView 注释。主要是为了向后兼容。
下面是一个示例:
@RestController@Api(value ="User API", tags ="User Management")@RequestMapping("/api/users")publicclassUserController{@ApiOperation(value ="Get user by ID", notes ="Retrieve user information based on the given ID")@GetMapping("/{id}")publicUserDTOgetUserById(@PathVariable("id")Long id){// 实现代码...}}
在上述示例中,
@ApiOperation
注解标记了
getUserById
方法,其中
value
属性指定了 API 操作的简要描述为 “Get user by ID”,
notes
属性提供了关于该 API 操作的详细描述,
tags
属性设置了该 API 操作所属的标签为 “User Management”。
通过使用
@ApiOperation
注解,Swagger 可以根据该方法中标记的 API 操作生成相应的文档。开发人员可以在注解的属性中提供接口的详细说明、备注信息等,帮助其他开发人员理解和使用这个接口。
需要注意的是,
@ApiOperation
注解通常使用在具体的 API 接口方法上,可以为每个方法添加对应的注解。这样可以根据注解的信息来生成准确的文档描述,方便其他开发人员了解和使用接口。
🌀 @ApiParam
@ApiParam
注解是 Swagger 中用于标记方法参数的注解,用于为 API 操作的参数添加描述和说明。
@ApiParam
注解具有以下常用属性:
value:指定参数的简要描述。name:指定参数的名称。required:设置参数是否为必需,默认为false。defaultValue:设置参数的默认值。allowableValues:指定参数的可接受值范围。example:设置参数的示例值。hidden:设置参数是否在文档中隐藏,默认为false。
下面是一个示例:
@RestController@Api(value ="User API", tags ="User Management")@RequestMapping("/api/users")publicclassUserController{@ApiOperation(value ="Update user", notes ="Update the user information")@PutMapping("/{id}")publicvoidupdateUser(@ApiParam(value ="User ID", required =true)@PathVariable("id")Long id,@ApiParam(value ="User data", required =true)@RequestBodyUserDTO userDto
    ){// 实现代码...}}
在上述示例中,
@ApiParam
注解分别标记了
id
和
userDto
两个参数。其中,
id
参数的
value
属性指定了参数的简要描述为 “User ID”,
required
属性设置参数为必需,
userDto
参数的
value
属性指定了参数的简要描述为 “User data”。
通过使用
@ApiParam
注解,Swagger 可以根据该参数的注解生成相应的文档。开发人员可以在注解的属性中提供参数的描述、是否必需、默认值、可接受值范围等信息,帮助其他开发人员理解和使用该 API 接口。
需要注意的是,
@ApiParam
注解通常使用在具体的 API 接口方法的参数上,可以为每个参数添加对应的注解。这样可以根据注解的信息来生成准确的文档描述,方便其他开发人员了解和使用接口。
🌀 @ApiImplicitParam
@ApiImplicitParam
注解是 Swagger 提供的用于描述 API 操作的参数的注解之一,用于标记方法参数,并提供参数的详细描述和说明。
@ApiImplicitParam
注解具有以下常用属性:
name:指定参数的名称。value:指定参数的简要描述。dataType:指定参数的数据类型。dataTypeClass属性:数据类型,通过 dataTypeClass 定义。在设置了 dataTypeClass 属性的情况下,会覆盖 dataType 属性。推荐采用这个方式。paramType:指定参数的类型,包括路径参数(path)、查询参数(query)、请求体参数(body)、表单参数(form)等。 -path值:对应 SpringMVC 的@PathVariable注解。- 【默认值】query值:对应 SpringMVC 的@RequestParam注解。-body值:对应 SpringMVC 的@RequestBody注解。-header值:对应 SpringMVC 的@RequestHeader注解。-form值:Form 表单提交,对应 SpringMVC 的@PathVariable注解。example:设置参数的示例值。required:设置参数是否为必需,默认为false。defaultValue:设置参数的默认值。
下面是一个示例:
@RestController@Api(value ="User API", tags ="User Management")@RequestMapping("/api/users")publicclassUserController{@ApiOperation(value ="Create user", notes ="Create a new user")@ApiImplicitParams({@ApiImplicitParam(name ="name", value ="User name", dataType ="String", paramType ="query"),@ApiImplicitParam(name ="age", value ="User age", dataType ="int", paramType ="query")})@PostMapping("/")publicvoidcreateUser(HttpServletRequest request){String name = request.getParameter("name");int age =Integer.parseInt(request.getParameter("age"));// 实现代码...}}
在上述示例中,
@ApiImplicitParams
注解标记了多个
@ApiImplicitParam
注解,用于描述
createUser
方法的两个参数
name
和
age
。其中
name
参数的
value
属性指定了参数的简要描述为 “User name”,
dataType
属性指定了参数的数据类型为 “String”,
paramType
属性指定了参数的类型为查询参数(query)。
通过使用
@ApiImplicitParam
注解,Swagger 可以根据该参数的注解生成相应的文档。开发人员可以在注解的属性中提供参数的名称、描述、数据类型、类型等信息,帮助其他开发人员理解和使用该 API 接口。
需要注意的是,
@ApiImplicitParam
注解通常使用在具体的 API 接口方法的参数上,可以为每个参数添加对应的注解。这样可以根据注解的信息来生成准确的文档描述,方便其他开发人员了解和使用接口。
🔥 两个注解的区别
@ApiParam
注解和
@ApiImplicitParam
注解都是 Swagger 提供的用于描述 API 操作参数的注解,它们有以下区别:
- 适用范围:-
@ApiParam注解可以应用于方法的参数、字段或方法。-@ApiImplicitParam注解主要应用于方法的参数。 - 所属注解:-
@ApiParam注解属于 Swagger 的核心注解,提供了更丰富的参数描述功能。-@ApiImplicitParam注解属于@ApiImplicitParams注解的一部分,用于描述方法的多个参数。 - 参数传递方式:-
@ApiParam注解常用于路径参数、查询参数、请求体参数等。-@ApiImplicitParam注解常用于路径参数、查询参数等。 - 参数描述灵活性:-
@ApiParam注解提供了更多的属性,如name、value、dataType、required、allowableValues等,可以对参数进行详细描述,并支持限制范围、示例值等。-@ApiImplicitParam注解相对较简单,只提供了少数几个属性,如name、value、dataType、paramType,可用于基本的参数描述。
例如,使用
@ApiParam
注解时:
@PostMapping("/users/{id}")publicvoidupdateUser(@PathVariable("id")@ApiParam(value ="User ID", example ="1")Long userId,@RequestBody@ApiParam(value ="Updated user information")UserDto userDto){// 实现代码...}
上述示例中,
@ApiParam
注解用于对
userId
和
userDto
这两个参数进行详细的描述和说明。
而使用
@ApiImplicitParam
注解时:
@PostMapping("/users/{id}")@ApiImplicitParams({@ApiImplicitParam(name ="id", value ="User ID", dataType ="Long", paramType ="path"),@ApiImplicitParam(name ="userDto", value ="Updated user information", dataType ="UserDto", paramType ="body")})publicvoidupdateUser(@PathVariable("id")Long userId,@RequestBodyUserDto userDto){// 实现代码...}
上述示例中,
@ApiImplicitParam
注解用于对
userId
和
userDto
这两个参数进行基本的描述和说明。
总而言之,
@ApiParam
注解提供了更丰富的参数描述功能,并可以应用于更多的场景,而
@ApiImplicitParam
注解则相对简单,适合基本的参数描述。开发人员可以根据实际需求选择使用适当的注解来描述 API 操作的参数。
🌀 @ApiModel
@ApiModel
注解是 Swagger 中用于标记类的注解,表示该类是一个用于 API 文档定义的模型。
@ApiModel
注解具有以下常用属性:
value:指定模型的名称。description:提供对模型的详细描述和注释。parent:指定该模型的父类。discriminator:设置该模型的鉴别器(用于区分不同子类的字段)。
下面是一个示例:
@ApiModel(value ="User", description ="User object")publicclassUserDTO{@ApiModelProperty(value ="User ID", example ="1")privateLong id;@ApiModelProperty(value ="Username", example ="john.doe")privateString username;// 省略其他属性和方法...}
在上述示例中,
@ApiModel
注解标记了
UserDTO
类,其中
value
属性指定了模型的名称为 “User”,
description
属性提供了关于该模型的详细描述。
通过使用
@ApiModel
注解,Swagger 可以根据该类的注解生成相应的文档。开发人员可以在注解的属性中提供模型的名称、描述、父类等信息,帮助其他开发人员理解和使用该模型。
此外,还可以使用
@ApiModelProperty
注解标记模型中的属性,用于为属性添加描述和说明。
@ApiModelProperty
注解具有类似于
@ApiParam
注解的属性,例如
value
、
example
等,用于提供属性的描述、示例值等信息。
需要注意的是,
@ApiModel
注解通常使用在类上,用于标记该类是一个模型。而
@ApiModelProperty
注解通常使用在类的属性上,用于标记和描述属性。通过这些注解,Swagger 可以根据注解的信息生成准确的文档描述,方便其他开发人员了解和使用模型。
🌀 @ApiModelProperty
@ApiModelProperty
注解是 Swagger 提供的一个用于描述模型属性的注解。它可以用于类的字段或者 getter 方法上,用于提供更详细的属性描述和配置。
@ApiModelProperty
注解具有以下特点和用途:
- 属性说明:通过
value属性可以为属性提供文本说明,描述该属性的含义和用途。 - 数据类型:通过
dataType属性可以指定属性的数据类型,例如字符串、整数、布尔值等。 - 示例值:通过
example属性可以设置属性的示例值,用于展示该属性在实际使用中的取值范例。 - 是否必需:通过
required属性可以指定该属性是否是必需的,即是否需要在请求中提供该属性的值。 - 隐藏属性:通过
hidden属性可以控制是否将该属性隐藏起来,不在生成的文档中显示。 - 其他配置:
@ApiModelProperty还提供了一些其他的属性,例如allowableValues(限制属性的取值范围)、notes(额外的补充说明)等。这些属性可以根据需要进行配置。
下面是一个使用
@ApiModelProperty
注解的示例:
publicclassUser{@ApiModelProperty(value ="用户ID", example ="12345")privateLong id;@ApiModelProperty(value ="用户名", required =true)privateString username;// 省略其他属性的定义和注解// Getter 和 Setter 方法}
在上述示例中,
@ApiModelProperty
注解被应用于
id
和
username
这两个属性上,提供了属性的说明、示例值以及是否必需的信息。
通过使用
@ApiModelProperty
注解,我们可以更加清晰、详细地描述模型属性,使生成的 API 文档更加准确和友好。
🌀 @ApiResponse
@ApiResponse
注解是 Swagger 提供的一个用于描述 API 接口的响应信息的注解。它可以用于方法、类或者接口上,用于提供更详细的响应信息和配置。
@ApiResponse
注解具有以下特点和用途:
- 响应说明:通过
message属性可以为响应提供文本说明,描述该响应的含义和用途。 - 响应码:通过
code属性可以指定响应的状态码,例如 200、400、500 等。 - 响应模型:通过
response属性可以指定响应的模型类型,通常是一个实体类,用于描述响应的数据结构。 - 多个响应:
@ApiResponse注解支持多个一起使用,可以用于描述一个接口方法可能返回的不同响应场景。可以使用responseContainer属性来指定响应数据的容器类型,例如List、Map等。 - 其他配置:
@ApiResponse还提供了一些其他的属性,例如reference(引用其他定义的响应模型)、responseHeaders(响应头信息)等。这些属性可以根据需要进行配置。
下面是一个使用
@ApiResponse
注解的示例:
@GetMapping("/users/{id}")@ApiResponse(code =200, message ="成功", response =User.class)@ApiResponse(code =404, message ="用户不存在")publicUsergetUserById(@PathVariable("id")Long id){// 实现代码...}
在上述示例中,
@ApiResponse
注解被应用于
getUserById
方法上,提供了两个不同的响应场景:一个是 code 为 200 的成功响应,返回的是一个 User 类型的实体对象;另一个是 code 为 404 的用户不存在的错误响应。
通过使用
@ApiResponse
注解,我们可以更加清晰、详细地描述 API 接口的响应信息,使生成的 API 文档更加准确和全面。
🌀 @ApiResponses
@ApiResponses
注解是 Swagger 提供的一个用于描述 API 接口多个响应情况的注解。它可以用于方法、类或者接口上,用于提供更详细的响应信息和配置。
@ApiResponses
注解具有以下特点和用途:
- 响应说明:通过
value属性可以为多个响应情况提供文本说明,描述每个响应的含义和用途。 - 响应列表:通过数组形式,使用
@ApiResponse注解来描述每个响应情况。每个@ApiResponse注解包含code、message、response等属性,用于指定响应的状态码、说明和对应的响应模型。 - 其他配置:
@ApiResponses还提供了一些其他的属性,例如reference(引用其他定义的响应模型)、responseHeaders(响应头信息)等。这些属性可以根据需要进行配置。
下面是一个使用
@ApiResponses
注解的示例:
@GetMapping("/users/{id}")@ApiResponses(value ={@ApiResponse(code =200, message ="成功", response =User.class),@ApiResponse(code =404, message ="用户不存在")})publicResponseEntity<User>getUserById(@PathVariable("id")Long id){// 实现代码...}
在上述示例中,
@ApiResponses
注解被应用于
getUserById
方法上,提供了两个不同的响应情况:一个是 code 为 200 的成功响应,返回的是一个 User 类型的实体对象;另一个是 code 为 404 的用户不存在的错误响应。
通过使用
@ApiResponses
注解,我们可以更加清晰、详细地描述 API 接口的多个响应情况,使生成的 API 文档更加准确和全面。
🌀 @ApiIgnore
@ApiIgnore
是 Swagger 提供的一个注解,用于指示 Swagger 忽略某个特定的类、方法或字段,不生成对应的 API 文档。
使用
@ApiIgnore
注解的场景包括但不限于:
- 忽略整个类:将
@ApiIgnore注解应用于类上,表示 Swagger 忽略该类的所有 API 接口,不生成对应的文档信息。 - 忽略单个方法:将
@ApiIgnore注解应用于方法上,表示 Swagger 忽略该方法对应的 API 接口,不生成对应的文档信息。 - 忽略字段:将
@ApiIgnore注解应用于字段上,表示 Swagger 忽略该字段,不在生成的模型中包含该字段的信息。
下面是几个使用
@ApiIgnore
注解的示例:
@Api(tags ="用户管理")@RestControllerpublicclassUserController{@ApiOperation("获取用户列表")@GetMapping("/users")publicList<User>getUsers(){// 实现代码...}@ApiIgnore@GetMapping("/admin/users")publicList<User>getAdminUsers(){// 实现代码...}}
在上述示例中,
getUsers
方法被 Swagger 生成为 API 文档的一部分,因为它没有被标记为
@ApiIgnore
。而
getAdminUsers
方法被标记为
@ApiIgnore
,因此 Swagger 将忽略它,不会生成对应的 API 文档。
使用
@ApiIgnore
注解可以方便地控制 Swagger 生成的 API 文档内容,特别是在某些情况下需要隐藏或排除一些不需要展示的接口或字段时非常有用。
💧 进阶-Swagger UI
Knife4j 是一个基于 Swagger 的 API 文档生成和展示工具,它提供了一种更加强大和灵活的方式来生成和管理 API 文档。
与传统的 Swagger UI(Swagger-UI 是 Swagger 官方提供的前端 UI 库)相比,Knife4j 在功能和样式上都有一些创新和改进,使得 API 文档更加易用、美观和强大。
Knife4j 提供的主要特性包括:
- 界面美观:Knife4j 提供了漂亮的界面主题和样式,使得生成的 API 文档更加专业和吸引人。
- 接口分组:Knife4j 支持将接口按照一定的规则进行分组,方便用户对接口进行组织和管理。
- 接口测试:Knife4j 提供了在线的接口测试功能,使得开发人员可以在文档页面直接进行接口测试,而无需另外打开其他工具。
- 文档扩展:Knife4j 支持在 API 文档中嵌入自定义的 Markdown 格式文档,方便开发人员添加额外的说明和示例。
- 参数校验和模拟测试:Knife4j 支持对接口请求参数进行校验,并提供了模拟测试的功能,方便开发人员在不依赖后端接口实现的情况下进行接口调试。
总之,Knife4j 是一个功能强大、界面美观的 Swagger 扩展工具,通过提供更多的功能和改进的样式,使得 API 文档更易用、美观和强大。它在提供标准的 Swagger 功能的同时,还增加了一些额外的特性,方便开发人员更好地管理和使用 API 接口文档。
🌀 与 spring boot整合
🔥 引入依赖
<dependency><groupId>com.github.xiaoymin</groupId><artifactId>knife4j-spring-boot-starter</artifactId><version>2.0.7</version></dependency>
🔥 放行Knife4j请求
@ConfigurationpublicclassResourcesConfigimplementsWebMvcConfigurer{@OverridepublicvoidaddResourceHandlers(ResourceHandlerRegistry registry){/** swagger配置 */
        registry.addResourceHandler("doc.html").addResourceLocations("classpath:/META-INF/resources/");
        registry.addResourceHandler("/webjars/**").addResourceLocations("classpath:/META-INF/resources/webjars/");}}
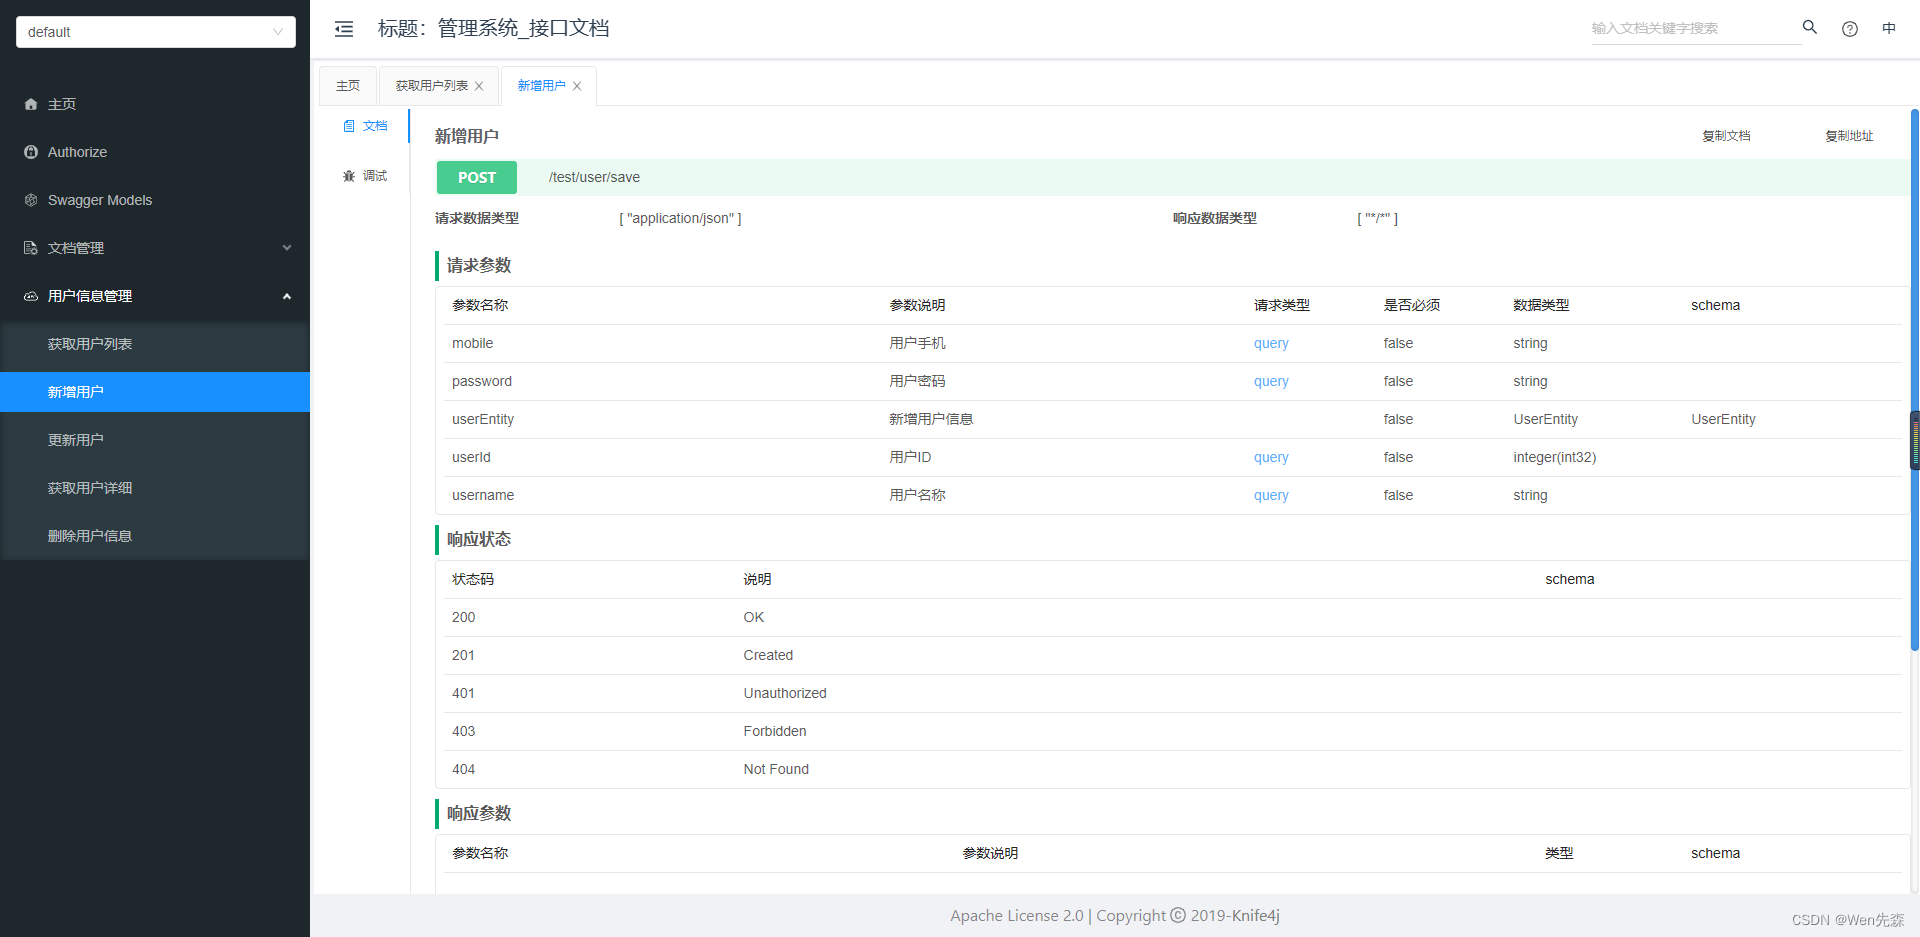
启动项目。然后浏览器访问 http://127.0.0.1:8080/doc.html (
8080是你项目端口
)地址,就可以看到 Swagger 生成的 API 接口文档。效果如下:
版权归原作者 Wen先森 所有, 如有侵权,请联系我们删除。