
我 | 在这里
🕵️ 读书 | 长沙 ⭐软件工程 ⭐ 本科
🏠 工作 | 广州 ⭐ Java 全栈开发(软件工程师)
🎃 爱好 | 研究技术、旅游、阅读、运动、喜欢流行歌曲
🏷️ 标签 | 男 自律狂人 目标明确 责任心强
✈️公众号 | 热爱技术的小郑
🚀 邮箱 | 2977429967@qq.com
✈️ GitHub项目仓库 开源项目 + 实战Demo为何而写?
🍍 好记性不如烂笔头,记录学习的相关知识 、项目 BUG 解决
🍇 复盘总结,加深记忆,方便自己查看
🍑 分享知识,咱就是这么乐于助人、专注填坑20年、哈哈哈哈目标描述
🏆 没有伞的孩子、只能用力奔跑。向着架构师的方向努力、做一个有始有终的人。
前言
目录结构
Spring 的相关代码 都公开在了 GitHub上的代码仓库:GitHub源代码地址
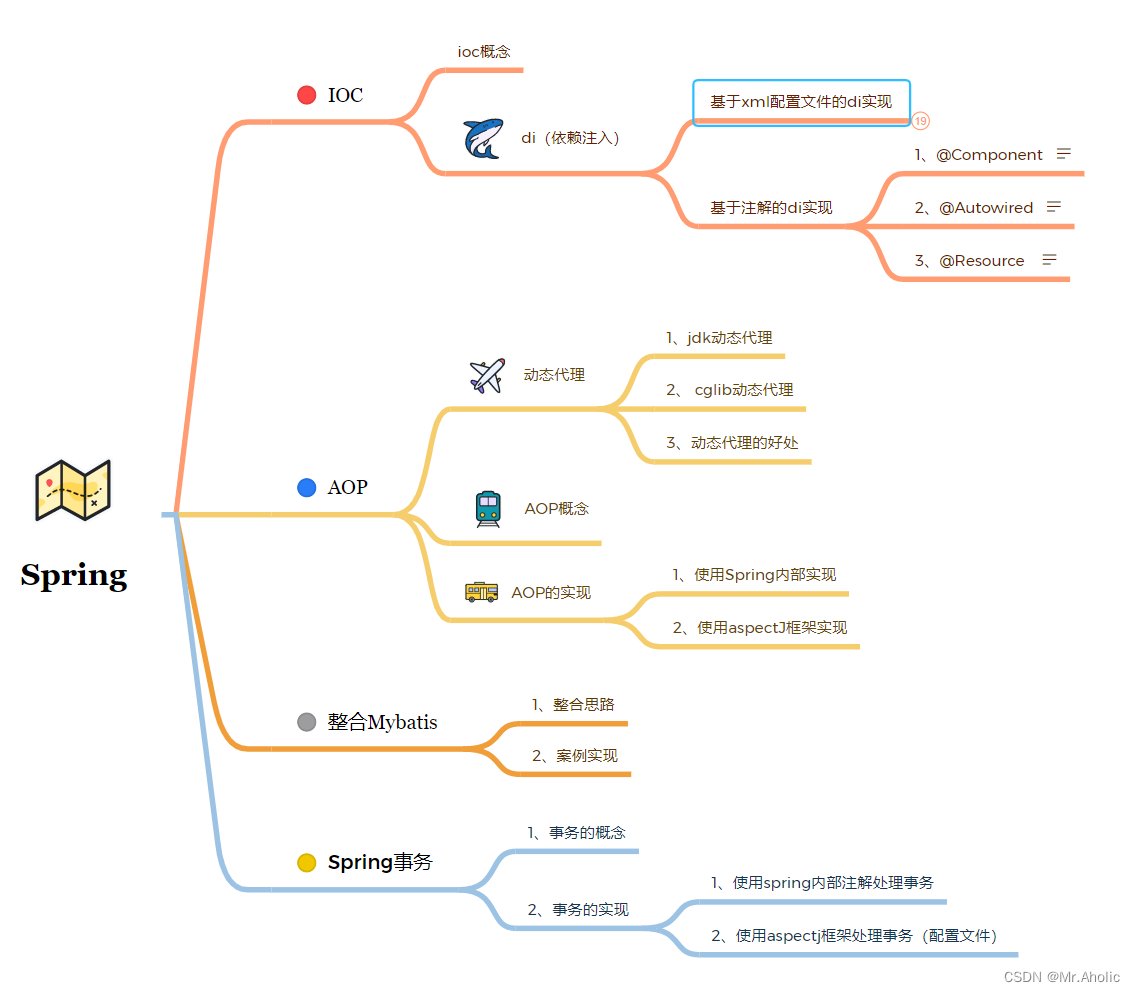
目录
1、搭建一个简单的项目
项目代码在Github上的位置:
源码地址
1.1 导入依赖包
依赖包下载地址:Spring所需要的核心jar包
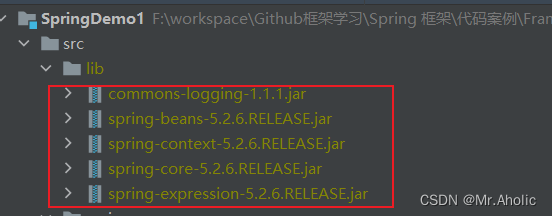
将项目导入jar包
1.2 添加一个实体
package com.zyz.SpringDemo1.entity;/**
 * @author zyz
 * @version 1.0
 * @data 2023/11/8 13:58
 * @Description: 用户实体
 */publicclassPerson{private Integer id;private String name;private String age;publicPerson(){}publicPerson(Integer id, String name, String age){this.id = id;this.name = name;this.age = age;}public Integer getId(){return id;}publicvoidsetId(Integer id){this.id = id;}public String getName(){return name;}publicvoidsetName(String name){this.name = name;}public String getAge(){return age;}publicvoidsetAge(String age){this.age = age;}

    @Override
    public String toString(){return"Person{"+"id="+ id +", name='"+ name +'\''+", age='"+ age +'\''+'}';}//定义一个方法publicvoidsay(){
        System.out.println("我是Person中的方法");}}
1.3 添加配置文件
创建配置文件:application.xml 。注意配置文件顶部 不要留有空格
<?xml version="1.0" encoding="UTF-8"?><beans xmlns="http://www.springframework.org/schema/beans"
       xmlns:xsi="http://www.w3.org/2001/XMLSchema-instance"
       xsi:schemaLocation="http://www.springframework.org/schema/beans http://www.springframework.org/schema/beans/spring-beans.xsd"><!-- 配置Person对象创建--><bean id="person"class="com.zyz.SpringDemo1.entity.Person"></bean></beans>
1.4 测试单元
@Test
public void TestDemo(){
//1、加载spring配置文件
ClassPathXmlApplicationContext context = new ClassPathXmlApplicationContext(“application.xml”);
//2、获取配置创建的对象
Person person = context.getBean("person", Person.class);
person.setId(1);
person.setName("张三");
person.setAge("18");
System.out.println(person);
person.say();
}
1.5 测试效果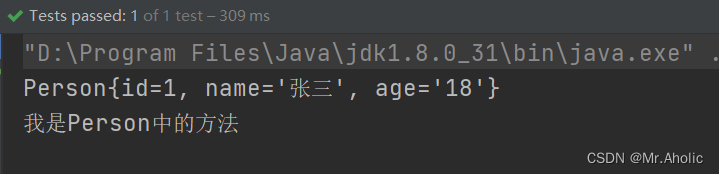
2、IOC
2.1 ioc概念
(1)控制反转,把对象创建和对象之间的调用过程,交给 Spring 进行管理
(2)使用 IOC 目的:为了耦合度降低
(3)做入门案例就是 IOC 实现:例子
IoC (Inversion of Control) : 控制反转, 是一个理论,概念,思想。把对象的创建,赋值,管理工作都交给代码之外的容器实现, 也就是对象的创建是有其它外部资源完成,这样做实现了与解耦合。
正转:对象的创建、赋值等操作交由程序员手动完成,即使用类似new Xxx(Xxx Xxx)、Xxx.setXxx()语句完成对象的创建与赋值,缺点是一旦程序功能发生改变,涉及到的类就要修改代理,耦合度高,不便于维护和管理。
反转:对象的创建、赋值等操作交由代码之外的容器实现,有容器代替程序员完成对象的创建、赋值;且当程序功能发生变化时,只需要修改容器的配置文件即可。
2.2 Di 依赖注入
2.3.1 依赖注入是什么?
DI(Dependency Injection) : 依赖注入, 只需要在程序中提供要使用的对象名称就可以, 至于对象如何在容器中创建, 赋值,查找都由容器内部实现。
DI是ioc技术的实现方式(即容器如何创建对象这一问题的实现方式)
2.3.2 入门案例 及 环境搭建参考
入门案例:使用ioc容器创建对象,调用对象的方法
环境搭建 具体过程 参考 目录一
1、创建maven项目,目前都是javase项目,推荐使用骨架,选择quickstart
2、加入maven依赖:分别是spring依赖、junit依赖
3、创建类(接口和它的实现类)
4、创建spring需要使用的配置文件
5、测试
项目的大致结构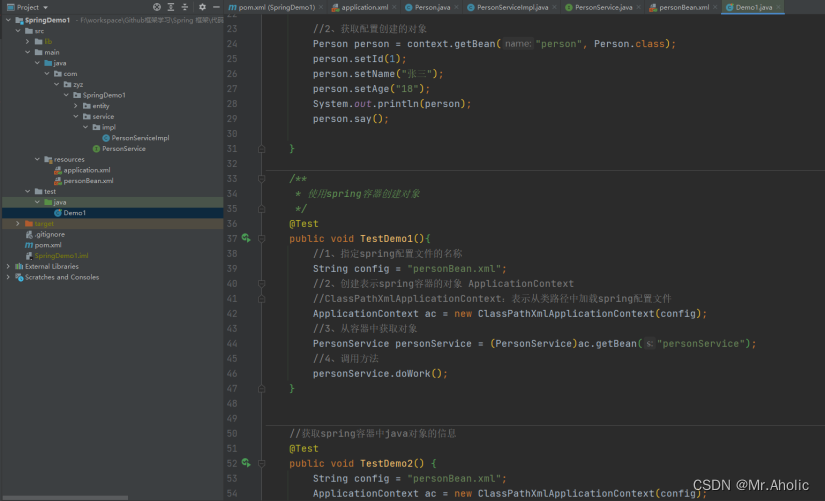
创建类
public interface PersonService {voiddoWork();}publicclassPersonServiceImpl implements PersonService {
@Override
publicvoiddoWork(){
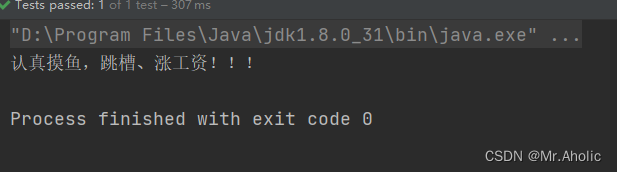
System.out.println("认真摸鱼,跳槽、涨工资!!!");}}
配置文件
<?xml version="1.0" encoding="UTF-8"?><beans xmlns="http://www.springframework.org/schema/beans"
       xmlns:xsi="http://www.w3.org/2001/XMLSchema-instance"
       xsi:schemaLocation="http://www.springframework.org/schema/beans http://www.springframework.org/schema/beans/spring-beans.xsd"><!--
        声明bean(告诉spring要创建某个类的对象)
        1、id:自定义名称,唯一值,spring通过该id的属性值找到对象
        2、class:要创建类的全限定类名
        3、下述的声明语句在spring底层类似与执行了以下代码:
            PersonServiceImpl personService =newPersonServiceImpl();4、对象的保存:
            spring将对象保存到内部的map中,map.put(id值,对象)
            map.put("personService",newPersonServiceImpl())5、一个bean标签声明一个java对象
        6、spring容器根据bean标签创建对象,尽管存在class属性相同的bean标签,只要是id值不同,
           spring容器就会创建该class的对象
    --><bean id="personService"class="com.zyz.SpringDemo1.service.impl.PersonServiceImpl"></bean><bean id="personService2"class="com.zyz.SpringDemo1.service.impl.PersonServiceImpl"></bean><!--
       spring容器也可以创建非自定义类的对象,例如java.lang.String类的对象,只要指定了
       class属性,spring容器就可以创建该类的对象
   --><bean id="myString"class="java.lang.String"/></beans>
测试单元
/**
* 使用spring容器创建对象
*/
@Test
publicvoidTestDemo1(){//1、指定spring配置文件的名称
String config ="personBean.xml";//2、创建表示spring容器的对象 ApplicationContext//ClassPathXmlApplicationContext:表示从类路径中加载spring配置文件
ApplicationContext ac =newClassPathXmlApplicationContext(config);//3、从容器中获取对象
PersonService personService =(PersonService)ac.getBean("personService");//4、调用方法
personService.doWork();}//获取spring容器中java对象的信息
@Test
publicvoidTestDemo2(){
String config ="personBean.xml";
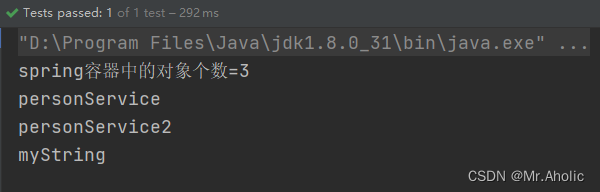
ApplicationContext ac =newClassPathXmlApplicationContext(config);//获取spring容器中对象的个数int beansCount = ac.getBeanDefinitionCount();
System.out.println("spring容器中的对象个数="+beansCount);//获取spring容器中对象的名称(即bean标签的id值)
String[] beansNames = ac.getBeanDefinitionNames();for(String beanName : beansNames){
System.out.println(beanName);}}
输出效果
2.3.3 案例小结
spring配置文件中一个bean标签就代表一个对象,该对象有bean标签的id值唯一标识,从spring拿对象是使用getBean(“bean标签的id值”)
spring默认是使用类的无参构造来创建对象的
2.3.4 简单类型属性赋值(set注入)
在入门案例的总结我们说过了spring容器默认是使用无参构造构造来实例化对象的,那么对象的属性必定为初始值,例如int类型为0,boolean类型为false等,那么当我们想使用相关属性进行操作时必然要手动使用set方法给属性赋值,那么有没有办法让容器帮我们完成对象属性的赋值呢?让我们直接就能够从容器中拿到有属性值的对象?答案是肯定的,下面就通过代码演示简单类型的属性赋值。
set注入要求
JavaBean必须要有set方法,因为ioc容器是使用javabean的set方法进行属性赋值的
spring容器调用的是setXxx()方法,而不管对象是否具有Xxx属性(即对象没有的属性只要有set方法也可以实现注入),Xxx不区分大小写
实体类
package com.zyz.SpringDemo1.entity;/**
 * @author zyz
 * @version 1.0
 * @data 2023/11/9 8:42
 * @Description: 学生类
 */publicclassStudent{private String name;private Integer age;public String getName(){return name;}publicvoidsetName(String name){this.name = name;}public Integer getAge(){return age;}publicvoidsetAge(Integer age){this.age = age;}

    @Override
    public String toString(){return"Student{"+"name='"+ name +'\''+", age="+ age +'}';}}
Spring配置文件
<?xml version="1.0" encoding="UTF-8"?><beans xmlns="http://www.springframework.org/schema/beans"
       xmlns:xsi="http://www.w3.org/2001/XMLSchema-instance"
       xsi:schemaLocation="http://www.springframework.org/schema/beans http://www.springframework.org/schema/beans/spring-beans.xsd"><!--声明Student对象--><bean id="student"class="com.zyz.SpringDemo1.entity.Student"><!--1、简单类型使用property和value标签给对象属性赋值
           2、简单类型:8个基本类型+String
           3、当spring容器加载到这一行时会在创建完对象的同时使用对象的set方法给属性赋值,底层
              调用的是对象的set方法
           4、spring容器调用的是setXxx()方法,而不管对象是否具有Xxx属性,Xxx不区分大小写
       --><property name="name" value="张三"></property><property name="age" value="18"></property><!--测试对象没有属性的set方法   这部分代码会爆红 报错--><property name="graName" value="s1"/></bean></beans>
爆红信息如下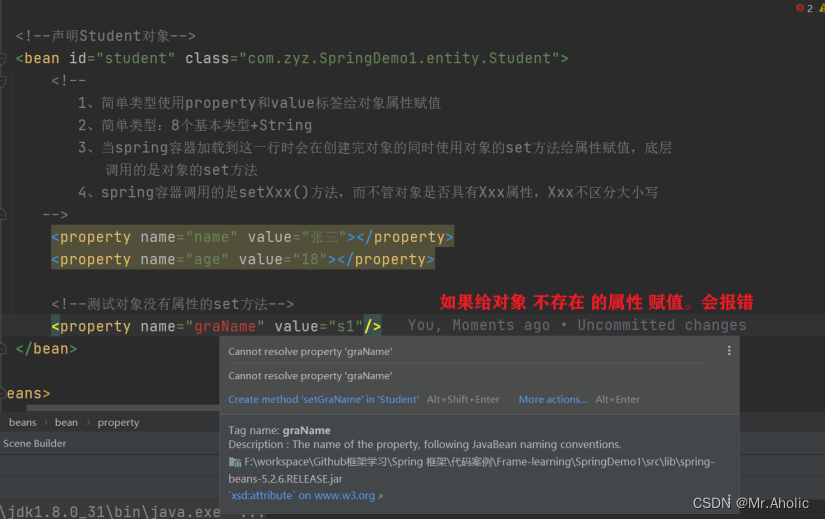
测试单元
/**
 * 注入的方式 set方式 注入属性测试
 */
@Test
publicvoidTestDemo3(){
    String config ="StudentBean.xml";
    ApplicationContext ac =newClassPathXmlApplicationContext(config);

    Student student =(Student) ac.getBean("student");
    System.out.println(student);}
输出如下
2.3.4.1 正常注入
Spring 配置文件
<!--声明Student对象--><bean id="student"class="com.zyz.SpringDemo1.entity.Student"><!--1、简单类型使用property和value标签给对象属性赋值
           2、简单类型:8个基本类型+String
           3、当spring容器加载到这一行时会在创建完对象的同时使用对象的set方法给属性赋值,底层
              调用的是对象的set方法
           4、spring容器调用的是setXxx()方法,而不管对象是否具有Xxx属性,Xxx不区分大小写
       --><property name="name" value="张三"></property><property name="age" value="18"></property></bean>
测试单元
@Test
public void TestDemo3() {
    String config = "StudentBean.xml";
    ApplicationContext ac = new ClassPathXmlApplicationContext(config);
    Student student = (Student) ac.getBean("student");
    System.out.println(student); // 输出结果:Student{name='张三', age=18}
}
2.3.4.2 属性注入空值
Spring配置文件
<!--声明Student2对象  测试属性值是 null--><bean id="student2"class="com.zyz.SpringDemo1.entity.Student"><!--
        两种写法赋予null 值
            第一种 value赋值 写成 null
            第二种 不写value ,直接使用 <null/>--><property name="name" value="null"></property><property name="age"><null/></property></bean>
测试单元
@Test
publicvoidTestDemo4(){
    String config ="StudentBean.xml";
    ApplicationContext ac =newClassPathXmlApplicationContext(config);
    Student student =(Student) ac.getBean("student2");
    System.out.println(student);// 输出结果:Student{name='null', age=null}}
2.3.4.3 注入 特殊符号
Spring配置文件
<!--声明Student3对象 测试属性值是 特殊符号--><bean id="student3"class="com.zyz.SpringDemo1.entity.Student"><!--
属性值包含特殊符号
1、把<> 进行转义 <>2、把带特殊符号内容写到 CDATA 比如:<![CDATA[<<王五>>]]>--><property name="name"><value><![CDATA[<<王五>>]]></value></property><property name="age"><value>23</value></property></bean>
单元测试
@Test
public void TestDemo5() {
    String config = "StudentBean.xml";
    ApplicationContext ac = new ClassPathXmlApplicationContext(config);
    Student student = (Student) ac.getBean("student3");
    System.out.println(student); // 输出结果:Student{name='<<王五>>', age=23}

}
错误演示
2.3.4.4 属性集合类注入的方式
实体类
package com.zyz.SpringDemo1.entity;importjava.util.Arrays;importjava.util.List;importjava.util.Map;importjava.util.Set;/**
 * @author zyz
 * @version 1.0
 * @data 2023/11/9 10:01
 * @Description: 大学生实体类
 */publicclassUniversityStudent{private String name;/**
     * 1、数组类型属性 课程
     */private String [] courses;/**
     * 2、list集合类型属性 水果
     */private List<String> fruitList;/**
     * 3、map集合类型属性 体育运动
     */private Map<String,String> sportMaps;/**
     * 4、set集合类型属性 爱好
     */private Set<String> hobbySets;public String getName(){return name;}publicvoidsetName(String name){this.name = name;}public String[]getCourses(){return courses;}publicvoidsetCourses(String[] courses){this.courses = courses;}public List<String>getFruitList(){return fruitList;}publicvoidsetFruitList(List<String> fruitList){this.fruitList = fruitList;}public Map<String, String>getSportMaps(){return sportMaps;}publicvoidsetSportMaps(Map<String, String> sportMaps){this.sportMaps = sportMaps;}public Set<String>getHobbySets(){return hobbySets;}publicvoidsetHobbySets(Set<String> hobbySets){this.hobbySets = hobbySets;}

    @Override
    public String toString(){return"UniversityStudent{"+"name='"+ name +'\''+", courses="+ Arrays.toString(courses)+", fruitList="+ fruitList +", sportMaps="+ sportMaps +", hobbySets="+ hobbySets +'}';}}
Spring 配置文件
<!-- 配置 UniversityStudent 对象创建--><bean id="universityStudent"class="com.zyz.SpringDemo1.entity.UniversityStudent"><property name="name" value="张三"></property><!--1、数组类型属性注入--><property name="courses"><array><value>C语言</value><value>Go语言</value><value>Java语言</value></array></property><!--2、list类型属性注入 水果--><property name="fruitList"><list><value>🍎苹果</value><value>🍑桃子</value><value>🍇葡萄</value></list></property><!--3、map类型属性注入 体育运动 --><property name="sportMaps"><map><entry key="basketball" value="篮球"/><entry key="football" value="足球"/><entry key="badminton" value="羽毛球"/></map></property><!--4、set类型属性注入 爱好--><property name="hobbySets"><set><value>读书</value><value>敲代码</value><value>听音乐</value></set></property></bean>
测试单元
  @Test
    publicvoidTestDemo6(){
        String config ="UniversityStudentBean.xml";
        ApplicationContext ac =newClassPathXmlApplicationContext(config);
        UniversityStudent universityStudent =(UniversityStudent) ac.getBean("universityStudent");
        System.out.println(universityStudent);/**
         * UniversityStudent{name='张三',
         *                   courses=[C语言, Go语言, Java语言],
         *                   fruitList=[🍎苹果, 🍑桃子, 🍇葡萄],
         *                   sportMaps={basketball=篮球, football=足球, badminton=羽毛球},
         *                   hobbySets=[读书, 敲代码, 听音乐]
         *                  }
         */}
2.3.5 非简单类型属性的赋值(set注入)
上文中的set注入使用property标签的name和value属性给对象属性赋值,但是value知识给简单类型属性赋值,对于非简单类型我们是使用property标签的name和ref属性给对象属性赋值。我们现在给Student类增加一个属性address,该属性是一个引用类型,那当ioc容器创建Student对象时如何给address属性赋值呢?
2.3.5.1 注入外部对象
创建一个外部对象 Address ,然后在 Student类中,引入这个外部属性
Address 代码如下
package com.zyz.SpringDemo1.entity;/**
 * @author zyz
 * @version 1.0
 * @data 2023/11/9 11:13
 * @Description:  学生家庭地址
 */publicclassAddress{private String province;private String city;public String getProvince(){return province;}publicvoidsetProvince(String province){this.province = province;}public String getCity(){return city;}publicvoidsetCity(String city){this.city = city;}

    @Override
    public String toString(){return"Address{"+"province='"+ province +'\''+", city='"+ city +'\''+'}';}}

Student 中添加 外部属性
private Address address;// 引用类型属性publicvoidsetAddress(Address address){this.address = address;}
Spring 配置文件
<!--声明Student对象--><bean id="student"class="com.zyz.SpringDemo1.entity.Student"><property name="name" value="张三"></property><property name="age" value="18"></property><!--注入 Address 对象
               name 属性:类里面属性名称
               ref 属性:创建 Address 对象 bean 标签 id 值
     --><property name="address" ref="address"></property></bean><!--声明Address对象--><bean id="address"class="com.zyz.SpringDemo1.entity.Address"><property name="province" value="河南"></property><property name="city" value="郑州"></property></bean>
测试单元
@Test
publicvoidTestDemo7(){
    String config ="StudentAndAddress.xml";
    ApplicationContext ac =newClassPathXmlApplicationContext(config);
    Student student =(Student) ac.getBean("student");
    System.out.println(student);// 输出结果:Student{name='张三', age=18, address=Address{province='河南', city='郑州'}}}
上文执行流程分析:当ioc容器创建id为student的对象时,会进行set注入,当执行到最后一个propert标签时发现使用了ref属性,则ioc容器知道了name为address的属性是非简单类型,它就会暂时跳过address属性的赋值以及Student对象的创建,转而去配置文件的下文去找bean标签id值等于ref属性值的对象,现将该对象创建,再将该对象赋值给之前的address属性并将Student对象创建。
2.3.5.2 注入外部对象
基本上和外部对象的使用过程相似,不同点是 在Spring 配置中,是否使用了ref 。
Spring配置文件
<!--内部 Bean 的形式--><bean id="student2"class="com.zyz.SpringDemo1.entity.Student"><property name="name" value="李四"></property><property name="age" value="23"></property><!--注入 Address 对象
                   name 属性:类里面属性名称
                   直接在内部创建一个对象
         --><property name="address"><bean id="address2"class="com.zyz.SpringDemo1.entity.Address"><property name="province" value="广东"></property><property name="city" value="广州"></property></bean></property></bean>
测试单元
 @Test
    publicvoidTestDemo8(){
        String config ="StudentAndAddress.xml";
        ApplicationContext ac =newClassPathXmlApplicationContext(config);
        Student student =(Student) ac.getBean("student2");
        System.out.println(student);//输出结果:Student{name='李四', age=23, address=Address{province='广东', city='广州'}}}
2.3.6 构造注入
顾名思义,构造注入是使用javabean的构造方法进行属性的赋值的。与set注入一样,构造注入要求javabean必须提供构造方法,且必须是有参构造(如果是无参构造还怎么给属性赋值,对吧),构造注入使用较少,了解就可以了,我们一般使用set注入。看看代码吧,将Student类的set方法注释,加入构造方法,别的地方不用改变,只需要改变spring配置文件即可(这里就可以看出ioc容器与程序的解耦合的好处了)。
实体类 School 使用构造方法
publicclassSchool{private String name;private Integer hisotry;private Address address;publicSchool(String name, Integer hisotry, Address address){this.name = name;this.hisotry = hisotry;this.address = address;}

    @Override
    public String toString(){return"School{"+"name='"+ name +'\''+", address='"+ address +'\''+", hisotry="+ hisotry +'}';}}
Spring 配置类
还可以使用 ref 引入 外部bean
<!--
    构造注入
    1、使用constructor-arg标签完成构造注入
    2、构造注入方式一:根据形参名字
    3、构造注入方式二:根据形参顺序,默认下标从0开始递增
-->
<!--根据形参名构造注入,形参的出现顺序不是必须的-->
<bean id="school" class="com.zyz.SpringDemo1.entity.School">
    <constructor-arg name="name" value="国防科技大学"></constructor-arg>
    <constructor-arg name="hisotry" value="70"></constructor-arg>
    <constructor-arg name="address" ref="address"></constructor-arg>
</bean>

<bean id="school2" class="com.zyz.SpringDemo1.entity.School">
    <constructor-arg name="address" ref="address"></constructor-arg>
    <constructor-arg name="hisotry" value="70"></constructor-arg>
    <constructor-arg name="name" value="国防科技大学"></constructor-arg>
</bean>

<!--构造注入,使用下标,出现的顺序没要求,因为已经通过下标绑定起来了-->
<bean id="school3" class="com.zyz.SpringDemo1.entity.School">
    <constructor-arg index="0" value="国防科技大学"/>
    <constructor-arg index="1" value="70"/>
    <constructor-arg index="2" ref="address"/>
</bean>

<!--外部bean-->
<bean id="address" class="com.zyz.SpringDemo1.entity.Address">
    <constructor-arg name="province" value="湖南"></constructor-arg>
    <constructor-arg name="city" value="长沙"></constructor-arg>
</bean>
单元测试
  @Test
    publicvoidTestDemo9(){
        String config ="SchoolBean.xml";
        ApplicationContext ac =newClassPathXmlApplicationContext(config);
        School school =(School) ac.getBean("school");
        System.out.println(school);//构造参数按照顺序 输出结果:School{name='国防科技大学', address='Address{province='湖南', city='长沙'}', hisotry=70}

        School school2 =(School) ac.getBean("school2");
        System.out.println(school2);//构造参数不按照顺序 输出结果:School{name='国防科技大学', address='Address{province='湖南', city='长沙'}', hisotry=70}

        School school3 =(School) ac.getBean("school3");
        System.out.println(school3);//构造参数按照下标 输出结果:School{name='国防科技大学', address='Address{province='湖南', city='长沙'}', hisotry=70}}
2.3.7 非简单类型 自动注入
对于非简单类型,我们在上面是使用ref属性指向一个非简单类型的对象来完成赋值的,那么当ioc容器每次给一个对象的非简单类型属性赋值时,就要在bean标签内部写一行ref这样的代码,这样会造成重复代码的大量堆积,可以使用引用类型的自动注入。
有两种方式的引用类型自动注入
byName形式的引用类型自动注入:
通过java对象引用类型的属性名与spring容器中bean标签对象的id值一样且数据类型是一致的,这样能够实现引用类型的自动注入
byType形式的引用类型自动注入
通过java对象引用类型属性的数据类型和spring容器中 bean标签的class属性值是同源关系;
常见的同源关系:
1)java引用类型属性数据类型和bean标签的class属性值数据类型一样
2)java引用类型属性数据类型和bean标签的class属性值数据类型是父子关系
3)java引用类型属性数据类型和bean标签的class属性值数据类型是接口和实现类关系
注意:在一个配置文件中,符合条件的同源关系只能有一个
2.3.7.1 通过byName 的形式
实体类 这里的 address 要和 bean对象的值一样。byName 就是通过外部属性的name ,去配置文件中找对应的bean对象。
publicclassStudent{private String name;private Integer age;private Address address;// 引用类型属性}
Spring配置文件
<!--
        创建一个Student对象
            1. 使用byName 自动装配  不写外部bean的情况下 对应的属性值为空
                测试结果:Student{name='张三', age=18, address=null}2.在写外部bean的情况下 外部bean 的 id  和类里边外部对象属性 一致.
                测试结果:Student{name='张三', age=18, address=Address{province='河南', city='郑州'}}3.写外部bean的情况下,但是 id 的值 和 类里外部对象属性值 不一样情况
                测试结果:Student{name='张三', age=18, address=null}--><bean id="student"class="com.zyz.SpringDemo1.entity.Student" autowire="byName"><property name="name" value="张三"></property><property name="age" value="18"></property></bean><!--外部bean 对象  id 要和 Student 类里边 对应的 Address 对象名一致.--><bean id="address"class="com.zyz.SpringDemo1.entity.Address"><property name="province" value="河南"></property><property name="city" value="郑州"></property></bean>
单元测试
/**
 * 注入的方式 set方式 注入属性测试
 *  属性的值赋予 自动装配   byType  bean对象设置成 autowire="byName"  配置文件中寻找和实体类中对应类对象一样的 值
 */
@Test
public void TestDemo10() {
    String config = "AutomaticAssemblyBean.xml";
    ApplicationContext ac = new ClassPathXmlApplicationContext(config);
    Student student = (Student) ac.getBean("student");
    System.out.println(student);
    //输出结果:Student{name='张三', age=18, address=Address{province='河南', city='郑州'}}

}
匹配详解: 当ioc容器在创建Student对象时,发现使用了autowire属性且属性值为byName,ioc容器就会去Student类中去拿 引用类型的属性名 与和spring配置文件中的 bean标签的id值进行比对,若发现有一致的且数据类型一致,则将该对象赋值给引用类型属性。
2.3.7.2 通过byType 的形式
Spring配置文件 这里一定要确保 配置文件中只有一个对象。多个对象会报错
<!--外部bean 对象  id 要和 Student 类里边 对应的 Address 对象名一致.-->
<bean id="address" class="com.zyz.SpringDemo1.entity.Address">
    <property name="province" value="河南"></property>
    <property name="city" value="郑州"></property>
</bean>

<!--使用 byType 自动装配-->
<bean id="student2" class="com.zyz.SpringDemo1.entity.Student" autowire="byType">
    <property name="name" value="李四"></property>
    <property name="age" value="24"></property>
</bean>
如果存在多个bean 对象 报错如下
单元测试
/**
 * 注入的方式 set方式 注入属性测试
 *  属性的值赋予 自动装配  byType  bean对象设置成 autowire="byType" 会在配置文件中,寻找该类型的对象
 */
@Test
public void TestDemo11() {
    String config = "AutomaticAssemblyBean.xml";
    ApplicationContext ac = new ClassPathXmlApplicationContext(config);
    Student student2 = (Student) ac.getBean("student2");
    System.out.println(student2);
    //输出结果: Student{name='李四', age=24, address=Address{province='河南', city='郑州'}}

}
2.3.8 基于注解的 DI 实现
除了使用配置文件实现 ioc 创建对象的功能外,使用spring提供的注解也可以实现di。下面来介绍注解方式的di实现,下面是spring提供的di实现的常用注解。
@Component:该注解的功能是使用spring容器创建对象
1)、在要创建对象的类的声明上方加入该注解,该注解有一个属性value,value为spring创建的该类对象的id值
2)、开发中使用将value省略,直接使用双引号将值键入即可
3)、该注解使用类的无参构造创建对象
@Repository 创建dao类对象,访问数据库的对象
@Service 创建service类对象,业务层对象
@Controller 创建控制器对象,用于分发用户的请求和显示处理结果
下面通过代码来看看@Component注解是怎么实现di的。
@Component(value ="student")publicclassStudent{...}
//在注解里面 value 属性值可以省略不写
//默认值是类名称,首字母小写
//UserService -- userService
@Component(value ="employee")//<bean id="employee" class=".."/>publicclassEmployee{private String ename;private String gender;}

@Component("student")publicclassStudent{}
该语句就等价为在spring配置文件中进行了以下声明
但是怎么让配置文件知道哪些类是使用注解进行创建对象的呢?需要在配置文件中声明组件扫描器
<context:component-scan base-package=“com.zyz.SpringDemo1.entity”/>
当spring读取配置文件时,读取到组件扫描器声明语句时,就会去base-package指定的包和其子包下去递归的寻找有注解修饰的类,并根据注解的功能去执行相应的动作
2.3.8.1 简单类型的注解di实现
简单类型的注入使用@Value注解实现,哪些简单类型要设置属性值,直接在简单类型属性声明语句的上面加入注解@Value即可,并在@Value的括号内键入属性值,注意不论简单类型属性的数据类型,均由双引号将属性值括起来。例如之前的Student类使用注解注入如下。
@Component("student")publicclassStudent{
    @Value("张三")private String name;
    @Value("23")privateint age;}
注意别忘了该类要加注解@Component注解,因为要创建该类对象。
2.3.8.2 引用类型的注解di实现
引用类型的注入使用@Autowired注解完成。
@Autowired
@Autowired是spring提供的属性赋值,用于给引用类型赋值,有byName和byType两种方式,默认使用byType方式自动注入
若是要强制至于byName方式,要在@Autowired注解下面加入 @Qualifier(value = “bean的id”)注解,若程序在给引用类型注入时在xml文件中找不到 该id的bean标签或者手找不到该id的@Component注解,则报错;若不想让程序在赋值失败时报错,可以在@Autowired注解的required属性值置为false
还是拿Student类的school属性的赋值来举例。
学生类
@Component("student")publicclassStudent{/*引用类型注入(byType方式)
    @Autowired
    private School school;*///引用类型赋值(byName方式)
    @Autowired(required =false)
    @Qualifier(value ="mySchool")private School school;}

School类
@Component("mySchool")publicclassSchool{//注入值
    @Value("西南大学")private String schoolAddress;
    @Value("新疆")private String homeAddress;

    @Override
    public String toString(){return"School{"+"schoolAddress='"+ schoolAddress +'\''+", homeAddress='"+ homeAddress +'\''+'}';}}
重点提示:
在注解里面 value 属性值可以省略不写 默认值是类名称,首字母小写
例如:UserService – userService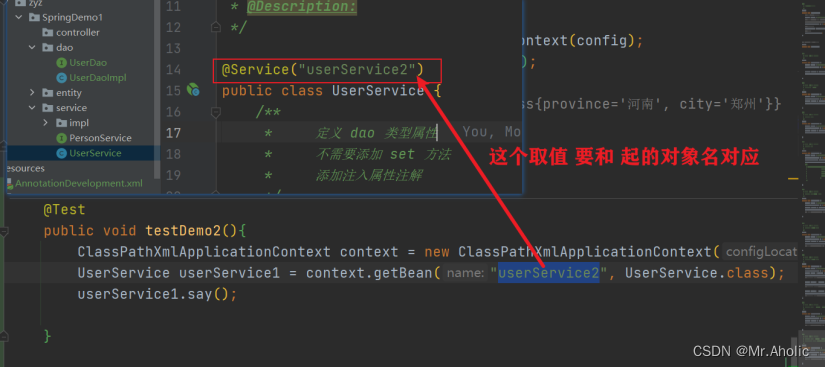
测试单元 中 取对象的时候 如果取值 和命名不一致 则会报如下错误: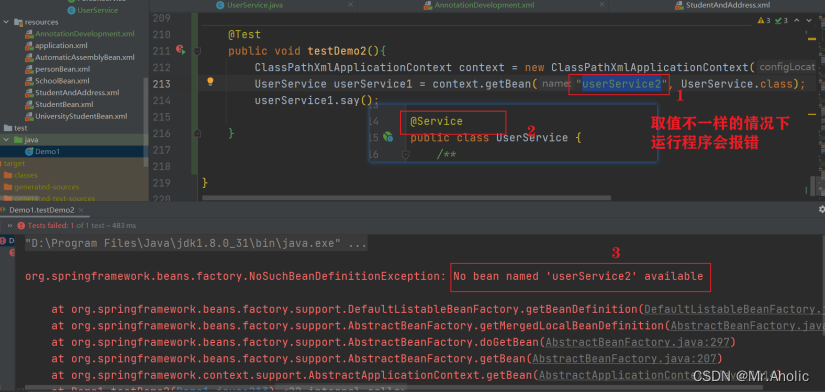
2.3.8.3 案例代码
参考GitHub 上的
@Qualifier(“userDaoImplTwo”) @Repository(“userDaoImplTwo”)
当一个类型 有多个对象的时候。这个时候通过类型自动装配。需要 让 @Autowired 和 @Qualifier 配合使用。同时需要指定对象的名称
自动装配,更具byType ,同时一个类型 有多个对象的时候。需要配合 @Repository
@Repository("userDaoImplTwo")//起个名称publicclassUserDaoImplTwo implements UserDao{
    @Override
    publicvoidshowTime(){
        System.out.println("UserDaoImplTwo showTime ......");}}

@Service
publicclassUserService{
    @Autowired  //根据类型自动装配
    @Qualifier("userDaoImplTwo")//根据起的名称private UserDao userDao;publicvoidsay(){
        userDao.showTime();
        System.out.println("UserService say .......");}}

    @Test
    publicvoidtestDemo13(){
        ClassPathXmlApplicationContext context =newClassPathXmlApplicationContext("AnnotationDevelopment.xml");
        UserService userService1 = context.getBean("userService", UserService.class);
        userService1.say();//输出结果:UserDaoImplTwo showTime ......//        UserService say .......}

或者简化成这样写:  使用@Resource
    // 这里的userDaoImplTwo是指bean的ID
    @Resource(name ="userDaoImplTwo")private UserDao userDao;
3、AOP
3.1 动态代理
3.1.1 jdk动态代理
使用jdk中的Proxy,Method,InvocaitonHanderl创建代理对象。 jdk动态代理要求目标类必须实现接口
/**
 * @author zyz
 * @version 1.0
 * @data 2023/11/16 20:41
 * @Description: 动态代理 Dao
 */public interface DynamicProxiesDao {intadd(int a,int b);voidupdate(int a);}publicclassDynamicProxiesDaoImpl implements DynamicProxiesDao{
    @Override
    publicintadd(int a,int b){
        System.out.println("执行了add方法");return a+b;}

    @Override
    publicvoidupdate(int a){
        System.out.println(a);}}publicclassJdkProxy{publicstaticvoidmain(String[] args){//创建接口实现类代理对象
        Class[] interfaces ={DynamicProxiesDao.class};//        Proxy.newProxyInstance(JdkProxy.class.getClassLoader(), interfaces,//                new InvocationHandler() {//                    @Override//                    public Object invoke(Object proxy, Method method, Object[] args)//                            throws//                            Throwable {//                        return null;//                    }//                });
        DynamicProxiesDaoImpl dynamicProxiesDao =newDynamicProxiesDaoImpl();
        DynamicProxiesDao dao =(DynamicProxiesDao) Proxy.newProxyInstance(JdkProxy.class.getClassLoader(), interfaces,newDynamicProxiesDaoProxy(dynamicProxiesDao));int rs = dao.add(4,5);
        System.out.println("result:"+ rs);//测试结果// 方法执行之前:add,传递的参数是:[4, 5]// 执行了add方法// 方法执行之后:com.zyz.SpringDemo1.dao.DynamicProxiesDaoImpl@63947c6b// result:9}}/**
 * 代理对象代码
 */classDynamicProxiesDaoProxy implements InvocationHandler {/**
     * 1 把创建的是谁的代理对象,把谁传递过来
     *  有参数构造传递
     */private Object obj;publicDynamicProxiesDaoProxy(Object obj){this.obj = obj;}/**
     *  增强的逻辑
     */
    @Override
    public Object invoke(Object proxy, Method method, Object[] args) throws Throwable {//方法之前
        System.out.println("方法执行之前:"+ method.getName()+",传递的参数是:"+ Arrays.toString(args));//被增强的方法执行
        Object rs = method.invoke(obj, args);//方法之后
        System.out.println("方法执行之后:"+ obj);return rs;}}
3.1.2 cglib动态代理
第三方的工具库,创建代理对象,原理是继承。 通过继承目标类,创建子类。子类就是代理对象。 要求目标类不能是final的,方法也不能是final的
3.1.3 动态代理的好处
在目标类源代码不改变的情况下,增加功能。
减少代码的重复
专注业务逻辑代码
解耦合,让你的业务功能和日志,事务非业务功能分离。
3.2 什么是AOP
面向切面编程, 基于动态代理的,可以使用jdk,cglib两种代理方式。Aop就是动态代理的规范化, 把动态代理的实现步骤,方式都定义好了, 让开发人员用一种统一的方式,使用动态代理实现
3.2.1 AOP常用术语
Aspect: 切面,给你的目标类增加的功能,就是切面。 像日志,事务都是切面。切面的特点: 一般都是非业务方法,独立使用的。
JoinPoint:连接点 ,连接业务方法和切面的位置。需要给哪个方法增加切面,这个方法就是连接点。
Pointcut : 切入点 ,指多个连接点方法的集合。
目标对象: 给哪个类的方法增加功能, 这个类就是目标对象。
Advice:通知,通知表示切面功能执行的时间。
3.2.2 切面的构成
切面就是要给别的方法进行增强的方法,一个切面有以下三个要素。
切面的功能代码,切面干什么
切面的执行位置,使用Pointcut表示切面执行的位置
切面的执行时间,使用Advice表示时间,在目标方法之前,还是目标方法之后。
3.3 使用aspectJ框架实现AOP
3.3.1 aspectJ简介
aspectJ是一个开源的专门做aop的框架。spring框架中集成了aspectj框架,通过spring就能使用aspectj的功能。aspectJ框架实现aop有两种方式:
使用xml的配置文件 : 配置全局事务
使用注解,我们在项目中要做aop功能,一般都使用注解, aspectj有5个注解。
再使用aspectJ做aop之前要先加入aspectJ依赖。
<dependency>
  <groupId>org.springframework</groupId>
  <artifactId>spring-aspects</artifactId>
  <version>5.2.5.RELEASE</version>
</dependency>
3.3.2 @Before前置通知
前置通知注解修饰的切面在连接点方法之前执行。下面通过一段代码体验一下。
声明接口IService
public interface IService {voiddoSome(String name,int age);}

声明实现类ServiceImpl
@Component(value ="service")publicclassServiceImpl implements IService {
    @Override
    publicvoiddoSome(String name,int age){
        System.out.println("===doSome()===");}}

声明切面
@Component
@Aspect
publicclassMyAspectJ{/**
     * 定义功能增强方法(方法就是切面)
     * 1、方法的必须为public
     * 2、方法无返回值
     * 3、方法名称自定义
     * 4、方法可以有参数,也可以没有参数
     * 5、方法的定义上方加入注解,表示切入点的执行时机

    @Before(value = "execution(public void com.mms.ba01.ServiceImpl.doSome(String,int))")
    public void beforeLog() {
        System.out.println("前置通知->系统当前时间:" + new Date());
    }
    *//*
        前置通知,带方法参数的切面
        切面方法有参数时要求参数是JoinPoint类型,参数名自定义,该参数就代表了连接点方法,即doSome方法
        使用该参数可以获取切入点表达式、切入点方法签名、目标对象等
     */
    @Before(value ="execution(* *..ServiceImpl.doSome(..))")publicvoidbeforeLog(JoinPoint jp){
        System.out.println("连接点方法的方法签名="+jp.getSignature());
        System.out.println("连接点方法的方法名="+jp.getSignature().getName());//获取连接点方法参数
        Object[] args = jp.getArgs();for(Object arg : args){
            System.out.println("arg="+arg);}}}

测试
publicclassMyTest{//aop前置通知
    @Test
    publicvoidtest01(){
        String config ="ba01/applicationContext.xml";
        ApplicationContext ac =newClassPathXmlApplicationContext(config);//获取目标对象,此时的service就是spring生成的代理对象//注意返回值类型是接口类型,不能是实现类接口,否则报错
        IService service =(IService) ac.getBean("service");//使用代理对象执行方法
        service.doSome("张三",23);}}
3.3.3 @AfterReturning后置通知
在IService接口中新增方法:
Student doStudent(Student student);

在ServiceImpl实现doStudent方法
@Override
    public Student doStudent(Student student){return student;}

切面类代码
@Component
@Aspect
publicclassMyAspectJ{/**
     * @AfterReturning: 后置通知,在连接点方法执行之后执行后置通知方法
     * 方法定义格式:
     * 1、公共方法
     * 2、没有返回值
     * 3、方法名称自定义
     * 4、与前置通知一样,可以有JoinPoint类型参数,该参数表示连接点方法对象;还可以有一个
     *    Object类型参数,用于接收连接点方法的执行结果,注意该参数的参数名必须与切入点表达式
     *    的returning属性的属性值一致,表示将returning属性值赋给Object对象
     *//*@AfterReturning(value = "execution(* *..ServiceImpl.doOther(..))", returning = "obj")
        public void afterTransaction(JoinPoint jp, Object obj) {
        System.out.println("doOther方法的返回参数="+obj);
        System.out.println("事务已提交...");
        经过验证:在后置通知切面内不能改变连接点方法的返回值
    }*/

    @AfterReturning(value ="execution(* *..ServiceImpl.doStudent(..))", returning ="obj")publicvoidafterTransaction(JoinPoint jp, Object obj){
        System.out.println(obj);
        Student student =newStudent();
        student.setName("李四");
        student.setAge(24);
        obj = student;
        System.out.println("===查看是否改变了连接点方法的返回值==="+obj);/*
            经过验证:在后置通知切面内不能改变连接点方法的返回值
         */}}
3.3.4 @Around环绕通知(功能最强的通知)
环绕通知是功能最强的通知,它的本质就是jdk动态代理,他可以在连接点方法之前和之后都可以执行,最厉害的是他可以改变连接点方法的执行结果(返回结果)。还是拿上面的doStudent(Student student)方法来说明,经过验证前置通知和后置通知都不能改变doStudent(Student student)方法的返回值。下面看一下环绕通知是如何做的。
切面类
@Aspect
publicclassMyAspectJ{/*
        环绕通知:@Around(切入点表达式)
        1、环绕通知是最重要的一个通知,他表示在连接点方法的前或者后都可以执行,它的本质就是jdk动态代理的invoke
           方法的method参数
        2、定义格式
            a、public
            b、必须有返回值,类型为Object

     */
    @Around(value ="pointCut()")/*
        再次回忆一下jdk动态代理的invoke方法的定义
        @Override
        public Object invoke(Object proxy, Method method, Object[] args) throws Throwable {
        是不是感觉与下面的方法定义眼熟啊,没错,环绕通知切面的定义实质上就是jdk动态代理
     */public Object around(ProceedingJoinPoint pj) throws Throwable {
        System.out.println("环绕通知在连接点方法之前执行了...");
        Object result = null;
        result = pj.proceed();
        Student student =newStudent();
        student.setName("李四");
        student.setAge(24);//改变连接点方法返回值
        result = student;
        System.out.println("事务已提交...");return result;}/*
        使用pointcut管理切面表达式
        1、在一个切面类中,若多个切面的切面表达式均为同一个,每次都要写重复的代码,此时就可以使用pointcut来
          管理切面表达式了
        2、定义格式:
            公共public
            无返回值
            无参数
     */
    @Pointcut(value ="execution(* *.doStudent(..))")publicvoidpointCut(){//空方法体}}33.3.5 完全注解开发
添加一个配置类  。在类中 完成 开启包扫描 及 aop 注解
@Configuration
@ComponentScan(basePackages ={"com.zyz"})
@EnableAspectJAutoProxy(proxyTargetClass =true)publicclassConfigAop{}

测试单元
    // 完全注解开发 添加配置类 。开启包扫描 及 aop 注解
    @Test
    publicvoidtest04(){//加载配置类
        ApplicationContext context =newAnnotationConfigApplicationContext(ConfigAop.class);
        IService service = context.getBean("service",IService.class);
        service.doSome("张三",18);// 测试结果:// 连接点方法的方法签名=void com.zyz.SpringDemo1.service.impl.ServiceImpl.doSome(String,int)// 连接点方法的方法名=doSome// arg=张三// arg=18// ===doSome()===}
4、整合mybatis
4.1 梳理整合思路
所谓的spring整合mybatis就是把两者集成在一起,就像使用一个框架一样。
mybatis框架开发步骤
定义mapper接口,定义方法
定义mapper.xml映射文件
创建mybatis核心配置文件
创建SqlSession对象,使用该对象生成mapper接口的代理对象执行方法
spring整合mybatis的核心就是把mybatis开发用到的对象交由spring容器ioc来创建,这样就做到了整合的目的。
在开发中,我们一般不使用mybatis自带的数据源,而是使用别的数据源,比如c3p0,dbcp等,本人使用的是阿里的druid数据源。
4.2 整合实现
4.2.1 环境搭建
pom中导入相关依赖
<dependencies><!--单元测试--><dependency><groupId>junit</groupId><artifactId>junit</artifactId><version>4.11</version><scope>test</scope></dependency><!--spring核心ioc--><dependency><groupId>org.springframework</groupId><artifactId>spring-context</artifactId><version>5.2.5.RELEASE</version></dependency><dependency><groupId>org.springframework</groupId><artifactId>spring-jdbc</artifactId><version>5.2.5.RELEASE</version></dependency><!--mybatis依赖--><dependency><groupId>org.mybatis</groupId><artifactId>mybatis</artifactId><version>3.5.1</version></dependency><!--mybatis和spring集成的依赖--><dependency><groupId>org.mybatis</groupId><artifactId>mybatis-spring</artifactId><version>1.3.1</version></dependency><!--mysql驱动--><dependency><groupId>mysql</groupId><artifactId>mysql-connector-java</artifactId><version>5.1.9</version></dependency><!--阿里公司的数据库连接池--><dependency><groupId>com.alibaba</groupId><artifactId>druid</artifactId><version>1.1.12</version></dependency></dependencies><build><!--目的是把src/main/java目录中的xml文件包含到输出结果中。输出到classes目录中--><resources><resource><directory>src/main/java</directory><!--所在的目录--><includes><!--包括目录下的.properties,.xml 文件都会扫描到--><include>**/*.properties</include>
          <include>**/*.xml</include></includes><filtering>false</filtering></resource></resources><!--指定jdk的版本--><plugins><plugin><artifactId>maven-compiler-plugin</artifactId><version>3.1</version><configuration><source>1.8</source><target>1.8</target></configuration></plugin></plugins></build>
重点是注意resources标签的配置,很多人都是在这里出错导致程序运行报错找不到mapper.xml文件
4.2.2 案例分析
数据库脚本
CREATE TABLE `student`  (
  `stuno` int(11) NOT NULL COMMENT '学号',
  `stuname` varchar(25) CHARACTER SET utf8mb4 COLLATE utf8mb4_general_ci NULL DEFAULT NULL COMMENT '姓名',
  `cardid` int(11)NULL DEFAULT NULL,
  `classid` int(11)NULL DEFAULT NULL COMMENT '班级',
  PRIMARY KEY(`stuno`) USING BTREE
) ENGINE = InnoDB CHARACTER SET = utf8mb4 COLLATE = utf8mb4_general_ci ROW_FORMAT = Dynamic;
本案例从student表中查询学生和新增学生功能。
publicclassStudent{privateint stuNo;private String stuName;privateint cardID;privateint classID;publicStudent(){}publicStudent(int stuNo, String stuName,int cardID,int classID){this.stuNo = stuNo;this.stuName = stuName;this.cardID = cardID;this.classID = classID;}publicintgetStuNo(){return stuNo;}publicvoidsetStuNo(int stuNo){this.stuNo = stuNo;}public String getStuName(){return stuName;}publicvoidsetStuName(String stuName){this.stuName = stuName;}publicintgetCardID(){return cardID;}publicvoidsetCardID(int cardID){this.cardID = cardID;}publicintgetClassID(){return classID;}publicvoidsetClassID(int classID){this.classID = classID;}
    @Override
    public String toString(){return"Student{"+"stuNo="+ stuNo +", stuName='"+ stuName +'\''+", cardID="+ cardID +", classID="+ classID +'}';}}
mapper接口
public interface StudentMapper {/**
     * @description: 查询全部
     * @author: zhengyuzhu
     * @date: 2023/11/16 22:34
     * @return: java.util.List<com.zyz.SpringDemo2.entity.Student>
     **/
    List<Student>queryAll();/**
     * @description: 新增学生
     * @author: zhengyuzhu
     * @date: 2023/11/16 22:34
     * @param: student
     **/voidaddStudent(Student student);}
mapper.xml映射文件
<?xml version="1.0" encoding="UTF-8"?><!DOCTYPE mapper
        PUBLIC "-//mybatis.org//DTD Mapper 3.0//EN""http://mybatis.org/dtd/mybatis-3-mapper.dtd"><mapper namespace="com.zyz.SpringDemo2.mapper.StudentMapper"><!--查询全部--><select id="queryAll" resultType="Student">
        select * from student
    </select><!--新增学生--><insert id="addStudent" parameterType="Student">
        insert into student(stuno,stuname,cardid,classid)values(#{stuNo},#{stuName},#{cardID},#{classID})</insert></mapper>
service接口
public interface IStudentService {
    List<Student>queryAll();voidaddStudent(Student student);}
service实现类
publicclassStudentServiceImpl implements IStudentService {//mapper属性private StudentMapper mapper;//set注入给mapper对象赋值publicvoidsetMapper(StudentMapper mapper){this.mapper = mapper;}

    @Override
    public List<Student>queryAll(){return mapper.queryAll();}

    @Override
    publicvoidaddStudent(Student student){
        mapper.addStudent(student);}}
mybatis核心配置文件 mybatis-config.xml
<?xml version="1.0" encoding="UTF-8"?><!DOCTYPE configuration
        PUBLIC "-//mybatis.org//DTD Config 3.0//EN""http://mybatis.org/dtd/mybatis-3-config.dtd"><configuration><typeAliases><!--
            批量设置别名,会自动的将该包下的所有类定义了别名,别名就是其自身且不区分大小
        --><package name="com.zyz.SpringDemo2.entity"/></typeAliases><!--加载映射配置文件--><mappers><mapper resource="com/zyz/SpringDemo2/mapper/StudentMapper.xml"></mapper></mappers></configuration>
在这里由于数据源对象我们是交由spring容器托管了,因此mybatsi核心配置文件中就没有environments标签了。
数据库配置相关 db.properties
jdbc.driverClassName=com.mysql.jdbc.Driver
jdbc.url=jdbc:mysql://localhost:3306/spring_test?serverTimezone=UTC&useUnicode=true&characterEncoding=UTF-8&useSSL=false
jdbc.username=root
jdbc.password=root
spring配置文件
<?xml version="1.0" encoding="UTF-8"?><beans xmlns="http://www.springframework.org/schema/beans"
xmlns:xsi="http://www.w3.org/2001/XMLSchema-instance"
xmlns:context="http://www.springframework.org/schema/context"
xsi:schemaLocation="http://www.springframework.org/schema/beans
http://www.springframework.org/schema/beans/spring-beans.xsd http://www.springframework.org/schema/context https://www.springframework.org/schema/context/spring-context.xsd"><!--加载数据库配置文件--><context:property-placeholder location="classpath:db.properties"/><!--声明数据源--><bean id="myDataSource"class="com.alibaba.druid.pool.DruidDataSource" init-method="init" destroy-method="close"><!--set注入给数据库信息赋值,不需要指定驱动类,spring根据url自动识别
<property name="url" value="jdbc:mysql://localhost:3306/test?characterEncoding=utf8&useSSL=true&serverTimezone=UTC"/><property name="username" value="root"/><property name="password" value="333"/>--><!--使用db配置文件读取数据库信息,格式类似el表达式--><property name="driverClassName" value="${jdbc.driverClassName}"></property><property name="url" value="${jdbc.url}"></property><property name="username" value="${jdbc.username}"></property><property name="password" value="${jdbc.password}"></property></bean><!--声明的是mybatis中提供的SqlSessionFactoryBean类,这个类内部创建SqlSessionFactory的--><bean id="sqlSessionFactory"class="org.mybatis.spring.SqlSessionFactoryBean"><!--set注入赋值--><!--set注入,把数据库连接池付给了dataSource属性--><property name="dataSource" ref="myDataSource"/><!--mybatis主配置文件的位置
configLocation属性是Resource类型,读取配置文件
它的赋值,使用value,指定文件的路径,使用classpath:表示文件的位置
--><property name="configLocation" value="classpath:mybatis-config.xml"/></bean><!--创建dao对象,使用SqlSession的getMapper(StudentDao.class)
MapperScannerConfigurer:在内部调用getMapper()生成每个dao接口的代理对象。
--><bean class="org.mybatis.spring.mapper.MapperScannerConfigurer"><!--指定SqlSessionFactory对象的id--><property name="sqlSessionFactoryBeanName" value="sqlSessionFactory"/><!--指定包名, 包名是dao接口所在的包名。
MapperScannerConfigurer会扫描这个包中的所有接口,把每个接口都执行
一次getMapper()方法,得到每个接口的dao对象。
创建好的dao对象放入到spring的容器中的。 dao对象的默认名称是 接口名首字母小写
--><property name="basePackage" value="com.zyz.SpringDemo2.mapper"/></bean><!--声明service--><bean id="studentServiceImpl"class="com.zyz.SpringDemo2.service.impl.StudentServiceImpl"><property name="mapper" ref="studentMapper"/></bean></beans>
测试
//执行查询全部,不使用service
    @Test
    publicvoidtest02(){
        String config ="SpringApplication.xml";
        ApplicationContext ac =newClassPathXmlApplicationContext(config);//获取mapper的代理对象
        StudentMapper mapper =(StudentMapper) ac.getBean("studentMapper");
        List<Student> students = mapper.queryAll();for(Student student : students){
            System.out.println("student--->"+student);}}//执行增加学生,使用service
    @Test
    publicvoidtest03(){
        String config ="SpringApplication.xml";
        ApplicationContext ac =newClassPathXmlApplicationContext(config);//获取service对象
        IStudentService service =(IStudentService) ac.getBean("studentServiceImpl");
        Student student =newStudent();
        student.setStuName("呵呵");
        student.setStuNo(1111);
        student.setCardID(1115);
        student.setClassID(1);
        service.addStudent(student);}
测试结果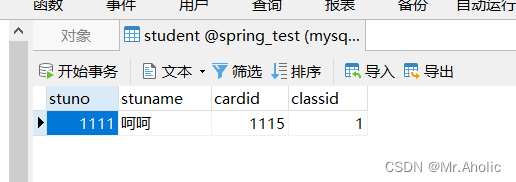
5、处理事务
5.1 什么是事务
事务是指一组sql语句的集合, 集合中有多条sql语句可能是insert , update ,select ,delete, 我们希望这些多个sql语句都能成功,或者都失败, 这些sql语句的执行是一致的,作为一个整体执行。关于事务最经典的例子就是转账了。
5.2 使用spring内部注解处理事务
5.2.1 环境搭建
加入事务相关依赖
<dependency><groupId>org.springframework</groupId><artifactId>spring-tx</artifactId><version>5.2.5.RELEASE</version></dependency>
案例:数据库有两张表,一张sale表,该表是商品订单信息;一张goods表,该表是商品库存信息。service类有一个业务方法buy,该方法指定要购买商品的id和数量,dao有三个方法分别是像sale表增加一条购买记录、更新goods表的库存信息、在goods表查询指定id商品是否存在。
下面是两张表的记录信息
sale表(初始默认添加了一些数据),id字段自增长
goods表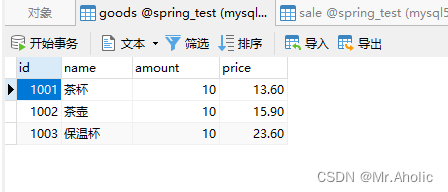
业务流程大致,用户向buy方法传递两个参数,分别是goods表的id字段和购买数量nums。buy方法体中的第一个方法是向sale表增加一条记录,类似与buy(1002,20),那么sale表应该多出来一条记录。
buy方法的定义
publicvoidbuy(Integer goodsId, Integer nums){//sale表新增购买记录//更新库存//先查询该编号的商品是否存在
        Goods goods = goodsMapper.queryGoods(goodsId);//进行判断if(goods == null){//说明商品不存在}elseif(goods.getAmount()< nums){//说明库存不足}//能够进行到这里说明商品信息是合法的,可以更新库存}
首先根据用户传入的参数id和nums向sale表新增一条购买记录。即有商品卖出去了,那么我们理应更新一下库存对吧,不然怎么知道还有多少货,万一别人要买100件商品而你只有50件肯定会导致别人购买失败对吧。那么问题就就来了,当我们执行完向sale表新增记录后,就该更新库存了,我们必须要知道刚卖出去的商品是谁对吧,这个通过用户传入的id和商品表goods的id字段一一对应,所以先去数据库查询用户传入的id是否存在goods表中,若不存在应该将事务回滚,即前面向sale表增加的记录是不应该存在的;同理,若用户传入的id商品在goods表中,但是用户要求的数量大于该商品当前库存,事务也应该回滚;只有当用户传入的id商品和数量都满足条件时我们才应该更新库存并且提交事务。
实体类 Goods 和 Sale
package com.zyz.SpringDemo3.entity;/**
 * @BelongsProject: SpringDemo1
 * @BelongsPackage: com.zyz.SpringDemo3.entity
 * @Author: zhengyuzhu
 * @CreateTime: 2023-11-17  16:40
 * @Description: 商品实体类
 * @Version: 1.0
 */publicclassGoods{private Integer id;private String name;private Integer amount;private Float price;publicGoods(){}publicGoods(Integer id, String name, Integer amount, Float price){this.id = id;this.name = name;this.amount = amount;this.price = price;}public Integer getId(){return id;}publicvoidsetId(Integer id){this.id = id;}public String getName(){return name;}publicvoidsetName(String name){this.name = name;}public Integer getAmount(){return amount;}publicvoidsetAmount(Integer amount){this.amount = amount;}public Float getPrice(){return price;}publicvoidsetPrice(Float price){this.price = price;}
    @Override
    public String toString(){return"Goods{"+"id="+ id +", name='"+ name +'\''+", amount="+ amount +", price="+ price +'}';}}

package com.zyz.SpringDemo3.entity;/**
 * @BelongsProject: SpringDemo1
 * @BelongsPackage: com.zyz.SpringDemo3.entity
 * @Author: zhengyuzhu
 * @CreateTime: 2023-11-17  16:41
 * @Description: 销售实体类
 * @Version: 1.0
 */publicclassSale{private Integer id;private Integer gid;private Integer nums;publicSale(){}publicSale(Integer id, Integer gid, Integer nums){this.id = id;this.gid = gid;this.nums = nums;}public Integer getId(){return id;}publicvoidsetId(Integer id){this.id = id;}public Integer getGid(){return gid;}publicvoidsetGid(Integer gid){this.gid = gid;}public Integer getNums(){return nums;}publicvoidsetNums(Integer nums){this.nums = nums;}
    @Override
    public String toString(){return"Sale{"+"id="+ id +", gid="+ gid +", nums="+ nums +'}';}}
mapper接口 GoodsMapper 和 SaleMapper
package com.zyz.SpringDemo3.mapper;importcom.zyz.SpringDemo3.entity.Goods;/**
 * @BelongsProject: SpringDemo1
 * @BelongsPackage: com.zyz.SpringDemo3.mapper
 * @Author: zhengyuzhu
 * @CreateTime: 2023-11-17  16:43
 * @Description: TODO
 * @Version: 1.0
 */public interface GoodsMapper {/**
     * 更新库存
     * goods表示本次用户购买的商品信息
     * @param goods
     */voidupdateGoods(Goods goods);/**
     * @description:查询商品信息
     * @author: zhengyuzhu
     * @date: 2023/11/17 16:44
     * @param: id
     * @return: com.zyz.SpringDemo3.entity.Goods
     **/
    Goods queryGoods(Integer id);}

package com.zyz.SpringDemo3.mapper;importcom.zyz.SpringDemo3.entity.Sale;/**
 * @BelongsProject: SpringDemo1
 * @BelongsPackage: com.zyz.SpringDemo3.mapper
 * @Author: zhengyuzhu
 * @CreateTime: 2023-11-17  16:43
 * @Description: TODO
 * @Version: 1.0
 */public interface SaleMapper {//增加销售记录voidaddSale(Sale sale);}
mapper.xml映射文件 GoodsMapper.xml 和 SaleMapper.xml
<?xml version="1.0" encoding="UTF-8"?><!DOCTYPE mapper
        PUBLIC "-//mybatis.org//DTD Mapper 3.0//EN""http://mybatis.org/dtd/mybatis-3-mapper.dtd"><mapper namespace="com.zyz.SpringDemo3.mapper.GoodsMapper"><!--更新商品信息--><update id="updateGoods" parameterType="Goods">
        update goods set amount = amount - #{amount} where id = #{id}</update><!--查询商品信息--><select id="queryGoods" resultType="Goods">
        select * from goods where id = #{id}</select></mapper><?xml version="1.0" encoding="UTF-8"?><!DOCTYPE mapper
        PUBLIC "-//mybatis.org//DTD Mapper 3.0//EN""http://mybatis.org/dtd/mybatis-3-mapper.dtd"><mapper namespace="com.zyz.SpringDemo3.mapper.SaleMapper"><!--增加销售记录--><insert id="addSale" parameterType="Sale">
        insert into sale(gid,nums)values(#{gid},#{nums})</insert></mapper>
service接口
package com.zyz.SpringDemo3.service;importcom.zyz.SpringDemo3.entity.Goods;/**
 * @author zyz
 * @version 1.0
 * @data 2023/11/17 16:48
 * @Description:
 */public interface IBuyGoodsService {/**
     * @description: 根据 ID 查询商品
     * @author: zhengyuzhu
     * @date: 2023/11/17 23:09
     * @param: id
     * @return: com.zyz.SpringDemo3.entity.Goods
     **/
     Goods queryGoodsById(Integer id);/**
     * @description:购买商品的方法,goodsId是购买商品的编号,nums是购买商品的数量
     * @author: zhengyuzhu
     * @date: 2023/11/17 16:48
     * @param: goodsId
     * @param: nums
     **/voidbuy(Integer goodsId,Integer nums);}
service实现类
package com.zyz.SpringDemo3.service.impl;importcom.zyz.SpringDemo3.entity.Goods;importcom.zyz.SpringDemo3.entity.Sale;importcom.zyz.SpringDemo3.mapper.GoodsMapper;importcom.zyz.SpringDemo3.mapper.SaleMapper;importcom.zyz.SpringDemo3.service.IBuyGoodsService;importorg.springframework.transaction.annotation.Transactional;/**
 * @BelongsProject: SpringDemo1
 * @BelongsPackage: com.zyz.SpringDemo3.service.impl
 * @Author: zhengyuzhu
 * @CreateTime: 2023-11-17  16:49
 * @Description: TODO
 * @Version: 1.0
 */publicclassBuyGoodsServiceImpl implements IBuyGoodsService {private SaleMapper saleMapper;private GoodsMapper goodsMapper;//set注入赋值publicvoidsetSaleMapper(SaleMapper saleMapper){this.saleMapper = saleMapper;}publicvoidsetGoodsMapper(GoodsMapper goodsMapper){this.goodsMapper = goodsMapper;}/**
     * @description: 更具ID 查询商品
     * @author: zhengyuzhu
     * @date: 2023/11/17 23:08
     * @param: id
     * @return: com.zyz.SpringDemo3.entity.Goods
     **/
    @Override
    public Goods queryGoodsById(Integer id){
        Goods goods = null;
        goods = goodsMapper.queryGoods(id);return goods;}/**
     * 购买商品方法
     * goodsId表示要购买的商品编号,nums表示购买的数量
     *
     * @param goodsId
     * @param nums
     *//*
        1、@Transactional定义在需要加入事务处理的方法上面
        2、rollbackFor
            1)当方法发生的异常属于rollbackFor,事务就会回滚
            2)当方法发生的异常不属于rollbackFor,spring就会判断发生的异常是不是运行时异常,
               若是运行时异常,事务就会回滚

    @Transactional(
            propagation = Propagation.REQUIRED,
            isolation = Isolation.DEFAULT,
            readOnly = false,
            rollbackFor = {
                    NullPointerException.class,
                    NotEnoughException.class
            }

    )*///开发中推荐使用默认值,直接使用@Transactional注解
    @Transactional
    @Override
    publicvoidbuy(Integer goodsId, Integer nums){
        System.out.println("buy开始...");/*
            记录销售的信息,向sale表添加记录,由于sale表id是自增长的,所以不需要设置id属性
            向sale表添加一条购买记录
         */
        Sale sale =newSale();
        sale.setGid(goodsId);
        sale.setNums(nums);
        saleMapper.addSale(sale);//更新库存//先查询该编号的商品是否存在
        Goods goods = goodsMapper.queryGoods(goodsId);//进行判断if(goods == null){//说明商品不存在thrownewNullPointerException("编号为:"+ goodsId +"商品不存在...");}elseif(goods.getAmount()< nums){//说明库存不足thrownewNotEnoughException("编号为:"+goodsId+"商品库存不足...");}//能够进行到这里说明商品信息是合法的,可以更新库存
        Goods good =newGoods();
        good.setId(goodsId);
        good.setAmount(nums);
        goodsMapper.updateGoods(good);

        System.out.println("buy结束...");}}
异常处理类 NotEnoughException
package com.zyz.SpringDemo3.service.impl;/**
 * @BelongsProject: SpringDemo1
 * @BelongsPackage: com.zyz.SpringDemo3.service.impl
 * @Author: zhengyuzhu
 * @CreateTime: 2023-11-18  15:57
 * @Description: 定义异常类
 * @Version: 1.0
 */publicclassNotEnoughException extends RuntimeException {publicNotEnoughException(){}publicNotEnoughException(String msg){super(msg);}}
spring配置文件也和整合部分一致,只需要在根标签beans加入以下部分即可
<!--声明使用spring的事务处理--><!--1、声明事务管理器--><bean id="transactionManager"class="org.springframework.jdbc.datasource.DataSourceTransactionManager"><!--连接的数据库,指定数据源--><property name="dataSource" ref="myDataSource"/></bean><!--2、开启事务注解驱动,告诉sprint使用注解管理事务,创建代理对象--><tx:annotation-driven transaction-manager="transactionManager"/>
mybatis核心配置文件 TransactionMybatis-config.xml 数据库配置文件同整合 mybatis 这里不在给出。
<?xml version="1.0" encoding="UTF-8"?><!DOCTYPE configuration
        PUBLIC "-//mybatis.org//DTD Config 3.0//EN""http://mybatis.org/dtd/mybatis-3-config.dtd"><configuration><typeAliases><!--
            批量设置别名,会自动的将该包下的所有类定义了别名,别名就是其自身且不区分大小
        --><package name="com.zyz.SpringDemo3.entity"/></typeAliases><!--加载映射配置文件--><mappers><mapper resource="com/zyz/SpringDemo3/mapper/GoodsMapper.xml"></mapper><mapper resource="com/zyz/SpringDemo3/mapper/SaleMapper.xml"></mapper></mappers></configuration>
Spring 整合 配置文件
<?xml version="1.0" encoding="UTF-8"?><beans xmlns="http://www.springframework.org/schema/beans"
xmlns:xsi="http://www.w3.org/2001/XMLSchema-instance"
xmlns:context="http://www.springframework.org/schema/context"
xmlns:tx="http://www.springframework.org/schema/tx"
xsi:schemaLocation="http://www.springframework.org/schema/beans http://www.springframework.org/schema/beans/spring-beans.xsd
http://www.springframework.org/schema/context http://www.springframework.org/schema/context/spring-context.xsd
http://www.springframework.org/schema/tx http://www.springframework.org/schema/tx/spring-tx.xsd"><!--加载数据库配置文件--><context:property-placeholder location="classpath:db.properties"/><!--声明数据源--><bean id="myDataSource"class="com.alibaba.druid.pool.DruidDataSource" init-method="init" destroy-method="close"><!--set注入给数据库信息赋值,不需要指定驱动类,spring根据url自动识别
<property name="url" value="jdbc:mysql://localhost:3306/test?characterEncoding=utf8&useSSL=true&serverTimezone=UTC"/><property name="username" value="root"/><property name="password" value="333"/>--><!--使用db配置文件读取数据库信息,格式类似el表达式--><property name="driverClassName" value="${jdbc.driverClassName}"></property><property name="url" value="${jdbc.url}"></property><property name="username" value="${jdbc.username}"></property><property name="password" value="${jdbc.password}"></property></bean><!--声明的是mybatis中提供的SqlSessionFactoryBean类,这个类内部创建SqlSessionFactory的--><bean id="sqlSessionFactory"class="org.mybatis.spring.SqlSessionFactoryBean"><!--set注入赋值--><!--set注入,把数据库连接池付给了dataSource属性--><property name="dataSource" ref="myDataSource"/><!--mybatis主配置文件的位置
configLocation属性是Resource类型,读取配置文件
它的赋值,使用value,指定文件的路径,使用classpath:表示文件的位置
--><property name="configLocation" value="classpath:TransactionMybatis-config.xml"/></bean><!--创建dao对象,使用SqlSession的getMapper(StudentDao.class)
MapperScannerConfigurer:在内部调用getMapper()生成每个dao接口的代理对象。
--><bean class="org.mybatis.spring.mapper.MapperScannerConfigurer"><!--指定SqlSessionFactory对象的id--><property name="sqlSessionFactoryBeanName" value="sqlSessionFactory"/><!--指定包名, 包名是dao接口所在的包名。
MapperScannerConfigurer会扫描这个包中的所有接口,把每个接口都执行
一次getMapper()方法,得到每个接口的dao对象。
创建好的dao对象放入到spring的容器中的。 dao对象的默认名称是 接口名首字母小写
--><property name="basePackage" value="com.zyz.SpringDemo3.mapper"/></bean><!--声明service--><bean id="buyGoodsService"class="com.zyz.SpringDemo3.service.impl.BuyGoodsServiceImpl"><!--dao对象的默认名称是 接口名首字母小写--><property name="saleMapper" ref="saleMapper"/><property name="goodsMapper" ref="goodsMapper"/></bean><!--声明使用spring的事务处理--><!--1、声明事务管理器--><bean id="transactionManager"class="org.springframework.jdbc.datasource.DataSourceTransactionManager"><!--连接的数据库,指定数据源--><property name="dataSource" ref="myDataSource"/></bean><!--2、开启事务注解驱动,告诉sprint使用注解管理事务,创建代理对象--><tx:annotation-driven transaction-manager="transactionManager"/></beans>
测试类
//不使用事务测试 和使用事务  取决于是否添加  @Transactional  使用默认值就可以了
    @Test
    publicvoidtest01(){
        String config ="TransactionApplication.xml";
        ApplicationContext ac =newClassPathXmlApplicationContext(config);//获取service对象
        IBuyGoodsService service =(IBuyGoodsService) ac.getBean("buyGoodsService");//商品编号不存在情况//java.lang.NullPointerException: 编号为:1003商品不存在...// service.buy(1006,50);//商品库存不足情况//com.mms.exception.NotEnoughException: 编号为:1002商品库存不足...
        service.buy(1002,100);//正常情况// service.buy(1002,2);}
测试结果如下:
原始数据
商品表
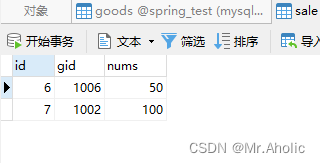
订单表
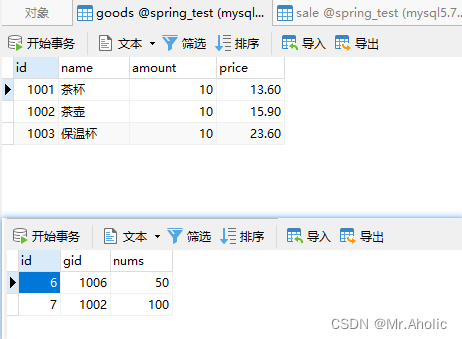
购买不存在的商品 或者购买商品的数量超过库存,未开启事务的情况下:sql语句都将执行
//不使用事务测试
    @Test
    publicvoidtest01(){
        String config ="TransactionApplication.xml";
        ApplicationContext ac =newClassPathXmlApplicationContext(config);//获取service对象
        IBuyGoodsService service =(IBuyGoodsService) ac.getBean("buyGoodsService");//商品编号不存在情况//java.lang.NullPointerException: 编号为:1006商品不存在...
        service.buy(1006,50);//商品库存不足情况//NotEnoughException: 编号为:1002商品库存不足...
        service.buy(1002,100);}
控制台报错信息如下:
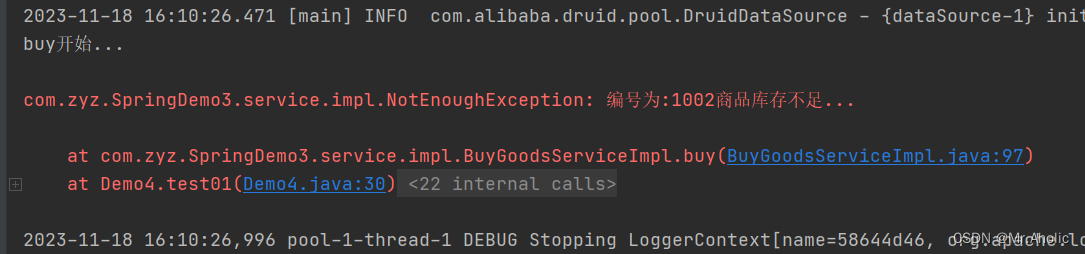
查看数据库表情况
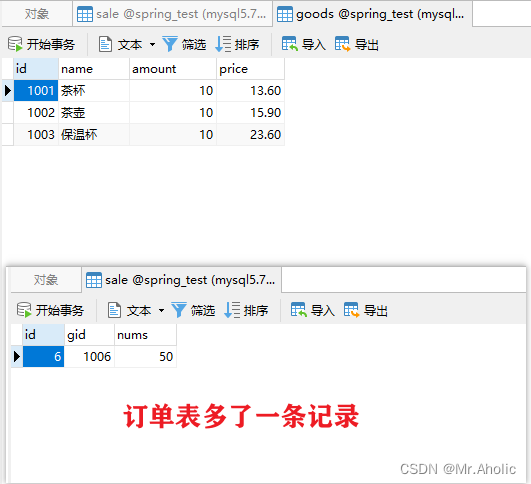
购买商品数量不足的情况下,也会添加一条记录
开启事务注解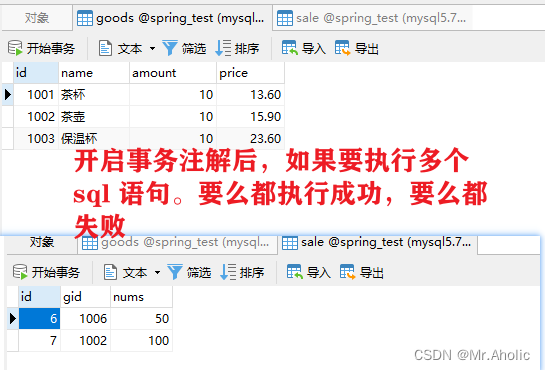
5.3 使用aspectj框架处理事务(配置文件)
aspectJ处理事务是基于配置文件形式的,别的地方都和上面一样,只需要更改service实现类的buy方法和spring核心配置文件即可
1、取消buy方法上的事务注解,因为我们现在是使用aspectJ,基于配置文件
2、将spring注解形式事务开发的spring配置文件中加入的声明事务管理器的部分换成下面的配置
<!--
       使用aspectj方式的事务(声明式事务)
       1、aspectj事务适合大型项目,因为其声明在配置文件中,大大与程序解耦合
    --><!--1、声明事务管理器--><bean id="transactionManager"class="org.springframework.jdbc.datasource.DataSourceTransactionManager"><property name="dataSource" ref="myDataSource"/></bean><!--2、声明业务方法的事务属性(隔离级别、传播行为、超时时间)
            id:自定义
            transaction-manager:事务故管理器对象的id值
    --><tx:advice id="myAdvice" transaction-manager="transactionManager"><!--tx:attributes配置事务属性--><tx:attributes><!--
                tx:method:给具体的方法配置事务属性,method可以有多个,由于给多个方法配置事务
                name:方法名,不带包名和类名,方法可以使用通配符
                propagation:传播行为,枚举类
                isolation:隔离级别
                rollback-for:你指定的异常全限定类名,发生异常一定回滚
            --><tx:method name="buy"
                       propagation="REQUIRED"
                       isolation="DEFAULT"
                       rollback-for="java.lang.NullPointerException,com.zyz.SpringDemo3.service.impl.NotEnoughException"/></tx:attributes></tx:advice><aop:config><!--3、配置切入点表达式
        为什么需要配置切入点表达式?
            因为步骤2中的方法不确定是哪一个类、哪一个包的方法,所以需要指定
        --><aop:pointcut id="servicePt" expression="execution(* *..service..*.*(..))"/><!--
            配置增强器,用于关联advice和pointcut
            advice-ref:通知,上面的tx:advice的id值
            pointcut-ref:切入点表达式的id值
        --><aop:advisor advice-ref="myAdvice" pointcut-ref="servicePt"/></aop:config>
完整配置文件
<?xml version="1.0" encoding="UTF-8"?><beans xmlns="http://www.springframework.org/schema/beans"
xmlns:xsi="http://www.w3.org/2001/XMLSchema-instance"
xmlns:context="http://www.springframework.org/schema/context"
xmlns:tx="http://www.springframework.org/schema/tx"
xmlns:aop="http://www.springframework.org/schema/aop"
xsi:schemaLocation="http://www.springframework.org/schema/beans http://www.springframework.org/schema/beans/spring-beans.xsd
http://www.springframework.org/schema/context http://www.springframework.org/schema/context/spring-context.xsd
http://www.springframework.org/schema/tx http://www.springframework.org/schema/tx/spring-tx.xsd
http://www.springframework.org/schema/aop http://www.springframework.org/schema/aop/spring-aop.xsd"><!--加载数据库配置文件--><context:property-placeholder location="classpath:db.properties"/><!--声明数据源--><bean id="myDataSource"class="com.alibaba.druid.pool.DruidDataSource" init-method="init" destroy-method="close"><!--set注入给数据库信息赋值,不需要指定驱动类,spring根据url自动识别
<property name="url" value="jdbc:mysql://localhost:3306/test?characterEncoding=utf8&useSSL=true&serverTimezone=UTC"/><property name="username" value="root"/><property name="password" value="333"/>--><!--使用db配置文件读取数据库信息,格式类似el表达式--><property name="driverClassName" value="${jdbc.driverClassName}"></property><property name="url" value="${jdbc.url}"></property><property name="username" value="${jdbc.username}"></property><property name="password" value="${jdbc.password}"></property></bean><!--声明的是mybatis中提供的SqlSessionFactoryBean类,这个类内部创建SqlSessionFactory的--><bean id="sqlSessionFactory"class="org.mybatis.spring.SqlSessionFactoryBean"><!--set注入赋值--><!--set注入,把数据库连接池付给了dataSource属性--><property name="dataSource" ref="myDataSource"/><!--mybatis主配置文件的位置
configLocation属性是Resource类型,读取配置文件
它的赋值,使用value,指定文件的路径,使用classpath:表示文件的位置
--><property name="configLocation" value="classpath:TransactionMybatis-config.xml"/></bean><!--创建dao对象,使用SqlSession的getMapper(StudentDao.class)
MapperScannerConfigurer:在内部调用getMapper()生成每个dao接口的代理对象。
--><bean class="org.mybatis.spring.mapper.MapperScannerConfigurer"><!--指定SqlSessionFactory对象的id--><property name="sqlSessionFactoryBeanName" value="sqlSessionFactory"/><!--指定包名, 包名是dao接口所在的包名。
MapperScannerConfigurer会扫描这个包中的所有接口,把每个接口都执行
一次getMapper()方法,得到每个接口的dao对象。
创建好的dao对象放入到spring的容器中的。 dao对象的默认名称是 接口名首字母小写
--><property name="basePackage" value="com.zyz.SpringDemo3.mapper"/></bean><!--声明service--><bean id="buyGoodsService"class="com.zyz.SpringDemo3.service.impl.BuyGoodsServiceImpl"><!--dao对象的默认名称是 接口名首字母小写--><property name="saleMapper" ref="saleMapper"/><property name="goodsMapper" ref="goodsMapper"/></bean><!--
使用aspectj方式的事务(声明式事务)
1、aspectj事务适合大型项目,因为其声明在配置文件中,大大与程序解耦合
--><!--1、声明事务管理器--><bean id="transactionManager"class="org.springframework.jdbc.datasource.DataSourceTransactionManager"><property name="dataSource" ref="myDataSource"/></bean><!--2、声明业务方法的事务属性(隔离级别、传播行为、超时时间)
id:自定义
transaction-manager:事务故管理器对象的id值
--><tx:advice id="myAdvice" transaction-manager="transactionManager"><!--tx:attributes配置事务属性--><tx:attributes><!--
tx:method:给具体的方法配置事务属性,method可以有多个,由于给多个方法配置事务
name:方法名,不带包名和类名,方法可以使用通配符
propagation:传播行为,枚举类
isolation:隔离级别
rollback-for:你指定的异常全限定类名,发生异常一定回滚
--><tx:method name="buy"
propagation="REQUIRED"
isolation="DEFAULT"
rollback-for="java.lang.NullPointerException,com.zyz.SpringDemo3.service.impl.NotEnoughException"/></tx:attributes></tx:advice><aop:config><!--3、配置切入点表达式
为什么需要配置切入点表达式?
因为步骤2中的方法不确定是哪一个类、哪一个包的方法,所以需要指定
--><aop:pointcut id="servicePt" expression="execution(* *..service..*.*(..))"/><!--
配置增强器,用于关联advice和pointcut
advice-ref:通知,上面的tx:advice的id值
pointcut-ref:切入点表达式的id值
--><aop:advisor advice-ref="myAdvice" pointcut-ref="servicePt"/></aop:config></beans>
版权归原作者 Mr.Aholic 所有, 如有侵权,请联系我们删除。