
个人简介
👀个人主页: 前端杂货铺
🙋♂️学习方向: 主攻前端方向,也会涉及到服务端
📃个人状态: 在校大学生一枚,已拿 offer(秋招)
🥇推荐学习:🍍前端面试宝典 🍉Vue2 🍋Vue3 🍓Vue2&Vue3项目实战 🥝Node.js
Node.js系列文章目录
内容参考链接Node.js(一)初识 Node.js
文章目录
一、http 请求概述
- DNS 解析,建立 TCP 连接,发送 http 请求
- server 接收 http 请求,处理,并返回
- 客户端接收到返回数据,处理数据(如渲染页面,执行 JS)
二、处理请求
1、处理 get 请求
- get 请求,即客户端要向 server 端获取数据,如查询博客列表
- 通过 querystring 来传递数据,如 a.html?a=100&b=200
- 浏览器直接访问,就发送 get 请求
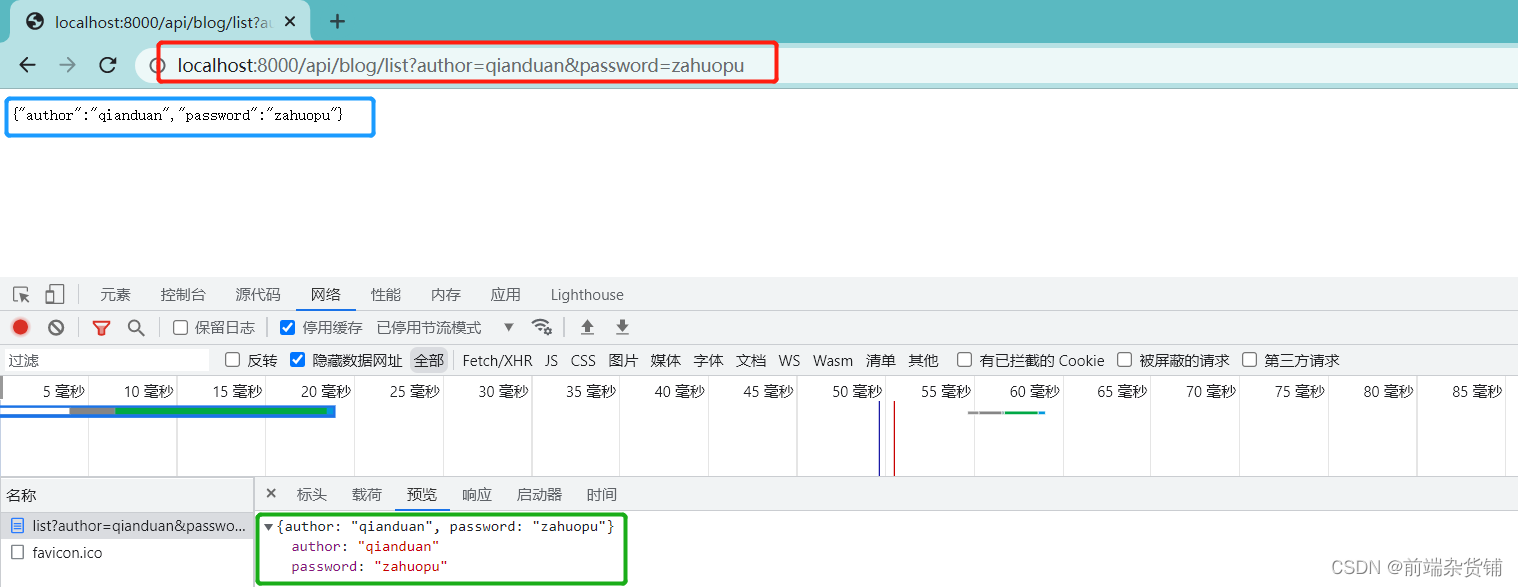
示例:GET 请求
// 获取 node.js 提供的原生 http 模块const http =require('http')const querystring =require('querystring')// 创建服务const server = http.createServer((req, res)=>{
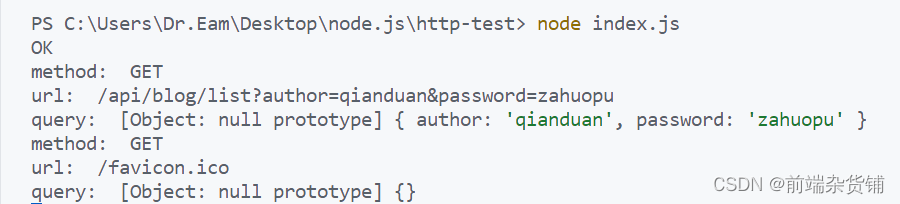
console.log('method: ', req.method)// GETconst url = req.url // 获取请求的完整 url
console.log('url: ', url)
req.query = querystring.parse(url.split('?')[1])// 解析 querystring
console.log('query: ', req.query)
res.end(JSON.stringify(req.query))// 将 querystring 返回})// 监听端口
server.listen(8000)
console.log('OK')
2、处理 post 请求
- post 请求,即客户端要像服务端传递数据,如新建博客
- 通过 post data 传递数据
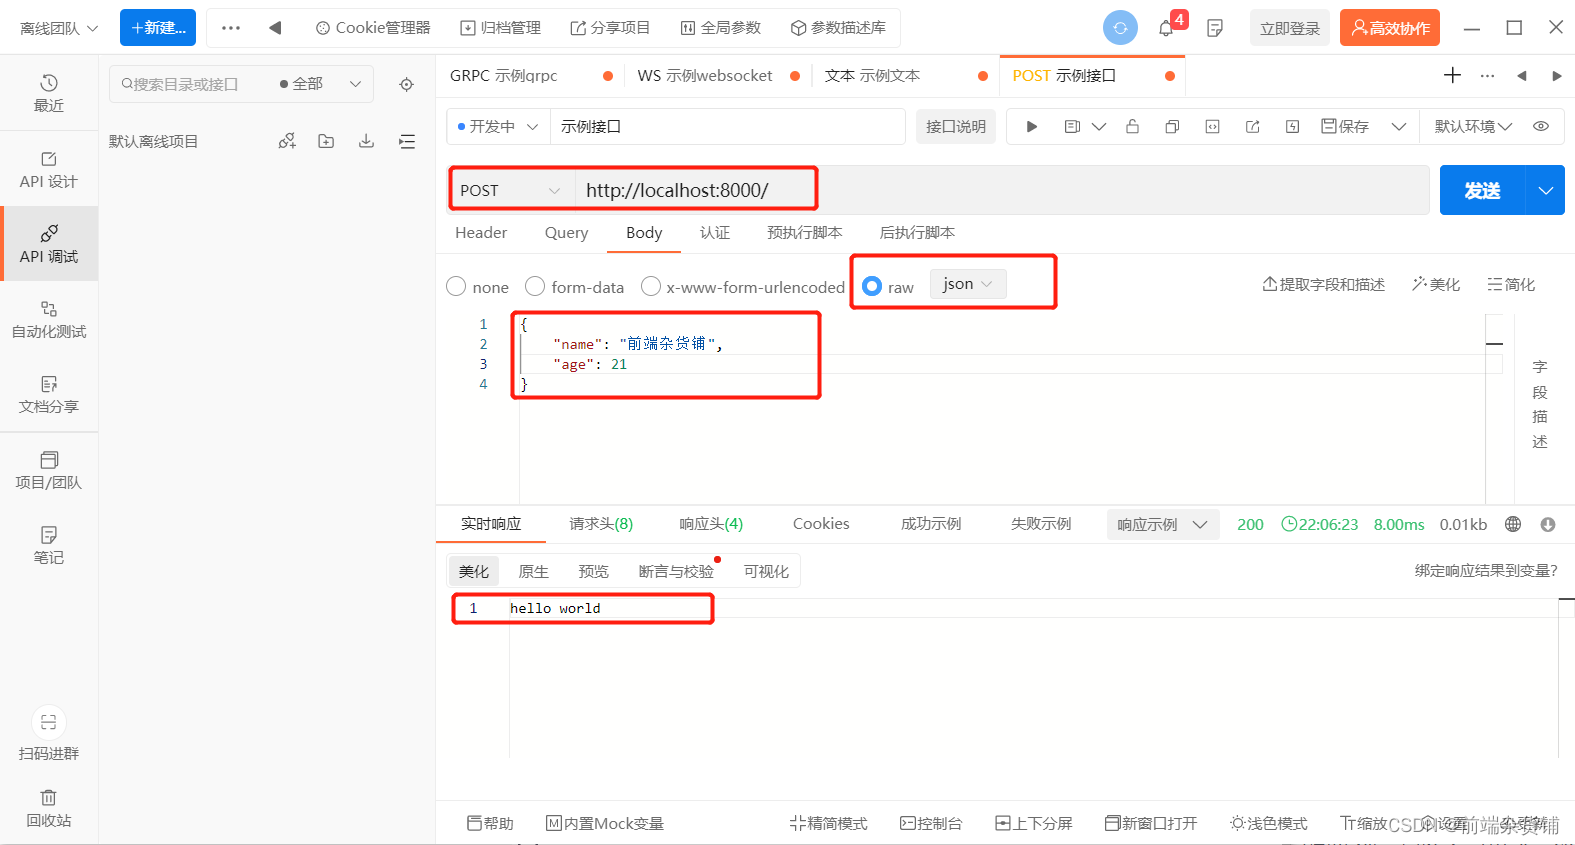
- 浏览器无法直接模拟,需要手写 js,或者使用 postman
示例:POST 请求
const http =require('http')// 创建服务const server = http.createServer((req, res)=>{// POST 请求if(req.method ==='POST'){// req 数据格式
        console.log('req content-type', req.headers['content-type'])// 接收数据let postData =''// 每次来数据都会触发 data 事件
        req.on('data',chunk=>{
            postData += chunk.toString()})
        req.on('end',()=>{
            console.log('postData: ', postData)
            res.end('hello world')})}})// 监听端口
server.listen(8000)
console.log('OK')
测试:使用 postman 或者 ApiPost

三、搭建开发环境
- 从 0 开始搭建,不使用任何框架
- 使用 nodemon 监测文件变化,自动重启 node
- 使用 cross-env 设置环境变量,兼容 windows mac 和 linux
1、搭建环境
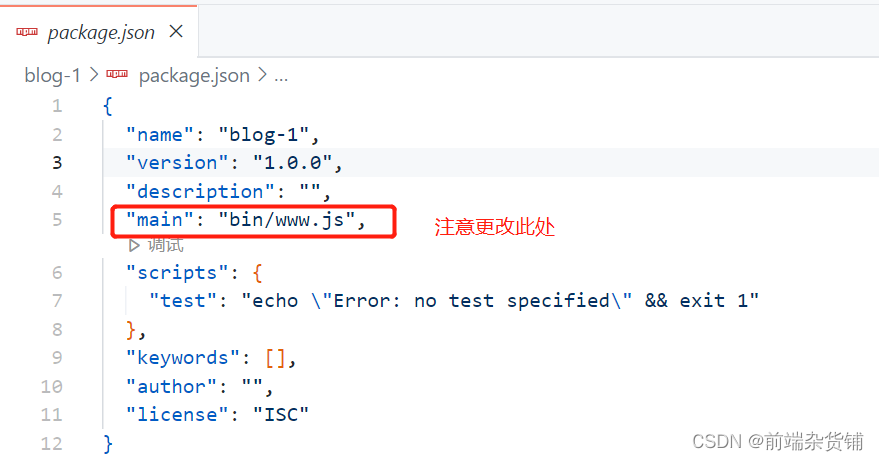
文件格式如下:
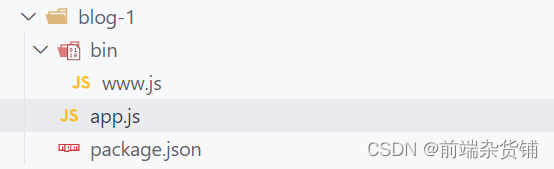
更改 main 的值:
app.js 文件
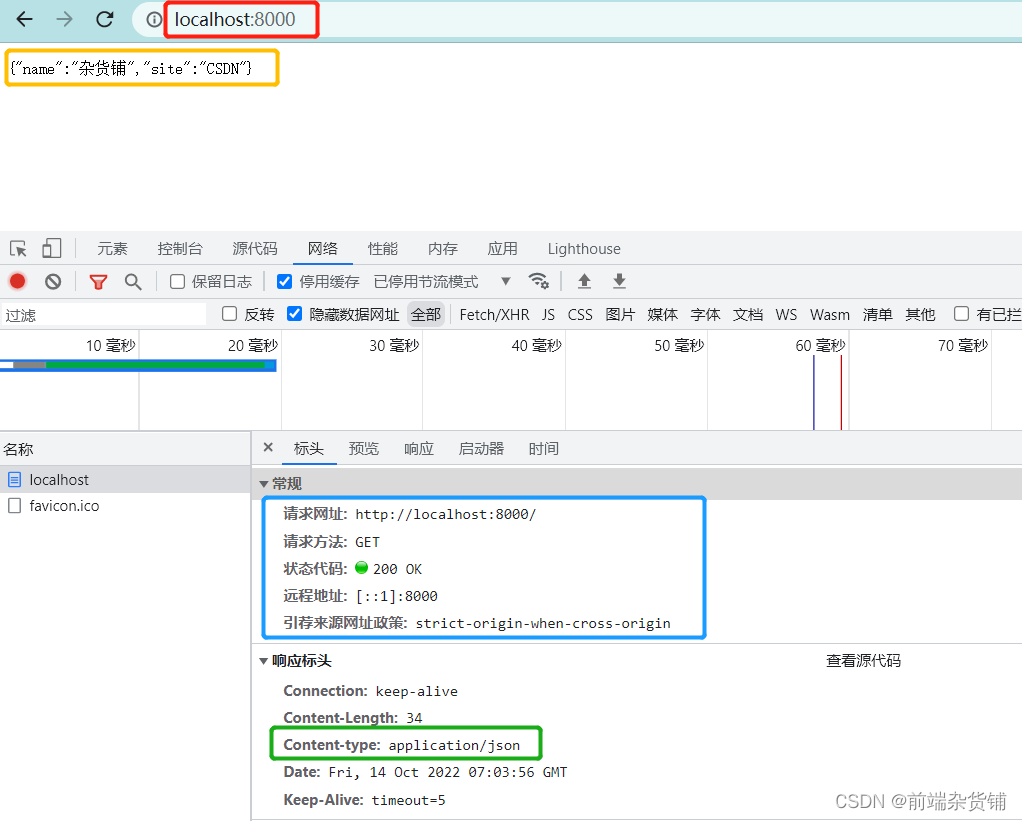
constserverHandle=(req, res)=>{// 设置返回格式 JSON
    res.setHeader('Content-type','application/json')// 返回的数据const resData ={name:'杂货铺',site:'CSDN'}// 服务器端要返回给客户端的数据
    res.end(JSON.stringify(resData))}// 模块化 把 serverHandle 暴露出去
module.exports = serverHandle
www.js 文件
const http =require('http')// 端口constPORT=8000// 引入 app.jsconst serverHandle =require('../app')// 创建服务const server = http.createServer(serverHandle)// 监听端口
server.listen(PORT)
在当前文件夹路径下终端键入
node bin/www.js
启动服务,打开 8000 端口
2、安装 nodemon
nodemon 作用:可以监控文件变化,自动重启,无需手动
安装 nodemon,终端键入如下命令:
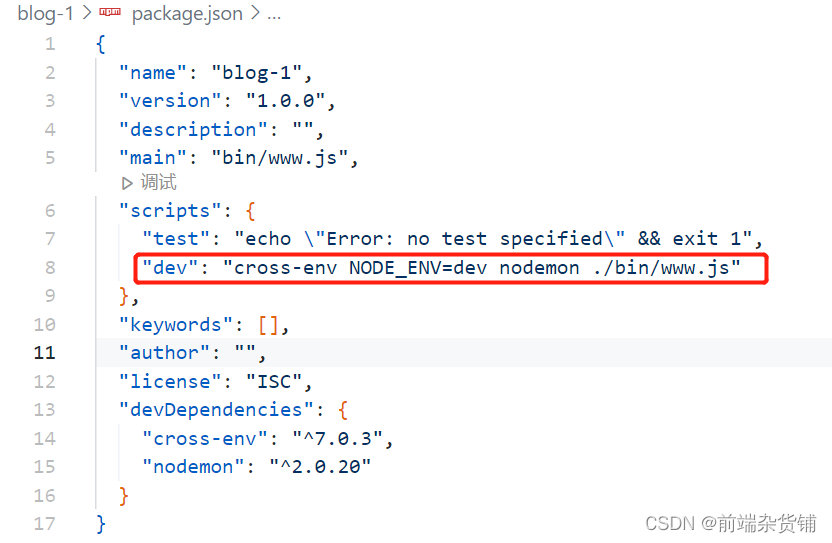
npm install nodemon cross-env --save-dev
在 package.json 中 添加 如下内容(测试环境,兼容多种操作系统):
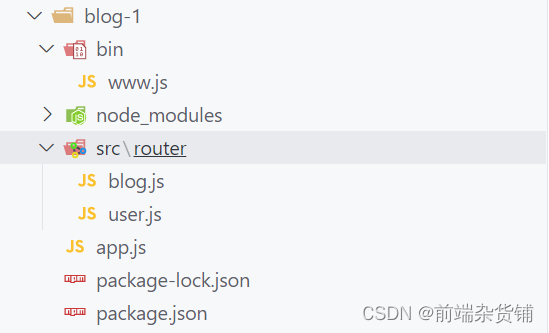
四、开发路由
1、初始化路由
- 初始化路由:根据技术方案的设计,做出路由
- 返回假数据:将路由和数据处理分离,以符合设计规则
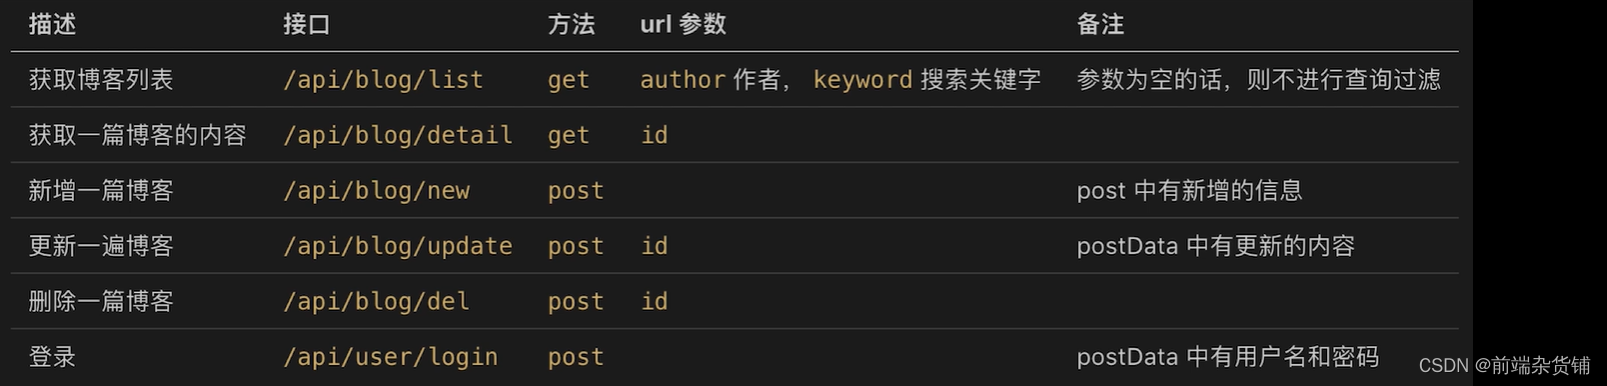
示例:开发接口,并测试使用
文件格式如下:
www.js 文件
- 创建服务,监听端口
- 最终
nodemon ./bin/www.js运行就是在此文件位置
const http =require('http')// 端口constPORT=8000// 引入 app.jsconst serverHandle =require('../app')// 创建服务const server = http.createServer(serverHandle)// 监听端口
server.listen(PORT)
app.js 文件
- 整合的文件
- 处理 blog 和 user 的相关接口
const handleBlogRouter =require('./src/router/blog')const handleUserRouter =require('./src/router/user')constserverHandle=(req, res)=>{// 设置返回格式 JSON
    res.setHeader('Content-type','application/json')// 获取 pathconst url = req.url
    req.path = url.split('?')[1]// 获取 ? 的后半部分// 处理 blog 路由const blogData =handleBlogRouter(req, res)if(blogData){
        res.end(JSON.stringify(blogData))return}// 处理 user 路由const userData =handleUserRouter(req, res)if(userData){
        res.end(JSON.stringify(userData))return}// 未命中路由,返回 404
    res.writeHead(404,{"Content-type":"text/plain"})
    res.write("404 Not Found\n")
    res.end()}// 模块化 把 serverHandle 暴露出去
module.exports = serverHandle
blog.js 文件
- 博客相关接口
- 最后暴露出去
consthandleBlogRouter=(req, res)=>{const method = req.method // GET POST// 获取博客列表if(method ==='GET'&& req.path ==='/api/blog/list'){return{msg:'这是获取博客列表的接口'}}// 获取博客详情if(method ==='GET'&& req.path ==='/api/blog/detail'){return{msg:'这是获取博客详情的接口'}}// 新建一篇博客if(method ==='POST'&& req.path ==='/api/blog/new'){return{msg:'这是新建博客的接口'}}// 更新一篇博客if(method ==='POST'&& req.path ==='/api/blog/update'){return{msg:'这是更新博客的接口'}}// 删除一篇博客if(method ==='POST'&& req.path ==='/api/blog/delete'){return{msg:'这是删除博客的接口'}}}

module.exports = handleBlogRouter
user.js 文件
- 登录相关接口
- 最后暴露出去
consthandleUserRouter=(req, res)=>{const method = req.method

    // 登录if(method ==='POST'&& req.path ==='/api/user/login'){return{msg:'这是登录接口'}}}

module.exports = handleUserRouter
测试如下:
获取博客列表:

获取博客详情:

资源未找到 404:

2、使用 Promise 读取文件
示例:使用 Promise 读取三个 json 文件
a.json 文件
{"next":"b.json","msg":"this is a"}
b.json 文件
{"next":"c.json","msg":"this is b"}
c.json 文件
{"next":null,"msg":"this is c"}
index.js 文件
- 封装获取文件内容的函数
- 依次读取文件内容
const fs =require('fs')const path =require('path')// 用 promise 获取文件内容functiongetFileContent(fileName){const promise =newPromise((resolve, reject)=>{// 获取文件全名, __dirname 表示当前文件所在的目录const fullFileName = path.resolve(__dirname,'files', fileName)// 读取文件
        fs.readFile(fullFileName,(err, data)=>{// 失败if(err){reject(err)return}// 成功resolve(JSON.parse(data.toString()))})})// 返回 promise 实例return promise
}// then 的链式调用getFileContent('a.json').then(aData=>{
    console.log('a data', aData)returngetFileContent(aData.next)}).then(bData=>{
    console.log('b data', bData)returngetFileContent(bData.next)}).then(cData=>{
    console.log('c data', cData)})
终端键入 nodemon index.js 测试结果如下:

五、写在最后
至此,我们学会了请求的处理,搭建开发环境以及路由的开发。继续跟进学习吧!
后续会对该项目进行多次重构【多种框架(express,koa)和数据库(mysql,sequelize,mongodb)】
如果你需要该项目的 源码,请通过本篇文章最下面的方式 加入 进来~~
本文转载自: https://blog.csdn.net/qq_45902692/article/details/127305579
版权归原作者 前端杂货铺 所有, 如有侵权,请联系我们删除。
版权归原作者 前端杂货铺 所有, 如有侵权,请联系我们删除。