
1 消息队列
MQ(Message Queue):翻译为消息队列,消息队列是一个存放消息的容器,生产者发送消息到消息队列,消费者从队列取出并处理消息。由于Queue是一种先进先出的数据结构,所以消费消息时是按照顺序来消费的。
1.1 消息队列的作用
1.通过异步处理提高系统性能(减少响应所需时间)。
2.削峰/限流。
3.降低系统耦合性。
通过异步处理提高系统性能(减少响应所需时间)
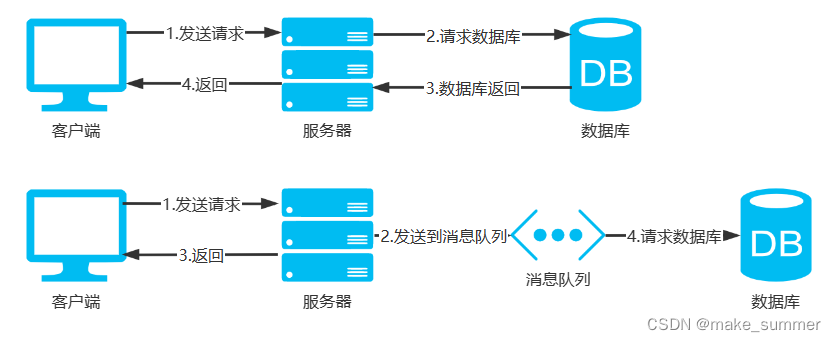
将用户请求的数据存入消息队列后直接返回。后续系统再对消息进行消费。类似我们平时网上订火车票等,后续消息消费后才发送短信通知用户订购成功。
削峰/限流
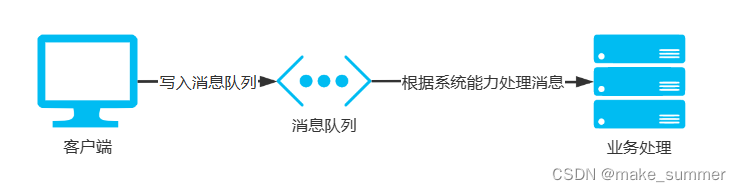
秒杀系统的高并发请求,每接收一个用户请求就放入消息队列,即可响应用户,而生成订单等服务就订阅消息队列,每取一个消息就处理,不至于大量请求直接让服务器宕机。
降低系统耦合性
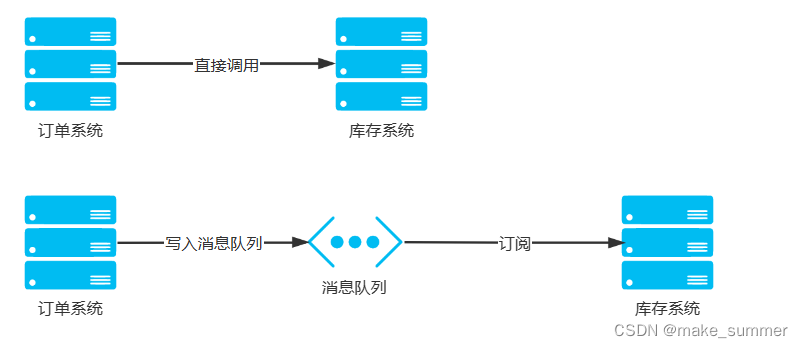
生产者(客户端)发送消息到消息队列中去,接受者(服务端)处理消息,需要消费的系统直接去消息队列取消息进行消费即可而不需要和其他系统有耦合,这显然也提高了系统的扩展性。
1.2 消息队列的问题
1.系统可用性降低: 系统可用性在某种程度上降低,为什么这样说呢?在加入 MQ 之前,你不用考虑消息丢失或者说 MQ 挂掉等等的情况,但是,引入 MQ 之后你就需要去考虑了!
2.系统复杂性提高: 加入 MQ 之后,你需要保证消息没有被重复消费、处理消息丢失的情况、保证消息传递的顺序性等等问题!
3.一致性问题: 我上面讲了消息队列可以实现异步,消息队列带来的异步确实可以提高系统响应速度。但是,万一消息的真正消费者并没有正确消费消息怎么办?这样就会导致数据不一致的情况了!
1.3 常见的消息队列
1.Kafka:Kafka 是 LinkedIn 开源的一个分布式流式处理平台,已经成为 Apache 顶级项目,早期被用来用于处理海量的日志,后面才慢慢发展成了一款功能全面的高性能消息队列。
官网:Kafaka
2.RocketMQ:RocketMQ 是阿里开源的一款云原生“消息、事件、流”实时数据处理平台,借鉴了 Kafka,已经成为 Apache 顶级项目。
官网:RocketMQ
3.RabbitMQ:RabbitMQ 是采用 Erlang 语言实现AMQP(Advanced Message Queuing Protocol,高级消息队列协议)的消息中间件,它最初起源于金融系统,用于在分布式系统中存储转发消息。
官网:RabbitMQ
4.ActiveMQ:目前已经被淘汰,不推荐使用,不建议学习。
2 RabbitMQ
基于AMQP协议,erlang语言开发,是部署最广泛的开源消息中间件,是最受欢迎的开源消息中间件之一。
2.1 安装
本文介绍安装在CentOS 7上,因为官网目前安装下载所需CentOS版本已到8.x,因此我们从GitHub上下载rpm包安装。
地址:RabbitMQ GitHub
我下载的版本:rabbitmq-server-3.10.0.rc.6-1.el7.noarch.rpm
之前我们说到RabbitMQ是erlang语言开发的,在安装前我们需要先安装erlang,从GitHub上下载rpm包进行安装
我下载的版本:erlang-23.3.4.8-1.el7.x86_64.rpm
地址:erlang GitHub
注意:el7代表CentOS 7,el8代表CentOS 8。
# cd 到安装包所在目录
yum -yinstall erlang-23.3.4.8-1.el7.x86_64.rpm
# 输入erl检查是否安装成功
erl
出现下面内容表示安装完成
之后就可以开始安装RabbitMQ了
# cd到安装包所在目录
yum -yinstall rabbitmq-server-3.10.0.rc.6-1.el7.noarch.rpm
安装Web管理工具
rabbitmq-plugins enable rabbitmq_management
在/etc/rabbitmq目录下新增rabbitmq.config文件
cd /etc/rabbitmq
vim rabbitmq.config
内容为
[{rabbit, [{loopback_users, []}]}].
注意:不要漏掉.
RabbitMQ管理命令
# 启动|停止|重启RabbitMQ服务
systemctl start|stop|restart rabbitmq-server.service
# 查看服务状态
systemctl status rabbitmq-server.service
访问Web管理界面
http://ip地址:15672
用户名: guest
密码: guest
注意:guest用户只是被容许从localhost访问。官网文档描述如下:
“guest” user can only connect via localhost
解决远程访问问题需要新建用户并授权,具体操作这里不再赘述。
3 SpringBoot集成并简单使用RabbitMQ
添加依赖
<!-- https://mvnrepository.com/artifact/org.springframework.boot/spring-boot-starter-amqp --><dependency><groupId>org.springframework.boot</groupId><artifactId>spring-boot-starter-amqp</artifactId><version>3.0.2</version></dependency>
添加配置
# 消息队列rabbitmq:host: ip地址
    port:5672username: guest
    password: guest
注意:username可以换为其他自定义用户
3.1 RabbitMQ支持的消息模型
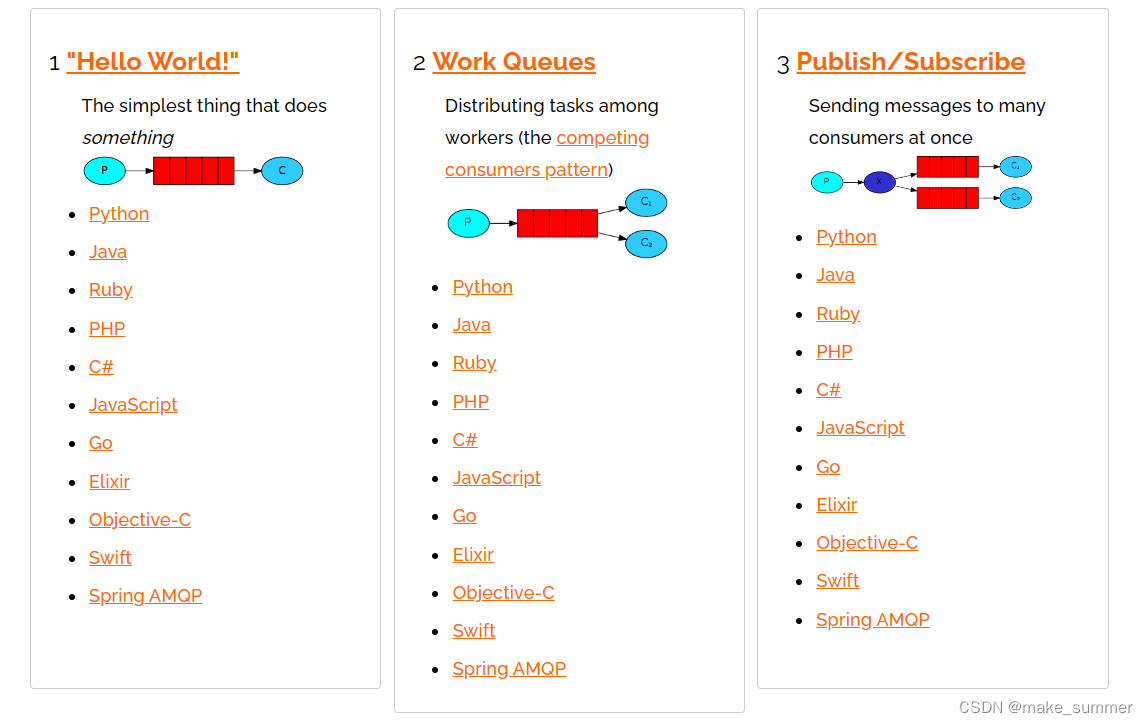
3.1.1 Hello World!

在上图的模型中,有以下概念:
P:生产者,也就是要发送消息的程序
C:消费者:消息的接受者,会一直等待消息到来
queue:消息队列,图中红色部分。类似一个邮箱,可以缓存消息;生产者向其中投递消息,消费者从其中取出消息
配置文件
@ConfigurationpublicclassRabbitConfig{@BeanpublicQueuehelloQueue(){returnnewQueue("helloQueue");}}
生产者
@ComponentpublicclassHelloSender{@ResourceprivateAmqpTemplate amqpTemplate;@ResourceprivateRabbitTemplate rabbitTemplate;publicvoidhelloSend(){String context ="hi i am a message";System.out.println("sender:"+ context);this.amqpTemplate.convertAndSend("helloQueue", context);}}
消费者
@ComponentpublicclassHelloReceiver{@RabbitHandler@RabbitListener(queues ="helloQueue")publicvoidprocess(String message){System.out.println("Receiver:"+ message);}}
测试
@SpringBootTest(classes =TestApplication.class)@RunWith(SpringRunner.class)publicclassTestRabbitMQ{@ResourceprivateHelloSender helloSender;@TestpublicvoidhelloSend(){
        helloSender.helloSend();}}
注意:不添加@RunWith(SpringRunner.class)注解可能导致NPE
结果:
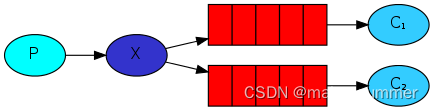
3.1.2 Work Queues
work 模型:让多个消费者绑定到一个队列,共同消费队列中的消息。队列中的消息一旦消费,就会消失,因此任务是不会被重复执行的。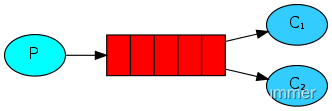
角色:
P:生产者:消息的发送者
C1:消费者-1,接收消息并处理
C2:消费者-2:接收消息并处理
配置文件
@ConfigurationpublicclassWorkQueueRabbitConfig{@BeanpublicQueueworkQueue(){returnnewQueue("workQueue");}}
生产者
@ComponentpublicclassWorkQueueSender{@ResourceprivateAmqpTemplate amqpTemplate;publicvoidworkQueueSend(){String context ="hi i am a message";System.out.println("sender:"+ context);this.amqpTemplate.convertAndSend("workQueue", context);}}
消费者
@ComponentpublicclassWorkQueueReceiver{@RabbitHandler@RabbitListener(queues ="workQueue")publicvoidprocess1(String message){System.out.println("receiver1:"+ message);}@RabbitHandler@RabbitListener(queues ="workQueue")publicvoidprocess2(String message){System.out.println("receiver2:"+ message);}}
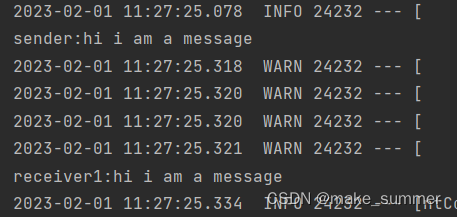
测试
@SpringBootTest(classes =TestApplication.class)@RunWith(SpringRunner.class)publicclassTestRabbitMQ{@ResourceprivateWorkQueueSender workQueueSender;@TestpublicvoidworkQueueSend(){
        workQueueSender.workQueueSend();}}
结果:
消息可被消费者1和消费者2轮询消费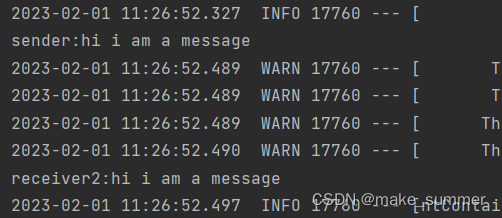
轮询消费的测试
生产者
@ComponentpublicclassWorkQueueSender{@ResourceprivateAmqpTemplate amqpTemplate;publicvoidworkQueueSend(){for(int i =1; i <=10; i++){String context ="hi i am a message"+ i;System.out.println("sender:"+ context);this.amqpTemplate.convertAndSend("workQueue", context);}}}
结果: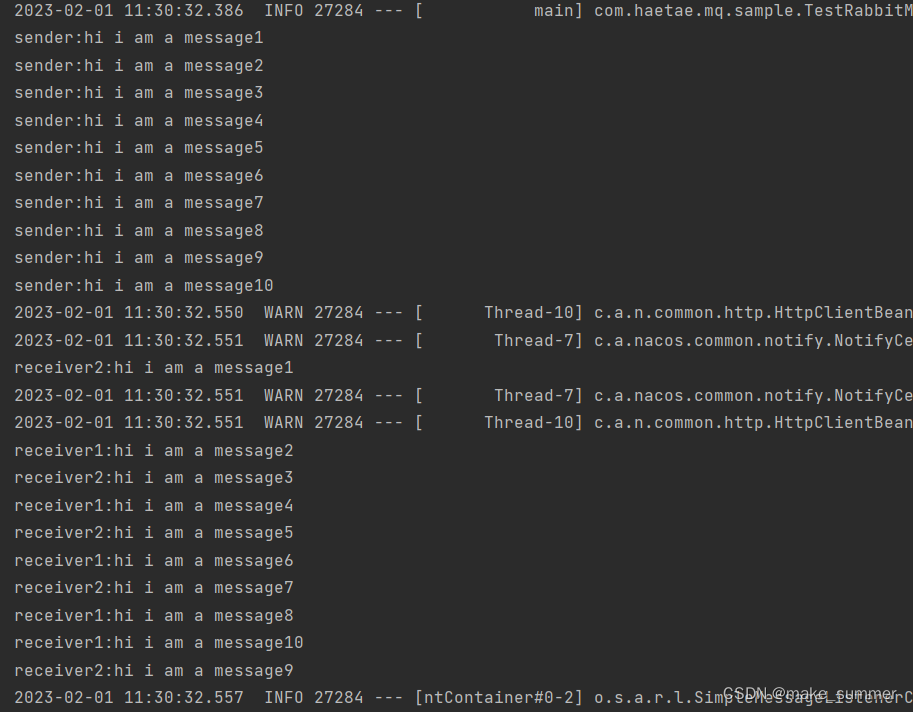
不管消费者的消费速度如何,消息都是轮询发送到各个消费者。
3.1.3 Publish/Subscribe
在此模式下,消息发送流程是这样的:
可以有多个消费者
每个消费者有自己的queue(队列)
每个队列都要绑定到Exchange(交换机)
生产者发送的消息,只能发送到交换机,交换机来决定要发给哪个队列,生产者无法决定。
交换机把消息发送给绑定过的所有队列
队列的消费者都能拿到消息。实现一条消息被多个消费者消费
配置文件
@ConfigurationpublicclassFanoutRabbitConfig{@BeanpublicQueuefanoutQueue1(){returnnewQueue("fanoutQueue1");}@BeanpublicQueuefanoutQueue2(){returnnewQueue("fanoutQueue2");}@BeanFanoutExchangefanoutExchange(){returnnewFanoutExchange("fanoutExchange");}@BeanBindingbindingQueue1(Queue fanoutQueue1,FanoutExchange fanoutExchange){returnBindingBuilder.bind(fanoutQueue1).to(fanoutExchange);}@BeanBindingbindingQueue2(Queue fanoutQueue2,FanoutExchange fanoutExchange){returnBindingBuilder.bind(fanoutQueue2).to(fanoutExchange);}}
生产者
@ComponentpublicclassFanoutSender{@ResourceprivateAmqpTemplate amqpTemplate;publicvoidfanoutSend(){String context ="hi i am a message";System.out.println("sender:"+ context);this.amqpTemplate.convertAndSend("fanoutExchange","", context);}}
消费者
@ComponentpublicclassFanoutReceiver{@RabbitHandler@RabbitListener(queues ="fanoutQueue1")publicvoidprocess1(String message){System.out.println("receiver1:"+ message);}@RabbitHandler@RabbitListener(queues ="fanoutQueue2")publicvoidprocess2(String message){System.out.println("receiver2:"+ message);}}
测试
@SpringBootTest(classes =TestApplication.class)@RunWith(SpringRunner.class)publicclassTestRabbitMQ{@ResourceprivateFanoutSender fanoutSender;@TestpublicvoidfanoutSend(){
        fanoutSender.fanoutSend();}}
结果: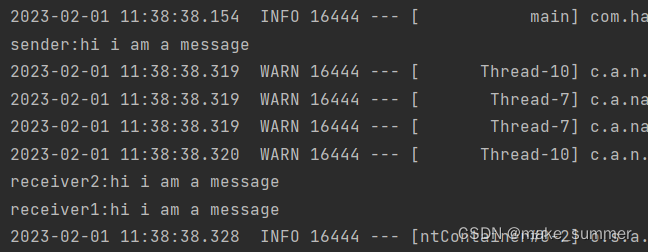
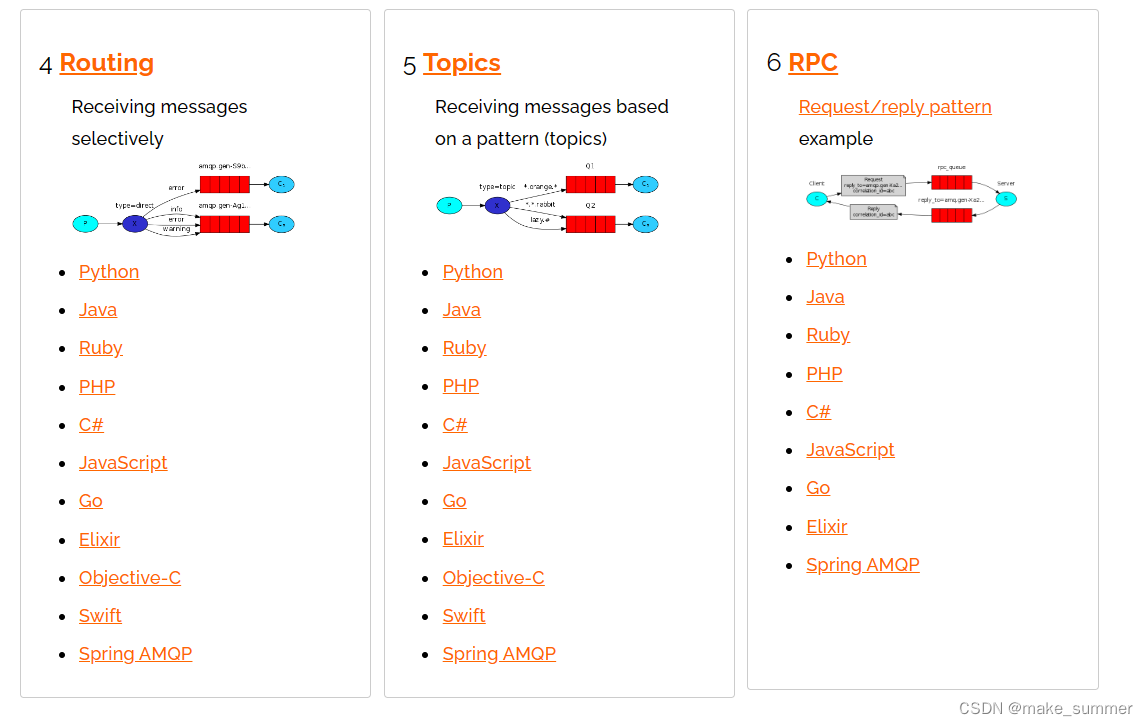
3.1.4 Routing
在Publish/Subscribe模式中,一条消息,会被所有订阅的队列都消费。但是,在某些场景下,我们希望不同的消息被不同的队列消费。这时就要用到Direct类型的Exchange。
在此模型下:
队列与交换机的绑定,不能是任意绑定了,而是要指定一个RoutingKey(路由key)
消息的发送方 向 Exchange发送消息时,也必须指定消息的 RoutingKey。
Exchange不再把消息交给每一个绑定的队列,而是根据消息的Routing Key进行判断,只有队列的Routingkey与消息的 Routing key完全一致,才会接收到消息。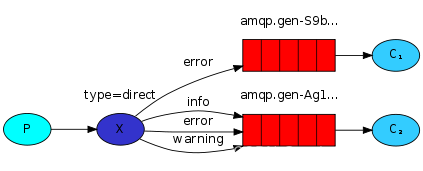
图解:
P:生产者,向Exchange发送消息,发送消息时,会指定一个routing key。
X:Exchange(交换机),接收生产者的消息,然后把消息递交给 与routing key完全匹配的队列
C1:消费者,其所在队列指定了需要routing key 为 error 的消息
C2:消费者,其所在队列指定了需要routing key 为 info、error、warning 的消息
配置文件
@ConfigurationpublicclassRoutingRabbitConfig{@BeanpublicQueueerrorQueue(){returnnewQueue("errorQueue");}@BeanpublicQueueinfoQueue(){returnnewQueue("infoQueue");}@BeanDirectExchangedirectExchange(){returnnewDirectExchange("routingExchange");}@BeanBindingbindingError(Queue errorQueue,DirectExchange directExchange){returnBindingBuilder.bind(errorQueue).to(directExchange).with("error");}@BeanBindingbindingInfo(Queue infoQueue,DirectExchange directExchange){returnBindingBuilder.bind(infoQueue).to(directExchange).with("info");}}
生产者
@ComponentpublicclassRoutingSender{@ResourceprivateAmqpTemplate amqpTemplate;publicvoidsend(){String context1 ="hi i am error message";System.out.println("context1:"+ context1);this.amqpTemplate.convertAndSend("routingExchange","error", context1);String context2 ="hi i am info message";System.out.println("context2:"+ context2);this.amqpTemplate.convertAndSend("routingExchange","info", context2);}}
消费者
@ComponentpublicclassRoutingReceiver{@RabbitHandler@RabbitListener(queues ="errorQueue")publicvoidprocess1(String message){System.out.println("receiver1:"+ message);}@RabbitHandler@RabbitListener(queues ="infoQueue")publicvoidprocess2(String message){System.out.println("receiver2:"+ message);}}
测试
@SpringBootTest(classes =TestApplication.class)@RunWith(SpringRunner.class)publicclassTestRabbitMQ{@ResourceprivateRoutingSender routingSender;@TestpublicvoidroutingSend(){
        routingSender.send();}}
结果: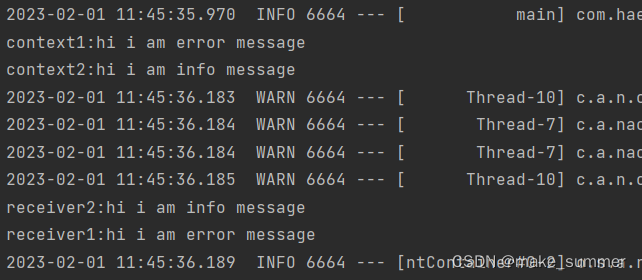
3.1.5 Topics
Topic类型的Exchange与Direct相比,都是可以根据RoutingKey把消息路由到不同的队列。只不过Topic类型Exchange可以让队列在绑定Routing key 的时候使用通配符!这种模型Routingkey 一般都是由一个或多个单词组成,多个单词之间以”.”分割,例如: item.insert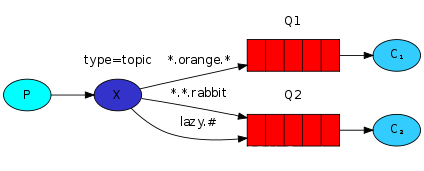
# 通配符
    * 匹配不多不少恰好一个词
    # 匹配一个或多个词# 如
    topic.* 匹配topic.message
    topic.# 匹配topic.message 或 topic.message.messages
配置文件
@ConfigurationpublicclassTopicRabbitConfig{finalstaticString message ="topic.message";finalstaticString messages ="topic.messages";@BeanpublicQueuequeueMessage(){returnnewQueue(TopicRabbitConfig.message);}@BeanpublicQueuequeueMessages(){returnnewQueue(TopicRabbitConfig.messages);}@BeanTopicExchangeexchange(){returnnewTopicExchange("topicExchange");}@BeanBindingbindingExchangeMessage(Queue queueMessage,TopicExchange exchange){returnBindingBuilder.bind(queueMessage).to(exchange).with("topic.message");}@BeanBindingbindingExchangeMessages(Queue queueMessages,TopicExchange exchange){returnBindingBuilder.bind(queueMessages).to(exchange).with("topic.#");}}
生产者
@ComponentpublicclassTopicSender{@ResourceprivateAmqpTemplate amqpTemplate;publicvoidsend1(){String context ="hi i am a message 1";System.out.println("sender1:"+ context);this.amqpTemplate.convertAndSend("topicExchange","topic.message", context);}publicvoidsend2(){String context ="hi i am a messages 2";System.out.println("sender2:"+ context);this.amqpTemplate.convertAndSend("topicExchange","topic.messages", context);}}
消费者
@ComponentpublicclassTopicReceiver{@RabbitHandler@RabbitListener(queues ="topic.message")publicvoidprocess1(String message){System.out.println("receiver1:"+ message);}@RabbitHandler@RabbitListener(queues ="topic.messages")publicvoidprocess2(String message){System.out.println("receiver2:"+ message);}}
测试
@SpringBootTest(classes =TestApplication.class)@RunWith(SpringRunner.class)publicclassTestRabbitMQ{@ResourceprivateRoutingSender routingSender;@TestpublicvoidtopicSend1(){
        topicSender.send1();}@TestpublicvoidtopicSend2(){
        topicSender.send2();}}
结果: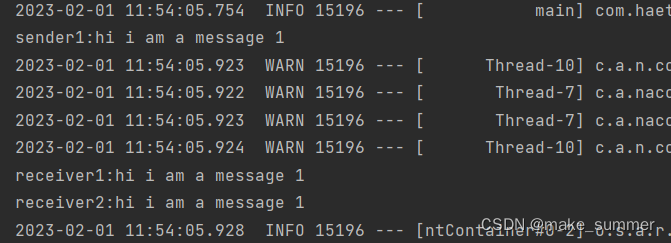
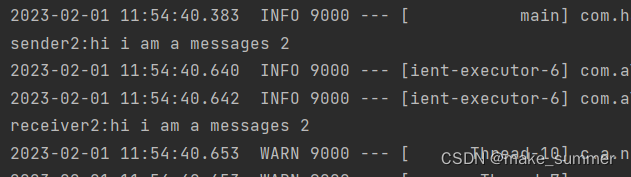
总结:topic.message只匹配topic.message,topic.#匹配topic.message和topic.messages。所以发送者1发送的消息俩个消费者都能接收到,但发送者2发送的消息只有消费者2能接收到。
4 RabbitMQ集群
此时,貂蝉还在骑马来的路上…
版权归原作者 make_summer 所有, 如有侵权,请联系我们删除。