
1.postman下载:Download Postman (getpostman.com)https://app.getpostman.com/app/download/win64

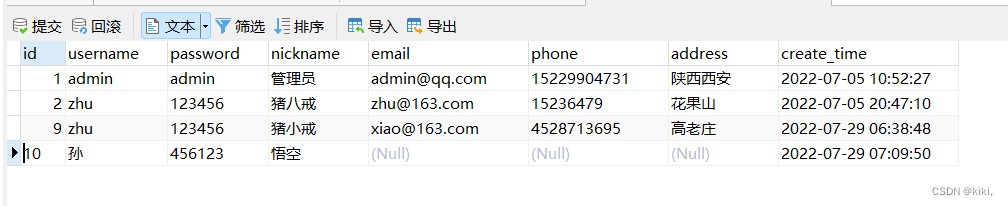
新增结果:
mybatis xml格式:
<?xml version="1.0" encoding="UTF-8" ?>
<!DOCTYPE mapper
        PUBLIC "-//mybatis.org//DTD Mapper 3.0//EN"
        "http://mybatis.org/dtd/mybatis-3-mapper.dtd">
增删改查接口 :
@RestController
@RequestMapping("/user")
public class UserController {
    @Autowired
    private UserMapper userMapper;

    @Autowired
    private UserService userService;

    //新增和修改
    @PostMapping
    public Integer save(@RequestBody User user){//@RequestBody 可以将前台传过来的json对象转换成java对象
        //新增或者更新
        return userService.save(user);
    }

    //查询所有数据
    @GetMapping
    public List<User> index(){
        List<User> all=userMapper.findAll();
        return all;
    }

    @DeleteMapping("/{id}")
    public Integer delete(@PathVariable Integer id){
        return userMapper.deleteById(id);
    }

}
2.分页查询
Parameter 'pageNum' not found. Available parameters are [pageSize, param1, param2]使用多个单参数没有使用@Param注解进行标注的方式进行传值时,就会出现参数xxx找不到的问题,如下加入@Param("pageNum")和@Param("pageSize")后就可以显示出数据了。
    @Select("select * from sys_user limit #{pageNum}, #{pageSize}")
    List<User> selectPage(@Param("pageNum") Integer pageNum, @Param("pageSize") Integer pageSize);
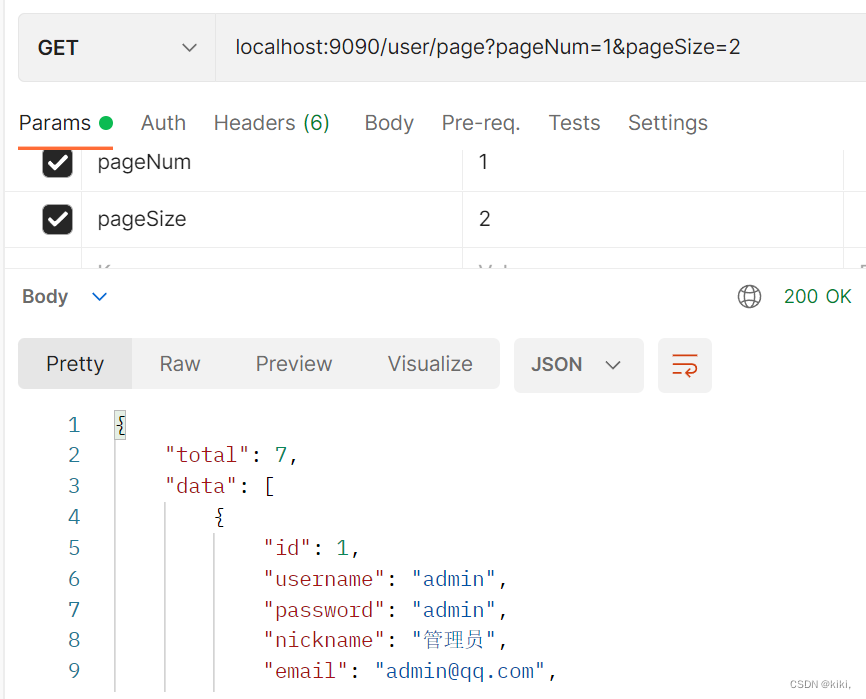
使用postman测试分页查询结果的实现:
前端跨域问题:
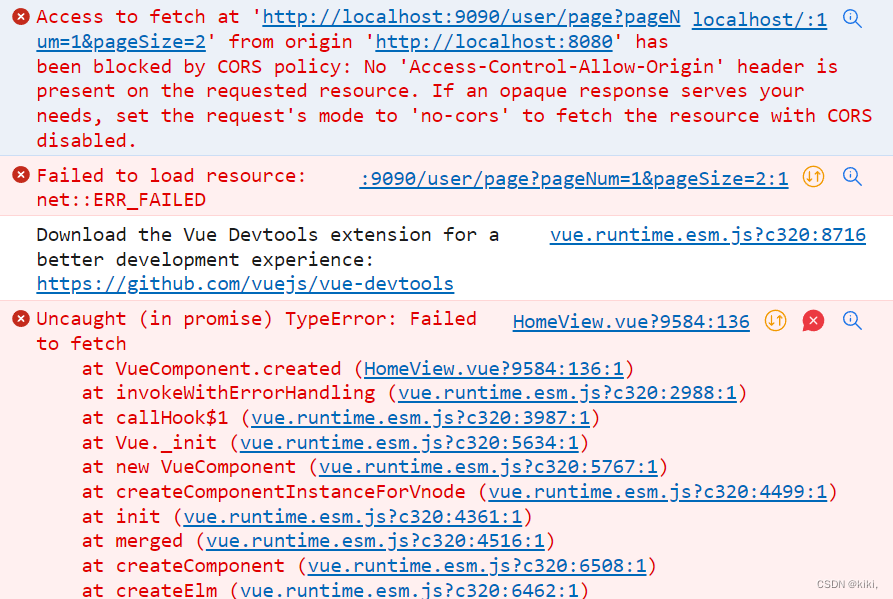
springboot跨域设置:
import org.springframework.context.annotation.Bean;
import org.springframework.context.annotation.Configuration;
import org.springframework.web.cors.CorsConfiguration;
import org.springframework.web.cors.UrlBasedCorsConfigurationSource;
import org.springframework.web.filter.CorsFilter;

@Configuration
public class CorsConfig {
    // 当前跨域请求最大有效时长。这里默认1天
    private static final long MAX_AGE = 24 * 60 * 60;
    @Bean
    public CorsFilter corsFilter() {
        UrlBasedCorsConfigurationSource source = new UrlBasedCorsConfigurationSource();
        CorsConfiguration corsConfiguration = new CorsConfiguration();
        // 1 设置访问源地址
        corsConfiguration.addAllowedOrigin("http://localhost:8080");
        // 2 设置访问源请求头
        corsConfiguration.addAllowedHeader("*");
        // 3 设置访问源请求方法
        corsConfiguration.addAllowedMethod("*");
        corsConfiguration.setMaxAge(MAX_AGE);
        // 4 对接口配置跨域设置
        source.registerCorsConfiguration("/**", corsConfiguration);
        return new CorsFilter(source);
    }
}
忽略某个不展示的字段:
密码上常加:@JsonIgnore,防止用户看到别人的password
绑定数据:
        <el-table :data="tableData" border stripe :header-cell-class-name="headerBg">
          <el-table-column prop="id" label="ID" width="80"></el-table-column>
          <el-table-column prop="username" label="用户名" width="140"></el-table-column>
          <el-table-column prop="nickname" label="昵称" width="120"></el-table-column>
          <el-table-column prop="email" label="邮箱"></el-table-column>
          <el-table-column prop="phone" label="电话"></el-table-column>
          <el-table-column prop="address" label="地址"></el-table-column>

          <el-table-column label="操作">
            <template slot-scope="scope">
              <el-button type="success">编辑<i class="el-icon-edit"></i></el-button>
              <el-button type="danger">删除<i class="el-icon-remove-outline"></i></el-button>
            </template>
          </el-table-column>
        </el-table>
        <div style="padding: 10px 0">
          <el-pagination
                  @size-change="handleSizeChange"
                  @current-change="handleCurrentChange"
                  :current-page="pageNum"
                  :page-sizes="[2, 5, 10, 20]"
                  :page-size="pageSize"
                  layout="total, sizes, prev, pager, next, jumper"
                  :total="total">
          </el-pagination>
        </div>
      </el-main>

    </el-container>
  </el-container>
</template>

<script>
export default {
  name: 'HomeView',
  data(){
    return {
      tableData: [],
      total:0,
      pageNum:1,
      pageSize:2,
      msg:"hello 小琪",
      collapseBtnClass:'el-icon-s-fold',
      isCollapse:false,
      sideWidth: 200,
      logoTextShow:true,
      headerBg: 'headerBg'
     }
  },
  created(){
    //请求分页查询数据
    this.load()
  },
  methods:{
    collapse(){  //点击收缩按钮触发
      this.isCollapse = !this.isCollapse
      if(this.isCollapse){ //收缩
        this.sideWidth = 64
        this.collapseBtnClass='el-icon-s-unfold'
        this.logoTextShow=false
      }else{    //展开
      this.sideWidth = 200
      this.collapseBtnClass='el-icon-s-fold'
      this.logoTextShow=true
      }
    },
    load(){
       fetch("http://localhost:9090/user/page?pageNum="+this.pageNum+"&pageSize="+this.pageSize)
      .then(res => res.json()).then(res =>{
      console.log(res)
      this.tableData = res.data
      this.total=res.total
    })
    },
    handleSizeChange(pageSize){
    console.log(pageSize)
    this.pageSize=pageSize
    this.load()
    },
    handleCurrentChange(pageNum){
    console.log(pageNum)
    this.pageNum=pageNum
    this.load()
    }
  }
}
</script>

加条件username查询:
前端绑定username:通过v-model方式绑定
<el-input style="width: 200px" placeholder="请输入名称" suffix-icon="el-icon-search" v-model="username"></el-input> 绑定第一个框
username:"", 默认是空字符串
fetch("http://localhost:9090/user/page?pageNum="+this.pageNum+"&pageSize="+this.pageSize+"&username="+this.username)拼上username参数
点击搜索触发一个函数:绑定load函数
<el-button class="ml-5" type="primary" @click="load">搜索</el-button>
//请求后台数据接口的函数
load(){
       fetch("http://localhost:9090/user/page?pageNum="+this.pageNum+"&pageSize="+this.pageSize+"&username="+this.username)
      .then(res => res.json()).then(res =>{
      console.log(res)
      this.tableData = res.data
      this.total=res.total
    })
多条件分页查询使用MyBatis-Plus
简介 | MyBatis-Plus (baomidou.com)
MyBatis-Plus依赖
<dependency>
            <groupId>com.baomidou</groupId>
            <artifactId>mybatis-plus-boot-starter</artifactId>
            <version>3.5.1</version>
        </dependency>
MybatisPlusConfig.java
package com.qiqi.demo.config;
import com.baomidou.mybatisplus.annotation.DbType;
import com.baomidou.mybatisplus.extension.plugins.MybatisPlusInterceptor;
import com.baomidou.mybatisplus.extension.plugins.inner.PaginationInnerInterceptor;
import org.mybatis.spring.annotation.MapperScan;
import org.springframework.context.annotation.Bean;
import org.springframework.context.annotation.Configuration;
@Configuration
@MapperScan("com.qiqi.demo.mapper")
public class MybatisPlusConfig {

    @Bean
    public MybatisPlusInterceptor mybatisPlusInterceptor(){
        MybatisPlusInterceptor interceptor=new MybatisPlusInterceptor();
        interceptor.addInnerInterceptor(new PaginationInnerInterceptor(DbType.MYSQL));
        return  interceptor;
    }
}
报错:** Table 'qi.user' doesn't exist**
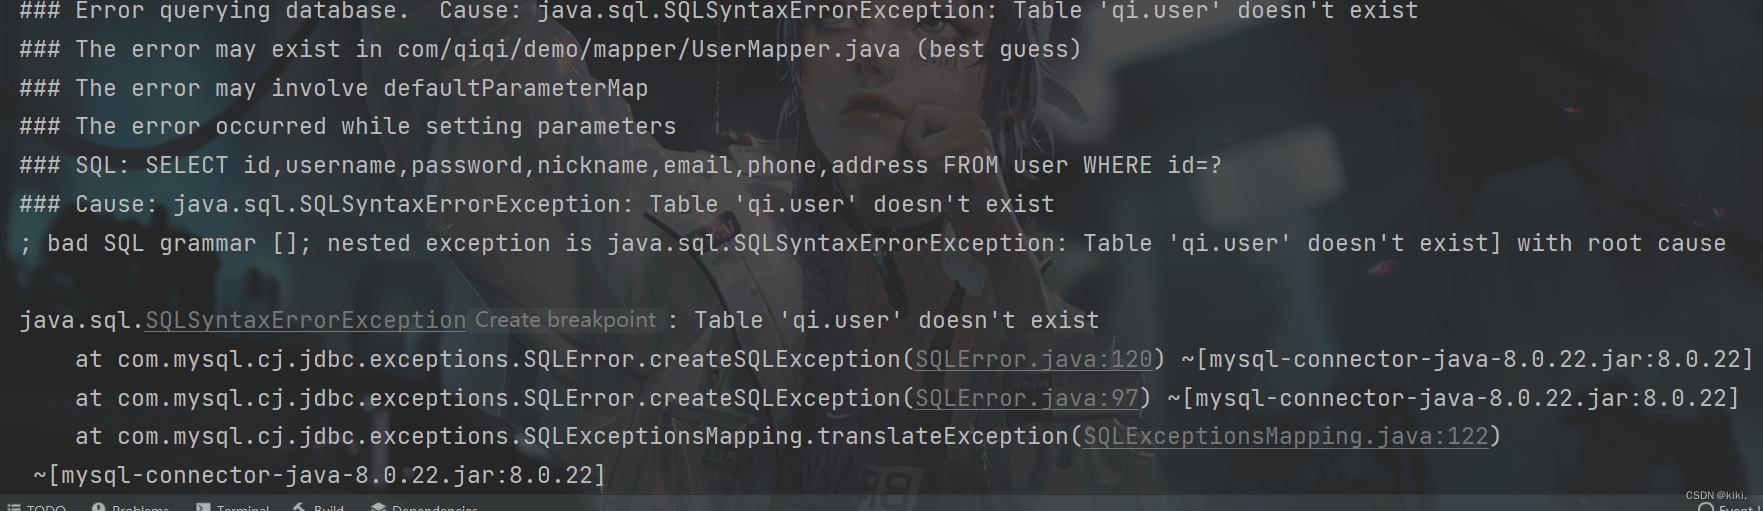
解决办法:
@Data
@TableName(value = "sys_user")
public class User {
    @TableId(value = "id")//指定数据库的字段名称
    private Integer i000d;
    private String username;
    @JsonIgnore
    private String password;
    private String nickname;
    private String email;
    private String phone;
    private String address;

}
集成swagger-ui地址:Swagger UI
SwaggerConfig.java
package com.qiqi.demo.config;
import org.springframework.context.annotation.Bean;
import org.springframework.context.annotation.Configuration;
import springfox.documentation.builders.ApiInfoBuilder;
import springfox.documentation.builders.PathSelectors;
import springfox.documentation.builders.RequestHandlerSelectors;
import springfox.documentation.oas.annotations.EnableOpenApi;
import springfox.documentation.service.ApiInfo;
import springfox.documentation.service.Contact;
import springfox.documentation.spi.DocumentationType;
import springfox.documentation.spring.web.plugins.Docket;

@Configuration
@EnableOpenApi
public class SwaggerConfig {
    /**
     * 创建API应用
     * apiInfo() 增加API相关信息
     * 通过select()函数返回一个ApiSelectorBuilder实例,用来控制哪些接口暴露给Swagger来展现,
     * 本例采用指定扫描的包路径来定义指定要建立API的目录。
     *
     * @return
     */
    @Bean
    public Docket restApi() {
        return new Docket(DocumentationType.SWAGGER_2)
                .groupName("标准接口")
                .apiInfo(apiInfo("Spring Boot中使用Swagger2构建RESTful APIs", "1.0"))
                .useDefaultResponseMessages(true)
                .forCodeGeneration(false)
                .select()
                .apis(RequestHandlerSelectors.basePackage("com.qiqi.demo.controller"))
                .paths(PathSelectors.any())
                .build();
    }
    /**
     * 创建该API的基本信息(这些基本信息会展现在文档页面中)
     * 访问地址:http://ip:port/swagger-ui.html
     *
     * @return
     */
    private ApiInfo apiInfo(String title, String version) {
        return new ApiInfoBuilder()
                .title(title)
                .description("更多请关注: https://blog.csdn.net/weixin_52340910")
                .termsOfServiceUrl("https://blog.csdn.net/weixin_52340910")
                .contact(new Contact("weixin_52340910", "https://blog.csdn.net/weixin_52340910", "[email protected]"))
                .version(version)
                .build();
    }
}
pom.xml:
        <!--swagger-->
        <dependency>
            <groupId>io.springfox</groupId>
            <artifactId>springfox-boot-starter</artifactId>
            <version>3.0.0</version>
        </dependency>
本文转载自: https://blog.csdn.net/weixin_52340910/article/details/126047524
版权归原作者 kiki, 所有, 如有侵权,请联系我们删除。
版权归原作者 kiki, 所有, 如有侵权,请联系我们删除。