
文章目录
前言
- v1.24.0 - v1.26.0 之前支持docker,但是需要额外安装cri-docker来充当垫片
- 截至作者更新目前v1.26.0暂时不支持docker方式,因此本次采用containerd
- 由于工作原因作者会同时使用Ubuntu和CentOS,因此本次将两个系统的K8S安装一起记录一下
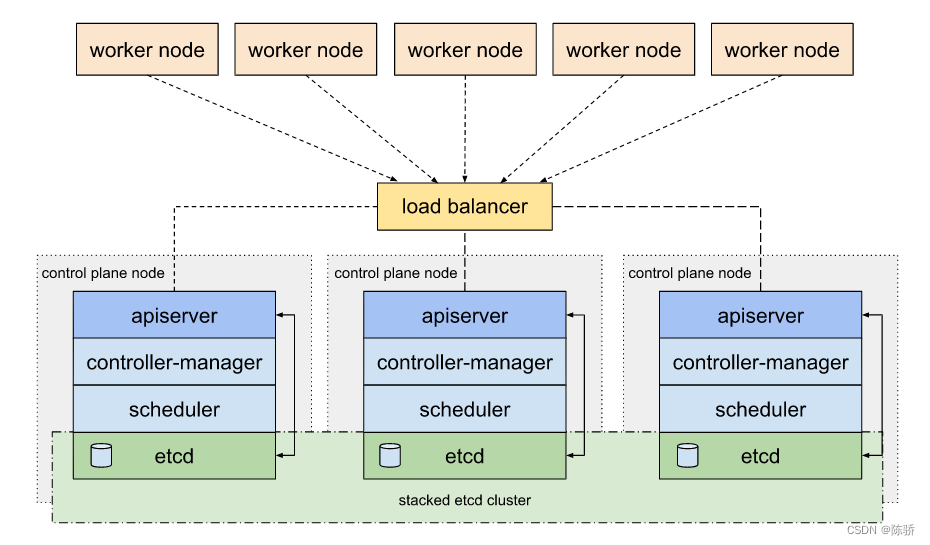
- 使用kubeadm部署3主2从高可用集群
- etcd采用二进制部署,复用3个管理节点
- 本次部署无vip,采用nginx做负载均衡理想拓扑图如下
准备工作
准备5台虚拟机
虚拟机建议同时使用相同操作系统并配置好正确的IP地址
初始化操作
大部分步骤只需要在管理节点1操作
记录一下规划的配置文件,避免后面写错
cat<<EOF> /opt/k8s_env.sh
#!/bin/bash

# k8s节点网段,方便做chronyd对时
NODEIPS=192.168.3.0/24
# k8s集群所有节点
HOSTS=(master1 master2 master3 node1 node2)
# k8s管理节点
MASTERS=(master1 master2 master3)
# k8s工作节点
WORKS=(master1 master2 master3 node1 node2)
# 每个节点对应的IP地址
master1=192.168.3.201
master2=192.168.3.202
master3=192.168.3.203
node1=192.168.3.204
node2=192.168.3.205

# 节点root密码,方便脚本自动免密
export SSHPASS=1

# 配置kubectl自动补全
#source <(kubeadm completion bash)
#source <(kubectl completion bash)
#source <(crictl completion bash)

# 服务网段(Service CIDR),部署前路由不可达,部署后集群内部使用IP:Port可达
SERVICE_CIDR="10.100.0.0/16"

# Pod 网段(Cluster CIDR),部署前路由不可达,部署后路由可达(flanneld 保证)
CLUSTER_CIDR="172.31.0.0/16"

# 服务端口范围(NodePort Range)
NODE_PORT_RANGE="30000-40000"

# etcd集群服务地址列表(默认复用3个master节点)
ETCD_ENDPOINTS="https://\$master1:2379,https://\$master2:2379,https://\$master3:2379"

# etcd集群服务地址列表(默认复用3个master节点)
ETCD_CLUSTERS="master1=https://\$master1:2380,master2=https://\$master2:2380,master3=https://\$master3:2380"
EOF
Centos
配置yum源
- 配置基础yum源为阿里源(后续安装基础软件包)
mkdir /opt/yum_bak &&mv /etc/yum.repos.d/* /opt/yum_bak/    # 备份原有的repocurl-o /etc/yum.repos.d/CentOS-Base.repo https://repo.huaweicloud.com/repository/conf/CentOS-7-reg.repo

yum -yinstall epel-release
sed-i"s/#baseurl/baseurl/g" /etc/yum.repos.d/epel.repo
sed-i"s/metalink/#metalink/g" /etc/yum.repos.d/epel.repo
sed-i"s@https\?://download.fedoraproject.org/pub@https://repo.huaweicloud.com@g" /etc/yum.repos.d/epel.repo
# curl -o /etc/yum.repos.d/CentOS-Base.repo https://mirrors.aliyun.com/repo/Centos-7.repo# curl -o /etc/yum.repos.d/epel.repo https://mirrors.aliyun.com/repo/epel-7.repo# 阿里貌似限速了,最近用阿里的源老慢了
- 添加启用源(后续更新内核)
yum install https://www.elrepo.org/elrepo-release-7.el7.elrepo.noarch.rpm -ysed-i"s@mirrorlist@#mirrorlist@g" /etc/yum.repos.d/elrepo.repo
sed-i"[email protected]/[email protected]/elrepo@g" /etc/yum.repos.d/elrepo.repo
- 添加docker源(用于安装containerd)
yum install-y yum-utils device-mapper-persistent-data lvm2

curl-o /etc/yum.repos.d/docker-ce.repo https://repo.huaweicloud.com/docker-ce/linux/centos/docker-ce.repo
# Step 3sed-i's+download.docker.com+repo.huaweicloud.com/docker-ce+' /etc/yum.repos.d/docker-ce.repo
- 添加k8s源(用于安装kubeadm、kubelet、kubectl)
cat<<EOF> /etc/yum.repos.d/kubernetes.repo
[kubernetes]
name=Kubernetes
baseurl=https://repo.huaweicloud.com/kubernetes/yum/repos/kubernetes-el7-$basearch
enabled=1
gpgcheck=10
repo_gpgcheck=0
gpgkey=https://repo.huaweicloud.com/kubernetes/yum/doc/yum-key.gpg https://repo.huaweicloud.com/kubernetes/yum/doc/rpm-package-key.gpg
EOF# 提示 若您使用的yum中变量 $basearch 无法解析, 请把第二步配置文件中的$basearch修改为相应系统架构(aarch64/armhfp/ppc64le/s390x/x86_64).
- 建立yum缓存
yum clean all && yum makecache fast
配置免密、修改hostname、关闭防火墙、selinux、关闭swap分区(方便后面进行其它操作)
- 修改hosts文件
source /opt/k8s_env.sh
forhostin${HOSTS[@]};doecho"$(evalecho"$"$host)$host">> /etc/hosts;done# 执行本命令之前记得先修改配置文件/opt/k8s_env.sh
- 修改hostname、关闭防火墙、selinux、关闭swap分区
source /opt/k8s_env.sh
yum -yinstall sshpass
ssh-keygen -t rsa -b2048-P""-f /root/.ssh/id_rsa -qforhostin${HOSTS[@]};do#sshpass -p 1  ssh-copy-id -o StrictHostKeyChecking=no $host
    sshpass -e  ssh-copy-id -oStrictHostKeyChecking=no $hostssh$host"hostnamectl set-hostname $host"ssh$host"systemctl disable --now firewalld"ssh$host"setenforce 0"ssh$host"sed -ri '/^SELINUX=/cSELINUX=disabled' /etc/selinux/config"ssh$host"sed -i 's@.*swap.*@#&@g' /etc/fstab"ssh$host"swapoff -a"scp /etc/hosts $host:/etc/hosts
done
下载软件包并批量安装
- 下载软件包至/opt/rpm_dir方便后续一起安装
yumdownloader --resolve--destdir /opt/rpm_dir wget psmisc vim net-tools nfs-utils telnet yum-utils device-mapper-persistent-data lvm2 gittarcurl ipvsadm ipset sysstat conntrack libseccomp chrony
# 常用基础软件包
yumdownloader --resolve--destdir /opt/rpm_dir kernel-ml --enablerepo=elrepo-kernel
# 新版本ml内核软件包
yumdownloader --resolve--destdir /opt/rpm_dir containerd.io  --disableexcludes=docker-ce
# containerd软件包
yumdownloader --resolve--destdir /opt/rpm_dir kubelet-1.26.0-0 kubectl-1.26.0-0 kubeadm-1.26.0-0 --disableexcludes=kubernetes
# 1.26.0的kubelet、kubectl、kubeadm软件包
- 所有节点都安装以上软件包
source /opt/k8s_env.sh
forhostin${HOSTS[@]};doscp /etc/yum.repos.d/*.repo $host:/etc/yum.repos.d/
    scp-r /opt/rpm_dir $host:/tmp/
    ssh$host"yum -y localinstall /tmp/rpm_dir/*"ssh$host"rm -rf /tmp/rpm_dir/"#ssh $host "echo 'export LC_ALL=en_US.UTF-8' >> ~/.bashrc"# 如果习惯中文可以将这句的注释去掉done
- 升级内核(节点会重启)
source /opt/k8s_env.sh
forhostin${HOSTS[@]};dossh$host"rpm -qa|grep kernel"#ssh $host  " awk -F\' '$1=="menuentry " {print $2}' /etc/grub2.cfg"echo$hostecho""ssh$host"grub2-set-default 0"doneforhostin${HOSTS[@]};doif[[$host==$(hostname)]];thencontinuefissh$hostrebootdone
init 6
配置时间同步
计划master1同步阿里ntp服务器,其余节点同步master1
cat> /etc/chrony.conf <<EOF
server ntp.aliyun.com iburst
driftfile /var/lib/chrony/drift
makestep 1.0 3
rtcsync
allow $NODEIPS
local stratum 10
keyfile /etc/chrony.keys
leapsectz right/UTC
logdir /var/log/chrony
EOFcat> /opt/chrony.conf <<EOF
server $master1 iburst
driftfile /var/lib/chrony/drift
makestep 1.0 3
rtcsync
local stratum 10
keyfile /etc/chrony.keys
leapsectz right/UTC
logdir /var/log/chrony
EOF
分发chrony配置文件
source /opt/k8s_env.sh
forhostin${HOSTS[@]};dossh$host"ln -sf /usr/share/zoneinfo/Asia/Shanghai /etc/localtime"if[[$host==$(hostname)]];thenssh$host"systemctl restart chronyd"continuefiscp /opt/chrony.conf  $host:/etc/chrony.conf
    ssh$host" systemctl restart chronyd"donesleep3forhostin${HOSTS[@]};dossh$host"timedatectl"ssh$host"chronyc sources -v"done
配置打开文件描述符
cat<<EOF> /etc/security/limits.conf
* soft nofile 655360
* hard nofile 131072
* soft nproc 655350
* hard nproc 655350
* seft memlock unlimited
* hard memlock unlimitedd
EOFsource /opt/k8s_env.sh
forhostin${HOSTS[@]};doscp /etc/security/limits.conf $host:/etc/security/limits.conf
done
添加ipvs模块和内核模块
- 添加ipvs模块
cat<<EOF> /etc/modules-load.d/ipvs.conf
ip_vs
ip_vs_lc
ip_vs_wlc
ip_vs_rr
ip_vs_wrr
ip_vs_lblc
ip_vs_lblcr
ip_vs_dh
ip_vs_sh
ip_vs_fo
ip_vs_nq
ip_vs_sed
ip_vs_ftp
ip_vs_sh
nf_conntrack #内核小于4.18,把这行改成nf_conntrack_ipv4
ip_tables
ip_set
xt_set
ipt_set
ipt_rpfilter
ipt_REJECT
ipip
overlay
br_netfilter
EOF
- 添加内核模块
cat<<EOF>  /etc/sysctl.d/k8s.conf
net.ipv4.ip_forward = 1
net.bridge.bridge-nf-call-iptables = 1
net.bridge.bridge-nf-call-ip6tables = 1
fs.may_detach_mounts = 1
vm.overcommit_memory=1
vm.panic_on_oom=0
fs.inotify.max_user_watches=89100
fs.file-max=52706963
fs.nr_open=52706963
net.netfilter.nf_conntrack_max=2310720
net.ipv4.tcp_keepalive_time = 600
net.ipv4.tcp_keepalive_probes = 3
net.ipv4.tcp_keepalive_intvl =15
net.ipv4.tcp_max_tw_buckets = 36000
net.ipv4.tcp_tw_reuse = 1
net.ipv4.tcp_max_orphans = 327680
net.ipv4.tcp_orphan_retries = 3
net.ipv4.tcp_syncookies = 1
net.ipv4.tcp_max_syn_backlog = 16384
net.ipv4.ip_conntrack_max = 65536
net.ipv4.tcp_max_syn_backlog = 16384
net.ipv4.tcp_timestamps = 0
net.core.somaxconn = 16384
vm.swappiness=0
EOF
- 进行配置文件分发
source /opt/k8s_env.sh

forhostin${WORKS[@]};doscp /etc/modules-load.d/ipvs.conf $host:/etc/modules-load.d/ipvs.conf
    scp /etc/sysctl.d/k8s.conf $host:/etc/sysctl.d/k8s.conf
    ssh$host"systemctl restart systemd-modules-load.service"ssh$host"sysctl --system"done
Ubuntu
配置apt源
- 基础apt源
mv /etc/apt/{sources.list,sources.list.bak}# 备份现有的apt源cat<<EOF> /etc/apt/sources.list
deb http://repo.huaweicloud.com/ubuntu focal main restricted
deb http://repo.huaweicloud.com/ubuntu focal-updates main restricted
deb http://repo.huaweicloud.com/ubuntu focal universe
deb http://repo.huaweicloud.com/ubuntu focal-updates universe
deb http://repo.huaweicloud.com/ubuntu focal multiverse
deb http://repo.huaweicloud.com/ubuntu focal-updates multiverse
deb http://repo.huaweicloud.com/ubuntu focal-backports main restricted universe multiverse
deb http://repo.huaweicloud.com/ubuntu focal-security main restricted
deb http://repo.huaweicloud.com/ubuntu focal-security universe
deb http://repo.huaweicloud.com/ubuntu focal-security multiverse
EOFsudoapt-get update
- 添加docker源(用于安装containerd)
curl-fsSL https://repo.huaweicloud.com/docker-ce/linux/ubuntu/gpg |sudo apt-key add -
sudo add-apt-repository "deb [arch=amd64] https://repo.huaweicloud.com/docker-ce/linux/ubuntu $(lsb_release -cs) stable"
- 添加k8s源(用于安装kubeadm、kubelet、kubectl)
cat<<EOF> /etc/apt/sources.list.d/kubernetes.list
deb https://repo.huaweicloud.com/kubernetes/apt/ kubernetes-xenial main
EOFcurl-s https://repo.huaweicloud.com/kubernetes/apt/doc/apt-key.gpg |sudo apt-key add -
配置免密、修改hostname、关闭防火墙、关闭swap分区(方便后面进行其它操作)
- 修改hosts文件
source /opt/k8s_env.sh
forhostin${HOSTS[@]};doecho"$(evalecho"$"$host)$host">> /etc/hosts;done# 执行本命令之前记得先修改配置文件/opt/k8s_env.sh
- 修改hostname、关闭防火墙、关闭swap分区
source /opt/k8s_env.sh
apt-yinstall sshpass
ssh-keygen -t rsa -b2048-P""-f /root/.ssh/id_rsa -qforhostin${HOSTS[@]};do#sshpass -p 1  ssh-copy-id -o StrictHostKeyChecking=no $host
    sshpass -e  ssh-copy-id -oStrictHostKeyChecking=no $hostssh$host"hostnamectl set-hostname $host"ssh$host"systemctl disable --now ufw"ssh$host"sed -i 's@.*swap.*@#&@g' /etc/fstab"ssh$host"swapoff -a"scp /etc/hosts $host:/etc/hosts
done
下载软件包并批量安装
- 本来想下载软件包然后一起dpkg安装的,但是总是少安装包,就还是直接安装了
source /opt/k8s_env.sh
forhostin${HOSTS[@]};dossh$host"apt -y install net-tools   ipvsadm ipset  conntrack  chrony "ssh$host"apt -y install kubelet=1.26.0-00 kubeadm=1.26.0-00 kubectl=1.26.0-00"ssh$host"apt -y install containerd.io"done
配置时间同步
计划master1同步阿里ntp服务器,其余节点同步master1
cat> /etc/chrony/chrony.conf <<EOF
server ntp.aliyun.com iburst
driftfile /var/lib/chrony/drift
makestep 1.0 3
rtcsync
allow $NODEIPS
local stratum 10
keyfile /etc/chrony/chrony.keys
leapsectz right/UTC
logdir /var/log/chrony
EOFcat> /opt/chrony.conf <<EOF
server $master1 iburst
driftfile /var/lib/chrony/drift
makestep 1.0 3
rtcsync
local stratum 10
keyfile /etc/chrony/chrony.keys
leapsectz right/UTC
logdir /var/log/chrony
EOF
分发chrony配置文件
source /opt/k8s_env.sh
forhostin${HOSTS[@]};dossh$host"ln -sf /usr/share/zoneinfo/Asia/Shanghai /etc/localtime"if[[$host==$(hostname)]];thenssh$host"systemctl restart chrony"continuefiscp /opt/chrony.conf  $host:/etc/chrony/chrony.conf
    ssh$host" systemctl restart chrony"donesleep3forhostin${HOSTS[@]};dossh$host"systemctl enable chrony"ssh$host"timedatectl"ssh$host"chronyc sources -v"done
配置打开文件描述符
cat<<EOF> /etc/security/limits.conf
* soft nofile 655360
* hard nofile 131072
* soft nproc 655350
* hard nproc 655350
* seft memlock unlimited
* hard memlock unlimitedd
EOFsource /opt/k8s_env.sh
forhostin${HOSTS[@]};doscp /etc/security/limits.conf $host:/etc/security/limits.conf
done
添加ipvs模块和内核模块
- 添加ipvs模块
cat<<EOF> /etc/modules-load.d/ipvs.conf
ip_vs
ip_vs_lc
ip_vs_wlc
ip_vs_rr
ip_vs_wrr
ip_vs_lblc
ip_vs_lblcr
ip_vs_dh
ip_vs_sh
ip_vs_fo
ip_vs_nq
ip_vs_sed
ip_vs_ftp
ip_vs_sh
nf_conntrack #内核小于4.18,把这行改成nf_conntrack_ipv4
ip_tables
ip_set
xt_set
ipt_set
ipt_rpfilter
ipt_REJECT
ipip
overlay
br_netfilter
EOF
- 添加内核模块
cat<<EOF>  /etc/sysctl.d/k8s.conf
net.ipv4.ip_forward = 1
net.bridge.bridge-nf-call-iptables = 1
net.bridge.bridge-nf-call-ip6tables = 1
fs.may_detach_mounts = 1
vm.overcommit_memory=1
vm.panic_on_oom=0
fs.inotify.max_user_watches=89100
fs.file-max=52706963
fs.nr_open=52706963
net.netfilter.nf_conntrack_max=2310720
net.ipv4.tcp_keepalive_time = 600
net.ipv4.tcp_keepalive_probes = 3
net.ipv4.tcp_keepalive_intvl =15
net.ipv4.tcp_max_tw_buckets = 36000
net.ipv4.tcp_tw_reuse = 1
net.ipv4.tcp_max_orphans = 327680
net.ipv4.tcp_orphan_retries = 3
net.ipv4.tcp_syncookies = 1
net.ipv4.tcp_max_syn_backlog = 16384
net.ipv4.ip_conntrack_max = 65536
net.ipv4.tcp_max_syn_backlog = 16384
net.ipv4.tcp_timestamps = 0
net.core.somaxconn = 16384
vm.swappiness=0
EOF
- 进行配置文件分发
source /opt/k8s_env.sh

forhostin${WORKS[@]};doscp /etc/modules-load.d/ipvs.conf $host:/etc/modules-load.d/ipvs.conf
    scp /etc/sysctl.d/k8s.conf $host:/etc/sysctl.d/k8s.conf
    ssh$host"systemctl restart systemd-modules-load.service"ssh$host"sysctl --system"done
编译一个nginx做负载均衡
如果不想编译的话也可以直接yum/apt安装nginx,但是需要额外安装模块
CentOS
yum -yinstall nginx
yum -yinstall nginx-all-modules.noarch
Ubuntu
apt-yinstall nginx
- 安装编译需要的软件CentOS
yum -yinstall gcc gcc-c++ //C语言环境
yum -yinstall pcre pcre-devel //正则
yum -yinstall zlib zlib-devel //lib包
yum -yinstall openssl openssl-devel make
Ubuntu
apt-getinstall gcc
apt-getinstall libpcre3 libpcre3-dev
apt-getinstall zlib1g zlib1g-dev
apt-getinstallmake
- 下载源码包
wget http://nginx.org/download/nginx-1.20.1.tar.gz
tar-xf nginx-1.20.1.tar.gz
cd nginx-1.20.1/
- 编译部署nginx
./configure --prefix=/opt --with-stream --without-http --without-http_uwsgi_module &&\make&&\makeinstall
- 编写nginx配置文件
cat> /opt/nginx.conf <<EOF
worker_processes auto;
events {
    worker_connections  1024;
}
stream {
    upstream backend {
        hash \$remote_addr consistent;
        server $master1:6443        max_fails=3 fail_timeout=30s;
        server $master2:6443        max_fails=3 fail_timeout=30s;
        server $master3:6443        max_fails=3 fail_timeout=30s;
    }
    server {
        listen *:8443;
        proxy_connect_timeout 1s;
        proxy_pass backend;
    }
}
EOF
- 编写nginx的service文件
cat> /opt/kube-nginx.service <<EOF
[Unit]
Description=kube-apiserver nginx proxy
After=network.target
After=network-online.target
Wants=network-online.target
[Service]
Type=forking
ExecStartPre=/usr/local/bin/nginx -c /etc/nginx/nginx.conf -p /etc/nginx -t
ExecStart=/usr/local/bin/nginx -c /etc/nginx/nginx.conf  -p /etc/nginx
ExecReload=/usr/local/bin/nginx -c /etc/nginx/nginx.conf  -p /etc/nginx -s reload
PrivateTmp=true
Restart=always
RestartSec=5
StartLimitInterval=0
LimitNOFILE=65536
[Install]
WantedBy=multi-user.target
EOF
- 分发文件并启动nginx
source /opt/k8s_env.sh
forhostin${HOSTS[@]};dossh$host"mkdir /etc/nginx/logs -p"scp /opt/sbin/nginx $host:/usr/local/bin/
    scp /opt/nginx.conf $host:/etc/nginx/nginx.conf
    scp /opt/kube-nginx.service $host:/etc/systemd/system/
    ssh$host"systemctl daemon-reload "ssh$host"systemctl enable kube-nginx"ssh$host"systemctl restart kube-nginx"done
二进制安装etcd
- 下载二进制包
wget https://ghproxy.com/https://github.com/etcd-io/etcd/releases/download/v3.4.23/etcd-v3.4.23-linux-amd64.tar.gz
tar-xf  etcd-v3.4.23-linux-amd64.tar.gz
- 准备etcd的service文件
cat<<EOF> etcd.service
[Unit]
Description=Etcd Server
After=network.target
After=network-online.target
Wants=network-online.target
Documentation=https://github.com/coreos

[Service]
Type=notify
WorkingDirectory=/var/lib/etcd/
ExecStart=/usr/local/bin/etcd \\
 --name=##NODE_NAME## \\
 --cert-file=/etc/etcd/ssl/etcd.pem \\
 --key-file=/etc/etcd/ssl/etcd-key.pem \\
 --peer-cert-file=/etc/etcd/ssl/etcd.pem \\
 --peer-key-file=/etc/etcd/ssl/etcd-key.pem \\
 --trusted-ca-file=/etc/etcd/ssl/ca.pem \\
 --peer-trusted-ca-file=/etc/etcd/ssl/ca.pem \\
 --initial-advertise-peer-urls=https://##NODE_IP##:2380 \\
 --listen-peer-urls=https://##NODE_IP##:2380 \\
 --listen-client-urls=https://##NODE_IP##:2379,http://127.0.0.1:2379 \\
 --advertise-client-urls=https://##NODE_IP##:2379 \\
 --initial-cluster-token=etcd-cluster \\
 --initial-cluster=##ETCD_CLUSTERS## \\
 --initial-cluster-state=new \\
 --data-dir=/var/lib/etcd
Restart=on-failure
RestartSec=5
LimitNOFILE=65536

[Install]
WantedBy=multi-user.target
EOF
准备etcd所需证书
- 下载cfssl工具制作证书
wget https://pkg.cfssl.org/R1.2/cfssl_linux-amd64    &&mv cfssl_linux-amd64 /usr/local/bin/cfssl
wget https://pkg.cfssl.org/R1.2/cfssljson_linux-amd64 &&mv cfssljson_linux-amd64 /usr/local/bin/cfssljson
wget https://pkg.cfssl.org/R1.2/cfssl-certinfo_linux-amd64 &&mv cfssl-certinfo_linux-amd64 /usr/local/bin/cfsslinfo
- 创建根证书配置
mkdir pki
cd!$
cat> ca-config.json <<EOF
{
 "signing": {
   "default": {
     "expiry": "87600h"
   },
   "profiles": {
     "etcd": {
       "usages": [
           "signing",
           "key encipherment",
           "server auth",
           "client auth"
       ],
       "expiry": "876000h"
     }
   }
 }
}
EOF
- 创建ca证书请求文件
cat> ca-csr.json <<EOF
{
  "CN": "etcd",
  "key": {
    "algo": "rsa",
    "size": 2048
  },
  "names": [
    {
      "C": "CN",
      "ST": "HuBei",
      "L": "WuHan",
      "O": "etcd",
      "OU": "etcd"
    }
  ],
  "ca": {
    "expiry": "876000h"
 }
}
EOF
- 创建etcd证书请求文件
cat<<EOF> etcd-csr.json
{
  "CN": "etcd",
  "hosts": [
    "127.0.0.1",
    "$master1",
    "$master2",
    "$master3"
  ],
  "key": {
    "algo": "rsa",
    "size": 2048
  },
  "names": [
    {
      "C": "CN",
      "ST": "HuBei",
      "L": "WuHan",
      "O": "etcd",
      "OU": "etcd"
    }
  ]
}
EOF
- 初始化ca证书,利用生成的根证书生成etcd证书文件
cfssl gencert -initca ca-csr.json | cfssljson -bare ca
cfssl gencert -ca=ca.pem -ca-key=ca-key.pem -config=ca-config.json -profile=etcd etcd-csr.json |cfssljson -bare etcd
分发证书、二进制文件及service文件
source /opt/k8s_env.sh

forhostin${MASTERS[@]};dossh$host"mkdir /etc/etcd/ssl/ -p"ssh$host"mkdir /var/lib/etcd"scp /opt/pki/etcd* $host:/etc/etcd/ssl/
   scp /opt/pki/ca*  $host:/etc/etcd/ssl/
doneforhostin${MASTERS[@]};doIP=$(evalecho"$"$host)sed-e"s@##NODE_NAME##@$host@g"-e"s@##NODE_IP##@$IP@g"-e"s@##ETCD_CLUSTERS##@$ETCD_CLUSTERS@g" etcd.service > etcd.service.$hostscp etcd.service.$host$host:/etc/systemd/system/etcd.service
   scp /opt/etcd-v3.4.23-linux-amd64/etcd* $host:/usr/local/bin/
   ssh$host"systemctl daemon-reload"ssh$host"systemctl enable etcd"ssh$host"systemctl restart etcd"done
检查etcd是否正常
ETCDCTL_API=3 etcdctl --endpoints=$ETCD_ENDPOINTS--cacert=/etc/etcd/ssl/ca.pem --cert=/etc/etcd/ssl/etcd.pem --key=/etc/etcd/ssl/etcd-key.pem endpoint status --write-out=table
+---------------------------+------------------+---------+---------+-----------+------------+-----------+------------+--------------------+--------+
|         ENDPOINT          |        ID        | VERSION | DB SIZE | IS LEADER | IS LEARNER | RAFT TERM| RAFT INDEX | RAFT APPLIED INDEX | ERRORS |
+---------------------------+------------------+---------+---------+-----------+------------+-----------+------------+--------------------+--------+
| https://10.10.21.232:2379 | 60e9bfc3d268a8a9 |3.4.23 |20 kB |true|false|12|27|27||| https://10.10.21.233:2379 | c3f9a83d12a6d10d |3.4.23 |20 kB |false|false|12|27|27||| https://10.10.21.234:2379 | 1d0903088fe311d1 |3.4.23 |20 kB |false|false|12|27|27||
+---------------------------+------------------+---------+---------+-----------+------------+-----------+------------+--------------------+--------+
配置containerd
下载crictl二进制文件
wget https://ghproxy.com/https://github.com/kubernetes-sigs/cri-tools/releases/download/v1.26.0/crictl-v1.26.0-linux-amd64.tar.gz
tar-xf crictl-v1.26.0-linux-amd64.tar.gz

cat> /etc/crictl.yaml <<EOF
runtime-endpoint: "unix:///run/containerd/containerd.sock"
image-endpoint: "unix:///run/containerd/containerd.sock"
timeout: 10 #超时时间不宜过短,我这里修改成10秒了
debug: false
pull-image-on-create: false
disable-pull-on-run: false
EOF
分发配置文件及crictl二进制文件
forhostin${WORKS[@]};dossh$host"containerd config default | tee /etc/containerd/config.toml"ssh$host'sed -i "s@systemd_cgroup\ \=\ false@systemd_cgroup\ \=\ true@g" /etc/containerd/config.toml'ssh$host'sed -i "[email protected]@registry.aliyuncs.com/google_containers@g" /etc/containerd/config.toml'ssh$host'sed -i "s@runtime_type.*@runtime_type\ \=\ \"io.containerd.runtime.v1.linux\"@g" /etc/containerd/config.toml'scp crictl $host:/usr/local/bin/crictl
  scp /etc/crictl.yaml $host:/etc/crictl.yaml
  ssh$host"systemctl daemon-reload"ssh$host"systemctl enable  containerd"ssh$host"systemctl restart containerd"done
kubeadm初始化集群
编写init文件
cat <<EOF > kubeadm_init.yaml
apiVersion: kubeadm.k8s.io/v1beta3
bootstrapTokens:-groups:- system:bootstrappers:kubeadm:default-node-token
  token: abcdef.0123456789abcdef
  ttl: 24h0m0s
  usages:- signing
  - authentication
kind: InitConfiguration
localAPIEndpoint:advertiseAddress:##master1##bindPort:6443nodeRegistration:criSocket: unix:///var/run/containerd/containerd.sock
  imagePullPolicy: IfNotPresent
  name: $(hostname)
  taints:null---apiServer:timeoutForControlPlane: 4m0s
apiVersion: kubeadm.k8s.io/v1beta3
certificatesDir: /etc/kubernetes/pki
clusterName: kubernetes
controllerManager:{}dns:{}etcd:external:#这里默认是local,由于我们用的外部etcd,所以需要修改endpoints:- https://$master1:2379- https://$master2:2379- https://$master3:2379#搭建etcd集群时生成的ca证书caFile: /etc/etcd/ssl/ca.pem
    #搭建etcd集群时生成的客户端证书certFile: /etc/etcd/ssl/etcd.pem
    #搭建etcd集群时生成的客户端密钥keyFile: /etc/etcd/ssl/etcd-key.pem

imageRepository: registry.aliyuncs.com/google_containers
kind: ClusterConfiguration
kubernetesVersion: 1.26.0
controlPlaneEndpoint: 127.0.0.1:8443# 负载均衡的IP+Portnetworking:dnsDomain: cluster.local
  serviceSubnet:##SERVICE_CIDR##podSubnet:##CLUSTER_CIDR##scheduler:{}---apiVersion: kubeproxy.config.k8s.io/v1alpha1
kind: KubeProxyConfiguration
mode: ipvs #kube-proxy模式---apiVersion: kubelet.config.k8s.io/v1beta1
authentication:anonymous:enabled:falsewebhook:cacheTTL: 0s
    enabled:truex509:clientCAFile: /etc/kubernetes/pki/ca.crt
authorization:mode: Webhook
  webhook:cacheAuthorizedTTL: 0s
    cacheUnauthorizedTTL: 0s
cgroupDriver: systemd
clusterDNS:-##CLUSTER_KUBERNETES_SVC_IP##clusterDomain: cluster.local
cpuManagerReconcilePeriod: 0s
evictionPressureTransitionPeriod: 0s
fileCheckFrequency: 0s
healthzBindAddress: 127.0.0.1
healthzPort:10248httpCheckFrequency: 0s
imageMinimumGCAge: 0s
kind: KubeletConfiguration
logging:flushFrequency:0options:json:infoBufferSize:"0"verbosity:0memorySwap:{}nodeStatusReportFrequency: 0s
nodeStatusUpdateFrequency: 0s
resolvConf: /run/systemd/resolve/resolv.conf
rotateCertificates:trueruntimeRequestTimeout: 0s
shutdownGracePeriod: 0s
shutdownGracePeriodCriticalPods: 0s
staticPodPath: /etc/kubernetes/manifests
streamingConnectionIdleTimeout: 0s
syncFrequency: 0s
volumeStatsAggPeriod: 0s
EOF
开始初始化
sed-i"s@##master1##@$master1@g" kubeadm_init.yaml
sed-i"s@##SERVICE_CIDR##@$SERVICE_CIDR@g" kubeadm_init.yaml
sed-i"s@##CLUSTER_CIDR##@$CLUSTER_CIDR@g" kubeadm_init.yaml
sed-i"s@##CLUSTER_KUBERNETES_SVC_IP##@$CLUSTER_KUBERNETES_SVC_IP@g" kubeadm_init.yaml
kubeadm init --config=kubeadm_init.yaml
配置kubeconfig
mkdir-p$HOME/.kube
 sudocp-i /etc/kubernetes/admin.conf $HOME/.kube/config
 sudochown$(id-u):$(id-g)$HOME/.kube/config
安装网络插件
cat <<EOF >> flannel.yaml
---kind: Namespace
apiVersion: v1
metadata:name: kube-flannel
  labels:pod-security.kubernetes.io/enforce: privileged
---kind: ClusterRole
apiVersion: rbac.authorization.k8s.io/v1
metadata:name: flannel
rules:-apiGroups:-""resources:- pods
  verbs:- get
-apiGroups:-""resources:- nodes
  verbs:- list
  - watch
-apiGroups:-""resources:- nodes/status
  verbs:- patch
---kind: ClusterRoleBinding
apiVersion: rbac.authorization.k8s.io/v1
metadata:name: flannel
roleRef:apiGroup: rbac.authorization.k8s.io
  kind: ClusterRole
  name: flannel
subjects:-kind: ServiceAccount
  name: flannel
  namespace: kube-flannel
---apiVersion: v1
kind: ServiceAccount
metadata:name: flannel
  namespace: kube-flannel
---kind: ConfigMap
apiVersion: v1
metadata:name: kube-flannel-cfg
  namespace: kube-flannel
  labels:tier: node
    app: flannel
data:cni-conf.json:|
    {
      "name": "cbr0",
      "cniVersion": "0.3.1",
      "plugins": [
        {
          "type": "flannel",
          "delegate": {
            "hairpinMode": true,
            "isDefaultGateway": true
          }
        },
        {
          "type": "portmap",
          "capabilities": {
            "portMappings": true
          }
        }
      ]
    }net-conf.json:|
    {
      "Network": "$CLUSTER_CIDR",
      "Backend": {
        "Type": "vxlan"
      }
    }#POD对应的CIDR---apiVersion: apps/v1
kind: DaemonSet
metadata:name: kube-flannel-ds
  namespace: kube-flannel
  labels:tier: node
    app: flannel
spec:selector:matchLabels:app: flannel
  template:metadata:labels:tier: node
        app: flannel
    spec:affinity:nodeAffinity:requiredDuringSchedulingIgnoredDuringExecution:nodeSelectorTerms:-matchExpressions:-key: kubernetes.io/os
                operator: In
                values:- linux
      hostNetwork:truepriorityClassName: system-node-critical
      tolerations:-operator: Exists
        effect: NoSchedule
      serviceAccountName: flannel
      initContainers:-name: install-cni-plugin
       #image: flannelcni/flannel-cni-plugin:v1.1.0 for ppc64le and mips64le (dockerhub limitations may apply)image: docker.io/rancher/mirrored-flannelcni-flannel-cni-plugin:v1.1.0
        command:- cp
        args:--f
        - /flannel
        - /opt/cni/bin/flannel
        volumeMounts:-name: cni-plugin
          mountPath: /opt/cni/bin
      -name: install-cni
       #image: flannelcni/flannel:v0.19.2 for ppc64le and mips64le (dockerhub limitations may apply)image: docker.io/rancher/mirrored-flannelcni-flannel:v0.19.2
        command:- cp
        args:--f
        - /etc/kube-flannel/cni-conf.json
        - /etc/cni/net.d/10-flannel.conflist
        volumeMounts:-name: cni
          mountPath: /etc/cni/net.d
        -name: flannel-cfg
          mountPath: /etc/kube-flannel/
      containers:-name: kube-flannel
       #image: flannelcni/flannel:v0.19.2 for ppc64le and mips64le (dockerhub limitations may apply)image: docker.io/rancher/mirrored-flannelcni-flannel:v0.19.2
        command:- /opt/bin/flanneld
        args:---ip-masq
        ---kube-subnet-mgr
        resources:requests:cpu:"100m"memory:"50Mi"limits:cpu:"100m"memory:"50Mi"securityContext:privileged:falsecapabilities:add:["NET_ADMIN","NET_RAW"]env:-name: POD_NAME
          valueFrom:fieldRef:fieldPath: metadata.name
        -name: POD_NAMESPACE
          valueFrom:fieldRef:fieldPath: metadata.namespace
        -name: EVENT_QUEUE_DEPTH
          value:"5000"volumeMounts:-name: run
          mountPath: /run/flannel
        -name: flannel-cfg
          mountPath: /etc/kube-flannel/
        -name: xtables-lock
          mountPath: /run/xtables.lock
      volumes:-name: run
        hostPath:path: /run/flannel
      -name: cni-plugin
        hostPath:path: /opt/cni/bin
      -name: cni
        hostPath:path: /etc/cni/net.d
      -name: flannel-cfg
        configMap:name: kube-flannel-cfg
      -name: xtables-lock
        hostPath:path: /run/xtables.lock
          type: FileOrCreate
EOF
kubectl apply -f flannel.yaml
检查是否成功
kubectl get pod -n kube-flannel
NAME                    READY   STATUS    RESTARTS   AGE
kube-flannel-ds-bhtq4   1/1     Running   0          5m26s
kubectl get node
NAME   STATUS   ROLES           AGE   VERSION
node   Ready    control-plane   56m   v1.26.0
添加节点
添加Worker节点
生成token
kubeadm token create --print-join-command
按提示到其他工作节点进行输入
forhostin node1 node2;dossh$host"kubeadm join 127.0.0.1:8443 --token phyh1z.9nbkxuc2rjwl6lhl --discovery-token-ca-cert-hash sha256:93b8abf312eb1ecec18a3c0317a18bf494b45aafba5f368f2a67489ea4360b7e ";done
检查是否成功
kubectl get node
NAME    STATUS   ROLES           AGE    VERSION
master1 Ready    control-plane   1h     v1.26.0
node1   Ready    <none>          41s    v1.26.0
node2   Ready    <none>          119s   v1.26.0
添加控制节点
更新证书
kubeadm init phase upload-certs --upload-certs --config kubeadm_init.yaml
W1228 23:56:43.166317   98389 utils.go:69] The recommended value for"clusterDNS"in"KubeletConfiguration" is: [192.168.0.10]; the provided value is: [192.168.0.1][upload-certs] Storing the certificates in Secret "kubeadm-certs"in the "kube-system" Namespace
[upload-certs] Using certificate key:
e55be7a28936f39f26327678a274209049fba18f3d1f4b010570fb439168a844
将之前生成的token和这次生成的key拼接起来即可
forhostin master2 master3;dossh$host"kubeadm join 127.0.0.1:8443 --token phyh1z.9nbkxuc2rjwl6lhl --discovery-token-ca-cert-hash sha256:93b8abf312eb1ecec18a3c0317a18bf494b45aafba5f368f2a67489ea4360b7e --control-plane --certificate-key e55be7a28936f39f26327678a274209049fba18f3d1f4b010570fb439168a844";done
检查是否成功
kubectl get node
NAME      STATUS   ROLES           AGE     VERSION
master2   Ready    control-plane   6m39s   v1.26.0
master3   Ready    control-plane   4m55s   v1.26.0
master1   Ready    control-plane   1h      v1.26.0
node1     Ready    <none>          16m     v1.26.0
node2     Ready    <none>          17m     v1.26.0
修改配置文件
- 管理节点修改两个文件,工作节点只需要修改kubelet.conf
cd /etc/kubernetes
# 修改/etc/kubernetes/admin.conf,/etc/kubernetes/kubelet.conf文件中的server ip改成127.0.0.1vi /etc/kubernetes/admin.conf
vi /etc/kubernetes/kubelet.conf

# 覆盖配置cp /etc/kubernetes/admin.conf ~/.kube/config
- 重启kubelet
source /opt/k8s_env.sh
forhostin${HOSTS[@]};dossh$i systemctl restart kubelet
    ssh$i systemctl is-active kubelet
done
删除旧的证书,生成新证书
cd /etc/kubernetes/pki

# 先备份mv apiserver.key apiserver.key.bak
mv apiserver.crt apiserver.crt.bak

# 使用如下命令生成,分别在三个master节点上执行
kubeadm init phase certs apiserver --apiserver-advertise-address 当前节点IP --apiserver-cert-extra-sans "127.0.0.1,192.168.0.1"

kubeadm init phase certs apiserver --apiserver-advertise-address 当前节点IP --apiserver-cert-extra-sans "127.0.0.1,192.168.0.1"

kubeadm init phase certs apiserver --apiserver-advertise-address 当前节点IP --apiserver-cert-extra-sans "127.0.0.1,192.168.0.1"#  --apiserver-cert-extra-sans "127.0.0.1":设置了这个,之后加入节点验证证书阶段就不会报错了。
本文转载自: https://blog.csdn.net/weixin_67405599/article/details/128466282
版权归原作者 陈骄 所有, 如有侵权,请联系我们删除。
版权归原作者 陈骄 所有, 如有侵权,请联系我们删除。