
目录
🌟前言
哈喽小伙伴们,上一期给大家总结了一些常见的Vue实战中的经常用到的Vue小魔法,私下也收到了好多小伙伴的补充;小伙伴们实在是太强啦,和大家一起共同学习进步真的很开心。今天博主使用Vue3,结合ElementPlus和Canvas实现一个建议的画板,支持将绘画作品导出为图片哦;一起来看下吧。
🌟粉丝先看
博主实在没有绘画细胞大家别笑
🌟创建Vue3项目
1.使用vite构建一个vue3项目
npm create vite@latest
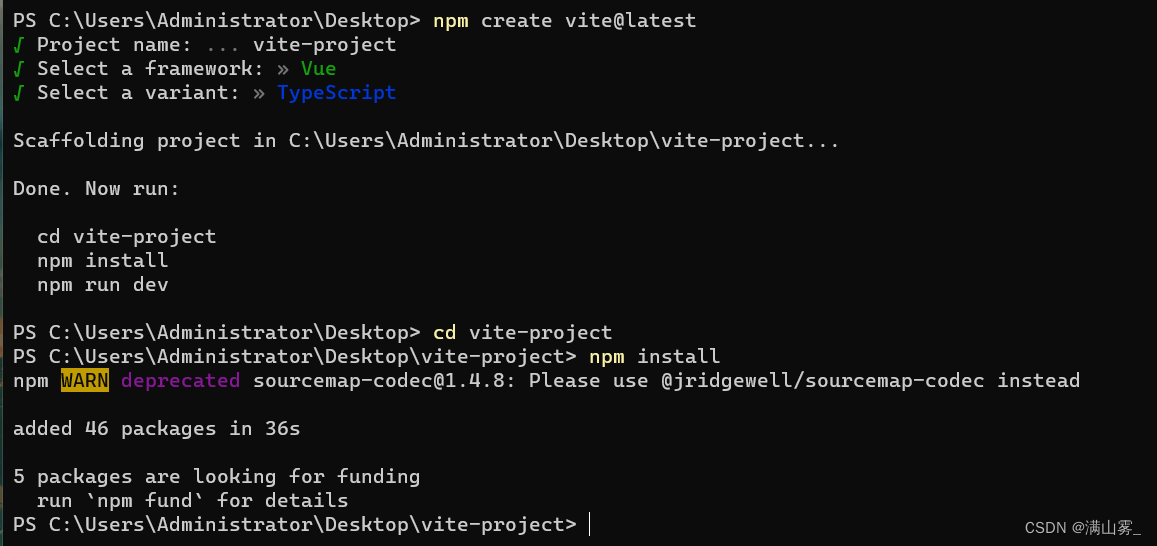
Project name:你的项目名;
Select a framework:框架选择Vue;
Select a variant:语言选择TypeSceript
cd vite-project
npm install
npm run dev
这样你的项目就创建好了
🌟引入Element Plus
Element-Plus官网国内站点
使用包管理器
我们建议您使用包管理器(如 NPM、Yarn 或 pnpm)安装 Element Plus,然后您就可以使用打包工具,例如 Vite 或 webpack。
# 选择一个你喜欢的包管理器# NPM
$ npm install element-plus --save

# Yarn
$ yarn add element-plus

# pnpm
$ pnpm install element-plus
如果您的网络环境不好,建议使用相关镜像服务 cnpm 或 中国 NPM 镜像。
浏览器直接引入
直接通过浏览器的 HTML 标签导入 Element Plus,然后就可以使用全局变量 ElementPlus 了。 根据不同的 CDN 提供商有不同的引入方式, 我们在这里以 unpkg 和 jsDelivr 举例。 你也可以使用其它的 CDN 供应商。
unpkg
<head><!-- Import style --><linkrel="stylesheet"href="//unpkg.com/element-plus/dist/index.css"/><!-- Import Vue 3 --><scriptsrc="//unpkg.com/vue@3"></script><!-- Import component library --><scriptsrc="//unpkg.com/element-plus"></script></head>
jsDelivr
<head><!-- Import style --><linkrel="stylesheet"href="//cdn.jsdelivr.net/npm/element-plus/dist/index.css"/><!-- Import Vue 3 --><scriptsrc="//cdn.jsdelivr.net/npm/vue@3"></script><!-- Import component library --><scriptsrc="//cdn.jsdelivr.net/npm/element-plus"></script></head>
完整引入
// main.tsimport{ createApp }from'vue'import ElementPlus from'element-plus'import'element-plus/dist/index.css'import App from'./App.vue'const app =createApp(App)

app.use(ElementPlus)
app.mount('#app')
按需导入
首先你需要安装unplugin-vue-components 和 unplugin-auto-import这两款插件
npm install -D unplugin-vue-components unplugin-auto-import
然后把下列代码插入到你的 Vite 的配置文件中
// vite.config.tsimport{ defineConfig }from'vite'import AutoImport from'unplugin-auto-import/vite'import Components from'unplugin-vue-components/vite'import{ ElementPlusResolver }from'unplugin-vue-components/resolvers'exportdefaultdefineConfig({// ...
  plugins:[// ...AutoImport({
      resolvers:[ElementPlusResolver()],}),Components({
      resolvers:[ElementPlusResolver()],}),],})
🌟实现代码(详细注释)
<template><div id="content"><div class="toolBar"><el-button @click="clear">清空</el-button><el-button @click="exprot">导出</el-button><el-button @click="eraser">{{ text }}</el-button><div style="margin-left: 12px"><!-- Element-Plus 颜色选择器 --><el-color-picker  v-model="color1"@change="colorChange"/></div><div style="margin-left: 12px;width: 100px"><!-- Element-Plus 滑块 --><el-slider style="margin-left: 12px;width: 100px" v-model="value1"@change="numberChange"/></div><!-- 右上方关闭按钮 --><div class="light"@click="backIndex"><div></div><div></div><div></div><div></div>X</div></div><canvas id="myCanvas"></canvas></div></template><script setup lang="ts">import{reactive, ref, toRefs, onBeforeMount, onMounted, nextTick}from'vue'import{useRouter}from"vue-router";import icon from'../../assets/pen2.png'// 初始文字const text =ref('橡皮擦')// 该变量用来记录按钮文本const textFlag =ref(true)// 初始颜色const color1 =ref('#409EFF')// 初始线条粗细const value1 =ref(6)// 光标自定义const cursorIcon =ref(`url(${icon}),default`);let myCanvas: HTMLElement |nulllet ctx:{scale:(arg0:number, arg1:number)=>void;moveTo:(arg0:number, arg1:number)=>void;beginPath:()=>void; lineWidth:any; strokeStyle:any;lineTo:(arg0:number, arg1:number)=>void;stroke:()=>void;}let isMouseDown:booleanlet strokeStyle:stringlet lineWidth:numberonMounted(()=>{nextTick(()=>{initCanvas()})})//返回首页const router =useRouter();functionbackIndex(){
    router.push('/')}// 初始化canvasfunctioninitCanvas(){// 线条细节处理,分辨率let dpr = window.devicePixelRatio ||1;
    myCanvas = document.getElementById('myCanvas')// 设置canvas实际尺寸
    myCanvas.width = window.innerWidth -20
    myCanvas.height = window.innerHeight -50// 让canvas坐标系统使用css像素
    ctx = myCanvas.getContext('2d');
    ctx.scale(dpr, dpr);// 监听canvas的鼠标按下时间
    myCanvas.addEventListener('mousedown',function(e){// console.log(e);
      isMouseDown =true// 变量记录是否按下鼠标
      ctx.moveTo(e.pageX, e.pageY)// 将绘制起始点设置为鼠标按下的点// 设置绘制图形的样式:线条宽度和颜色;开始画线
      ctx.beginPath();
      ctx.lineWidth =  lineWidth || value1.value;
      ctx.strokeStyle = strokeStyle || color1.value;})// 监听鼠标松开事件
    myCanvas.addEventListener('mousemove',function(e){if(isMouseDown){// 如果鼠标按下
        ctx.lineTo(e.pageX, e.pageY)// 设置终点
        ctx.stroke()// 连接起点和终点并用设置好的样式描边}})// 监听鼠标松开事件,停止绘制
    myCanvas.addEventListener('mouseup',function(){// ctx.closePath();
      isMouseDown =false})}// 清空functionclear(){// 1. 简单填充 使用一个新的背景色简单地填充整个画布,这样就可以清除当前内容// ctx.fillStyle = '#fff';// let rect = this.canvas.getBoundingClientRect();// ctx.fillRect(rect.x, rect.y, rect.width, rect.height)// 2.重置画布高度 当画布的宽或高被重置时,当前画布内容就会被移除。let rect = myCanvas.getBoundingClientRect();
    myCanvas.width = rect.width;
    myCanvas.height = rect.height;//3. 使用clearRect函数 clearRect() 函数可以指定起始点的x, y 位置以及宽度和高度来清除画布// let rect = this.canvas.getBoundingClientRect();// this.ctx.clearRect(rect.x, rect.y, rect.width, rect.height);}// 导出functionexprot(){let link = document.createElement('a')
    link.href = myCanvas.toDataURL('image/png')
    link.download ='draw.png'
    link.click()}// 改变颜色functioncolorChange(e:string|undefined){console.log(e)
    strokeStyle =<string>e
  }// 改变线条粗细functionnumberChange(e:number){
    lineWidth = e
  }// 橡皮擦,更换文本以及光标样式functioneraser(e:string|undefined){
    textFlag.value =!textFlag.value
    console.log(textFlag.value)if(!textFlag.value){
      cursorIcon.value ="url(/src/assets/rubber.png),default"
      text.value ='画笔'
      strokeStyle ='#ffffff'}else{
      cursorIcon.value ='url(/src/assets/pen2.png),default'
      text.value ='橡皮擦'colorChange(e)}}</script><style scoped lang="scss">
  html,
  body {
    width:100%;
    height:100%;
    margin:0;
    box-sizing: border-box;
    overflow-y: hidden;
    overflow-x: hidden;}

  #content {
    width:100%;
    height:100%;
    position: relative;}.toolBar {
    width: 100vw;
    height: 50px;
    background-color: azure;
    box-shadow:0 5px 2px #e8e8e8;
    position: absolute;
    top:0;
    left:0;
    display: flex;
    align-items: center;
    padding: 20px;
    box-sizing: border-box;}// 关闭按钮样式以及动画:霓虹灯效果.light {
    width: 40px;
    height: 30px;
    position: absolute;
    top: 30px;
    right: 30px;
    transform:translate(-50%,-50%);
    text-align: center;
    line-height: 30px;
    color: #03e9f4;
    font-size: 20px;
    text-transform: uppercase;
    transition:0.5s;
    letter-spacing: 4px;
    cursor: pointer;
    overflow: hidden;}.light:hover {
    background-color: #03e9f4;
    color: #050801;
    box-shadow:00 5px #03e9f4,00 25px #03e9f4,00 50px #03e9f4,00 200px #03e9f4;}.light div {
    position: absolute;}.light div:nth-child(1){
    width:100%;
    height: 2px;
    top:0;
    left:-100%;
    background: linear-gradient(to right, transparent, #03e9f4);
    animation: animate1 1s linear infinite;}.light div:nth-child(2){
    width: 2px;
    height:100%;
    top:-100%;
    right:0;
    background: linear-gradient(to bottom, transparent, #03e9f4);
    animation: animate2 1s linear infinite;
    animation-delay:0.25s;}.light div:nth-child(3){
    width:100%;
    height: 2px;
    bottom:0;
    right:-100%;
    background: linear-gradient(to left, transparent, #03e9f4);
    animation: animate3 1s linear infinite;
    animation-delay:0.5s;}.light div:nth-child(4){
    width: 2px;
    height:100%;
    bottom:-100%;
    left:0;
    background: linear-gradient(to top, transparent, #03e9f4);
    animation: animate4 1s linear infinite;
    animation-delay:0.75s;}@keyframes animate1 {0%{
      left:-100%;}50%,100%{
      left:100%;}}@keyframes animate2 {0%{
      top:-100%;}50%,100%{
      top:100%;}}@keyframes animate3 {0%{
      right:-100%;}50%,100%{
      right:100%;}}@keyframes animate4 {0%{
      bottom:-100%;}50%,100%{
      bottom:100%;}}

  #myCanvas {
    cursor: v-bind(cursorIcon);
    overflow-y: hidden;
    overflow-x: hidden;}</style>
🌟写在最后
以上就是实现简易画板的全部代码了,画出来的作品实在有点丑小伙伴们不要介意哈哈哈;大家也可以去试试,后续我会把一些图形加入进去实现拖拽等效果。喜欢的小伙伴们可以支持一下博主;你们的支持就是我创作的动力。各位小伙伴让我们 let’s be prepared at all times!
🌟JSON包里写函数,关注博主不迷路
✨原创不易,还希望各位大佬支持一下!
👍 点赞,你的认可是我创作的动力!
⭐️ 收藏,你的青睐是我努力的方向!
✏️ 评论,你的意见是我进步的财富!
版权归原作者 忆凡_ 所有, 如有侵权,请联系我们删除。