文章目录
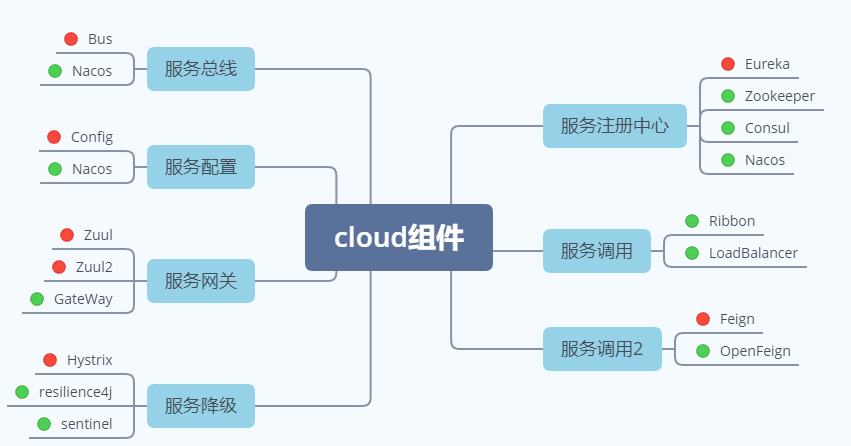
一、cloud组件
二、环境搭建
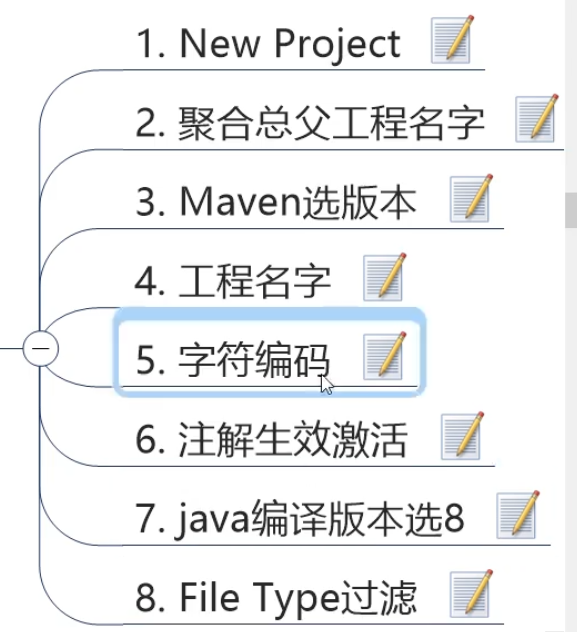
2.1 创建父工程
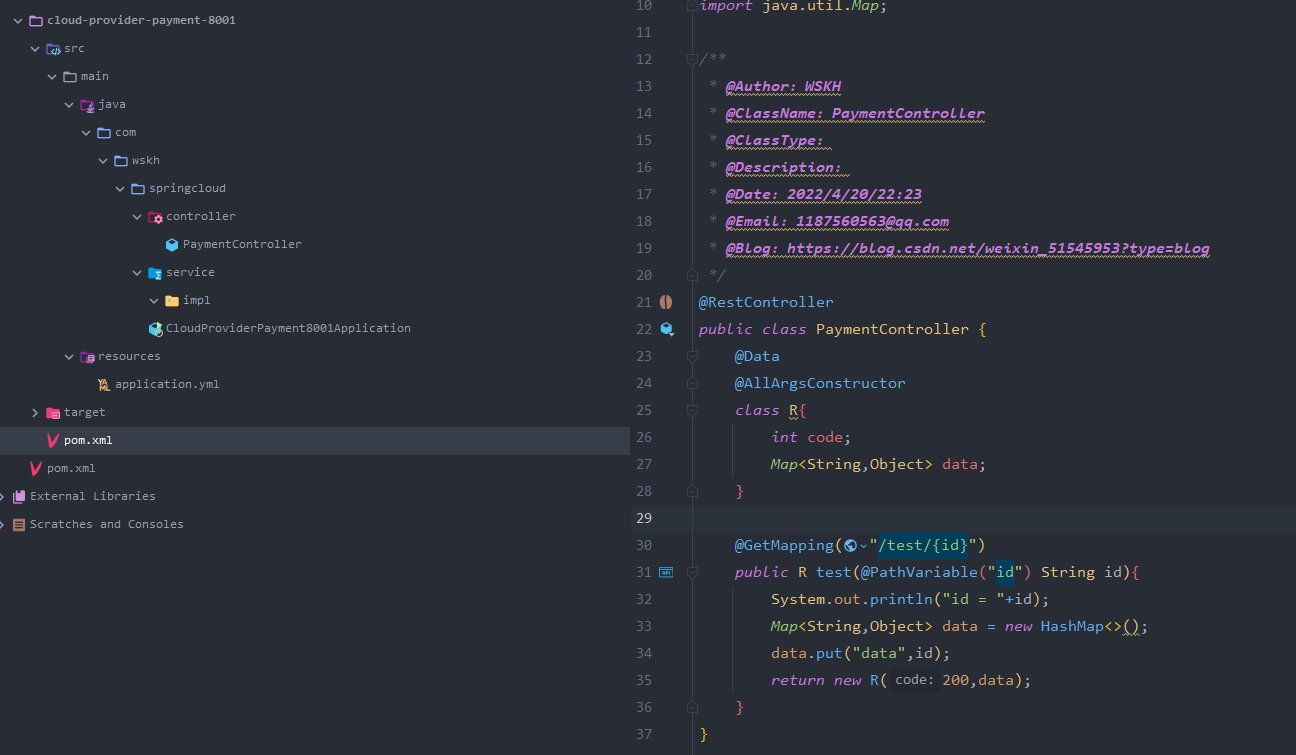
2.2 支付模块构建
2.3 消费者模块构建
2.3.1 引入RestTemplate
@ConfigurationpublicclassApplicationContextConfig{// 配置bean 不然后面没法依赖注入,就像以前ssm整合时配置依赖注入一样,// 需要在配置文件配置之后,代码中才可以依赖注入// 当前文件就是spring的配置文件@Bean// @LoadBalanced //让这个RestTemplate在请求时拥有客户端负载均衡的能力 //将此注解注释掉,使用自己的轮询算法不使用默认的publicRestTemplategetRestTemplate(){returnnewRestTemplate();}}
2.3.2 远程调用支付模块
@RestControllerpublicclassOrderController{publicstaticfinalString PAYMENT_URL ="http://localhost:8001";publicstaticfinalString PAYMENT_URL ="http://CLOUD-PAYMENT-SERVICE";@ResourceprivateRestTemplate restTemplate;@GetMapping("/testRPC/{id}")publicCommonResult<Payment>getPayment(@PathVariable("id")String id){return restTemplate.getForObject(PAYMENT_URL +"/test/"+ id,CommonResult.class);}}
三、Eureka
3.1 基础知识
前面我们没有服务注册中心,也可以服务间调用,为什么还要服务注册?
当服务很多时,单靠代码手动管理是很麻烦的,需要一个公共组件,统一管理多服务,包括服务是否正常运行,等
Eureka用于服务注册,目前官网已经停止更新
3.2 单机版Eureka安装
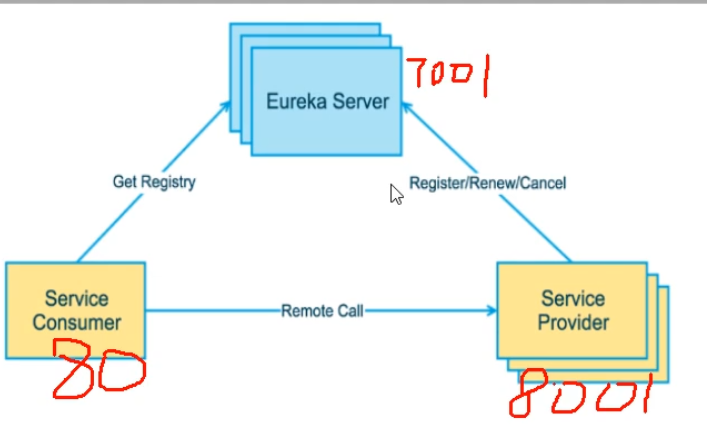
创建项目cloud-eureka-server-7001
引入依赖
<dependencies><!-- 服务注册中心的服务端 eureka-server --><dependency><groupId>org.springframework.cloud</groupId><artifactId>spring-cloud-starter-netflix-eureka-server</artifactId></dependency><dependency><groupId>org.springframework.boot</groupId><artifactId>spring-boot-starter-web</artifactId></dependency><dependency><groupId>org.springframework.boot</groupId><artifactId>spring-boot-starter-actuator</artifactId></dependency><dependency><groupId>org.springframework.boot</groupId><artifactId>spring-boot-starter-test</artifactId><scope>test</scope></dependency><dependency><groupId>junit</groupId><artifactId>junit</artifactId></dependency></dependencies>
yml配置文件
server:port:7001# 单机版eureka:instance:hostname: localhost #eureka服务端的实例名字client:register-with-eureka:false#表示不向注册中心注册自己fetch-registry:false#表示自己就是注册中心,职责是维护服务实例,并不需要去检索服务service-url:#设置与eureka server交互的地址查询服务和注册服务都需要依赖这个地址defaultZone: http://${eureka.instance.hostname}:${server.port}
启动类
/**
 * @author WSKH
 * @date 2020/12/19 14:12
 * @description 注册中心
 */@SpringBootApplication@EnableEurekaServer// 启动Eureka服务publicclassCloudEurekaServer7001Application{publicstaticvoidmain(String[] args){SpringApplication.run(CloudEurekaServer7001Application.class, args);System.out.println("启动成功!");}}
3.3 服务注册
引入依赖
<!-- 服务注册中心的客户端端 eureka-client --><dependency><groupId>org.springframework.cloud</groupId><artifactId>spring-cloud-starter-netflix-eureka-client</artifactId></dependency>
yaml配置
server:port:8001spring:application:name: cloud-payment-service

eureka:client:register-with-eureka:true#是否向注册中心注册自己fetchRegistry:true#是否从注册中心抓取已有的注册信息 默认true,集群必须设置为trueservice-url:#      设置与eureka server交互的地址查询服务和注册服务都需要依赖这个地址defaultZone: http://localhost:7001#单机版instance:instance-id: payment8001
    prefer-ip-address:true#访问路径可以显示IP地址#    Eureka客户端向服务端发送心跳的时间间隔,单位为秒(默认是30秒)#    lease-renewal-interval-in-seconds: 1#    Eureka服务端在收到最后一次心跳后等待时间上限,单位为秒(默认是90秒),超时将剔除服务#    lease-expiration-duration-in-seconds: 2
启动类
@SpringBootApplication@EnableEurekaClient// 指定成为Eureka客户端@EnableDiscoveryClient// 开启服务发现@Slf4jpublicclassCloudProviderPayment8001Application{publicstaticvoidmain(String[] args){SpringApplication.run(CloudProviderPayment8001Application.class, args);
        log.info("cloud-provider-payment-8001 启动成功!");}}
3.4 Eureka集群
单机版注册中心会出现单点故障,故一般都采用集群
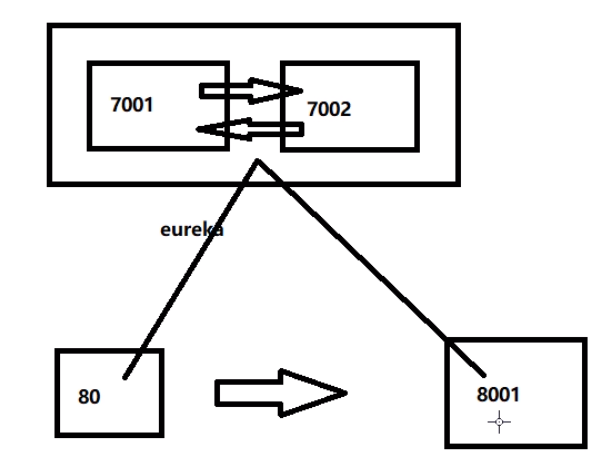
两台或以上的Rureka互相注册,相互守望,对外暴露端口
3.4.1 Eureka端配置

7001的yaml配置
server:port:7001#集群版eureka:instance:hostname: eureka7001 #eureka服务端的实例名字(实际好像不起作用,DS Replicas是直接截取URL中冒号前面的部分,当作队友名,如http://localhost:7001,那就截取localhost当作队友名)client:register-with-eureka:false#表示不向注册中心注册自己fetch-registry:false#表示自己就是注册中心,职责是维护服务实例,并不需要去检索服务service-url:#设置与eureka server交互的地址查询服务和注册服务都需要依赖这个地址# defaultZone: http://eureka7001.com:7001defaultZone: http://localhost:7002#这个是集群版开启 互相注册# server:## 关闭自我保护机制,保证不可用服务被及时踢除# enable-self-preservation: false# eviction-interval-timer-in-ms: 2000
7002的yaml配置
server:port:7002#集群版eureka:instance:hostname: eureka7002 #eureka服务端的实例名字(实际好像不起作用,DS Replicas是直接截取URL中冒号前面的部分,当作队友名,如http://localhost:7001,那就截取localhost当作队友名)client:register-with-eureka:false#表识不向注册中心注册自己fetch-registry:false#表示自己就是注册中心,职责是维护服务实例,并不需要去检索服务service-url:#设置与eureka server交互的地址查询服务和注册服务都需要依赖这个地址defaultZone: http://localhost:7001
3.4.2 微服务端配置

server:port:80spring:application:name: cloud-order-service

eureka:client:register-with-eureka:true#是否向注册中心注册自己fetchRegistry:true#是否从注册中心抓取已有的注册信息 默认true,集群必须设置为trueservice-url:#设置与eureka server交互的地址查询服务和注册服务都需要依赖这个地址defaultZone: http://localhost:7001,http://localhost:7002#集群版

server:port:8001spring:application:name: cloud-payment-service

eureka:client:register-with-eureka:true#是否向注册中心注册自己fetchRegistry:true#是否从注册中心抓取已有的注册信息 默认true,集群必须设置为trueservice-url:#      设置与eureka server交互的地址查询服务和注册服务都需要依赖这个地址defaultZone: http://localhost:7001,http://localhost:7002#集群版instance:instance-id: payment8001
    prefer-ip-address:true#访问路径可以显示IP地址#    Eureka客户端向服务端发送心跳的时间间隔,单位为秒(默认是30秒)#    lease-renewal-interval-in-seconds: 1#    Eureka服务端在收到最后一次心跳后等待时间上限,单位为秒(默认是90秒),超时将剔除服务#    lease-expiration-duration-in-seconds: 2

3.4.3 restTemplate负载均衡
加入@LoadBalanced注解即可开启负载均衡
@ConfigurationpublicclassApplicationContextConfig{// 配置bean 不然后面没法依赖注入,就像以前ssm整合时配置依赖注入一样,// 需要在配置文件配置之后,代码中才可以依赖注入// 当前文件就是spring的配置文件@Bean@LoadBalanced//让这个RestTemplate在请求时拥有客户端负载均衡的能力 //将此注解注释掉,使用自己的轮询算法不使用默认的publicRestTemplategetRestTemplate(){returnnewRestTemplate();}}
测试
@RestControllerpublicclassOrderController{// http://服务名大写publicstaticfinalString PAYMENT_URL ="http://CLOUD-PAYMENT-SERVICE";@ResourceprivateRestTemplate restTemplate;@GetMapping("/testLoadBalancedRpc/{id}")publicCommonResult<Payment>testLoadBalancedRpc(@PathVariable("id")String id){return restTemplate.getForObject(PAYMENT_URL +"/test/"+id,CommonResult.class);}}
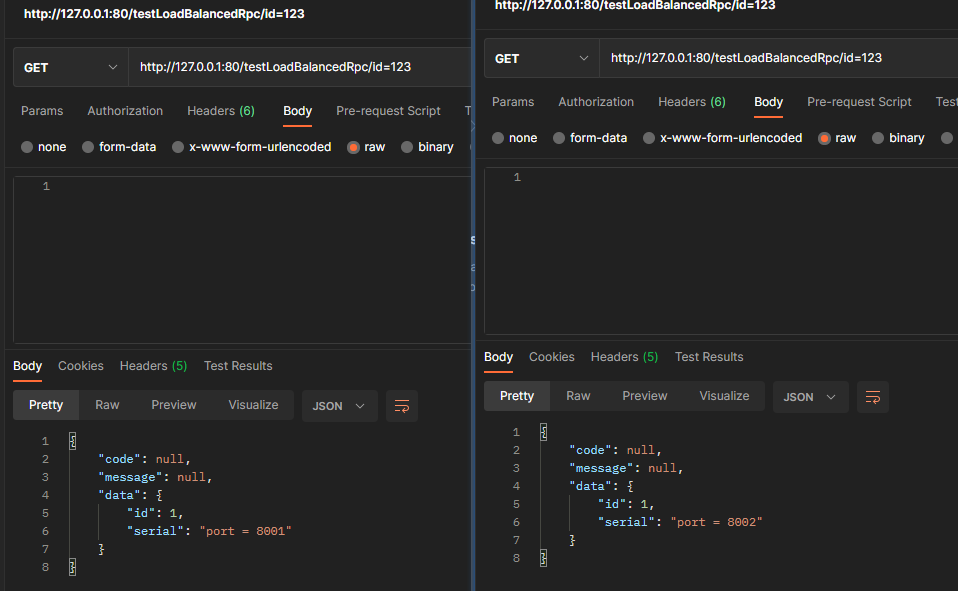
最后发送请求 http://127.0.0.1:80/testLoadBalancedRpc/id=123 进行测试
发现会自动均衡地访问8001和8002
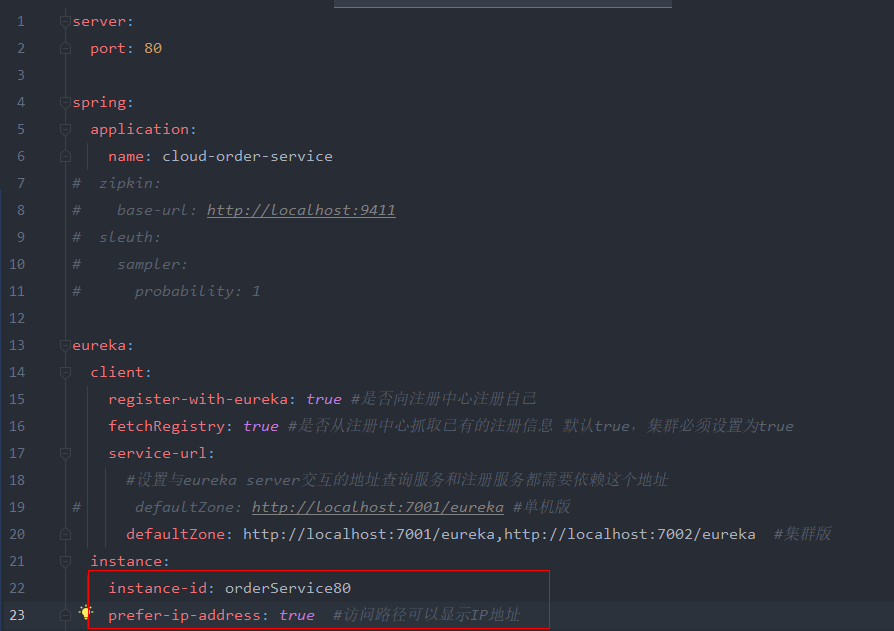
3.4.4 主机名修改和ip地址显示

3.5 服务发现Discovery
开启服务发现
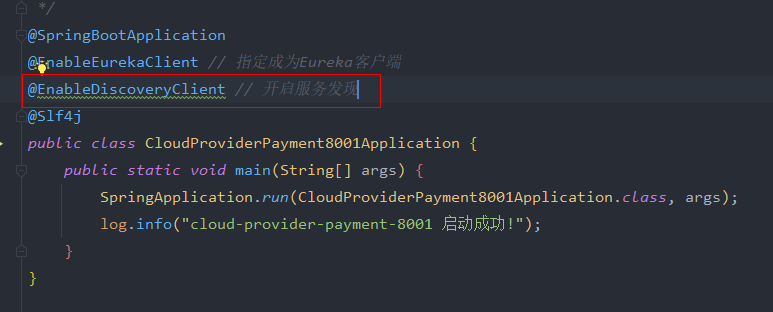
使用DiscoveryClient完成服务发现
// 注入DiscoveryClient对象@ResourceDiscoveryClient discoveryClient;@GetMapping("/testDiscoveryClient")publicvoidtestDiscoveryClient(){// 从注册中心获取所有服务的名称List<String> services = discoveryClient.getServices();
    services.forEach(System.out::println);// 根据服务名称找到其下的所有实例List<ServiceInstance> instances = discoveryClient.getInstances("CLOUD-PAYMENT-SERVICE");// 遍历输出实例信息
    instances.forEach(instance ->{System.out.println(instance.getServiceId()+"\t"+ instance.getHost()+"\t"+ instance.getPort()+"\t"+ instance.getUri());});}
测试 http://127.0.0.1:8001/testDiscoveryClient

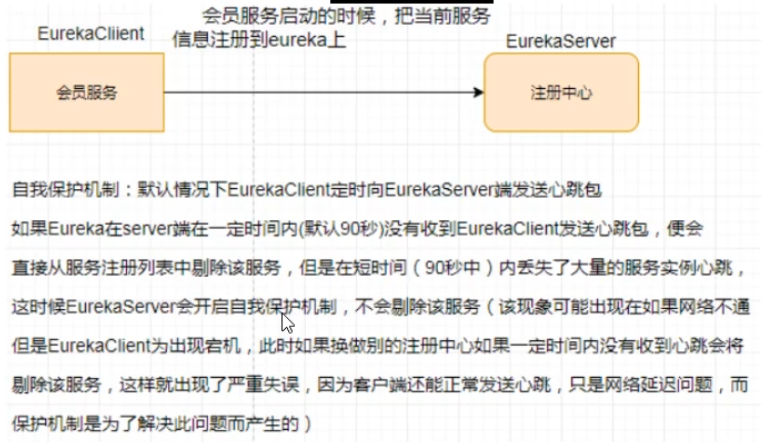
3.6 Rureka自我保护机制



3.7 禁止Eureka自我保护
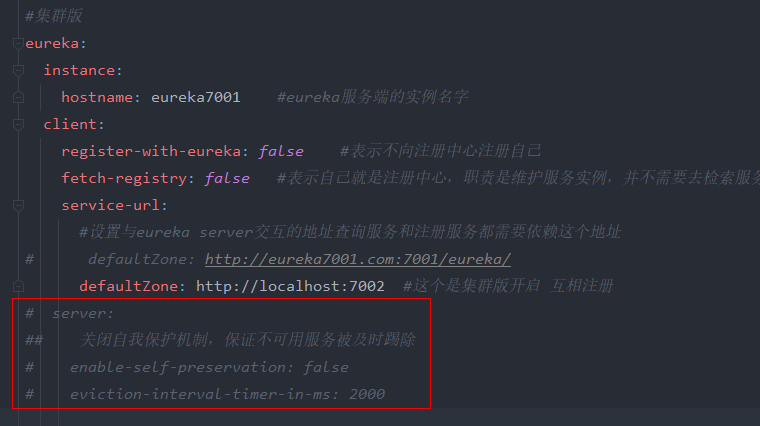
#集群版eureka:instance:hostname: eureka7001 #eureka服务端的实例名字client:register-with-eureka:false#表示不向注册中心注册自己fetch-registry:false#表示自己就是注册中心,职责是维护服务实例,并不需要去检索服务service-url:#设置与eureka server交互的地址查询服务和注册服务都需要依赖这个地址# defaultZone: http://eureka7001.com:7001/eureka/defaultZone: http://localhost:7002#这个是集群版开启 互相注册# server:## 关闭自我保护机制,保证不可用服务被及时踢除# enable-self-preservation: false# eviction-interval-timer-in-ms: 2000

四、Zookeeper
五、Consul
5.1 简介


5.2 安装
中文官网: https://www.spring.cloud.cc/spring-cloud-consul.html
需要下载一个安装包

查看版本

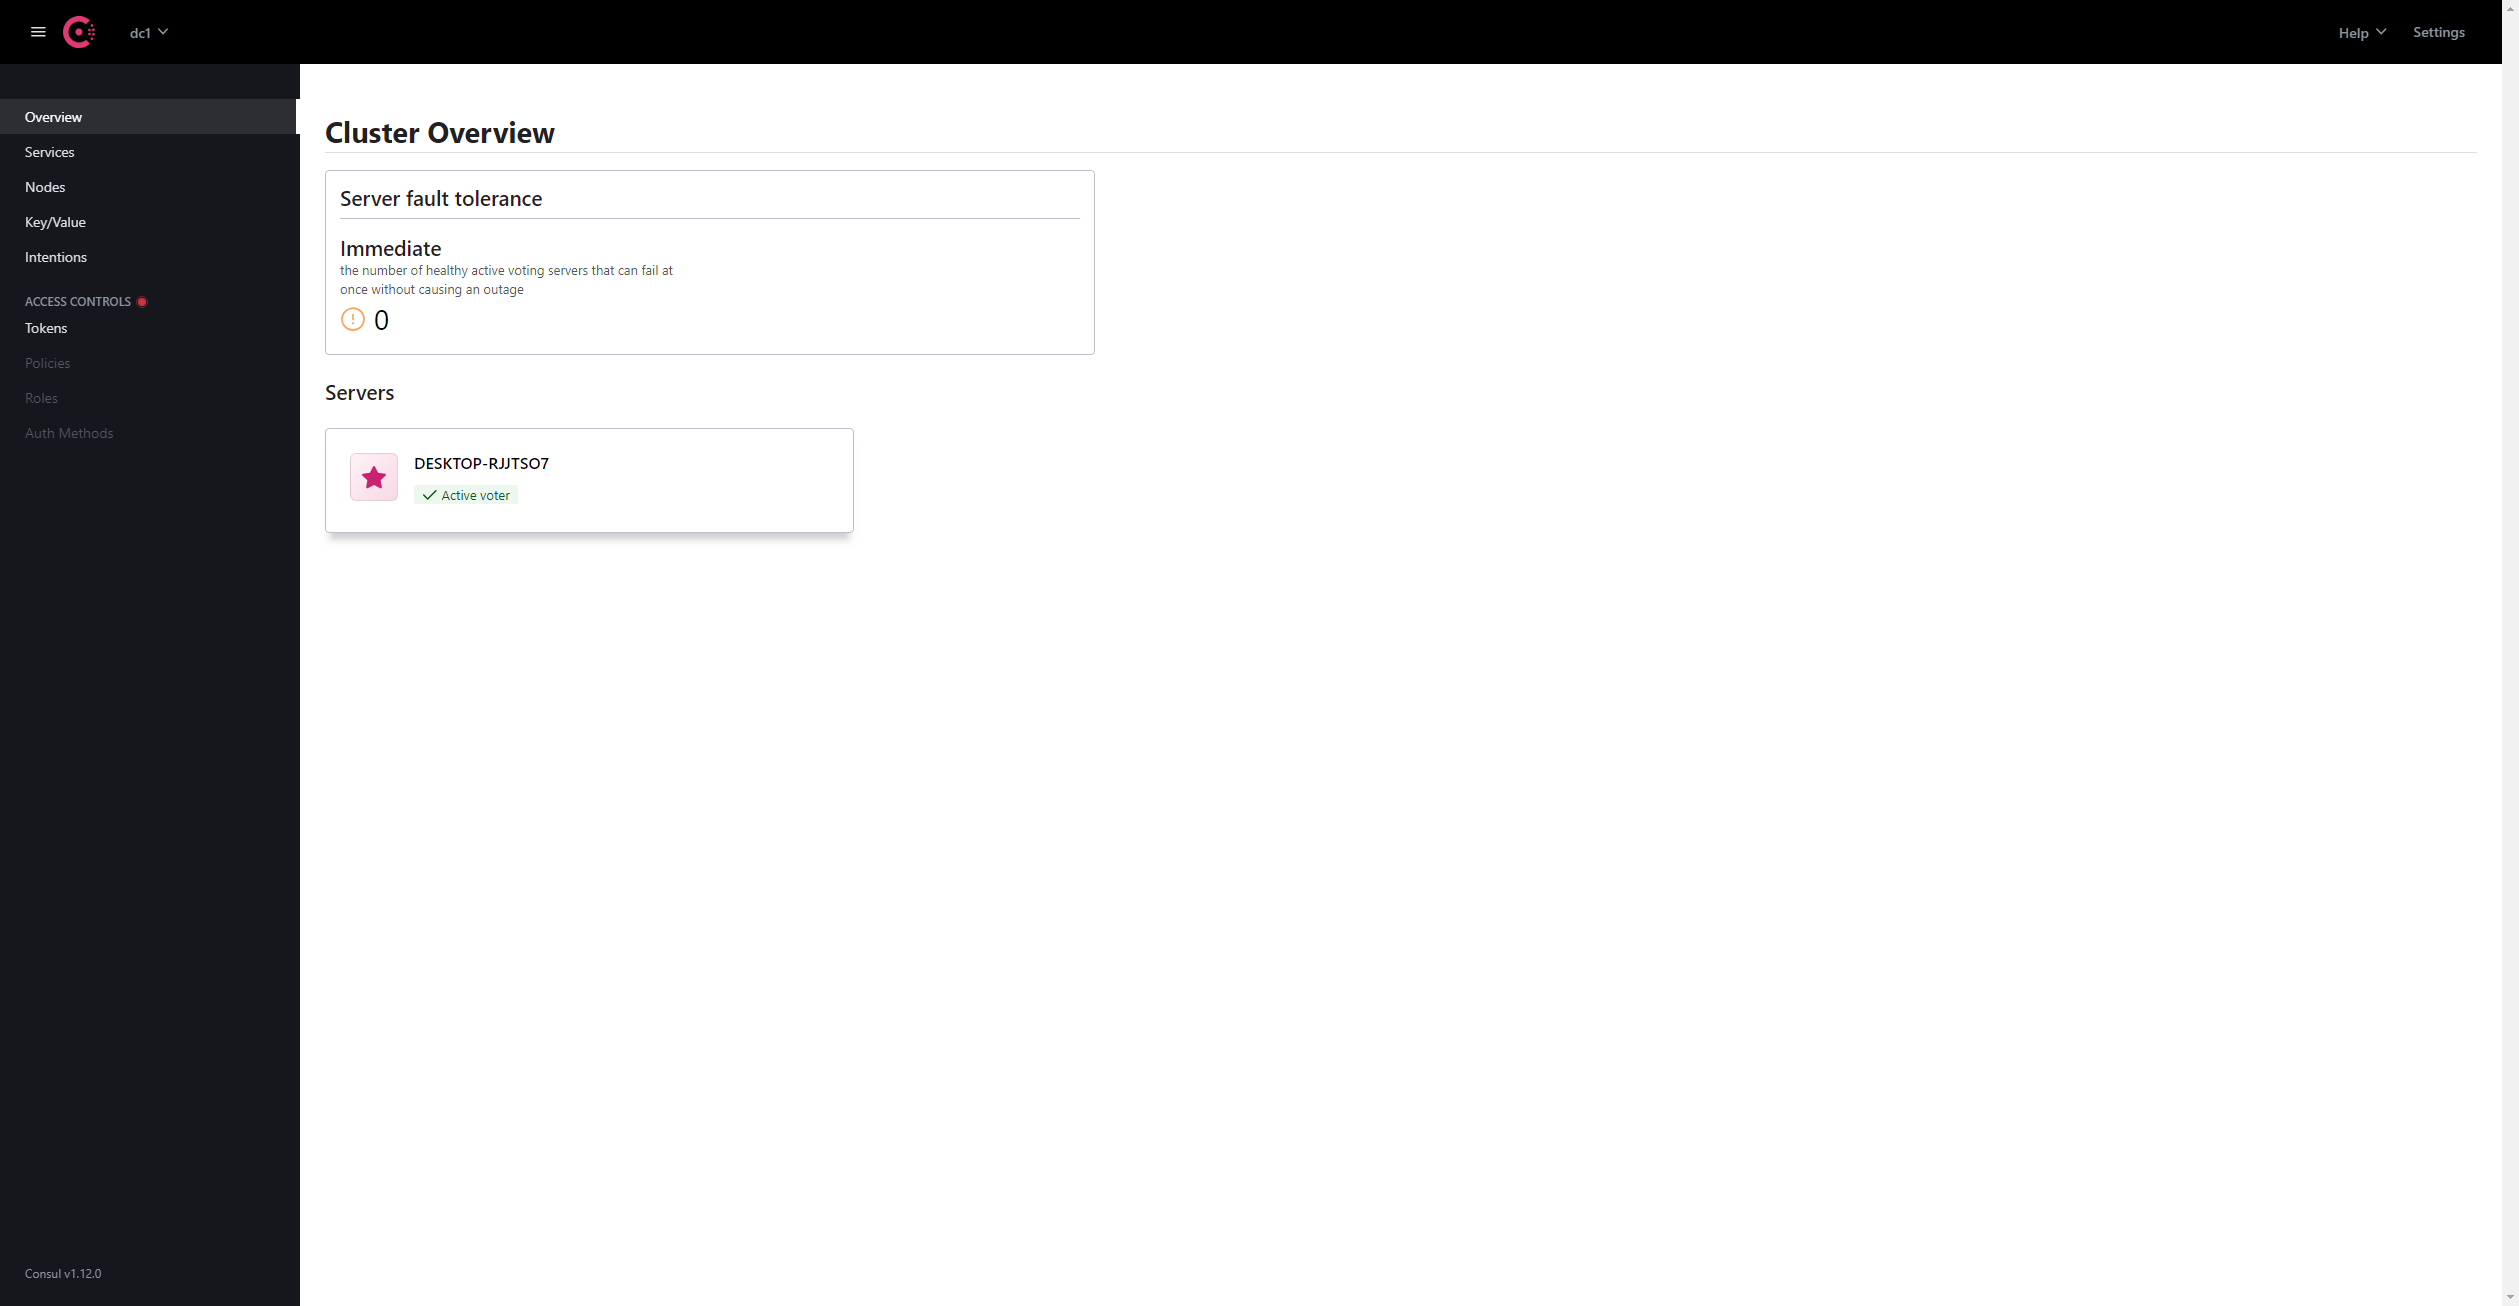
启动是一个命令行界面,需要输入consul agent -dev启动
5.3 搭建项目
引入依赖
<dependency><groupId>org.springframework.cloud</groupId><artifactId>spring-cloud-starter-consul-discovery</artifactId></dependency>
yaml配置
server:port:8006spring:application:name: consul-provider-payment
  cloud:consul:host: localhost
      port:8500discovery:service-name: ${spring.application.name}
启动类
@SpringBootApplication@EnableDiscoveryClient//该注解用于向使用consul或者zookeeper作为注册中心时注册服务publicclassCloudProviderconsulPayment8006Application{publicstaticvoidmain(String[] args){SpringApplication.run(CloudProviderconsulPayment8006Application.class, args);System.out.println("启动成功");}}
启动App,查看服务注册情况
六、三个注册中心的异同点

七、Ribbon
7.1 入门介绍


7.2 使用Ribbon
默认我们使用eureka的新版本时,它默认集成了ribbon:

这个starter中集成了reibbon了
我们也可以手动引入ribbon
7.3 RestTemplate类
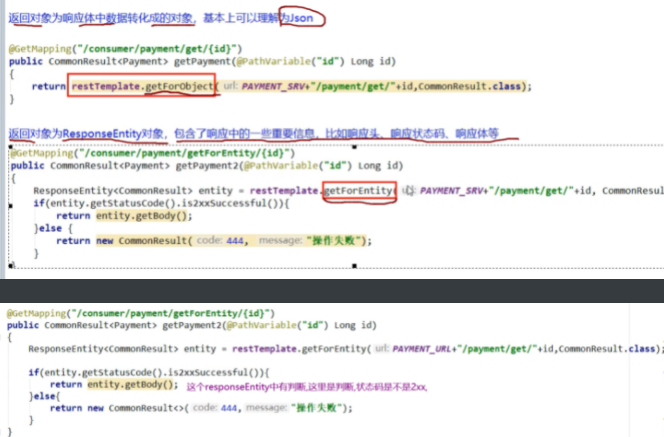
RestTemplate的:xxxForObject()方法,返回的是响应体中的数据
        xxxForEntity()方法.返回的是entity对象,这个对象不仅仅包含响应体数据,还包含响应体信息(状态码等)
7.4 Ribbon常用负载均衡算法
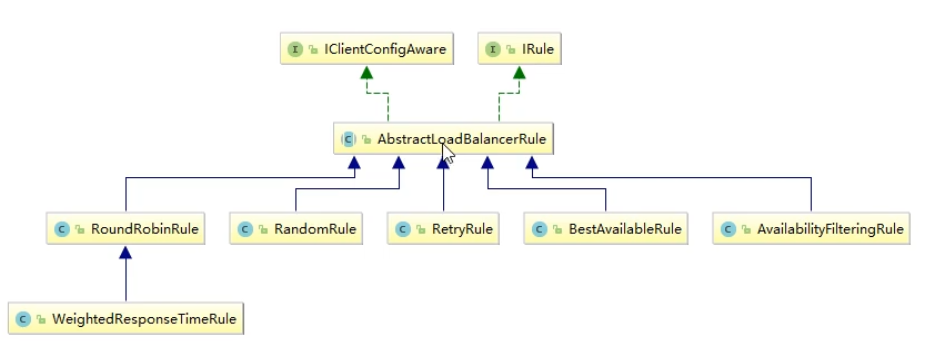
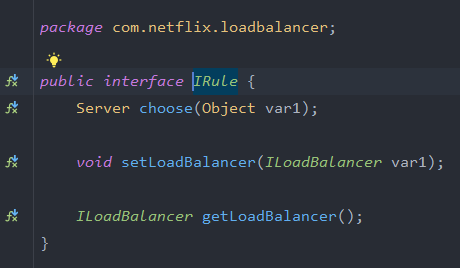
IRule接口,Riboon使用该接口,根据特定算法从所有服务中,选择一个服务,
Rule接口有7个实现类,每个实现类代表一个负载均衡算法

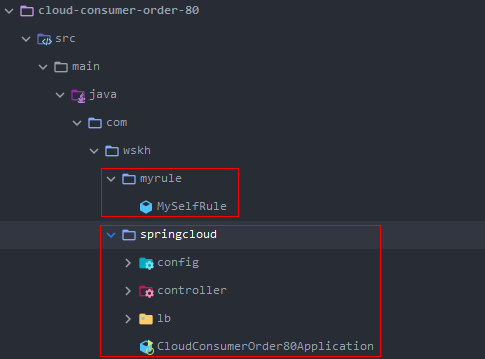
7.5 Ribbon负载均衡规则替换
[外链图片转存失败,源站可能有防盗链机制,建议将图片保存下来直接上传(img-jqERrsdi-1686926847827)(…/…/AppData/Roaming/Typora/typora-user-images/image-20220423202944560.png)]
配置类
@ConfigurationpublicclassMySelfRule{@BeanpublicIRulemyRule(){// 此处将ribbon默认使用的轮询策略改为随机策略returnnewRandomRule();}}
启动类
@SpringBootApplication@EnableEurekaClient@EnableDiscoveryClient// 启动CLOUD-PAYMENT-SERVICE服务时去加载自定义的ribbon配置@RibbonClient(name ="CLOUD-PAYMENT-SERVICE", configuration =MySelfRule.class)@Slf4jpublicclassCloudConsumerOrder80Application{publicstaticvoidmain(String[] args){SpringApplication.run(CloudConsumerOrder80Application.class, args);
        log.info("cloud-consumer-order-80 启动成功!");}}
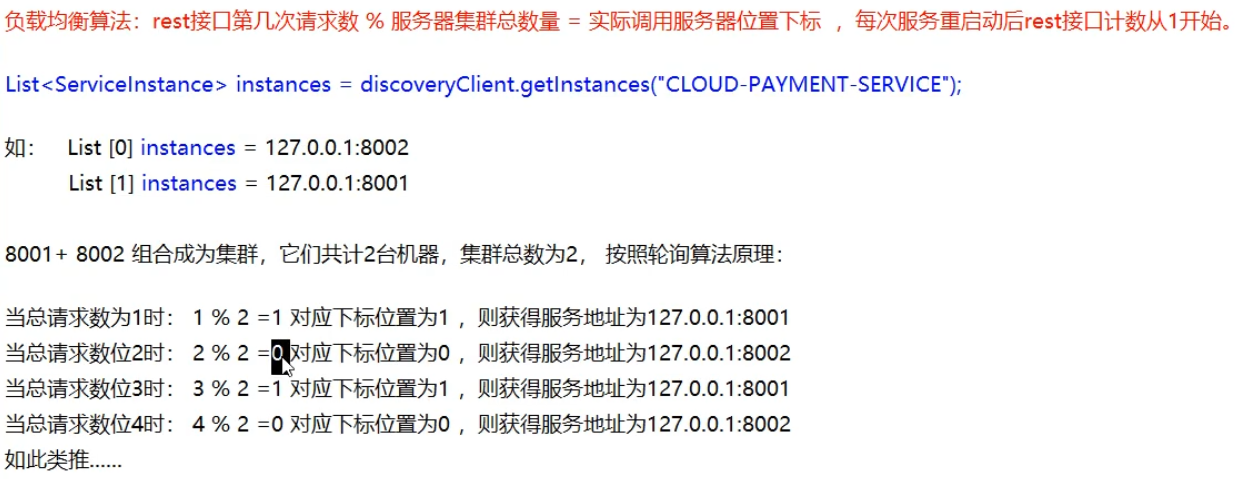
7.6 轮询算法原理
7.7 源码分析
7.8 手写轮询算法
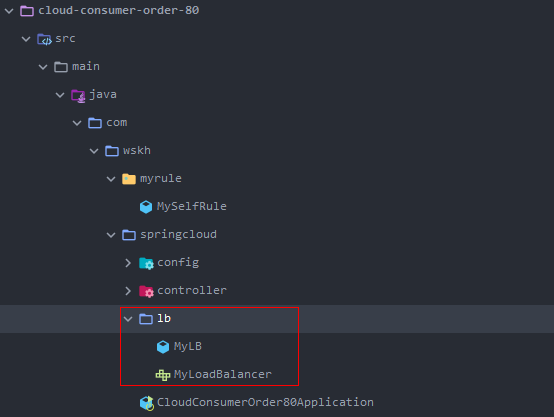
publicinterfaceMyLoadBalancer{/**
     * 收集服务器总共有多少台能够提供服务的机器,并放到list里面
     *
     * @param serviceInstances
     * @return ServiceInstance
     * @author WSKH
     * @date 2020/12/23 9:24
     */ServiceInstanceinstances(List<ServiceInstance> serviceInstances);}
@ComponentpublicclassMyLBimplementsMyLoadBalancer{// 原子类privatefinalAtomicInteger atomicInteger =newAtomicInteger(0);/**
     * @author WSKH
     * @date 2020/12/23 10:07
     * @description 判断时第几次访问
     */publicfinalintgetAndIncrement(){int current;String a ="current";int next =0;do{
            current = atomicInteger.get();// 防止越界
            next = current >=Integer.MAX_VALUE ?0: current +1;}while(!atomicInteger.compareAndSet(current, next));System.out.println("*****第几次访问,次数next: "+ next);return next;}/**
     * 负载均衡算法:rest接口第几次请求数 % 服务器集群总数量 = 实际调用服务器位置下标, 每次服务重启动后rest接口计数从1开始。1
     *
     * @param serviceInstances
     * @return ServiceInstance
     * @author WSKH
     * @date 2020/12/23 9:51
     */@OverridepublicServiceInstanceinstances(List<ServiceInstance> serviceInstances){int index =getAndIncrement()% serviceInstances.size();return serviceInstances.get(index);}}
// 注入自定义的负载均衡规则@ResourceprivateMyLoadBalancer myLoadBalancer;@ResourceprivateDiscoveryClient discoveryClient;/**
 * @author WSKH
 * @date 2020/12/23 10:27
 * @description 测试自定义的负载均衡规则
 */@GetMapping(value ="/payment/lb")publicStringgetPaymentLB(){List<ServiceInstance> instances = discoveryClient.getInstances("CLOUD-PAYMENT-SERVICE");if(instances ==null|| instances.isEmpty()){returnnull;}// 调用自定义的负载均衡策略ServiceInstance serviceInstance = myLoadBalancer.instances(instances);URI uri = serviceInstance.getUri();return restTemplate.getForObject(uri +"/payment/lb",String.class);}
八、OpenFeign
8.1 什么是OpenFeign


8.2 OpenFeign服务调用
未完待续...
版权归原作者 WSKH0929 所有, 如有侵权,请联系我们删除。