
文章目录
第一步 创建vue项目
使用vue
script标签引入
如果只是单纯的使用vue,可以使用
<script src="https://cdn.jsdelivr.net/npm/vue/dist/vue.js"></script>
直接引入
npm安装vue
- 使用npm安装vue需要先安装node.js,如果你的电脑未安装node,可以参考我的个人碰到的前端问题总结及解决方案2第15个问题先安装nvm(node version manager),然后再安装npm。
- npm install -g cnpm --registry=https://registry.npm.taobao.org (装完之后运行这个换下npm源,改成国内的,下载依赖速度会快些
- 安装好npm后,全局安装vue-cli(vue脚手架),命令如下,个人推荐安装vueCli3及以上版本(毕竟现在脚手架已经5.0了)。
//安装vueCli2
npminstall vue-cli -g
//安装vueCli3及以上
npminstall @vue/cli -g

vue项目的创建
创建vue项目有三种方式
- 编程工具直接创建。 比如webstorm创建项目如下: 第一步:点击文件 --> 点击新建 --> 点击项目
 第二步:选择vue项目 --> 选择项目目录(我这里是默认的,可以自己修改)–> 选择要构建项目的vueCli位置,可以选择自己本地安装的vueCli目录,也可以使用webstorm默认的npx命令执行vueCli --> 创建项目
- vue ui创建。可视化的操作,创建、安装初始化依赖简单。但需要注意是若想使用vue的UI界面来创建项目,需先安装vue脚手架 3.0以上的版本。详细创建的步骤可以看下面参考的链接。
参考:使用图形化界面创建vue项目
- vueCli创建。
参考:五分钟教你使用vue-cli3创建项目(三种创建方式,小白入门必看)
第二步 vue-router、vuex、element ui、axios安装和配置
main.js
vue-router、vuex、element ui
安装配置完后都需要在src目录下main.js(主js入口)里进行引用才会生效。
main.js
/**
 * normalize.css重置浏览器css样式。
 * 这里需要`npm install normalize.css`
 * reset和normalize区别。
 * reset的目的是将所有的浏览器的自带样式重置掉,这样更易于保持各浏览器渲染的一致性。
 * normalize的理念则是尽量保留浏览器的默认样式,不进行太多的重置,而尽力让这些样式保持一致并尽可能与现代标准相符合。
*/import"normalize.css/normalize.css";import Vue from"vue";import App from"./App.vue";import router from"./router";//vue-routerimport store from"./store";//vueximport"@/plugins/element-ui";//按需引入的element组件import'./permission'//页面权限(vue-router的全局守卫配置)
Vue.config.productionTip =false;newVue({
  router,
  store,render:(h)=>h(App),}).$mount("#app");
vue-route(vue路由管理)
安装
打开项目,在项目目录下运行下面命令进行安装。项目的package.json的dependencies里有vue-router就代表安装成功了。如果之前已经有了就不用执行安装命令。结果如图。
//vue2
npminstall [email protected]
//vue3
npminstall vue-router
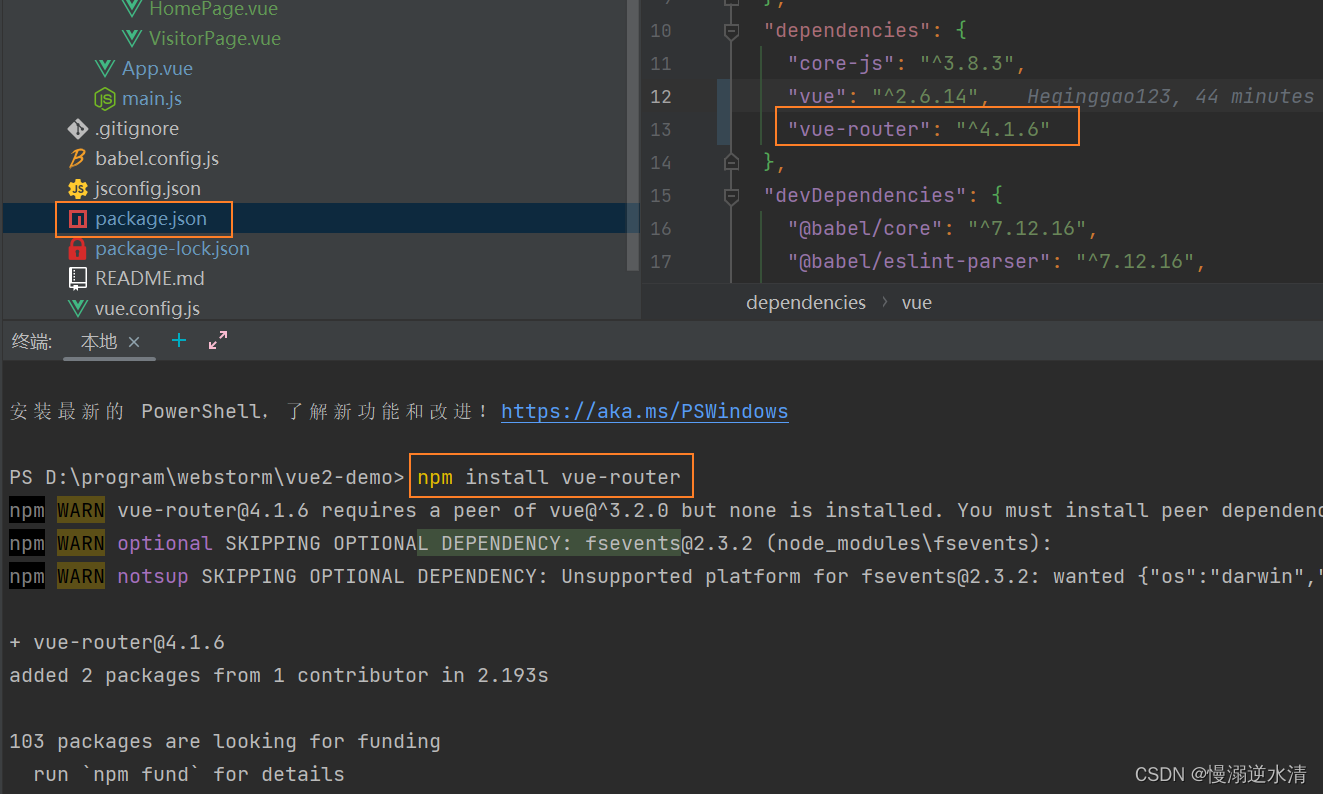
需要注意的是如果你使用的是vue2,那么不要直接
npm install vue-router
,这样会安装最新版本即4.x版本的vue-router,4.x版本的vue-router与vue2不兼容。
查看vue-router版本命令如图。
配置
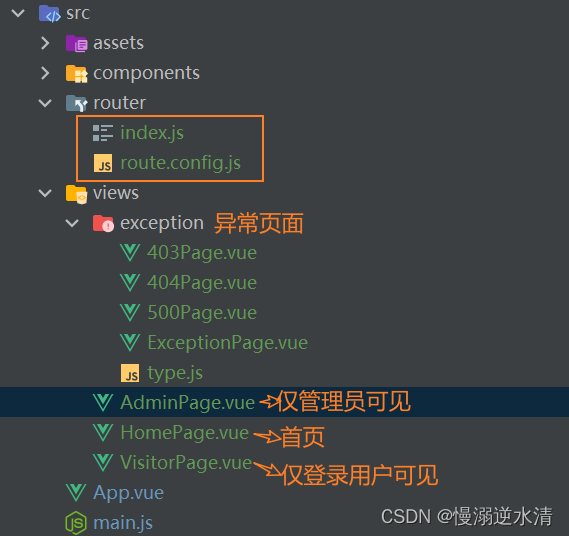
项目src目录下新建router目录。内容如图。
- index.js里生成vue-router实例,并配置相关信息,然后暴露出去。
- router.config.js里存放页面路由信息。 分为静态路由和动态路由。 动态路由与用户角色权限相关,可配合后端存放取出。
 index.js内容如下。
import Vue from"vue";import Router from"vue-router";import{ constantRouterMap }from"@/router/route.config";// 【优化】访问online功能测试 浏览器控制台抛出异常try{// 保存原来的push函数const originalPush =Router.prototype.push;// 重写push函数Router.prototype.push=functionpush(location, onResolve, onReject){if(onResolve || onReject)returnoriginalPush.call(this, location, onResolve, onReject);// 调用原来的push函数,并捕获异常returnoriginalPush.call(this, location).catch((err)=> err);};}catch(e){
    console.log(e);}

Vue.use(Router);constcreateRouter=()=>newRouter({mode:"history",//hash、history两种模式base: process.env.BASE_URL,routes: constantRouterMap,scrollBehavior:()=>({y:0}),});const router =createRouter();/**
 * 重置注册的路由导航map
 * 主要是为了通过addRoutes方法动态注入新路由时,避免重复注册相同name路由
 *
 * 修改用户角色、用户退出时调用
 */exportfunctionresetRouter(){const newRouter =createRouter();
    router.matcher = newRouter.matcher;// reset router}exportdefault router;
router.config.js内容如下:
import HomePage from"@/views/HomePage";/**
 * constantRouterMap
 * 没有权限要求的基本页
 * 所有角色都可以访问
 * 不需要动态判断权限的路由
 */exportconst constantRouterMap =[{path:"/",name:"home",component: HomePage,meta:{title:"首页",},},{path:"/403",name:"403",component:()=>import("@/views/exception/403Page"),},{path:"/500",name:"500",component:()=>import("@/views/exception/500Page"),},];/**
 * 动态菜单,走权限控制
 *
 * 可从后端获取
 * 可分多个角色
 * 这里分为二个角色 管理员admin  普通角色 visitor
 */exportconst asyncRouterMap =[{path:"/onlyAdminCanSee",name:"adminPage",component:()=>import('@/views/AdminPage'),meta:{title:"管理员页面",keepalive:false,roles:["admin"],},},{path:"/onlyLoginUserCanSee",name:"visitPage",component:()=>import('@/views/VisitorPage'),meta:{title:"用户界面",keepalive:false,roles:["admin","visitor"],},},{path:'*',redirect:'/404',component:()=>import('@/views/exception/404Page')}];
全局守卫配置(router.beforeEach前置守卫、router.beforeEach后置守卫)
在src下新建permission.js,需要在main.js里引用。
需要安装一个轻量级的进度条组件NProgress
内容如下。
import Vue from"vue";import router from"./router";import store from"./store";import NProgress from"nprogress";// progress barimport"nprogress/nprogress.css";// progress bar styleimport{ACCESS_TOKEN}from"@/store/mutation-types";

NProgress.configure({showSpinner:false});// NProgress Configurationconst whiteList =['/login','/home']// 页面路由白名单//前置守卫
router.beforeEach(async(to, from, next)=>{
    NProgress.start();// start progress bar//判断是否是去登录页面,是,直接过if(to.path ==='/login'){next()
        NProgress.done()}else{//不是去登录页面,判断用户是否登录过if(Vue.ls.get(ACCESS_TOKEN)){const hasRoles = store.getters.userRoles && store.getters.userRoles.length >0//登录了,判断是否有用户详细信息(如果有),比如角色权限,直接过if(hasRoles){next()}else{//没有用户详细信息,代表用户刷新了,或者其他行为,重新获取一次用户信息,// 并根据该用户的角色权限,来获取用户权限范围内能看到的界面try{//获取当前角色const{roles}=await store.dispatch('app/getInfo')//根据权限查询动态路由const accessRoutes =await store.dispatch('permission/generateRoutes', roles)//添加动态路由for(let i =0; i < accessRoutes.length; i++){const element = accessRoutes[i]
                            router.addRoute(element)// router.addRoute('globalLayout', {//   path: element.path,//   name: element.path.slice(1, 2).toUpperCase() + element.path.slice(2),//   component: () => import('@/' + element.component),//   // meta: {//   //     // title: '',//   //     roles: [roles],//   // }// })}// console.log(router.getRoutes())//decodeURIComponentconst redirect = from.query.redirect || to.path
                        if(to.path === redirect){// 确保addRoutes已完成 ,set the replace: true so the navigation will not leave a history recordnext({...to,replace:true})}else{// 跳转到目的路由next({path: redirect})}}catch(error){
                        console.log(error)await store.dispatch('app/Logout').then(()=>{next({path:'/login',query:{redirect: to.fullPath}})})
                        NProgress.done()}}}else{//如果没有登录if(whiteList.indexOf(to.path)!==-1){// 在免登录白名单,直接进入next()}else{//跳转到登录页面next({path:'/login',query:{redirect: to.fullPath}})
                NProgress.done()}}}});
vuex (vue状态管理)
安装
运行npm 安装命令。结果如图。
//vue2
npminstall [email protected]
//vue3
npminstall vuex
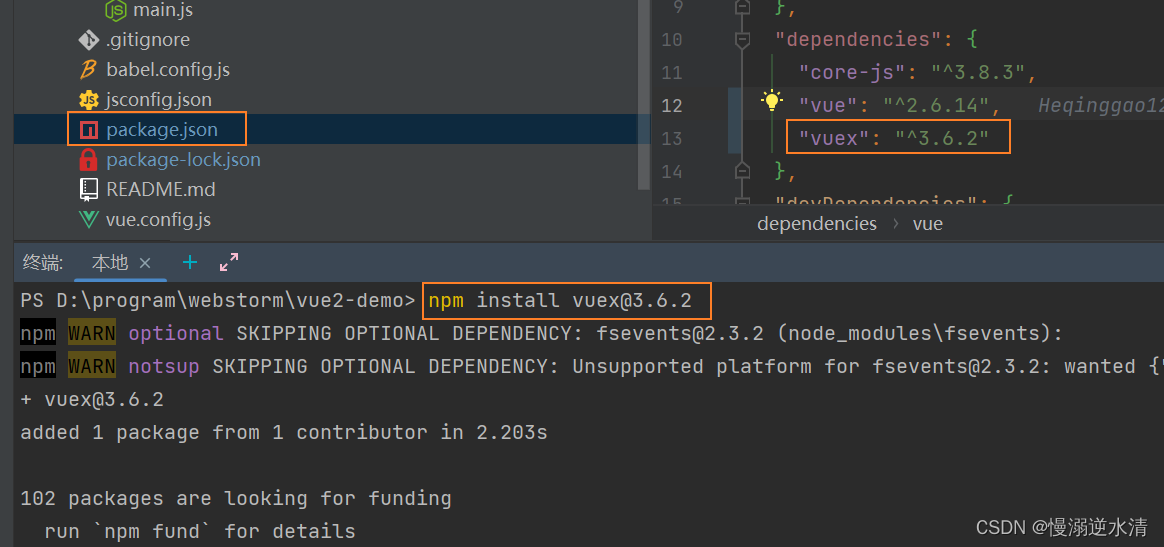
需要注意的是如果你使用的是vue2,那么不要直接
npm install vuex
,这样会安装最新版本即4.x版本的vuex,4.x版本的vuex与vue2不兼容。
查看vuex版本命令如图。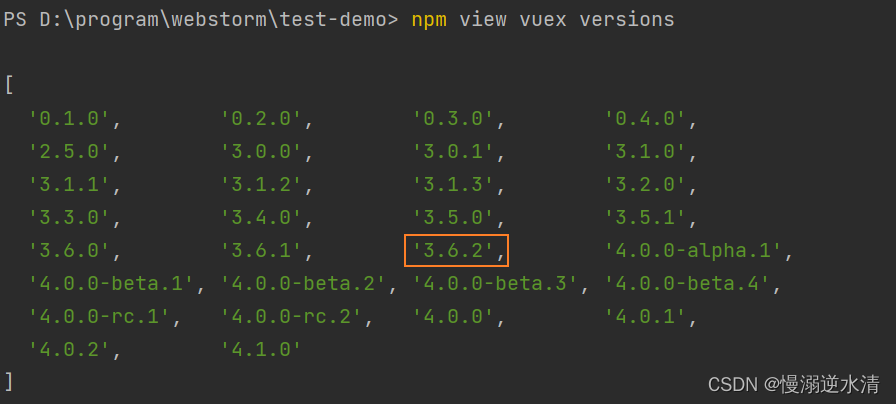
参考:vue2.0只能安装vuex3.x版本,最高3.6.2,vue3.0才能装vuex4.x版本
配置
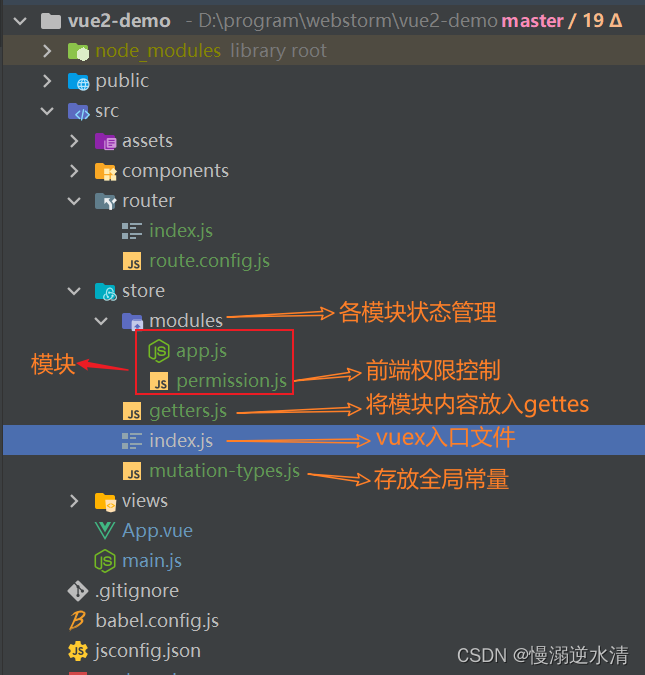
项目src目录创建store目录,内容如图。
- index.js vuex的路口文件
- modules 项目各模块的状态管理,如果项目比较小的话,可以直接将内容写在入口文件里 permission.js里存放的是前端权限管理方法和操作。权限如果是前端控制才有会用到。即动态路由内容存放在前端。
- mutation-type.js 存放全局变量,比如请求头token名、登录状态名等
index.js
// you do not need `import app from './modules/app'`// it will auto require all vuex module from modules fileconst modules = modulesFiles.keys().reduce((modules, modulePath)=>{// set './app.js' => 'app'const moduleName = modulePath.replace(/^\.\/(.*)\.\w+$/,'$1')const value =modulesFiles(modulePath)
  modules[moduleName]= value.default
  return modules
},{})const store =newVuex.Store({
  modules,
  getters
})exportdefault store
app.js
const state ={showText:'hello world',}const mutations ={SET_SHOW_TEXT(state,showText){
    state.showText=showText
  }}const actions ={}exportdefault{namespaced:true,
  state,
  mutations,
  actions
}
permission.js
import{ constantRouterMap, asyncRouterMap }from"@/router/route.config";/**
 * 通过meta.role判断是否与当前用户权限匹配
 * @param roles
 * @param route
 */functionhasPermission(roles, route){if(route.meta && route.meta.roles){// return roles.some(role => route.meta.roles.includes(role))if(route.meta.roles.indexOf(roles)>=0){returntrue;}else{returnfalse;}}else{returntrue;}}/**
 * 递归过滤异步路由表,返回符合用户角色权限的路由表
 * @param routes asyncRoutes
 * @param roles
 */exportfunctionfilterAsyncRoutes(routes, roles){const res =[];
  routes.forEach((route)=>{const tmp ={...route };if(hasPermission(roles, tmp)){if(tmp.children){
        tmp.children =filterAsyncRoutes(tmp.children, roles);}
      res.push(tmp);}});return res;}const state ={routes:[],addRoutes:[],};const mutations ={SET_ROUTES:(state, routes)=>{
    state.addRoutes = routes;
    state.routes = constantRouterMap.concat(routes);},};const actions ={//根据角色权限过滤生成动态路由generateRoutes({ commit }, roles){returnnewPromise((resolve)=>{let accessedRoutes;
      accessedRoutes =filterAsyncRoutes(asyncRouterMap, roles);commit("SET_ROUTES", accessedRoutes);resolve(accessedRoutes);});},};exportdefault{namespaced:true,
  state,
  mutations,
  actions,};
mutation-types.js
//将常量放在单独的文件中,方便协作开发exportconstACCESS_TOKEN="Access-Token";//token存储名字exportconstUSER_INFO="Login_Userinfo";
element ui(基于vue的组件库)
安装
npm 命令
npm i element-ui -S
配置(按需引入)
为什么要按需引入?
按需引入的目的是只引入用到的组件,以达到减小项目体积的目的。
要实现按需引入需要安装
babel-plugin-component
依赖
安装命令
npm i babel-plugin-component -D
,安装成功后需要在babel.config.js配置
module.exports ={/**
    compact: false解除babel处理文件的大小被限制在了500kb的限制,
  用来解决npm run dev或者npm run build 出现...exceeds the max of 500KB
  */compact:false,presets:[["@vue/cli-plugin-babel/preset"],["@babel/preset-env",{modules:false}],//es2015],plugins:[["component",{libraryName:"element-ui",styleLibraryName:"theme-chalk",},],],};
官网的按需引入会报错,‘es2015’改成’@babel/preset-env’,就好了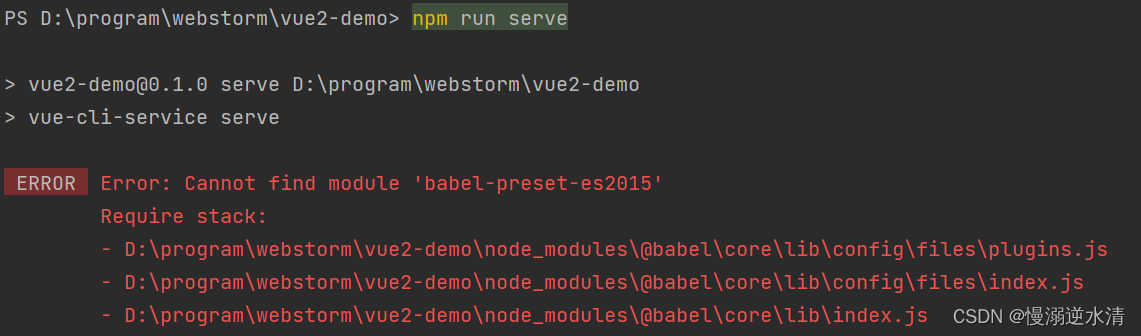
然后就是按需引入element组件内容。
我是在src目录下新建了个plugins目录,如图。
element-ui.js里面存放的element按需引入的组件。
这里我引入了Button、Message、MessageBox组件,button组件首页HomePage有用到,Message、MessageBox消息组件下面的axios拦截器配置里有用到。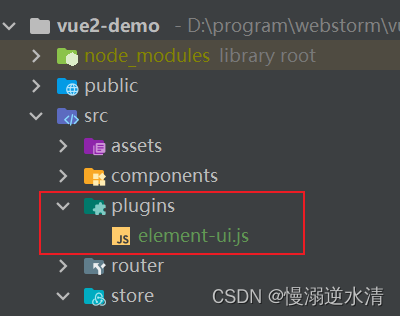
element-ui.js
// 按需全局引入 element ui组件import Vue from"vue";import{ Button,MessageBox }from"element-ui";import{ Message }from"element-ui";// import { message } from "@/config/message"; //全局配置message

Vue.use(Button);Vue.prototype.$message = Message;Vue.prototype.$msgbox = MessageBox;Vue.prototype.$alert = MessageBox.alert;Vue.prototype.$confirm = MessageBox.confirm;Vue.prototype.$prompt = MessageBox.prompt;
按需引入区别?
vant-ui
(移动端组件库)使用babel-plugin-import按需引入,
element-ui
使用babel-plugin-component,两者有啥区别?
babel-plugin-import
是 ant-design 团队出的,可以说其他绝大部分按需引入的插件都是在此基础上魔改的。
babel-plugin-component
是饿了么团队在前者的基础上做了一些改动。主要是因为 fork 的时间太早(2016 年 4 月),饿了么修复了一些早期 bug 却并没有 PR 到 ant-design 的仓库里去,但后来 ant-design 也有修复;再就是后来 ant-design 的有一些配置项的变动、而饿了么团队却没有跟进合并。所以二者还是有一些差异的。
参考:babel-plugin-import 实现按需引入
axios (前后端交互)
安装
npm 安装命令
npm install axios
配置
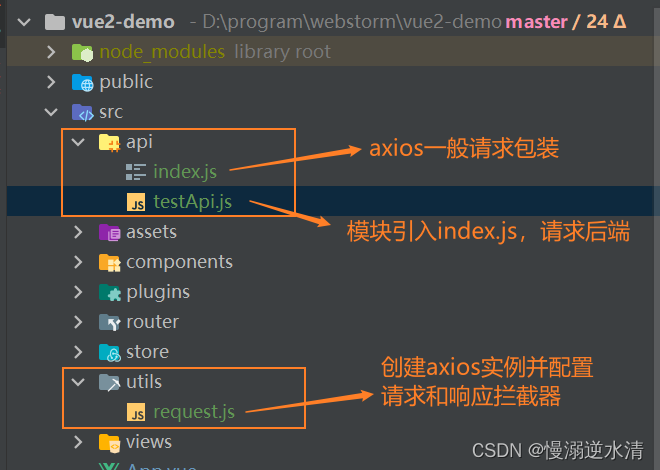
在项目src目录下创建utils目录用来存放项目的工具类:
- request.js :创建axios实例,并配置axios的请求和响应拦截器。
- 请求拦截器一般会全局添加请求头token或调用element的loading组件。响应拦截器用来对于请求的报错信息进行提示。
创建api目录用来存放模块请求接口:
- index.js:引入utils目录下的request的axios实例,来封装一般的axios请求,比如get、post以及文件下载等请求。
- testApi (模块名): 项目模块引入index.js,请求后端。
utils/request.js
import Vue from"vue";import axios from"axios";import store from"@/store";import{ Message, MessageBox }from"element-ui";import{ACCESS_TOKEN}from"@/store/mutation-types";// 创建axios 实例const service = axios.create({baseURL:"/api",// api base_urltimeout:90000,// 请求超时时间});consterr=(error)=>{if(
    error.code ==="ECONNABORTED"||
    error.message ==="Network Error"||
    error.message.includes("timeout")){
    Message.error("请求超时,请稍候重试");}if(error.response){let data = error.response.data;const token = Vue.ls.get(ACCESS_TOKEN);
    console.log("------异常响应------", token);
    console.log("------异常响应------", error.response.status);var pathName = window.location.pathname;switch(error.response.status){/**
       * 401:未授权,请重新登录、403:拒绝访问、404:很抱歉,资源未找到!、408:请求超时
       * 500:服务器内部错误、502:网关错误、504:网络超时、505:HTTP 版本不受支持
       */case401:
        Message.error("未授权,请重新登录");if(token){
          store.dispatch("Logout").then(()=>{setTimeout(()=>{
              window.location.reload();},1500);});}break;case403:
        Message.error("拒绝访问");break;case404:
        Message.error("很抱歉,资源未找到!");break;case408:
        Message.error("请求超时");break;case500:
          Message.error("服务器内部错误");break;case502:
        Message.error("网关错误");break;case504:
        Message.error("网络超时");break;case505:
        Message.error("HTTP 版本不受支持");break;default:
        Message.error(data.message || data);break;}}return Promise.reject(error);// return Promise.reject(new Error(error))};// 请求拦截器,一般用来添加请求token和请求方法加loading
service.interceptors.request.use((config)=>{const token = Vue.ls.get(ACCESS_TOKEN);if(token){
      config.headers["X-Access-Token"]= token;// 让每个请求携带自定义 token 请根据实际情况自行修改}return config;},(error)=>{return Promise.reject(error);// return Promise.reject(new Error(error))});// 响应拦截器
service.interceptors.response.use((response)=>{return response.data;}, err);export{ service as axios };
api/index.js
import{ axios }from"@/utils/request";/**
 * get请求
 * @param url 请求api
 * @param parameter 请求参数
 */exportfunctiongetAction(url, parameter){returnaxios({url: url,method:"get",params: parameter,});}/**
 * post请求
 * @param url 请求api
 * @param parameter 请求参数
 */exportfunctionpostAction(url, parameter){returnaxios({url: url,method:"post",data: parameter,});}exportfunctionpostAction1(url, parameter){returnaxios({url: url,method:"post",data: parameter,contentType:"application/json",//请求头类型});}exportfunctionpostAction2(url, parameter){returnaxios({url: url,method:"post",data: parameter,timeout:300000,// 请求超时时间});}/**
 * post method= {post | put}
 */exportfunctionhttpAction(url, parameter, method){returnaxios({url: url,method: method,data: parameter,});}/**
 * put请求
 */exportfunctionputAction(url, parameter){returnaxios({url: url,method:"put",data: parameter,});}/**
 *  delete请求
 */exportfunctiondeleteAction(url, parameter){returnaxios({url: url,method:"delete",params: parameter,});}/**
 * 下载文件 用于excel导出
 */exportfunctiondownFile(url, parameter){returnaxios({url: url,params: parameter,method:"get",responseType:"blob",});}
api/testApi
import{postAction}from"@/api/index";//登录constlogin=(params)=>postAction("/sys/login",params);export{
    login
}
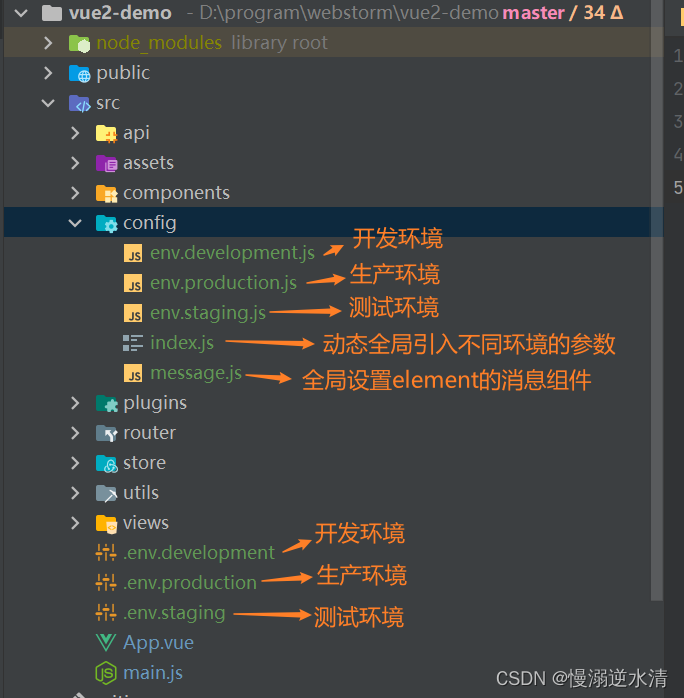
第三步:配置不同环境的后端请求地址(开发、测试、正式)
在src目录新建config目录。
index.js根据当前所属环境动态引入参数,比如开发环境下就会引入env.development.js下的变量内容。env.*.js配置全局的环境参数,比如后端请求地址,项目的静态文件引用的cdn地址,端口号等
在项目目录下创建.env.*文件。
.env.*是会根据npm命令调用,里面配置不同环境的参数。- 注意:千万不要建到src目录下,这样会导致如果你在.env.*里创建了VUE_APP_开头的环境变量后,在其他地方使用
process.env.VUE_APP_*就会报undefined,查不到。
自问自答环节:
.env.*
就可以根据不同环境定义不同环境的参数,为啥还定义index.js和
env.*.js
?
答:个人觉得这个更友好吧,含义更清晰。
在packge.json的scripts里添加
"stage": "vue-cli-service build --mode staging",
npm run serve运行成功后就会使用开发环境的环境变量npm run bulid打包过程中里的js文件会使用正式环境的环境变量- 同理,
npm run stage打包过程中里的js文件会使用测试环境的环境变量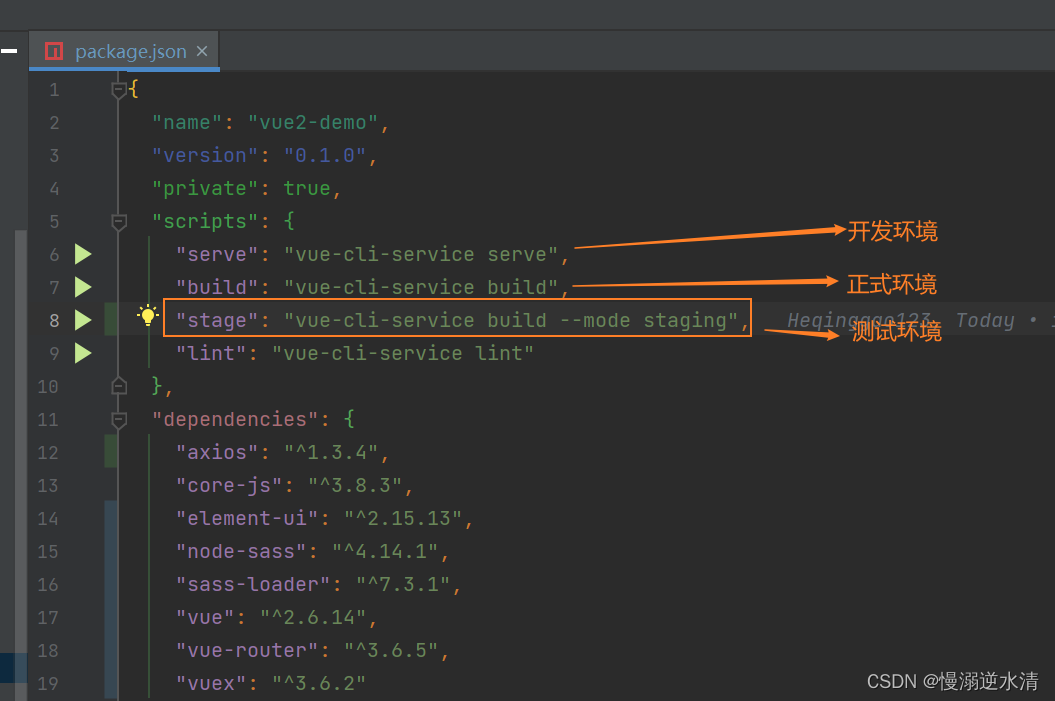
config/index.js
/**
 * 以 VUE_APP_ 开头的变量,在代码中可以通过 process.env.VUE_APP_ 访问。
 * 比如,VUE_APP_ENV = 'development' 通过process.env.VUE_APP_ENV 访问。
 * 除了 VUE_APP_* 变量之外,在你的应用代码中始终可用的还有两个特殊的变量NODE_ENV 和BASE_URL
 */// 根据环境引入不同配置 process.env.VUE_APP_ENVconst environment = process.env.VUE_APP_ENV||"production";const config =require("./env."+ environment);
module.exports = config;
config/env.*.js
env.development.js
// 本地环境配置
module.exports ={title:"testDemo",baseApi:"http://localhostxxx/api",// 本地api请求地址port:8080,};

env.staging.js
// 测试环境配置
module.exports ={title:"testDemo",baseApi:"http://testxxx/api",port:8081,};

env.productionxxx.js
// 正式环境配置
module.exports ={title:"testDemo",baseApi:"http://productionxxx/api",port:8082,};
项目目录(我这里就是vue2-demo)/.env.*
.env.development
NODE_ENV='development'
# must start withVUE_APP_VUE_APP_ENV='development'.env.staging
NODE_ENV='staging'
# must start withVUE_APP_VUE_APP_ENV='staging'.env.production
NODE_ENV='production'
# must start withVUE_APP_VUE_APP_ENV='production'
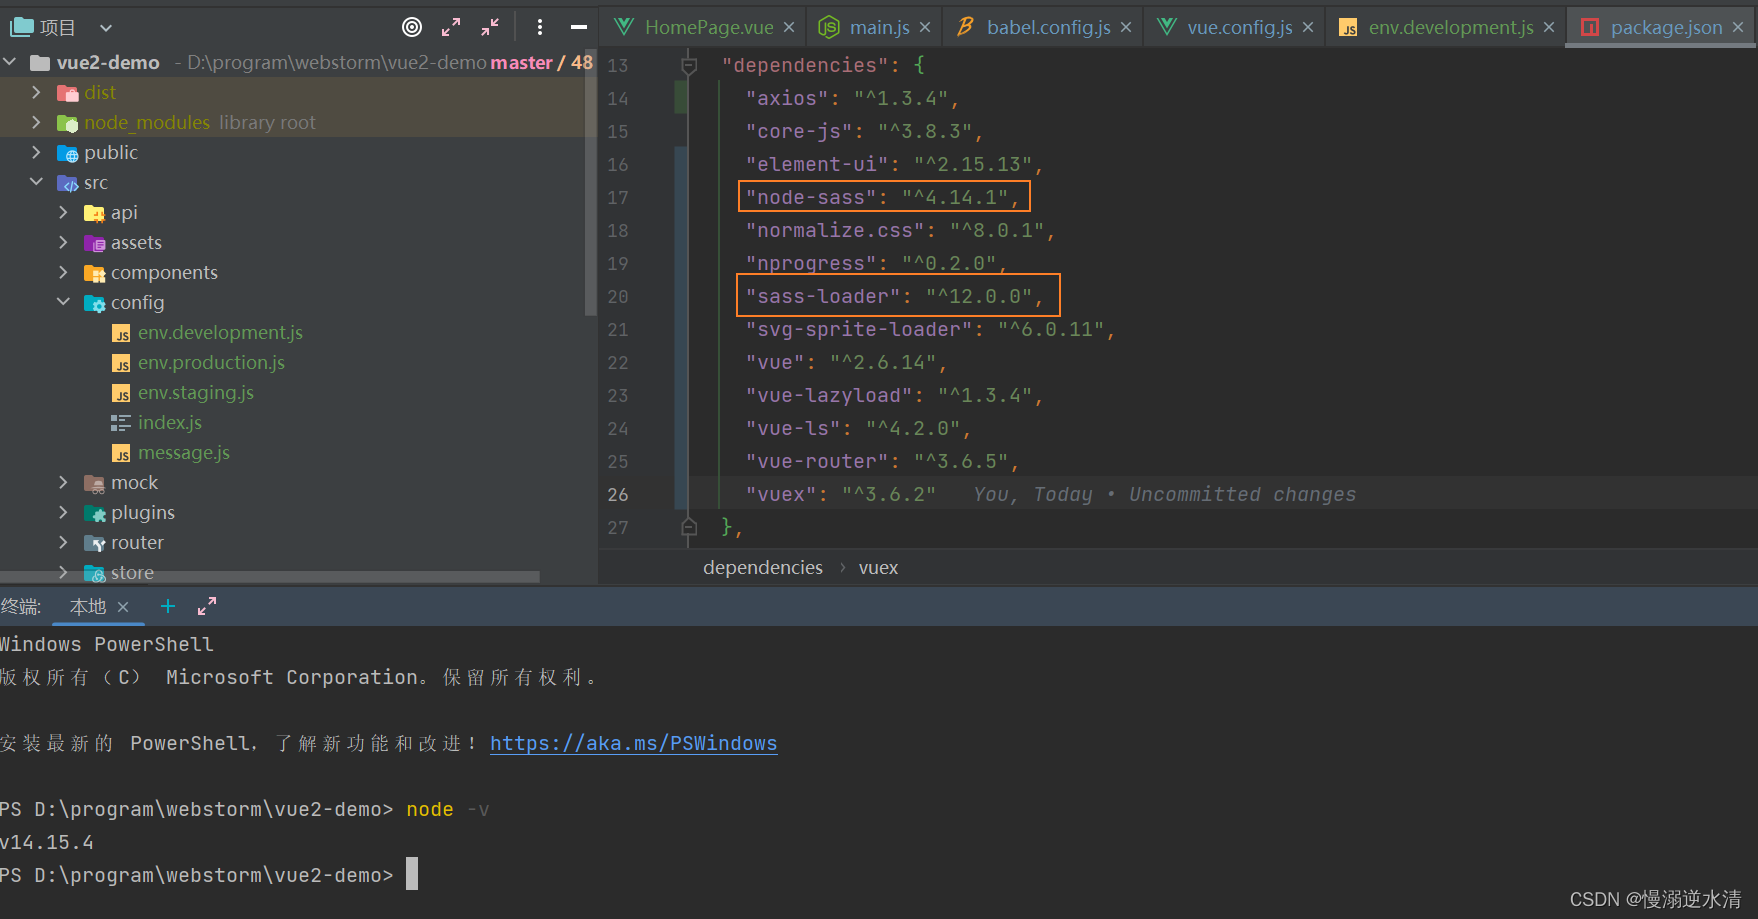
vue.config.js (基础配置+代理跨域、sass全局样式、图标引入、打包分析、生成环境去除console.log、splitChunks 单独打包第三方模块)
- sass全局样式需要安装node-sass和sass-loader。 我的node版本是14.15.4。运行下面命令。如图所示。
npm install [email protected] [email protected]
参考:
安装 node-sass 和 sass-loader 的过程及各 node 版本对应的 node-sass 版本号
Sass详解
sass官网
- 图标引入需要安装
svg-sprite-loader,将svg图片以雪碧图的方式在项目中加载。 雪碧图是一种将多个图片资源合并成一张大图片的做法,用到网页,能减少 HTTP 请求数量,以及提前加载一些还未使用的小图片。npm i svg-sprite-loader有两种方式——使用iconfont 集成到项目、使用svg图标。> 参考:> Vue中使用图标的两种常用方式> 手把手,带你优雅的使用 icon - 打包分析需要安装webpack-bundle-analyzer(打包分析可视化工具)
npm install webpack-bundle-analyzer -D - runtime.js处理策略。
npm add html-webpack-plugin script-ext-html-webpack-plugin -D - vue.config.js代码如下。
"use strict";const path =require("path");const defaultSettings =require("./src/config/index.js");const BundleAnalyzerPlugin =require("webpack-bundle-analyzer").BundleAnalyzerPlugin;functionresolve(dir){return path.join(__dirname, dir);}const name = defaultSettings.title ||"testDemo";// 生产环境,测试和正式constIS_PROD=["production","prod"].includes(process.env.NODE_ENV);const{ defineConfig }=require("@vue/cli-service");module.exports =defineConfig({// publicPath: './', // 署应用包时的基本 URL。 vue-router hash 模式使用//署应用包时的基本 URL。 vue-router history模式使用publicPath:"/",// 生产环境构建文件的目录outputDir:"dist",// outputDir的静态资源(js、css、img、fonts)目录assetsDir:"static",//保存是否校验eslintlintOnSave:!IS_PROD,// js调试源码映射地图,如果你不需要生产环境的 source map,可以将其设置为 false,即打包时不会生成 .map 文件,以加速生产环境构建。productionSourceMap:false,// 默认情况下 babel-loader 会忽略所有 node_modules 中的文件。你可以启用本选项,以避免构建后的代码中出现未转译的第三方依赖。transpileDependencies:false,devServer:{port: defaultSettings.port,// 端口open:false,// 启动后打开浏览器client:{overlay:{//当出现编译器错误或警告时,在浏览器中显示全屏覆盖层//设置错误在页面弹出、警告不在页面弹出warnings:false,errors:true,},},//proxy代理/** * 代理定义 * 正向代理:替客户端向服务器发送请求,可以解决跨域问题 * 反向代理:替服务器统一接收请求。 */proxy:{//配置跨域"/api":{target: defaultSettings.baseApi,// ws:true,changOrigin:true,pathRewrite:{"^/api":"",},},},},configureWebpack:(config)=>{ config.name = name;// 为生产环境修改配置.../** * 依赖模块采用第三方cdn资源 * externals: { * '包名' : '在项目中引入的名字' * 'vue': 'Vue', * 'vuex': 'Vuex', * 'vue-router': 'VueRouter', * 'element-ui': 'ELEMENT' * } */// if (IS_PROD) {// // externals// config.externals = externals// }// 取消webpack警告的性能提示 config.performance ={hints:"warning",//入口起点的最大体积maxEntrypointSize:50000000,//生成文件的最大体积maxAssetSize:30000000,//只给出 js 文件的性能提示assetFilter:function(assetFilename){return assetFilename.endsWith(".js");},};},css:{extract:IS_PROD,// 是否将组件中的 CSS 提取至一个独立的 CSS 文件中 (而不是动态注入到 JavaScript 中的 inline 代码)。sourceMap:false,loaderOptions:{//专门用来全局颜色、变量、mixin,千万不要引入全局样式,要不然每个页面都会重复引用scss:{// 向全局sass样式传入共享的全局变量, $src可以配置图片cdn前缀// 详情: https://cli.vuejs.org/guide/css.html#passing-options-to-pre-processor-loaders// $cdn: "${defaultSettings.$cdn}";additionalData:` @import "@/assets/styles/variables.scss"; //项目存放scss变量地址 `}}},chainWebpack:(config)=>{// 目录别名 alias config.resolve.alias.set("@",resolve("src"));// .set("assets", resolve("src/assets"))// .set("api", resolve("src/api"))// .set("views", resolve("src/views"))// .set("components", resolve("src/components"));/** * cdn = { * css: [ * 'https://unpkg.com/element-ui/lib/theme-chalk/index.css' // element-ui css 样式表 * ], * js: [ * // vue must at first! * 'https://unpkg.com/[email protected]/dist/vue.js', // vuejs * 'https://unpkg.com/element-ui/lib/index.js', // element-ui js * 'https://cdn.jsdelivr.net/npm/[email protected]/dist/xlsx.full.min.js', // xlsx * ] * } * 原文链接:https://blog.csdn.net/Wy_so_serious/article/details/121044173 */// config.plugin('html').tap(args => {// if (IS_PROD) {// args[0].cdn = cdn.build// } else {// args[0].cdn = cdn.dev// }// return args// })// const oneOfsMap = config.module.rule("scss").oneOfs.store;// oneOfsMap.forEach(item => {// item// .use("style-resources-loader")// .loader("style-resources-loader")// .options({// // 这里的路径不能使用 @ 符号,否则会报错// // patterns: ["./src/assets/reset1.less", "./src/assets/reset2.less"]// patterns: "./src/assets/styles/variables.scss"// })// .end()// })/** * 设置保留空格 */ config.module .rule("vue").use("vue-loader").loader("vue-loader").tap((options)=>{ options.compilerOptions.preserveWhitespace =true;return options;}).end();// config.module.rule('images')// .use('url-loader')// .tap(options => ({// //[hash:10]取图片的hash的前10位// //[ext]取文件原来扩展名// name: './assets/images/[name].[ext]',// quality: 85,// limit: 8 * 1024, //// // encoding: true, // 默认为true, 是否使用默认编码base64,可以["utf8","utf16le","latin1","base64","hex","ascii","binary","ucs2"]// // generator: '', // 类型:{Function},默认值:() => type/subtype;encoding,base64_data,可以自定义数据编码。// esModule: false, // 关掉es6模块化解析// // fallback: 'file-loader', //指定当目标文件的大小超过限制时要使用的备用加载程序// })); config.module.rule("images").set("parser",{dataUrlCondition:{maxSize:8*1024,// 小于8K的图片将直接以base64的形式内联在代码中,可以减少一次http请求。},});// svg-sprite-loader 将svg图片以雪碧图的方式在项目中加载 config.module.rule("svg").exclude.add(resolve("src/assets/icons")).end(); config.module .rule("icons").test(/\.svg$/)//添加匹配规则.include.add(resolve("src/assets/icons"))//添加我们要处理的文件路径 svg图片地址.end()//上面的add方法改变了上下文,调用end()退回到include这一级.use("svg-sprite-loader")//使用"svg-sprite-loader"这个依赖.loader("svg-sprite-loader")//选中这个依赖.options({// 这个配置是这个包的配置不属于webpack,可以查看相关文档,symbolId指定我们使用svg图片的名字symbolId:"icon-[name]",// 使用图标的方式 icon-文件名})//传入配置.end();/** * 打包分析 * https://blog.csdn.net/formylovetm/article/details/126424858 */if(IS_PROD){ config.plugin("webpack-report").use(BundleAnalyzerPlugin,[{analyzerMode:"static",},]);}/** * 是否开启源码映射调试 * https://www.cnblogs.com/suwanbin/p/16901247.html * 浏览器上调试代码的问题,但是代码在显示的时候会出现压缩编码等问题,代码和原来就不一样,这时候需要打开调试模式. * source-map: 在外部生成一个文件,在控制台会显示 错误代码准确信息 和 源代码的错误位置 * inline-source-map: 内嵌到bundle.js中, 只生成一个source-map,在控制台会显示 错误代码准确信息 和 源代码的错误位置 * hidden-source-map: 外部,错误代码错误原因,源代码的错误位置,不能追踪源代码错误,只能提示到构建后代码的错误位置 * eval-source-map: 内嵌,每一个文件都生成对应的source-map,在控制台会显示 错误代码准确信息,源代码的错误位置 * nosources-source-map: 外部,错误代码准确信息,没有任何源代码信息 * cheap-source-map: 外部,错误代码准确信息,源代码的错误位置,只能精准到行 * cheap-module-source-map: 外部,错误代码准确信息,源代码的错误位置,module会将loader的source-map加入 * * 内嵌与外部的区别: 1.外部生成单独的文件,内嵌没有 2.内嵌构建速度快 * 这么多source-map如何选择? * 开发环境:速度快,调试更友好 * 速度快( eval>inline>cheap>··· ) * 组合eval-cheap-source-map > eval-source-map,调试更友好 * source-map > cheap-module-source-map > cheap-source-map * 最终结果:cheap-module-source-map 和 eval-source-map (vuecli与react脚手架默认) *生产环境:源代码要不要隐藏?调试要不要更友好 *内嵌会让代码体积变大,所以在生产环境下不用内嵌 * nosources-source-map全部隐藏 * hidden-source-map 只隐藏源代码,会提示构建后代码错误信息 * 最终结果:source-map 和 cheap-module-source-map */ config // https://webpack.js.org/configuration/devtool/#development.when(!IS_PROD,(config)=> config.devtool("cheap-module-source-map")); config.when(IS_PROD,(config)=>{/** * Vue预渲染prerender-spa-plugin+vue-meta-info * https://blog.csdn.net/milkgan/article/details/127509160 * 只有少量页面需要SEO优化 * 仅仅提高首屏的渲染速度,且首屏的几乎只有静态数据的情况 * preload 预加载,提前预加载提高切换路由的体验,加上这个,会打包报错 * Vue CLI 4.5 和更早版本会使用 Preload 技术 */// config.plugin("preload").tap(() => [// {// rel: "preload",// // to ignore runtime.js 注:这里要把 runtime 代码的 preload 去掉。// fileBlacklist: [/\.map$/, /hot-update\.js$/, /runtime\..*\.js$/],// include: "initial"// }// ]);/** * https://blog.csdn.net/qq_36278221/article/details/128042470 * 多页面打包配置 * Object.keys(pages).forEach((element) => { * config.plugin('preload-' + element).tap(() => [ * { * rel: 'preload', * // to ignore runtime.js * fileBlacklist: [/\.map$/, /hot-update\.js$/, /runtime\..*\.js$/], * include: 'initial', * }, * ]) * config * .plugin("ScriptExtHtmlWebpackPlugin") * .after('html-' + element) * .use('script-ext-html-webpack-plugin', [ * { * // `runtime` must same as runtimeChunk name. default is `runtime` * inline: /runtime\..*\.js$/, * }, * ]) * .end() * config.plugins.delete('prefetch-' + element) * }) * runtime.js 处理策略 * 根据路由驱动页面的 runtime 代码默认情况是包含在 build 后的 app.hash.js 内的,如果我们改动其他路由,就会导致 runtime 代码改变。从而不光我们改动的路由对应的页面 js 会变,含 runtime 代码的 app.hash.js 也会变,对用户体验是非常不友好的。 * 为了解决这个问题要设定 runtime 代码单独抽取打包: * config.optimization.runtimeChunk('single') * 但是 runtime 代码由于只是驱动不同路由页面的关系,代码量比较少,请求 js 的时间都大于执行时间了, * 所以使用 script-ext-html-webpack-plugin 插件将其内链在 index.html 中比较友好。 */ config .plugin("ScriptExtHtmlWebpackPlugin").after("html").use("script-ext-html-webpack-plugin",[{// 将 runtime 作为内联引入不单独存在inline:/runtime\..*\.js$/,},]).end();//当有很多页面时,会导致太多无意义的请求 config.plugins.delete("prefetch");/** * https://blog.csdn.net/weixin_44786530/article/details/126936033 * 去掉代码中的console和debugger和注释 */ config.optimization.minimizer("terser").tap((options)=>{ options[0].terserOptions.compress.warnings =false; options[0].terserOptions.compress.drop_console =true; options[0].terserOptions.compress.drop_debugger =true; options[0].terserOptions.compress.pure_funcs =["console.log"]; options[0].terserOptions.output ={//删除注释comments:false,};return options;});/** * chunks 资源分块 * 如果使用了某些长期不会改变的库,像 element-ui ,打包完成有 600 多 KB , * 包含在默认 vendor 中显然不合适,每次用户都要加载这么大的文件体验不好,所以要单独打包 */ config.optimization.splitChunks({chunks:"all",cacheGroups:{// cacheGroups 下可以可以配置多个组,每个组根据test设置条件,符合test条件的模块commons:{name:"chunk-commons",test:resolve("src/components"),minChunks:3,// 被至少用三次以上打包分离priority:5,// 优先级reuseExistingChunk:true,// 表示是否使用已有的 chunk,如果为 true 则表示如果当前的 chunk 包含的模块已经被抽取出去了,那么将不会重新生成新的。},node_vendors:{name:"chunk-libs",chunks:"initial",// 只打包初始时依赖的第三方test:/[\\/]node_modules[\\/]/,priority:10,},vantUI:{name:"chunk-elementUI",// 单独将 vantUI 拆包priority:20,// 数字大权重到,满足多个 cacheGroups 的条件时候分到权重高的test:/[\\/]node_modules[\\/]_?element-ui(.*)/,},},}); config.optimization.runtimeChunk("single"),{from: path.resolve(__dirname,"./public/robots.txt"),//防爬虫文件to:"./",//到根目录下};});},pluginOptions:{"style-resources-loader":{preProcessor:"sass",patterns:[],},},});
参考:
Vue 配置全局样式(style-resources-loader)
设置全局css/less/sass样式and优化与style-resources-loader的理解
vue.config.js 全局配置
版权归原作者 慢溺逆水清 所有, 如有侵权,请联系我们删除。