
系列文章目录
提示:请提前了解本章总体内容,点击快捷导航
文章目录
前言
提示:总结软件测试岗位,必会的Linux操作系统命令
本人将耗费一定的心血,完成这篇文章的著作,如果你目前要往测试岗位方向走,可以参考此篇文章,你将对Linux操作系统有一个充分的认识
2022.06.22 敬上
一、Linux 基础知识
1. 命令行的标识符
[root@localhost /]#
root 当前用户
@ 分割作用,并无实际含义
localhost 当前主机名
/ 当前目录
# 超级管理员 (如果是普通用户,即会显示 $)
2. 目录结构
/ 根目录
/etc 存放系统和应用程序的配置文件
/usr 存放应用程序文件
/home 普通用户的家目录
/boot 存放系统的内核,启动时所需的文件
/bin 存放普通用户和系统管理员所需的命令(/var/bin)
/sbin 存放超级管理员 root 用户的命令(/var/sbin)
/root root用户的家目录
/tmp 临时文件
/var 应用程序的数据、日志、临时文件
二、Linux日常操作
1. Tab 按键
自动补全,对于一些不知道完整的目录、命令,可快速补全未完成的指令
按 Tab 健,自动补全
注意:剩下唯一可选择的,才能自动补全,例如more,系统中,mor 最后一个可选择项是 more,因此可以自动补全
[root@localhost ~]# mor
[root@localhost ~]# more
双击 Tab 健,查看与之匹配的所有指令、目录
[root@localhost ~]# mk
[root@localhost ~]# mk
mkdict            mkfs              mkfs.ext4         mklost+found
mkdir             mkfs.btrfs        mkfs.minix        mknod
mkdumprd          mkfs.cramfs       mkfs.xfs          mkswap
mke2fs            mkfs.ext2         mkhomedir_helper  mktemp
mkfifo            mkfs.ext3         mkinitrd
目录的补全
[root@localhost java]# ls
apache-tomcat-9.0.45         jdk1.8.0_40
apache-tomcat-9.0.45.tar.gz  JDK-8u40-linux-x64.tar.gz
[root@localhost java]# cd apache
[root@localhost java]# cd apache-tomcat-9.0.45
2. clear 清屏
对于操作了大量的命令,窗口可能会烦杂,这个时候可以使用clear,快速清屏
快捷键:Ctrl + L
[root@localhost ~]# cd .[root@localhost ~]# ls
anaconda-ks.cfg
[root@localhost ~]# cd /[root@localhost /]# ls
bin   dev  home  lib64      media  opt   root  sbin  sys   tmp  var
boot  etc  lib   linux.txt  mnt    proc  run   srv   test  usr
[root@localhost /]# cd usr
[root@localhost usr]# ls
bin  etc  games  include  java  lib  lib64  libexec  local  sbin  share  src  tmp
[root@localhost usr]# cd etc
[root@localhost etc]# ls
[root@localhost etc]# cd ../[root@localhost usr]# ls
bin  etc  games  include  java  lib  lib64  libexec  local  sbin  share  src  tmp
[root@localhost usr]# cd java
[root@localhost java]# ls
apache-tomcat-9.0.45         jdk1.8.0_40
apache-tomcat-9.0.45.tar.gz  JDK-8u40-linux-x64.tar.gz
[root@localhost java]# cd apache-tomcat-9.0.45
[root@localhost java]# clear
3. Ctrl + C 强制退出
如果在Linux打开了,持续运行并持续输出,全屏模式的程序,可以强制退出,并返回到指令状态
[root@localhost java]# ping www.baidu.com
PING www.a.shifen.com(14.215.177.39)56(84) bytes of data.64 bytes from 14.215.177.39(14.215.177.39): icmp_seq=1 ttl=56 time=12.4 ms
64 bytes from 14.215.177.39(14.215.177.39): icmp_seq=2 ttl=56 time=6.58 ms
64 bytes from 14.215.177.39(14.215.177.39): icmp_seq=3 ttl=56 time=6.90 ms
64 bytes from 14.215.177.39(14.215.177.39): icmp_seq=4 ttl=56 time=7.85 ms
64 bytes from 14.215.177.39(14.215.177.39): icmp_seq=5 ttl=56 time=10.6 ms
64 bytes from 14.215.177.39(14.215.177.39): icmp_seq=6 ttl=56 time=11.7 ms
64 bytes from 14.215.177.39(14.215.177.39): icmp_seq=7 ttl=56 time=11.2 ms
64 bytes from 14.215.177.39(14.215.177.39): icmp_seq=8 ttl=56 time=37.5 ms
64 bytes from 14.215.177.39(14.215.177.39): icmp_seq=9 ttl=56 time=31.7 ms
64 bytes from 14.215.177.39(14.215.177.39): icmp_seq=10 ttl=56 time=8.09 ms
^C
--- www.a.shifen.com ping statistics ---33 packets transmitted,33 received,0% packet loss, time 32069ms
rtt min/avg/max/mdev =6.584/31.494/151.414/34.922 ms
[root@localhost java]#
4. man 帮助
如果你对某个命令,不知道怎么使用,可以使用man + 命令,可以调出帮助文档,不过,都是英文文档,需要具备一定的英文阅读能力
[root@localhost java]# man clear
clear(1)                       General Commands Manual                       clear(1)

NAME
       clear - clear the terminal screen

SYNOPSIS
       clear

DESCRIPTION
       clear clears your screen if this is possible.  It looks in the environment for
       the terminal type and then in the terminfo database to figure out how to clear
       the  screen.  Some terminals can clear also their scrollback buffer to prevent
       access to potentially sensitive data.  If the terminfo entry for the  terminal
       type  contains  extended capability E3, clear will use it to clear the scroll‐
       back buffer.

       clear ignores any command-line parameters that may be present.

SEE ALSO
       tput(1),terminfo(5)

       This describes ncurses version 5.9(patch 20130511).clear(1)
 Manual page clear(1) line 1(press h for help or q to quit)
5. q 退出阅读模式
如果你进入了阅读模式,即查看帮助,以及查看文件内容等,可以按q健,退出阅读模式
clear(1)                       General Commands Manual                       clear(1)

NAME
       clear - clear the terminal screen

......

       This describes ncurses version 5.9(patch 20130511).clear(1)
 Manual page clear(1) line 1(press h for help or q to quit)
按 q ,即可返回
[root@localhost java]#
6. pwd 查看当前路径
查询当前所在目录的绝对路径
[root@localhost conf]# pwd
/usr/java/apache-tomcat-9.0.45/conf
7. ls 显示当前目录所有文件
查看当前目录下的所有文件
如需查看隐藏文件,加-a
如需查看文件的详细信息,权限,大小,类型,加-l
(以上两个可以合并,输入 ll 即可)
可以查看某个目录下的文件
ls -la 路径
[root@localhost ~]# ls
anaconda-ks.cfg
[root@localhost ~]# ls -a
.   anaconda-ks.cfg  .bash_logout   .bashrc  .mysql_history  .tcshrc
...bash_history    .bash_profile  .cshrc   .rnd
[root@localhost ~]# ls -la
总用量 44
dr-xr-x---.2 root root  1696月  1609:20.
dr-xr-xr-x.18 root root  2736月  1517:38..-rw-------.1 root root 12166月  1410:07 anaconda-ks.cfg
-rw-------.1 root root 88766月  1610:10.bash_history
-rw-r--r--.1 root root   1812月 292013.bash_logout
-rw-r--r--.1 root root  17612月 292013.bash_profile
-rw-r--r--.1 root root  17612月 292013.bashrc
-rw-r--r--.1 root root  10012月 292013.cshrc
-rw-------1 root root  4446月  1511:13.mysql_history
-rw-------1 root root 10246月  1510:33.rnd
-rw-r--r--.1 root root  12912月 292013.tcshrc
[root@localhost ~]# ll /usr/java
总用量 180380
drwxr-xr-x  9 root root       2206月  1510:22 apache-tomcat-9.0.45-rw-r--r--1 root root  114869646月  1415:07 apache-tomcat-9.0.45.tar.gz
drwxr-xr-x.8101432552月  112015 jdk1.8.0_40
-rw-r--r--.1 root root 1732181276月  1414:46 JDK-8u40-linux-x64.tar.gz
8. cd 切换目录
进入其他路径
cd 绝对路径
cd 相对路径
绝对路径和相对路径的区别就是,绝对路径是以 / 开头
cd …/ 倒退一级目录
cd …/…/ 倒退两级目录
[root@localhost ~]# cd /[root@localhost /]# cd /root
[root@localhost ~]# cd /[root@localhost /]# cd usr
[root@localhost usr]#
注意,下面的话,直接cd 并回车,会直接进入
用户的家目录,即 /root 标识符显示为 ~
linux的根目录为 /
[root@localhost usr]# cd
[root@localhost ~]# cd /[root@localhost /]# cd /root
[root@localhost ~]#
9. history 查看命令行操作记录
[root@localhost ~]# history
    1  cd /etc/default2  ls
    3  ls -a
    4  vi console-setup
    5  vi /boot/grub
    6  ls
    7  cd /boot
    8  ls
    9  cd grub
   10  ls
   11  ls -a
   12  vi /etc/sysconfig/network-scripts//ifcfg-ens33 13  systemctl restart network
   14  ls
   15  ip adder
   16  ip addr
查看最新的10行,history 10
[root@localhost ~]# history 10807  cat /etc/group
  808  chgrp -R test002 1111.txt
  809  ll
  810  ln -s 1111.txt hi
  811  ll
  812  vi hi
  813  vi 1111.txt
  814  vi hi
  815  history
  816  history 10
10. 开启/关闭/重启/状态防火墙
开启防火墙
[root@localhost ~]# systemctl start firewalld
关闭防火墙
[root@localhost ~]# systemctl stop firewalld
重启防火墙
[root@localhost ~]# systemctl restart firewalld
查看防火墙状态
[root@localhost ~]# systemctl status firewalld
● firewalld.service - firewalld - dynamic firewall daemon
   Loaded:loaded(/usr/lib/systemd/system/firewalld.service; enabled; vendor preset: enabled)
   Active:active(running) since 四 2022-06-2317:24:31 CST;2s ago
     Docs: man:firewalld(1)
 Main PID:7978(firewalld)
   CGroup:/system.slice/firewalld.service
           └─7978/usr/bin/python2 -Es /usr/sbin/firewalld --nofork --nopid

6月 2317:24:31 localhost.localdomain systemd[1]: Starting firewalld - dynamic fire....6月 2317:24:31 localhost.localdomain systemd[1]: Started firewalld - dynamic firew....
Hint: Some lines were ellipsized, use -l to show in full.
11. 程序 设置/关闭 开机自启动
设置开机自启动
[root@localhost ~]# systemctl disable firewalld
关闭开机自启动
[root@localhost ~]# systemctl disable firewalld
Removed symlink /etc/systemd/system/multi-user.target.wants/firewalld.service.
Removed symlink /etc/systemd/system/dbus-org.fedoraproject.FirewallD1.service.
12. 系统关机/重启
立即关机
[root@localhost ~]# shutdown -h now
10分钟之后定时关机
[root@localhost ~]# shutdown -h 10
中午12点准时关机
[root@localhost ~]# shutdown -h 12:00
立即重启
[root@localhost ~]# reboot
10分之后重启
[root@localhost ~]# shutdown -r 10
取消定时
[root@localhost ~]# shutdown -C
13. 开启/重启/关闭网络
开启网络
[root@localhost ~]# systemctl start network
关闭网络
[root@localhost ~]# systemctl stop network
重启网络
[root@localhost ~]# systemctl restart network
三、文件的操作
1. mkdir 新建文件夹
mkdir 文件名(其实这里的文件名是填写路径参数)
只不过是默认是相对路径,即当前路径
例如,我想直接往usr/java创建文件夹,当前目录但是又不在此路径
即可:mkdir /usr/java/test
即,创建了一个位于 /usr/java/ 下的文件夹,文件名为 test
创建多层级文件夹,加参数 -p
在当前路径创建文件夹 test
[root@localhost ~]# mkdir test
[root@localhost ~]# ls
anaconda-ks.cfg  test
在 usr/java 路径下创建test
[root@localhost ~]# mkdir /usr/java/test
[root@localhost ~]# cd /usr/java
[root@localhost java]# ls
apache-tomcat-9.0.45         jdk1.8.0_40                test
apache-tomcat-9.0.45.tar.gz  JDK-8u40-linux-x64.tar.gz
在家目录 ~ 同时创建同级目录 a b c d
[root@localhost ~]# mkdir a b c d
[root@localhost ~]# ls
a  anaconda-ks.cfg  b  c  d  test
在家目录 ~ 创建一个四层级文件夹 a1/b2/c3/d4
[root@localhost ~]# mkdir -p a1/b2/c3/d4
[root@localhost ~]# ls
a  a1  anaconda-ks.cfg  b  c  d  test
[root@localhost ~]# cd a1
[root@localhost a1]# ls
b2
[root@localhost a1]# cd b2
[root@localhost b2]# ls
c3
[root@localhost b2]# cd c3
[root@localhost c3]# ls
d4
2. rmdir 删除空文件夹
默认是删除空文件夹,mkdir 文件路径
删除空文件夹
[root@localhost ~]# ls
a  a1  anaconda-ks.cfg  b  c  d  test
[root@localhost ~]# rmdir a
[root@localhost ~]# ls
a1  anaconda-ks.cfg  b  c  d  test
[root@localhost ~]#
3. rm 删除文件夹/文件
如果文件里面有内容,需要加参数:-rf 即强制删除
强制删除
[root@localhost ~]# rm a1
rm: 无法删除"a1": 是一个目录
[root@localhost ~]# rm -rf a1
[root@localhost ~]# ls
anaconda-ks.cfg  b  c  d  test
4. mv 剪切文件(移动文件 / 重命名)
mv 当前文件 新的路径文件(移动)
即:mv test.txt /usr/text.txt
mv 旧文件 新文件(重命名)
即:mv test.txt pass.text
重命名
[root@localhost ~]# ls
anaconda-ks.cfg  b  c  d  test
[root@localhost ~]# mv test test10086
[root@localhost ~]# ls
anaconda-ks.cfg  b  c  d  test10086
移动
注意:移动到新的文件夹,后面必须加 / ,否则则是重命名
[root@localhost ~]# ls
anaconda-ks.cfg  b  c  d  test10086
[root@localhost ~]# mv test10086 b/[root@localhost ~]# ls
anaconda-ks.cfg  b  c  d
[root@localhost ~]# cd b
[root@localhost b]# ls
test10086
5. cp 复制文件
命令:cp 当前文件 新的文件(路径)
即:cp text.txt /usr/java
又或:cp text.txt /usr/java/test10086.txt (复制+改名)
当文件夹有内容时,需要加参数 -r 才能完整复制
在当前路径复制test.txt 生成新的pass.txt
[root@localhost ~]# ls
anaconda-ks.cfg  b  c  d  test.txt
[root@localhost ~]# cp test.txt pass.txt
[root@localhost ~]# ls
anaconda-ks.cfg  b  c  d  pass.txt  test.txt
用绝对路径,复制到/usr/java里
[root@localhost ~]# ls
anaconda-ks.cfg  b  c  d  pass.txt  test.txt
[root@localhost ~]# cp pass.txt /usr/java
[root@localhost ~]# ls /usr/java
apache-tomcat-9.0.45         jdk1.8.0_40                pass.txt
apache-tomcat-9.0.45.tar.gz  JDK-8u40-linux-x64.tar.gz  test
复制有内容的文件夹
[root@localhost ~]# ls
anaconda-ks.cfg  b  c  d  pass.txt  test.txt
[root@localhost ~]# ls b
test10086  test10086.txt
[root@localhost ~]# cp -r b d/[root@localhost ~]# ls d
b
[root@localhost ~]# ls b
test10086  test10086.txt
6. find 查找文件
命令:find 路径 -name 文件名
对于需要模糊搜索的
可以使用统配符
星号x 即:剩下 全部
问号? 占位
例如:
‘name?’,只会搜索出namea,nameb…
‘name*’,不管剩下有多少位,都可以搜索出来,例如:nametest,namee…
在根目录 / ,可以最大化查询所需的文件
[root@localhost ~]# find /-name jdk1.8.0_40
/usr/java/jdk1.8.0_40
模糊查询
[root@localhost ~]# find /-name 'apache-tomcat-9.0.45*'/usr/java/apache-tomcat-9.0.45.tar.gz
/usr/java/apache-tomcat-9.0.45
[root@localhost ~]# find /-name 'apache-tomcat-9.0.4?'/usr/java/apache-tomcat-9.0.45
7. touch 创建文件
一般用来创建一些配置文件,init,txt,conf等
命令:touch 文件路径
例如:touch test.txt
例如:touch /usr/java/pass.conf
[root@localhost ~]# touch boss.conf
[root@localhost ~]# ls
anaconda-ks.cfg  b  boss.conf  c  d  pass.txt  test.txt
[root@localhost ~]# touch /usr/java/testConf.init
[root@localhost ~]# ls /usr/java
apache-tomcat-9.0.45         jdk1.8.0_40                pass.txt  testConf.init
apache-tomcat-9.0.45.tar.gz  JDK-8u40-linux-x64.tar.gz  test
8. cat 查看
会把文件的所有内容,全部展示出来
[root@localhost ~]# cat test.txt
12...99100
如果要显示行号,可以加参数:-n
[root@localhost ~]# cat -n test.txt
     1122334455667788991010
9. more 分页查看
[root@localhost ~]# more test.txt
123...2425--More--(46%)
往下小幅度翻页 :Enter 回车键
往下大幅度翻页:space 空格键
显示当前行号,以及文件名
需要输入冒号+f,即 :f
2425
“test.txt”第 25 行
10. less 单行查看
less相比于more,功能更多,但是也类似于vi操作
比如,查找,通过方向键盘操作,g返回到第一行,G返回到最后一行等
上下移动:
k向前 (可按向上 ↑ 的键盘)
j 向后 (可按向下 ↓ 的键盘)
搜索 / 和 ?
向前面搜索: / 搜索内容
向后面搜索: ? 搜索内容
【从 3 这里,往后面查询包含8的】
123
?8
【从 23 这里,往前面查询包含9的】
...20212223/9
当查询出相对应的结果时,可以使用 n / N,切换行
n 向前切换
N 向后切换
如果你想快速返回到第一行,或者,快速返回到最后一行
g 快速返回到第一行
G 快速返回到最后一行
11. head 查看头部
查看文件内容,从头部开始查看
如果想查看前几行,参数:-n 数字
如果想查看前几个字节,参数:-c 数字
把文件名也显示出来,参数:-v (默认是-q 隐藏)
默认显示前 10行
[root@localhost ~]# head test.txt
12...8910
显示前20行,并显示文件名
[root@localhost ~]# head -v -n 20 test.txt
==> test.txt <==123...1920
显示前5个字节,并隐藏文件名(默认为隐藏,这里作为演示效果)
[root@localhost ~]# head -q -c 5 test.txt
123
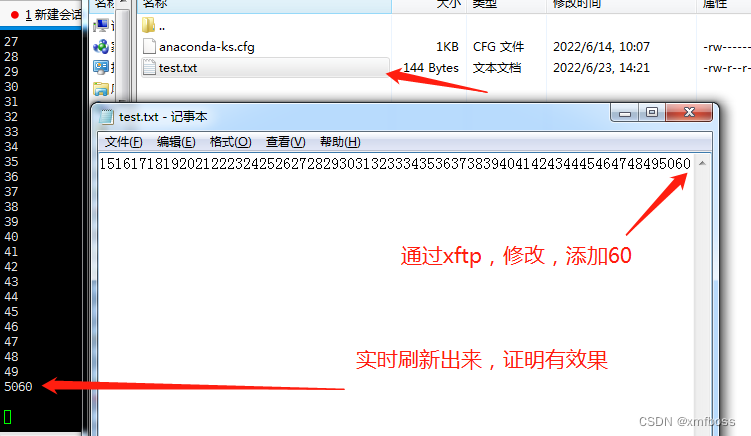
12. tail 查看尾部
主要可以用来实时查看动态文件
用法跟head差不多,只不过是从尾部开始读取
循环读取,需要加-f参数即可
刷新间隔,可以加-s 数字,表示每多少秒刷新一次
查看后20行的数据
[root@localhost ~]# tail -20 test.txt
3132...4950
通过-f参数,并且刷新间隔为3秒,实时查看
注意:如果要退出,按q和esc是没有效果的,这个需要强制退出,ctrl + c
[root@localhost ~]# tail -f -s 3 test.txt
四、vi / vim 操作
1. 说明
vi 是系统自带的文本编辑器,这里以vi作为演示效果,而vim的话,是需要下载安装的,vim 比 vi 更加强大,视觉效果更好,但是基本操作完全一致
2. 键盘图
通过此键盘图,可以了解到linux系统,文本编辑器,但是非常强大的,只要使用得当,可以极大提高效率,不过,日常使用的,也就那么几个,不必全部学会,只需掌握日常技能

3. 常用命令
在光标所在处,按 x,即删除该字符
[root@localhost ~]# vi test.txt
12(光标)4
在光标前进入编辑模式,按 i
[root@localhost ~]# vi test.txt
12(光标)34
在光标后进入编辑模式,按 a
[root@localhost ~]# vi test.txt
123(光标)4
在光标后所在行,新建一行,并把光标移到下方,按 o
[root@localhost ~]# vi test.txt
123abcdefsk(光标)ksks
4
[root@localhost ~]# vi test.txt
123abcdefskksks
(光标)4
左右上下移动光标
h 左 (←)
j 下 (↓)
k 上 (↑)
l 下 (↓)
你会发现这四个字母,在键盘上,处于相隔一列
上下翻页
Ctrl + b 向上翻页 (也可按键盘 PgUp)
Ctrl + f 向上翻页 (也可按键盘 PgDn)
快速跳行
跳到首行 gg
跳到尾行 G
跳到某行:数字G,
例如:
10G,就是跳到第10行
如果想在单行的头部,单行的尾部,快速跳转
行的尾部 $
行的头部 ^
删除
删除光标所在行,dd
删除多行,数字 dd
例如:删除光标所在行的后5行,即 5dd
从光标处删除到单行尾部,即 d$
从光标处删除到单行头部,即 d^
撤销
撤销刚才的操作,u
复制
复制单行,yy
复制多行,从光标往下,数字 yy
例如:复制光标所在行的后10行,10yy
粘贴
粘贴刚才复制的,p
显示/隐藏行号
需要进入底线模式,即按冒号
显示行号,并输入set nu
隐藏行号,并输入set nonu
...232324242525:set nu
...232425:set nonu
查找
向下查找 某个字符,即 /abc
并按回车,开始查找
按 n 向下移动到下个目标
按 N 向上移动到上个目标
向上查找 某个字符,即 ? abc
替换
查找某个字符,并替换
:s%/某个字符/替换的字符/g
例如,把20替换成999
:%s/20/999/g
从某行开始,到某行结束,找出某个字符,并进行替换
(注意:需要输入冒号进入命令模式)
:数字,数字s/某字符/新的字符/g
例如, 从第1行,到,30行,找出20,并替换成999
即 :1,30s/20/999/g
如果需要进行确认,是否要替换,可以加 c
例如:
:%s/10/999/gc
replace with 888(y/n/a/q/l/^E/^Y)?
y 替换
n 不替换
保存/退出
需要按冒号进入命令模式
:q 退出(前提是不修改文件内容)
:q! 强制退出不保存(修改了文件内容)
:w 保存
组合使用,wq 保存并退出
五、设置静态/自动获取ip
可以当作了解,为什么要设置好服务器的ip?
因为服务器的ip,一般来说,最好不要变更
比如,某个网站www.xxxx.com,与ip xx.xx.xx.xx 进行绑定
如果服务器的ip发生了变化,就会导致网站无法访问
查看ip,即 ip addr
[root@localhost ~]# ip addr
1: lo:<LOOPBACK,UP,LOWER_UP> mtu 65536 qdisc noqueue state UNKNOWN group default qlen 1000
    link/loopback 00:00:00:00:00:00 brd 00:00:00:00:00:00
    inet 127.0.0.1/8 scope host lo
       valid_lft forever preferred_lft forever
    inet6 ::1/128 scope host
       valid_lft forever preferred_lft forever
2: ens33:<BROADCAST,MULTICAST,UP,LOWER_UP> mtu 1500 qdisc pfifo_fast state UP group default qlen 1000
    link/ether 00:0c:29:79:e6:44 brd ff:ff:ff:ff:ff:ff
    (下面这里即为ip地址)
    (下面这里即为ip地址)
    (下面这里即为ip地址)
    inet 192.168.88.143/24 brd 192.168.88.255 scope global noprefixroute dynamic ens33
       valid_lft 6996sec preferred_lft 6996sec
    inet6 fe80::b3f9:dafa:4d06:1cb5/64 scope link noprefixroute
       valid_lft forever preferred_lft forever
查看网关,ip route
[root@localhost ~]# ip route
(下方这里即为网关)
(下方这里即为网关)
(下方这里即为网关)
default via 192.168.88.1 dev ens33 proto dhcp metric 100192.168.88.0/24 dev ens33 proto kernel scope link src 192.168.88.143 metric 100
配置ip的配置,ifcfg-ens33
我们通过find来查找根目录,即可
[root@localhost ~]# find /-name 'ifcfg-ens33'/etc/sysconfig/network-scripts/ifcfg-ens33
然后,编辑
vi /etc/sysconfig/network-scripts/ifcfg-ens33
TYPE="Ethernet"
PROXY_METHOD="none"
BROWSER_ONLY="no"
(下方这里,bootproto,自动获取dhcp,静态static)
BOOTPROTO="static"
DEFROUTE="yes"
IPV4_FAILURE_FATAL="no"
IPV6INIT="yes"
IPV6_AUTOCONF="yes"
IPV6_DEFROUTE="yes"
IPV6_FAILURE_FATAL="no"
IPV6_ADDR_GEN_MODE="stable-privacy"
NAME="ens33"
UUID="fb9e9de2-227e-4435-980f-6767bcff2ecc"
DEVICE="ens33"
(这里要选择yes)
ONBOOT="yes"
(下方添加静态ip的信息)
IPADDR=192.168.88.106  #标识唯一主机
NETMASK=255.255.255.0  #确定网络号、主机号
GATEWAY=192.168.88.1   #内网和外网的桥梁(和ip处于同一个网络)
DNS1=114.114.114.114   #域名解析
保存并退出之后,重启一下网络
systemctl restart network
好了,就可以通过ip addr,重新查看一下ip是否变更即可
如何测试,配置的ip信息,是否有误呢?
可以通过ping的方式
[root@localhost ~]# ping www.baidu.com
PING www.a.shifen.com(14.215.177.38)56(84) bytes of data.64 bytes from 14.215.177.38(14.215.177.38): icmp_seq=1 ttl=56 time=10.2 ms
64 bytes from 14.215.177.38(14.215.177.38): icmp_seq=2 ttl=56 time=17.9 ms
64 bytes from 14.215.177.38(14.215.177.38): icmp_seq=3 ttl=56 time=6.93 ms
六、筛选 grep
对于有时候,我们在使用linux查询命令的时候,查出来的结果,我们想进行筛选,筛选出我们想要的数据,就可以用到grep
在当前目录下,查找出所有txt中,文件内容包含 1
[root@localhost ~]# grep 1*txt
123.txt:111123.txt:123
test.txt:11
test.txt:1
test.txt:13
test.txt:14
在当前目录下,在test.txt 文件内,文件内容包含 2
[root@localhost ~]# grep 2 test.txt
2212223242542
我们以abc.txt作为演示
[root@localhost ~]# cat abc.txt
test00001
boss2222
boss333
keep999
kepp999
hello01
helloo2
查找出,单行头部,包含boss的
[root@localhost ~]# grep ^boss abc.txt
boss2222
boss333
查找出,单行尾部,包含99的
[root@localhost ~]# grep 99$ abc.txt
keep999
kepp999
查找出所有txt文件,并且,文件内容包含1
[root@localhost ~]# find -name '*.txt'| xargs grep 1./test.txt:11./test.txt:1./test.txt:13./test.txt:14./test.txt:15./test.txt:16./test.txt:17./test.txt:18./test.txt:19./test.txt:21./test.txt:31./test.txt:41./123.txt:111./123.txt:123./abc.txt:test00001
./abc.txt:hello01
查找出所有txt文件,并且,文件名包含1
[root@localhost ~]# find -name '*.txt'| grep 1./1111.txt
./123.txt
七、rpm / yum 安装卸载软件包
1. rpm
主要直接操作,以 .rpm 后缀的文件
安装rpm会有依赖关系验证
比如,你要安装A包,但是A包跟B包产生依赖,必须安装B包,才能安装A包,所以,你将会安装失败,但是rpm会抛出一条错误提示,提示你应该先安装某些依赖包
安装 rpm -ivh
[root@localhost ~]# rpm -ivh xxxxx.rpm
强制安装 --force,忽略依赖警告 --nodeps
[root@localhost ~]# rpm -ivh xxxxx.rpm --nodeps --force
查询有无安装 rpm -q 程序名
[root@localhost ~]# rpm -q httpd
httpd-2.4.6-97.el7.centos.5.x86_64
查询安装路径 rpm -ql 程序名
[root@localhost ~]# rpm -ql httpd
/etc/httpd
/etc/httpd/conf
/etc/httpd/conf.d
/etc/httpd/conf.d/README
/etc/httpd/conf.d/autoindex.conf
/etc/httpd/conf.d/userdir.conf
/etc/httpd/conf.d/welcome.conf
/etc/httpd/conf.modules.d
/etc/httpd/conf.modules.d/00-base.conf
/etc/httpd/conf.modules.d/00-dav.conf
/etc/httpd/conf.modules.d/00-lua.conf
/etc/httpd/conf.modules.d/00-mpm.conf
/etc/httpd/conf.modules.d/00-proxy.conf
/etc/httpd/conf.modules.d/00-systemd.conf
/etc/httpd/conf.modules.d/01-cgi.conf
...
卸载 rpm -e 程序名
[root@localhost ~]# rpm -e xxx
2. yum
底层原理,还是一样,管理rpm包
可以在线安装,并且自动下载安装依赖,你无需解决,每个包之间的依赖关系
也可以在线更新包
下载 某个程序
注意,下载完之后,会提示你 [y/d/n],选择y时会安装,选择d不安装,选择n取消
[root@localhost ~]# yum install xxx
卸载某个程序
[root@localhost ~]# yum remove xxx
列出所有可安装的软件
[root@localhost ~]# yum list
更新某个程序
[root@localhost ~]# yum update xx
更新所有程序
[root@localhost ~]# yum update
显示可更新的程序
[root@localhost ~]# yum check-update
清除缓存的软件包
[root@localhost ~]# yum clean packages
八、zip和tar.gz 解压/压缩
1. zip
常见与window系统的zip包,在linux系统上解压
这个需要单独安装,系统没有自带
yum install unzip zip
解压
[root@localhost ~]# unzip xxx
解压到指定路径 -d 路径
[root@localhost ~]# unzip xxx -d /usr/java/
压缩
[root@localhost ~]# zip -r xxx(这里写目录)
2. tar.gz
常见于linux系统专用包
各种命令字符参照
-c    创建打包文件
-v    显示打包或者解包的详细信息
-f    指定文件名称, 必须放到所有选项后面
-z    压缩或解压缩(.gz)-j    压缩或解压缩(.bz2)-x    解包
-C    解压缩到指定目录
解压
[root@localhost ~]# tar -xzvf xxx.tar.gz
压缩
[root@localhost ~]# tar -czvf xxx
九、用户管理
管理linux系统的用户帐号,创建完用户,默认会在
/home创建一个目录,目录名即为用户名
1. 创建用户 useradd
[root@localhost ~]# useradd xiaomifeng
[root@localhost ~]# cd /home/xiaomifeng/[root@localhost xiaomifeng]#
2. 删除用户 userdel
注意,只有超级管理员,才能删除用户,普通用户没有删除权限
注意,删除帐号之前,如果登录过此帐号,需要查看进程,如果有该用户的进程,需要禁用掉,才能删除成功,另外一个办法是,重启系统
如果要删除该用户在home的目录,加参数:-r
[root@localhost ~]# userdel -r xiaomifeng
[root@localhost ~]# cd /home/xiaomifeng
-bash: cd:/home/xiaomifeng: 没有那个文件或目录
3. 设置/修改用户密码 passwd
[root@localhost ~]# passwd xiaomifeng
更改用户 xiaomifeng 的密码 。
新的 密码:
4. 切换用户 su
[root@localhost ~]# su xiaomifeng
[xiaomifeng@localhost root]$
5. 查看当前所有登录的用户 who
[root@localhost ~]# who
root     tty1         2022-06-2311:18
root     pts/02022-06-2311:20(x09264.lan
6. 查看所有用户 cat /etc/passwd
[root@localhost ~]# cat /etc/passwd
root:x:0:0:root:/root:/bin/bash
bin:x:1:1:bin:/bin:/sbin/nologin
daemon:x:2:2:daemon:/sbin:/sbin/nologin
adm:x:3:4:adm:/var/adm:/sbin/nologin
lp:x:4:7:lp:/var/spool/lpd:/sbin/nologin
sync:x:5:0:sync:/sbin:/bin/sync
shutdown:x:6:0:shutdown:/sbin:/sbin/shutdown
halt:x:7:0:halt:/sbin:/sbin/halt
mail:x:8:12:mail:/var/spool/mail:/sbin/nologin
operator:x:11:0:operator:/root:/sbin/nologin
games:x:12:100:games:/usr/games:/sbin/nologin
ftp:x:14:50:FTP User:/var/ftp:/sbin/nologin
nobody:x:99:99:Nobody:/:/sbin/nologin
十、用户组管理
1. 创建用户组 groupadd
[root@localhost ~]# groupadd test99
[root@localhost ~]# cat /etc/group | grep test99
test99:x:1007:
2. 修改用户组 groupmod -n
用法:groupmod [选项] 组 选项:
-g, --gid GID 将组 ID 改为 GID
-h, --help 显示此帮助信息并推出
-n, --new-name NEW_GROUP 改名为 NEW_GROUP
-o, --non-unique 允许使用重复的 GID
-p, --password PASSWORD 将密码更改为(加密过的) PASSWORD
-R, --root CHROOT_DIR chroot 到的目录
-P, --prefix PREFIX_DIR prefix directory where are located the /etc/* files
[root@localhost ~]# groupmod -n test000 test99
[root@localhost ~]# cat /etc/group | grep test000
test000:x:1007:
把用户添加到某个组 gpasswd -a 用户 组
[root@localhost ~]# gpasswd -a test002 test000
正在将用户“test002”加入到“test000”组中
把用户从某个组移除 gpasswd -d 用户 组
[root@localhost ~]# gpasswd -d test002 test000
正在将用户“test002”从“test000”组中删除
3. 删除用户组 groupdel
[root@localhost ~]# groupdel test000
4. 查看用户属于哪个组 groups
[root@localhost ~]# groups root
root : root
5. 查看所有组 cat /etc/group
[root@localhost ~]# cat /etc/group
root:x:0:ts33
bin:x:1:
daemon:x:2:
sys:x:3:
adm:x:4:
tty:x:5:
disk:x:6:
lp:x:7:
mem:x:8:
kmem:x:9:
wheel:x:10:
cdrom:x:11:
mail:x:12:postfix
十一、文件权限管理
下面是权限字符含义
r 读取(read),权限值 4
w 写(write),权限值 2
x 执行 权限值 1
下面是文件标识符含义
- 普通文件
l 快捷方式的文件(软链接)
d 目录
1. 基础权限认知
[root@localhost ~]# ll
总用量 16-rw-r--r--1 root root    06月  2315:371111.txt
-rw-r--r--1 root root   286月  2315:40123.txt
-rw-r--r--1 root root    06月  2315:372999.txt
-rw-r--r--1 root root    06月  2315:373288.txt
-rw-r--r--1 root root   596月  2315:44 abc.txt
-rw-------.1 root root 12166月  1410:07 anaconda-ks.cfg
-rw-r--r--1 root root  1476月  2315:20 test.txt
我们以1111.txt为案例
普通文件-读写-读-读 root用户 root用户组 日期 文件名
注意:权限分别为:用户的权限 | 组的权限 | 其他人的权限
即对应:rw-r--r-- 权限值为:644
-rw-r--r--1 root root 06月 2315:371111.txt
2. 修改权限 chmod 权限值/权限字符 文件名
[root@localhost ~]# chmod 7771111.txt
[root@localhost ~]# ll
总用量 16-rwxrwxrwx  1 root root    06月  2315:371111.txt
3. 修改文件的用户权限 chown -R 新用户 文件
[root@localhost ~]# chown -R test002 1111.txt
[root@localhost ~]# ll
总用量 16-rwxrwxrwx  1 test002 root    06月  2315:371111.txt
4. 修改文件的组权限 chgrp -R 新的组 文件
[root@localhost ~]# chgrp -R test002 1111.txt
[root@localhost ~]# ll
总用量 16-rwxrwxrwx  1 test002 test002    06月  2315:371111.txt
5. 扩展-软链接(快捷方式)创建
ln -s 文件 快捷名称
[root@localhost ~]# ln -s 1111.txt hi
这个时候vi hi,等同于vi 1111.txt
[root@localhost ~]# ll
总用量 16-rwxrwxrwx  1 test002 test002    06月  2315:371111.txt
lrwxrwxrwx  1 root    root       86月  2317:17 hi ->1111.txt
十二、进程
1. 查看所有进程 ps -ef
[root@localhost ~]# ps -ef
UID         PID   PPID  C STIME TTY          TIME CMD
root          10011:18?00:00:03/usr/lib/systemd/systemd --switched-ro
root          20011:18?00:00:00[kthreadd]
root          42011:18?00:00:00[kworker/0:0H]
root          62011:18?00:00:00[ksoftirqd/0]
root          72011:18?00:00:00[migration/0]
root          82011:18?00:00:00[rcu_bh]
root          92011:18?00:00:01[rcu_sched]...
2. 配合 grep 筛选
[root@localhost ~]# ps -ef | grep mysql
mysql      11001011:18?00:00:00/bin/sh /usr/bin/mysqld_safe --basedir=/usr
mysql      15091100011:18?00:00:07/usr/libexec/mysqld --basedir=/usr --datadir=/var/lib/mysql --plugin-dir=/usr/lib64/mysql/plugin --log-error=/var/log/mariadb/mariadb.log --pid-file=/var/run/mariadb/mariadb.pid --socket=/var/lib/mysql/mysql.sock
root       84165689017:30 pts/000:00:00 grep --color=auto mysql
3. 结束进程 kill
结束某个进程 kill pid号
[root@localhost ~]# kill 5665
强制结束进程 kill -9 pid号
[root@localhost ~]# kill -95665
十三、查看系统数据
1. 内存
命令,free
可以加以下参数
-b 以字节单位输出结果
-k 以kb单位输出结果
-m 以mb单位输出结果
-g 以 gb单位输出结果
-h 以可读的形式输出
-l 显示高内存,低内存的详细
-s 秒数,每几秒输出一次结果
Mem(内存),Swap(交换分区)
-b
[root@localhost ~]# free -b
              total        used        free      shared  buff/cache   available
Mem:10195804162124021766619504648200192145227776659177472
Swap:214747955202147479552
-k
[root@localhost ~]# free -k
              total        used        free      shared  buff/cache   available
Mem:9956842074246464368008141824643728
Swap:209714802097148
-m
[root@localhost ~]# free -m
              total        used        free      shared  buff/cache   available
Mem:9722026317138628
Swap:204702047
-g
[root@localhost ~]# free -g
              total        used        free      shared  buff/cache   available
Mem:000000
Swap:101
-l
[root@localhost ~]# free -l
              total        used        free      shared  buff/cache   available
Mem:9956842074246464368008141824643728
Low:995684349248646436
High:000
Swap:209714802097148
-h
[root@localhost ~]# free -h
              total        used        free      shared  buff/cache   available
Mem:972M        202M        631M        7.8M        138M        628M
Swap:2.0G          0B        2.0G
–s3
[root@localhost ~]# free -s3
              total        used        free      shared  buff/cache   available
Mem:9956842074566464048008141824643696
Swap:209714802097148

              total        used        free      shared  buff/cache   available
Mem:9956842074806463808008141824643672
Swap:209714802097148
2. 硬盘
用法与内存的差不多,大家以内存的参考即可
命令,df
参数,与内存几乎一致
-h 可读形式
[root@localhost ~]# df -h
文件系统                 容量  已用  可用 已用% 挂载点
devtmpfs                 475M     0475M    0%/dev
tmpfs                    487M     0487M    0%/dev/shm
tmpfs                    487M  7.7M  479M    2%/run
tmpfs                    487M     0487M    0%/sys/fs/cgroup
/dev/mapper/centos-root   17G  2.3G   15G   14%//dev/sda1               1014M  137M  878M   14%/boot
tmpfs                     98M     098M    0%/run/user/0
3. 文件大小
命令,du
du -h 文件(查看某个文件的大小)
[root@localhost ~]# ls
1111.txt  123.txt  2999.txt  3288.txt  abc.txt  anaconda-ks.cfg  hi  test.txt
[root@localhost ~]# du -h 1111.txt
4.0K    1111.txt
du -h * (查看当前目录下, 所有文件)
[root@localhost ~]# du -h 1111.txt
4.0K    1111.txt
[root@localhost ~]# du -h *4.0K    1111.txt
4.0K    123.txt
02999.txt
03288.txt
4.0K    abc.txt
4.0K    anaconda-ks.cfg
0    hi
4.0K    test.txt
du -sh 目录(查看目录的大小,注意加参数 s,表示合计)
[root@localhost /]# du -sh /etc
32M    /etc
4. 查看端口
命令
natstat -anp | grep 端口号
如果被占用,会显示出相关信息
[root@localhost /]# netstat -anp | grep 3306
tcp        000.0.0.0:33060.0.0.0:*               LISTEN      1376/mysqld
[root@localhost /]# netstat -anp | grep 8080[root@localhost /]#

netstat -nultp 查看所有使用的端口

```c
[root@localhost /]# netstat -nultp
Active Internet connections(only servers)
Proto Recv-Q Send-Q Local Address           Foreign Address         State       PID/Program name
tcp        000.0.0.0:220.0.0.0:*               LISTEN      953/sshd
tcp        00127.0.0.1:250.0.0.0:*               LISTEN      1403/master
tcp        000.0.0.0:33060.0.0.0:*               LISTEN      1376/mysqld
tcp6       00:::22:::*                    LISTEN      953/sshd
tcp6       00::1:25:::*                    LISTEN      1403/master
tcp6       00:::443:::*                    LISTEN      954/httpd
tcp6       00:::80:::*                    LISTEN      954/httpd
udp        000.0.0.0:680.0.0.0:*751/dhclient
udp        00127.0.0.1:3230.0.0.0:*662/chronyd
udp6       00::1:323:::*662/chro
5. 查看系统负载
命令,top
top 实时更新当前的系统负载情况
top -15:52:44 up 49 min,1 user,  load average:0.00,0.01,0.05
Tasks:108 total,1 running,107 sleeping,0 stopped,0 zombie
%Cpu(s):0.0 us,0.3 sy,0.0 ni,99.7 id,0.0 wa,0.0 hi,0.0 si,0.0 st
KiB Mem :995684 total,640524 free,210132 used,145028 buff/cache
KiB Swap:2097148 total,2097148 free,0 used.639556 avail Mem

   PID USER      PR  NI    VIRT    RES    SHR S %CPU %MEM     TIME+ COMMAND
   655 root      20030550065805184 S  0.30.70:02.82 vmtoolsd
  2992 root      20016209222001556 R  0.30.20:00.02 top
     1 root      20012533638842592 S  0.00.40:01.69 systemd
     2 root      200000 S  0.00.00:00.00 kthreadd
     3 root      200000 S  0.00.00:00.12 kworker/0:04 root       0-20000 S  0.00.00:00.00 kworker/0:0H
     5 root      200000 S  0.00.00:00.09 kworker/u256:06 root      200000 S  0.00.00:00.14 ksoftirqd/0
top -n 3 (查看三次刷新之后退出)
[root@localhost /]# top -n 3
top -15:53:50 up 50 min,1 user,  load average:0.00,0.01,0.05
Tasks:108 total,1 running,107 sleeping,0 stopped,0 zombie
%Cpu(s):0.3 us,0.3 sy,0.0 ni,99.3 id,0.0 wa,0.0 hi,0.0 si,0.0 st
KiB Mem :995684 total,640692 free,209964 used,145028 buff/cache
KiB Swap:2097148 total,2097148 free,0 used.639724 avail Mem

   PID USER      PR  NI    VIRT    RES    SHR S %CPU %MEM     TIME+ COMMAND
     9 root      200000 S  0.30.00:00.59 rcu_sched
   655 root      20030550065805184 S  0.30.70:02.88 vmtoolsd
     1 root      20012533638842592 S  0.00.40:01.71 systemd
     2 root      200000 S  0.00.00:00.00 kthreadd
     3 root      200000 S  0.00.00:00.12 kworker/0:04 root       0-20000 S  0.00.00:00.00 kworker/0:0H
     5 root      200000 S  0.00.00:00.09 kworker/u256:0
top -d 5 (刷新间隔,改为每5秒刷新一次)
[root@localhost /]# top -d 5
top -15:54:32 up 50 min,1 user,  load average:0.00,0.01,0.05
Tasks:108 total,1 running,107 sleeping,0 stopped,0 zombie
%Cpu(s):5.9 us,5.9 sy,0.0 ni,88.2 id,0.0 wa,0.0 hi,0.0 si,0.0 st
KiB Mem :995684 total,640588 free,210068 used,145028 buff/cache
KiB Swap:2097148 total,2097148 free,0 used.639620 avail Mem

   PID USER      PR  NI    VIRT    RES    SHR S %CPU %MEM     TIME+ COMMAND
     1 root      20012533638842592 S  0.00.40:01.71 systemd
     2 root      200000 S  0.00.00:00.00 kthreadd
     3 root      200000 S  0.00.00:00.12 kworker/0:04 root       0-20000 S  0.00.00:00.00 kworker/0:0H
     5 root      200000 S  0.00.00:00.09 kworker/u256:0
top -p pid号(根据某个进程的PID号的相关情况)
[root@localhost /]# top -p 1
top -15:54:58 up 51 min,1 user,  load average:0.00,0.01,0.05
Tasks:1 total,0 running,1 sleeping,0 stopped,0 zombie
%Cpu(s):0.0 us,0.0 sy,0.0 ni,100.0 id,0.0 wa,0.0 hi,0.0 si,0.0 st
KiB Mem :995684 total,640712 free,209944 used,145028 buff/cache
KiB Swap:2097148 total,2097148 free,0 used.639744 avail Mem

   PID USER      PR  NI    VIRT    RES    SHR S %CPU %MEM     TIME+ COMMAND
     1 root      20012533638842592 S  0.00.40:01.72 systemd
中文翻译
[root@localhost ~]# top
top -14:07:40 up  5:03,1 user,  load average:0.00,0.01,0.05
系统运行的时长 1个用户 系统的平均负载 1分钟 5分钟 15分钟(一般不超过0.8)
Tasks:109 total,1 running,108 sleeping,0 stopped,0 zombie
进程   109个进程    1个真正运行    108个休眠        0个停止        0个僵尸进程(父进程已近结束、子进程还在运行的进程)
%Cpu(s):0.0 us,0.0 sy,0.0 ni,100.0 id,0.0 wa,0.0 hi,0.0 si,0.0 st
CPU的使用率
KiB Mem :995684 total,381300 free,251468 used,362916 buff/cache
内存的使用率       总共                空闲          使用              缓存
KiB Swap:2097148 total,2097148 free,0 used.561468 avail Mem
交换分区使用率      总共            空闲          使用              缓存

PID USER      PR  NI    VIRT    RES    SHR S %CPU %MEM     TIME+ COMMAND
进程的情况,把资源使用率最高的排在前面
9 root      200000 S  0.30.00:02.38 rcu_sched
286 root      200000 S  0.30.00:00.40 kworker/u256:2
更新日志
提示:会持续更新优化,建议收藏+关注
2022-6-27,内存,硬盘,文件大小,查看端口,查看系统负载
2022-06-23,cat 查看,more 分页查看,less 单行查看,head 查看头部,tail 查看尾部,vi 操作,设置静态/自动获取ip,grep 筛选,rpm / yum 安装卸载软件包,zip和tar.gz解压/压缩,用户管理,用户组管理,history 查看历史操作记录,进程,文件权限管理,目录结构,防火墙的操作,网络的操作,开机自启动,系统关机/重启
2022-06-22,Tab按键,clear 清屏,ctrl+c 强制退出,q键 退出阅读模式,命令行的标识符,pwd 查看当前路径,ls 显示目录所有文件,cd 切换目录,mkdir 创建文件夹,rmdir 删除空文件夹,rm 删除文件/文件夹,mv 移动/重命名文件,cp 复制文件,find 查找文件,touch 创建文件
版权归原作者 smobee 所有, 如有侵权,请联系我们删除。