
软件质量保障
所寫即所思|一个阿里质量人对测试的所感所悟。
TestContainers 是一个开源库,它允许开发者在测试环境中轻松地启动和管理实际的外部资源,如数据库、消息队列等,以实现更接近生产环境的集成测试。该项目基于Java版的TestContainers并进行了Python化的改造,旨在为Python开发者提供相同级别的便利。
本文主要介绍Testcontainers结合pytest的用法,通过代码案例展示如何实践。

背景
对数据有强依赖的产品在回归测试时会面临独特的挑战。我们有时需要在测试用例之间进行隔离数据。例如,假设客户A反馈了一个bug(例如bug1),并得到了修复。然后几周后客户B报告了另一个bug(例如bug2),也得到了修复。但是为客户B修复问题的方法可能导致客户A的问题重新出现,用于重现bug1和bug2的数据很可能没有重叠。因此,当我们回归测试时,确实需要一种方法来为bug1和bug2分别提供测试数据。换句话说,我们需要在两个测试用例之间隔离测试数据。
现在,“正确的”方法是找出问题的根本原因,并创建准确的数据来复现问题。但在为多家初创公司工作之后,我们可以自信地说,这种情况很少发生,如果有的话。一个更简单但更偷懒的解决方案是捕获产生缺陷的数据并用它编写一个测试,这种方法的缺点是必须维护良好的测试数据。
测试过程中我们发现Testcontainers也是一个不错的解决方案——我们可以轻松地维护数据,通过代码与数据库交互,同时支持多种版本的数据库,并且与pytest工作流程很好地集成。
Testcontainers概述
Testcontainers 是一个Python库,它利用 Docker 引擎创建临时容器,这些容器可以运行数据库实例、Selenium 浏览器或其他任何在测试期间应用程序可能需要交互的服务。它在 Docker 容器中提供轻量级的数据库实例。这种方法允许用户创建一个隔离的测试环境,这对于实现本地测试至关重要。每个测试都与一个全新的数据库实例交互,确保测试隔离。使用 Testcontainers 的另一个关键好处是它能够对数据库进行自动化设置和清理。只需使用 Testcontainers API 启动所需的服务(数据库、消息系统等)作为 Docker 容器,运行测试并销毁容器即可。在本文中,我们将深入探讨 Testcontainers 如何帮助我们生成数据库实例。
在本节中,我们将探讨如何使用 Testcontainers 创建一次性 MySQL 和 PostgreSQL 数据库容器。我们的目标是正确地配置可以与测试脚本交互的一次性数据库容器。这种方法允许我们在受控环境中模拟真实生产场景,从而在多个数据库配置和版本之间进行测试。
Pytest fixture
在pytest中,fixture是在实际测试函数之前(之后)运行的函数。它们非常适合在测试之前设置必要的先决条件,并在测试运行完成后进行清理。通常,fixture函数定义在名为 conftest.py 的文件中,这样就可以让来自多个模块的测试访问fixture函数。在我们的代码中没有使用conftest.py,主要是为了保持示例的简洁性。
以下是Fixture代码:
@pytest.fixture(scope="session")def db_setup(request): connector, version, data_rows, min_value, max_value = request.param[:-1] # exclude the last item (expected result) expected_result = request.param[-1] # the last item is the expected result container_key = f"{connector}:{version}" metadata = MetaData() if container_key not in containers: # Select container based on connector type if connector == "mysql": container = MySqlContainer(f"{connector}:{version}") elif connector == "postgres": container = PostgresContainer(f"{connector}:{version}") containers[container_key] = container container.start() container = containers[container_key] url = container.get_connection_url() engine = create_engine(url) # Create table user_table = Table( 'user_data', metadata, Column('id', Integer, primary_key=True), Column('username', String(50)), Column('email', String(100)), Column('status', String(10)), extend_existing=True ) # create table metadata.create_all(engine) # Insert data into table with engine.begin() as connection: connection.execute(text("DELETE FROM user_data;")) for i in range(data_rows): connection.execute(user_table.insert(), {'username': f'user{i}', 'email': f'user{i}@example.com', 'status': 'active'}) yield min_value, max_value, url, eval(expected_result) # Cleanup metadata.drop_all(engine)
这个测试套件从 request.param 中提取出诸如连接器、版本、数据行数、最小值、最大值和预期结果等参数。
元数据
元数据是一组包含表、列和约束定义的集合,数据库的完整详细结构定义在元数据对象中。
metadata = MetaData()
创建表
使用元数据,定义一个简单的 users_data 表格结构,用于插入和验证数据。
user_table = Table( 'user_data', metadata, Column('id', Integer, primary_key=True), Column('username', String(50)), Column('email', String(100)), Column('status', String(10)), extend_existing=True ) # create table metadata.create_all(engine)
插入数据
这部分代码根据 data_rows中指定的行数插入用户数据
with engine.begin() as connection: connection.execute(text("DELETE FROM user_data;")) for i in range(data_rows): connection.execute(user_table.insert(), {'username': f'user{i}', 'email': f'user{i}@example.com', 'status': 'active'})
该块中的代码会清除现有数据,并根据我们测试套件中的 data_rows 参数向表中插入指定数量的行。
使用SQL Dumps与TestContainers
对于创建表格,上述函数使用了SQLAlchemy在MetaData集合中定义的Table类。除了使用Table类逐行编写每个表格之外,还可以使用SQL脚本。以下是如何将SQL脚本与TestContainer结合使用并使用Docker卷的方法:
- 准备SQL脚本 确保您的SQL脚本文件(.sql文件)已准备好,其中包含创建表的语句以及数据的INSERT语句(注:在我们的示例.sql文件中只包含创建表的语句)。
- 设置环境变量 使用环境变量存储包含SQL导出文件的目录路径。在此我们使用MYSQL_SCHEMA_PATH变量。
schema_directory = os.getenv('MYSQL_SCHEMA_PATH')
为 TestContainer 配置映射 - 在为 MySQL TestContainer 设置环境时,请将其与包含 SQL 导出文件的映射到容器内的适当路径。当容器首次启动时,数据库映像的入口脚本会自动执行放置在 docker-entrypoint-initdb.d 目录中的脚本或 SQL 文件。
def db_setup(request): connector, version, data_rows, min_value, max_value = request.param container_key = f"{connector}:{version}" if container_key not in containers: # Select container based on connector type if connector == "mysql": container = MySqlContainer(f"{connector}:{version}") schema_directory = os.getenv('MYSQL_SCHEMA_PATH') elif connector == "postgres": container = PostgresContainer(f"{connector}:{version}") schema_directory = os.getenv('POSTGRES_SCHEMA_PATH') containers[container_key] = container container.with_volume_mapping(schema_directory, "/docker-entrypoint-initdb.d/") container.start()
@pytest.fixture(scope="session", autouse=True)def cleanup_containers(): yield for container in containers.values(): container.stop()
这可以确保在测试会话结束后,所有容器实例都被正确停止,从而释放Docker上的资源。
简单的测试案例
参数化测试是一种强大的技术,用于使用不同的输入执行相同的测试。在我们的测试环境中,我们使用pytest参数化来为不同的数据库版本和配置传递输入,以测试不同的数据库交互。
使用不同的数据集来参数化测试是有帮助的,这样就可以在同一测试中使用不同的数据集。在我们的测试设置中,pytest参数化结构如下所示。
@pytest.mark.parametrize("db_setup",[ ("mysql", "8.0.36", 4, 5, 10,"False"), ("mysql", "latest", 5, 5, 10, "True"), ("mysql", "8.0.36", 6, 5, 10, "True"), ("postgres", "9.5", 9, 5, 10, "True"), ("postgres", "9.5", 10, 5, 10, "True"), ("postgres", "latest", 11, 5, 10, "False")],indirect=True)
以下是每个参数的解释:
- 数据库类型(连接器):指定数据库类型
- 数据库版本(版本):表示要使用的数据库版本。
- 要插入的行数(data_rows):用于测试时将要插入到数据库中的行数
- 最小值(min_value)和最大值(max_value):预计行数的范围。
- 预期结果(expected_result):一个布尔值(“True”或“False”),表示测试通过或失败。
使用不同数据进行测试
我们尝试了不同的测试值,如 4、5、6、9、10 和 11。每种测试都探索了在不同数量的数据下期望值的行为。例如:
- 将输入参数(如“mysql”、“latest”、5、5、10、“True”)传递给该函数,将测试一个特殊情况,即行数恰好等于最小边界的情况,并应返回True,表示成功。
- 输入如 ("postgres", "9.5", 11, 5, 10, "False") 会检查当数据略微超过上限时的功能是否正常,此时应该出现错误。
这些测试确保应用程序能够处理不同的数据场景,并确保数据验证逻辑被正确地实现。
使用数据库类型进行测试
使用不同的数据库类型进行测试对于确保验证逻辑在不同数据库系统之间保持一致至关重要。在我们的测试中,我们通过提供不同的参数来测试不同的数据库变体。这些参数包括不同版本和类型的数据库,如MySQL和PostgreSQL(“mysql”,“8.0.36”和“postgres”,“最新版本”)。这有助于选择合适的Docker容器或配置来设置测试数据库。
这是我们完整的测试定义。
@pytest.mark.parametrize("db_setup",[ ("mysql", "8.0.36", 4, 5, 10,"False"), ("mysql", "latest", 5, 5, 10, "True"), ("mysql", "8.0.36", 6, 5, 10, "True"), ("postgres", "9.5", 9, 5, 10, "True"), ("postgres", "9.5", 10, 5, 10, "True"), ("postgres", "latest", 11, 5, 10, "False") ],indirect=True)def test_row_count_expectation(db_setup): # Define test parameters min_value, max_value, url, expected_result = db_setup # Initialize Great Expectations context context = ge.get_context() datasource_config = { "name": "my_mysql_datasource", "class_name": "Datasource", "execution_engine": { "class_name": "SqlAlchemyExecutionEngine", "connection_string": url }, "data_connectors": { "default_runtime_data_connector_name": { "class_name": "RuntimeDataConnector", "batch_identifiers": ["default_identifier_name"], }, }, } # Create or update datasource context.add_datasource(**datasource_config) batch_request = RuntimeBatchRequest( datasource_name="my_mysql_datasource", data_connector_name="default_runtime_data_connector_name", data_asset_name="user_data", runtime_parameters={"query": "SELECT * FROM user_data"}, batch_identifiers={"default_identifier_name": "default_identifier"}, ) # Create or update expectation suite expectation_suite_name = "test_suite" context.add_or_update_expectation_suite(expectation_suite_name="test_suite") # Get validator validator = context.get_validator( batch_request=batch_request, expectation_suite_name=expectation_suite_name ) # Run validation result = validator.expect_table_row_count_to_be_between(min_value=min_value, max_value=max_value) # Check the validation result and print messages accordingly if result.success == expected_result: print(f"Test passed: Expected {expected_result}, got {result.success}") else: print(f"Test failed: Expected {expected_result}, got {result.success}") assert False, f"Expected {expected_result}, got {result.success}"
测试结果
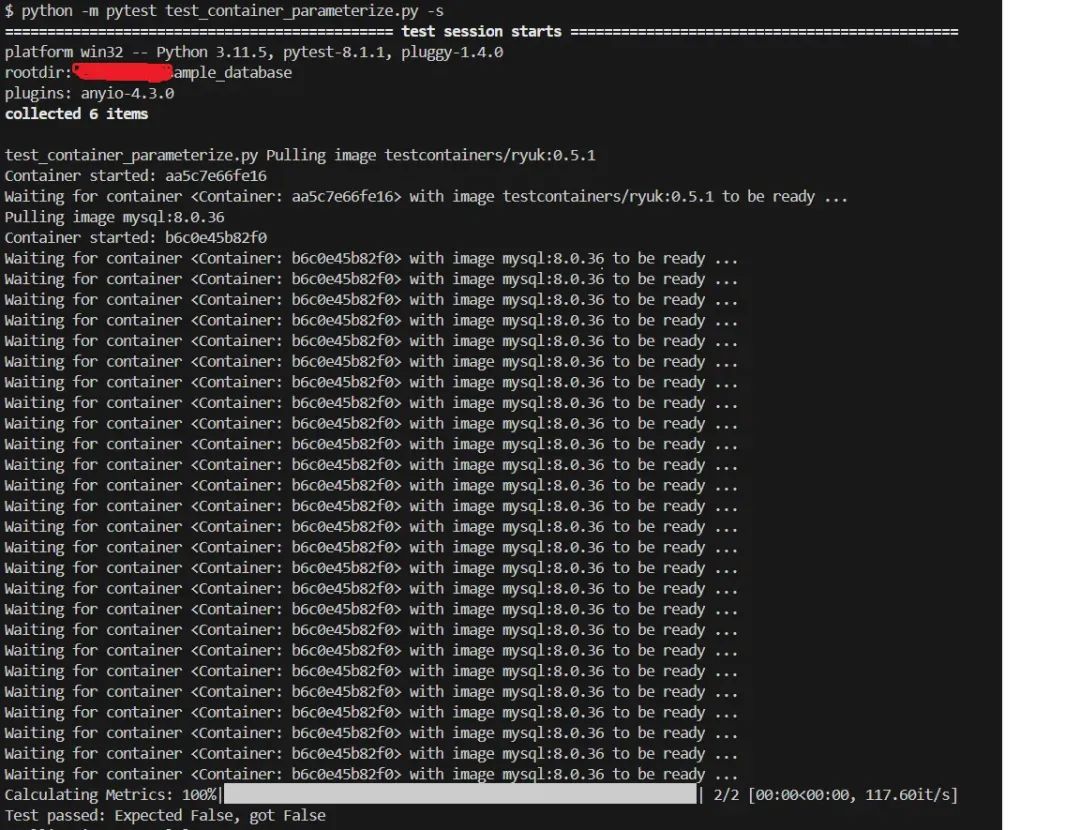
使用 pytest 命令运行测试。
python -m pytest test_container_parameterize.py -s
往期系列文章
阿里微服务质量保障系列:微服务知多少
阿里微服务质量保障系列:研发流程知多少
阿里微服务质量保障系列:研发环境知多少
阿里微服务质量保障系列:阿里变更三板斧
阿里微服务质量保障系列:故障演练
阿里微服务质量保障系列:研发模式&发布策略
阿里微服务质量保障系列:性能监控
阿里微服务质量保障系列:性能监控最佳实践
阿里微服务质量保障系列:基于全链路的测试分析实践
- END -
下方扫码关注 软件质量保障,与质量君一起学习成长、共同进步,做一个职场最贵Tester!
- 关注公众号, 后台回复【测开】获取测试开发xmind脑图
- 扫码加作者, 获取加入测试社群!
往期推荐
聊聊工作中的自我管理和向上管理
经验分享|测试工程师转型测试开发历程
聊聊UI自动化的PageObject设计模式
细读《阿里测试之道》
我在阿里做测开
版权归原作者 软件质量保障 所有, 如有侵权,请联系我们删除。