
最近几天一直在弄FuzzBench添加新的fuzzer,在添加过程中遇到各种问题,在此做详细记录。
拉取fuzzbench到本地
这一部分可以直接参考此链接FuzzBench预备条件
1.拉取代码到本地
git clone https://github.com/google/fuzzbench
cd fuzzbench
git submodule update --init
2.安装fuzzbench
sudo apt-get install build-essential
3.安装fuzzbench需要使用的依赖
sudo apt-get install python3.8-dev python3.8-venv
make install-dependencies
#接下里是进入虚拟环境,这一步可以不执行,执行后也可以执行deactivate退出虚拟环境
source .venv/bin/activate
4.安装本地依赖
如果想要在本地执行fuzzbench需要执行一下语句进行rsync的安装
sudo apt-get install rsync
添加新的Fuzzer
1.创建目录
首先到fuzzbench的fuzzer目录下创建需要添加的fuzzer对应的文件名,该文件夹用于存放接下来需要创建的三个文件
export FUZZER_NAME= < your_fuzzer_name>
cd fuzzers
mkdir $FUZZER_NAME
例如本文新增的fuzzer名为agilefuzz,注意这里fuzzer_name名称只能是小写字母,否则会报错。
2.编写fuzzer文件
接下来编写的文件都保存在(1)中创建的目录下
cd $FUZZER_NAME
builder.Dockerfile编写
此处使用vim对该文件进行编写,直接参考它给出的例子afl。
vim builder.Dockerfile
写入代码如下:
#Copyright 2020 Google LLC
#
#Licensed under the Apache License, Version 2.0(the "License");#youmay not use this file except in compliance with the License.#You may obtain a copy of the License at
#
#http://www.apache.org/licenses/LICENSE-2.0
#
#Unless required by applicable law or agreed to in writing, software#distributedunder the License is distributed on an "AS IS"BASIS,#WITHOUT WARRANTIES OR CONDITIONS OF ANY KIND, either express or implied.#See the License for the specific language governing permissions and#limitationsunder the License.

ARG parent_image
FROM $parent_image

#Download and compile AFL v2.57b.#Set AFL_NO_X86 to skip flaky tests.
#注意这里的git clone的地址要改成你需要添加的fuzzer的拉取地址
#拉取到afl目录下是为了方便在afl编写的其他代码中进行兼容,看了一下其他模糊器的builder.Dockerfile也是拉取到afl目录下
RUN git clone https://github.com/12qwetyd/agile.git /afl  && \
    cd /afl && \
    AFL_NO_X86=1 make#Use afl_driver.cpp from LLVM as our fuzzing library.#wget部分用于拉取编译fuzzer的函数,此处可以直接使用AFL的驱动程序
RUN apt-get update && \
    apt-get install wget -y && \
    wget https://raw.githubusercontent.com/llvm/llvm-project/5feb80e748924606531ba28c97fe65145c65372e/compiler-rt/lib/fuzzer/afl/afl_driver.cpp -O /afl/afl_driver.cpp && \
    clang -Wno-pointer-sign -c /afl/llvm_mode/afl-llvm-rt.o.c -I/afl && \
    clang++ -stdlib=libc++ -std=c++11 -O2 -c /afl/afl_driver.cpp && \
    ar r /libAFL.a *.o
run.Dockerfile
这里对于大部分模糊测试只需要一句from语句用于拉取镜像即可,但如果fuzzer需要一些依赖也可以直接使用apt-get语句下载,在本次实验中并不需要其他依赖,因此代码如下:
首先创建run.Dockerfile
vim run.Dockerfile
在编译器中输入如下代码:
FROM gcr.io/fuzzbench/base-image

fuzzer.py
vim fuzzer.py
直接复制AFL的fuzzer.py文件即可,由于在上面runner.Dockerfile中直接将fuzzer拉取并命名为afl,因此对该文件不需要做修改,但如果添加的fuzzer中存在一些新的执行参数或者删除了一些参数,则需要对fuzzer.py中的参数进行修改。
fuzzer.py代码
# Copyright 2020 Google LLC## Licensed under the Apache License, Version 2.0 (the "License");# you may not use this file except in compliance with the License.# You may obtain a copy of the License at## http://www.apache.org/licenses/LICENSE-2.0## Unless required by applicable law or agreed to in writing, software# distributed under the License is distributed on an "AS IS" BASIS,# WITHOUT WARRANTIES OR CONDITIONS OF ANY KIND, either express or implied.# See the License for the specific language governing permissions and# limitations under the License."""Integration code for AFL fuzzer."""import json
import os
import shutil
import subprocess

from fuzzers import utils

defprepare_build_environment():"""Set environment variables used to build targets for AFL-based
    fuzzers."""
    cflags =['-fsanitize-coverage=trace-pc-guard']
    utils.append_flags('CFLAGS', cflags)
    utils.append_flags('CXXFLAGS', cflags)

    os.environ['CC']='clang'
    os.environ['CXX']='clang++'
    os.environ['FUZZER_LIB']='/libAFL.a'defbuild():"""Build benchmark."""
    prepare_build_environment()

    utils.build_benchmark()print('[post_build] Copying afl-fuzz to $OUT directory')# Copy out the afl-fuzz binary as a build artifact.
    shutil.copy('/afl/afl-fuzz', os.environ['OUT'])defget_stats(output_corpus, fuzzer_log):# pylint: disable=unused-argument"""Gets fuzzer stats for AFL."""# Get a dictionary containing the stats AFL reports.
    stats_file = os.path.join(output_corpus,'fuzzer_stats')withopen(stats_file)as file_handle:
        stats_file_lines = file_handle.read().splitlines()
    stats_file_dict ={}for stats_line in stats_file_lines:
        key, value = stats_line.split(': ')
        stats_file_dict[key.strip()]= value.strip()# Report to FuzzBench the stats it accepts.
    stats ={'execs_per_sec':float(stats_file_dict['execs_per_sec'])}return json.dumps(stats)defprepare_fuzz_environment(input_corpus):"""Prepare to fuzz with AFL or another AFL-based fuzzer."""# Tell AFL to not use its terminal UI so we get usable logs.
    os.environ['AFL_NO_UI']='1'# Skip AFL's CPU frequency check (fails on Docker).
    os.environ['AFL_SKIP_CPUFREQ']='1'# No need to bind affinity to one core, Docker enforces 1 core usage.
    os.environ['AFL_NO_AFFINITY']='1'# AFL will abort on startup if the core pattern sends notifications to# external programs. We don't care about this.
    os.environ['AFL_I_DONT_CARE_ABOUT_MISSING_CRASHES']='1'# Don't exit when crashes are found. This can happen when corpus from# OSS-Fuzz is used.
    os.environ['AFL_SKIP_CRASHES']='1'# Shuffle the queue
    os.environ['AFL_SHUFFLE_QUEUE']='1'# AFL needs at least one non-empty seed to start.
    utils.create_seed_file_for_empty_corpus(input_corpus)defcheck_skip_det_compatible(additional_flags):""" Checks if additional flags are compatible with '-d' option"""# AFL refuses to take in '-d' with '-M' or '-S' options for parallel mode.# (cf. https://github.com/google/AFL/blob/8da80951/afl-fuzz.c#L7477)if'-M'in additional_flags or'-S'in additional_flags:returnFalsereturnTrue#这部分是编译afl的代码,如果添加的fuzzer修改了一些参数在此处进行修改defrun_afl_fuzz(input_corpus,
                 output_corpus,
                 target_binary,
                 additional_flags=None,
                 hide_output=False):"""Run afl-fuzz."""# Spawn the afl fuzzing process.print('[run_afl_fuzz] Running target with afl-fuzz')
    command =['./afl-fuzz','-i',
        input_corpus,'-o',
        output_corpus,# Use no memory limit as ASAN doesn't play nicely with one.'-m','none','-t','1000+',# Use same default 1 sec timeout, but add '+' to skip hangs.]# Use '-d' to skip deterministic mode, as long as it it compatible with# additional flags.ifnot additional_flags or check_skip_det_compatible(additional_flags):
        command.append('-d')if additional_flags:
        command.extend(additional_flags)
    dictionary_path = utils.get_dictionary_path(target_binary)if dictionary_path:
        command.extend(['-x', dictionary_path])
    command +=['--',
        target_binary,# Pass INT_MAX to afl the maximize the number of persistent loops it# performs.'2147483647']print('[run_afl_fuzz] Running command: '+' '.join(command))
    output_stream = subprocess.DEVNULL if hide_output elseNone
    subprocess.check_call(command, stdout=output_stream, stderr=output_stream)deffuzz(input_corpus, output_corpus, target_binary):"""Run afl-fuzz on target."""
    prepare_fuzz_environment(input_corpus)

    run_afl_fuzz(input_corpus, output_corpus, target_binary)
执行文件
在fuzzbench目录下执行如下语句,其中FUZZER_NAME在前文中已经给出了定义,为新添加的fuzzer目录名称:
export BENCHMARK_NAME=libpng-1.2.56
make build-$FUZZER_NAME-$BENCHMARK_NAME
#debug a build
make debug-builder-$FUZZER_NAME-$BENCHMARK_NAME
执行完以上语句会生成多个镜像
下面这两句执行任意一句即可,后一句执行一个更快的测试
make run-$FUZZER_NAME-$BENCHMARK_NAME
make test-run-$FUZZER_NAME-$BENCHMARK_NAME
上面的语句执行速度比较慢,我这边执行的第一句,等了一天多还没执行完。
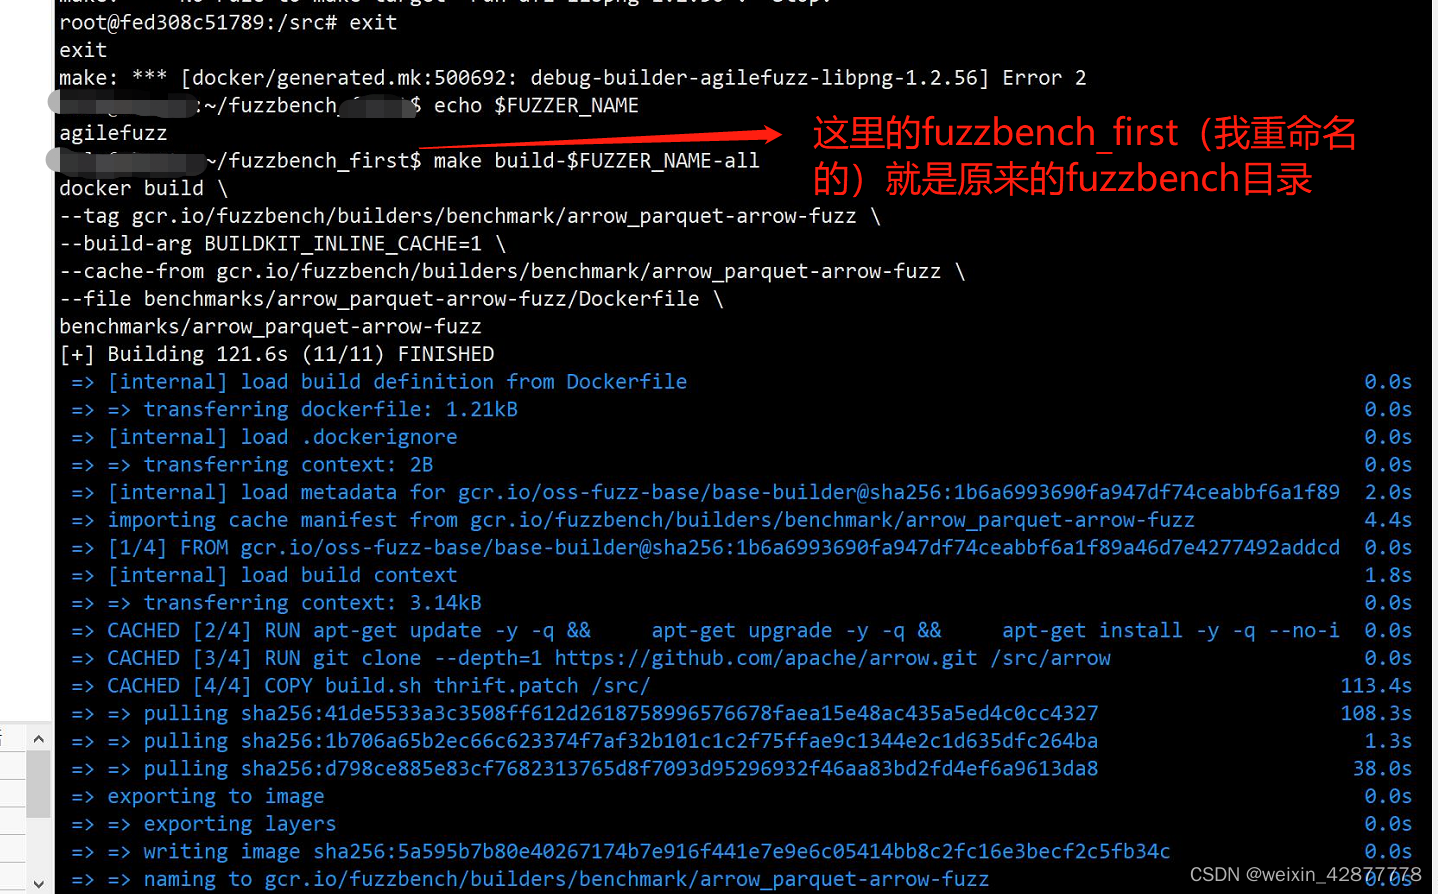
如果需要为新建的fuzzer构建所有的benchmark,在fuzzbench目录下执行以下语句(但通常情况下并不需要所有的BENCHMARK):
make build-$FUZZER_NAME-all
以上为添加fuzzer的全过程,结束。
遇见问题
如果添加的fuzzer删除或新增了一些指令,在复制完fuzzer.py后应该上上文中文提到的部分修改参数引用,例如本文添加的fuzzer删除了-d参数,由于没有及时修改fuzzer.py文件,在执行过程中报错如下: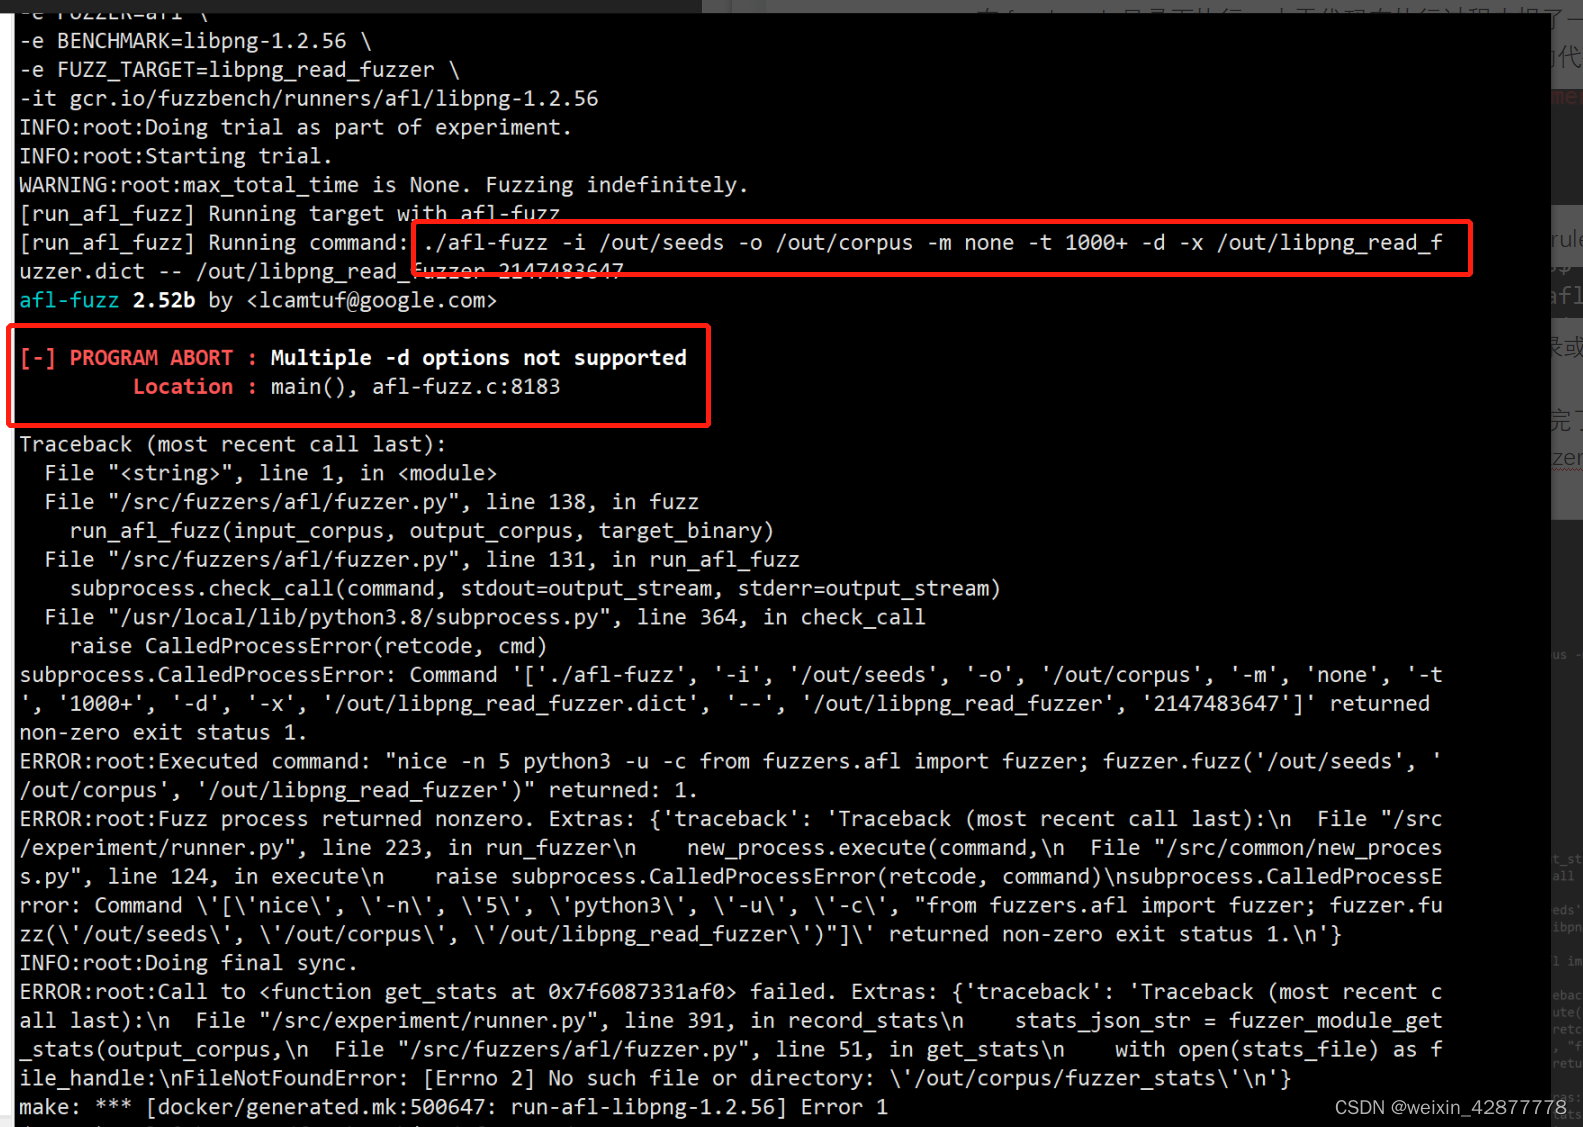
这是因为在执行afl-fuzz时新增的fuzzer没有-d参数,直接在fuzzer.py文件中删除这一参数即可:
需要提交
fuzzbench更新了代码后需要执行git commit提交命令,否则会报失败,这里可以直接修改它的检查语句:
在fuzzbench的experiment目录下修改run_experiment.py文件
在vim非编译模式下输入一下命令查找到git提交检查部分,删除该部分代码即可: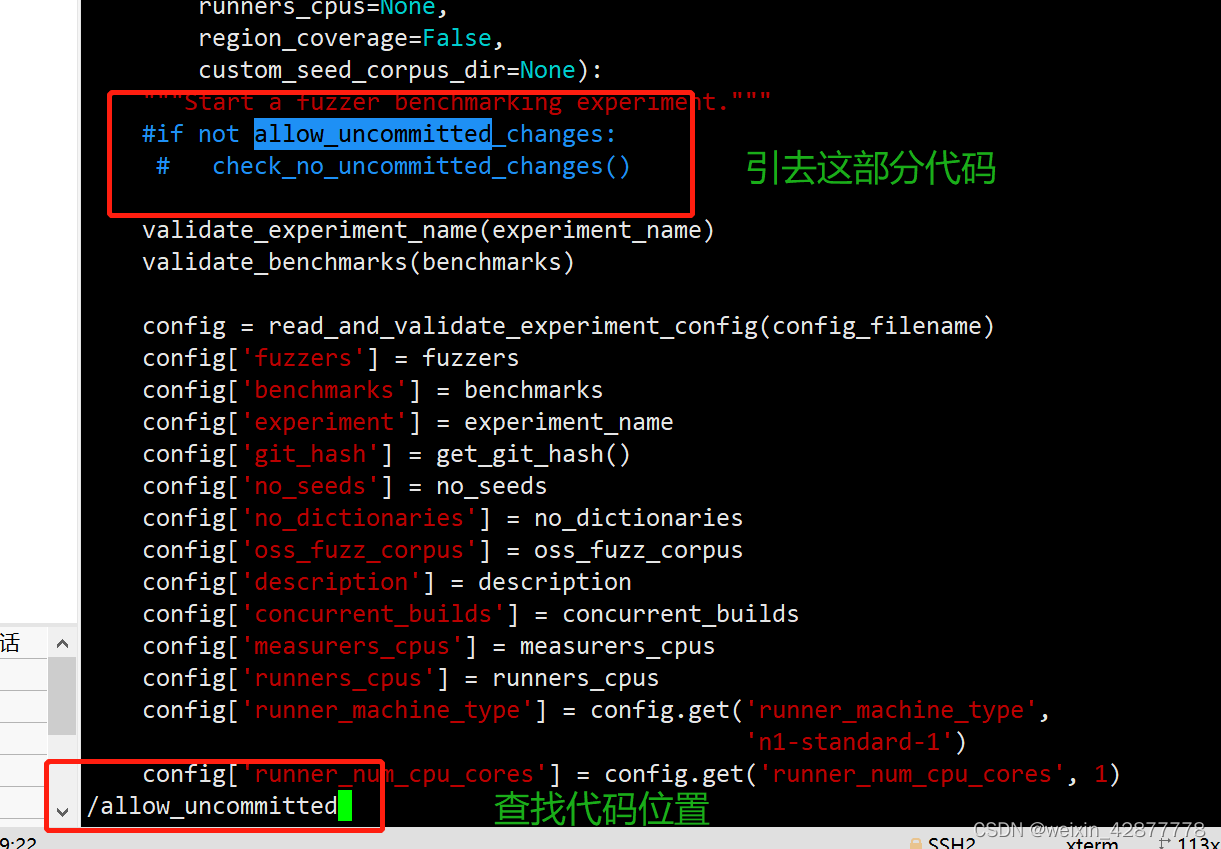
版权归原作者 weixin_42877778 所有, 如有侵权,请联系我们删除。