一、web服务器
1.1www所用的协议
HTTP超文本传输协议,是互联网上最广泛的一种网络协议,所有的www文件都必须遵守这个标准
它是建立在TCP上一种的无状态连接,整个基本的工作流程是客户端发送一个HTTP请求,说明客户端想要访问的资源和请求的动作,服务端收到请求之后,服务端开始处理请求,并根据请求做出相应的动作访问服务器资源,最后通过发送HTTP相应把结果返回给客户端,其中一个请求的开始到一个相应的结束称为事务,当一个事务结束后还会在服务端添加一条日志条目
1.1.1 网址及HTTP简介
web服务器提供的这些数据大部分都是文件,那么我们需要在服务器端先将数据文件写好,并且放置在某个特殊的目录下面,这个目录就是我们整个网站的首页,在Redhat中,这个目录默认在/var/www/html。
URL:统一资源定位符,对可以从互联网上得到的资源的位置和访问方法的一种简洁的表示,是互联网上标准资源的地址
网址格式:<协议>://<主机或主机名>[:port]/<目录资源或路径>
httpd常用的协议状态码:
status(状态码):
1xx:100-101 信息提示
2xx:200-206 成功
3xx:300-305 重定向
4xx:400-415 错误类信息,客户端错误
5xx:500-505 错误类信息,服务器端错误
常见状态码、状态描述的说明:
200: 客户端请求成功

400: 客户端请求有语法错误,不能被服务器所理解

401: 请求未经授权,这个状态码必须和WWW-Authenticate报头域一起使用

403: 服务器收到请求,但是拒绝提供服务

404: 请求资源不存在,举个例子:输入了错误的URL

500: 服务器内部错误

502: 代理服务器从后端服务器收到了一条伪响应,如无法连接到网关

503 – 服务不可用,临时服务器维护或过载,服务器无法处理请求

504 – 网关超时

505 — http的版本不受支持
二、HTTP协议请求的工作过程
(1)终端客户在web浏览器地址输入访问地址http://www.ceshi.con:80/index.html
(2)web浏览器请求DNS服务器把域名www.ceshi.com解析成web服务的IP地址
(3)web浏览器将端口号(默认是80)从访问地址(URL)中解析出来
(4)web浏览器通过解析后的IP地址及端口号与web服务器之间建立一条TCP连接
(5)建立TCP连接后,web浏览器向web服务器发送一条HTTP请求报文
(6)web服务器响应并读取浏览器的请求信息,然后返回一条    HTTP响应报文
(7)web服务器关闭HTTP连接,关闭TCP连接,web浏览器显示访问的网站内容到屏幕上
三、www服务器的基本配置
在服务端(192.168.169.128)进行:
第一步:挂载
mount /dev/sr0 /mnt
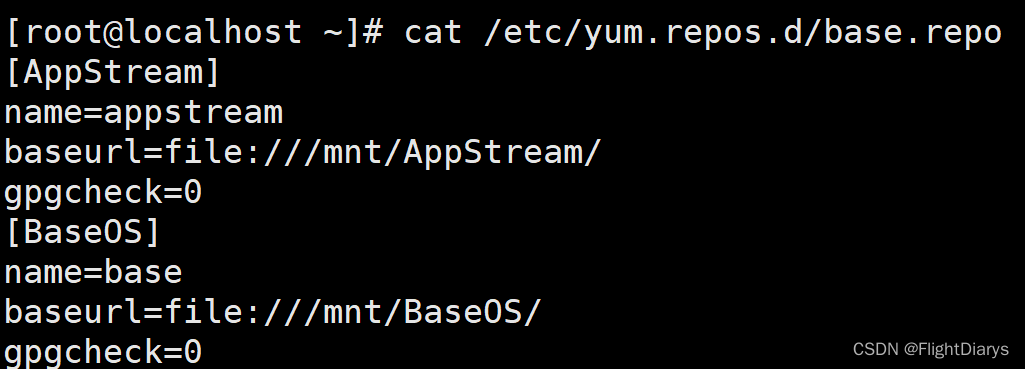
第二步:配置yum源仓库
vim /etc/yum.repos.d/base.repo
第三步:安装http并启动服务,关闭防火墙和selinux
[root@server ~]# yum install httpd -y
[root@server ~]# systemctl start httpd
[root@server ~]# systemctl stop filewalld
[root@server ~]# setenforce 0
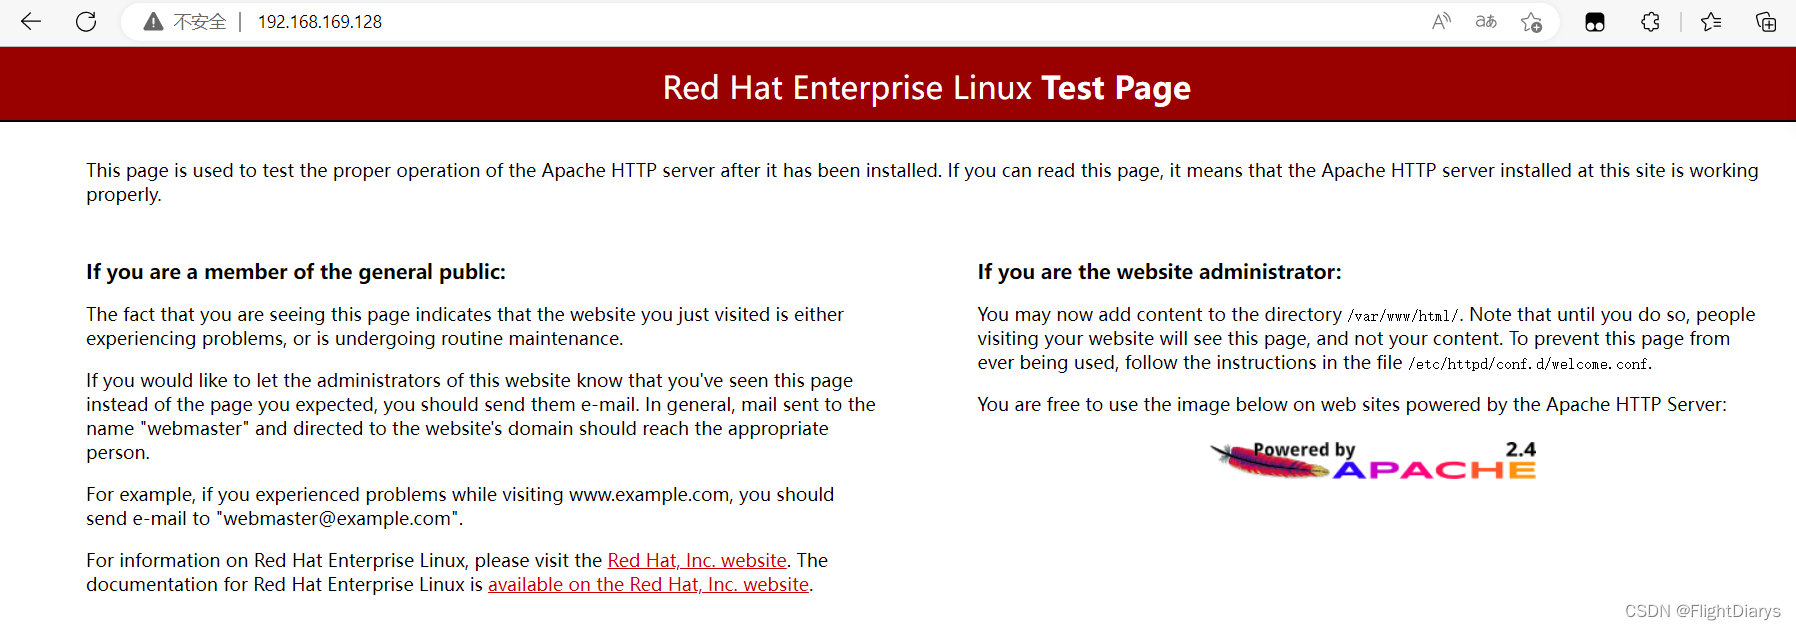
测试结果:可以访问到资源界面
四、搭建静态网站—基于http协议的静态网站
配置文件:/etc/httpd/conf/httpd.conf
ServerName  0.0.0.0:80
LISTEN 80 监听端口
DoucmentROOT /var/www/html  网站加载数据文件的主目录
<Directory />        默认有权限
    AllowOverride none        不允许覆盖
    Require all denied(granted)默认对根目录请求全部拒绝(授予)
<Directory>
<Directory /var/www>
    AllowOverride noe
    Require all granted
<Directory>
<Ifmodule dir_modlue>
        DIrectoryIndex index.html    网站的资源文件名
</Ifmodule>
搭建一个web服务器,访问该服务器时显示“hello world”欢迎界面
[root@server ~]# cd /var/www/html/
[root@server html]# vim index.html
hello world
之后再通过浏览器访问

或者:
[root@server ~]# echo hello world > /var/www/html/index.html
[root@server ~]# curl 192.168.169.128
helloworld
问题:
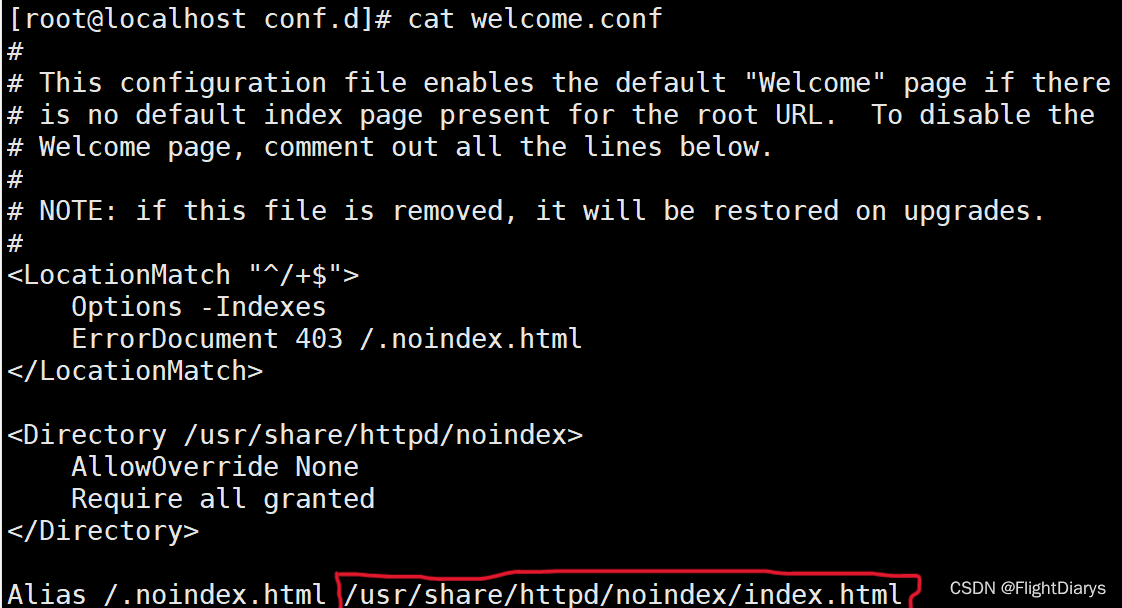
1.设置默认访问apache欢迎界面的配置文件是哪个?apache欢迎界面的具体文件在哪儿?
配置文件:/etc/httpd/conf.d/welcome.conf

具体文件:/usr/share/httpd/noindex/index.html
2.为什么自己定义的静态页面是在/var/www/html目录?
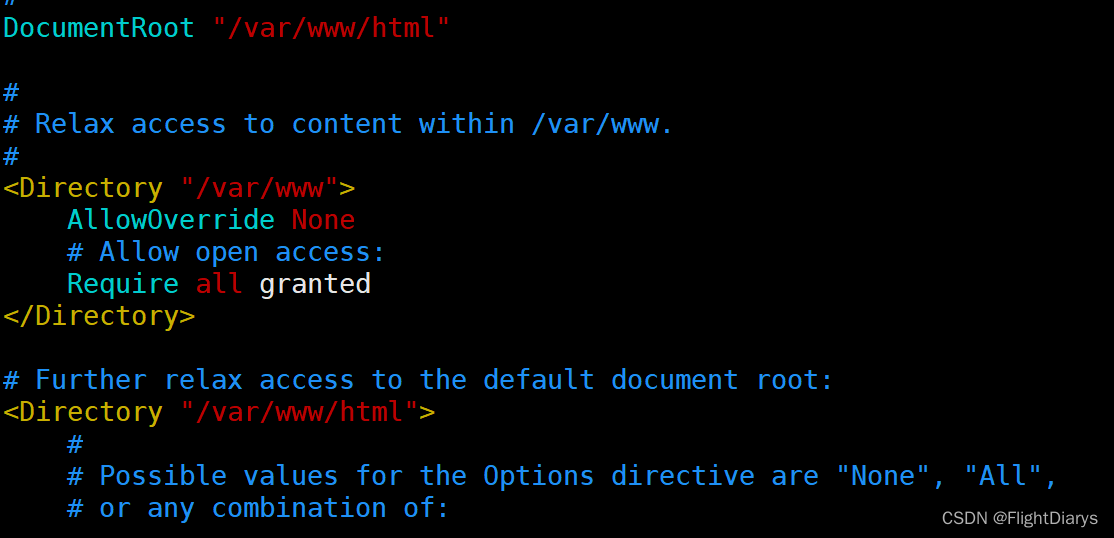
因为在配置文件/etc/httpd/conf/httpd.conf中,
网站加载数据文件的主目录为/var/www/html
DoucmentROOT /var/www/html
1、多IP网站搭建
第一步:添加多IP
[root@server ~]# nmcli connection modify ens160 ipv4.method manual +ipv4.addresses 192.168.169.134/24 +ipv4.addresses 192.168.169.135/24 +ipv4.addresses 192.168.169.136/24 ipv4.gateway 192.168.169.2 ipv4.dns 114.114.114.114 connection.autoconnect yes
[root@server ~]# nmcli connection up ens160
server主机配置:
1.安装web服务包
[root@server ~]# yum install httpd -y
2.关闭selinux,firewalld
[root@server ~]# systemctl stop filewalld
[root@server ~]# setenforce 0
3.根据需求更改配置文件
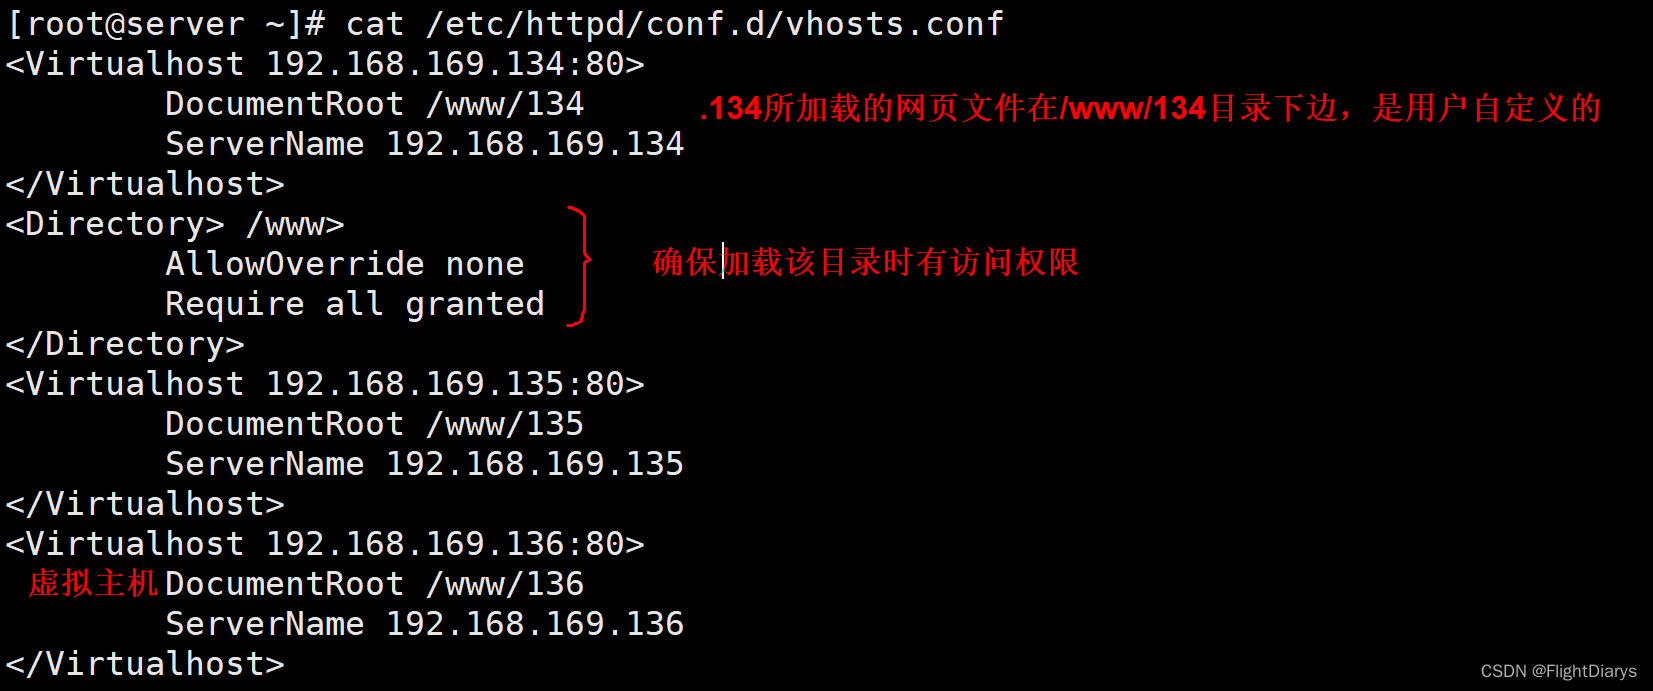
[root@server ~]# vim /etc/httpd/conf.d/vhosts.conf
[root@server ~]# cat /etc/httpd/conf.d/vhosts.conf
<Virtualhost 192.168.169.134:80>
    DocumentRoot /www/134
    ServerName 192.168.169.134
</Virtualhost>
<Directory /www>
    AllowOverride none
    Require all granted
</Directory>
<Virtualhost 192.168.169.135:80>
    DocumentRoot /www/135
    ServerName 192.168.169.135
</Virtualhost>
<Virtualhost 192.168.169.136:80>
    DocumentRoot /www/136
    ServerName 192.168.169.136
</Virtualhost>
4.创建对应资源目录、文件
[root@server ~]# mkdir /www/{134,135,136} -pv
[root@server ~]# echo this is 134 > /www/134/index.html
[root@server ~]# echo this is 135 > /www/135/index.html
[root@server ~]# echo this is 136 > /www/136/index.html

5.重启服务
[root@server ~]# systemctl restart httpd
测试结果:


eg:移除或修改网卡地址
ens160网卡中有192.168.10.100,134,135,136四个IP地址
移除134、135、136;添加200
[root@server ~]# nmcli connection edit ens160
nmcli> goto ipv4
nmcli ipv4> remove ipv4.addresses 192.168.10.134/24
nmcli ipv4> remove ipv4.addresses 192.168.10.135/24
nmcli ipv4> remove ipv4.addresses 192.168.10.136/24
nmcli ipv4> set ipv4.addresses 192.168.10.200/24
nmcli ipv4> save
nmcli ipv4> quit
2、单IP地址多端口搭建网站
1.添加多端口
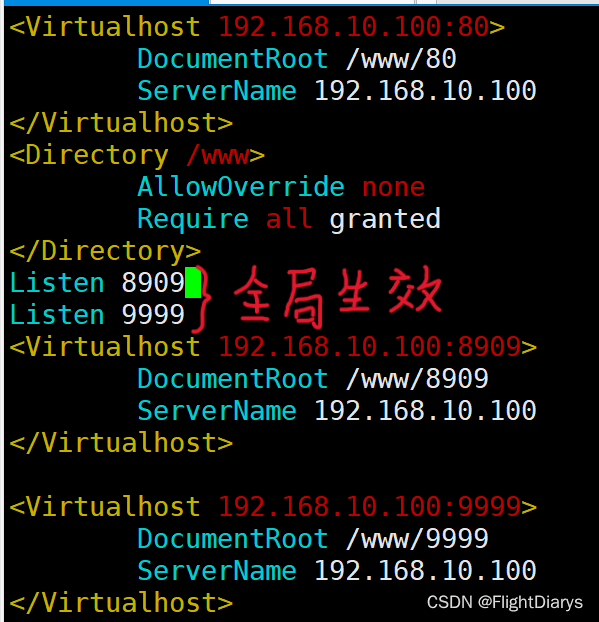
[root@server ~]# vim /etc/httpd/conf.d/vhosts.conf
[root@server ~]# cat /etc/httpd/conf.d/vhosts.conf
<Virtualhost 192.168.169.134:80>
DocumentRoot /www/80
ServerName 192.168.169.134
</Virtualhost>
<Directory /www>
AllowOverride none
Require all granted
</Directory>
Listen 8909
Listen 9999
<Virtualhost 192.168.169.134:8909>
DocumentRoot /www/8909
ServerName 192.168.169.134
</Virtualhost>
<Virtualhost 192.168.169.134:9999>
DocumentRoot /www/9999
ServerName 192.168.169.134
</Virtualhost>
2.根据配合创建对应资源目录、文件
[root@server ~]# mkdir /www/{80,8909,9999} -pv
[root@server ~]# echo this is 80 > /www/80/index.html
[root@server ~]# echo this is 8909 > /www/8909/index.html
[root@server ~]# echo this is 9999 > /www/9999/index.html
3.重启服务
4. 测试
3、建立两个基于域名访问的网站
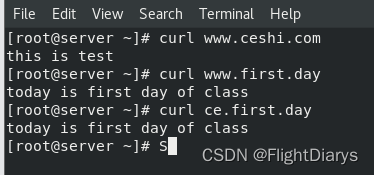
1.新建一个网站,域名为www.ceshi.com,设置DocumentRoot为/www/name,网页内容为this is test
2.新建一个网站,域名为www.first.day,同时可通过ce.first.day访问,设置DocumentRoot为/www/ce,网页内容为:today is first day of class
#本机地址192.168.10.100
[root@server ~]# vim /etc/hosts
127.0.0.1   localhost localhost.localdomain localhost4 localhost4.localdomain4
::1         localhost localhost.localdomain localhost6 localhost6.localdomain6
192.168.10.100  www.ceshi.com
192.168.10.100  www.first.day
192.168.10.100  ce.first.day

[root@server ~]# vim /etc/httpd/conf.d/vhost.conf
<virtualHost 192.168.10.100:80>
    DocumentRoot /www/ce
    ServerName www.first.day
    ServerName ce.first.day
</virtualHost>
<virtualHost 192.168.10.100:80>
    DocumentRoot /www/name
    ServerName www.ceshi.com
</virtualHost>
<Directory /www>
    AllowOverride none
    Require all granted
</Directory>

[root@server ~]# mkdir /www/name
[root@server ~]# mkdir /www/ce
[root@server ~]# echo this is test > /www/name/index.html
[root@server ~]# echo today is first day of class > /www/ce/index.html
[root@server ~]# systemctl restart httpd
测试结果:
<Directory /www>
    AllowOverride none
    <RequirelAll>
            Require all granted       #允许所有主机都可以访问
            Require not ip 192.168.10.134   #不允许此IP访问
    </RequireAll>
</Directory>
五、搭建静态网站—基于https协议的静态网站
HTTPS:超文本传输安全协议,是以安全为目标的HTTP通道。
1、介绍
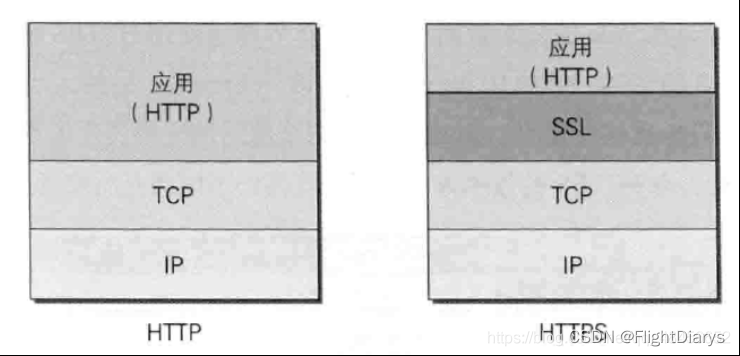
HTTPS并不是一个新协议,而是 HTTP+SSL(TLS)。原本HTTP先和TCP(假定传输层是TCP协议)直接通信,而加了SSL后,就变成HTTP先和SSL通信,再由SSL和TCP通信,相当于SSL被嵌在了HTTP和TCP之间。
SSL:是“Secure Sockets Layer”的缩写,中文叫做“安全套接层”。它是在上世纪90年代中期,由网景公司设计的。到了1999年,SSL 应用广泛,已经成为互联网上的事实标准。IETF 就把SSL 标准化。标准化之后SSL被改为 TLS(Transport Layer Security传输层安全协议)。
2、SSL协议
两层SSL协议:
SSL记录协议 (SSL Record Protocol):它建立在可靠的传输协议(如TCP)之上,为高层协议提供数据封装、压缩、加密等基本功能。
SSL握手协议(SSL Handshake Protocol):它建立在SSL记录协议之上,用于在实际的数据传输开始前,通讯双方进行身份认证、协商加密算法、交换加密密钥等。
SSL协议提供的服务:
1)认证用户和服务器,确保数据发送到正确的客户机和服务器
2)加密数据以防止数据中途被窃取
3)维护数据的完整性,确保数据在传输过程中不被改变。
搭建https静态网站
mod_ssl:是一种以openssl 的工具箱为基础专门为apache webserver 提供密码保护的软件。
1.装包
[root@localhost ~]# yum install mod_ssl -y

ssl.conf中重要的三条配置
SSLEngine on    引擎
SSLCertificateFile /etc/pki/tls/certs/localhost.crt    证书文件
SSLCertificateKeyFile /etc/pki/tls/private/localhost.key    私钥文件

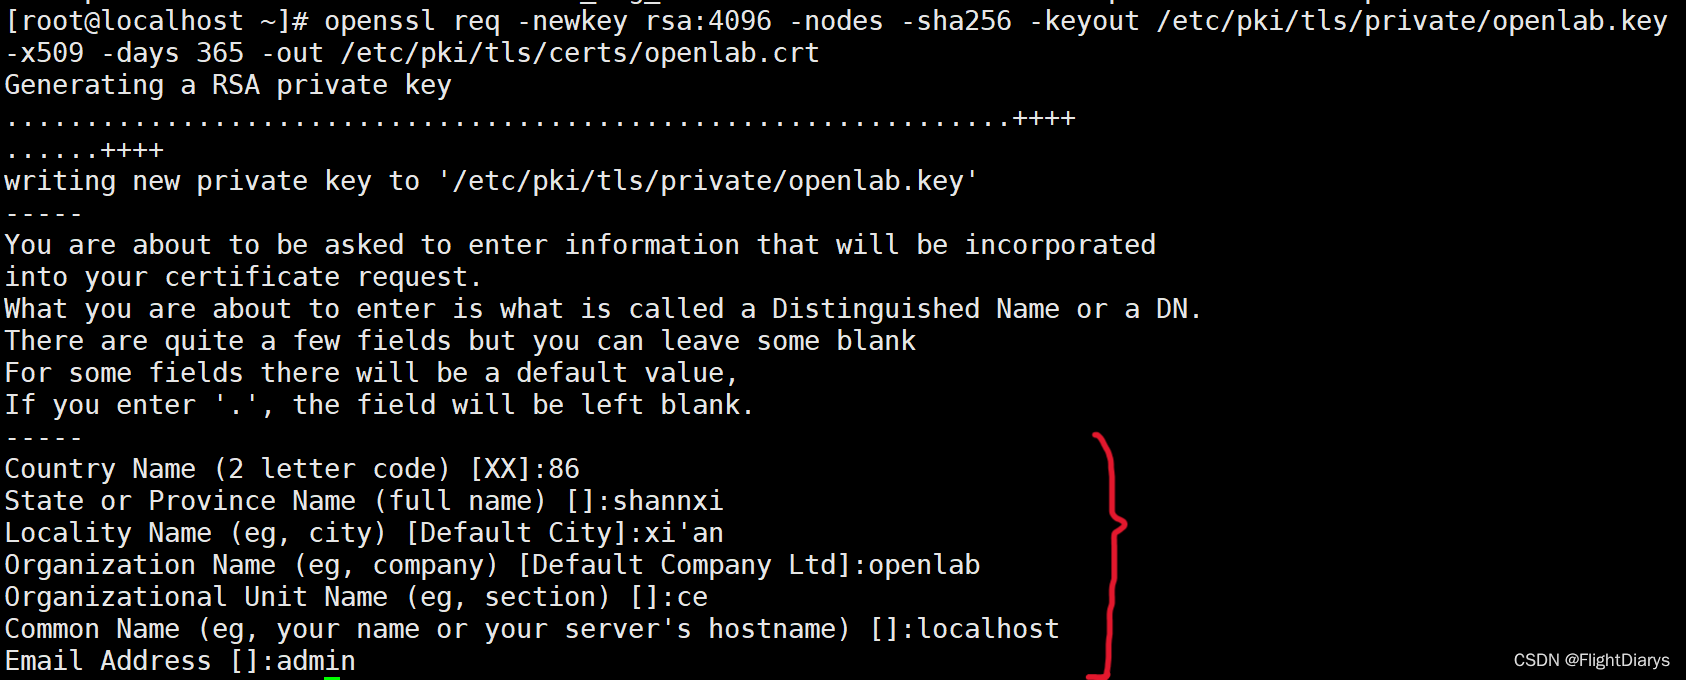
2.创建自签名证书和颁发证书
[root@localhost ~]# openssl req -newkey rsa:4096 -nodes -sha256 -keyout /etc/pki/tls/private/openlab.key -x509 -days 365 -out /etc/pki/tls/certs/openlab.crt

3.更改配置文件
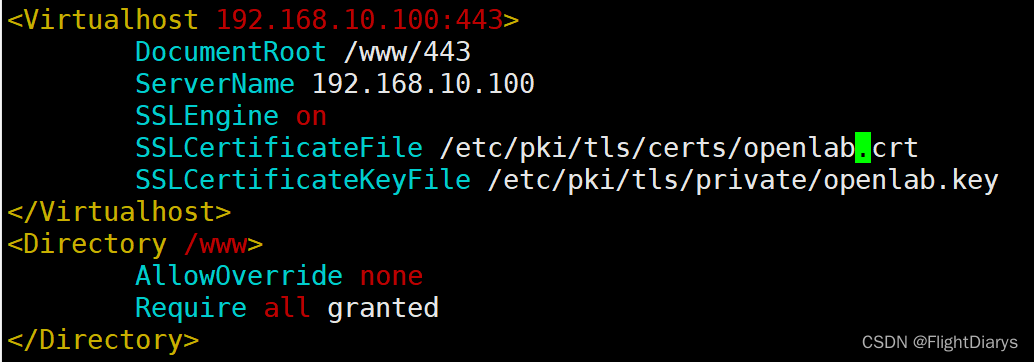
<Virtualhost 192.168.10.100:443>
    DocumentRoot /www/443
    ServerName 192.168.10.100
    SSLEngine on
    SSLCertificateFile /etc/pki/tls/certs/openlab.crt
    SSLCertificateKeyFile /etc/pki/tls/private/openlab.key
</Virtualhost>
<Directory /www>
    AllowOverride none
    Require all granted
</Directory>
4.创建对应资源目录、文件
[root@localhost ~]# mkdir /www/443
[root@localhost ~]# echo i really is 栓q > /www/443/index.html
5.重启服务、测试

六、搭建动态网站(搭建论坛)
LAMP(Linux+Apache+MySQL+PHP)
Apache主要提供www服务器平台
MySQL:数据库是一个特殊格式的文件,这种文件要通过特殊接口(数据库软件)来进行读写,由于这个特殊接口已经针对数据的查询,写入做过优化设计,因此适合多人同时写入与查询工作
PHP:可以被用来建立动态网页,PHP程序代码可以直接在HTML网页当中嵌入就像编辑HTML网页一样简单,PHP是一种程序语言,可以直接在网页当中编写,不需要经过编译即可执行
1.关闭防火墙和selinux
2.安包
yum install httpd -y
yum install php* -y
yum install mariadb-server -y

3.上传discuz包
包链接:
https://pan.baidu.com/s/15vywjSPrj4fhbxuANvsLpA?pwd=zw13

4.解压
[root@localhost discuz]# unzip Discuz_X3.4_SC_GBK_20191201.zip

5.启动MySQL服务以及初始化数据库
[root@localhost upload]# systemctl restart mariadb
[root@localhost upload]# mysql_secure_installation  设置密码

6.进入数据库并创建库
[root@localhost upload]# mysql -uroot -p
MariaDB [(none)]> create database discuz;
Query OK, 1 row affected (0.000 sec)
MariaDB [(none)]> exit
Bye
[root@localhost upload]# systemctl restart mariadb

7.更改配置
[root@localhost ~]# vim /etc/httpd/conf.d/vhosts.conf
<Virtualhost 192.168.10.100:80>
    DocumentRoot /discuz
    ServerName 192.168.10.100
</Virtualhost>
<Directory /discuz>
    AllowOverride none
    Require all granted
</Directory>
[root@localhost ~]# systemctl restart httpd
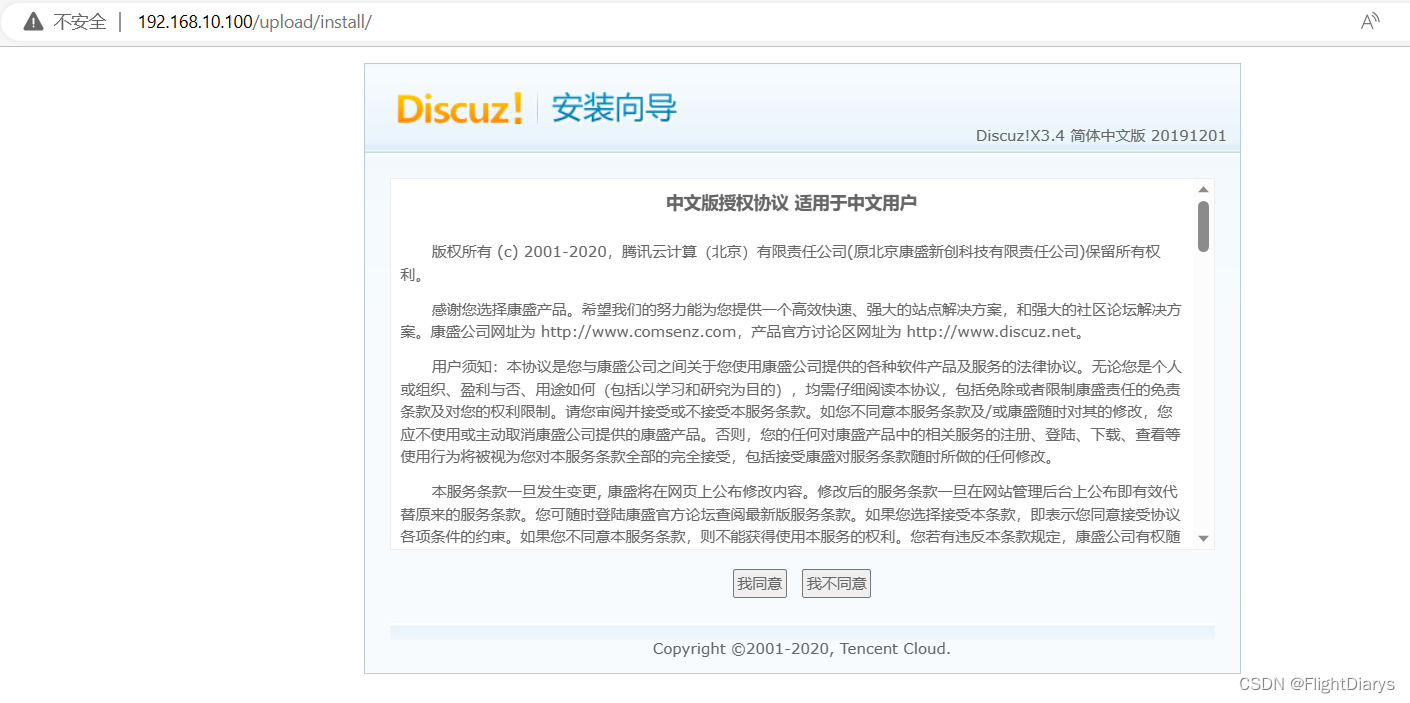
用浏览器访问 http://192.168.10.100/upload 进入论坛安装配置过程
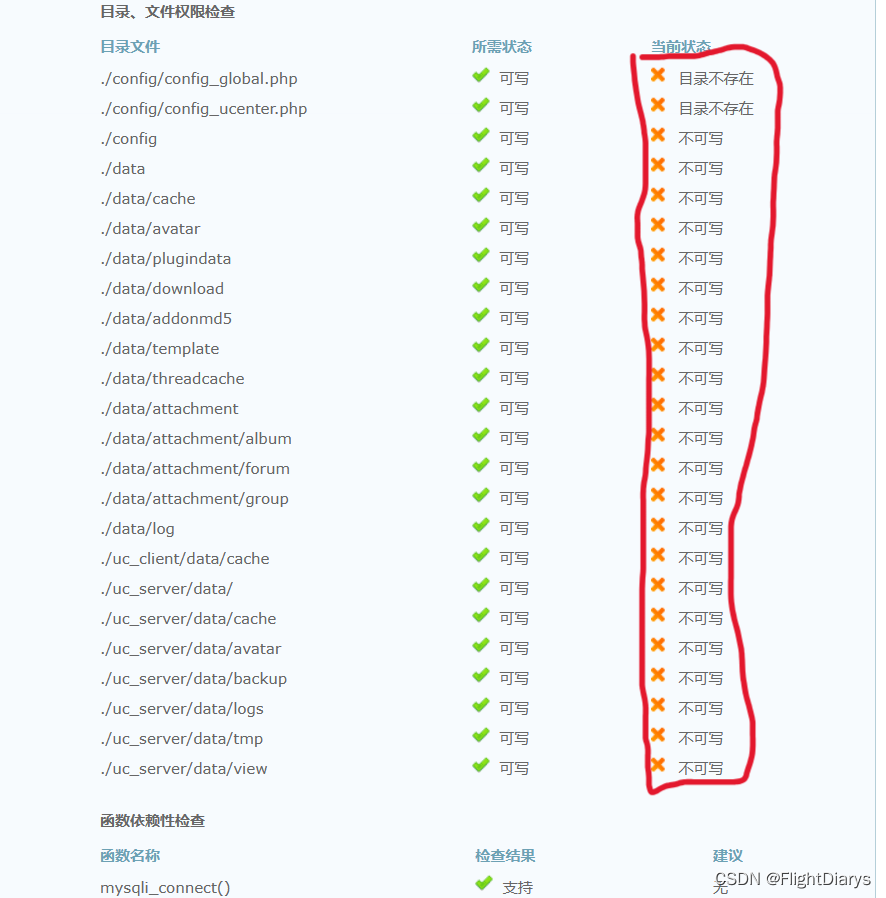
在当前目录upload下无权限,所以要加权限
[root@localhost upload]# chmod 777 config data uc_* -R

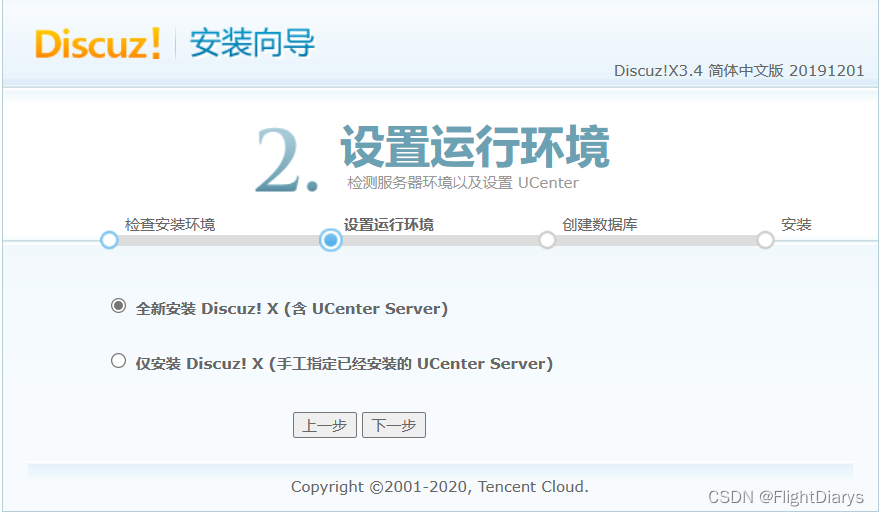
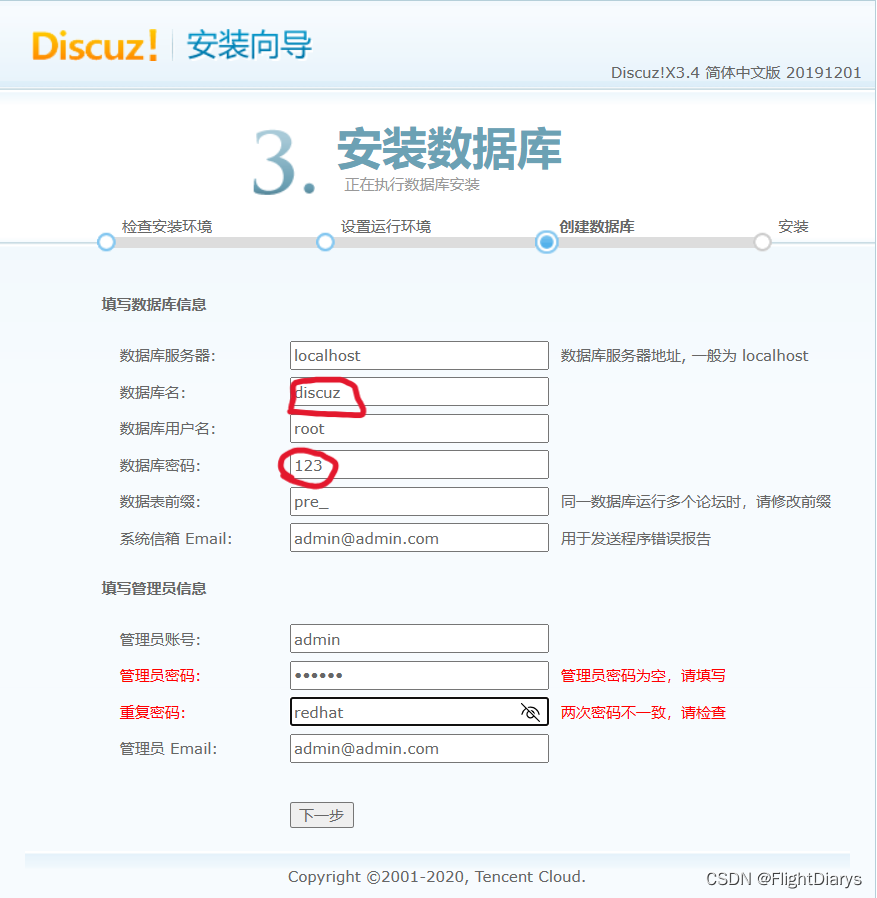
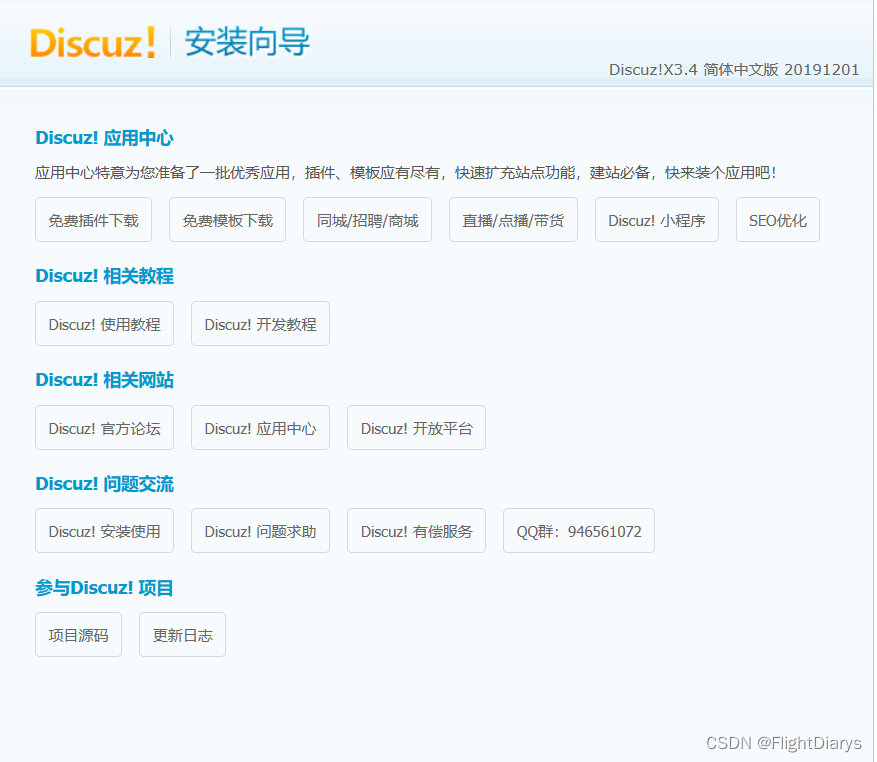
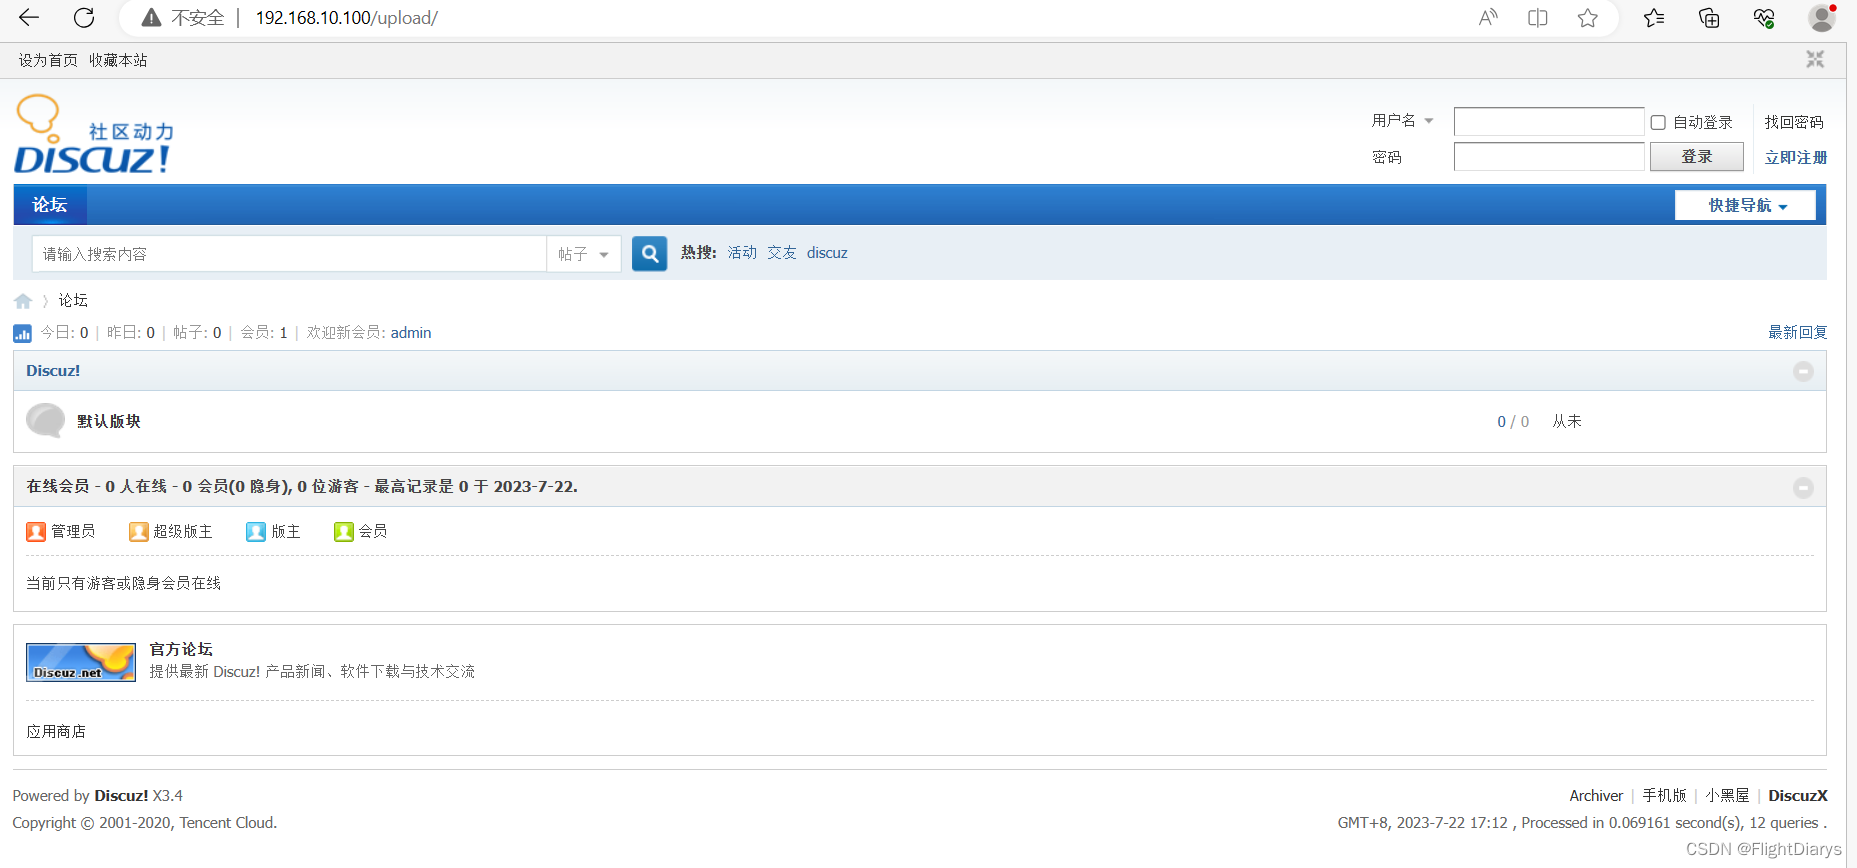
重新刷新
版权归原作者 FlightDiarys 所有, 如有侵权,请联系我们删除。