前端时间实现了一个关于摄像头拉流检测再推流前端查看的功能。整体流程是python端首先通过opencv直接获取海康摄像头的rtsp流,然后经yolo目标检测后再推流到流媒体服务器,前端再从流媒体服务器获取检测后的视频流进行展示。这里面踩过的坑主要就是流媒体服务器接收推流正常,但是拉流会出现中断,以及前端无法获取rtmp流,这个主要是因为rtmp流的播放需要依赖flash,而浏览器在2016年左右就陆续禁止了flash,由于我们在服务器的ubuntu系统上实现,所以插件也没办法用,只能更改流媒体服务器进行rtmp流转hls流。
这个功能的实现主要分了三步,一是流媒体服务器,二是python检测推流,三是前端拉流
1.Ubuntu部署流媒体服务器
由于之前自己配置的基于nginx的流媒体服务器出了问题,所以我在网上找了一个开源的:
流媒体服务器部署
这个流媒体的部署整体还是很简单的,这个也是用的别的博主教程,就不再多说了。贴一张服务器启动成功的图片:
在启动服务器的时候如果说有问题的话可以看看是不是文件没有执行权限,我这里给文件加了一个执行权限之后就直接运行成功了。
2.python端回去海康摄像头视频流检测之后再推流
这里我的初始项目也是有了别的博主写好的开源项目改的,这里直接把博客链接写出来供大家参考顺便膜拜下大佬:
python拉流检测之后再推流
由于这个博客里第一步使用的rtsp服务器最终拉流形式是rtmp,由于rtmp流前端不能拉流,所以我把第一步的服务器替换了成了前文所说的流媒体服务器。
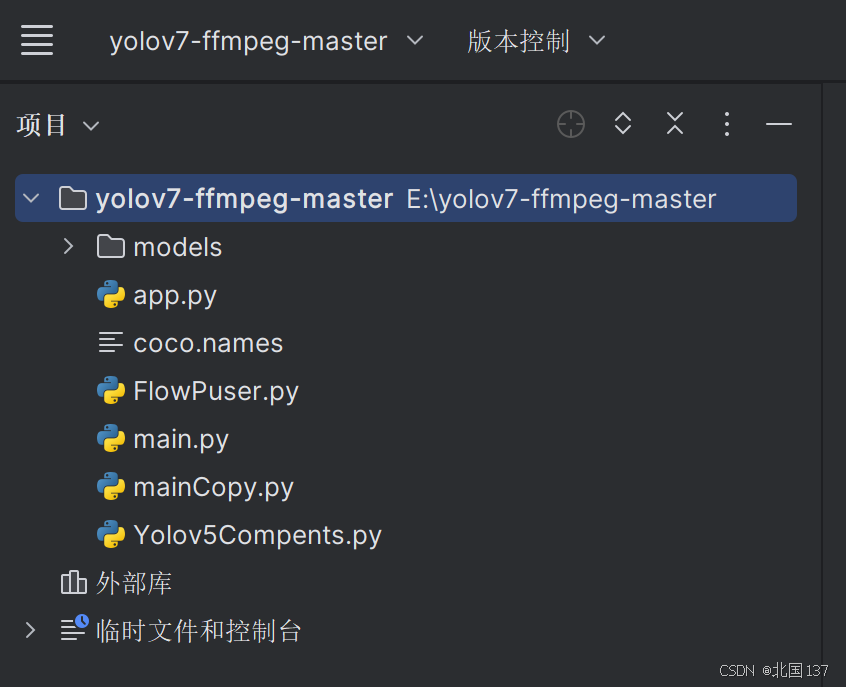
还要注意的是海康摄像头一般会有一个rtsp开头的拉流链接,不知道的可以百度一下。另外就是我们如果想实现前端拉流且要做摄像头切换的话是要把项目改为接口请求,并且如果接收一个新的请求就要停掉之前的摄像头检测推流过程然后开始新的摄像头检测推流过程,下面是更改后的项目结构:

这里其实比原项目就多了app.py和mainCopy.py,主要是用于把原来的方法进行封装,然后引入flask供前端请求以及切换摄像头使用,以下是两个类的代码:
app.py:
from flask import Flask, request
import threading
import time
import mainCopy

app = Flask(__name__)# 全局变量来管理推流线程和标志位
current_thread =None
running =False# 假设 push 方法已经被修改以接受中断defpush_video(video_url):global current_thread, running
    # 如果有一个线程在运行,则停止它if current_thread isnotNoneand current_thread.is_alive():print("Stopping the previous stream.")
        stop_push()
        current_thread.join()# 等待之前的线程结束# 启动新的推流线程
    running =True
    current_thread = threading.Thread(target=mainCopy.push, args=(video_url,))
    current_thread.start()# 停止推流defstop_push():global running
    running =False# 停止推流标志print("Push stream has been stopped.")@app.route('/video', methods=['GET'])defvideo_feed():global running
    video_url = request.args.get('videoUrl','rtsp://admin:[email protected]:554/Streaming.Channels/1')# 默认值为 'World'print(f"Received new request to stream: {video_url}")# 启动推流处理函数
    push_video(video_url)returnf"Started processing stream from {video_url}"if __name__ =='__main__':
    app.run(host='0.0.0.0', port=5000)
mainCopy.py:
import argparse
import time

import cv2
import imutils
from FlowPuser import StreamPusher
from Yolov5Compents import YOLOv5
rtmp_server ='rtmp://10.10.195.123:1935/live/test110'defpush(videoUrl):
    parser = argparse.ArgumentParser()

    parser.add_argument('--imgpath',type=str, default='video/test.mp4',help="image path")
    parser.add_argument('--modelpath',type=str, default='models/yolov5s.onnx',help="onnx filepath")
    parser.add_argument('--confThreshold', default=0.3,type=float,help='class confidence')
    parser.add_argument('--nmsThreshold', default=0.5,type=float,help='nms iou thresh')
    args = parser.parse_args()# Initialize YOLOv5 object detector
    yolov5_detector = YOLOv5(args.modelpath, conf_thres=args.confThreshold, iou_thres=args.nmsThreshold)

    VID_FORMATS =['asf','avi','gif','m4v','mkv','mov','mp4','mpeg','mpg','wmv']# include video suffixes
    imgpath = args.imgpath
    print(imgpath.split('.')[-1])if imgpath.split('.')[-1]in VID_FORMATS:# cap = cv2.VideoCapture('rtsp://admin:[email protected]:554/Streaming.Channels/1')
        cap = cv2.VideoCapture(videoUrl)
        pusher = StreamPusher(rtmp_server)whileTrue:
            success, srcimg = cap.read()
            srcimg = imutils.resize(srcimg, width=640)
            t1 = time.time()
            boxes, scores, class_ids = yolov5_detector.detect(srcimg)# print(time.time() - t1)  # 测量处理一帧图像的时间 用于评估模型的处理速度或性能(推理时间)# Draw detections
            dstimg = yolov5_detector.draw_detections(srcimg, boxes, scores, class_ids)# print(time.time() - t1)  # 测量了模型的推理时间以及绘制检测结果的时间
            winName ='Deep learning object detection in OpenCV'# cv2.namedWindow(winName, 0)
            cv2.imshow(winName, dstimg)
            cv2.waitKey(1)
            pusher.streamPush(dstimg)
        cv2.destroyAllWindows()else:
        srcimg = cv2.imread(args.imgpath)# Detect Objects
        t1 = time.time()
        boxes, scores, class_ids = yolov5_detector.detect(srcimg)print(time.time()- t1)# Draw detections
        dstimg = yolov5_detector.draw_detections(srcimg, boxes, scores, class_ids)print(time.time()- t1)
        winName ='Deep learning object detection in OpenCV'
        cv2.namedWindow(winName,0)
        cv2.imshow(winName, dstimg)
        cv2.waitKey(0)
        cv2.destroyAllWindows()
这里面需要将推流链接以及拉流链接换成自己的,之后直接运行app.py就可以了
3.前端拉流访问
在项目启动之后先发一次请求开始推流过程然后进行拉流测试,拉流链接使用第一步博客中提供的拉流链接,这里可以先用vlc测试一下,下面这两个链接我都试过了是没问题的:
http://127.0.0.1:8080/hls/test110.m3u8
http://127.0.0.1:8080/live/test110.flv
由于前端不是我负责的,所以大家想实现前端的可以自行百度这里就不提供前端代码了(我听前端对接的人说是引入一个js文件就可以了,不是很懂,不敢瞎掰)
版权归原作者 北国137 所有, 如有侵权,请联系我们删除。