
为何使用websocket
在浏览器与服务器通信间,传统的 HTTP 请求在某些场景下并不理想,比如实时聊天、实时性的小游戏等等,
其面临主要两个缺点:
- 无法做到消息的「实时性」;
- 服务端无法主动推送信息;
其基于 HTTP 的主要解决方案有:
- 基于 ajax 的轮询:客户端定时或者动态相隔短时间内不断向服务端请求接口,询问服务端是否有新信息;其缺点也很明显:多余的空请求(浪费资源)、数据获取有延时;
- Long Poll:其采用的是阻塞性的方案,客户端向服务端发起 ajax 请求,服务端挂起该请求不返回数据直到有新的数据,客户端接收到数据之后再次执行 Long Poll;该方案中每个请求都挂起了服务器资源,在大量连接的场景下是不可接受的;
可以看到,基于 HTTP 协议的方案都包含一个本质缺陷 —— 「被动性」,服务端无法下推消息,仅能由客户端发起请求不断询问是否有新的消息,同时对于客户端与服务端都存在性能消耗。
WebSocket 是 HTML5 开始提供的一种浏览器与服务器间进行全双工通讯的网络技术。 WebSocket 通信协议于2011年被IETF定为标准RFC 6455,WebSocketAPI 被 W3C 定为标准。 在 WebSocket API 中,浏览器和服务器只需要要做一个握手的动作,然后,浏览器和服务器之间就形成了一条快速通道。两者之间就直接可以数据互相传送。
WebSocket 是 HTML5 中提出的新的网络协议标准,其包含几个特点:
- 建立于 TCP 协议之上的应用层;
- 一旦建立连接(直到断开或者出错),服务端与客户端握手后则一直保持连接状态,是持久化连接;
- 服务端可通过实时通道主动下发消息;
- 数据接收的「实时性(相对)」与「时序性」;
- 较少的控制开销。连接创建后,ws客户端、服务端进行数据交换时,协议控制的数据包头部较小。在不包含头部的情况下,服务端到客户端的包头只有2~10字节(取决于数据包长度),客户端到服务端的的话,需要加上额外的4字节的掩码。而HTTP协议每次通信都需要携带完整的头部。
- 支持扩展。ws协议定义了扩展,用户可以扩展协议,或者实现自定义的子协议。(比如支持自定义压缩算法等)
实践
1.后端搭建
准配工作
所需要架包 注意:springboot环境 版本2.7.7
  <dependency>
      <groupId>org.springframework.boot</groupId>
      <artifactId>spring-boot-starter-web</artifactId>
  </dependency>
  <dependency>
      <groupId>org.springframework.boot</groupId>
      <artifactId>spring-boot-starter-websocket</artifactId>
  </dependency>

  <dependency>
      <groupId>org.projectlombok</groupId>
      <artifactId>lombok</artifactId>
      <optional>true</optional>
  </dependency>
  <dependency>
      <groupId>org.springframework.boot</groupId>
      <artifactId>spring-boot-starter-test</artifactId>
      <scope>test</scope>
  </dependency>
<!--  <dependency>
      <groupId>cn.hutool</groupId>
      <artifactId>hutool-json</artifactId>
      <version>5.8.9</version>
  </dependency>-->
  <dependency>
      <groupId>com.alibaba</groupId>
      <artifactId>fastjson</artifactId>
      <version>2.0.21</version>
  </dependency>
  <dependency>
      <groupId>org.apache.commons</groupId>
      <artifactId>commons-lang3</artifactId>
      <version>3.7</version>
  </dependency>
application配置
server.port=8080
server.servlet.context-path=/
2.搭建webSocket前后分离
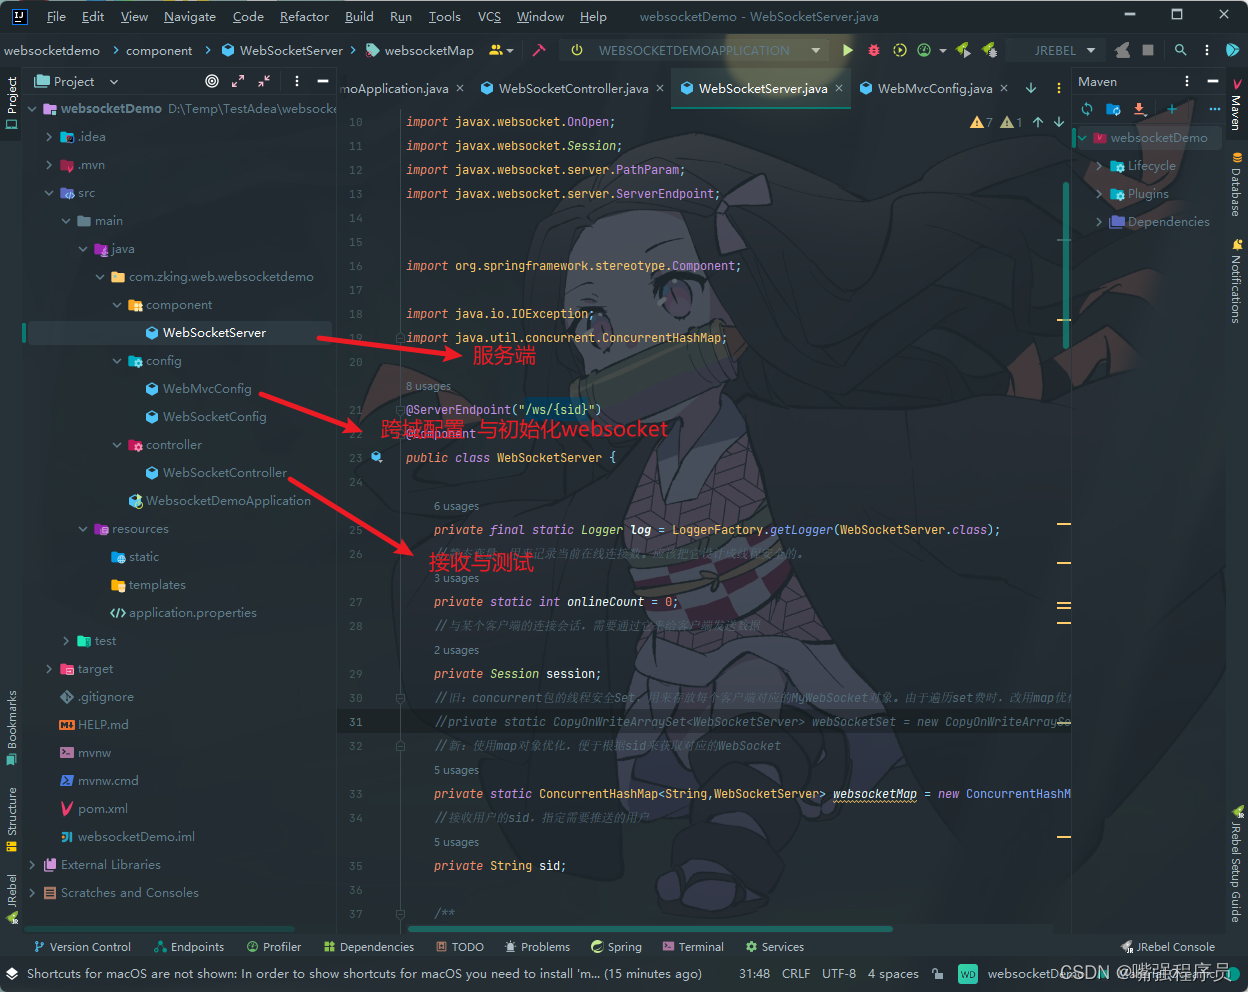
1.配置跨域过滤器与初始化websocket
package com.zking.web.websocketdemo.config;

import org.slf4j.Logger;
import org.slf4j.LoggerFactory;
import org.springframework.context.annotation.Bean;
import org.springframework.context.annotation.Configuration;
import org.springframework.web.servlet.config.annotation.CorsRegistry;
import org.springframework.web.servlet.config.annotation.WebMvcConfigurer;
import org.springframework.web.socket.server.standard.ServerEndpointExporter;

/**
 * Spring MVC 配置
 */
@Configuration
public class WebMvcConfig implements WebMvcConfigurer {

    private final Logger logger = LoggerFactory.getLogger(WebMvcConfig.class);

    //服务器支持跨域
    @Override
    public void addCorsMappings(CorsRegistry registry) {
        registry.addMapping("/**")
                .allowedOrigins("*")
                .allowedMethods("GET", "POST","OPTIONS")
                .allowedHeaders("*")
                .exposedHeaders("Access-Control-Allow-Headers",
                        "Access-Control-Allow-Methods",
                        "Access-Control-Allow-Origin",
                        "Access-Control-Max-Age",
                        "X-Frame-Options")
                .allowCredentials(false)
                .maxAge(3600);
    }


    /**
     * The bean shown in the preceding example registers any @ServerEndpoint
     * annotated beans with the underlying WebSocket container. When deployed to a
     * standalone servlet container, this role is performed by a servlet container
     * initializer, and the ServerEndpointExporter bean is not required.
     *
     * @return
     * 在Spring中可以直接使用Java WebSocket API来提供服务,如果使用内置的web容器,需要做的仅仅是需要在下面添加
     */
    /** 注入ServerEndpointExporter,这个bean会自动注册使用了@ServerEndpoint注解声明的Websocket endpoint 。
     * 要注意,如果使用独立的servlet容器,而不是直接使用springboot的内置容器,就不要注入ServerEndpointExporter,因为它将由容器自己提供和管理。*/
    @Bean
    public ServerEndpointExporter serverEndpointExporter() {
        return new ServerEndpointExporter();
    }

}
2.定义websocket服务
websocket 是 javax.websocket下面的,不需要任何依赖,直接就可以使用
@ServerEndpoint 标记声明一个websocket 服务 ,configurator 属性指定 鉴权 配置类,@ServerEndpoint 标记的类 为每个链接会创建一个该对象实例,也就是成员变量这个链接内私有。
@OnOpen , @OnClose , @OnMessage , @OnError 4个事件方法,对应事件触发的时候调用 (除了@PathParam("path") 标记的参数以外,最多只能有 String message, Session session 两个参数)
package com.zking.web.websocketdemo.component;

import org.apache.commons.lang3.StringUtils;
import org.slf4j.Logger;
import org.slf4j.LoggerFactory;

import javax.websocket.OnClose;
import javax.websocket.OnError;
import javax.websocket.OnMessage;
import javax.websocket.OnOpen;
import javax.websocket.Session;
import javax.websocket.server.PathParam;
import javax.websocket.server.ServerEndpoint;

import org.springframework.stereotype.Component;

import java.io.IOException;
import java.util.concurrent.ConcurrentHashMap;

@ServerEndpoint("/ws/{sid}")
@Component
public class WebSocketServer {

    private final static Logger log = LoggerFactory.getLogger(WebSocketServer.class);
    //静态变量,用来记录当前在线连接数。应该把它设计成线程安全的。
    private static int onlineCount = 0;
    //与某个客户端的连接会话,需要通过它来给客户端发送数据
    private Session session;
    //旧:concurrent包的线程安全Set,用来存放每个客户端对应的MyWebSocket对象。由于遍历set费时,改用map优化
    //private static CopyOnWriteArraySet<WebSocketServer> webSocketSet = new CopyOnWriteArraySet<WebSocketServer>();
    //新:使用map对象优化,便于根据sid来获取对应的WebSocket
    private static ConcurrentHashMap<String,WebSocketServer> websocketMap = new ConcurrentHashMap<>();
    //接收用户的sid,指定需要推送的用户
    private String sid;

    /**
     * 连接成功后调用的方法
     */
    @OnOpen
    public void onOpen(Session session,@PathParam("sid") String sid) {
        this.session = session;
        //webSocketSet.add(this);     //加入set中
        websocketMap.put(sid,this); //加入map中
        addOnlineCount();           //在线数加1
        log.info("有新窗口开始监听:"+sid+",当前在线人数为" + getOnlineCount());
        this.sid=sid;
        try {
            sendMessage("连接成功");
        } catch (IOException e) {
            log.error("websocket IO异常");
        }
    }

    /**
     * 连接关闭调用的方法
     */
    @OnClose
    public void onClose() {
        if(websocketMap.get(this.sid)!=null){
            //webSocketSet.remove(this);  //从set中删除
            websocketMap.remove(this.sid);  //从map中删除
            subOnlineCount();           //在线数减1
            log.info("有一连接关闭!当前在线人数为" + getOnlineCount());
        }
    }

    /**
     * 收到客户端消息后调用的方法,根据业务要求进行处理,这里就简单地将收到的消息直接群发推送出去
     * @param message 客户端发送过来的消息
     */
    @OnMessage
    public void onMessage(String message, Session session) {
        log.info("收到来自窗口"+sid+"的信息:"+message);
        if(StringUtils.isNotBlank(message)){
            for(WebSocketServer server:websocketMap.values()) {
                try {
                    server.sendMessage(message);
                } catch (IOException e) {
                    e.printStackTrace();
                    continue;
                }
            }
        }
    }

    /**
     * 发生错误时的回调函数
     * @param session
     * @param error
     */
    @OnError
    public void onError(Session session, Throwable error) {
        log.error("发生错误");
        error.printStackTrace();
    }

    /**
     * 实现服务器主动推送消息
     */
    public void sendMessage(String message) throws IOException {
        this.session.getBasicRemote().sendText(message);
    }

    /**
     * 群发自定义消息(用set会方便些)
     * */
    public static void sendInfo(@PathParam("message")  String message,@PathParam("sid") String sid) throws IOException {
        log.info("推送消息到窗口"+sid+",推送内容:"+message);
        /*for (WebSocketServer item : webSocketSet) {
            try {
                //这里可以设定只推送给这个sid的,为null则全部推送
                if(sid==null) {
                    item.sendMessage(message);
                }else if(item.sid.equals(sid)){
                    item.sendMessage(message);
                }
            } catch (IOException e) {
                continue;
            }
        }*/
        if(StringUtils.isNotBlank(message)){
            for(WebSocketServer server:websocketMap.values()) {
                try {
                    // sid为null时群发,不为null则只发一个
                    if (sid == null) {
                        server.sendMessage(message);
                    } else if (server.sid.equals(sid)) {
                        server.sendMessage(message);
                    }
                } catch (IOException e) {
                    e.printStackTrace();
                    continue;
                }
            }
        }
    }

    public static synchronized int getOnlineCount() {
        return onlineCount;
    }
    public static synchronized void addOnlineCount() {
        WebSocketServer.onlineCount++;
    }
    public static synchronized void subOnlineCount() {
        WebSocketServer.onlineCount--;
    }
}
3.定义控制器进行测试webSocket向前端发送消息
package com.zking.web.websocketdemo.controller;

import com.zking.web.websocketdemo.component.WebSocketServer;
import com.zking.web.websocketdemo.config.WebSocketConfig;
import org.springframework.beans.factory.annotation.Autowired;
import org.springframework.stereotype.Controller;
import org.springframework.web.bind.annotation.GetMapping;
import org.springframework.web.bind.annotation.PathVariable;
import org.springframework.web.bind.annotation.RequestMapping;
import org.springframework.web.bind.annotation.ResponseBody;
import org.springframework.web.servlet.ModelAndView;

import java.io.IOException;
import java.util.HashMap;
import java.util.Map;

@Controller
@RequestMapping("/websocket")
public class WebSocketController {

    //页面请求
    @GetMapping("/socket/{cid}")
    public ModelAndView socket(@PathVariable String cid) {
        ModelAndView mav=new ModelAndView("/socket");
        mav.addObject("cid", cid);
        return mav;
    }
    //推送数据接口
    @ResponseBody
    @RequestMapping("/socket/push/{cid}")
    public Map<String,Object> pushToWeb(@PathVariable String cid, String message) {
        Map<String,Object> result = new HashMap<>();
        try {
            WebSocketServer.sendInfo(message,cid);
            result.put("status","success");
        } catch (IOException e) {
            e.printStackTrace();
            result.put("status","fail");
            result.put("errMsg",e.getMessage());
        }
        return result;
    }

}
后端准配完毕
2.前端准备
<!DOCTYPE html>
<html>
<head>
<meta charset="utf-8">
<title>websocket通讯</title>
</head>
<script src="https://cdn.bootcss.com/jquery/3.3.1/jquery.js"></script>
<script>
var socket;
function openSocket() {
if(typeof(WebSocket) == "undefined") {
console.log("您的浏览器不支持WebSocket");
}else{
console.log("您的浏览器支持WebSocket");
//实现化WebSocket对象,指定要连接的服务器地址与端口 建立连接
//等同于socket = new WebSocket("ws://localhost:8888/xxxx/im/25");
//var socketUrl="${request.contextPath}/im/"+$("#userId").val();
var socketUrl="http://localhost:8080/ws/"+$("#userId").val();
socketUrl=socketUrl.replace("https","ws").replace("http","ws");
console.log(socketUrl);
if(socket!=null){
socket.close();
socket=null;
}
socket = new WebSocket(socketUrl);
//打开事件
socket.onopen = function() {
console.log("websocket已打开");
//socket.send("这是来自客户端的消息" + location.href + new Date());
};
//获得消息事件
socket.onmessage = function(msg) {
console.log(msg.data);
//发现消息进入 开始处理前端触发逻辑
};
//关闭事件
socket.onclose = function() {
console.log("websocket已关闭");
};
//发生了错误事件
socket.onerror = function() {
console.log("websocket发生了错误");
}
}
}
function sendMessage() {
if(typeof(WebSocket) == "undefined") {
console.log("您的浏览器不支持WebSocket");
}else {
console.log("您的浏览器支持WebSocket");
console.log('{"toUserId":"'+$("#toUserId").val()+'","contentText":"'+$("#contentText").val()+'"}');
socket.send('{"toUserId":"'+$("#toUserId").val()+'","contentText":"'+$("#contentText").val()+'"}');
}
}
</script>
<body>
<p>【userId】:<div><input id="userId" name="userId" type="text" value="10"></div>
<p>【toUserId】:<div><input id="toUserId" name="toUserId" type="text" value="20"></div>
<p>【toUserId】:<div><input id="contentText" name="contentText" type="text" value="hello websocket"></div>
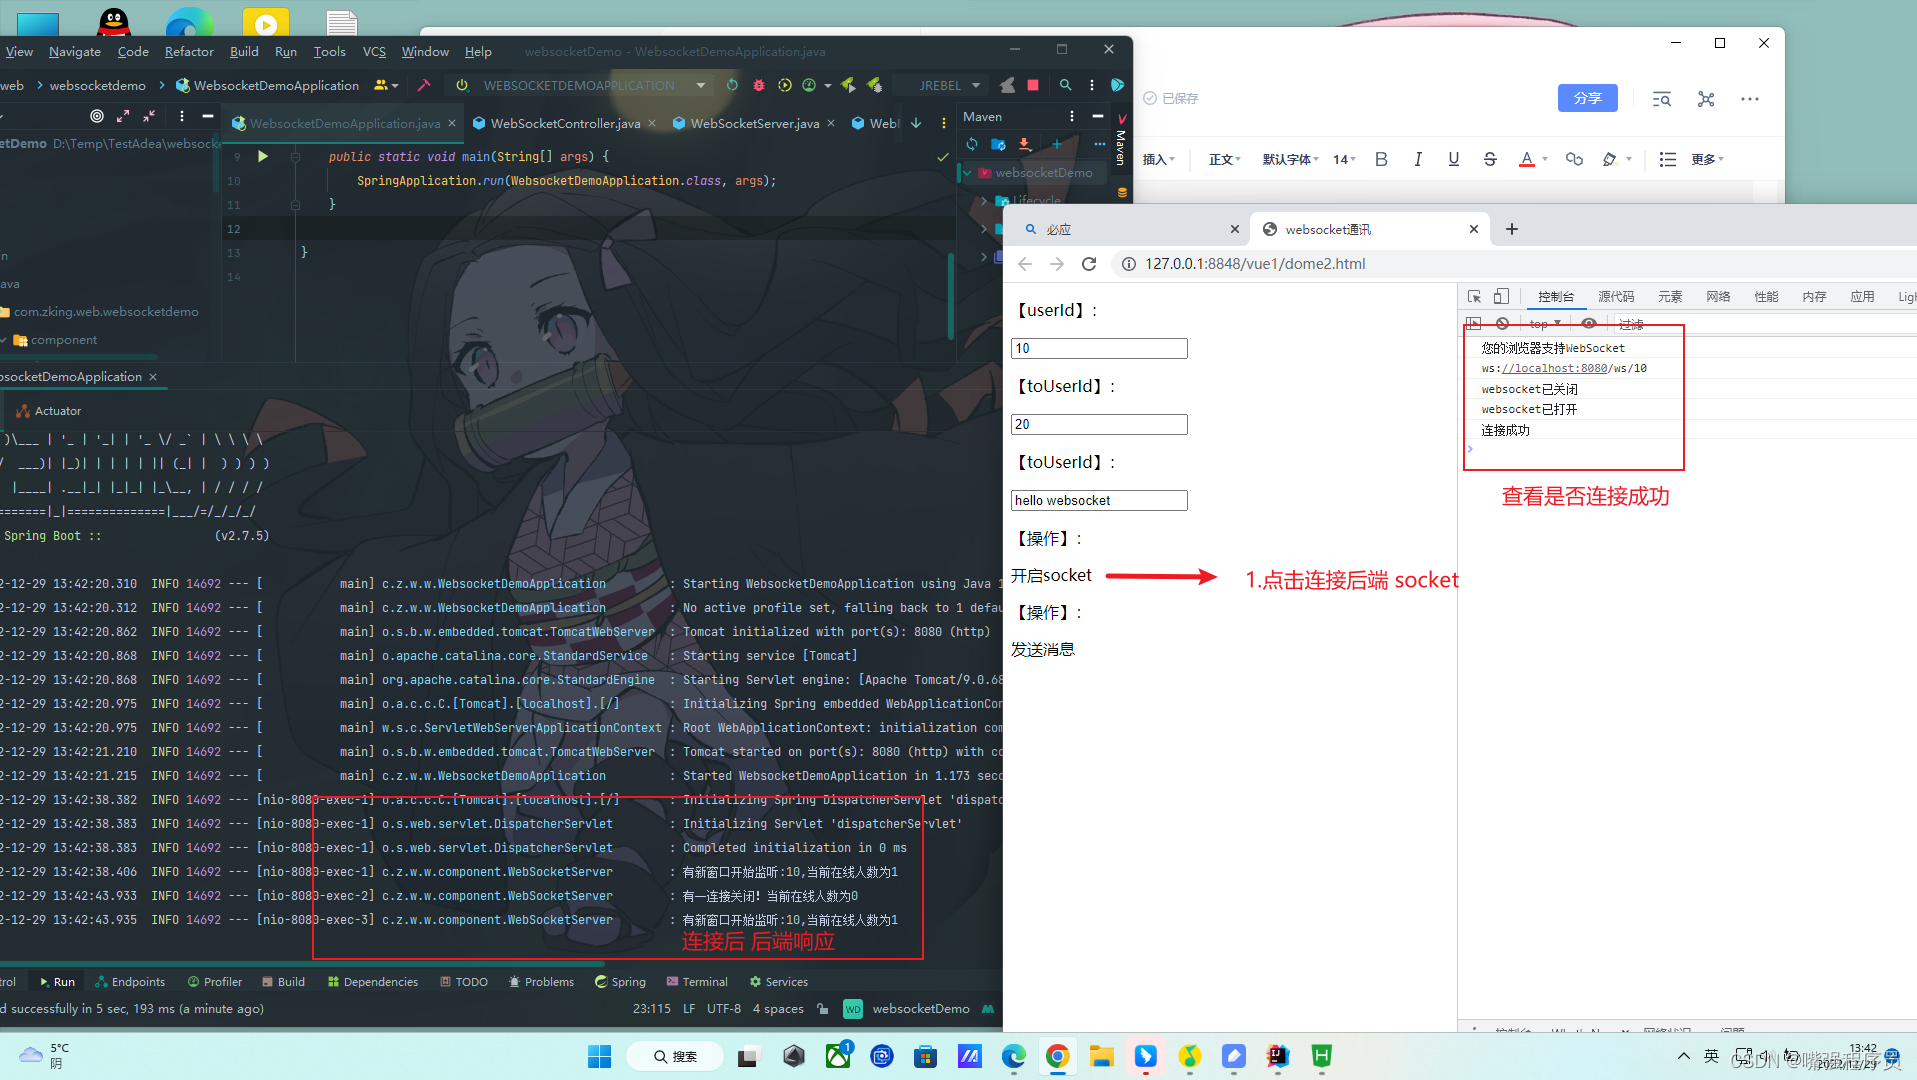
<p>【操作】:<div><a onclick="openSocket()">开启socket</a></div>
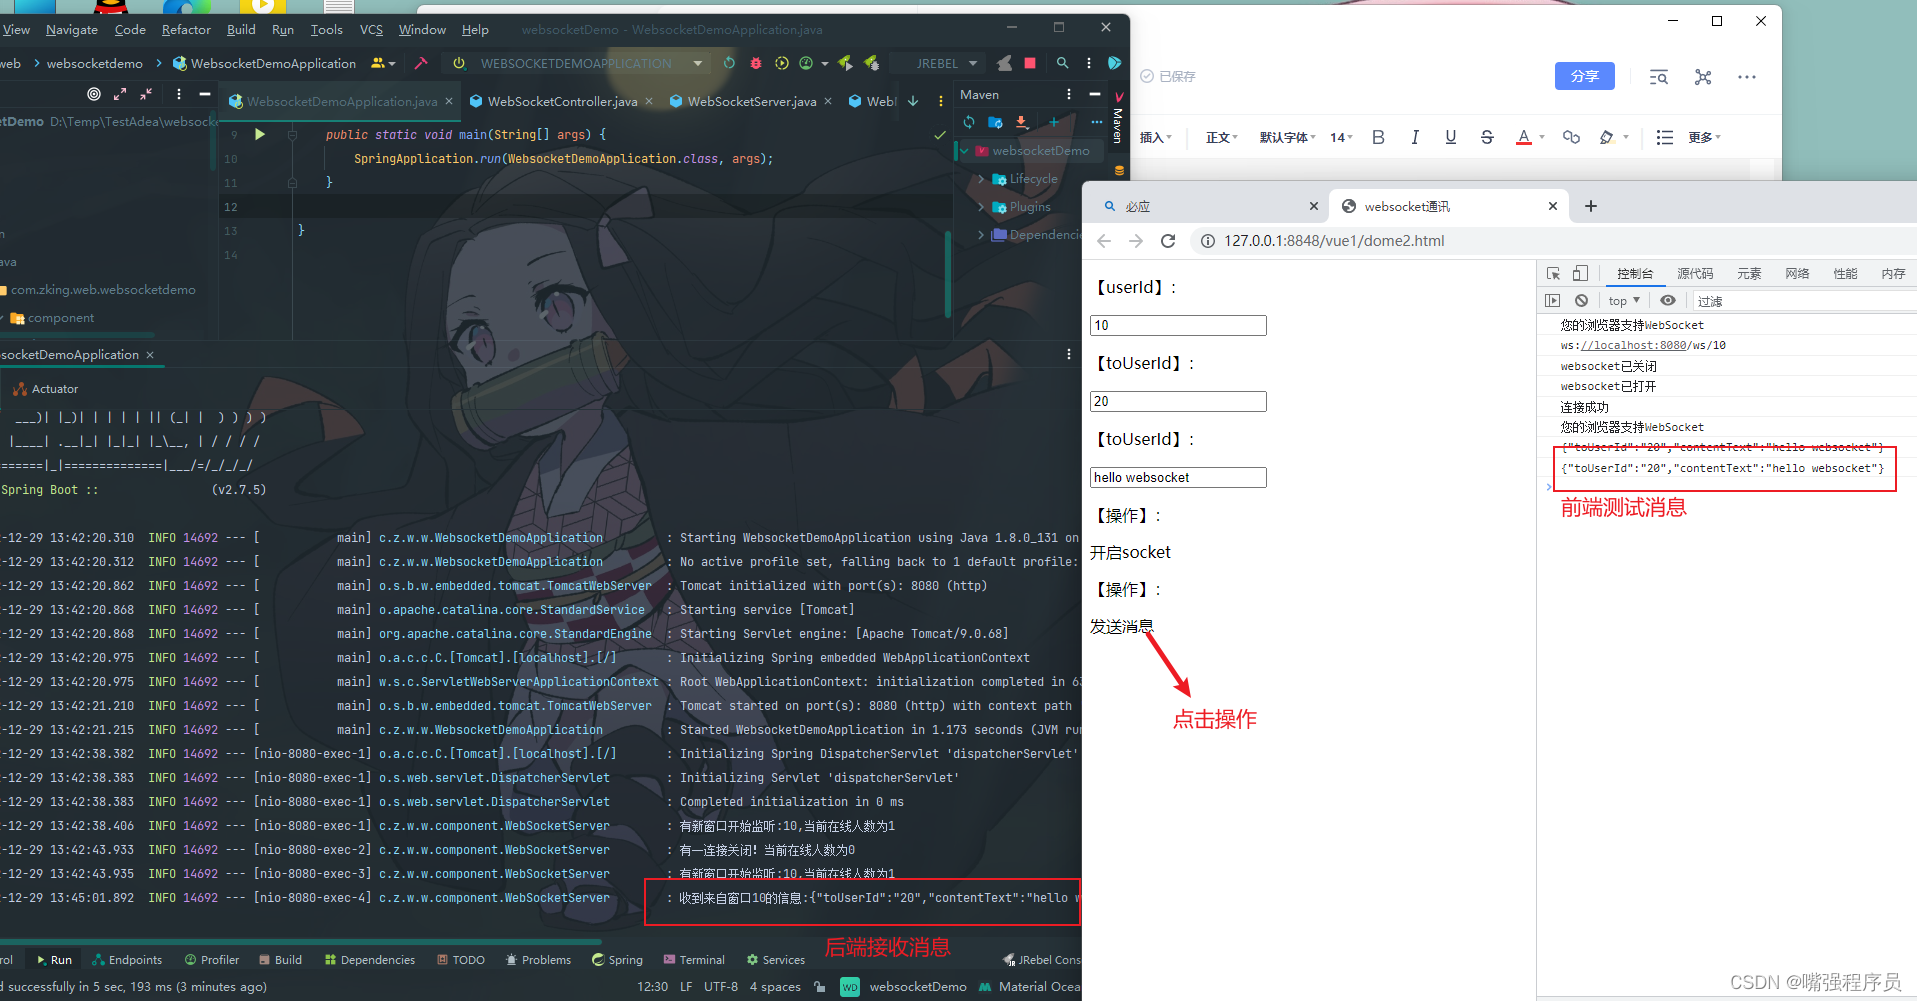
<p>【操作】:<div><a onclick="sendMessage()">发送消息</a></div>
</body>
</html>
运行前端与后端
3.进行测试
向后端发送消息测试
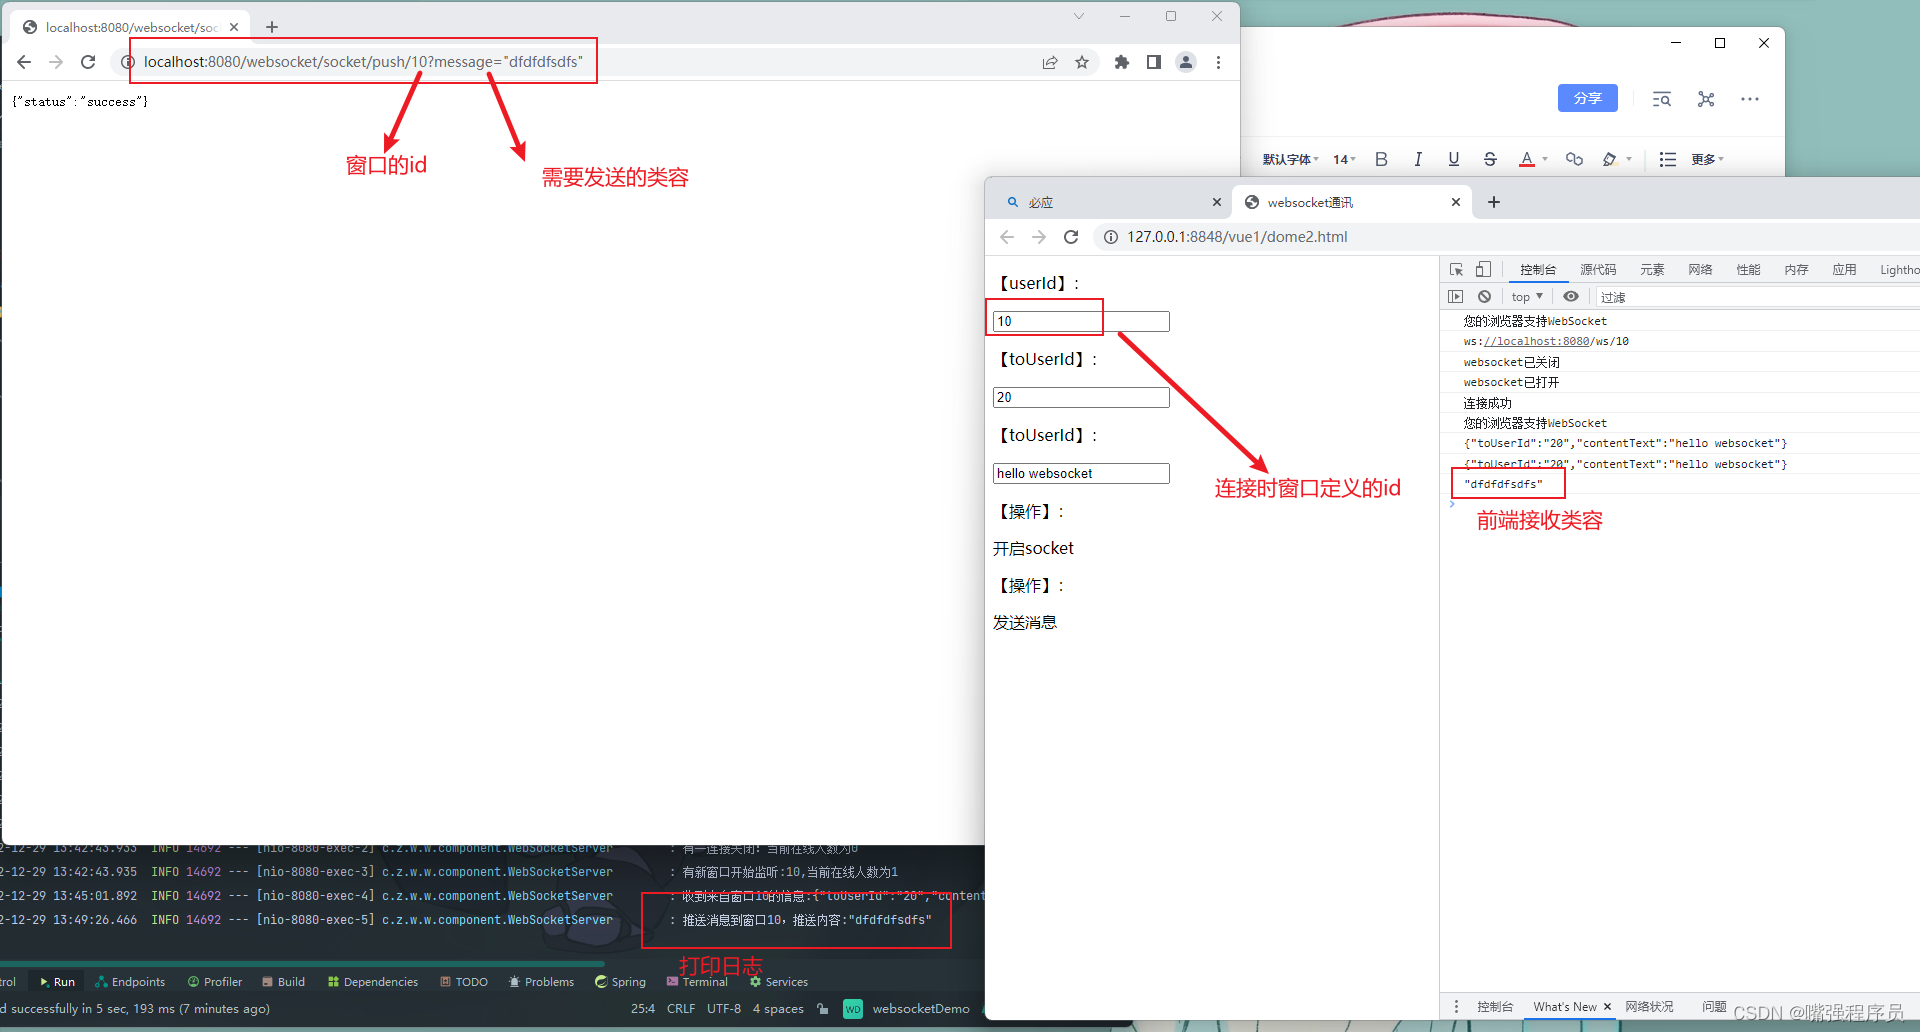
后端向前端发送消息测试
版权归原作者 嘴强程序员 所有, 如有侵权,请联系我们删除。