1.什么是前端跨域?
跨域是浏览器为了安全而做出的限制策略:浏览器请求必须遵从同源测试:
http://www.bilibili.com:8080:/anime/?key=calue路径 键值对
同协议、同域名、同端口
2.ajax和fetch访问接口都会有跨域问题!
3.跨域造成的问题?
a.无法读取非同源网页的cookie、localStorage和indexedDB
b.无法接触非同源网页的DOM
c.无法向非同源地址发送ajax请求
一、CORS跨域-前端最省事(大部分网站不会使用,不安全)
1.概念:CORS是一个W3C标准,全称是"跨域资源共享",允许跨域带入cookid
2.原理:它允许浏览器向跨源服务器,发出XMLHttpRequest请求,从而克服了AJAX只能同源使用的限制
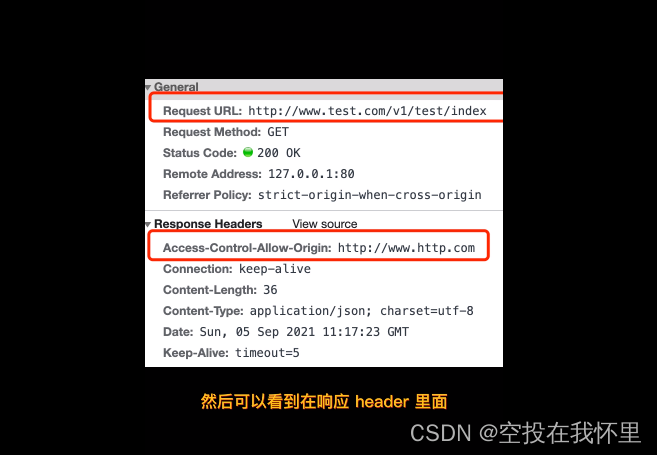
3.操作:服务端设置,前端直接调用,后台允许前端某个站点进行访问

如图:在”响应请求“里面,只允许http://www.http.com域名进行跨域,*符文是允许所有
// this.$axios.get("http://localhost:5000/students").then((response) => {
    //   console.log(response);
    // });//请求会报跨域错误

    // 解决方法1 cors跨域
    // this.$axios.get("http://localhost:5000/students").then((response) => {
    //   console.log(response);
    // });
    //在服务器中app.get('/students',(request,response)=>{
        //response.header("Access-Control-Allow-Origin","*")//后端添加后,可以进行跨域
    //}

    //cors跨域
    // this.$axios.get("https://api.github.com/search/users?q=%E6%88%91").then((response) => {
    //   console.log(response);
    // });
后端代码
const express = require('express')
const app = express()

app.use((request,response,next)=>{
    console.log('有人请求服务器1了');
    // console.log('请求来自于',request.get('Host'));
    // console.log('请求的地址',request.url);
    next()
})

//修改响应头
app.get('/students',(request,response)=>{
    response.header("Access-Control-Allow-Origin","*")//后端添加后,可以进行跨域
    const students = [
        {id:'001',name:'tom',age:18},
        {id:'002',name:'jerry',age:19},
        {id:'003',name:'tony',age:120},
    ]
    response.send(students)
})

app.listen(5000,(err)=>{
    if(!err) console.log('服务器1启动成功了,请求学生信息地址为:http://localhost:5000/students');
})
二、jsonp跨域(目前非常流行)
1.原理:最早的解决方案,利用script标签可以跨域的原理实现
在script标签引用了别的源,不会出现跨域问题,设计标签的时候,就允许在别的源请求脚本
HTML5里的script标签默认的type属性是text/javascript,浏览器,就会以js代码来进行执行
2.限制:需要服务的支持、只能发起GET请求
3.优势:
a.在于支持老式浏览器,以及可以向不支持CORS的网站请求数据
b.它不像XMLHttpRequest对象实现的Ajax请求那样受到同源策略的限制,JSONP可以跨越同源策略
4.缺点:
a.它只支持GET请求而不支持POST等其它类型的HTTP请求
b.它只支持跨域HTTP请求这种情况,不能解决不同域的两个页面之间如何进行JavaScript调用的问题。
c. jsonp在调用失败的时候不会返回各种HTTP状态码
d.缺点是安全性。万一假如提供jsonp的服务存在页面注入漏洞,即它返回的javascript的内容被人控制的。那么结果是什么?所有调用这个 jsonp的网站都会存在漏洞,于是无法把危险控制在一个域名下…所以在使用jsonp的时候必须要保证使用的jsonp服务必须是安全可信的。
<!DOCTYPE html>
<html lang="en">
<head>
    <meta charset="UTF-8">
    <meta http-equiv="X-UA-Compatible" content="IE=edge">
    <meta name="viewport" content="width=device-width, initial-scale=1.0">
    <title>Document</title>
</head>
<body>
</body>
</html>
<script>
//1.jsonp实现原理-封装写法
function jsonp(req){
    var script = document.createElement('script');
    var url = req.url + '?callback=' + req.callback.name;
    script.src = url;
    document.getElementsByTagName('head')[0].appendChild(script);
}

const students = [
        {id:'001',name:'tom',age:18},
        {id:'002',name:'jerry',age:19},
        {id:'003',name:'tony',age:120},
    ]

function hello(res){
    // alert('hello ' + res);
    console.log(res)
}

// hello(students)
jsonp({
    url : 'http://localhost:5000/students',
    callback : hello
});

</script>

<!-- 2.jsonp的原始写法 -->
<!-- <script src="http://localhost:5000/students?callback=hello"></script> -->
后端代码
const express = require('express')
const app = express()

app.use((request,response,next)=>{
    console.log('有人请求服务器1了');
    // console.log('请求来自于',request.get('Host'));
    // console.log('请求的地址',request.url);
    next()
})

app.get('/students',(request,response)=>{
    var funcname = request.query.callback;//获取
 //console.log('内容',funcname + "(students)");
    const students = [
        {id:'001',name:'tom',age:18},
        {id:'002',name:'jerry',age:19},
        {id:'003',name:'tony',age:120},
    ]

    //response.send(funcname + "('你好')")//单个数据
    //response.send(funcname + '(' + JSON.stringify(students) + ')')//转为json数据-多个数据
    //fun([{id:'001',name:'tom',age:18},...])
    //原理是src不受跨域影响,所以让后台返回一个js文件,js里的代码包含数据
    //response.send(students)
})

app.listen(5000,(err)=>{
    if(!err) console.log('服务器1启动成功了,请求学生信息地址为:http://localhost:5000/students');
})
注意:vue中的“axios默认是没有jsonp 跨域请求的方法的。一般来说流行的做法是将跨域放在后台来解决,也就是后台开发人员添加跨域头信息。
例如java中的 header,response.setHeader("Access-Control-Allow-Origin", www.allow-domain.com) 也就是CORS跨域
但是很多时候,后台出于一些原因不想修改或者已经写好jsonp的接口需要适应不同平台,此时,前端就可以单独引入依赖解决该问题了
vue安装jsonp跨域:
npm install jsonp -S
新建一个文件jsonp.js
// 引入原始jsonp插件
import originJsonp from 'jsonp'
/*
 封装原jsonp插件,返回promise对象
 url: 请求地址
 data:请求的json参数
 option:其他json参数,默认直接写空对象即可
*/
export default function jsonp (url, data, option) {
 url += (url.indexOf('?') < 0 ? '?' : '&') + param(data)
 return new Promise((resolve, reject) => {
 // originJsonp中的参数说明可以到前言中的github中查看
  originJsonp(url, option, (err, data) => {
   if (!err) {
    resolve(data)
   } else {
    reject(err)
   }
  })
 })
}
/*
 封装url参数的拼接
 */
function param (data) {
 let url = ''
 for (var k in data) {
  let value = data[k] !== undefined ? data[k] : ''
  // 防止参数为中文时出现乱码,把字符串作为 URI 组件进行编码
  url += `&${k}=${encodeURIComponent(value)}`
 }
 return url ? url.substring(1) : ''
}
在api文件目录下新建getCurrentCity.js
// 引入封装好的jsonp
import jsonp from '../jsonp'
// 假设这里为跨域请求当前城市的接口
export function getCurrentCity () {
 // 接口地址
 let url = 'https://www.imooc.com/carts'
 // 所需参数
 let datas = {
  'qt': 'dec',
  'ie': 'utf-8',
  'oue': 1,
  'fromproduct': 'jsapi',
  'res': 'api',
  'ak': 'QWilijLzYd6pCmTrHilAeWjbG41zMiXc'
 }
 return jsonp(url, datas, {})
}
使用:
// import {getCurrentCity} from './getCurrentCity'//jsonp跨域 引入地址

    mounted(){
      this._getCurrentCity ()
    },
    methods:{
      _getCurrentCity (){
        // getCurrentCity().then((res) => {//引用地址
        // // 打印出获取到的数据
        //  console.log(123)
        //  console.log(res)
        // }).catch((err) => {
        //   console.log(err)
        // })//jsonp跨域
      },
三、代理跨域-需要建一个vue.config.js-最安全的
1.最安全-最省事-前后端都不需要改,只需要运维团队把配置表改一下,需要服务器部署
2.建一个vue.config.js,文件名是不能改的
3.接口是自己的接口,但是会转接到其他地方
4.node.js是一个后端语言,没有限制,但是不同网站之间存在同源策略限制
5.有个好处在字符串拼接一个空的字符串,可以将请求地址变成一个混淆的地址,这样就最安全的
a.在vue中,新建或者进行修改vue.config.js
module.exports = {
  pages: {
    index: {
      //入口
      entry: 'src/main.js',
    },
  },
    lintOnSave:false, //关闭语法检查
    //开启代理服务器(方式一)
    // devServer: {
  //   proxy: 'http://localhost:5000'
  // },
    //开启代理服务器(方式二)
    devServer: {
    proxy: {
      '/atguigu': {
        target: 'http://localhost:5000',
                pathRewrite:{'^/atguigu':''},//重新路径-正则,匹配所有以atguigu开头的
        // ws: true, //用于支持websocket
        // changeOrigin: true //用于控制请求头中的host值
      },
      '/demo': {
        target: 'http://localhost:5001',
                pathRewrite:{'^/demo':''},
        // ws: true, //用于支持websocket
        // changeOrigin: true //用于控制请求头中的host值
      }
    }
  }
}
b.使用
<template>

</template>

<script>
export default {
  name: "Search",
  data() {
    return {
      keyWord: "",
    };
  },
  mounted() {
    // this.$axios.get("http://localhost:5000/students").then((response) => {
    //   console.log(response);
    // });//请求会报跨域错误

    // 解决方法1 cors跨域
    // this.$axios.get("http://localhost:5000/students").then((response) => {
    //   console.log(response);
    // });
    //在服务器中app.get('/students',(request,response)=>{
        //response.header("Access-Control-Allow-Origin","*")//后端添加后,可以进行跨域
    //}

    //cors跨域
    // this.$axios.get("https://api.github.com/search/users?q=%E6%88%91").then((response) => {
    //   console.log(response);
    // });

    //方法二-反向代理
    this.$axios.get("/atguigu/students").then((response) => {
      console.log( response.data);//跨域获取成功
    })

    this.$axios.get("/demo/cars").then((response) => {
      console.log( response.data);//跨域获取成功
    })
c.其他扩张:
module.exports = {
    devServer:{
        host:'localhost',//访问主机
        port:8080,//端口
        proxy:{//代理-很重要
            '/api' :{
                target:'http://mall-pre.springboot.cn',//访问的接口
                changeOrigin:true,//是否将主机头的原点设置为目标url位置
                pathRewrite:{//转发地址
                    '/api':''//添加路径的时候,把/api转为空,会把api后面的地址当作真实地址,每个接口都会含/api
                }
            },
        }
    },
    // publicPath:'/app',//打包和预览的时候或者,子路径多出一个地址拼接/app
    outputDir:'dest',//整个环境打包完之后的输出路径原来是默认是dist   现在是dest文件
    // indexPath:'index2.html',//单页面的文件名
    lintOnSave:false, //关闭esli语法检查
    productionSourceMap:false,
    chainWebpack:(config)=>{//按需加载
        config.plugins.delete('prefetch')
    }

}
使用案例:
 this.$axios.get('carts').then((res)=>{
           this.renderData(res)
        })

四、其他
- iframe解决跨域,有四种情况
a.location.hash
b.window.name
c.postMessage
d.document.domain
总结:
General(HTTP)HTTP响应
响应头(response headers)
请求头(request headers)
请求方式
请求地址
请求体
cors跨域方法是自己的服务器端跨域,那肯定可以+header解决
jsonp可以解决别人的服务器的跨域,相当于重新开一个浏览器去请求,然后把响应返回给你
版权归原作者 空投在我怀里 所有, 如有侵权,请联系我们删除。