
(由点生成曲线,npc沿曲线移动,相机跟随方式1)参考大佬: https://blog.csdn.net/weixin_40856652/article/details/125302355
(相机跟随方式2)参考大佬: https://lequ7.com/guan-yu-threejsthreejs-xi-lie-xie-yi-ge-di-yi-san-ren-cheng-shi-jiao-xiao-you-xi.html
(模型站走切换)参考大佬: https://zhuanlan.zhihu.com/p/595550231
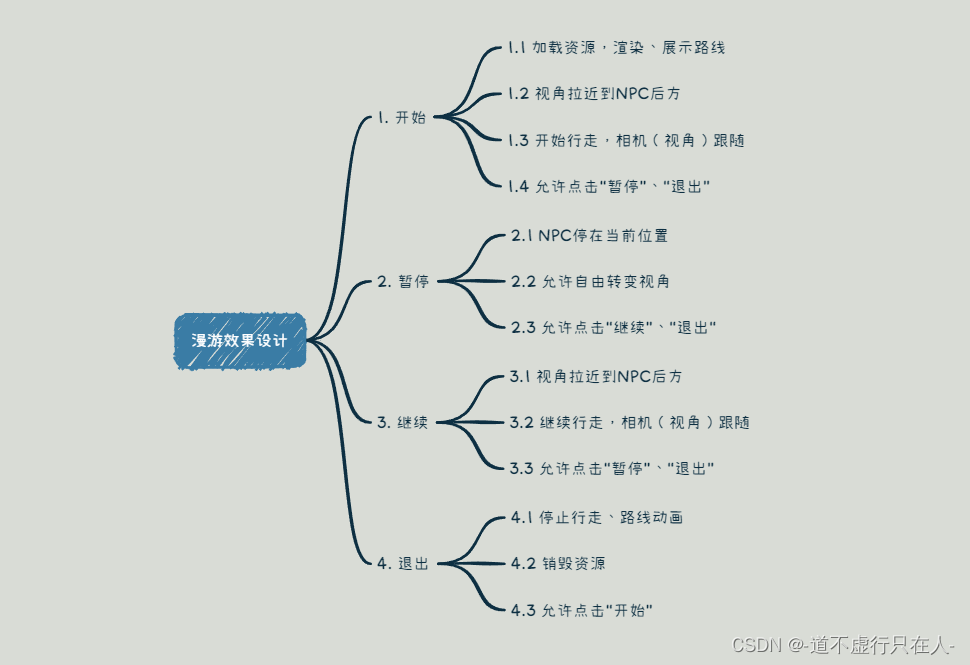
1. 功能设计
2. 功能实现
本文前面只放部分关键代码,最后再提供完整的关键代码。
2.1 依赖版本
"three": "^0.141.0""three.path": "^1.0.1""vue": "^3.2.13"
2.2 设计路线

整体思路:先确定一些关键的点,通过连接这些点,构成一条曲线,然后给曲线生成合适的几何体,填充上合适的纹理,展示到3D场景中。还可以通过uv动画的方式,让路径有“动起来”的效果。
2.2.1 确定关键点
// 设定好的坐标
pointArr =[121.78093686863522,0,-4.603376409073572,121.81339509799925,0,-1.0333897782644268,88.18838269349277,0,-1.0333897782644268,88.18838269349277,0,63.55900780432629,87.16531645200739,0,68.04794277498671,83.06620769318347,0,70.98695971872945,-1.130897005741467,0,70.34667258938468,-5.231039038271652,0,68.42613876317515,-7.758389327064392,0,64.62409029746112,-7.758389327064392,0,46.44123345882236,-114.62656106119152,0,46.44123345882236,-119.82497669490243,0,44.45968445743292,-121.94606515130032,0,39.4725534305143,-121.94606515130032,0,-42.76532835182727,-120.11831411582477,0,-48.53850237391983,-116.83579669695663,0,-49.908124030849784,78.54313968215955,0,-49.908124030849784,85.10694214192533,0,-50.16532666595109,89.88557886450108,0,-55.064547179368375,89.88557886450108,0,-93.93831946321087,91.96632492268847,0,-98.37744840781204,95.1920071430169,0,-100.1746448114269,152.736779207395,0,-100.1746448114269,157.30932898344975,0,-96.64823157224308,160.4735065923067,0,-99.846029526487,302.4743190232127,0,-99.846029526487,307.28097694970387,0,-98.29435216740127,309.4249527931002,0,-93.79194193938966,317.1439029555364,0,-10.678271186410282,322.7256435681537,0,64.82345541146658,321.948957384584,0,69.41475711676998,269.58743740380316,0,71.05051147709406,163.1264743368946,0,71.05051147709406,159.53952961773413,0,68.13337162416227,159.53952961773413,0,-4.677615417615058,124.42066238999215,0,-4.677615417615058,];// 将数组转为坐标数组
points =[];// 每3个元素组成一个坐标for(let i =0; i < pointArr.length; i +=3){// 将数组中的三个元素,分别作为坐标的x, y, z
  points.push(newThree.Vector3(pointArr[i], pointArr[i +1], pointArr[i +2]));}
2.2.2 生成曲线
通过
CatmullRomCurve3
创建一条曲线。
// 生成一条不闭合曲线
pathCurve =newThree.CatmullRomCurve3(points,false,'catmullrom',0);
2.2.3 渲染曲线
通过
three.path
包,来实现曲线路径的渲。
// 金色箭头的png作为材质const arrow =awaitnewThree.TextureLoader().loadAsync(require('@/assets/textures/golden-arrow.png'));// 贴图在水平方向上允许重复
 arrow.wrapS = Three.RepeatWrapping;// 向异性
 arrow.anisotropy = renderer.capabilities.getMaxAnisotropy();// 创建一个合适的材质const material =newThree.MeshPhongMaterial({map: arrow,transparent:true,depthWrite:false,blending: Three.AdditiveBlending
 });// 确定一个向上的向量const up =newThree.Vector3(0,1,0);// region 引入three.path包// 创建路径点的集合
 pathPoints =newPathPointList();// 设置集合属性
 pathPoints.set(pathCurve.getPoints(1000),0.5,2, up,false);// 创建路径几何体const geometry =newPathGeometry();// 更新几何体的属性
 geometry.update(pathPoints,{width:15,arrow:false});// 创建路径的网格模型
 pathToShow =newThree.Mesh(geometry, material);// 添加到场景
 scene.add(pathToShow);// endregion 引入three.path包// 在每一帧渲染的时候,更新贴图沿x轴的偏移量,形成uv动画效果this.registerRenderFunc('walk-way',()=>{
   arrow.offset.x -=0.02;});
2.2.4 实现效果
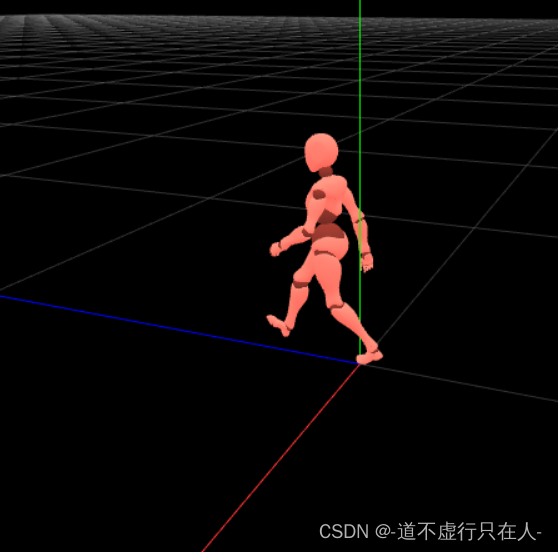
2.3 载入NPC,截取站走动画
你将至少需要一个有站、走两种动画的模型,根据场景切换动作。
2.3.1 载入NPC模型
// 创建gltf加载器const loader =newGLTFLoader();// 加载NPC模型
loader.load('models/walk/npc.glb',(obj)=>{

  npc = obj.scene;
  npc.name ='npc';// 将NPC模型添加到场景
  scene.add(npc);});
2.3.2 截取模型上的动画
在
loader.load
的回调中,截取模型上的动画。
// 创建动画混合器绑定到NPC模型
npcMixer =newThree.AnimationMixer(npc);// 截取第二个动画,作为站立动画
standAction = npcMixer.clipAction(obj.animations[1]);// 默认播放站立动画, 不然会展现“T-Pose”
standAction.play();// 截取第三个动画,作为行走动画
walkAction = npcMixer.clipAction(obj.animations[2]);
在每一帧的渲染中,更新动画混合器
// 更新动画混合器
 npcMixer.update(delta);
2.4 NPC沿路线移动
2.4.1 将曲线分割成很多很多点,让“NPC”沿着曲线上的这些点前进。
// 分段数,数越大,前进时取的点之间的距离越小,移动速度越慢const segment =30000;// 从路径曲线上面取点const stepPoints = pathCurve.getSpacedPoints(segment);// 每次前进一小段
step +=1;// NPC下个位置的索引const npcIndex = step % segment;// NPC下一个位置const npcPoint = stepPoints[npcIndex];// 更新NPC模型的位置
npc.position.copy(npcPoint);
2.4.2 会发现,当线路转弯后,“NPC”会有不面朝前进方向的情况。

2.4.3 沿着曲线,在“NPC”前方一段距离的位置,取一个点,作为“NPC”眼睛看向的方向。
// NPC眼睛看向的点的索引const eyeIndex =(step +50)% segment;// NPC眼睛看向的位置const eyePoint = stepPoints[eyeIndex];// 更新NPC模型看向的位置,保证模型的“朝向”
npc.lookAt(eyePoint.x, eyePoint.y, eyePoint.z);
2.4.4 效果
2.5 相机跟随
2.5.1 实现过程
由于要实现的效果是“第三人称”的漫游效果,漫游的过程当中,“NPC”始终要在画面的中间,面朝前进方向,用户看到的是“NPC”的背影,因此,相机应该总是保持在“NPC”模型的后方的。
- 相机的位置
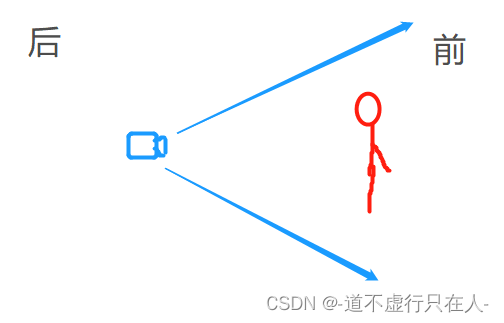
- 相机捕捉到的画面
// 相机的相对偏移向量, y = 1.0 让相机接近平视前方的效果, z = -5, 在NPC后5距离的位置。const relativeCameraOffset =newThree.Vector3(0,1.0,-5);// 转换为相对NPC世界矩阵的坐标const targetCameraPosition = relativeCameraOffset.applyMatrix4(npc.matrixWorld);// 更新相机的位置
camera.position.set(targetCameraPosition.x, targetCameraPosition.y, targetCameraPosition.z);// 更新控制器的目标为NPC的位置const walkerPosition = npc.position.clone();
orbitControls.target =newThree.Vector3(walkerPosition.x,1.0, walkerPosition.z);
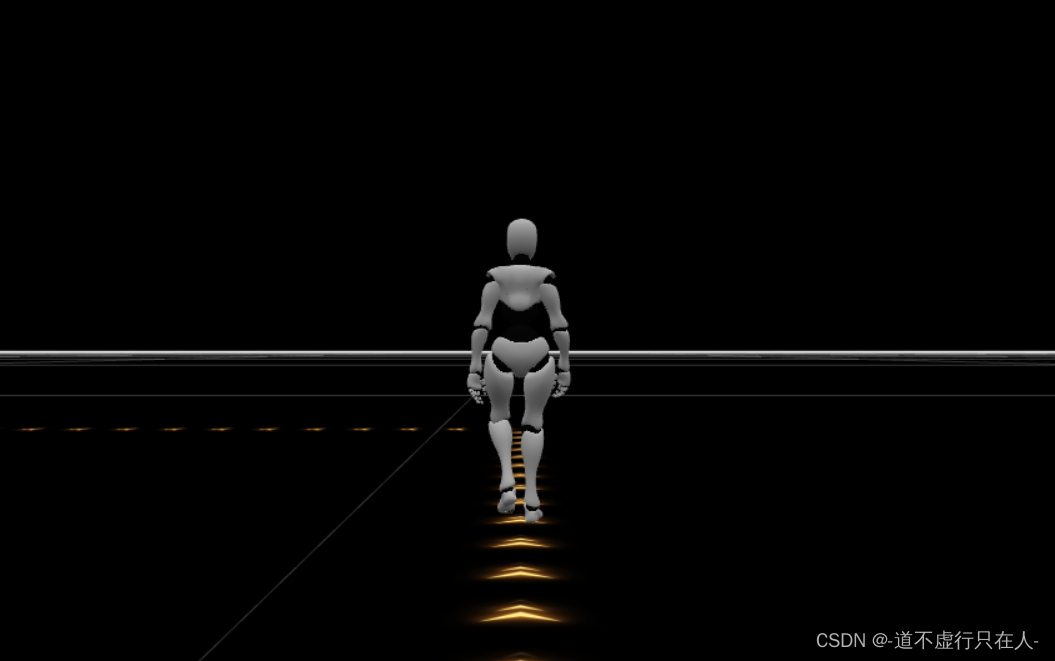
2.5.2 效果:NPC会保持在画面的中间
2.6 平滑移动相机位置
2.6.1 使用
TWEEN
补间动画,来实现相机的平滑移动。
// 取相机当前位置,从当前位置,平滑移动到目标位置const curCameraPosition = camera.position.clone();// 创建补间动画TWEEN对象
cameraTween =newTWEEN.Tween(curCameraPosition).to(position, duration).easing(TWEEN.Easing.Quadratic.Out);// 设定更新过程中执行的动作
cameraTween.onUpdate((obj)=>{// 持续duration毫秒的移动过程中, obj为“此时”坐标移动到的位置,通过不断地将相机的位置设定到坐标“此时”变化到的位置,来形成一个平滑的移动效果。
  camera.position.set(obj.x, obj.y, obj.z);// 如果指定了onUpdate方法,再执行下指定的onUpdate
  onUpdate &&onUpdate(obj);});// 设定完成后执行的动作
cameraTween.onComplete(()=>{
  callback &&callback();});// 开始补间动画(注意配合每帧渲染时的TWEEN.update()更新动画)
cameraTween.start();
2.6.2 每帧渲染时,记得更新
TWEEN
// 更新补间动画if(TWEEN&& cameraTween)TWEEN.update();
2.6.3 实现效果

2.7 加入按钮控制开始、暂停、继续、退出
2.7.1 添加标志位,记录当前各种动作的状态
isWalking:false,// 漫游开启isWalkingPaused:false,// 漫游被暂停
2.7.2 开始
// 更新标志位,开始行走,且未暂停。this.isWalking =true;this.isWalkingPaused =false;
2.7.3 暂停
if(this.isWalking){// 已经开始,更新暂停标志位this.isWalkingPaused =true;}
2.7.4 继续
// 更新标志位this.isWalkingPaused =false;
2.7.5 退出
// 还原标志位this.isWalking =false;this.isWalkingPaused =false;
2.7.6 按钮控制
<!--      正在漫游时,不允许点击“开始”--><el-buttontype="success":disabled="isWalking"@click="startWalking">开始</el-button><!--     暂停、没有开始漫游时,不允许点击“暂停”--><el-buttontype="info":disabled="isWalkingPaused || !isWalking"@click="pauseWalking">
  暂停
</el-button><!--      未暂停时,不允许点击“继续”--><el-buttontype="warning":disabled="!isWalkingPaused"@click="continueWalking">继续
</el-button><!--      未开始漫游时,不允许点击“退出”--><el-buttontype="danger":disabled="!isWalking"click="exitWalking">退出</el-button>
2.7.7 效果
- 初始时

- 开始时

- 暂停时

- 继续时

- 退出时

2.8 角色圈
2.8.1 创建一个平面,加载一个圆形的纹理,贴在平面上。
// 添加角色的光环贴图const ringTex =awaitnewThree.TextureLoader().loadAsync(require('@/assets/textures/role-ring.png'));// 创建一个2*2的平面几何体const plane =newThree.PlaneGeometry(2,2);// 创建一个材质const ringMaterial =newThree.MeshPhongMaterial({map: ringTex,transparent:true,blending: Three.AdditiveBlending,depthWrite:false});// 创建光环的网格模型
roleRing =newThree.Mesh(plane, ringMaterial);// 由于平面初始是垂直的, 给它翻转到与x0z的平面平行的角度
roleRing.rotateX(-0.5* Math.PI);// 把光环添加到场景
scene.add(roleRing);
2.8.2 每一帧渲染时,让平面旋转一个小角度,就形成了一直在转动的角色圈的效果。
// 更新角色圈的角度,实现旋转的效果
roleRing.rotation.z +=0.01;
2.8.3 每一帧渲染时,让角色圈时刻保持在“NPC”的脚下
// 让角色圈一直在NPC脚下
roleRing.position.copy(npc.position);
2.8.4 实现效果
2.9 站走切换
2.9.1 根据场景切换播放从模型上截取的“站立”动画,和“走”的动画。
/**
 * 当前动画淡出,下个动画淡入
 * @param curAction 当前动画
 * @param newAction 下一个动画
 */fadeAction(curAction, newAction){// 淡出当前动画
  curAction && curAction.fadeOut && curAction.fadeOut(0.3);// 重置并淡入新的动画
  newAction.reset();
  newAction.setEffectiveWeight(1);
  newAction.play();
  newAction.fadeIn(0.3);},
2.9.2 效果
2.9.3 切换动画的目的,主要是让“NPC”暂停的时候,不会停在走的过程中的某一帧
3. 整体效果
4. 完整代码
<template><divid="canvas-box"class="canvas-box"><h6>2.11 指定路线漫游(一)</h6><el-rowstyle="margin-bottom: 15px"><!--      正在进行路线展示,或正在漫游时,不允许点击“开始”--><el-buttontype="success":disabled="isShowingWalkingPath || isWalking"@click="startWalking">开始</el-button><!--      正在展示路线、暂停、没有开始漫游时,不允许点击“暂停”--><el-buttontype="info":disabled="isShowingWalkingPath || isWalkingPaused || !isWalking"@click="pauseWalking">
        暂停
      </el-button><!--      正在展示路线、未暂停时,不允许点击“继续”--><el-buttontype="warning":disabled="isShowingWalkingPath || !isWalkingPaused"@click="continueWalking">继续
      </el-button><!--      正在展示路线、未开始漫游时,不允许点击“退出”--><el-buttontype="danger":disabled="isShowingWalkingPath || !isWalking"@click="exitWalking">退出</el-button></el-row></div></template><script>import*as Three from'three';import{OrbitControls}from'three/examples/jsm/controls/OrbitControls';import{GLTFLoader}from'three/examples/jsm/loaders/GLTFLoader';// 补间动画,主要用来做平滑移动、或改变import{TWEEN}from'three/examples/jsm/libs/tween.module.min';// 绘制路径,相较于tubeGeometry,贴图的效果展现得更好import{PathGeometry, PathPointList}from'three.path';let scene;// 场景let renderer;// 渲染器let camera;// 相机let orbitControls;// 相机控制器let npcMixer;// npc 动作混合器const clock =newThree.Clock();// 计时工具let npc;// npclet pathCurve;// 路径曲线let pathToShow;// 渲染出来的路径let cameraTween;// 相机的补间动画let walkAction;// 行走动画let standAction;// 站立动画let pointArr =[];// 点坐标let roleRing;// 角色脚下的环let points =[];// 根据坐标数组转为点数组let step =0;// NPC当前的步数索引let pathPoints =null;// 路径上的点exportdefault{data(){return{renderFunc:{},// 渲染过程中注册进来的方法isWalking:false,// 漫游开启isWalkingPaused:false,// 漫游被暂停isShowingWalkingPath:false,// 正在进行路线展示, 此时不允许操作其他按钮};},mounted(){this.$nextTick(()=>{// vue实例挂载完成后,初始化3D场景资源this.init();});},methods:{/**
     * 开始漫游
     */startWalking(){// 处理一下坐标点this.initPathPoints();// 渲染路径this.renderPath();// 加载模型this.loadModel(()=>{// 先隐藏NPC和角色圈,展示路径
        npc.visible =false;
        roleRing.visible =false;// 展示路径全貌this.showWalkingPath(()=>{// 把NPC和角色圈的位置更新到路径的第一个点
            npc.position.copy(points[0]);
            roleRing.position.copy(points[0]);// 显示NPC和角色圈
            npc.visible =true;
            roleRing.visible =true;// 视角拉近后,进入漫游状态,可以缩小纹理贴图的大小,这样才不会太突兀
            pathToShow.geometry.update(pathPoints,{width:0.6,arrow:false});// 初始视角飞入, 距离远一些,故而“平滑”飞入this.updateCameraBehindNPC(true,()=>{// 淡出站立动画,淡入行走动画this.fadeAction(standAction, walkAction);// 更新标志位,开始行走,且未暂停。this.isWalking =true;this.isWalkingPaused =false;});});});},/**
     * 展示漫游的路线整体(运镜效果)
     * @param callback
     */showWalkingPath(callback){// 更新标志位状态this.isShowingWalkingPath =true;// 设定几个观察点const position1 =newThree.Vector3(-200,50,-350);const position2 =newThree.Vector3(400,50,-350);const position3 =newThree.Vector3(200,50,-350);const position4 =newThree.Vector3(400,50,350);const position5 =newThree.Vector3(200,1000,350);const position6 = camera.position.clone();// 一个接着一个地飞入视角,形成“运镜”的效果this.flyTo(position1,3000,()=>{this.flyTo(position2,3000,()=>{this.flyTo(position3,3000,()=>{this.flyTo(position4,3000,()=>{this.flyTo(position5,3000,()=>{this.flyTo(position6,3000,()=>{// 更新标志位状态this.isShowingWalkingPath =false;// 全部结束,执行回调函数
                  callback &&callback();});});});});});});},/**
     * 平滑飞入
     * @param position 目标位置
     * @param duration 持续时间,默认500ms。
     * @param callback 回调函数
     * @param onUpdate 更新回调
     */flyTo(position, duration, callback, onUpdate){// 未指定持续时间的,默认500毫秒if(duration ===undefined|| duration ===null){
        duration =500;}// 取相机当前位置,从当前位置,平滑移动到目标位置const curCameraPosition = camera.position.clone();// 创建补间动画TWEEN对象
      cameraTween =newTWEEN.Tween(curCameraPosition).to(position, duration).easing(TWEEN.Easing.Quadratic.Out);// 设定更新过程中执行的动作
      cameraTween.onUpdate((obj)=>{// 持续duration毫秒的移动过程中, obj为“此时”坐标移动到的位置,通过不断地将相机的位置设定到坐标“此时”变化到的位置,来形成一个平滑的移动效果。
        camera.position.set(obj.x, obj.y, obj.z);// 如果指定了onUpdate方法,再执行下指定的onUpdate
        onUpdate &&onUpdate(obj);});// 设定完成后执行的动作
      cameraTween.onComplete(()=>{
        callback &&callback();});// 开始补间动画(注意配合每帧渲染时的TWEEN.update()更新动画)
      cameraTween.start();},/**
     * 暂停漫游
     */pauseWalking(){if(this.isWalkingPaused)returnfalse;if(this.isWalking){this.fadeAction(walkAction, standAction);this.isWalkingPaused =true;}},/**
     * 继续漫游
     */continueWalking(){// 如果已经暂停,直接返回if(!this.isWalkingPaused)returnfalse;if(this.isWalking){// 暂停后,用户可能已经自由移动了视角,先平滑地将视角拉回到NPC后方,再“继续”漫游this.updateCameraBehindNPC(true,()=>{// 更新标志位,切换动画this.isWalkingPaused =false;this.fadeAction(standAction, walkAction);});}},/**
     * 退出漫游
     */exitWalking(){// 销毁资源、恢复标志位状态this.disposeWalking();},/**
     * 初始化漫游路径上的点位
     */initPathPoints(){// 设定好的坐标
      pointArr =[121.78093686863522,0,-4.603376409073572,121.81339509799925,0,-1.0333897782644268,88.18838269349277,0,-1.0333897782644268,88.18838269349277,0,63.55900780432629,87.16531645200739,0,68.04794277498671,83.06620769318347,0,70.98695971872945,-1.130897005741467,0,70.34667258938468,-5.231039038271652,0,68.42613876317515,-7.758389327064392,0,64.62409029746112,-7.758389327064392,0,46.44123345882236,-114.62656106119152,0,46.44123345882236,-119.82497669490243,0,44.45968445743292,-121.94606515130032,0,39.4725534305143,-121.94606515130032,0,-42.76532835182727,-120.11831411582477,0,-48.53850237391983,-116.83579669695663,0,-49.908124030849784,78.54313968215955,0,-49.908124030849784,85.10694214192533,0,-50.16532666595109,89.88557886450108,0,-55.064547179368375,89.88557886450108,0,-93.93831946321087,91.96632492268847,0,-98.37744840781204,95.1920071430169,0,-100.1746448114269,152.736779207395,0,-100.1746448114269,157.30932898344975,0,-96.64823157224308,160.4735065923067,0,-99.846029526487,302.4743190232127,0,-99.846029526487,307.28097694970387,0,-98.29435216740127,309.4249527931002,0,-93.79194193938966,317.1439029555364,0,-10.678271186410282,322.7256435681537,0,64.82345541146658,321.948957384584,0,69.41475711676998,269.58743740380316,0,71.05051147709406,163.1264743368946,0,71.05051147709406,159.53952961773413,0,68.13337162416227,159.53952961773413,0,-4.677615417615058,124.42066238999215,0,-4.677615417615058,];// 将数组转为坐标数组
      points =[];// 每3个元素组成一个坐标for(let i =0; i < pointArr.length; i +=3){// 将数组中的三个元素,分别作为坐标的x, y, z
        points.push(newThree.Vector3(pointArr[i], pointArr[i +1], pointArr[i +2]));}// 重置步数索引
      step =0;// 生成一条不闭合曲线
      pathCurve =newThree.CatmullRomCurve3(points,false,'catmullrom',0);},/**
     * 注册渲染中执行的方法
     * @param name 设定函数名称
     * @param func 函数方法体
     */registerRenderFunc(name, func){this.renderFunc[name]= func;},/**
     * 注销渲染中执行的方法
     * @param name 要注销的函数名称
     */logoutRenderFunc(name){const old =this.renderFunc[name];if(old){deletethis.renderFunc[name];}},/**
     * 当前动画淡出,下个动画淡入
     * @param curAction 当前动画
     * @param newAction 下一个动画
     */fadeAction(curAction, newAction){// 淡出当前动画
      curAction && curAction.fadeOut && curAction.fadeOut(0.3);// 重置并淡入新的动画
      newAction.reset();
      newAction.setEffectiveWeight(1);
      newAction.play();
      newAction.fadeIn(0.3);},/**
     * 初始化3d场景、渲染器、相机等部件
     */init(){const parent = document.querySelector('#canvas-box');this.parent = document.querySelector('#canvas-box');const maxWith = parent.clientWidth -31;const maxHeight = parent.clientHeight -63;
      scene =newThree.Scene();// 创建半球形光const hemiLight =newThree.HemisphereLight(0xffffff,0x444444);
      hemiLight.position.set(0,10,0);
      scene.add(hemiLight);// 创建网格辅助器const grid =newThree.GridHelper(2000,50,0xffffff,0xffffff);
      grid.material.opacity =0.2;
      grid.material.transparent =true;
      scene.add(grid);// 创建相机
      camera =newThree.PerspectiveCamera(45, maxWith / maxHeight,1,2000);
      camera.position.set(0,20,-300);// 创建渲染器
      renderer =newThree.WebGLRenderer({antialias:true,// 消除锯齿logarithmicDepthBuffer:true,// 对数深度缓冲区});
      renderer.setSize(maxWith, maxHeight);
      renderer.shadowMap.enabled =true;
      renderer.setClearColor(0x000000);
      parent.appendChild(renderer.domElement);// 创建控制器
      orbitControls =newOrbitControls(camera, renderer.domElement);// 改变窗口大小,更新相机画面大小和渲染器大小
      window.addEventListener('resize',()=>{
        camera.aspect =(this.parent.clientWidth -31)/(this.parent.clientHeight -63);
        camera.updateProjectionMatrix();
        renderer.setSize(this.parent.clientWidth -31,this.parent.clientHeight -63);});// 创建完毕,开始执行每帧渲染this.render();},/**
     * 开始渲染
     */render(){const _this =this;// 动画循环渲染functionanimate(){try{// 预约下一帧的渲染动作requestAnimationFrame(animate);// 让渲染器渲染一帧相机捕捉到的场景
          renderer.render(scene, camera);// 更新控制器
          orbitControls.update();// 更新补间动画if(TWEEN&& cameraTween)TWEEN.update();// 获取时间差const delta = clock.getDelta();// 执行registerRenderFunc方式注册进来的渲染操作const funcNames = Object.keys(_this.renderFunc);if(funcNames && funcNames.length >0){
            funcNames.forEach((funcName)=>{try{// 不太放心,try-catch一下,保证出现意外也能继续执行后面的内容
                _this.renderFunc[funcName](delta);}catch(e){
                console.error('render func error, func name: ',
                  funcName,', error message:',
                  e.message,);}});}}catch(e){
          console.error('render animate error,  error message: ', e.message);}}animate();},/**
     * 加载模型
     * @param callback 处理完成后执行的回调函数
     */loadModel(callback){// 创建gltf加载器const loader =newGLTFLoader();// 加载NPC模型
      loader.load('models/walk/npc.glb',async(obj)=>{

        npc = obj.scene;
        npc.name ='npc';// 创建动画混合器绑定到NPC模型
        npcMixer =newThree.AnimationMixer(npc);// 截取第二个动画,作为站立动画
        standAction = npcMixer.clipAction(obj.animations[1]);// 默认播放站立动画, 不然会展现“T-Pose”
        standAction.play();// 截取第三个动画,作为行走动画
        walkAction = npcMixer.clipAction(obj.animations[2]);// 将NPC模型添加到场景
        scene.add(npc);// 添加角色的光环贴图const ringTex =awaitnewThree.TextureLoader().loadAsync(require('@/assets/textures/role-ring.png'));// 创建一个2*2的平面几何体const plane =newThree.PlaneGeometry(2,2);// 创建一个材质const ringMaterial =newThree.MeshPhongMaterial({map: ringTex,transparent:true,blending: Three.AdditiveBlending,depthWrite:false});// 创建光环的网格模型
        roleRing =newThree.Mesh(plane, ringMaterial);// 由于平面初始是垂直的, 给它翻转到与x0z的平面平行的角度
        roleRing.rotateX(-0.5* Math.PI);// 把光环添加到场景
        scene.add(roleRing);// 每帧渲染时执行的内容this.registerRenderFunc('walk',(delta)=>{// 更新动画混合器
          npcMixer.update(delta);// 更新角色圈的角度,实现旋转的效果
          roleRing.rotation.z +=0.01;if(this.isWalking &&!this.isWalkingPaused){// 漫游开启,且未暂停this.updateNPCPosition();// 更新相机this.updateCameraBehindNPC();// 让角色圈一直在NPC脚下
            roleRing.position.copy(npc.position);}});// 有回调函数就执行回调函数
        callback &&callback();});},/**
     * 更新NPC的位置
     */updateNPCPosition(){// 分段数,数越大,前进时取的点之间的距离越小,移动速度越慢const segment =30000;// 从路径曲线上面取点const stepPoints = pathCurve.getSpacedPoints(segment);// 每次前进一小段
      step +=1;// NPC下个位置的索引const npcIndex = step % segment;// NPC眼睛看向的点的索引const eyeIndex =(step +50)% segment;// NPC下一个位置const npcPoint = stepPoints[npcIndex];// NPC眼睛看向的位置const eyePoint = stepPoints[eyeIndex];// 更新NPC模型的位置
      npc.position.copy(npcPoint);// 更新NPC模型看向的位置,保证模型的“朝向”
      npc.lookAt(eyePoint.x, eyePoint.y, eyePoint.z);},/**
     * 更新相机的位置等状态,让用户的视角移动到NPC身后
     * @param moveSmooth 是否平滑移动
     * @param callback 动作完成后执行的回调函数
     */updateCameraBehindNPC(moveSmooth, callback){// 相机的相对偏移向量, y = 1.0 让相机接近平视前方的效果, z = -5, 在NPC后5距离的位置。const relativeCameraOffset =newThree.Vector3(0,1.0,-5);// 转换为相对NPC世界矩阵的坐标const targetCameraPosition = relativeCameraOffset.applyMatrix4(npc.matrixWorld);if(moveSmooth){// 平滑移动时,使用TWEEN补间动画。this.flyTo(targetCameraPosition,1000, callback,()=>{// 更新控制器的目标为NPC的位置const walkerPosition = npc.position.clone();
          orbitControls.target =newThree.Vector3(walkerPosition.x,1.0, walkerPosition.z);});}else{// 在曲线上分段前进的过程中,每段的间距非常非常小,已经接近丝滑,此时不需要使用TWEEN了
        camera.position.set(targetCameraPosition.x, targetCameraPosition.y, targetCameraPosition.z);// 更新控制器的目标为NPC的位置const walkerPosition = npc.position.clone();
        orbitControls.target =newThree.Vector3(walkerPosition.x,1.0, walkerPosition.z);// 执行回调函数
        callback &&callback();}},/**
     * 绘制路径到场景下
     */asyncrenderPath(){// 金色箭头的png作为材质const arrow =awaitnewThree.TextureLoader().loadAsync(require('@/assets/textures/golden-arrow.png'));// 贴图在水平方向上允许重复
      arrow.wrapS = Three.RepeatWrapping;// 向异性
      arrow.anisotropy = renderer.capabilities.getMaxAnisotropy();// 创建一个合适的材质const material =newThree.MeshPhongMaterial({map: arrow,transparent:true,depthWrite:false,blending: Three.AdditiveBlending
      });// 确定一个向上的向量const up =newThree.Vector3(0,1,0);// region 引入three.path包// 创建路径点的集合
      pathPoints =newPathPointList();// 设置集合属性
      pathPoints.set(pathCurve.getPoints(1000),0.5,2, up,false);// 创建路径几何体const geometry =newPathGeometry();// 更新几何体的属性
      geometry.update(pathPoints,{width:15,arrow:false});// 创建路径的网格模型
      pathToShow =newThree.Mesh(geometry, material);// 添加到场景
      scene.add(pathToShow);// endregion 引入three.path包// 在每一帧渲染的时候,更新贴图沿x轴的偏移量,形成uv动画效果this.registerRenderFunc('walk-way',()=>{
        arrow.offset.x -=0.02;});},/**
     * 销毁漫游相关的各种资源和动画
     * (可以根据具体情况进行优化)
     */disposeWalking(){// 销毁渲染帧时的附加处理this.logoutRenderFunc('walk');this.logoutRenderFunc('walk-way');// 还原标志位this.isWalking =false;this.isWalkingPaused =false;this.isShowingWalkingPath =false;// 动画处理
      standAction && npcMixer && npcMixer.uncacheClip(standAction);
      standAction && npcMixer && npcMixer.uncacheAction(standAction, npc);
      walkAction && npcMixer && npcMixer.uncacheClip(walkAction);
      walkAction && npcMixer && npcMixer.uncacheAction(walkAction, npc);
      npcMixer && npcMixer.uncacheRoot(npc);// 从父对象中移除模型资源(可以酌情添加销毁材质、贴图的处理哦~)
      pathToShow && pathToShow.removeFromParent();
      npc && npc.removeFromParent();
      roleRing && roleRing.removeFromParent();}},unmounted(){// vue3的生命周期,使用vue2的话,可以改为destroyedthis.disposeWalking();}};</script><stylescoped></style>
本文转载自: https://blog.csdn.net/u010657801/article/details/129754337
版权归原作者 -道不虚行只在人- 所有, 如有侵权,请联系我们删除。
版权归原作者 -道不虚行只在人- 所有, 如有侵权,请联系我们删除。