
var code = “f3df93e6-12d6-46dd-b94c-8d89a3c72b06”
1、简介
想做一个简单的Java前后端分离的项目,不知如何下手,利用闲暇时间将学习的SpringBoot和Vue做一次简单的小整合,从而实现简单的前后端分离,帮助理清前后端思路。
该文档的目的就是为了帮助你理清前后端分离,并将对应的数据进行简单的CRUD,希望对你有所帮助。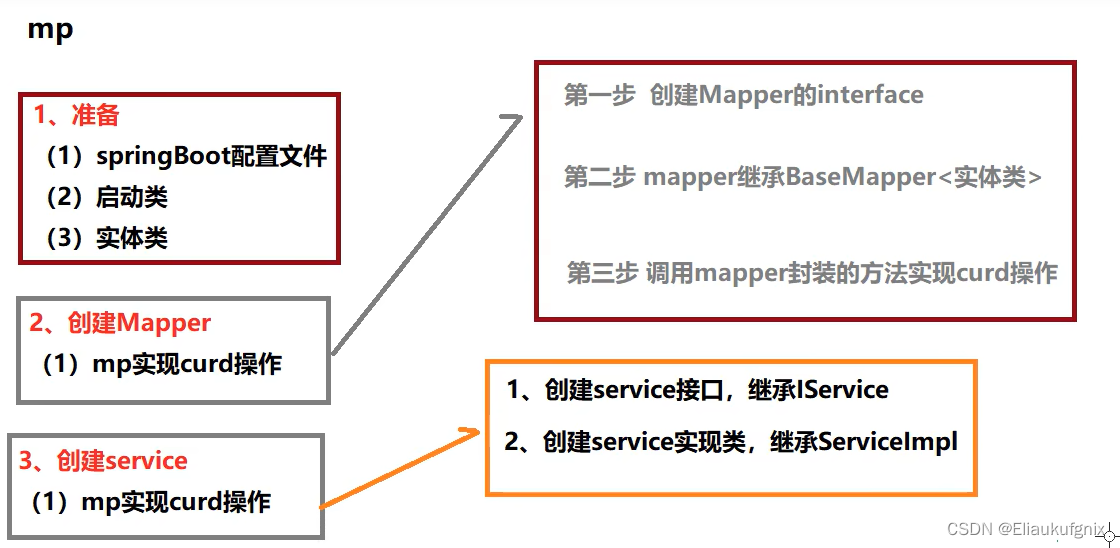
2、技术栈
使用的工具:
IntelliJ IDEA 2021.2.1,Maven,Navicat Premium 16,
前端
Vue:3.2.38
axios:1.1.3
ElementUI Plus 2.2.17
后端
SpringBoot 2.7.16
MySQL 8.0.33
Mybatis Plus
3、常用配置文件
先看项目结构

IDEA创建一个SpringBoot项目,然后修改pom.xml文件添加相关依赖。
3.1、pom.xml文件
<!--SpringBoot--><dependency><groupId>org.springframework.boot</groupId><artifactId>spring-boot-starter-web</artifactId></dependency><!--mysql驱动--><dependency><groupId>com.mysql</groupId><artifactId>mysql-connector-j</artifactId><scope>runtime</scope></dependency><!--数据库连接池druid--><dependency><groupId>com.alibaba</groupId><artifactId>druid</artifactId><version>1.2.16</version></dependency><!--mybatis-plus--><dependency><groupId>com.baomidou</groupId><artifactId>mybatis-plus-boot-starter</artifactId><version>3.5.3.1</version></dependency><!--lombok--><dependency><groupId>org.projectlombok</groupId><artifactId>lombok</artifactId><optional>true</optional></dependency><!--添加swagger3相关功能--><dependency><groupId>io.springfox</groupId><artifactId>springfox-boot-starter</artifactId><version>3.0.0</version></dependency><!--test--><dependency><groupId>org.springframework.boot</groupId><artifactId>spring-boot-starter-test</artifactId><scope>test</scope></dependency>
3.2、创建数据库和表
推荐一个网站可以快速创建数据库。SQL Father
建表语句
-- 用户表信息createtableifnotexists ehelper.userinfo
(
    id          bigintauto_incrementcomment'主键'primarykey,
    username    varchar(256)notnullcomment'用户名',
    password    varchar(256)notnullcomment'密码',
    id_card     varchar(256)nullcomment'身份证号',
    real_name   varchar(256)notnullcomment'真实姓名',
    gender      varchar(256)notnullcomment'性别',
    address     varchar(256)notnullcomment'地址',
    phone       varchar(256)notnullcomment'手机号',
    role        varchar(256)default'0'notnullcomment'角色',
    age         varchar(256)notnullcomment'年龄',
    user_status varchar(256)default'0'notnullcomment'状态',
    update_time datetimedefaultCURRENT_TIMESTAMPnotnullonupdateCURRENT_TIMESTAMPcomment'更新时间',
    create_time datetimedefaultCURRENT_TIMESTAMPnotnullcomment'创建时间',
    is_deleted  tinyintdefault0notnullcomment'是否删除(0-未删, 1-已删)')comment'用户表信息';
插入数据
insertinto ehelper.`userinfo`(`username`,`password`,`real_name`,`gender`,`address`,`phone`,`age`)values('小花暖','password','叶果','女','铜仁市','17143271301','99');insertinto ehelper.`userinfo`(`username`,`password`,`real_name`,`gender`,`address`,`phone`,`age`)values('葵司','password','莫擎宇','男','恩施市','17025595067','39');insertinto ehelper.`userinfo`(`username`,`password`,`real_name`,`gender`,`address`,`phone`,`age`)values('三上悠亜','password','王嘉懿','男','义乌市','14774162445','95');insertinto ehelper.`userinfo`(`username`,`password`,`real_name`,`gender`,`address`,`phone`,`age`)values('高崎聖子','password','范风华','女','汉中市','17287538963','73');insertinto ehelper.`userinfo`(`username`,`password`,`real_name`,`gender`,`address`,`phone`,`age`)values('西田那津','password','戴鹏','女','乐山市','18638853064','14');insertinto ehelper.`userinfo`(`username`,`password`,`real_name`,`gender`,`address`,`phone`,`age`)values('篠田優','password','魏嘉熙','女','常德市','17292962094','46');insertinto ehelper.`userinfo`(`username`,`password`,`real_name`,`gender`,`address`,`phone`,`age`)values('松本一香','password','龙明哲','男','江油市','17266790854','50');insertinto ehelper.`userinfo`(`username`,`password`,`real_name`,`gender`,`address`,`phone`,`age`)values('波多野結衣','password','孟伟宸','男','东宁市','15072855865','79');insertinto ehelper.`userinfo`(`username`,`password`,`real_name`,`gender`,`address`,`phone`,`age`)values('櫻空桃','password','黄晓博','男','宜都市','15746429348','16');insertinto ehelper.`userinfo`(`username`,`password`,`real_name`,`gender`,`address`,`phone`,`age`)values('小宵虎南','password','彭鸿煊','男','瑞金市','15302919204','17');insertinto ehelper.`userinfo`(`username`,`password`,`real_name`,`gender`,`address`,`phone`,`age`)values('高崎聖子','password','吕嘉懿','女','宁波市','17660591291','90');insertinto ehelper.`userinfo`(`username`,`password`,`real_name`,`gender`,`address`,`phone`,`age`)values('小野六花','password','卢志强','女','来宾市','15535937195','87');insertinto ehelper.`userinfo`(`username`,`password`,`real_name`,`gender`,`address`,`phone`,`age`)values('松本一香','password','周煜祺','男','黄冈市','17810651863','19');insertinto ehelper.`userinfo`(`username`,`password`,`real_name`,`gender`,`address`,`phone`,`age`)values('松本一香','password','万锦程','女','资阳市','17703749900','22');insertinto ehelper.`userinfo`(`username`,`password`,`real_name`,`gender`,`address`,`phone`,`age`)values('木下日葵','password','秦琪','女','聊城市','15073294885','23');insertinto ehelper.`userinfo`(`username`,`password`,`real_name`,`gender`,`address`,`phone`,`age`)values('橋本有菜','password','秦明杰','女','百色市','17532822622','59');insertinto ehelper.`userinfo`(`username`,`password`,`real_name`,`gender`,`address`,`phone`,`age`)values('西田那津','password','何鹏飞','女','汉中市','14502218356','86');insertinto ehelper.`userinfo`(`username`,`password`,`real_name`,`gender`,`address`,`phone`,`age`)values('神宮寺奈緒','password','范修杰','男','滁州市','15026804786','34');insertinto ehelper.`userinfo`(`username`,`password`,`real_name`,`gender`,`address`,`phone`,`age`)values('河北彩花','password','邱鹭洋','女','瑞金市','15378143680','60');insertinto ehelper.`userinfo`(`username`,`password`,`real_name`,`gender`,`address`,`phone`,`age`)values('篠田優','password','侯昊强','女','漳平市','17720387499','35');
修改数据库配置文件application.properties
server.port=8080
spring.datasource.driver-class-name=com.mysql.cj.jdbc.Driver
spring.datasource.url=jdbc:mysql://localhost:3306/store?useSSL=false
spring.datasource.username=root
spring.datasource.password=123456
mybatis-plus.configuration.log-impl=org.apache.ibatis.logging.stdout.StdOutImpl
#单个文件大小,默认1MB
spring.servlet.multipart.max-file-size=10MB
#每次请求文件的大小
spring.servlet.multipart.max-request-size=10MB
#springboot新版本与swagger冲突
spring.mvc.pathmatch.matching-strategy=ant_path_matcher
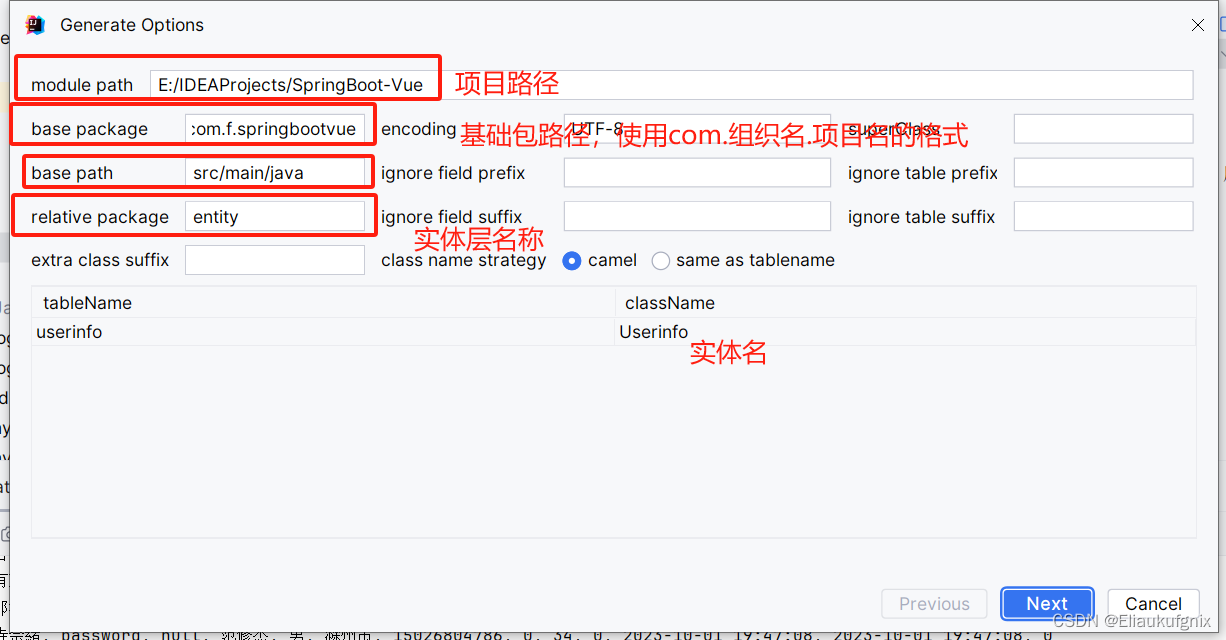
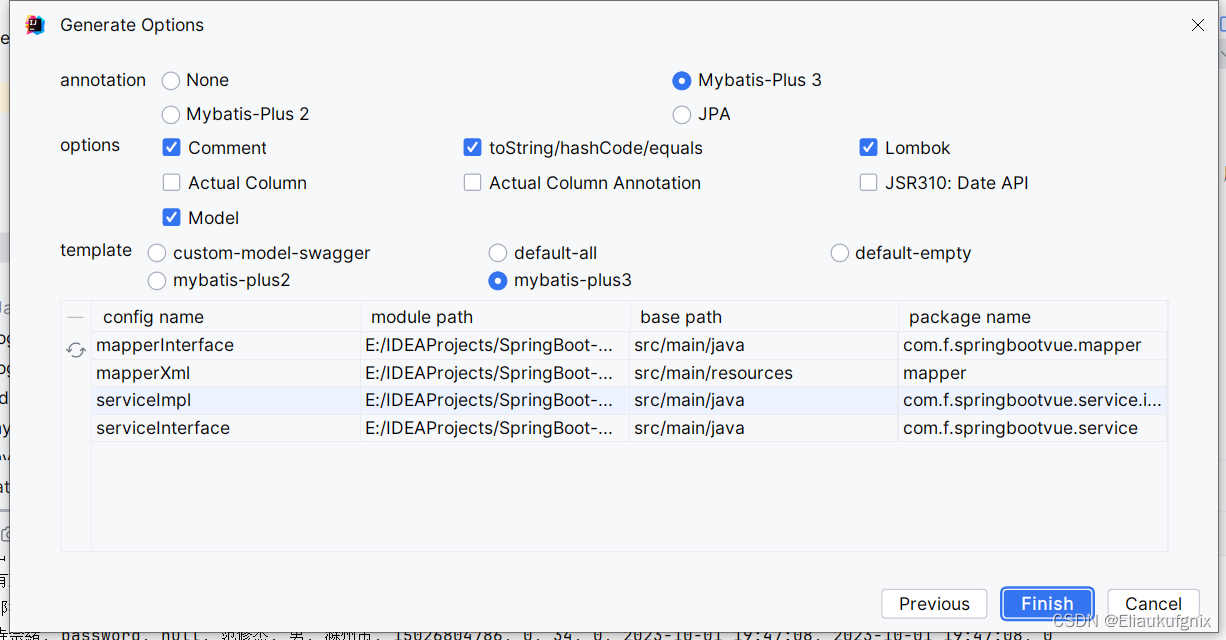
3.3、使用IDEA的插件MybatisX-Generator快速创建相关文件
安装插件MybatisX,连接数据库,右键点击表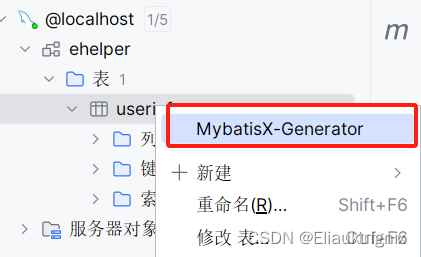
3.4、创建controller包
常用注解:
需要使用到的几个注解。简单举例:
@RestController
@RequestMapping(value=“/login”,method = RequestMethod.GET) //该写法等同于GetMapping@RequestMapping(value=“/login”,method = RequestMethod.POST) //该写法等同于PostMapping
@GetMapping(“/login”)//RESTful风格要求尽量用该注解进行获取资源
@PostMapping(“/login”)//RESTful风格要求尽量用该注解进行新建资源
@PutMapping(“”) //RESTful风格要求尽量用该注解进行更新资源
@DeleteMapping(“”) //RESTful风格要求尽量用该注解进行删除资源
@PathMapping() //RESTful风格要求尽量用该注解进行部分资源更新
@RequestParam 参数传递时,参数名称和方法中的名称不一致时可以使用。被该注解标记的参数必须有值。添加属性required=false可更改不必须有值。
@PathVariable 动态获取一个值。注意:@GetMapping(“/login/{id}”)要加上{}
@RequestBody 接收json类型的注解
@TableLogic 逻辑删除,添加到属性名上。例如:@TableLogic private Integer isDeleted;
Mybatis Plus中的一些注解
@TableId(type = IdType.AUTO) 设置到实体类的主键上,自动填充值。
@TableField(“”) 数据库中的名称和实体类中属性的名称不一致时可以使用。实体类中有数据库中不存在的字段时,可以使用exist=false属性设置为该字段为非数据库字段。
UserInfoController:
@CrossOrigin@RestController
@@RequestMapping("/userinfo")publicclassUserInfoController{privatefinalUserinfoService userinfoService;@AutowiredpublicUserInfoController(UserinfoService userinfoService){this.userinfoService = userinfoService;}//查询全部@GetMapping("/findAll")publicList<Userinfo>findAll(){return userinfoService.list();}}
添加@MapperSacn:
启动类中添加@MapperScan(“com.f.springbootvue.mapper”)指向mapper
@MapperScan("com.f.springbootvue.mapper")
SpringBootVueApplication
@SpringBootApplication@MapperScan("com.f.springbootvue.mapper")publicclassSpringBootVueApplication{publicstaticvoidmain(String[] args){SpringApplication.run(SpringBootVueApplication.class, args);}}
运行
运行SpringBoot启动类并在浏览器中访问localhost:8080/userinfo/findAll。
3.5、Mybatis Plus分页插件
编写配置类MybatisPlusConfig
@Configuration@MapperScan("com.f.springbootvue.mapper")publicclassMybatisPlusConfig{/**
     * 添加分页插件
     */@BeanpublicMybatisPlusInterceptormybatisPlusInterceptor(){MybatisPlusInterceptor interceptor =newMybatisPlusInterceptor();
        interceptor.addInnerInterceptor(newPaginationInnerInterceptor(DbType.MYSQL));//如果配置多个插件,切记分页最后添加//interceptor.addInnerInterceptor(new PaginationInnerInterceptor()); 如果有多数据源可以不配具体类型 否则都建议配上具体的DbTypereturn interceptor;}}
简单使用
//分页查询@GetMapping("/findByPage")publicIPage<Userinfo>findByPage(@RequestParam(defaultValue ="1")Integer pageNum,@RequestParam(defaultValue ="10")Integer pageSize){return userinfoService.page(newPage<>(pageNum, pageSize));}
3.6、Swagger3的使用
SpringBoot 2.7.12-SNAPSHOT中使用Swagger3
1、pom.xml
<!--添加swagger3相关功能--><dependency><groupId>io.springfox</groupId><artifactId>springfox-boot-starter</artifactId><version>3.0.0</version></dependency>
2、SwaggerConfig配置文件类
packagecom.f.springbootvue.config;importorg.springframework.context.annotation.Bean;importorg.springframework.context.annotation.Configuration;importspringfox.documentation.builders.ApiInfoBuilder;importspringfox.documentation.builders.PathSelectors;importspringfox.documentation.builders.RequestHandlerSelectors;importspringfox.documentation.oas.annotations.EnableOpenApi;importspringfox.documentation.service.ApiInfo;importspringfox.documentation.spi.DocumentationType;importspringfox.documentation.spring.web.plugins.Docket;@Configuration@EnableOpenApipublicclassSwaggerConfig{@BeanpublicDocketcreateRestApi(){returnnewDocket(DocumentationType.OAS_30).apiInfo(apiInfo()).select().apis(RequestHandlerSelectors.basePackage("com.f.springbootvue.controller")).paths(PathSelectors.regex("/.*/error").negate()).build();}privateApiInfoapiInfo(){returnnewApiInfoBuilder().title("SpringBoot2.7.16中使用Swagger3接口文档").description("一个简单的前后端分离项目的接口文档").version("1.0").build();}}
3、application.properties配置文件中添加
spring.mvc.pathmatch.matching-strategy=ant_path_matcher
server.port=8080
spring.datasource.driver-class-name=com.mysql.cj.jdbc.Driver
spring.datasource.url=jdbc:mysql://localhost:3306/store?useSSL=false
spring.datasource.username=root
spring.datasource.password=123456
mybatis-plus.configuration.log-impl=org.apache.ibatis.logging.stdout.StdOutImpl
#单个文件大小,默认1MB
spring.servlet.multipart.max-file-size=10MB
#每次请求文件的大小
spring.servlet.multipart.max-request-size=10MB
#springboot新版本与swagger冲突
spring.mvc.pathmatch.matching-strategy=ant_path_matcher
4、启动路径
http://localhost:8080/swagger-ui/index.html
5、类上添加一些描述信息
@Api(value ="userinfo",tags ="用户信息接口")@CrossOrigin@RestController@RequestMapping("/userinfo")publicclassUserInfoController{privatefinalUserinfoService userinfoService;@AutowiredpublicUserInfoController(UserinfoService userinfoService){this.userinfoService = userinfoService;}//查询全部@ApiOperation(value ="查询全部用户信息")@GetMapping("/findAll")publicList<Userinfo>findAll(){return userinfoService.list();}//分页查询@ApiOperation(value ="分页查询用户信息")@GetMapping("/findByPage")publicIPage<Userinfo>findByPage(@RequestParam(defaultValue ="1")Integer pageNum,@RequestParam(defaultValue ="10")Integer pageSize){return userinfoService.page(newPage<>(pageNum, pageSize));}}
3.7、设置自启动浏览器
RunConfig配置类
@ComponentpublicclassRunConfigimplementsCommandLineRunner{privatestaticLogger logger =LoggerFactory.getLogger(RunConfig.class);@Value("${spring.web.loginurl}")privateString loginUrl;@Value("${server.port}")privateString port;@Value("${spring.web.address}")privateString address;@Value("${spring.web.googleexcute}")privateString googleExcutePath;@Value("${spring.auto.openurl}")privateboolean isOpen;@Overridepublicvoidrun(String... args)throwsException{if(isOpen){String cmd = googleExcutePath +" "+ loginUrl+":"+port+address;Runtime run =Runtime.getRuntime();try{
                run.exec(cmd);
                logger.debug("启动浏览器打开项目成功");}catch(Exception e){
                e.printStackTrace();
                logger.error(e.getMessage());}}}}
配置文件中
#自动打开浏览器:是否打开,想打开下边就写true
spring.auto.openurl=true
spring.web.loginurl=http://localhost
spring.web.address=/swagger-ui/index.html
spring.web.googleexcute=C:\\Program Files\\Google\\Chrome\\Application\\chrome.exe
4、前端部分
4.1、Vue3
使用node.js下载Vue3,并创建一个项目。
npm init vue@latest
可供选用的功能
✔ Project name: … <your-project-name>
✔ Add TypeScript? … No / Yes
✔ Add JSX Support? … No / Yes
✔ Add Vue Router for Single Page Application development? … No / Yes
✔ Add Pinia for state management? … No / Yes
✔ Add Vitest for Unit testing? … No / Yes
✔ Add Cypress for both Unit and End-to-End testing? … No / Yes
✔ Add ESLint for code quality? … No / Yes
✔ Add Prettier for code formatting? … No / Yes

Scaffolding project in ./<your-project-name>...
Done.
4.2、ElementUI Plus
https://element-plus.gitee.io/zh-CN/
使用组件快速开发。
npminstall element-plus --save
main.js中添加以下内容
import ElementPlus from'element-plus'import'element-plus/dist/index.css'
app.use(ElementPlus)
4.3、Axios
第一步:安装
npminstall axios
第二步:main.js文件中添加
import axios from'axios'
第三步:main.js文件中注册
//将axios作为全局的自定义属性,每个组件可以在内部直接访问
app.config.globalProperties.$http=axios
第四步:main.js文件中指定请求头
//配置请求根路径
axios.defaults.baseURL ='http://localhost:8080';
4.4、跨域
1、@CrossOrigin 在controller包下需要跨域的类添加注解。
2、编写跨域配置文件,允许全部跨域。
5、具体使用
之后可以在前端界面中添加一个ElementUI Plus的表格,启动前端项目和后端项目,使用axios将后端数据加载到前端。
6、前端代码
main.js文件:
import{ createApp }from'vue'import App from'./App.vue'import router from'./router'import ElementPlus from'element-plus'import'element-plus/dist/index.css'import'./assets/main.css'import axios from'axios'//配置请求根路径
axios.defaults.baseURL ='http://localhost:8080';const app =createApp(App)

app.use(ElementPlus)

app.use(router)//将axios作为全局的自定义属性,每个组件可以在内部直接访问
app.config.globalProperties.$http=axios

app.mount('#app')
前端页面的代码:
这里我是使用的AboutView.vue文件,我将其内容全部重写了。
<template><divclass="about"><el-table:data="TableData"borderstyle="width: 100%"><el-table-columnprop="id"label="编号"/><el-table-columnprop="username"label="姓名"/><el-table-columnprop="password"label="密码"/><el-table-columnprop="idCard"label="身份证号"/><el-table-columnprop="gender"label="性别"/><el-table-columnprop="address"label="地址"/><el-table-columnprop="phone"label="手机"/><el-table-columnprop="age"label="年龄"/><el-table-columnprop="userStatus"label="状态"/><el-table-columnprop="createTime"label="创建时间"/><el-table-columnprop="updateTime"label="修改时间"/></el-table></div></template><style>@media(min-width: 1024px){.about{min-height: 100vh;display: flex;align-items: center;}}</style><script>exportdefault{created:function(){this.$http.get("/user/findAll").then((response)=>{this.TableData=response.data
    })},data(){return{TableData:[]}},}</script>
7、后端代码
MybatisPlusConfig 配置文件:
@Configuration@MapperScan("com.f.springbootvue.mapper")publicclassMybatisPlusConfig{/**
     * 添加分页插件
     */@BeanpublicMybatisPlusInterceptormybatisPlusInterceptor(){MybatisPlusInterceptor interceptor =newMybatisPlusInterceptor();
        interceptor.addInnerInterceptor(newPaginationInnerInterceptor(DbType.MYSQL));//如果配置多个插件,切记分页最后添加//interceptor.addInnerInterceptor(new PaginationInnerInterceptor()); 如果有多数据源可以不配具体类型 否则都建议配上具体的DbTypereturn interceptor;}}
SwaggerConfig配置文件:
@Configuration@EnableOpenApipublicclassSwaggerConfig{@BeanpublicDocketcreateRestApi(){returnnewDocket(DocumentationType.OAS_30).apiInfo(apiInfo()).select()// 读取controller的包名.apis(RequestHandlerSelectors.basePackage("com.f.springbootvue.controller")).paths(PathSelectors.any()).build();}privateApiInfoapiInfo(){returnnewApiInfoBuilder().title("SpringBoot2.7.16中使用Swagger3接口文档").description("一个简单的前后端分离项目的接口文档").version("1.0").build();}}
UserInfoController增删改查
@CrossOrigin@RestController@RequestMapping("/userinfo")publicclassUserInfoController{privatefinalUserinfoService userinfoService;@AutowiredpublicUserInfoController(UserinfoService userinfoService){this.userinfoService = userinfoService;}@ApiOperation(value ="查询全部用户信息")@GetMapping("/findUserInfoAll")publicList<Userinfo>findUserInfoAll(){return userinfoService.list();}@ApiOperation(value ="查询指定用户信息")@GetMapping("/findUserInfoById/{id}")publicUserinfofindUserInfoById(@PathVariable("id")int id){return userinfoService.getById(id);}@ApiOperation(value ="分页查询用户信息")@GetMapping("/findUserInfoByPage")publicIPage<Userinfo>findUserInfoByPage(@RequestParam(defaultValue ="1")Integer pageNum,@RequestParam(defaultValue ="10")Integer pageSize){return userinfoService.page(newPage<>(pageNum, pageSize));}@ApiOperation(value ="添加用户信息")@PostMapping("/addUserInfo")publicbooleanaddUserInfo(@RequestBodyUserinfo userinfo){return userinfoService.save(userinfo);}@ApiOperation(value ="删除指定用户信息")@DeleteMapping("/delUserInfoById//{id}")publicbooleandelUserInfoById(@PathVariable("id")int id){return userinfoService.removeById(id);}@ApiOperation(value ="修改用户信息")@PutMapping("/updateUserInfo")publicbooleanupdateUserInfo(@RequestBodyUserinfo userinfo){return userinfoService.updateById(userinfo);}}
Userinfo
packagecom.f.springbootvue.entity;importcom.baomidou.mybatisplus.annotation.IdType;importcom.baomidou.mybatisplus.annotation.TableField;importcom.baomidou.mybatisplus.annotation.TableId;importcom.baomidou.mybatisplus.annotation.TableName;importjava.io.Serializable;importjava.util.Date;importlombok.Data;/**
 * 用户表信息
 * @TableName userinfo
 */@TableName(value ="userinfo")@DatapublicclassUserinfoimplementsSerializable{/**
     * 主键
     */@TableId(type =IdType.AUTO)privateLong id;/**
     * 用户名
     */privateString username;/**
     * 密码
     */privateString password;/**
     * 身份证号
     */privateString idCard;/**
     * 真实姓名
     */privateString realName;/**
     * 性别
     */privateString gender;/**
     * 地址
     */privateString address;/**
     * 手机号
     */privateString phone;/**
     * 角色
     */privateString role;/**
     * 年龄
     */privateString age;/**
     * 状态
     */privateString userStatus;/**
     * 更新时间
     */privateDate updateTime;/**
     * 创建时间
     */privateDate createTime;/**
     * 是否删除(0-未删, 1-已删)
     */privateInteger isDeleted;@TableField(exist =false)privatestaticfinallong serialVersionUID =1L;@Overridepublicbooleanequals(Object that){if(this== that){returntrue;}if(that ==null){returnfalse;}if(getClass()!= that.getClass()){returnfalse;}Userinfo other =(Userinfo) that;return(this.getId()==null? other.getId()==null:this.getId().equals(other.getId()))&&(this.getUsername()==null? other.getUsername()==null:this.getUsername().equals(other.getUsername()))&&(this.getPassword()==null? other.getPassword()==null:this.getPassword().equals(other.getPassword()))&&(this.getIdCard()==null? other.getIdCard()==null:this.getIdCard().equals(other.getIdCard()))&&(this.getRealName()==null? other.getRealName()==null:this.getRealName().equals(other.getRealName()))&&(this.getGender()==null? other.getGender()==null:this.getGender().equals(other.getGender()))&&(this.getAddress()==null? other.getAddress()==null:this.getAddress().equals(other.getAddress()))&&(this.getPhone()==null? other.getPhone()==null:this.getPhone().equals(other.getPhone()))&&(this.getRole()==null? other.getRole()==null:this.getRole().equals(other.getRole()))&&(this.getAge()==null? other.getAge()==null:this.getAge().equals(other.getAge()))&&(this.getUserStatus()==null? other.getUserStatus()==null:this.getUserStatus().equals(other.getUserStatus()))&&(this.getUpdateTime()==null? other.getUpdateTime()==null:this.getUpdateTime().equals(other.getUpdateTime()))&&(this.getCreateTime()==null? other.getCreateTime()==null:this.getCreateTime().equals(other.getCreateTime()))&&(this.getIsDeleted()==null? other.getIsDeleted()==null:this.getIsDeleted().equals(other.getIsDeleted()));}@OverridepublicinthashCode(){finalint prime =31;int result =1;
        result = prime * result +((getId()==null)?0:getId().hashCode());
        result = prime * result +((getUsername()==null)?0:getUsername().hashCode());
        result = prime * result +((getPassword()==null)?0:getPassword().hashCode());
        result = prime * result +((getIdCard()==null)?0:getIdCard().hashCode());
        result = prime * result +((getRealName()==null)?0:getRealName().hashCode());
        result = prime * result +((getGender()==null)?0:getGender().hashCode());
        result = prime * result +((getAddress()==null)?0:getAddress().hashCode());
        result = prime * result +((getPhone()==null)?0:getPhone().hashCode());
        result = prime * result +((getRole()==null)?0:getRole().hashCode());
        result = prime * result +((getAge()==null)?0:getAge().hashCode());
        result = prime * result +((getUserStatus()==null)?0:getUserStatus().hashCode());
        result = prime * result +((getUpdateTime()==null)?0:getUpdateTime().hashCode());
        result = prime * result +((getCreateTime()==null)?0:getCreateTime().hashCode());
        result = prime * result +((getIsDeleted()==null)?0:getIsDeleted().hashCode());return result;}@OverridepublicStringtoString(){StringBuilder sb =newStringBuilder();
        sb.append(getClass().getSimpleName());
        sb.append(" [");
        sb.append("Hash = ").append(hashCode());
        sb.append(", id=").append(id);
        sb.append(", username=").append(username);
        sb.append(", password=").append(password);
        sb.append(", idCard=").append(idCard);
        sb.append(", realName=").append(realName);
        sb.append(", gender=").append(gender);
        sb.append(", address=").append(address);
        sb.append(", phone=").append(phone);
        sb.append(", role=").append(role);
        sb.append(", age=").append(age);
        sb.append(", userStatus=").append(userStatus);
        sb.append(", updateTime=").append(updateTime);
        sb.append(", createTime=").append(createTime);
        sb.append(", isDeleted=").append(isDeleted);
        sb.append(", serialVersionUID=").append(serialVersionUID);
        sb.append("]");return sb.toString();}}
UserMapper
publicinterfaceUserinfoMapperextendsBaseMapper<Userinfo>{}
UserinfoServiceImpl
@ServicepublicclassUserinfoServiceImplextendsServiceImpl<UserinfoMapper,Userinfo>implementsUserinfoService{}
UserinfoService
publicinterfaceUserinfoServiceextendsIService<Userinfo>{}
SpringBootVueApplication
@SpringBootApplication@MapperScan("com.f.springbootvue.mapper")publicclassSpringBootVueApplication{publicstaticvoidmain(String[] args){SpringApplication.run(SpringBootVueApplication.class, args);}}
8、最后
启动前后端项目,然后就能的到一个巨丑无比的表格,表格中的数据就是数据库中的数据。后续的简单的CRUD操作,可以直接使用mybatis plus提供的方法即可。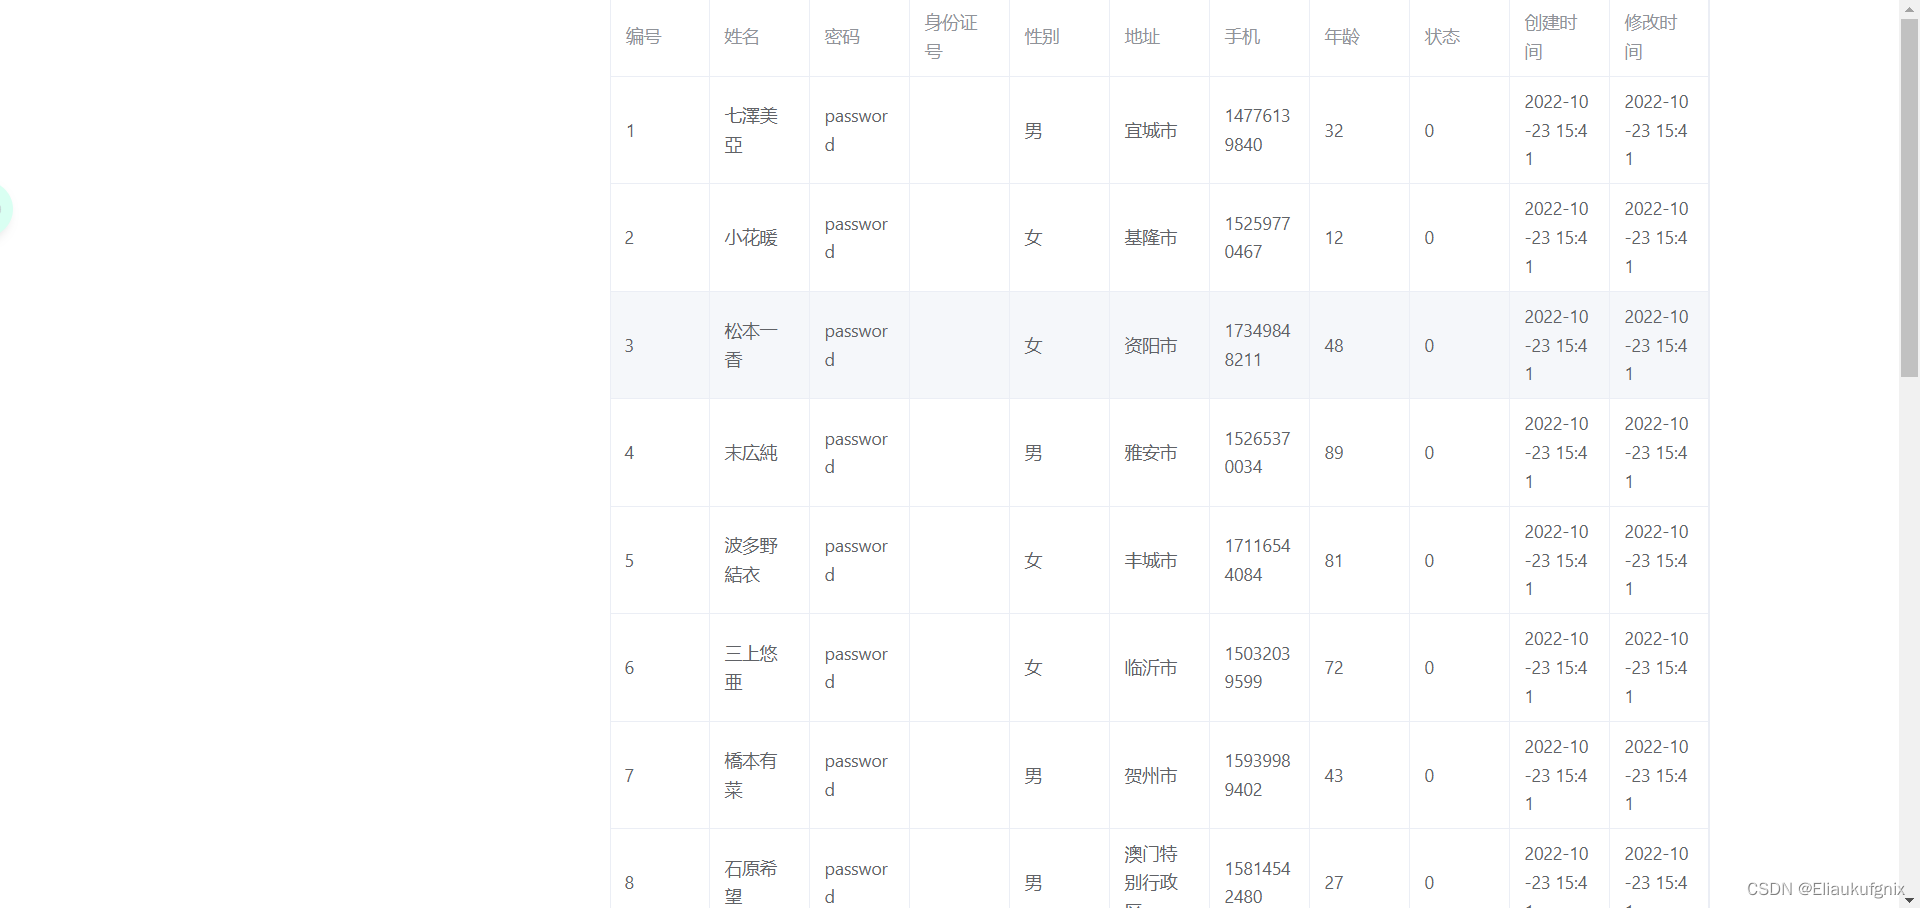
至此简单的前后端数据算是绑定在一起了,可以进行其他的操作了。
9、推荐一个github上的项目供学习参考
这里推荐一个后台管理的前后端项目。
项目地址:vue-element-admin
项目文档也非常的齐全,可供学习参考。
版权归原作者 Eliaukufgnix 所有, 如有侵权,请联系我们删除。