搭建MQTT服务,使用ubuntu搭建EMQX并用Springboot进行连接测试
1、EMQX介绍
1.1.emqx简介:
全球下载量超千万的开源物联网 MQTT 服务器,高效可靠连接海量物联网设备,高性能实时处理消息与事件流数据,可运行在公有云、私有云和混合云上。
优势
(1)基于 APL 2.0 开放源码协议
(2)完整 MQTT 3.x 和 5.0 规范
(3)Masterless 高可用集群架构
(4)高并发、低时延、高性能
(5)可扩展的网关和插件体系
关于emqx开源版与企业版的区别
emqx开源版是开源的且是完全免费的,emqx与企业版则是收费的
二者从性能上对比的主要差异是:十万级和百万级的差异。
二者从功能上对比的主要差异是:消息存储、增强规则引擎、增强数据桥接。
emqx开源版就已经足够满足中小型企业的需求了
1.2.emqx安装
emqx支持ubuntu版本:
- ubuntu 22.04
- ubuntu 20.04
- ubuntu 18.04
EMQX 支持通过 Apt 源安装,免除了用户需要手动处理依赖关系和更新软件包等的困扰,具有更加方便、安全和易用等优点。
【1】通过以下命令配置 EMQX Apt 源:
curl -s https://assets.emqx.com/scripts/install-emqx-deb.sh | sudo bash
【2】运行以下命令安装 EMQX:
sudo apt-get install emqx
【3】运行以下命令启动 EMQX:
sudo systemctl start emqx
【4】 EMQX常用的命令
sudo systemctl start emqx    启动
sudo systemctl stop emqx     停止
sudo systemctl restart emqx  重启
【5】默认安装后配置文件的路径
/etc/emqx/emqx.conf
如需修改端口,可按以下配置进行修改
dashboard {
    listeners.http {# bind = 18083# 访问服务端的端口号
        bind = 20018
    }}
listeners.tcp.default {# 客户端连接的端口号
     bind = "0.0.0.0:20019"}
1.3mqtt客户端工具
客户端工具连接
mqtt入门协议
1.4配置emqx服务器
emqx帮助文档
1.4.1.登录emqx内置管理控制台
EMQX 提供了一个内置的管理控制台,即 EMQX Dashboard。方便用户通过 Web 页面就能轻松管理和监控 EMQX 集群,并配置和使用所需的各项功能。
在浏览器里输入: http://ip:18083就可以访问EMQX的后台管理页面。可以管理以连接的客户端或检查运行状态。
打开浏览器后,输入地址后打开的效果: 默认用户名和密码:
用户名:admin
密码:public
第一次登录会提示你修改新密码,如果不想设置,也可以选择跳过(公网服务器部署,还是要修改密码安全些)。
登录成功的页面显示如下:
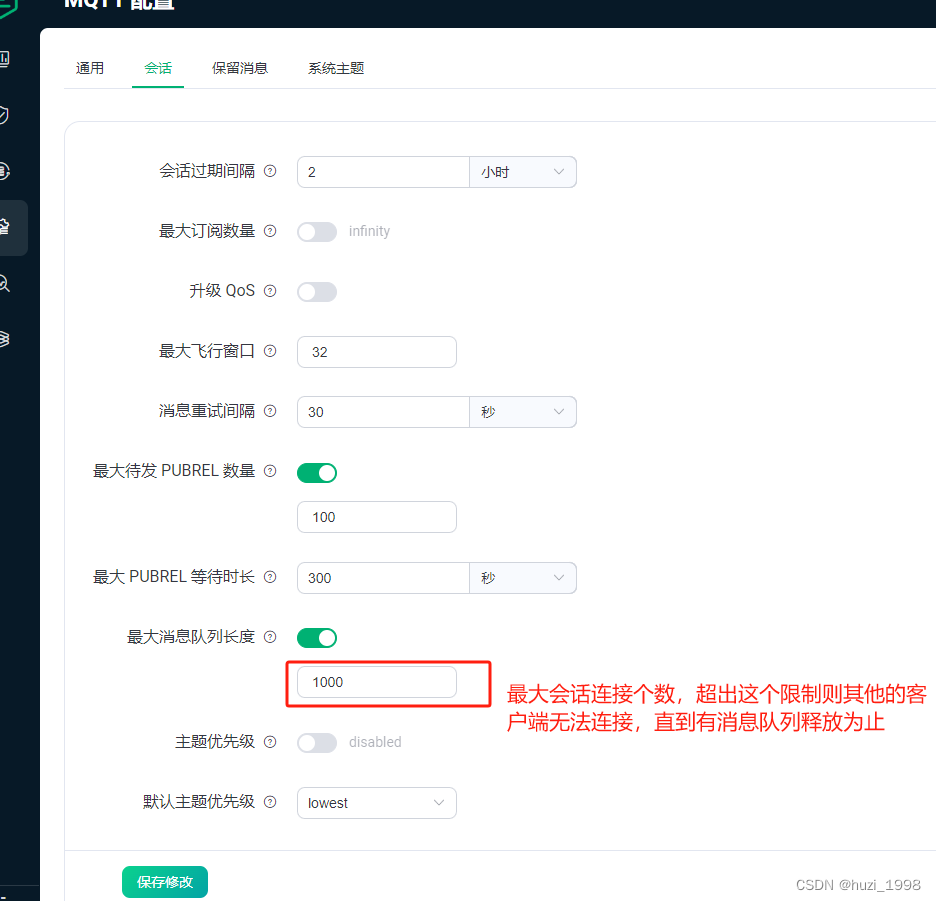
1.4.2.mqttp配置
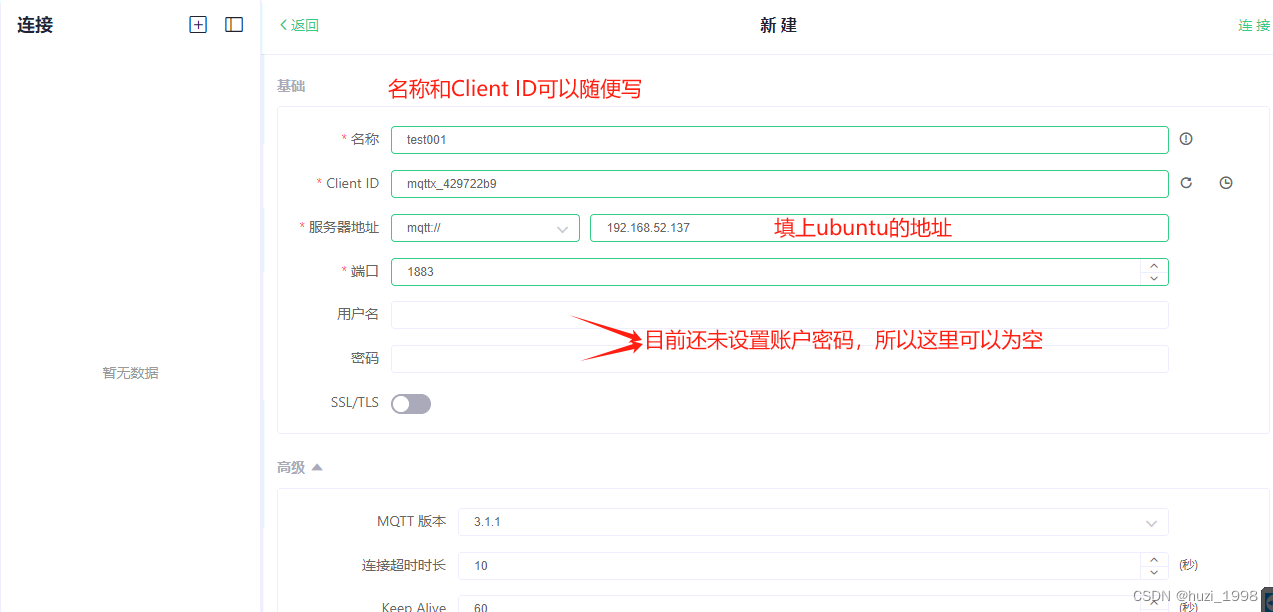
1.4.3.mqtt客户端连接emqx服务器
连接成功示意图: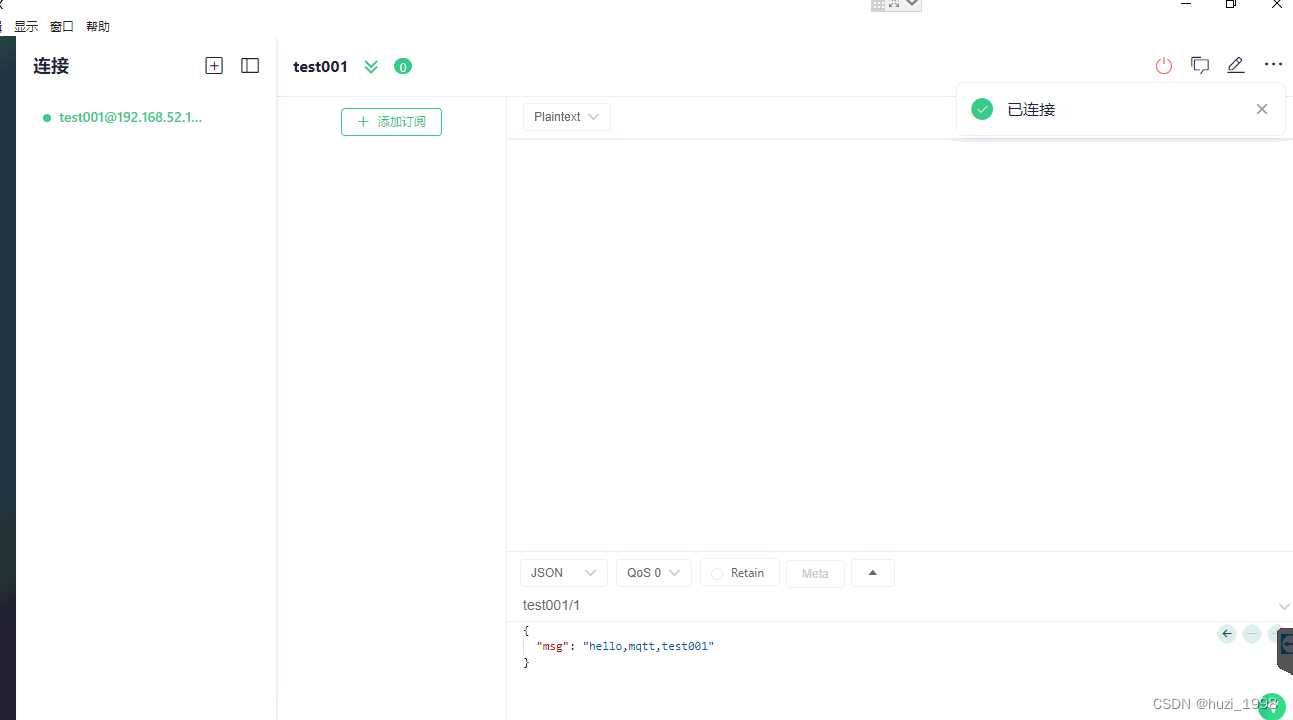
连接成功后emqx会显示当前连接的客户端信息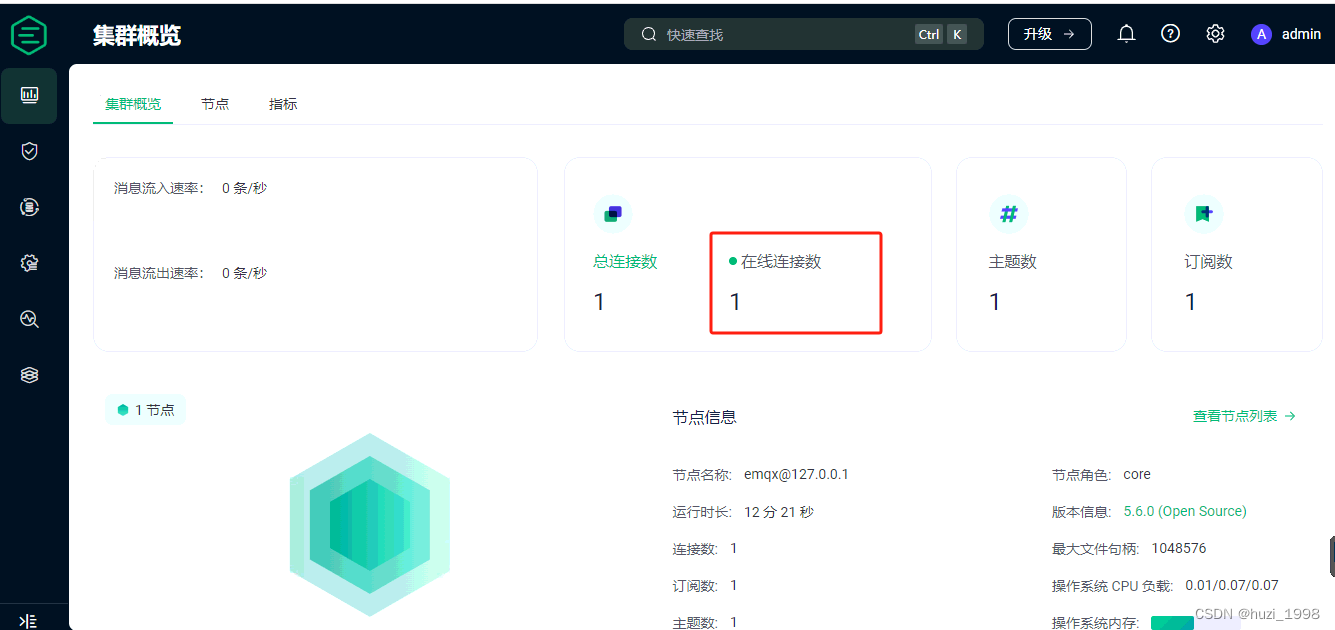
点击在线连接数可以查看详细信息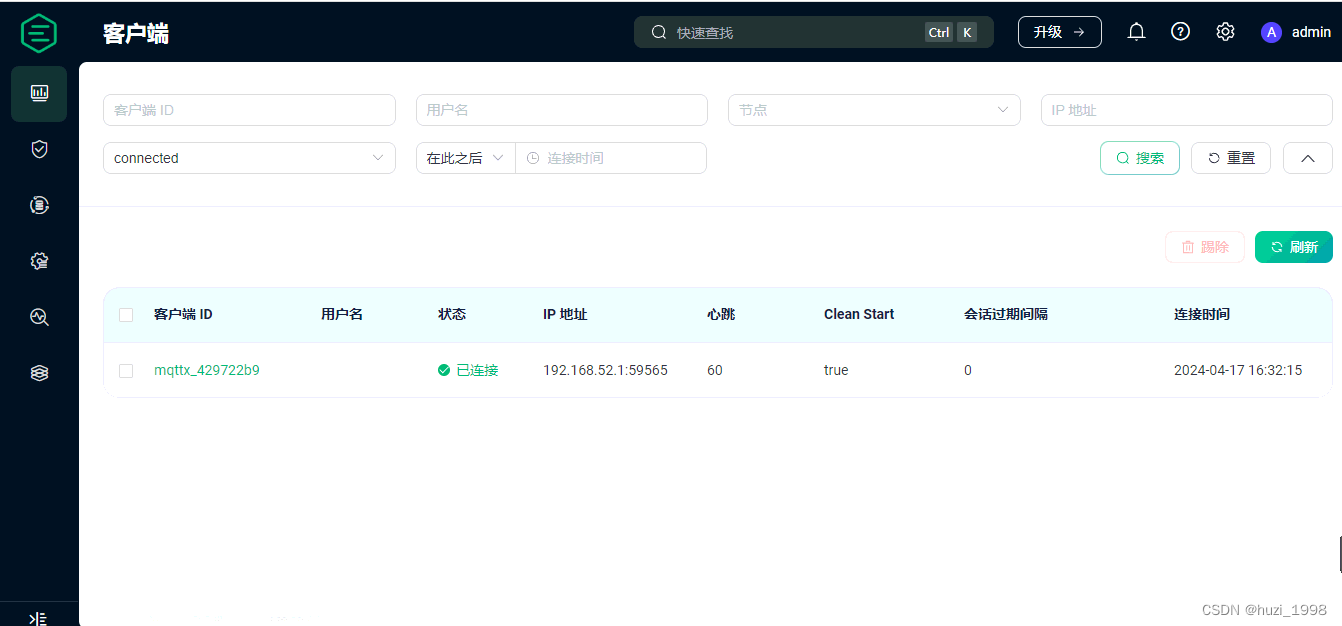
1.4.3.客户端添加主题订阅
MQTT 主题支持以下两种通配符:+ 和 #。
+:表示单层通配符,例如 testtopic/+ 匹配 testtopic/x 或 testtopic/y。
#:表示多层通配符,例如 testtopic/# 匹配 testtopic/x、testtopic/b/c/d。
MQTT 提供了三种服务质量(QoS),在不同网络环境下保证消息的可靠性。
- QoS 0:消息最多传送一次。如果当前客户端不可用,它将丢失这条消息。
- QoS 1:消息至少传送一次。
- QoS 2:消息只传送一次。
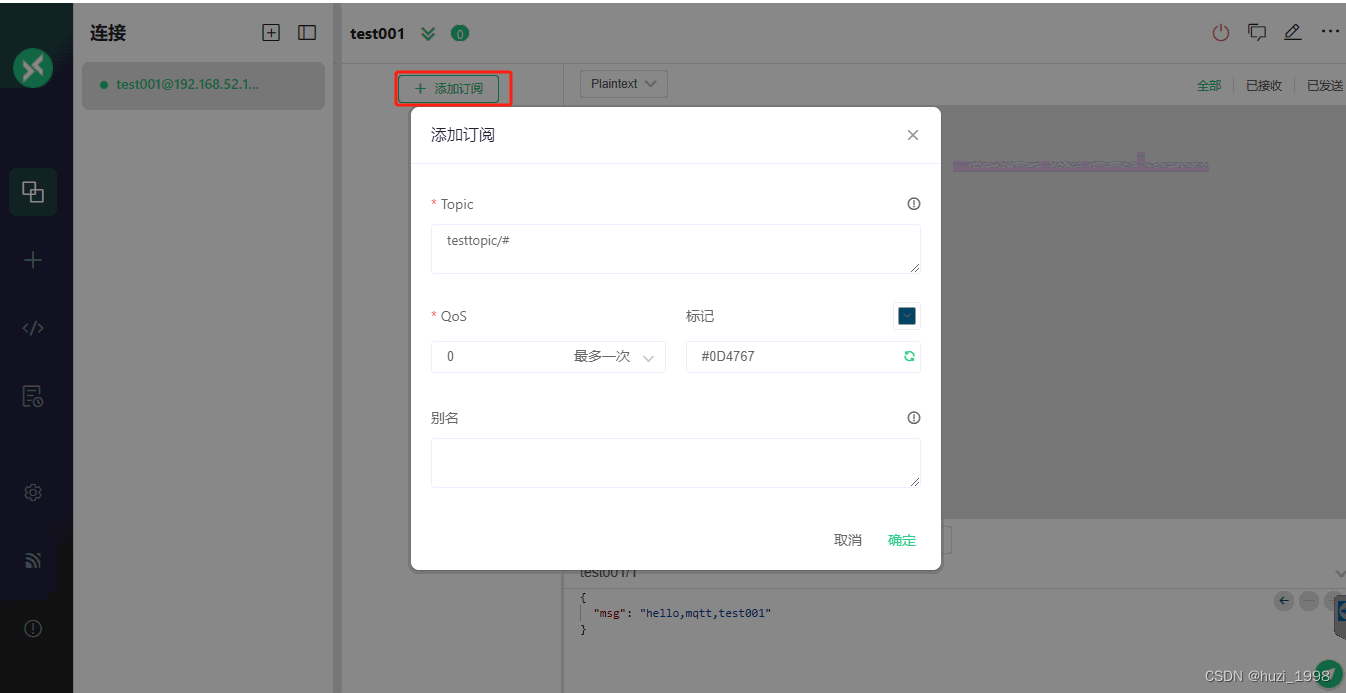
订阅成功后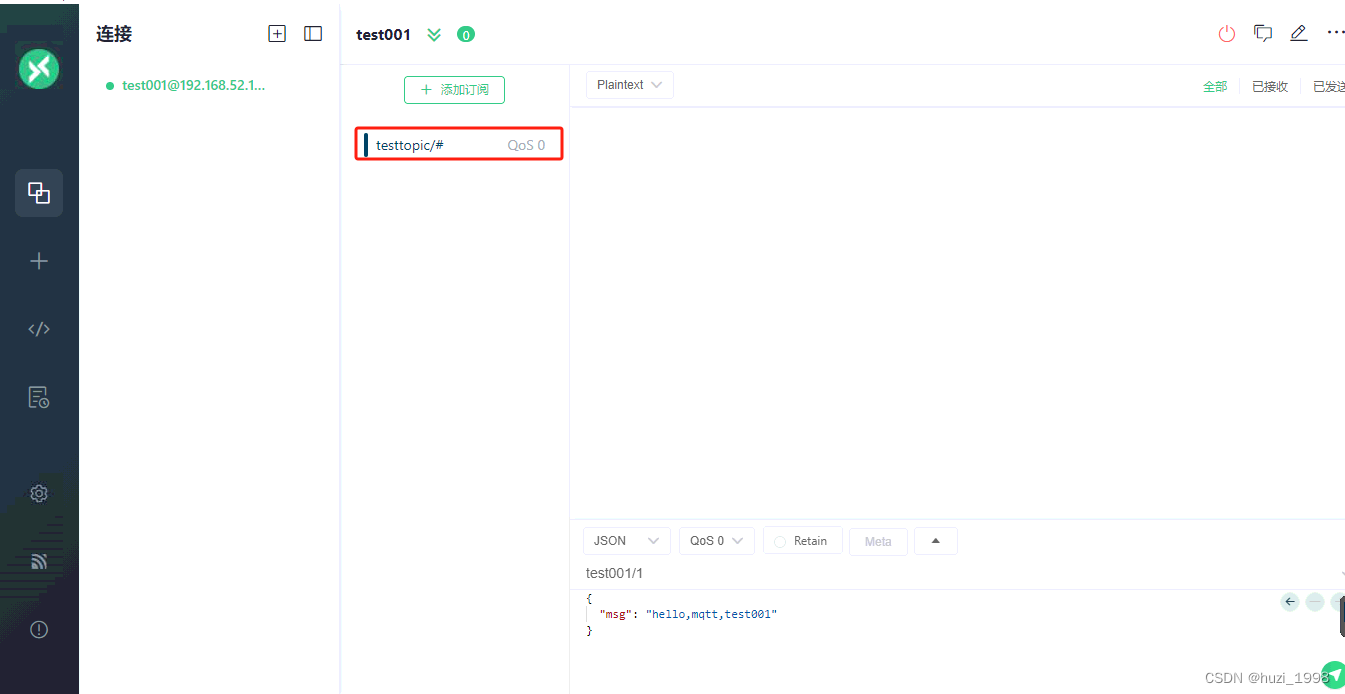
emqx上也可以看到当前订阅的主题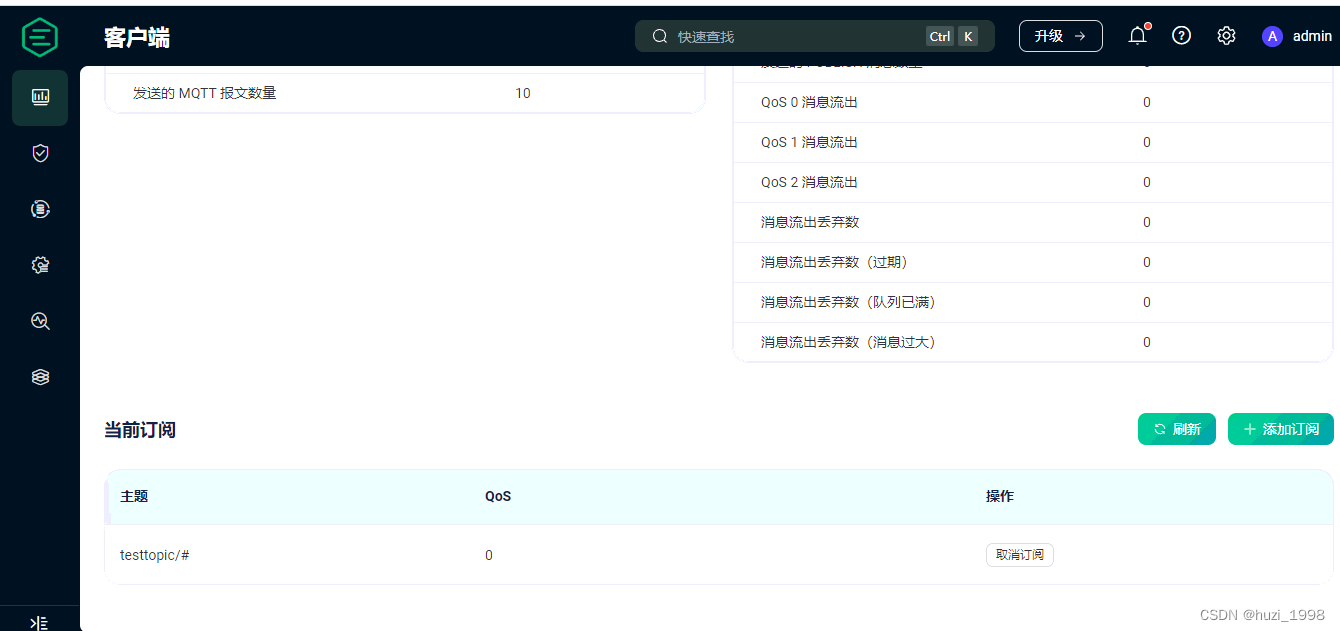
其他的详细测试可以查看mqtt入门协议
1.4.4.添加客户端账户密码认证(内置数据库)
由于之前没有设置账户密码认证,所以所有知道你emqx部署地址的客户端都能连接。这里需要加上账户密码进行限制
这里使用emqx提供的内置数据库进行添加账户
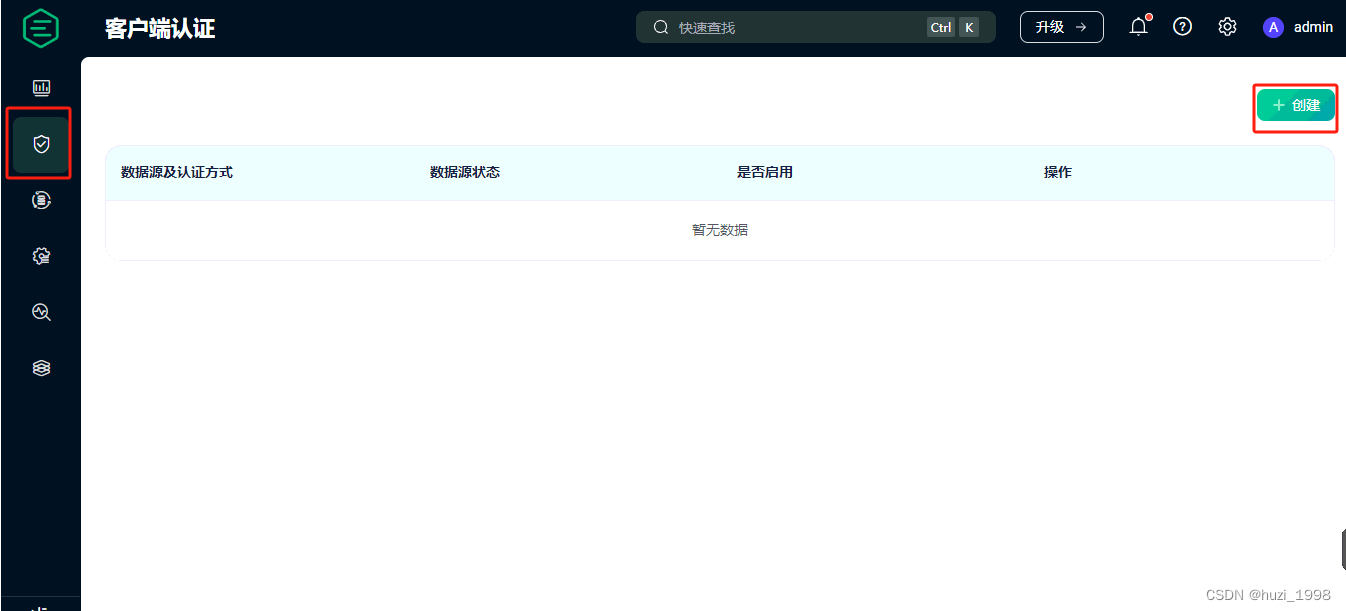
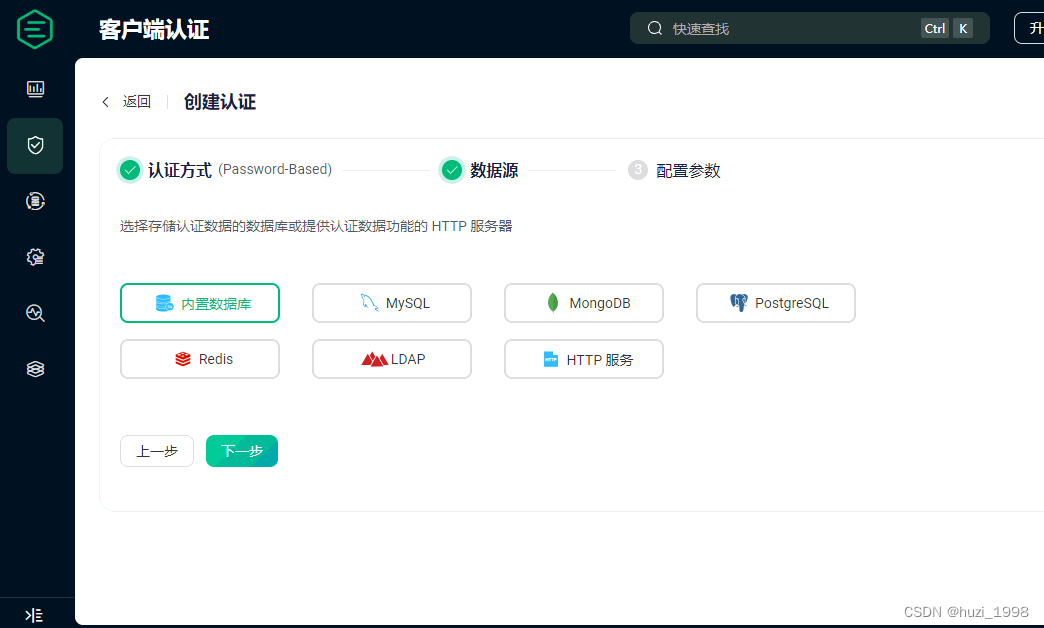
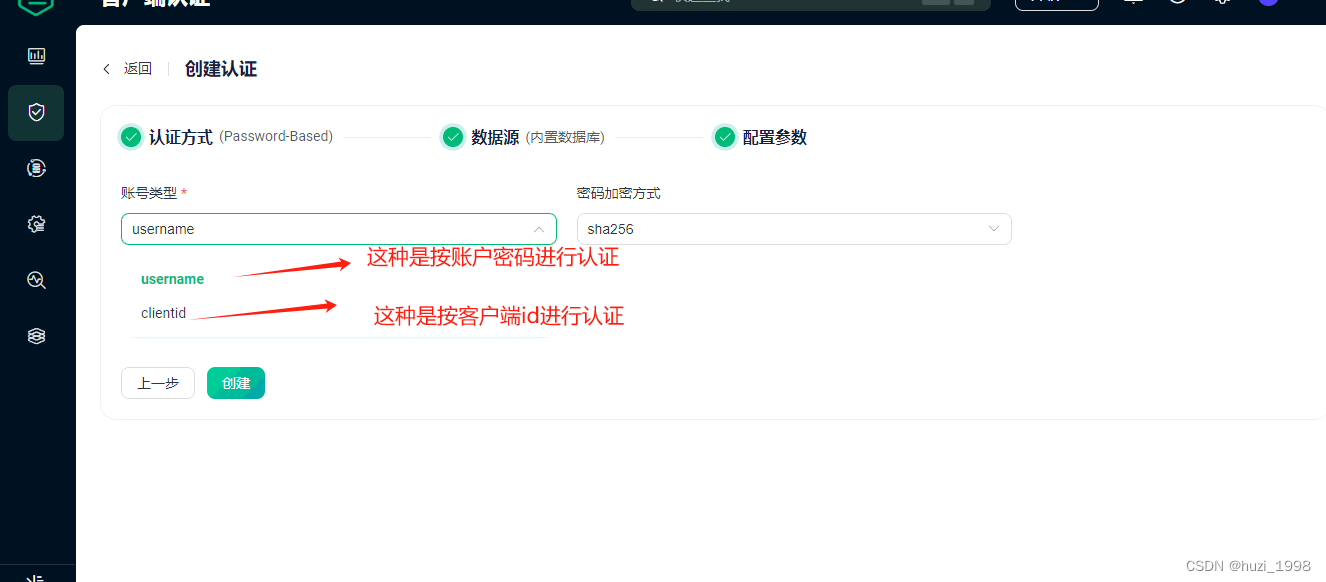
这里有2种模式选择,选择username方式,加密及加盐方式默认选择即可
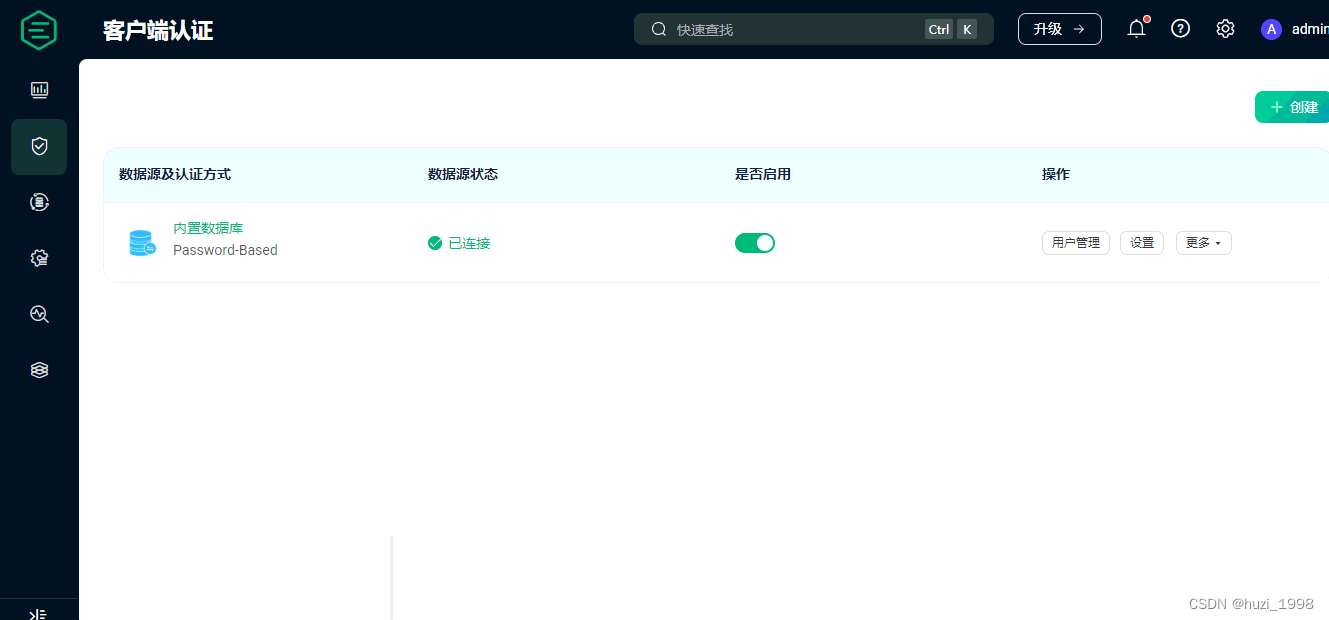
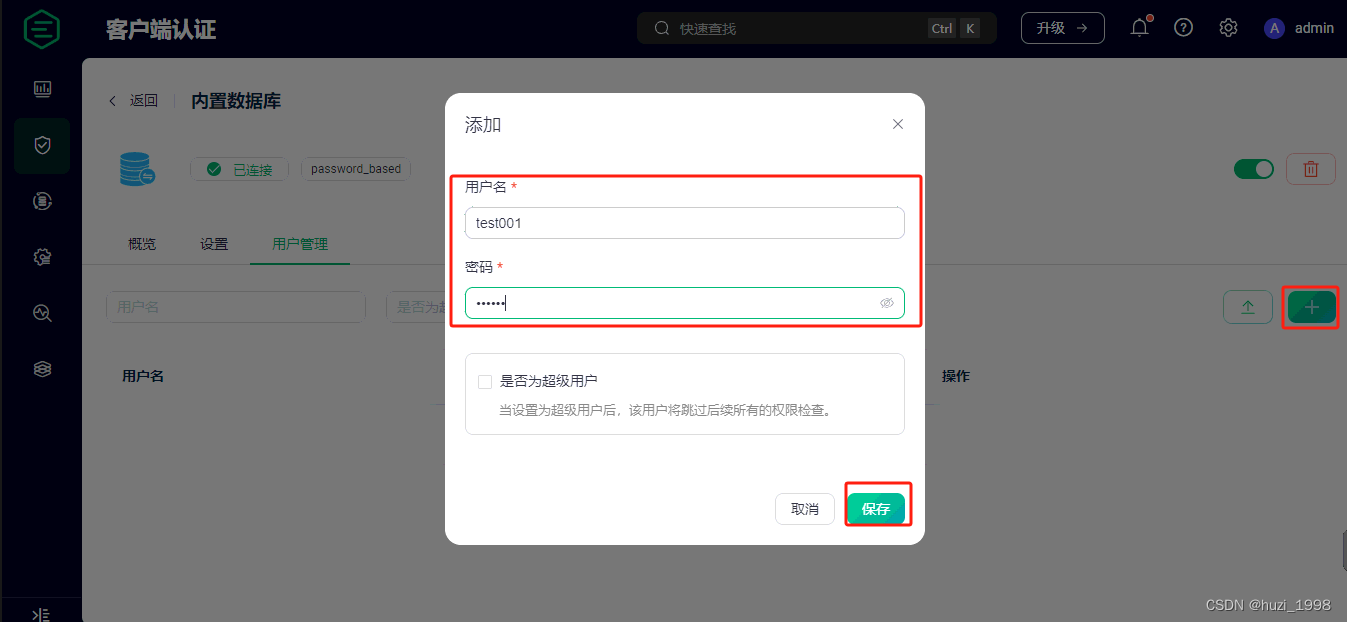
点击用户管理添加用户
创建成功后再次连接emqx就必须输入账户密码才能成功连接
没输入账户密码则会出错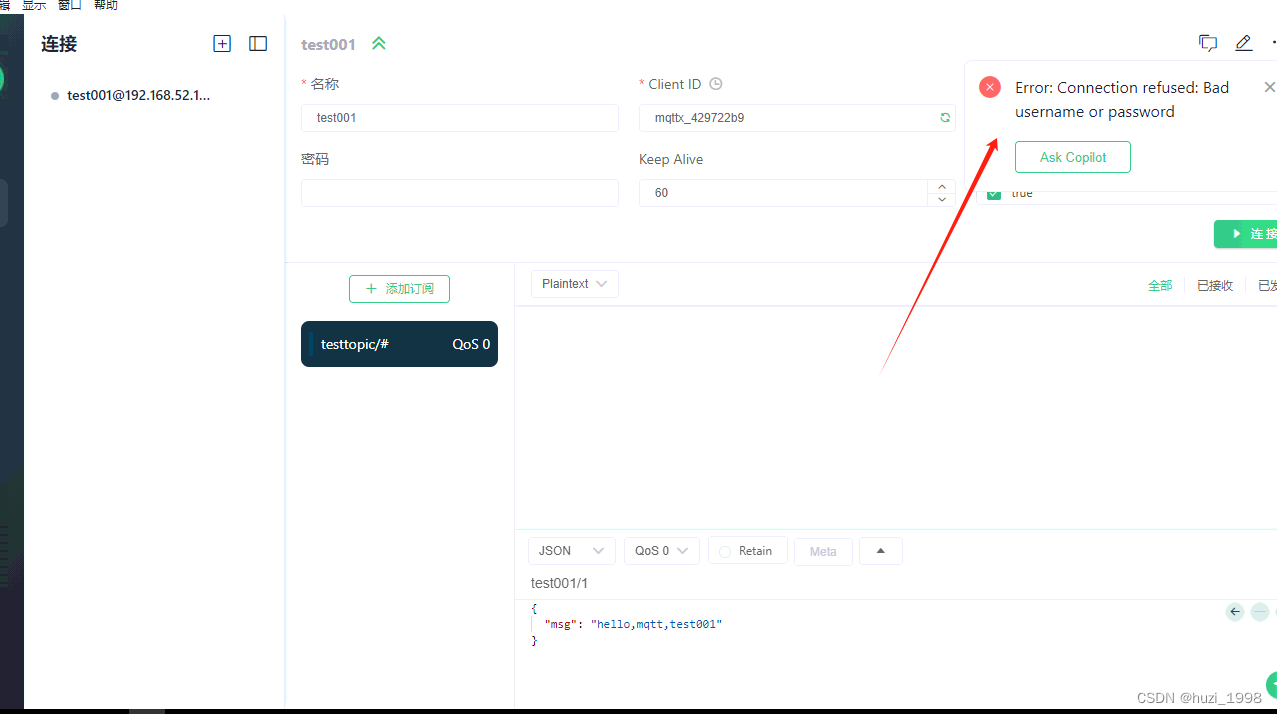
输入账户密码就能正常连接上了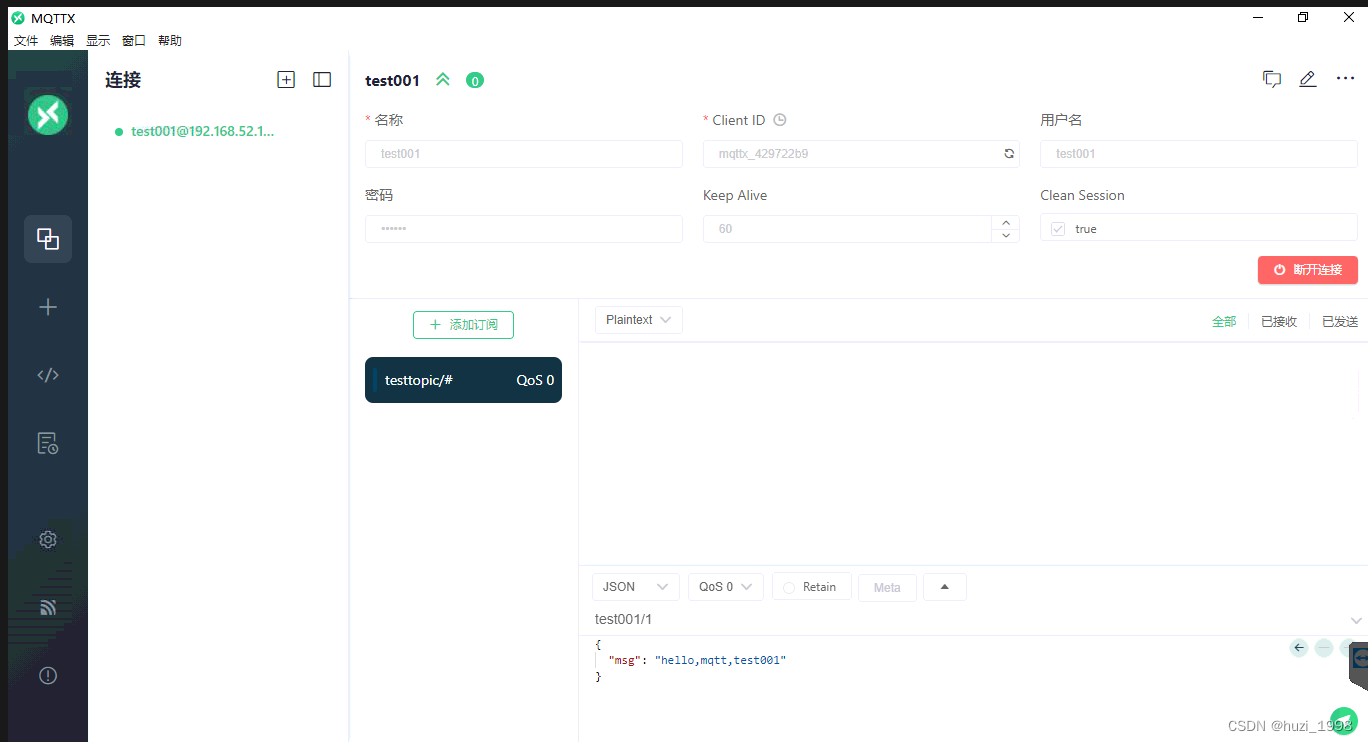
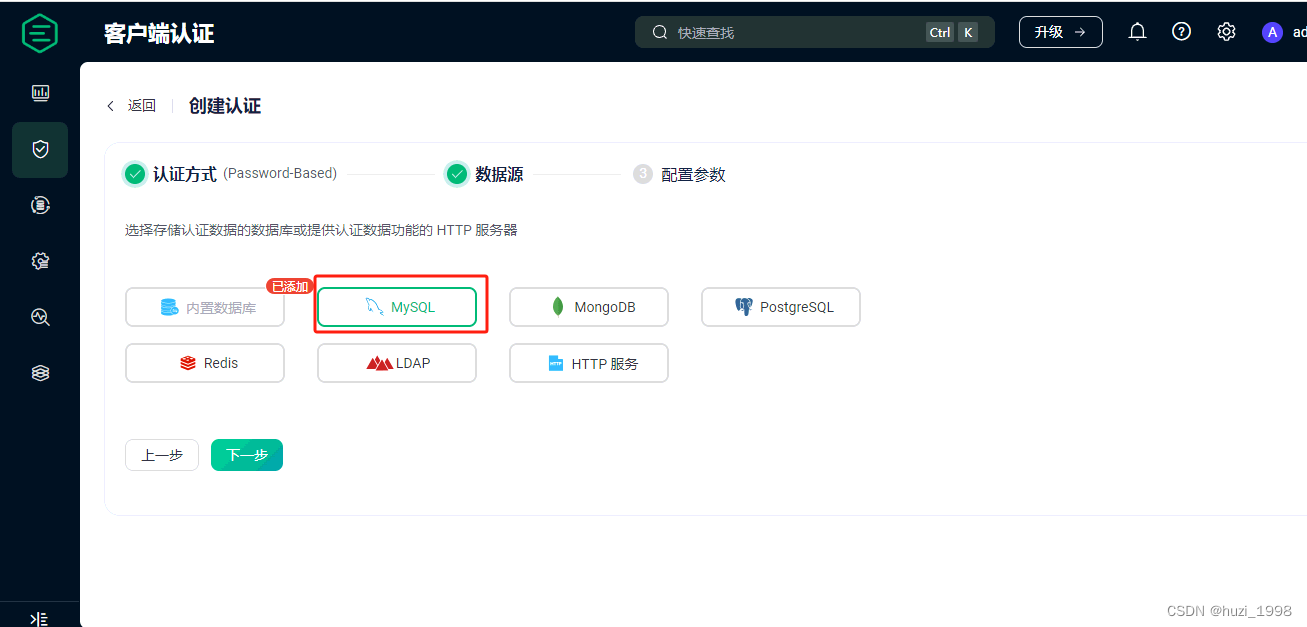
1.4.5.添加客户端账户密码认证(MySQL)
1.4.5.1.除了内置数据库认证方式还能选择MySQL认证方式
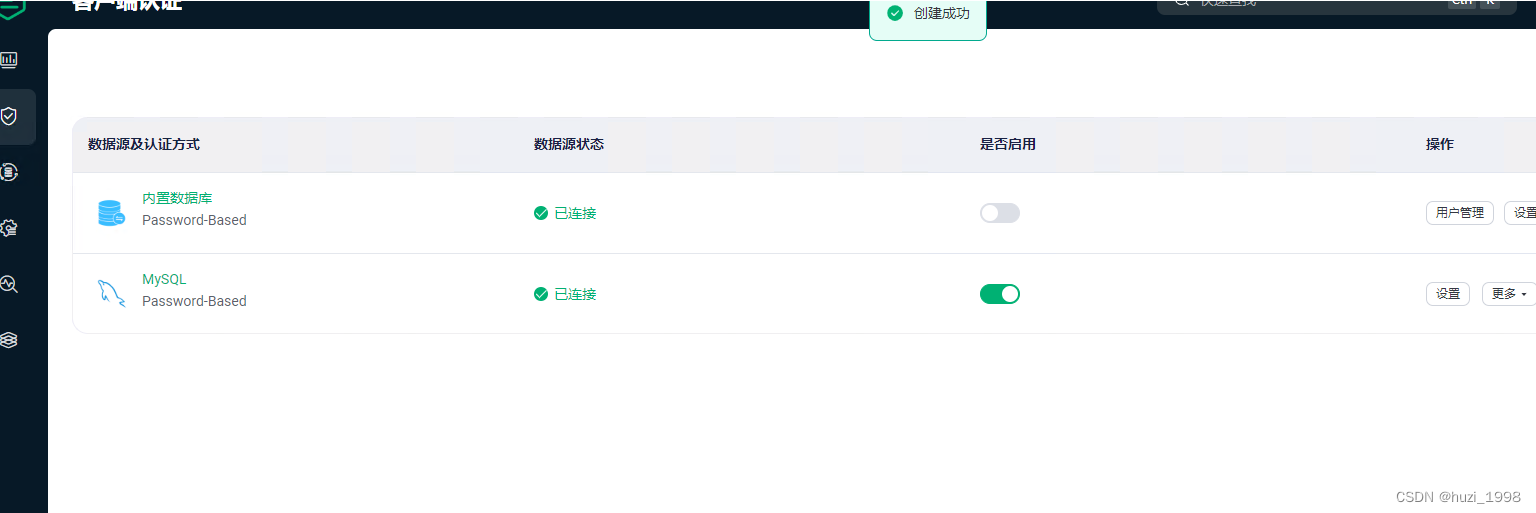
先关闭原来的内置数据库认证
如果存在多种认证方式,则emqx会按顺序进行认证,即会先认证内置数据库里的用户,再认证MySQL里的用户
emqx中mysql认证方式的流程:首先根据输入的用户名和密码到数据库中查询相应的用户名,加密后的密码,还有盐,其次根据在emqx上选择的加密方式和加盐的方式对输入的密码进行加密,然后与数据库中加密后的密码进行比较,一致则放行,不一致则拦截
1.4.5.2.点击帮助,获取mqtt_user表的建表信息
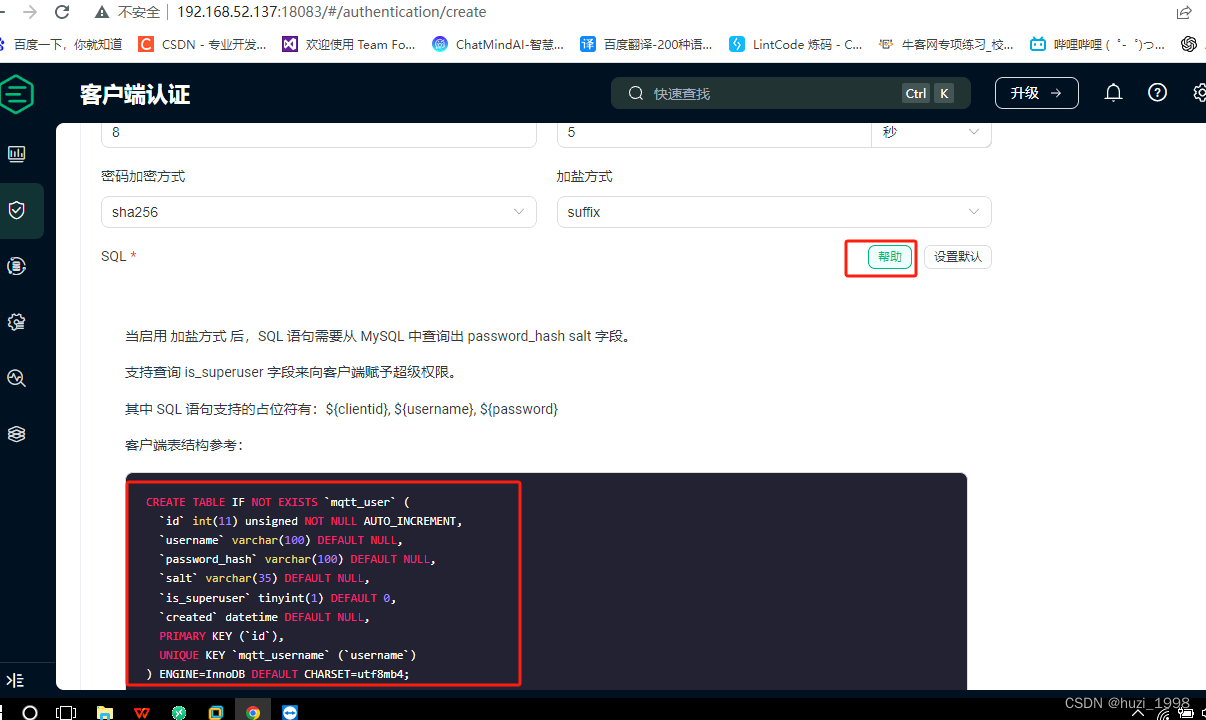
username:用户名
password_hash:密码(明文或加密方式)
salt:盐
is_superuser:是否超级用户
created:创建时间
CREATETABLEIFNOTEXISTS`mqtt_user`(`id`int(11)unsignedNOTNULLAUTO_INCREMENT,`username`varchar(100)DEFAULTNULL,`password_hash`varchar(100)DEFAULTNULL,`salt`varchar(35)DEFAULTNULL,`is_superuser`tinyint(1)DEFAULT0,`created`datetimeDEFAULTNULL,PRIMARYKEY(`id`),UNIQUEKEY`mqtt_username`(`username`))ENGINE=InnoDBDEFAULTCHARSET=utf8mb4;
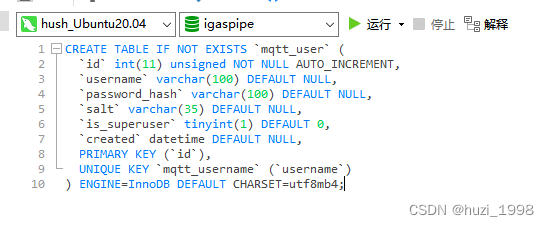
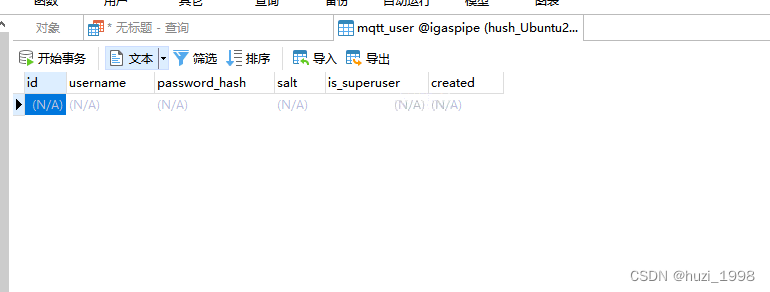
1.4.5.3.配置数据库信息
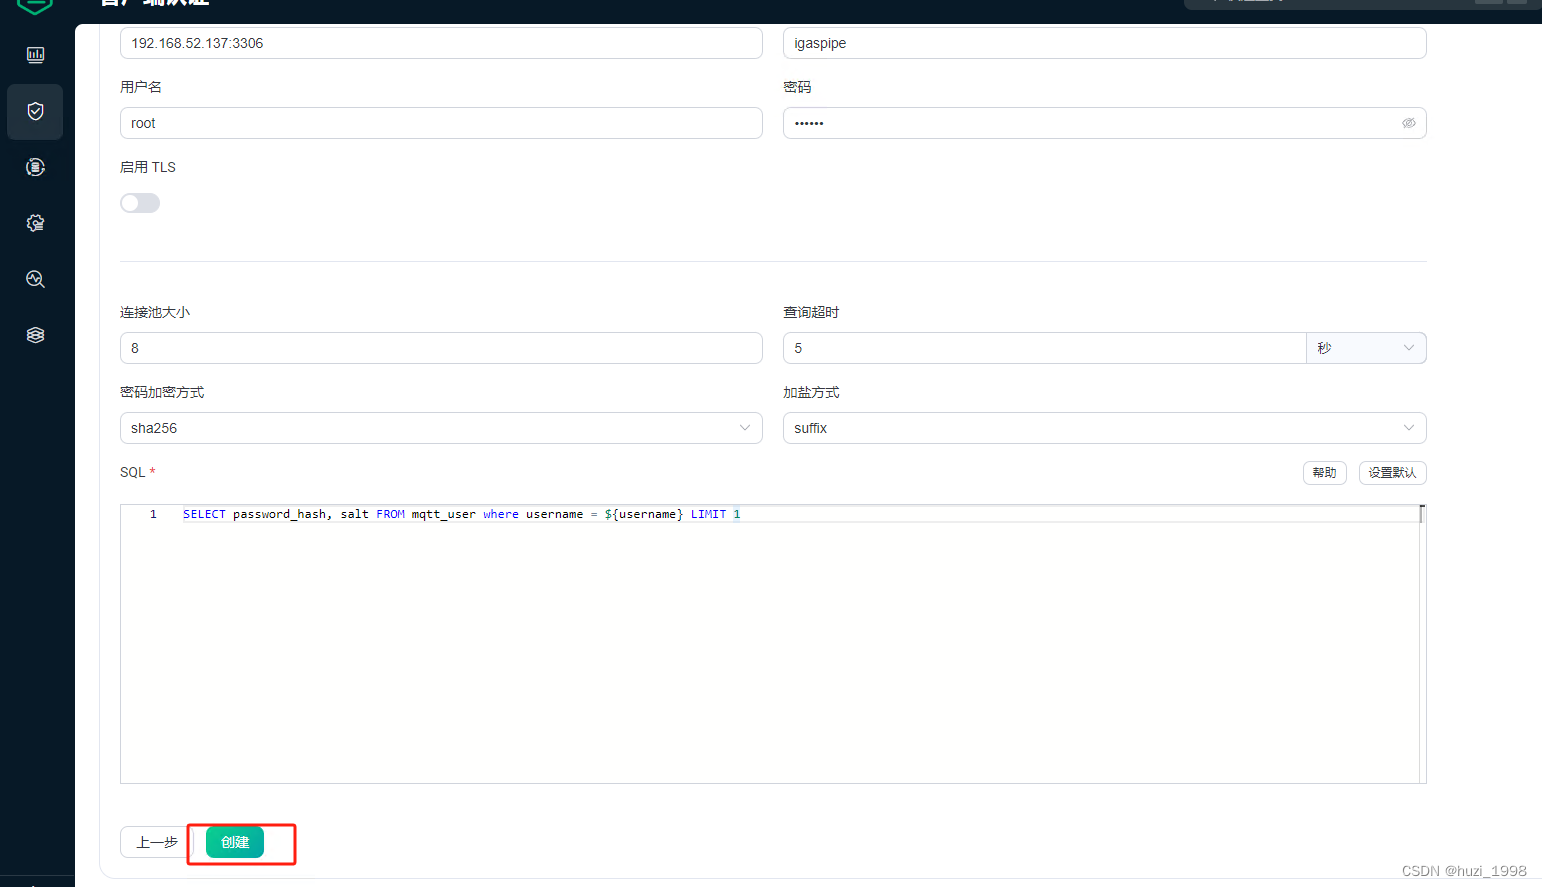
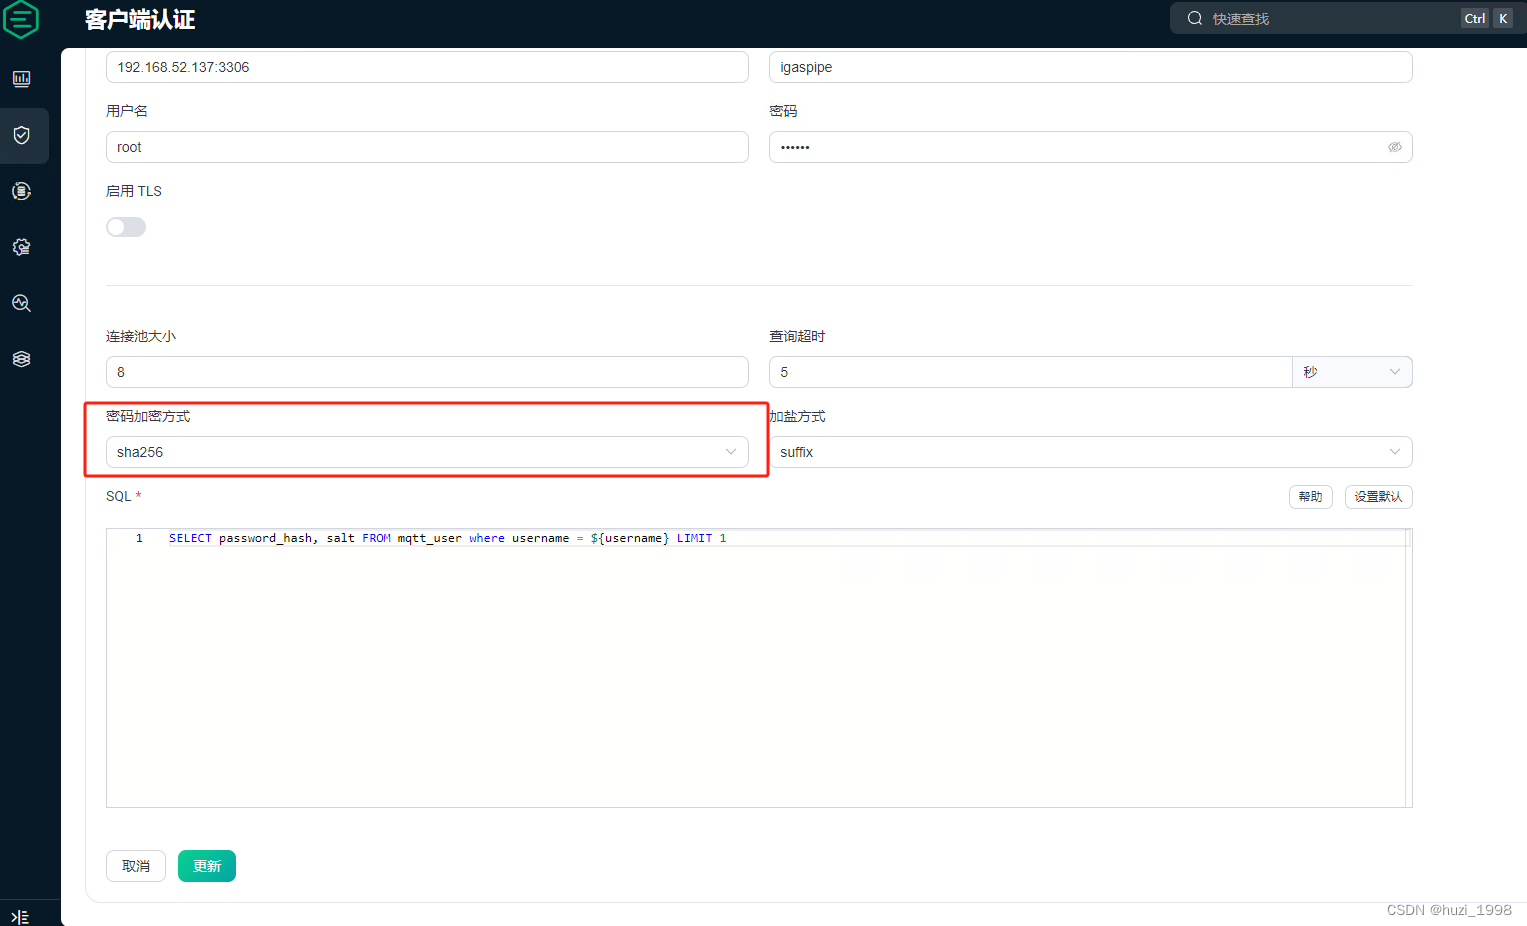
建表完成后继续回到emqx中的mysql创建步骤,填上自己的mysql地址,数据库名称,账户及密码,然后点击创建
由于创建数据库的时候选择的加密方式是sha256,所以我们插入的数据库的密码也需要用sha256进行加密
盐的选择有3种方式
- suffix(在密码尾部加盐):表示salt的位置在密码的尾部
- prefix(在密码头部加盐):表示salt的位置在密码的头部
- disable:当加密方式选择plain,盐必须选择disable,plain表示明文显示,不加密
1.4.5.4.插入数据
这个sql语句表示插入一个用户名称为emqx_u,密码为public,盐为slat_foo123的用户
INSERTINTO mqtt_user(username, password_hash, salt, is_superuser)VALUES('emqx_u', SHA2(concat('public','slat_foo123'),256),'slat_foo123',1);INSERTINTO mqtt_user(username, password_hash, salt, is_superuser)VALUES('test001', SHA2(concat('public','slat_foo123'),256),'slat_foo123',1);INSERTINTO mqtt_user(username, password_hash, salt, is_superuser)VALUES('test002', SHA2(concat('public','slat_foo123'),256),'slat_foo123',1);

1.4.5.5.启动mqtt进行测试
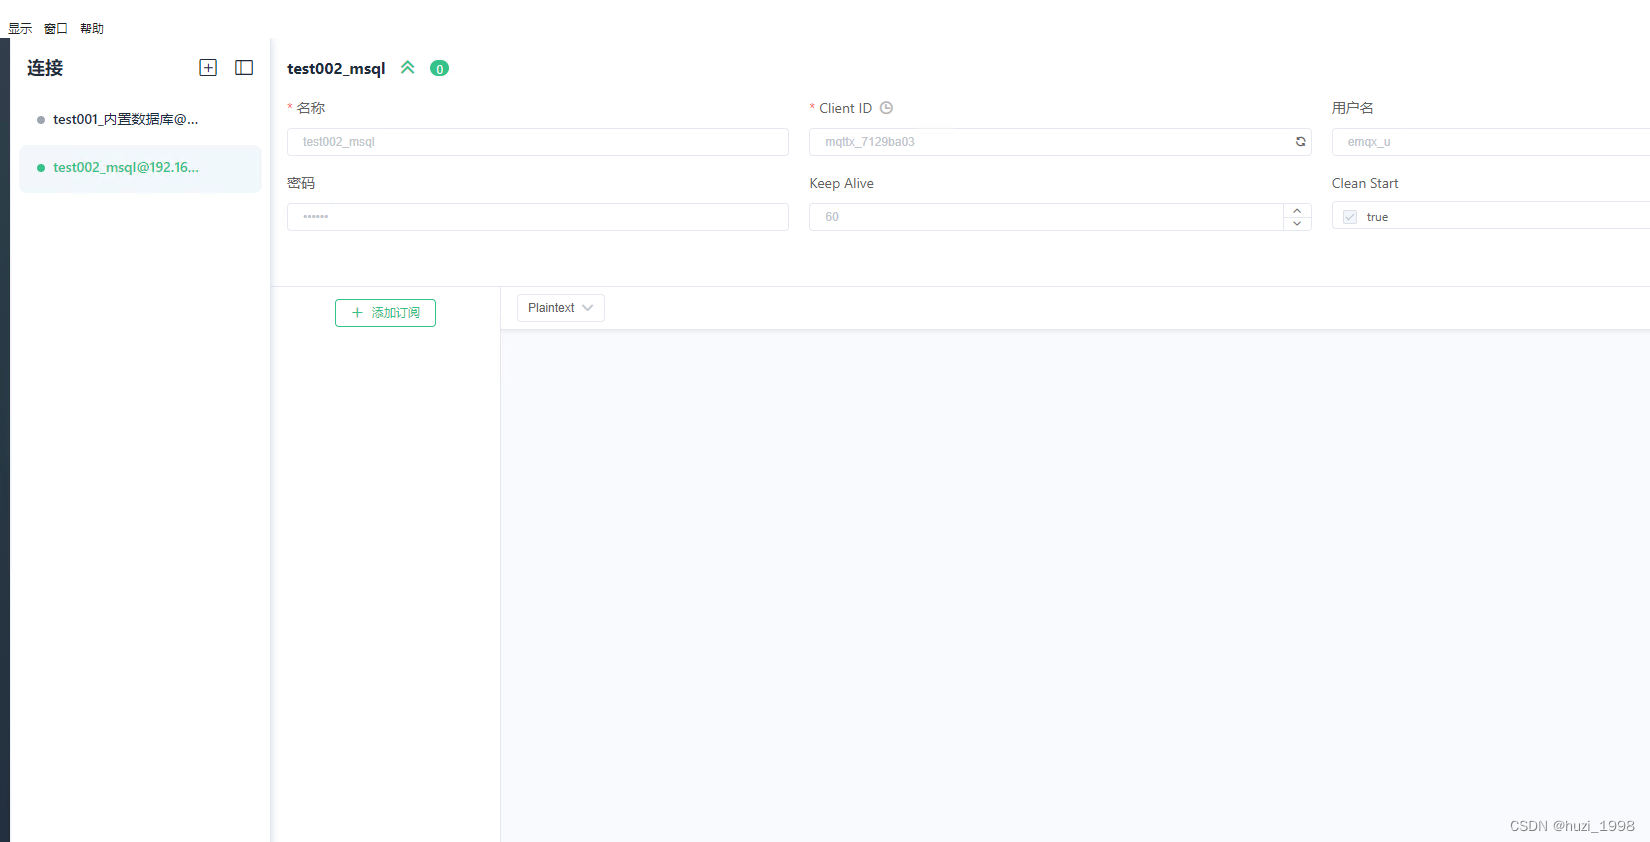
回到mqtt添加多一个新的连接,输入账户和密码即可,emqx会拿着账户和密码与数据库进行比对,一致则提示连接成功
emqx会自动根据输入的密码和在emqx上配置的加密方式及盐的方式对输入的密码进行加密后与数据库的进行比对
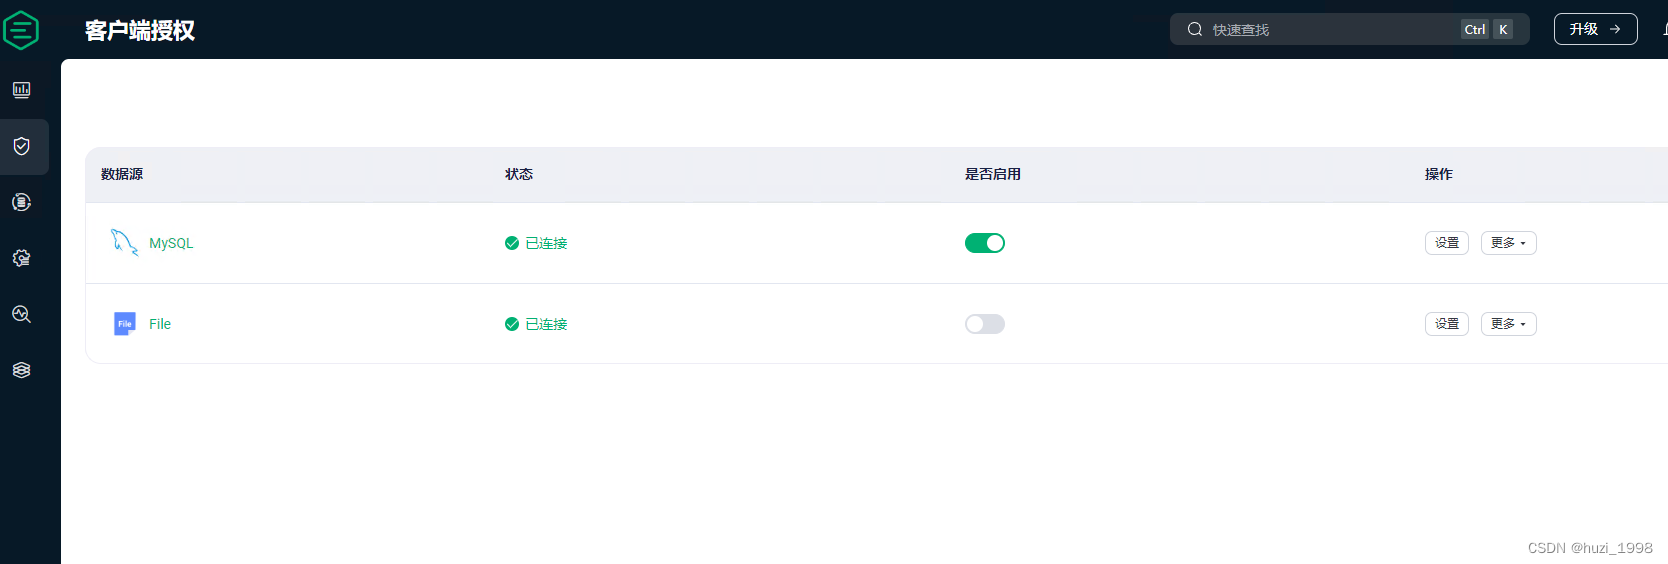
1.4.6.添加客户端授权服务
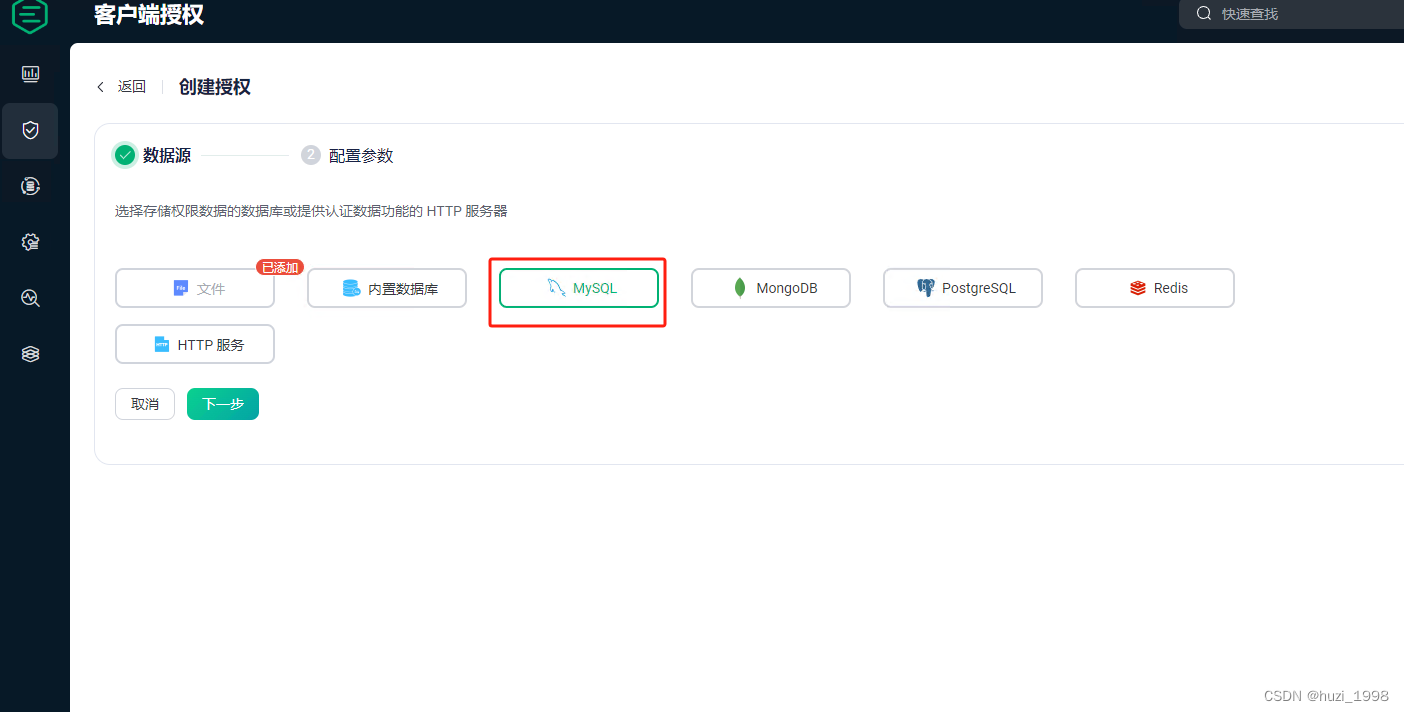
emqx支持对根据客户端id对客户端的发布和订阅主题的权限进行限制,这里采用mysql的方式对权限进行控制
1.4.6.1.创建myqsl授权方式
1.4.6.2.点击帮助获取建表语句
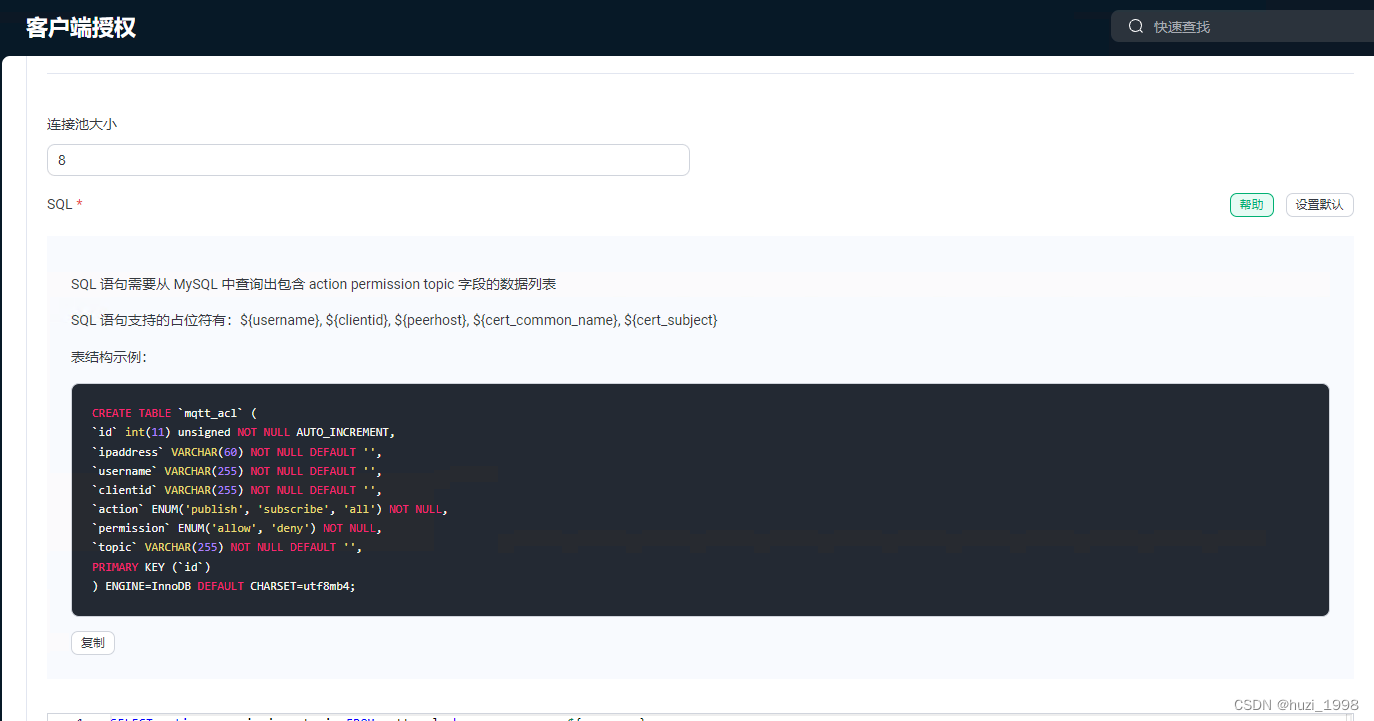
ipaddress:客户端的 IP 地址
username:客户端的用户名
clientid:客户端ID
action:枚举类型,表示 ACL 规则允许的操作类型。可以是 ‘publish’(发布消息)、‘subscribe’(订阅主题)或 ‘all’(全部操作)。
permission:枚举类型,表示 ACL 规则对指定操作的权限。可以是 ‘allow’(允许)或 ‘deny’(拒绝)。
topic:主题(Topic)用于消息发布和订阅的标识符,ACL 会根据主题来控制访问权限
CREATETABLE`mqtt_acl`(`id`int(11)unsignedNOTNULLAUTO_INCREMENT,`ipaddress`VARCHAR(60)NOTNULLDEFAULT'',`username`VARCHAR(255)NOTNULLDEFAULT'',`clientid`VARCHAR(255)NOTNULLDEFAULT'',`action`ENUM('publish','subscribe','all')NOTNULL,`permission`ENUM('allow','deny')NOTNULL,`topic`VARCHAR(255)NOTNULLDEFAULT'',PRIMARYKEY(`id`))ENGINE=InnoDBDEFAULTCHARSET=utf8mb4;
1.4.6.3.配置数据库账户密码
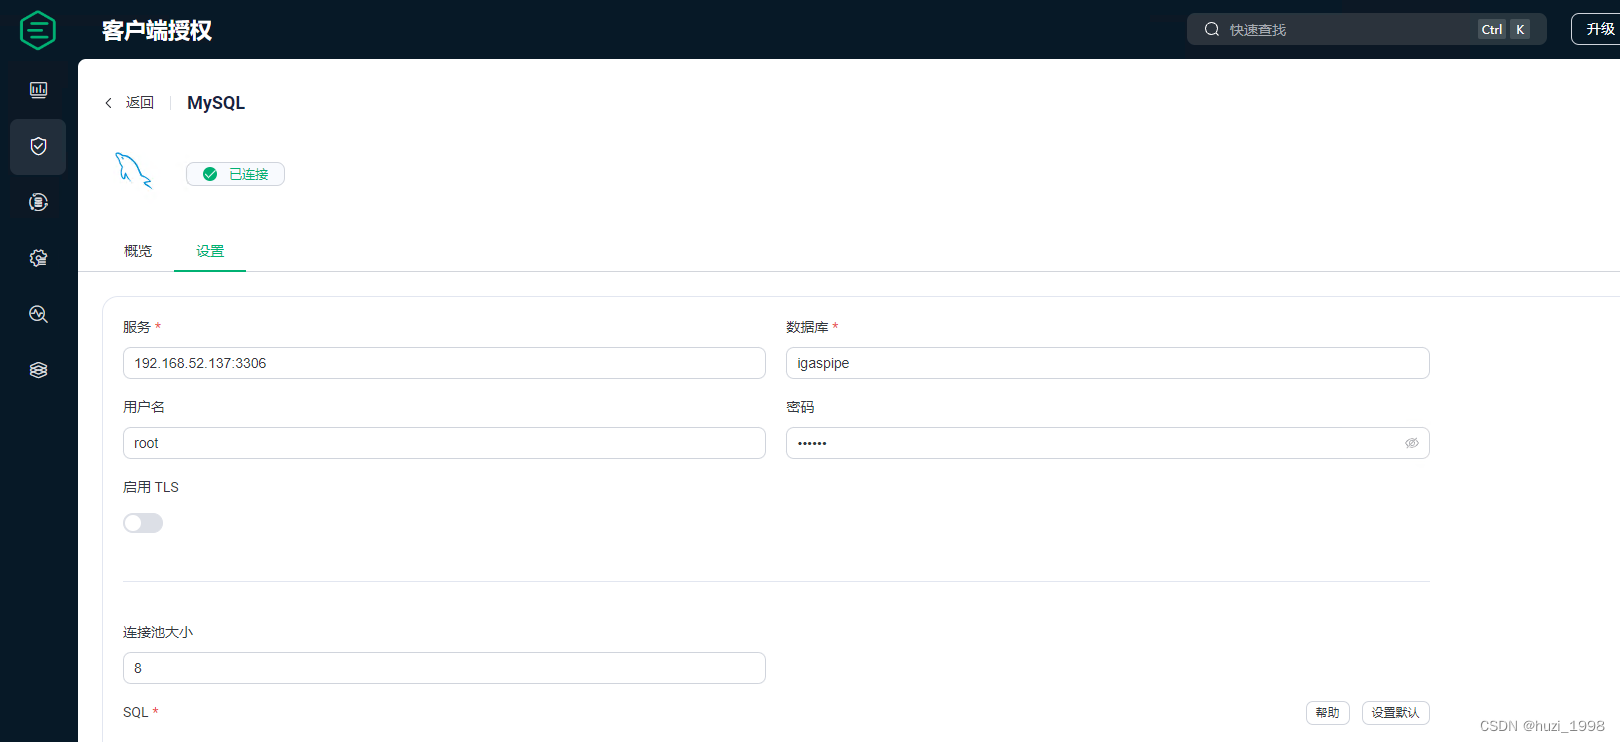
创建成功示意图
1.4.6.4.配置数据库中的acl规则
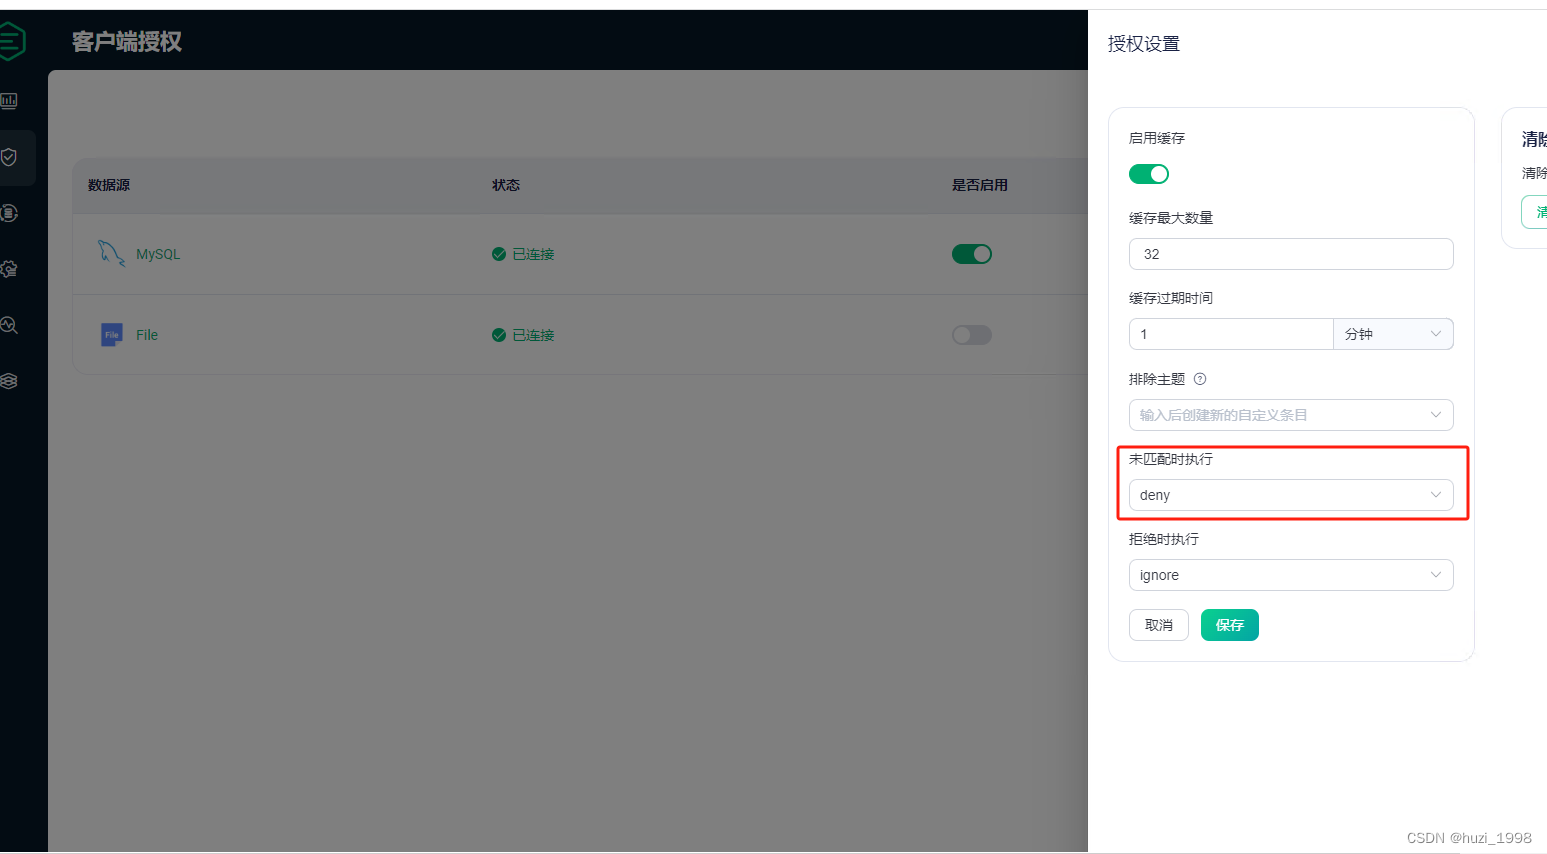
默认情况下,如果没有为 EMQX 设置 ACL(Access Control List,访问控制列表)规则,EMQX将允许所有客户端对所有主题进行发布和订阅。 要实现对客户端发布和订阅请求的拦截,您需要在 MySQL 数据库的 mqtt_acl表中添加相应的 ACL 规则。这些规则定义了客户端对特定主题的操作权限,包括允许或拒绝发布和订阅操作。
一旦 ACL 规则被添加到了mqtt_acl 表中,并且 EMQX 已经配置为使用 MySQL 进行 ACL 认证,EMQX将会根据这些规则来决定是否允许客户端对特定主题进行发布和订阅。 所以,如果您希望 EMQX 对客户端的发布和订阅请求进行拦截,请确保在MySQL 数据库中的 mqtt_acl 表中添加了相应的 ACL 规则,并且 EMQX 已经正确配置为使用 MySQL 进行 ACL认证,但如果mqtt_acl表中没有添加该客户端响应的规则则默认运行该客户端拥有所有主题的订阅及发布权限。
为了解决mqtt_acl中没有为客户端设置权限导致该客户端拥有所有主题的订阅和发布权限,emqx提供了一个关闭功能,一旦选择deny,只要数据库中不存在该客户端,则该客户端就无法无法进行发布和订阅,需要我们手动或者通过代码方式插入sql语句,赋予其对应的发布和订阅某个主题的权限
插入测试用户
INSERTINTO`mqtt_acl`VALUES(1,'','emqx_u','','all','allow','test1/#');INSERTINTO`mqtt_acl`VALUES(2,'','test001','','publish','allow','test1/#');INSERTINTO`mqtt_acl`VALUES(3,'','test001','','subscribe','deny','test1/#');
1.4.6.5.启动mqtt进行测试
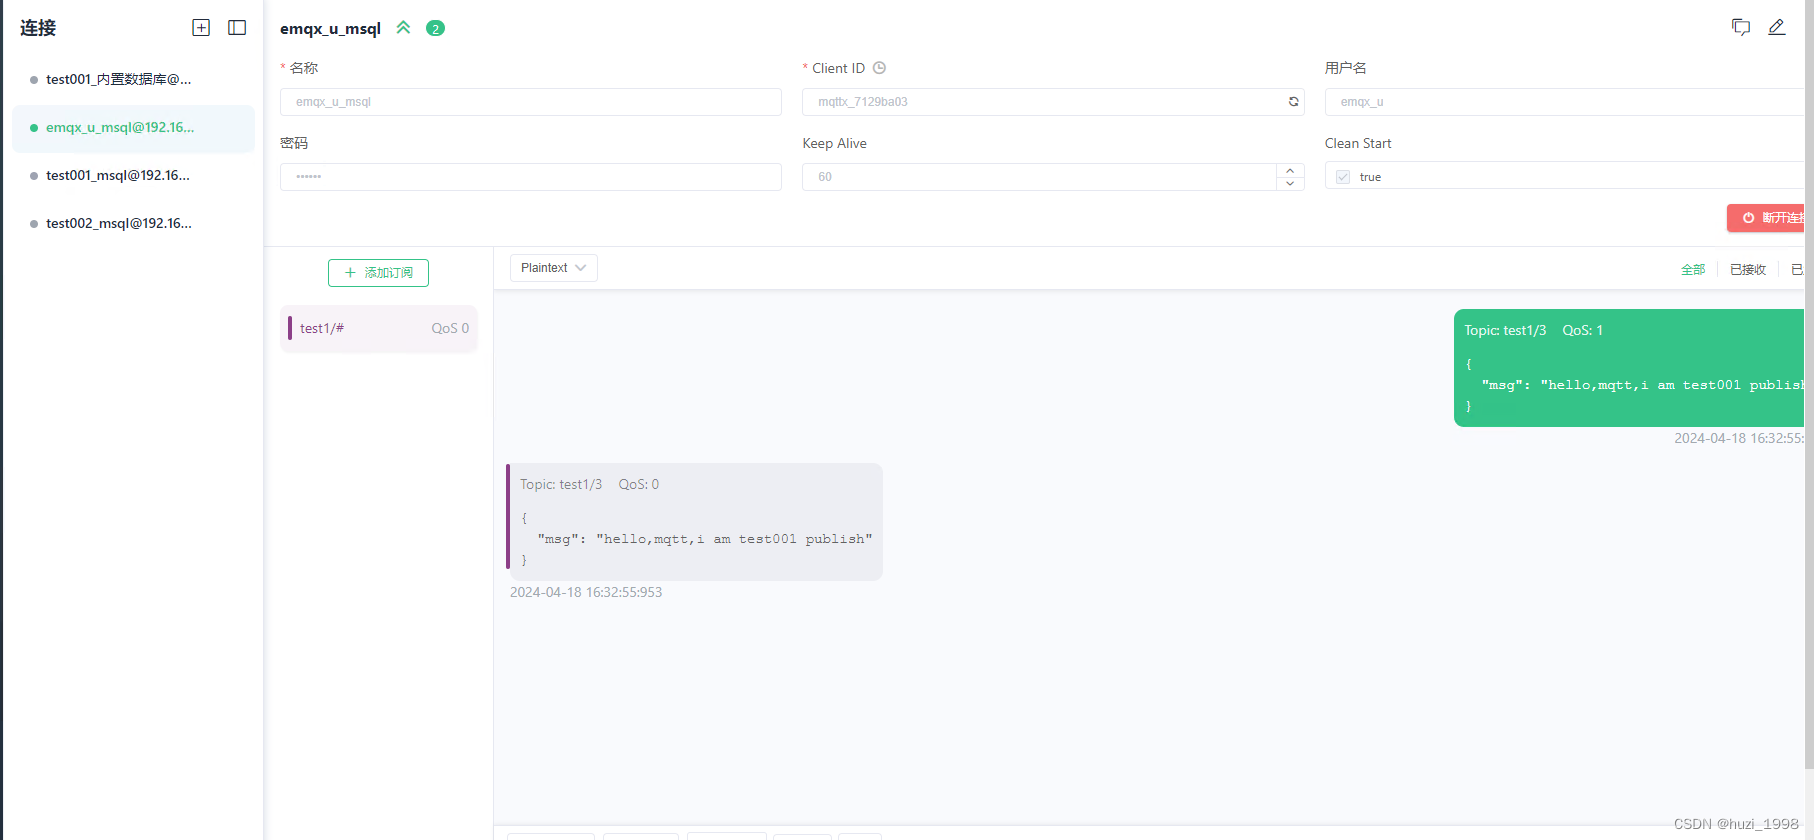
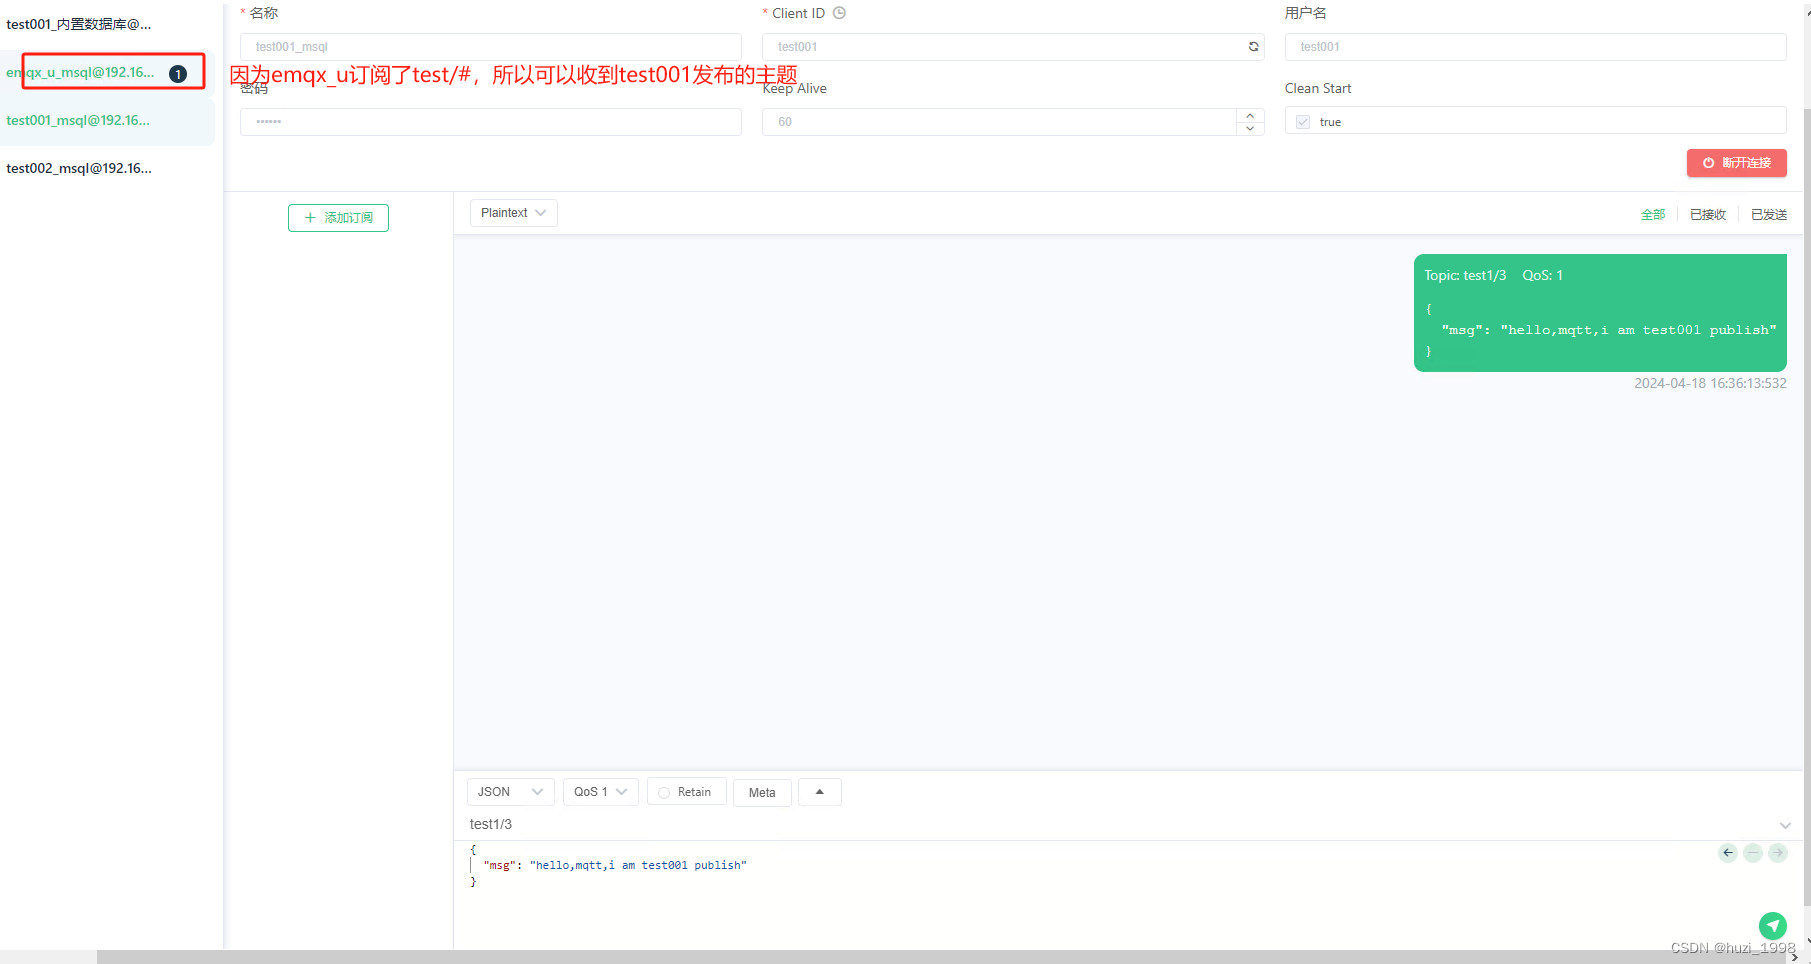
emqx_u支持订阅和发布,所以他能订阅也能发布
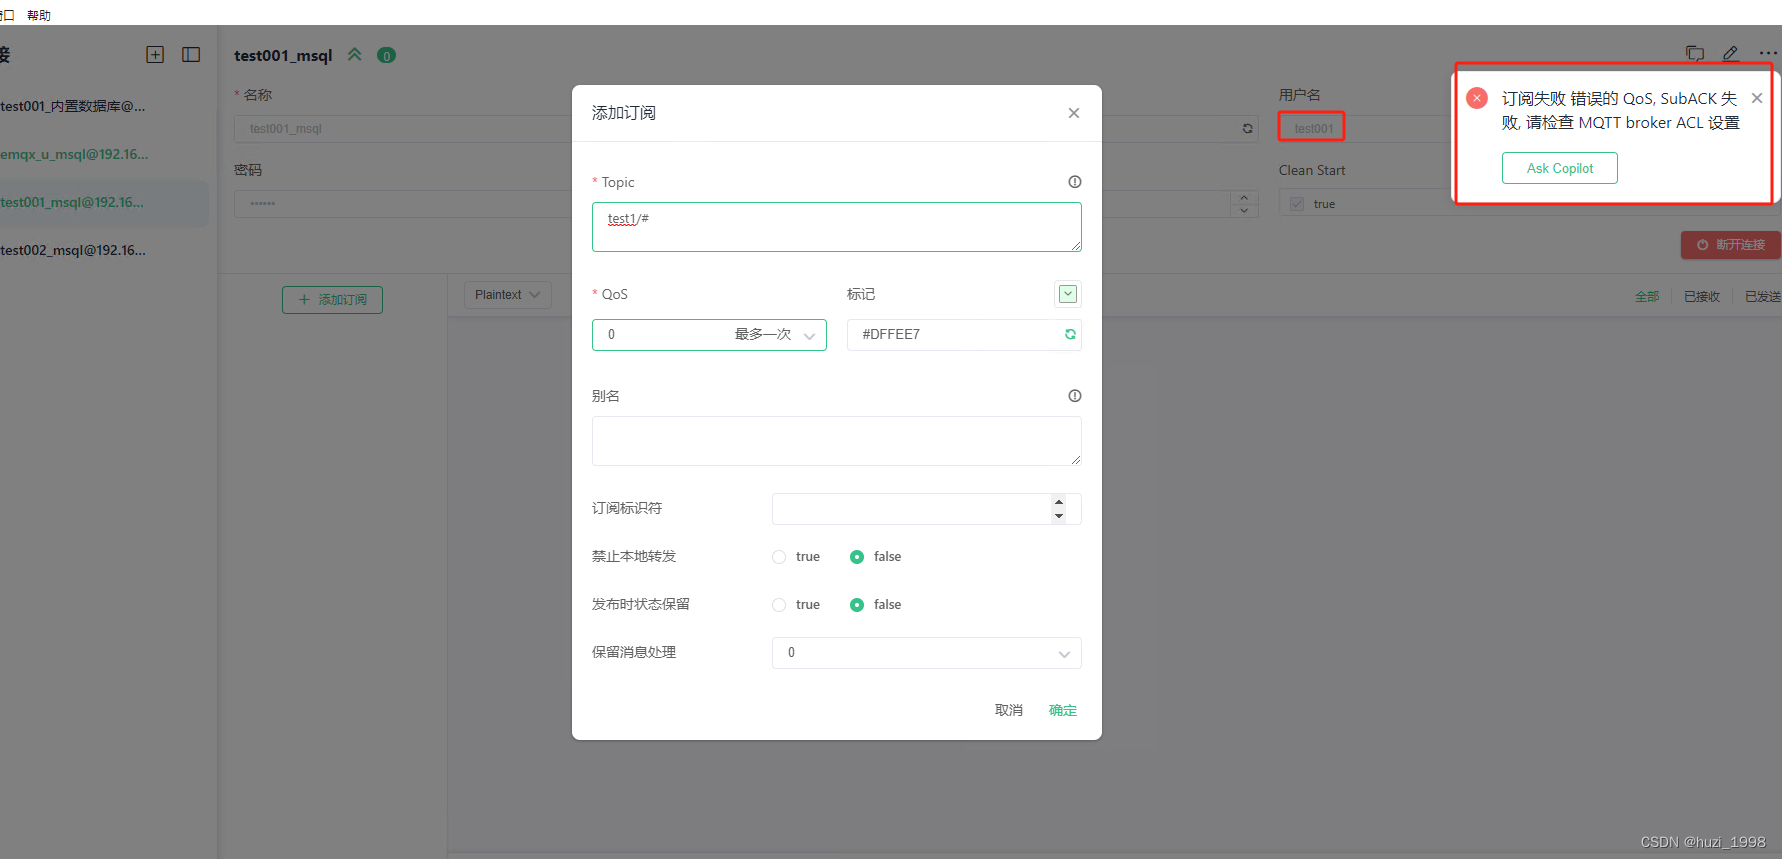
test001只能发布不能订阅
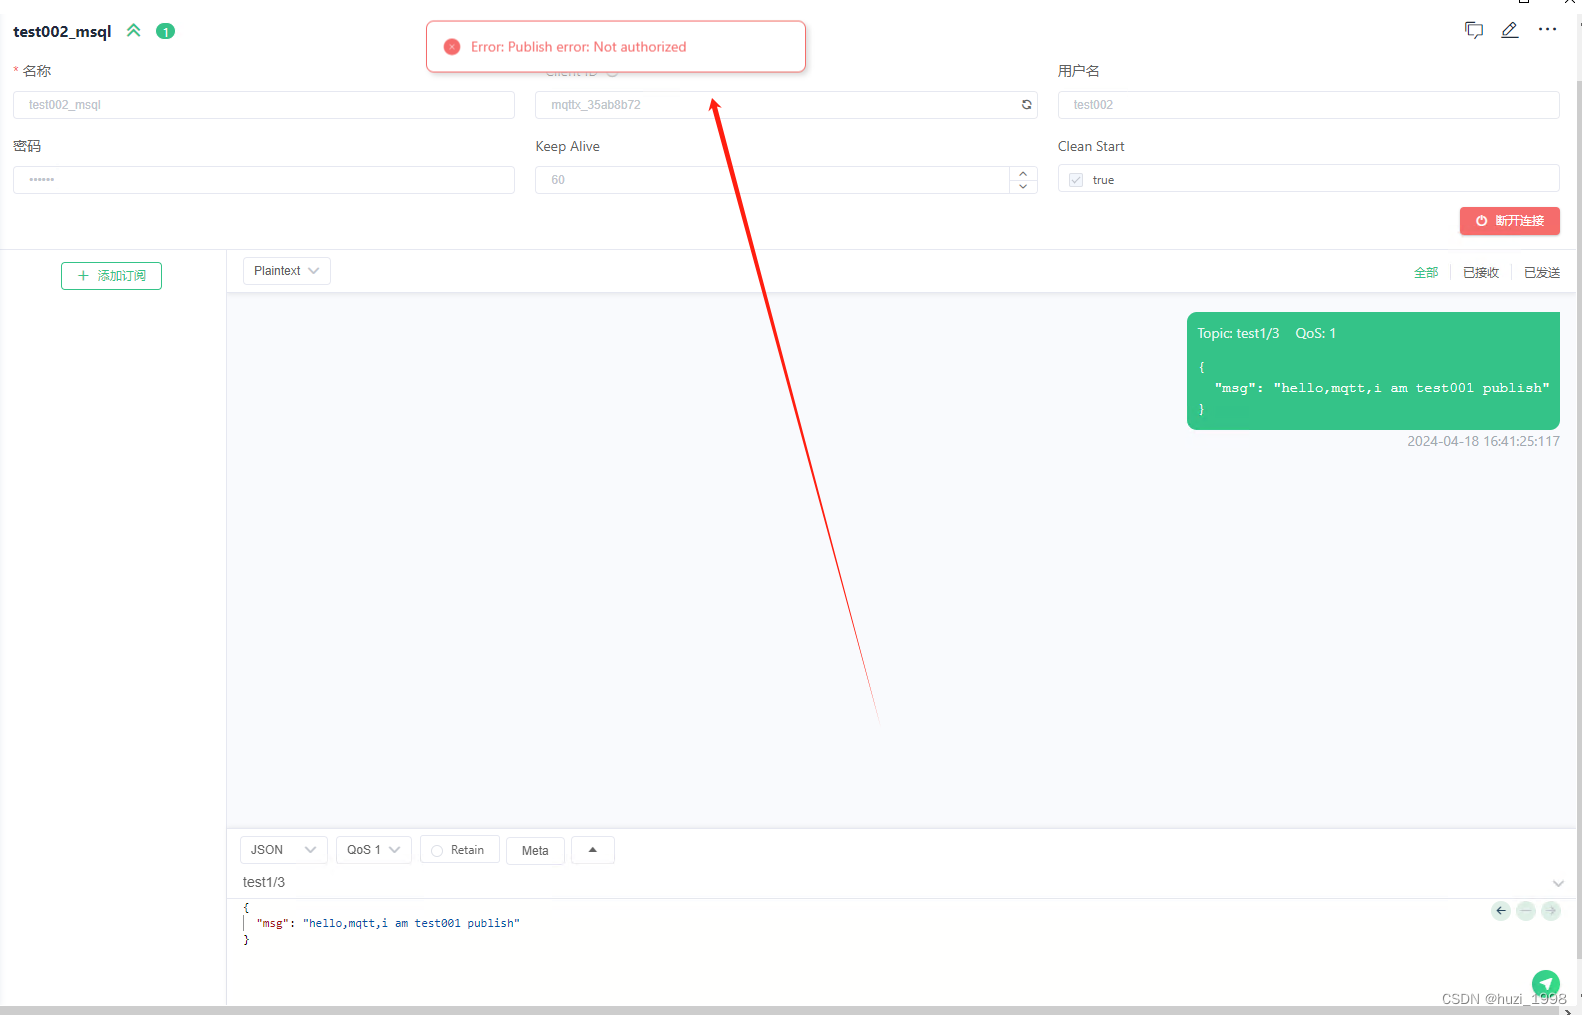
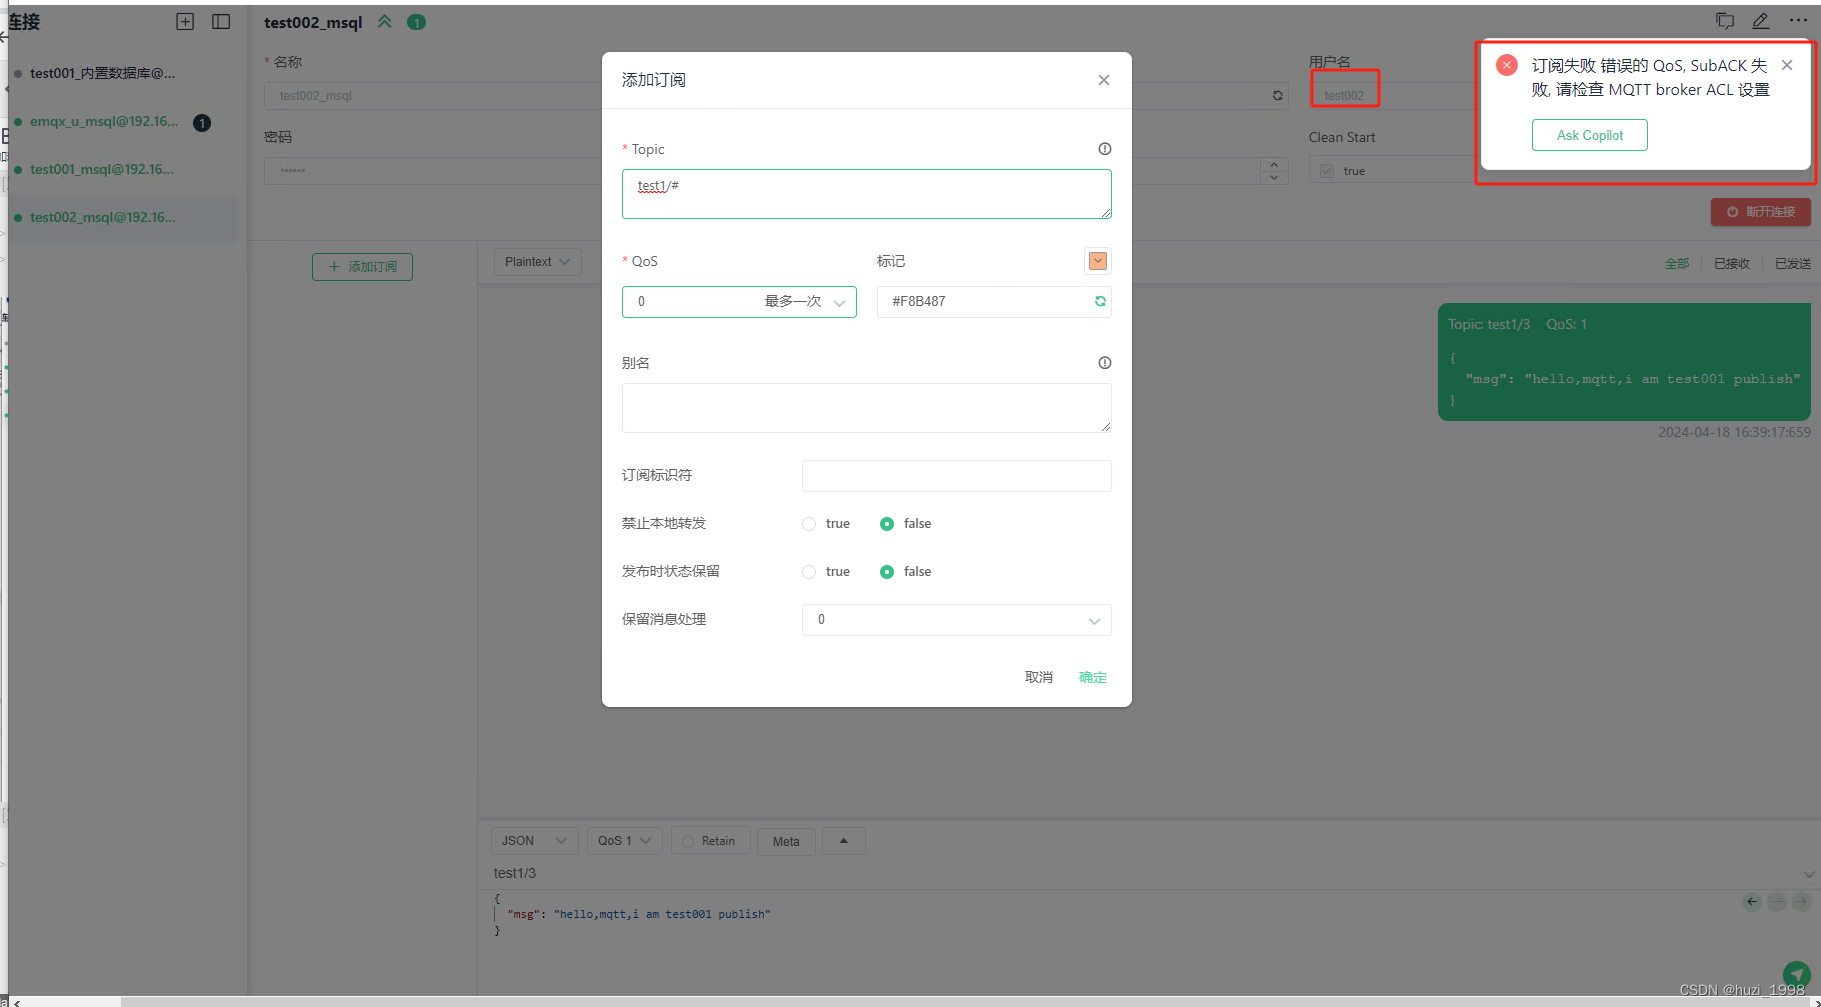
在mqtt_cal中没有test002这个用户,所以他无法发布也无法订阅
1.5.使用idea连接mqtt(内置数据库认证方法)
1.5.1.导入相关依赖
<!-- mqtt依赖 --><dependency><groupId>org.springframework.integration</groupId><artifactId>spring-integration-stream</artifactId></dependency><dependency><groupId>org.springframework.boot</groupId><artifactId>spring-boot-starter-integration</artifactId></dependency><dependency><groupId>org.springframework.integration</groupId><artifactId>spring-integration-mqtt</artifactId></dependency>
1.5.2.在yml中配置相关参数
server:port:10001servlet:context-path: /

spring:application:name: mqtt
  mqtt:# mqtt配置信息url: tcp://192.168.52.137:1883# mqtt服务器地址,默认端口1883,如有多个,用【,】隔开username: test001 # 用户名password:123456# 密码client:# 客户端配置id: subscriber-id # id,唯一标识
1.5.3.编写mqtt订阅者配置类
packagecom.hush.mqtt.config;importorg.eclipse.paho.client.mqttv3.MqttClient;importorg.eclipse.paho.client.mqttv3.MqttConnectOptions;importorg.eclipse.paho.client.mqttv3.MqttException;importorg.eclipse.paho.client.mqttv3.persist.MemoryPersistence;importorg.springframework.beans.factory.annotation.Value;importorg.springframework.context.annotation.Configuration;importjavax.annotation.PostConstruct;importjava.util.Arrays;/**
 * mqtt订阅者配置类
 * @author:hush
 * @createDate:2024-04-18 9:39
 */@ConfigurationpublicclassMqttSubscriberConfig{/**
     * mqtt服务器地址
     */@Value("${spring.mqtt.url}")privateString hostUrl;/**
     * mqtt用户名
     */@Value("${spring.mqtt.username}")privateString userName;/**
     * mqtt密码
     */@Value("${spring.mqtt.password}")privateString password;/**
     * mqtt客户端id
     */@Value("${spring.mqtt.client.id}")privateString clientId;/**
     * 客户端对象
     */privateMqttClient client;publicfinalstaticString[]TOPICLIST={"test1/+",// +匹配单个"test2/#",// #匹配多个};/**
     * 在bean初始化后创建好客户端
     */@PostConstructpublicvoidinit()throwsMqttException{// 创建mqtt客户端对象, new MemoryPersistence将这些数据存储在内存中的一种方式,而不是保存到文件或数据库中。// 需要更可靠的持久化方式,可以考虑使用 FilePersistence 或 MqttDefaultFilePersistence,它们会将数据保存到文件系统中
        client =newMqttClient(hostUrl, clientId,newMemoryPersistence());connect();}/**
     * 连接mqtt服务器
     */publicvoidconnect(){try{// 连接设置MqttConnectOptions options =newMqttConnectOptions();// 是否清空session,设置为false表示服务器会保留客户端的连接记录,客户端重连之后能获取到服务器在客户端断开连接期间推送的消息// 设置为true表示每次连接到服务端都是以新的身份
            options.setCleanSession(true);// 设置连接用户名
            options.setUserName(userName);// 设置密码
            options.setPassword(password.toCharArray());// 设置超时时间,单位秒
            options.setConnectionTimeout(100);// 设置心跳时间,单位秒,表示服务器每隔20秒的时间向客户端发送心跳判断客户端是否在线
            options.setKeepAliveInterval(20);// 设置遗嘱消息,若客户端和服务端连接意外断开,服务器将发布客户端的遗嘱消息// "willTopic":表示遗嘱消息的主题,即客户端断开连接时将会发布这条消息到指定的主题。// (clientId + "与服务器断开连接").getBytes():遗嘱消息的内容,这里是将客户端ID和指定的内容转换为字节数组作为遗嘱消息的内容。// 0:遗嘱消息的 QoS(服务质量),这里设为 0,表示最多发布一次。// false:遗嘱消息的 retain 标志,这里设置为 false,表示不需要保留。
            options.setWill("willTopic",(clientId +"与服务器断开连接").getBytes(),0,false);//设置回调
            client.setCallback(newMqttSubscriberCallBack());
            client.connect(options);// 创建了一个整型数组 qos,用于指定订阅每个主题的 QoS 等级。在这个例子中,将每个主题的 QoS 等级都设置为 1。QoS 等级表示消息传递的可靠性级别,通常有三种等级:0、1 和 2。在这里,QoS 等级为 1 表示消息会至少被传输一次。int[] qos =newint[TOPICLIST.length];Arrays.fill(qos,1);// 创建了一个字符串数组 topics,用于指定要订阅的 MQTT 主题。在这个例子中,订阅了两个主题,分别是 "topic1" 和 "topic2"。String[] topics =TOPICLIST;// 调用 MQTT 客户端的 subscribe 方法来订阅指定的主题。该方法接受两个参数:主题数组 topics 和 QoS 数组 qos,用于指定每个主题的订阅选项。通过调用这个方法,MQTT 客户端将会向 MQTT 服务器发送订阅请求,并订阅指定的主题,同时指定每个主题的 QoS 等级。
            client.subscribe(topics, qos);}catch(MqttException e){
            e.printStackTrace();}}/**
     * 断开连接
     */publicvoiddisConnect()throwsMqttException{
        client.disconnect();}/**
     * 判断客户端是否已经连接
     * @return
     */publicbooleanisConnected(){return client.isConnected();}}
1.5.4.编写订阅者回调函数
packagecom.hush.mqtt.config;importorg.eclipse.paho.client.mqttv3.IMqttDeliveryToken;importorg.eclipse.paho.client.mqttv3.MqttCallback;importorg.eclipse.paho.client.mqttv3.MqttMessage;importorg.springframework.context.annotation.Configuration;/**
 * 订阅者消息回调
 * @author:hush
 * @createDate:2024-04-18 9:48
 */@ConfigurationpublicclassMqttSubscriberCallBackimplementsMqttCallback{/**
     * 客户端与服务器断开连接
     * @param throwable
     */@OverridepublicvoidconnectionLost(Throwable throwable){}/**
     * 消息到达回调
     * @param s 主题
     * @param mqttMessage 消息内容体
     * @throws Exception
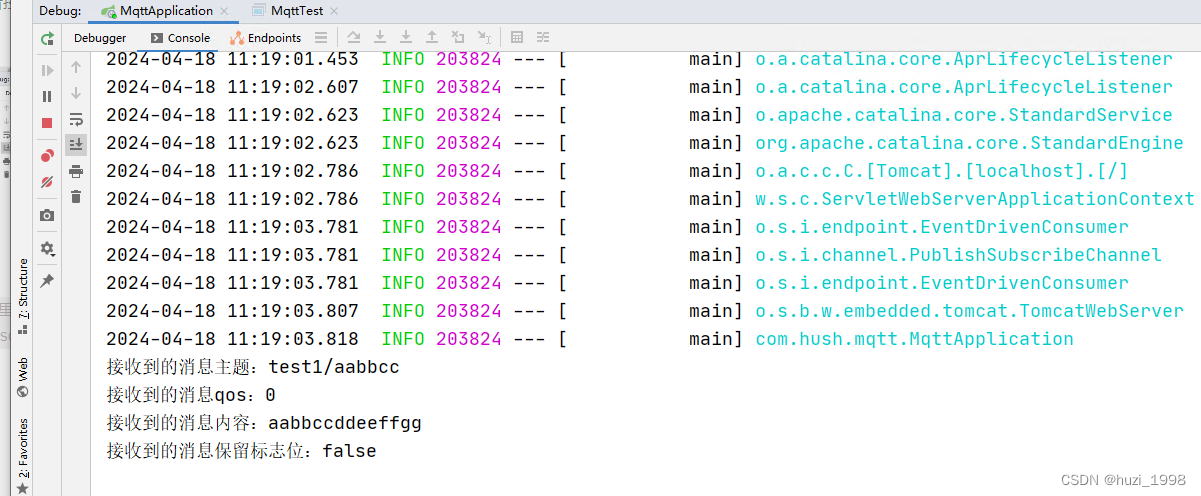
     */@OverridepublicvoidmessageArrived(String s,MqttMessage mqttMessage)throwsException{System.out.println("接收到的消息主题:"+ s);System.out.println("接收到的消息qos:"+ mqttMessage.getQos());System.out.println("接收到的消息内容:"+newString(mqttMessage.getPayload()));System.out.println("接收到的消息保留标志位:"+ mqttMessage.isRetained());}/**
     * 消息发布成功回调
     * @param iMqttDeliveryToken
     */@OverridepublicvoiddeliveryComplete(IMqttDeliveryToken iMqttDeliveryToken){}}
1.5.5.编写测试方法发布主题
不要用加有@SpringBootTest的类,他关闭的时候会把订阅服务也一起关闭了,自定义一个test类,应该是前面加的订阅者回调加了@Configuration,spring启动的时候就会把他当成配置类注入到ioc中,所以当我们在加有@SpringBootTest的类中进行连接及发布消息时,他会调用订阅者回调,然后关闭时候一并关闭了
packagecom.hush.mqtt;importorg.eclipse.paho.client.mqttv3.*;importorg.eclipse.paho.client.mqttv3.persist.MemoryPersistence;importstaticorg.eclipse.paho.client.mqttv3.MqttConnectOptions.MQTT_VERSION_3_1_1;/**
 * @author:hush
 * @createDate:2024-04-18 11:16
 */publicclassMqttTest{publicstaticvoidmain(String[] args)throwsMqttException{mqttSendTest();}staticvoidmqttSendTest()throwsMqttException{String pubTopic=String.format("test1/%s","aabbcc");String content="aabbccddeeffgg";// MQTT connection optionMqttConnectOptions connOpts =newMqttConnectOptions();
        connOpts.setMqttVersion(MQTT_VERSION_3_1_1);
        connOpts.setUserName("test001");
        connOpts.setPassword("123456".toCharArray());// retain session
        connOpts.setCleanSession(true);MqttClient client =newMqttClient("tcp://192.168.52.137:1883","testSend001",newMemoryPersistence());// set callback
        client.setCallback(newMqttCallback(){@OverridepublicvoidconnectionLost(Throwable throwable){
                throwable.printStackTrace();}@OverridepublicvoidmessageArrived(String s,MqttMessage mqttMessage)throwsException{System.out.println("messageArrived:\n"+s);}@OverridepublicvoiddeliveryComplete(IMqttDeliveryToken iMqttDeliveryToken){try{System.out.println("deliveryComplete:\n"+iMqttDeliveryToken.getMessage());}catch(MqttException e){
                    e.printStackTrace();}}});

        client.connect(connOpts);System.out.println("Connected");// Required parameters for message publishingMqttMessage message =newMqttMessage(content.getBytes());
        message.setQos(0);
        client.publish(pubTopic, message);System.out.println("Message published");

        client.disconnect();System.out.println("Disconnected");
        client.close();}}
1.5.6.运行结果
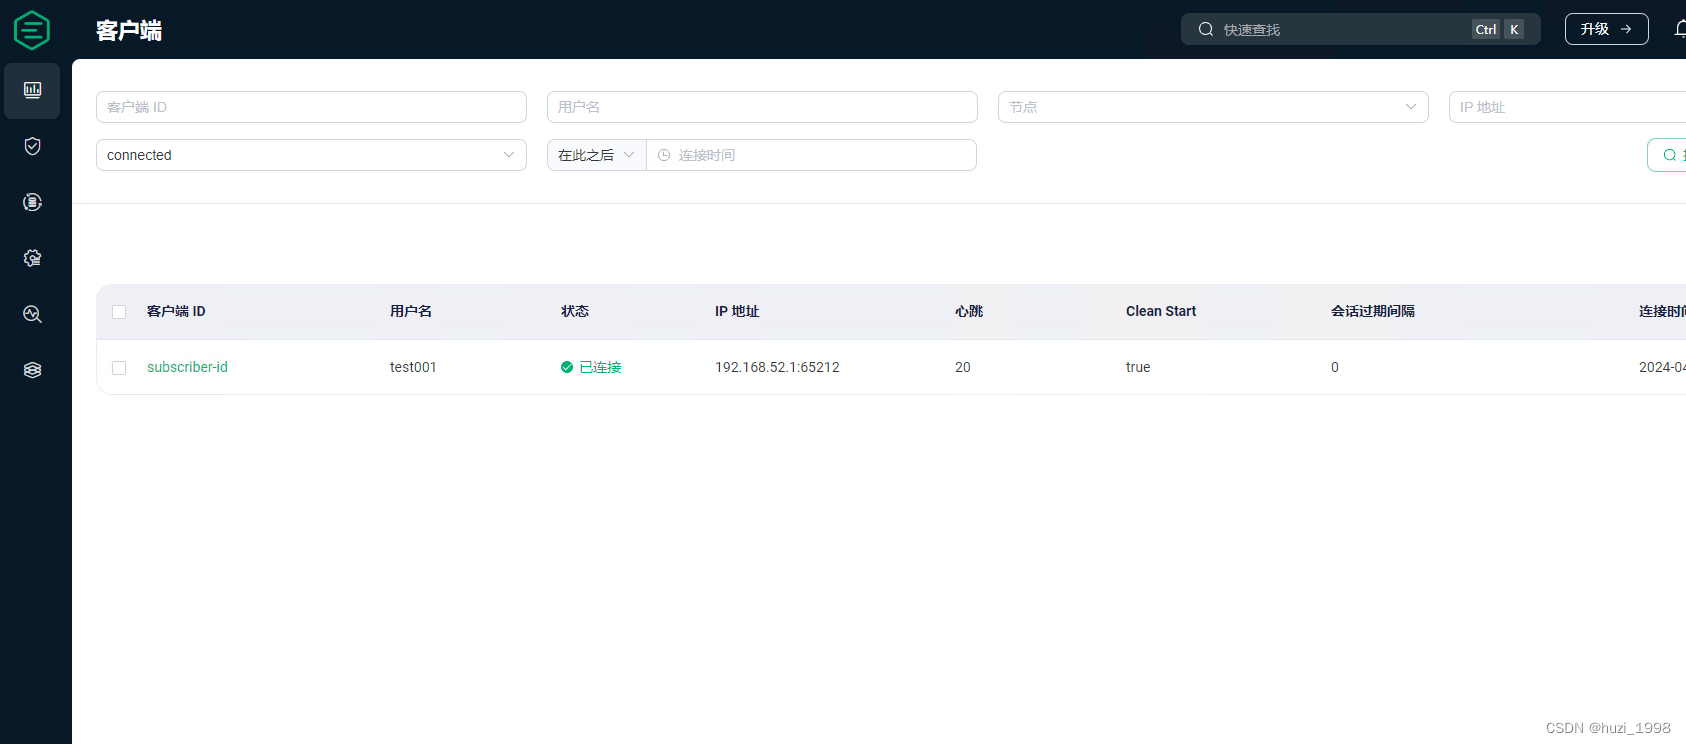
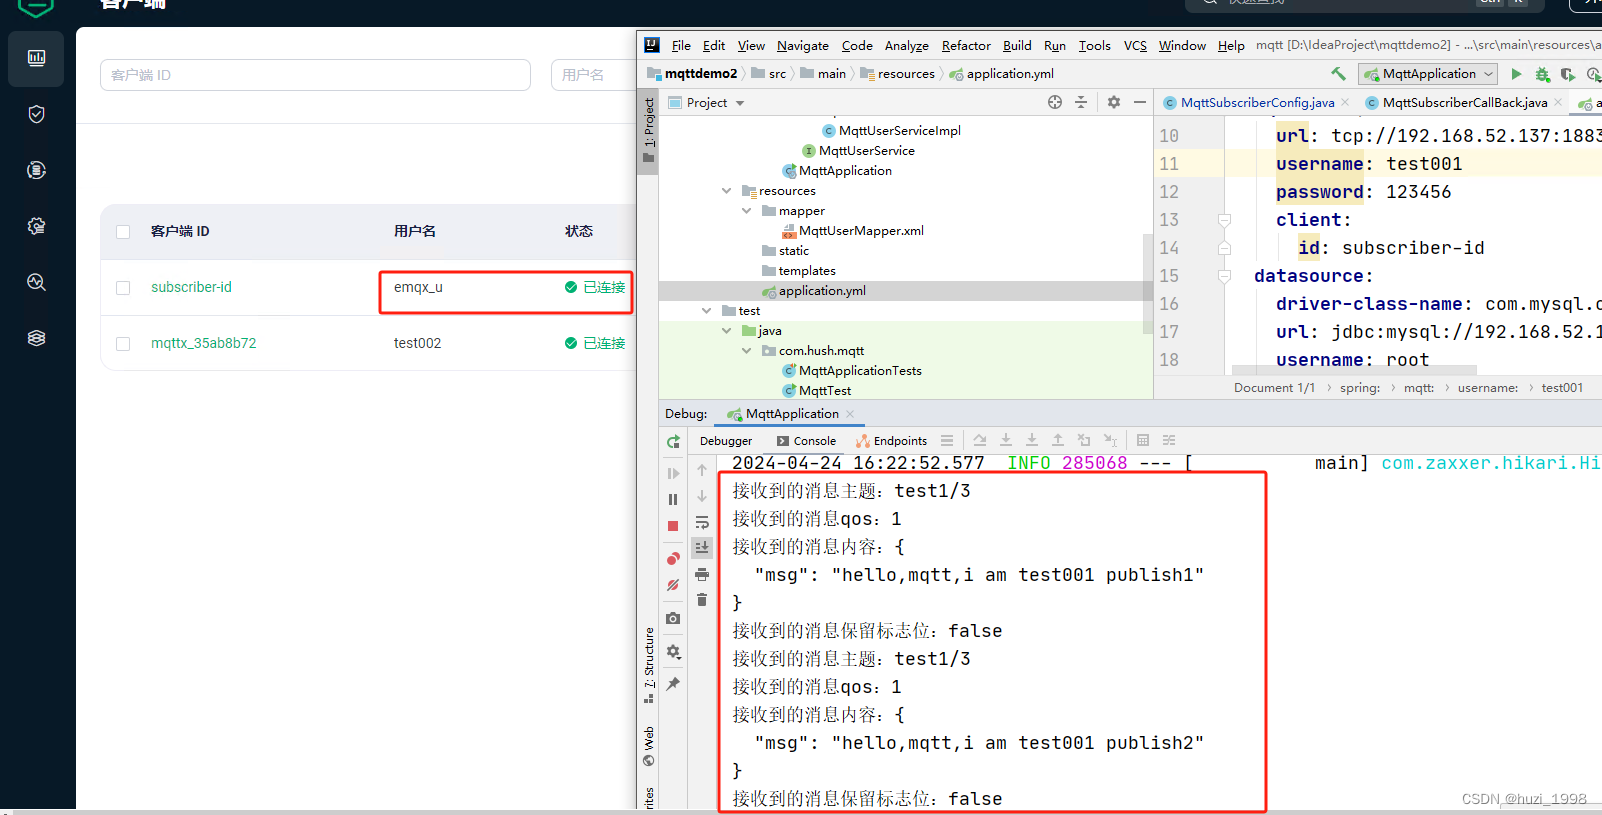
启动springboot可以看到客户端id为subscriber-id已经连接成功
启动测试案例,可以看到客户端id为testSend001已经连接成功
查看控制台
1.6.使用idea连接mqtt(mysql认证方法)采用mybatisplus
使用数据库验证时记得把emqx中的数据库认证打开
1.6.1.导入相关依赖
<!--mysql依赖--><dependency><groupId>com.mysql</groupId><artifactId>mysql-connector-j</artifactId><scope>runtime</scope></dependency><!-- lombok辅助类(@Data,@Slf4j等相关依赖) --><dependency><groupId>org.projectlombok</groupId><artifactId>lombok</artifactId><version>1.18.26</version><scope>compile</scope></dependency><!--mybatis-plus数据库操作依赖--><dependency><groupId>com.baomidou</groupId><artifactId>mybatis-plus-boot-starter</artifactId><version>3.4.3</version></dependency>
1.6.2.在yml中添加数据库配置
datasource:driver-class-name: com.mysql.cj.jdbc.Driver
    url: jdbc:mysql://192.168.52.137:3306/igaspipe?useUnicode=true&characterEncoding=utf-8&useSSL=true&serverTimezone=Asia/Shanghaiusername: 数据库用户名
    password: 数据库密码
1.6.3.用mybatisplus插件生成实体类,service类,controller层,mapper类
controller层
packagecom.hush.mqtt.controller;importorg.springframework.web.bind.annotation.RequestMapping;importorg.springframework.web.bind.annotation.RestController;/**
 * <p>
 *  前端控制器
 * </p>
 *
 * @author hush
 * @since 2024-04-18
 */@RestController@RequestMapping("/mqtt-user")publicclassMqttUserController{}
entity类
packagecom.hush.mqtt.entity;importcom.baomidou.mybatisplus.annotation.IdType;importcom.baomidou.mybatisplus.annotation.TableId;importlombok.Data;importlombok.EqualsAndHashCode;importlombok.experimental.Accessors;importjava.io.Serializable;importjava.time.LocalDateTime;/**
 * <p>
 *
 * </p>
 *
 * @author hush
 * @since 2024-04-18
 */@Data@EqualsAndHashCode(callSuper =false)@Accessors(chain =true)publicclassMqttUserimplementsSerializable{privatestaticfinallong serialVersionUID =1L;@TableId(value ="id", type =IdType.AUTO)privateInteger id;privateString username;privateString passwordHash;privateString salt;privateBoolean isSuperuser;privateLocalDateTime created;}
mapper类
packagecom.hush.mqtt.mapper;importcom.baomidou.mybatisplus.core.mapper.BaseMapper;importcom.hush.mqtt.entity.MqttUser;/**
 * <p>
 *  Mapper 接口
 * </p>
 *
 * @author hush
 * @since 2024-04-18
 */publicinterfaceMqttUserMapperextendsBaseMapper<MqttUser>{}
service及impl
packagecom.hush.mqtt.service;importcom.baomidou.mybatisplus.extension.service.IService;importcom.hush.mqtt.entity.MqttUser;/**
 * <p>
 *  服务类
 * </p>
 *
 * @author hush
 * @since 2024-04-18
 */publicinterfaceMqttUserServiceextendsIService<MqttUser>{}
packagecom.hush.mqtt.service.impl;importcom.baomidou.mybatisplus.extension.service.impl.ServiceImpl;importcom.hush.mqtt.entity.MqttUser;importcom.hush.mqtt.mapper.MqttUserMapper;importcom.hush.mqtt.service.MqttUserService;importorg.springframework.stereotype.Service;/**
 * <p>
 *  服务实现类
 * </p>
 *
 * @author hush
 * @since 2024-04-18
 */@ServicepublicclassMqttUserServiceImplextendsServiceImpl<MqttUserMapper,MqttUser>implementsMqttUserService{}
resource下的mapper.xml
<?xml version="1.0" encoding="UTF-8"?><!DOCTYPEmapperPUBLIC"-//mybatis.org//DTD Mapper 3.0//EN""http://mybatis.org/dtd/mybatis-3-mapper.dtd"><mappernamespace="com.hush.mqtt.mapper.MqttUserMapper"></mapper>
在application中添加mapper组件扫描
@SpringBootApplication@MapperScan("com.hush.mqtt.mapper")publicclassMqttApplication{publicstaticvoidmain(String[] args){SpringApplication.run(MqttApplication.class, args);}}
1.6.4.编写测试案例测试查询
packagecom.hush.mqtt;importcom.hush.mqtt.entity.MqttUser;importcom.hush.mqtt.service.MqttUserService;importorg.junit.jupiter.api.Test;importorg.springframework.boot.test.context.SpringBootTest;importjavax.annotation.Resource;importjava.util.List;@SpringBootTestclassMqttApplicationTests{@ResourceprivateMqttUserService mqttUserService;@TestvoidtestSelect(){List<MqttUser> list = mqttUserService.list();
        list.forEach(mqttUser ->System.out.println(mqttUser));}}
1.6.5.执行结果

1.6.6.修改MqttSubscriberConfig
packagecom.hush.mqtt.config;importcom.hush.mqtt.entity.MqttUser;importcom.hush.mqtt.service.MqttUserService;importorg.eclipse.paho.client.mqttv3.MqttClient;importorg.eclipse.paho.client.mqttv3.MqttConnectOptions;importorg.eclipse.paho.client.mqttv3.MqttException;importorg.eclipse.paho.client.mqttv3.persist.MemoryPersistence;importorg.springframework.beans.factory.annotation.Value;importorg.springframework.context.annotation.Configuration;importjavax.annotation.PostConstruct;importjavax.annotation.Resource;importjava.util.Arrays;importjava.util.List;/**
 * mqtt订阅者配置类
 * @author:hush
 * @createDate:2024-04-18 9:39
 */@ConfigurationpublicclassMqttSubscriberConfig{/**
     * mqtt服务器地址
     */@Value("${spring.mqtt.url}")privateString hostUrl;/**
     * mqtt用户名
     */@Value("${spring.mqtt.username}")privateString userName;/**
     * mqtt密码
     */@Value("${spring.mqtt.password}")privateString password;/**
     * mqtt客户端id
     */@Value("${spring.mqtt.client.id}")privateString clientId;/**
     * 客户端对象
     */privateMqttClient client;publicfinalstaticString[]TOPICLIST={"test1/+",// +匹配单个"test2/#",// #匹配多个};@ResourceprivateMqttUserService mqttUserService;/**
     * 在bean初始化后创建好客户端
     */@PostConstructpublicvoidinit()throwsMqttException{connect();}/**
     * 连接mqtt服务器
     */publicvoidconnect(){try{// 获取数据库中的用户MqttUser mqttUser = mqttUserService.list().get(0);
            userName = mqttUser.getUsername();//sha-256的哈希运算是单向的,无法反推,这里直接写死
            password ="public";// 连接设置MqttConnectOptions options =newMqttConnectOptions();// 是否清空session,设置为false表示服务器会保留客户端的连接记录,客户端重连之后能获取到服务器在客户端断开连接期间推送的消息// 设置为true表示每次连接到服务端都是以新的身份
            options.setCleanSession(true);// 设置连接用户名
            options.setUserName(userName);// 设置密码
            options.setPassword(password.toCharArray());// 设置超时时间,单位秒
            options.setConnectionTimeout(100);// 设置心跳时间,单位秒,表示服务器每隔20秒的时间向客户端发送心跳判断客户端是否在线
            options.setKeepAliveInterval(20);// 设置遗嘱消息,若客户端和服务端连接意外断开,服务器将发布客户端的遗嘱消息// "willTopic":表示遗嘱消息的主题,即客户端断开连接时将会发布这条消息到指定的主题。// (clientId + "与服务器断开连接").getBytes():遗嘱消息的内容,这里是将客户端ID和指定的内容转换为字节数组作为遗嘱消息的内容。// 0:遗嘱消息的 QoS(服务质量),这里设为 0,表示最多发布一次。// false:遗嘱消息的 retain 标志,这里设置为 false,表示不需要保留。
            options.setWill("willTopic",(clientId +"与服务器断开连接").getBytes(),0,false);// 创建mqtt客户端对象, new MemoryPersistence将这些数据存储在内存中的一种方式,而不是保存到文件或数据库中。// 需要更可靠的持久化方式,可以考虑使用 FilePersistence 或 MqttDefaultFilePersistence,它们会将数据保存到文件系统中
            client =newMqttClient(hostUrl, clientId,newMemoryPersistence());//设置回调
            client.setCallback(newMqttSubscriberCallBack());
            client.connect(options);// 创建了一个整型数组 qos,用于指定订阅每个主题的 QoS 等级。在这个例子中,将每个主题的 QoS 等级都设置为 1。QoS 等级表示消息传递的可靠性级别,通常有三种等级:0、1 和 2。在这里,QoS 等级为 1 表示消息会至少被传输一次。int[] qos =newint[TOPICLIST.length];Arrays.fill(qos,1);// 创建了一个字符串数组 topics,用于指定要订阅的 MQTT 主题。在这个例子中,订阅了两个主题,分别是 "topic1" 和 "topic2"。String[] topics =TOPICLIST;// 调用 MQTT 客户端的 subscribe 方法来订阅指定的主题。该方法接受两个参数:主题数组 topics 和 QoS 数组 qos,用于指定每个主题的订阅选项。通过调用这个方法,MQTT 客户端将会向 MQTT 服务器发送订阅请求,并订阅指定的主题,同时指定每个主题的 QoS 等级。
            client.subscribe(topics, qos);}catch(MqttException e){
            e.printStackTrace();}}/**
     * 断开连接
     */publicvoiddisConnect()throwsMqttException{
        client.disconnect();}/**
     * 判断客户端是否已经连接
     * @return
     */publicbooleanisConnected(){return client.isConnected();}}
1.6.7.修改MqttTest
packagecom.hush.mqtt;importorg.eclipse.paho.client.mqttv3.*;importorg.eclipse.paho.client.mqttv3.persist.MemoryPersistence;importstaticorg.eclipse.paho.client.mqttv3.MqttConnectOptions.MQTT_VERSION_3_1_1;/**
 * @author:hush
 * @createDate:2024-04-18 11:16
 */publicclassMqttTest{publicstaticvoidmain(String[] args)throwsMqttException{mqttSendTest();}staticvoidmqttSendTest()throwsMqttException{String pubTopic=String.format("test1/%s","aabbcc");String content="aabbccddeeffgg";// MQTT connection optionMqttConnectOptions connOpts =newMqttConnectOptions();
        connOpts.setMqttVersion(MQTT_VERSION_3_1_1);//        connOpts.setUserName("test001");//        connOpts.setPassword("123456".toCharArray());
        connOpts.setUserName("test001");
        connOpts.setPassword("public".toCharArray());// retain session
        connOpts.setCleanSession(true);MqttClient client =newMqttClient("tcp://192.168.52.137:1883","testSend001",newMemoryPersistence());// set callback
        client.setCallback(newMqttCallback(){@OverridepublicvoidconnectionLost(Throwable throwable){
                throwable.printStackTrace();}@OverridepublicvoidmessageArrived(String s,MqttMessage mqttMessage)throwsException{System.out.println("messageArrived:\n"+s);}@OverridepublicvoiddeliveryComplete(IMqttDeliveryToken iMqttDeliveryToken){try{System.out.println("deliveryComplete:\n"+iMqttDeliveryToken.getMessage());}catch(MqttException e){
                    e.printStackTrace();}}});

        client.connect(connOpts);System.out.println("Connected");// Required parameters for message publishingMqttMessage message =newMqttMessage(content.getBytes());
        message.setQos(0);
        client.publish(pubTopic, message);System.out.println("Message published");

        client.disconnect();System.out.println("Disconnected");
        client.close();}}
1.7.处理订阅者断开导致发布者消息丢失问题
实际过程中可能出现订阅者断开连接,而发布者还不知情,一直在发布消息,此时就会导致发布者的消息出现丢失,所以我们要对代码进行修改,以便在订阅者断开连接时可以保留发布者的消息
1.7.1.修改MqttSubscriberConfig


以下是源码:
/**
     * 连接mqtt服务器
     */publicvoidconnect(){try{MqttUser mqttUser = mqttUserService.list().get(0);
            userName = mqttUser.getUsername();//sha-256的哈希运算是单向的,无法反推,这里直接写死
            password ="public";// 连接设置MqttConnectOptions options =newMqttConnectOptions();// 是否清空session,设置为false表示服务器会保留客户端的连接记录,客户端重连之后能获取到服务器在客户端断开连接期间推送的消息// 设置为true表示每次连接到服务端都是以新的身份
            options.setCleanSession(false);// 设置连接用户名
            options.setUserName(userName);// 设置密码
            options.setPassword(password.toCharArray());// 设置超时时间,单位秒
            options.setConnectionTimeout(100);// 设置心跳时间,单位秒,表示服务器每隔20秒的时间向客户端发送心跳判断客户端是否在线
            options.setKeepAliveInterval(20);// 设置遗嘱消息,若客户端和服务端连接意外断开,服务器将发布客户端的遗嘱消息// "willTopic":表示遗嘱消息的主题,即客户端断开连接时将会发布这条消息到指定的主题。// (clientId + "与服务器断开连接").getBytes():遗嘱消息的内容,这里是将客户端ID和指定的内容转换为字节数组作为遗嘱消息的内容。// 0:遗嘱消息的 QoS(服务质量),这里设为 0,表示最多发布一次。// false:遗嘱消息的 retain 标志,这里设置为 false,表示不需要保留。
            options.setWill("willTopic",(clientId +"与服务器断开连接").getBytes(),0,false);// 创建mqtt客户端对象, new MemoryPersistence将这些数据存储在内存中的一种方式,而不是保存到文件或数据库中。// 需要更可靠的持久化方式,可以考虑使用 FilePersistence 或 MqttDefaultFilePersistence,它们会将数据保存到文件系统中//            client = new MqttClient(hostUrl, clientId, new MemoryPersistence());//  new MqttDefaultFilePersistence()将消息和会话数据默认存放到当前工作目录
            client =newMqttClient(hostUrl, clientId,newMqttDefaultFilePersistence());//设置回调
            client.setCallback(newMqttSubscriberCallBack());
            client.connect(options);// 创建了一个整型数组 qos,用于指定订阅每个主题的 QoS 等级。在这个例子中,将每个主题的 QoS 等级都设置为 1。QoS 等级表示消息传递的可靠性级别,通常有三种等级:0、1 和 2。在这里,QoS 等级为 1 表示消息会至少被传输一次。int[] qos =newint[TOPICLIST.length];Arrays.fill(qos,1);// 创建了一个字符串数组 topics,用于指定要订阅的 MQTT 主题。在这个例子中,订阅了两个主题,分别是 "topic1" 和 "topic2"。String[] topics =TOPICLIST;// 调用 MQTT 客户端的 subscribe 方法来订阅指定的主题。该方法接受两个参数:主题数组 topics 和 QoS 数组 qos,用于指定每个主题的订阅选项。通过调用这个方法,MQTT 客户端将会向 MQTT 服务器发送订阅请求,并订阅指定的主题,同时指定每个主题的 QoS 等级。
            client.subscribe(topics, qos);}catch(MqttException e){
            e.printStackTrace();}}
1.7.3.测试示意图
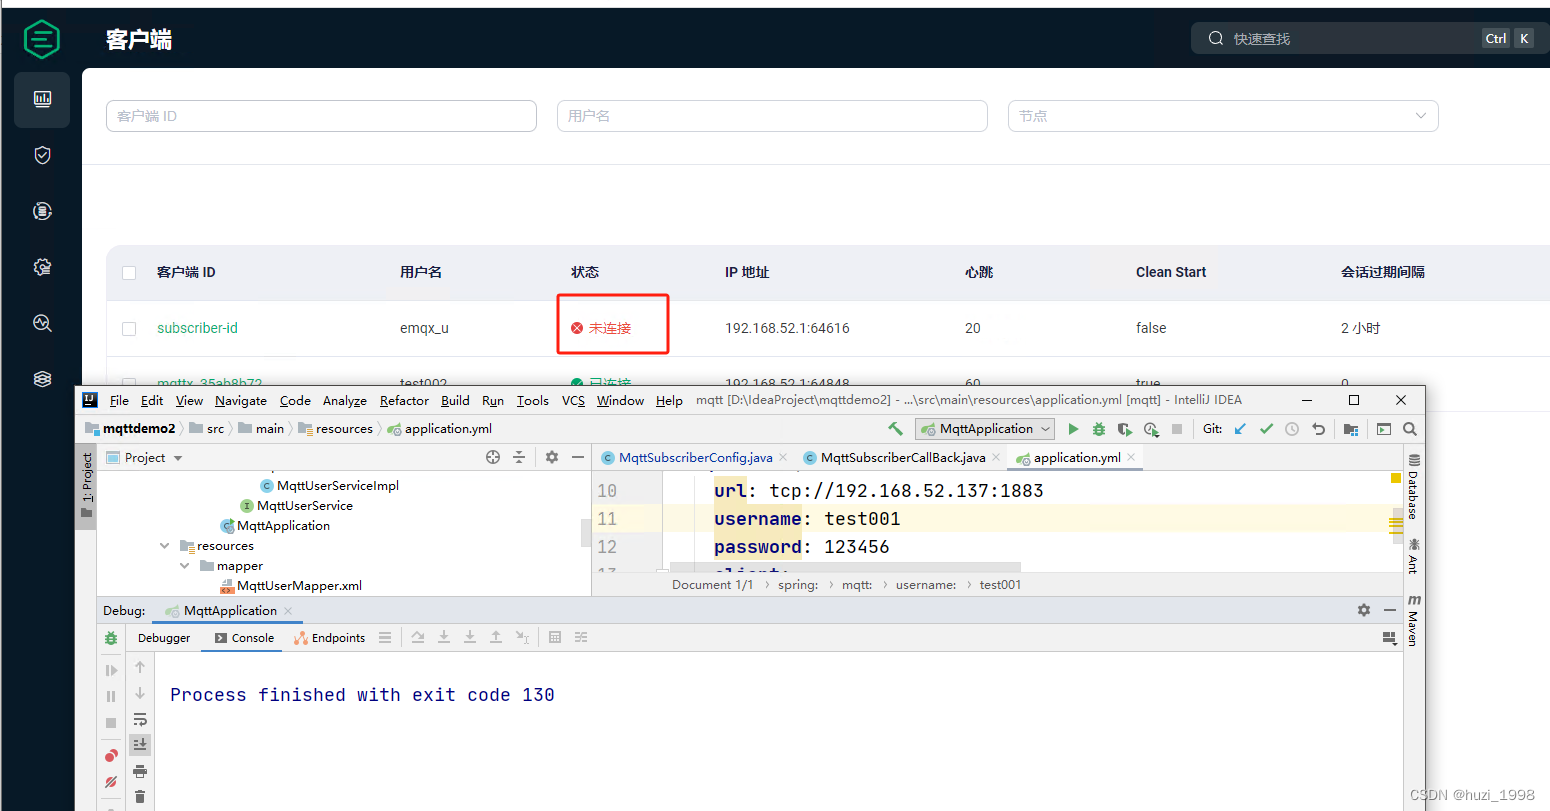
将订阅者断开
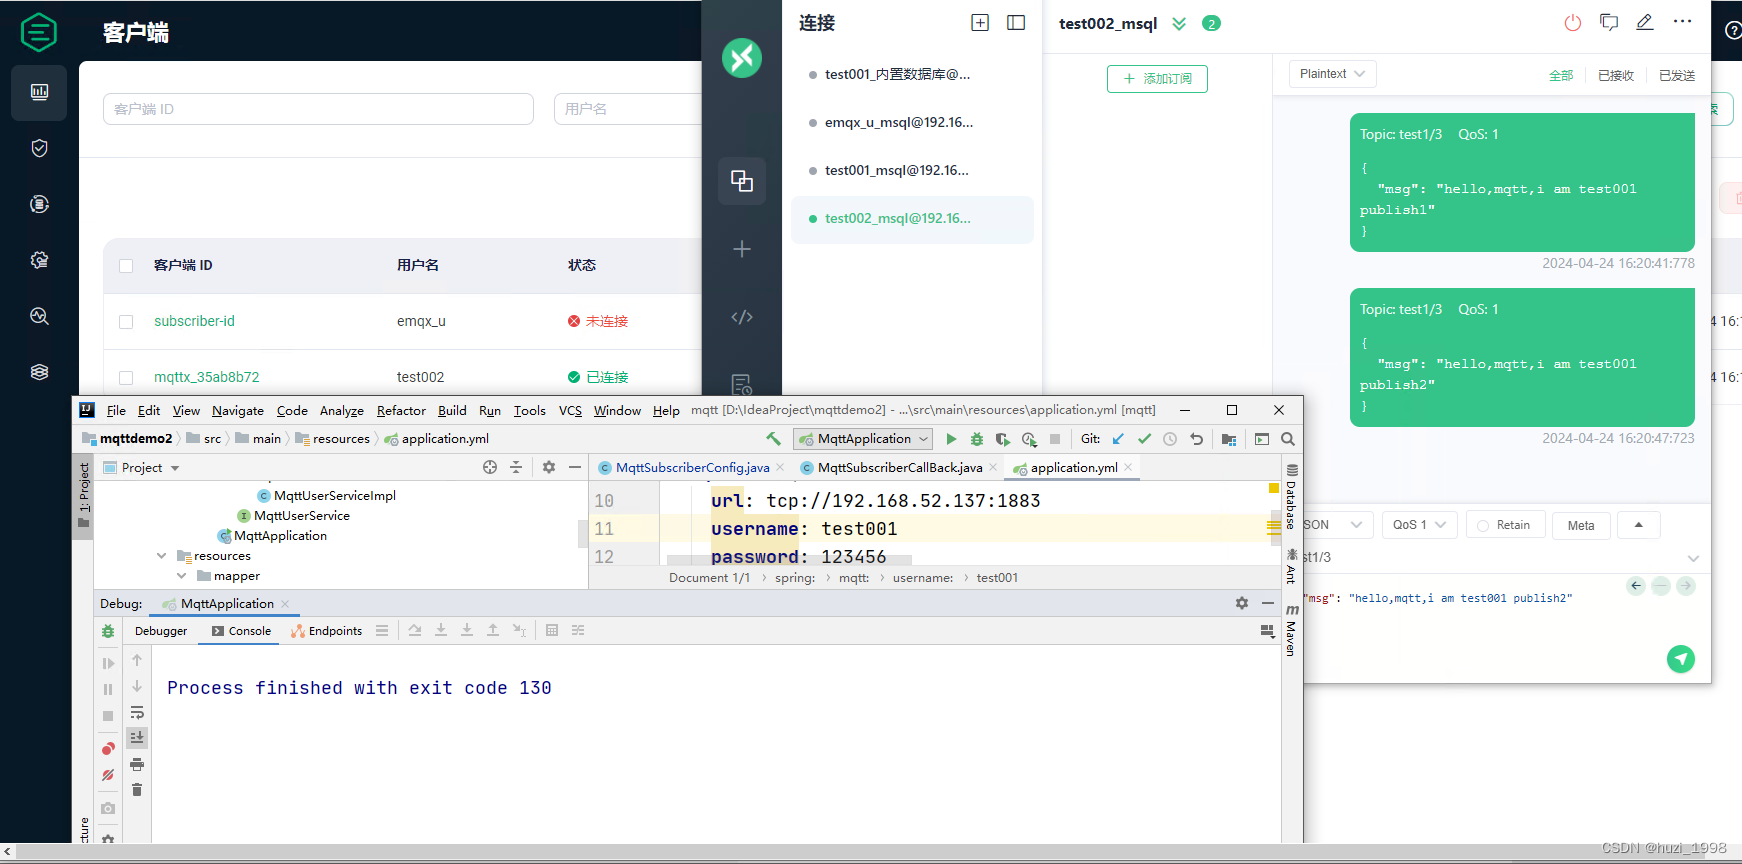
使用客户端发送消息,此时订阅者没有收到任何消息
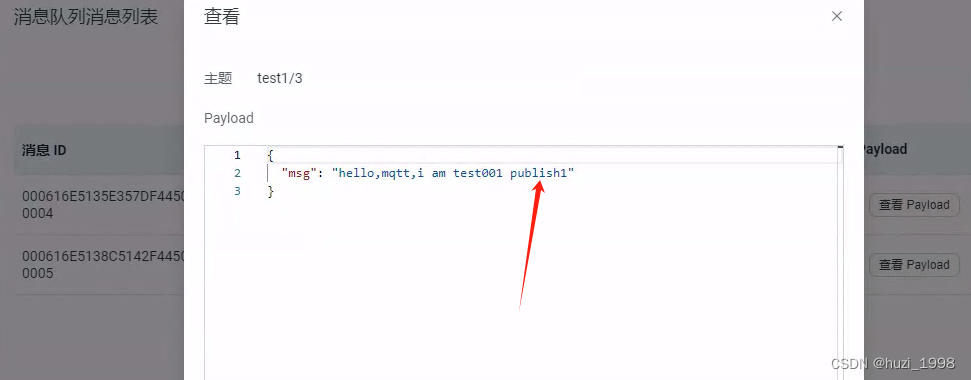
查看emqx控制台可以看到刚刚发送的消息队列
启动订阅者,此时就会接收刚刚发布者发布的消息了
1.8.添加异常打印
在MqttSubscriberCallBack中如果出现异常是不会被springboot管理的,就算我们写了全局异常处理类也无法捕获,所以我们只能在MqttSubscriberCallBack中进行捕捉。
每次MqttSubscriberCallBack出现异常都会断开连接,此时我们可以利用connectionLost(Throwable throwable)进行捕获异常
packagecom.hush.mqtt.config;importorg.eclipse.paho.client.mqttv3.IMqttDeliveryToken;importorg.eclipse.paho.client.mqttv3.MqttCallback;importorg.eclipse.paho.client.mqttv3.MqttMessage;importorg.springframework.context.annotation.Configuration;/**
 * 订阅者消息回调
 * @author:hush
 * @createDate:2024-04-18 9:48
 */@ConfigurationpublicclassMqttSubscriberCallBackimplementsMqttCallback{/**
     * 客户端与服务器断开连接,每次MqttSubscriberCallBack出现异常都会断开连接,此时我们可以利用Throwable捕获异常
     * @param throwable
     */@OverridepublicvoidconnectionLost(Throwable throwable){if(throwable.getStackTrace().length >0){StackTraceElement element = throwable.getCause().getStackTrace()[0];String fileName = element.getFileName()==null?"未找到指定文件": element.getFileName();int lineNumber = element.getLineNumber();String errorPosition ="出错原因:"+ throwable.toString()+",出错位置:"+ fileName +":"+ lineNumber;System.out.println(errorPosition);}System.out.println("与服务器断开连接,可重连");}/**
     * 消息到达回调
     * @param s 主题
     * @param mqttMessage 消息内容体
     * @throws Exception
     */@OverridepublicvoidmessageArrived(String s,MqttMessage mqttMessage)throwsException{System.out.println("接收到的消息主题:"+ s);System.out.println("接收到的消息qos:"+ mqttMessage.getQos());System.out.println("接收到的消息内容:"+newString(mqttMessage.getPayload()));System.out.println("接收到的消息保留标志位:"+ mqttMessage.isRetained());testException();// 测试异常打印,测试完记得关闭}/**
     * 消息发布成功回调
     * @param iMqttDeliveryToken
     */@OverridepublicvoiddeliveryComplete(IMqttDeliveryToken iMqttDeliveryToken){}/**
     * 测试异常是否打印
     */privatevoidtestException(){String test =null;boolean equals = test.equals("");System.out.println(equals);}}
测试结果
接收到的消息主题:test1/3
接收到的消息qos:1
接收到的消息内容:{
  "msg": "hello,mqtt,i am test001 publish3"
}
接收到的消息保留标志位:false
出错原因:MqttException (0) - java.lang.NullPointerException,出错位置:MqttSubscriberCallBack.java:61
与服务器断开连接,可重连
版权归原作者 huzi_1998 所有, 如有侵权,请联系我们删除。
