一、实验目的
1.掌握数字签名的基本原理,理解RSA算法如何提供数字签名。
2.熟悉实验环境和加密软件CrypTool 1.4(CrypTool 2)的使用。
3.编写代码实现签名算法。
二、实验内容
- 运行CrypTool 1.4(CrypTool 2),使用RSA算法对消息进行签名操作,选择公钥PK=(e,N),私钥为sk=(d,N)。例如:
消息:
Out of all cryptographic primitives, the digital signature using public key cryptography is considered as very important and useful tool to achieve information security. Apart from ability to provide non-repudiation of message, the digital signature also provides message authentication and data integrity.
密钥:e = 11
N =
97837973726418359868516951718991281325771149750958732944765111213631328027493925740023000937277990315891588119835562940190113563334615471147089645563941484459898854377253031679968434226000865737244299665393453851802313775580309976978804698982229486068546397607971083305570968358870209409102684170827187712579
d =
53366167487137287201009246392177062541329718045977490697144606116526178924087595858194364147606176535940866247183034331012789216364335711534776170307604435275621882890925722486791216663911766481240927473604083681494108652553529557950472379863877351129463207267185120618342084129306558631987155442108022251891
- 编程实现RSA/ElGamal签名算法并测试签名和验证过程。要求消息头部包含作者的姓名拼音,并通过哈希函数SHA-1得到消息摘要,对摘要进行签名,编程语言不限。
- 实验步骤
实验(1):
- 通过课堂与课本得知,RSA签名和实验4中的RSA算法正好相反,解密对应于签名,且解密的密钥为加密者的私钥。加密对应于验证,于是打开Cryptool2.1使用RSA解密算法生成16进制文件。如图一、二。
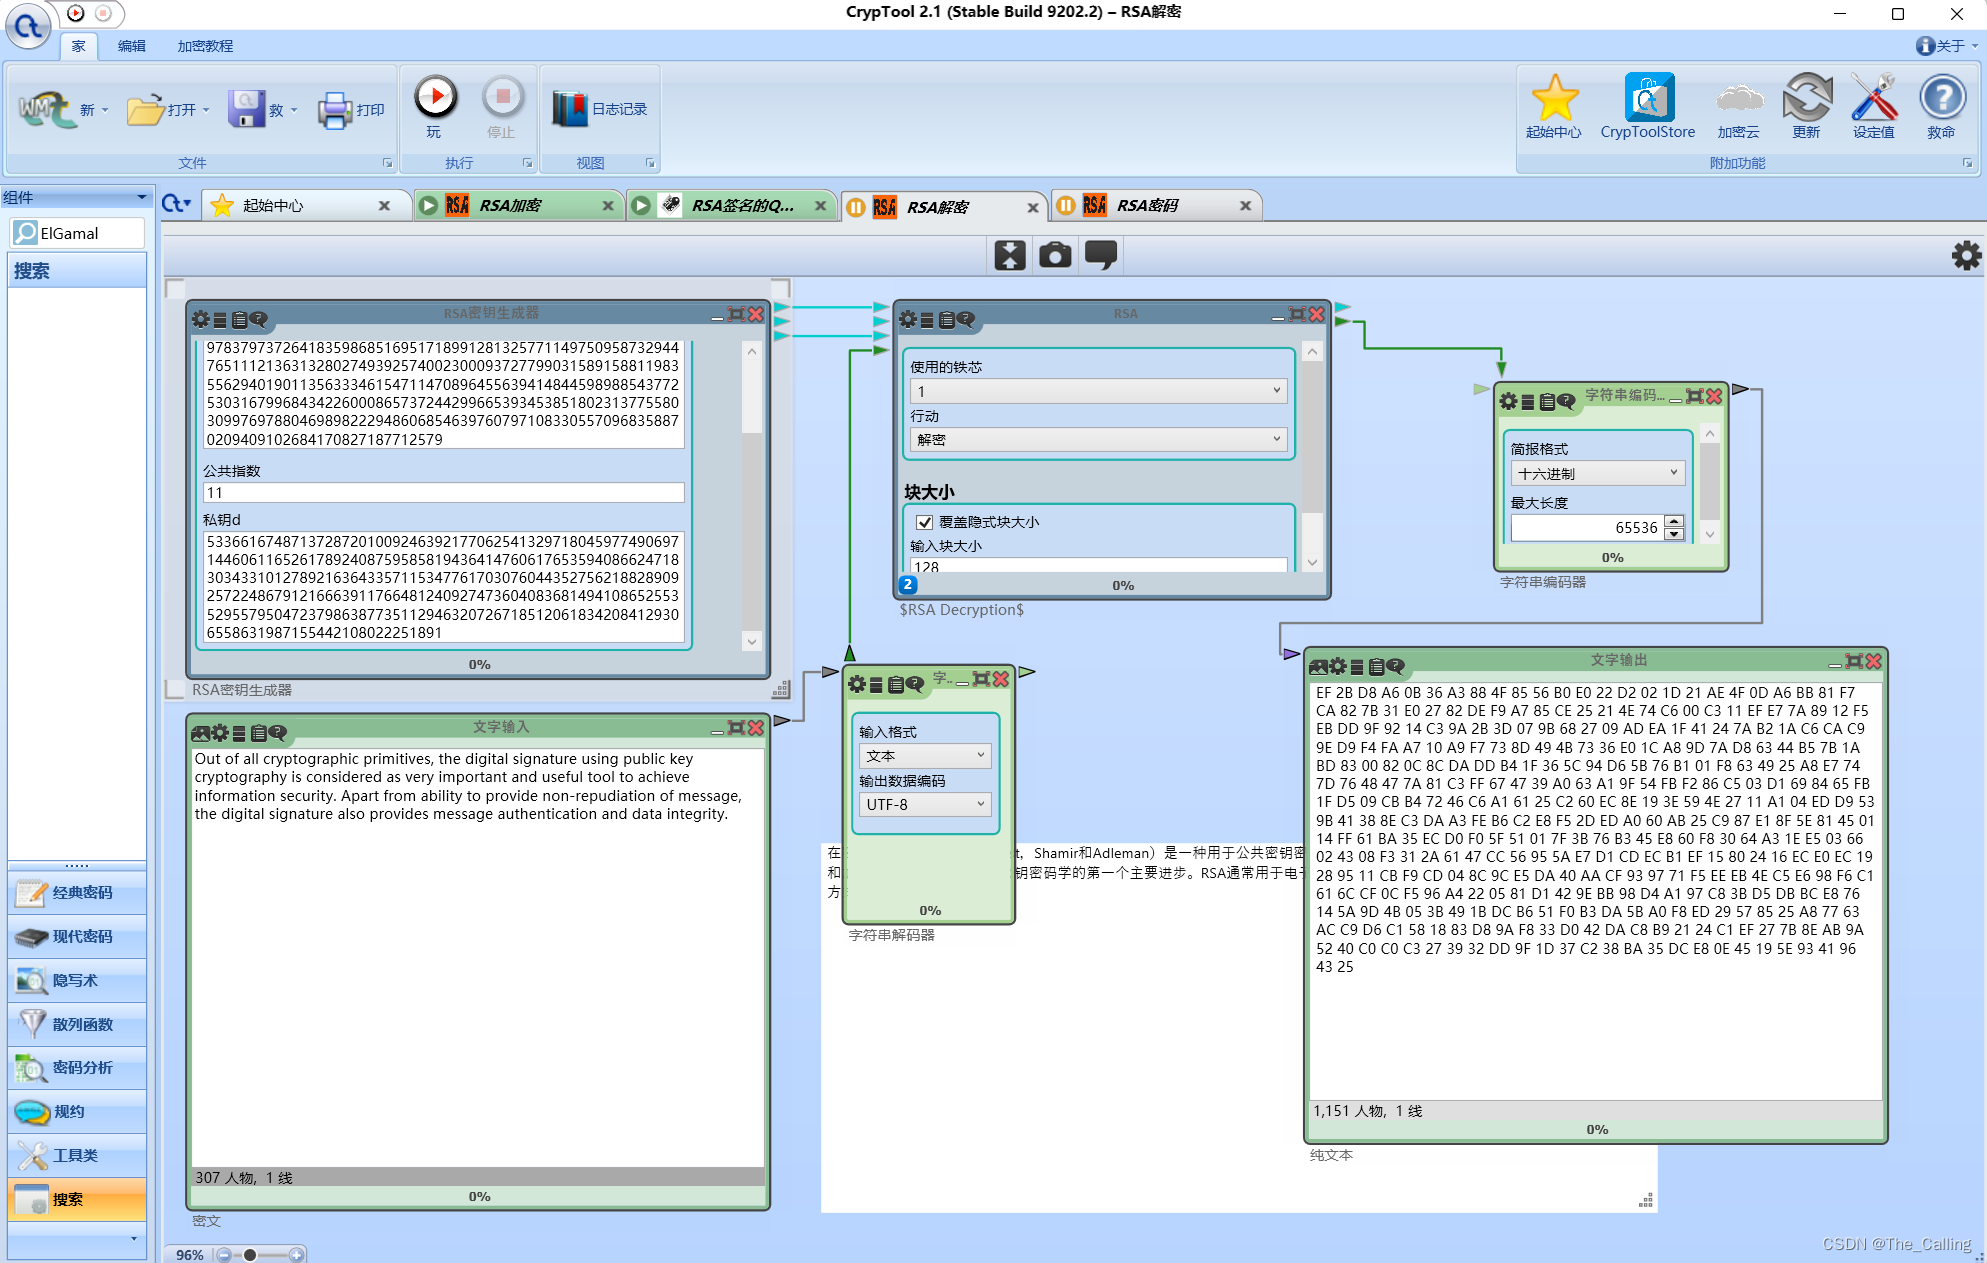
图一:签名过程
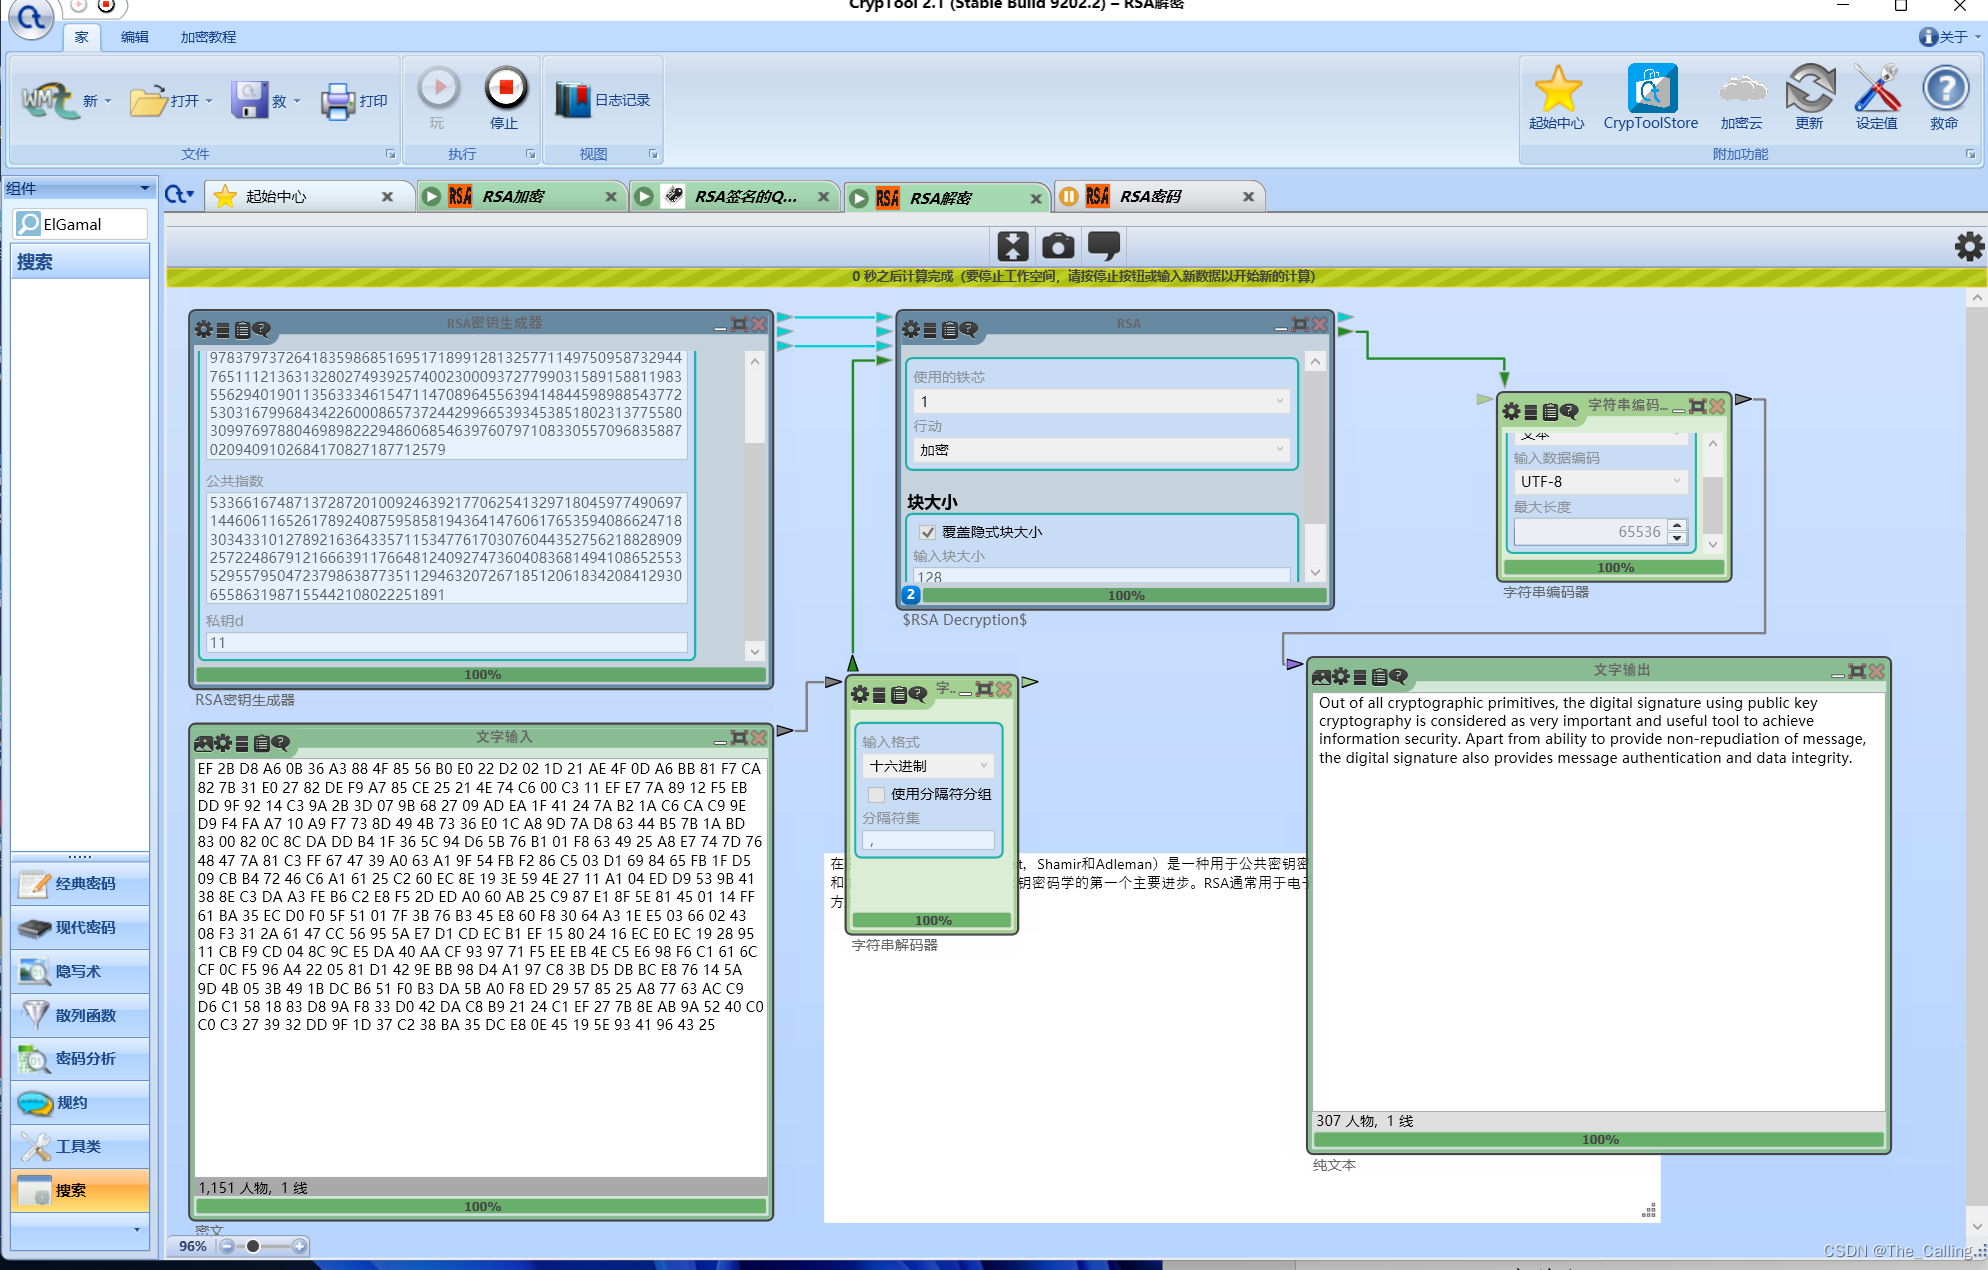
图二:验证过程
实验(2):
1、运用python自带的库生成sha-1消息摘要(图三):

图三:sha-1实现
2、将实验4的RSA算法实现倒置,解密对应签名,加密对应验证(如图四,五)
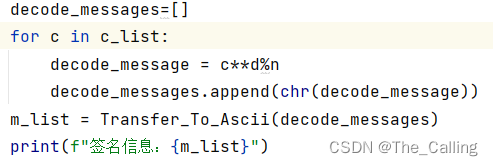
图四:解密对应签名
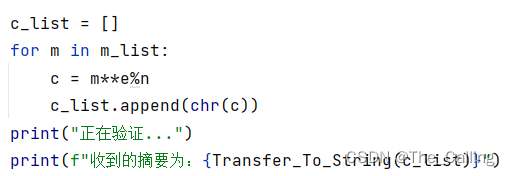
图五:加密对应验证
- 实验结果
实验(1):
数字签名:
EF 2B D8 A6 0B 36 A3 88 4F 85 56 B0 E0 22 D2 02 1D 21 AE 4F 0D A6 BB 81 F7 CA 82 7B 31 E0 27 82 DE F9 A7 85 CE 25 21 4E 74 C6 00 C3 11 EF E7 7A 89 12 F5 EB DD 9F 92 14 C3 9A 2B 3D 07 9B 68 27 09 AD EA 1F 41 24 7A B2 1A C6 CA C9 9E D9 F4 FA A7 10 A9 F7 73 8D 49 4B 73 36 E0 1C A8 9D 7A D8 63 44 B5 7B 1A BD 83 00 82 0C 8C DA DD B4 1F 36 5C 94 D6 5B 76 B1 01 F8 63 49 25 A8 E7 74 7D 76 48 47 7A 81 C3 FF 67 47 39 A0 63 A1 9F 54 FB F2 86 C5 03 D1 69 84 65 FB 1F D5 09 CB B4 72 46 C6 A1 61 25 C2 60 EC 8E 19 3E 59 4E 27 11 A1 04 ED D9 53 9B 41 38 8E C3 DA A3 FE B6 C2 E8 F5 2D ED A0 60 AB 25 C9 87 E1 8F 5E 81 45 01 14 FF 61 BA 35 EC D0 F0 5F 51 01 7F 3B 76 B3 45 E8 60 F8 30 64 A3 1E E5 03 66 02 43 08 F3 31 2A 61 47 CC 56 95 5A E7 D1 CD EC B1 EF 15 80 24 16 EC E0 EC 19 28 95 11 CB F9 CD 04 8C 9C E5 DA 40 AA CF 93 97 71 F5 EE EB 4E C5 E6 98 F6 C1 61 6C CF 0C F5 96 A4 22 05 81 D1 42 9E BB 98 D4 A1 97 C8 3B D5 DB BC E8 76 14 5A 9D 4B 05 3B 49 1B DC B6 51 F0 B3 DA 5B A0 F8 ED 29 57 85 25 A8 77 63 AC C9 D6 C1 58 18 83 D8 9A F8 33 D0 42 DA C8 B9 21 24 C1 EF 27 7B 8E AB 9A 52 40 C0 C0 C3 27 39 32 DD 9F 1D 37 C2 38 BA 35 DC E8 0E 45 19 5E 93 41 96 43 25
RSA加密后生成的密文:
Out of all cryptographic primitives, the digital signature using public key cryptography is considered as very important and useful tool to achieve information security. Apart from ability to provide non-repudiation of message, the digital signature also provides message authentication and data integrity.
与原文相同,验证成功。
实验(2):
私钥对消息摘要进行签名后,运用公钥验证签名,结果与摘要相同,验证成功!(如图六)
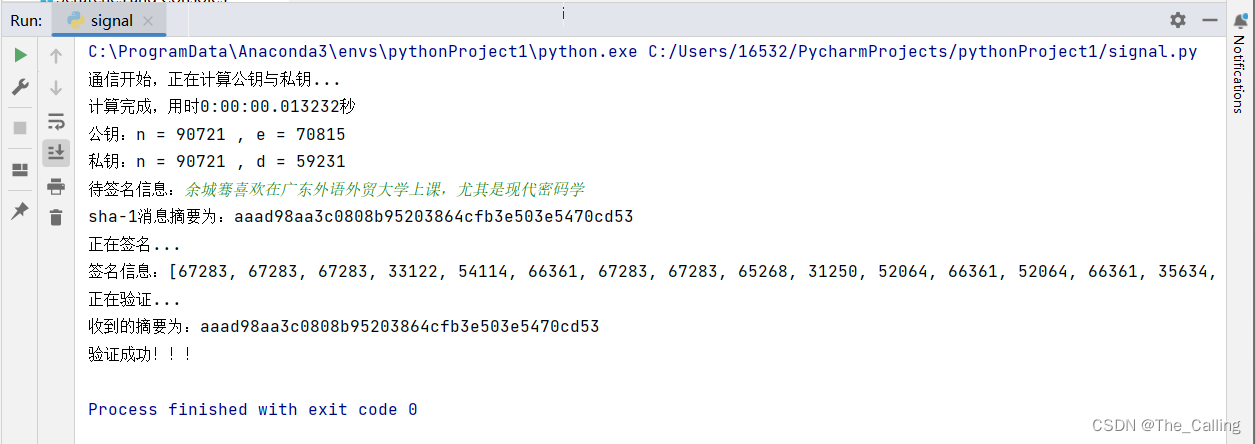
图六:运行结果
- 实验心得
本次实验的综合性较高,运用了前几课的知识,包括sha-1算法生成消息验证码,RSA算法实现不对称加密,在运用其不对称加密的性质实现数字签名,而这一切都是基于复杂的离散对数问题。Sha-1算法生成固定长度但又对明文具有强抗碰撞性,使得对摘要生成的签名长度很短都能达到较好的验证效果。
- 附录 (程序代码)
from random import randint

from datetime import datetime

import hashlib

"""判断是否是素数"""

def is_sushu(sushu):

    for i in range(2,sushu):

        if sushu % i == 0:

            return False

    return True

"""随机生成指定范围的大素数"""

def Create_Sushu():

    while True:

        sushu = randint(100,1000 )*#**下限越大,加密越安全,此处考虑计算时间,取值较小

        *if is_sushu(sushu):

            return sushu

"""计算欧拉函数"""

def Oula(sushu1 , sushu2):

    return (sushu1-1)*(sushu2-1)

"""判断是否互质"""

def Is_Huzhi(int_min,int_max):

    for i in range(2,int_min+1):

        if int_min % i == 0 and int_max % i == 0:

            return False

    return True

"""计算公钥,直接计算编程较简单,此处考虑了计算效率的优化"""

def Creat_E(oula):

    top = oula

    while True:

        i = randint(2,top)

        for e in range(i,top):

            if Is_Huzhi(e,oula):

                return e

        top = i

"""计算私钥"""

def Compute_D(oula,e):

    k = 1

    while ( k*oula+1 )% e != 0:

        k+=1

    return int((k*oula+1)/e)

"""将字符串转成ASCII"""

def Transfer_To_Ascii(messages):

    result = []

    for message in messages:

        result.append(  ord(message) )

    return result

"""将列表转化成字符串"""

def Transfer_To_String(string_list):

    string = ''.join('%s' %id for id in string_list)       *#**有数字不能直接**join .join('%s' %id for id in list1))

    *return string

if __name__ == "__main__":

    """

    p、q为大素数
    n=p*q

    oula = (p-1)* (q-1)
    e 为公钥
    d 为私钥
    """

    print("通信开始,正在计算公钥与私钥...")

    time_start = datetime.now()

    p = Create_Sushu()

    q = p

    while p ==q :

        q = Create_Sushu()

    n = p * q

    oula = Oula(p, q)

    e = Creat_E(oula)

    d = Compute_D(oula,e)

    time_end = datetime.now()

    print(f"计算完成,用时{str(time_end -time_start)}秒 ")

    print(f"公钥:n = {str(n)} , e = {str(e)}")

    print(f"私钥:n = {str(n)} , d = {str(d)}")

    m = input('待签名信息:')

    hash = hashlib.sha1(m.encode("utf-8")).hexdigest()

    c_list= Transfer_To_Ascii(hash)

    print(f"sha-1消息摘要为:{hash}")

    print("正在签名...")

    decode_messages=[]

    for c in c_list:

        decode_message = c**d%n

        decode_messages.append(chr(decode_message))

    m_list = Transfer_To_Ascii(decode_messages)

    print(f"签名信息:{m_list}")

    c_list = []

    for m in m_list:

        c = m**e%n

        c_list.append(chr(c))

    print("正在验证...")

    print(f"收到的摘要为:{Transfer_To_String(c_list)}")

    if Transfer_To_String(c_list) == hash:

        print("验证成功!!!")
版权归原作者 The_Calling 所有, 如有侵权,请联系我们删除。