
目录
springSecurity授权
认证与授权解耦
授权:据系统提前设置好的规则,给用户分配可以访问某一个资源的权限,用户根据自己所具有权限,去执行相应操作。

GrantedAuthority 应该如何理解呢? 是角色还是权限?
权限是具体一些操作,角色是一些权限的集合
- 基于角色权限设计就是:
用户<=>角色<=>资源三者关系 返回就是用户的角色 - 基于资源权限设计就是:
用户<=>权限<=>资源三者关系 返回就是用户的权限 - 基于角色和资源权限设计就是:
用户<=>角色<=>权限<=>资源返回统称为用户的权限
从代码层面角色和权限没有太大不同都是权限,特别是在 Spring Security 中,角色和权限处理方式基本上都是一样的。唯一区别 SpringSecurity 在很多时候会
自动
给角色添加一个
ROLE_
前缀,而权限则不会自动添加。
权限管理策略
springSecurity对实现对权限控制的两种方式,这两种方式可一起使用
基于url的权限管理
请求访问url 还没有到达方法之前,被过滤器拦截,判断用户对url的权限。即针对url设置哪些权限可以访问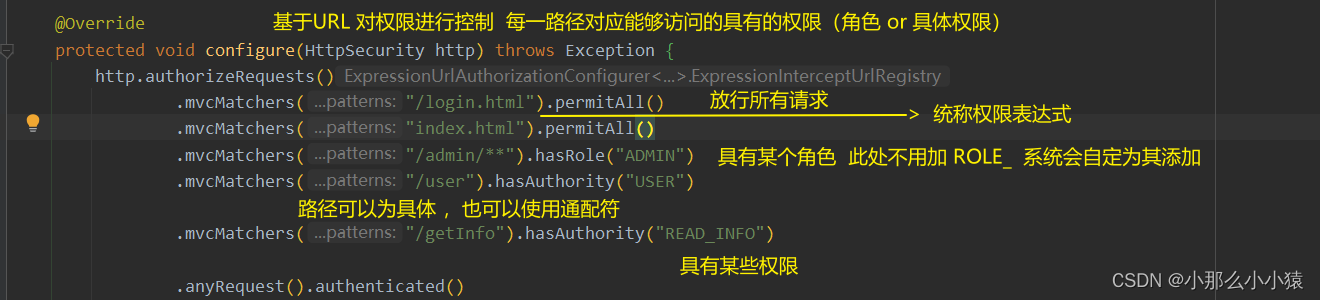
权限表达式
方法说明hasAuthority(String authority)当前用户是否具备指定权限hasAnyAuthority(String… authorities)当前用户是否具备指定权限中任意一个hasRole(String role)当前用户是否具备指定角色hasAnyRole(String… roles);当前用户是否具备指定角色中任意一个permitAll();放行所有请求/调用denyAll();拒绝所有请求/调用isAnonymous();当前用户是否是一个匿名用户isAuthenticated();当前用户是否已经认证成功isRememberMe();当前用户是否通过 Remember-Me 自动登录isFullyAuthenticated();当前用户是否既不是匿名用户又不是通过 Remember-Me 自动登录的hasPermission(Object targetId, Object permission);当前用户是否具备指定目标的指定权限信息hasPermission(Object targetId, String targetType, Object permission);当前用户是否具备指定目标的指定权限信息
mvcMatchers、antMatchers、regexMatchers、anyRequest
参数可写入
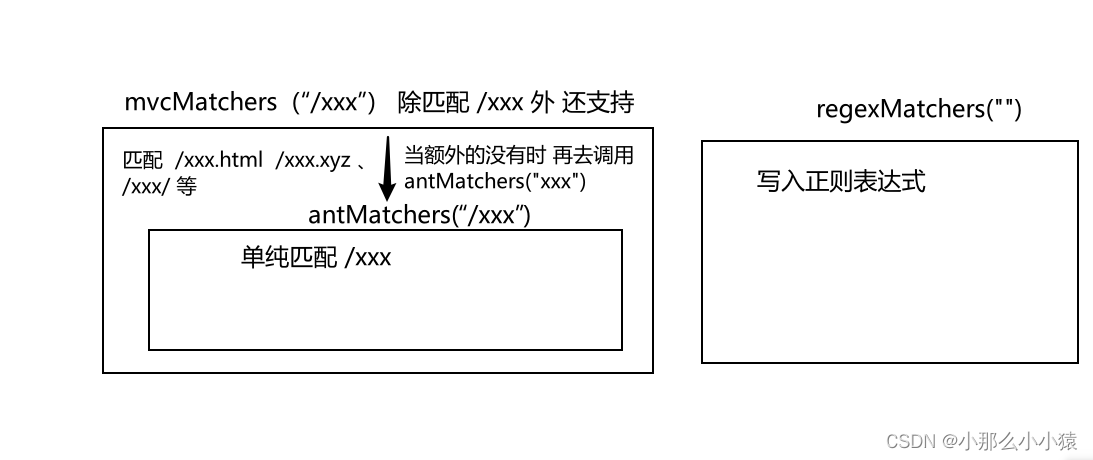
anyRequest() 匹配剩余所有请求
基于方法的权限管理
用户通过url 已经到达方法时,方法通过Aop的方式在调用之前进行拦截判断权限
相比于 上一种方法功能更强大 ,利用AOP特性,提供前置处理和后置处理,前置权限校验和后置权限校验
使用方式:
- 在secuity的配置类中 使用
@EnableGlobalMethodSecurity开启可使用的注解方法 提供三个参数
- perPostEnabled(常用): 开启
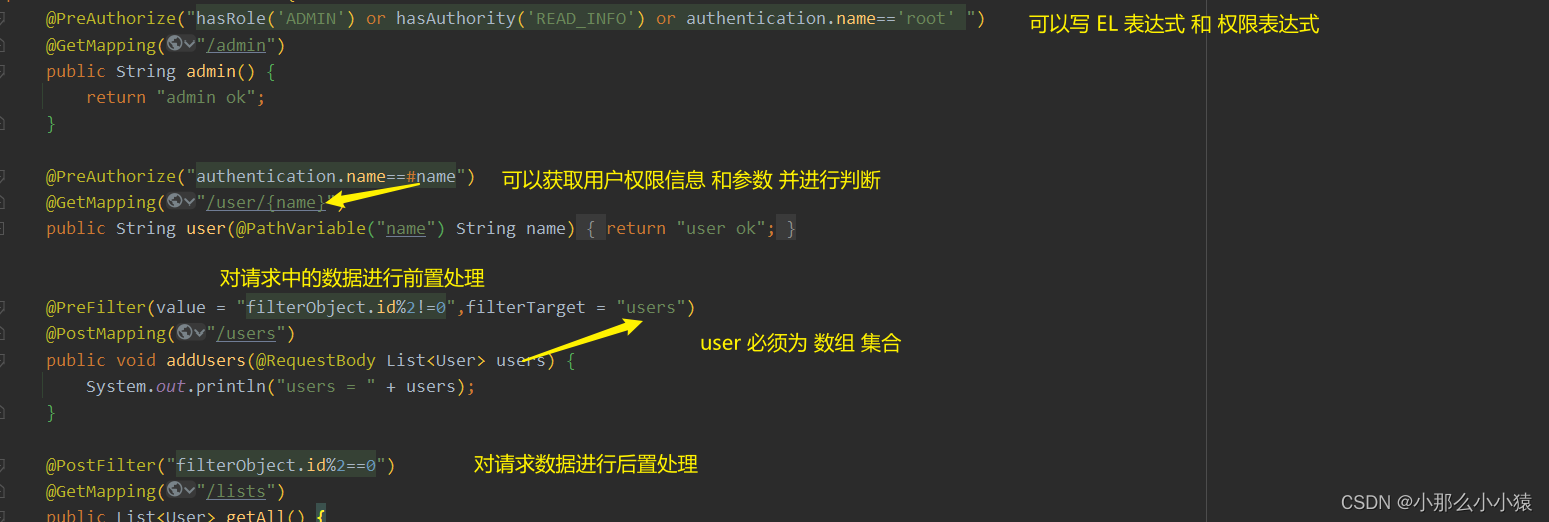
Spring Security提供的四个权限注解 特点:支持权限表达式,el表达式 功能强大
 @PreAuthorize:在目标方法执行之前进行权限校验。
 @PreFiter:在目前标方法执行之前对方法参数进行过滤。
 @PostAuthorize: 在目前标方法执行之后进行权限校验。
 @PostFiter: 在目标方法执行之后对方法的返回结果进行过滤。
例如:
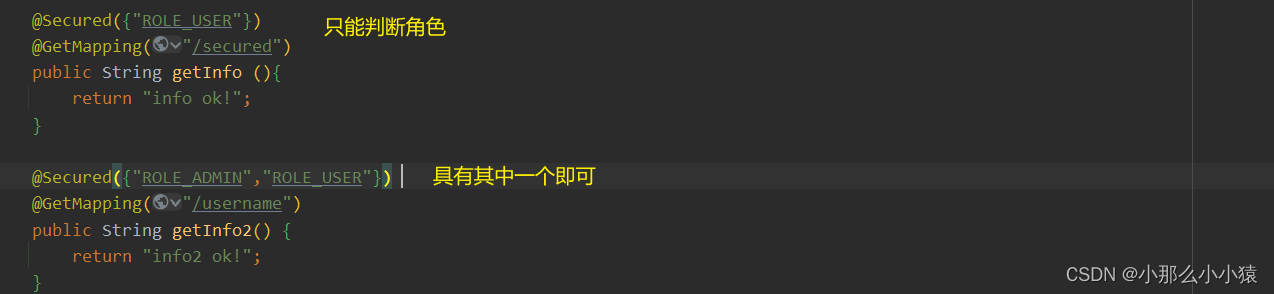
- securedEnabled: 开启 Spring Security 提供的 @Secured 注解支持,该注解不支持权限表达式
@Secured:访问目标方法必须具各相应的角色。
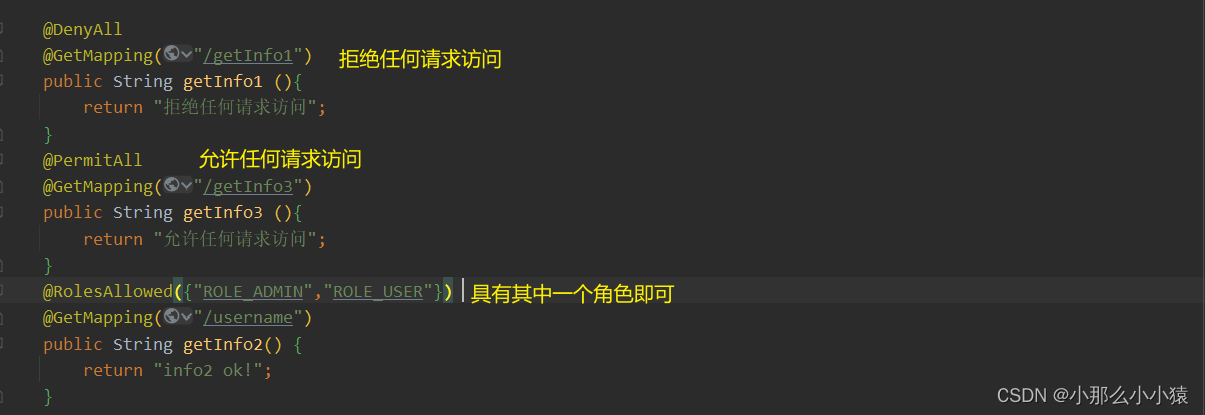
- jsr250Enabled: 开启 JSR-250 提供的注解,也不支持权限表达式
@DenyAll:拒绝所有访问。
@PermitAll:允许所有访问。
@RolesAllowed:访问目标方法必须具备相应的角色。
授权流程:
只针对 url授权,因为在拦截器层面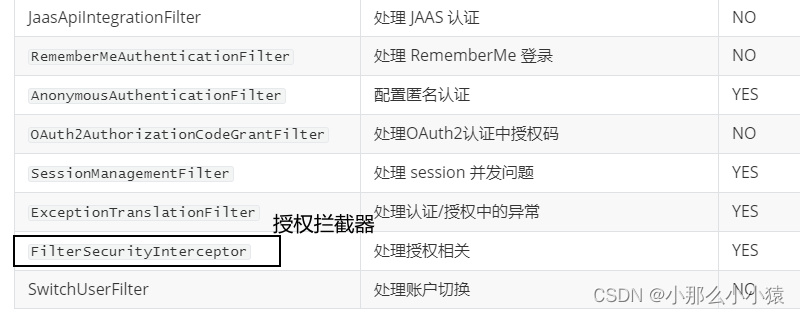
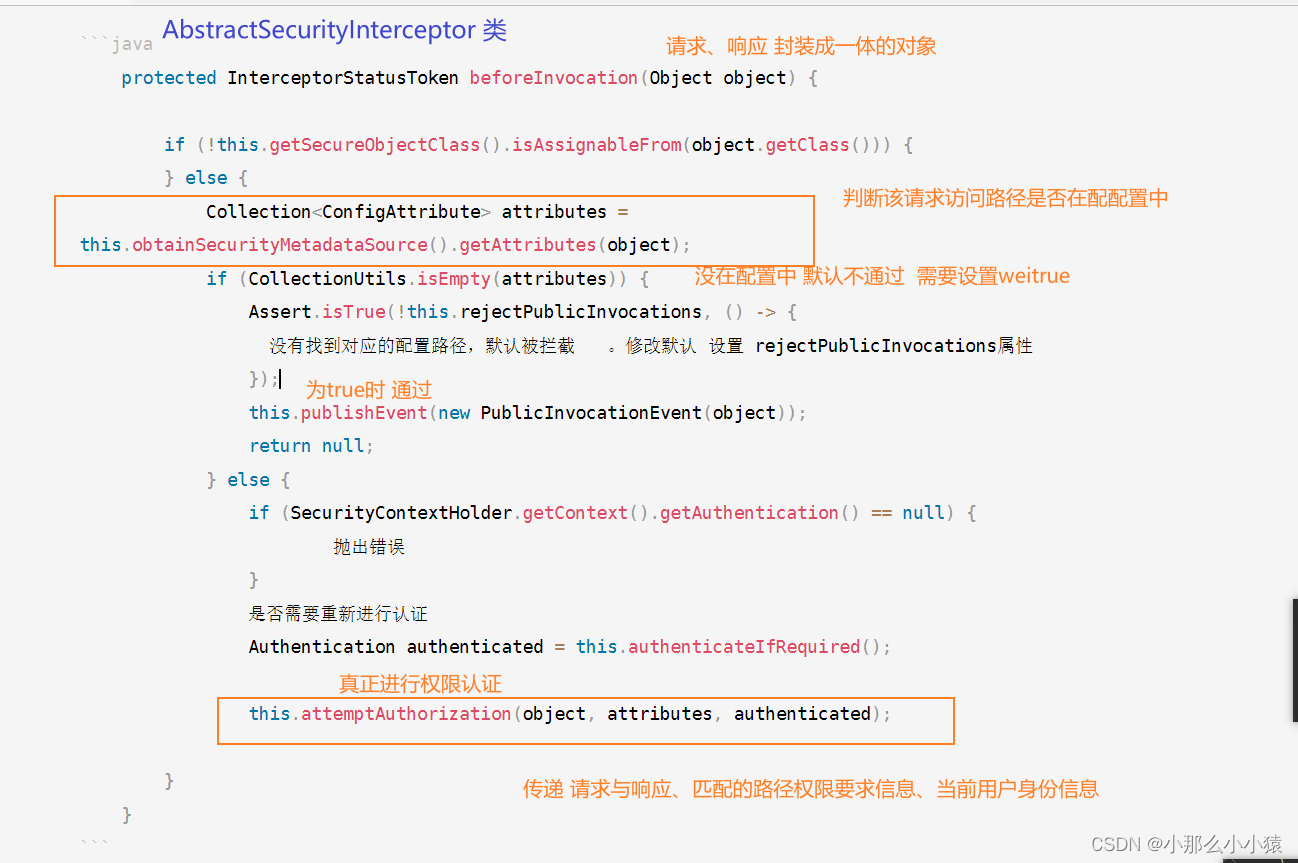
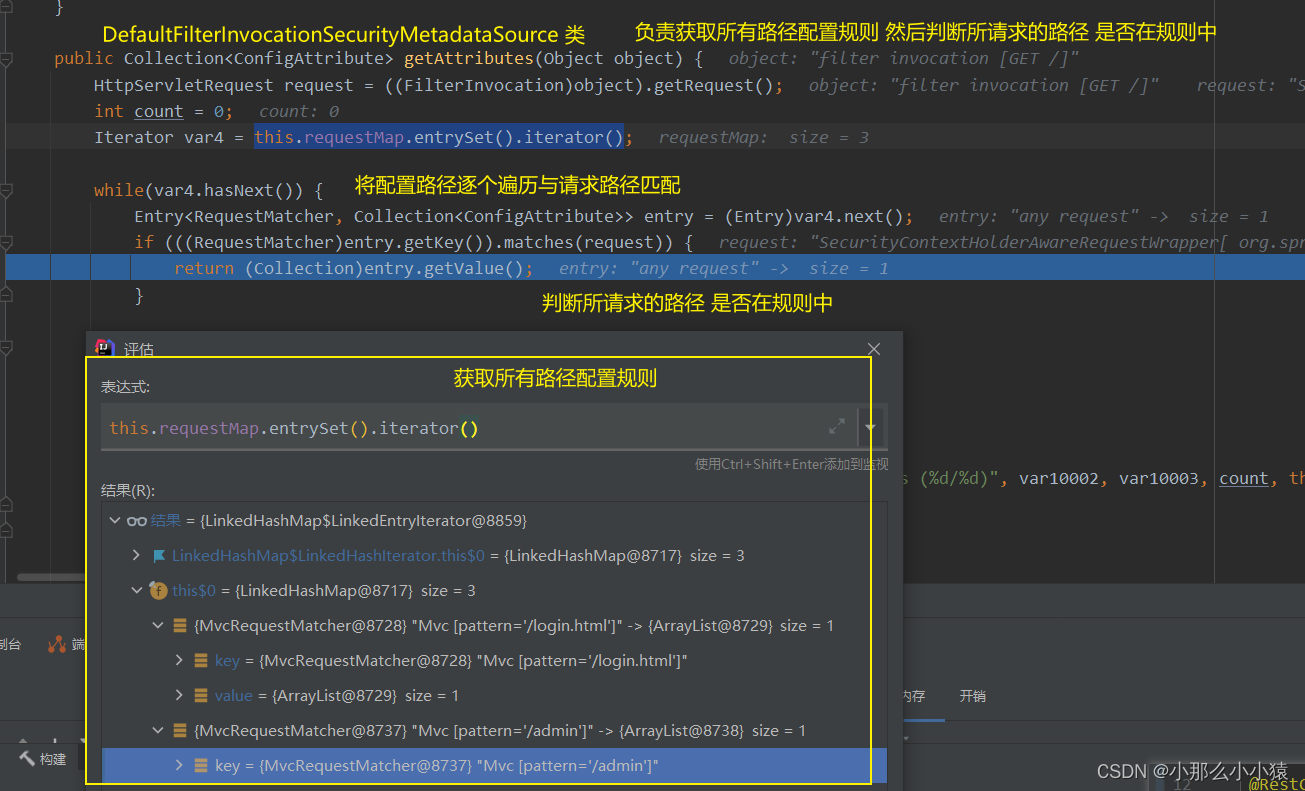
获取请求所要访问路径在security配置中的权限信息。若实现动态配置(路径的权限配置在数据库中)要重写这个方法。这个方法默认是 臊面这里
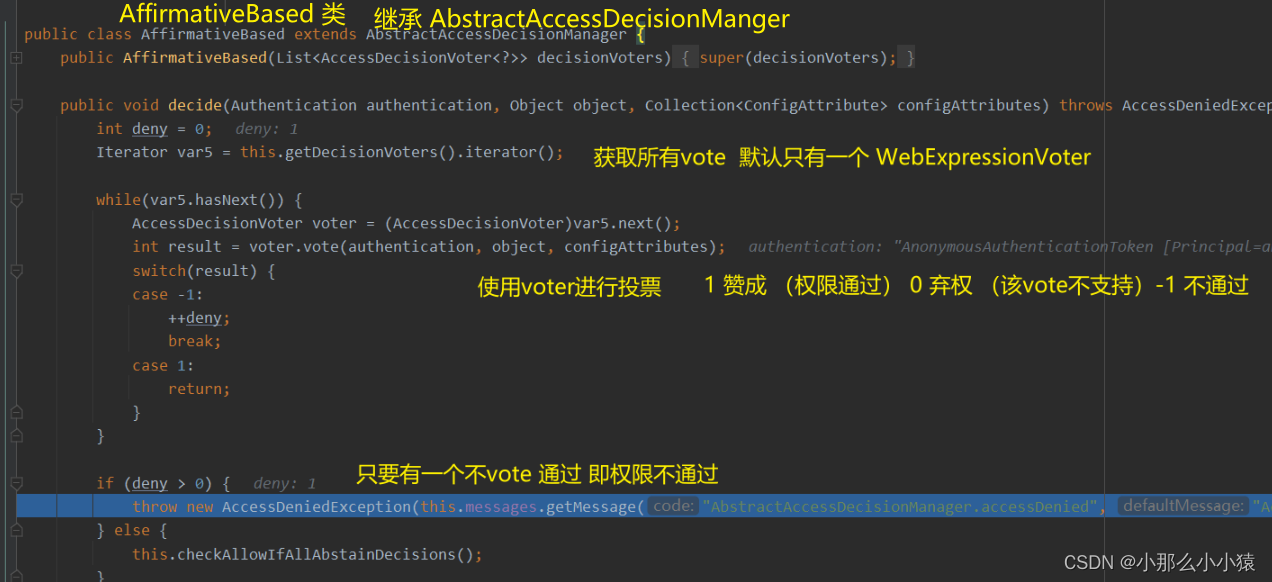
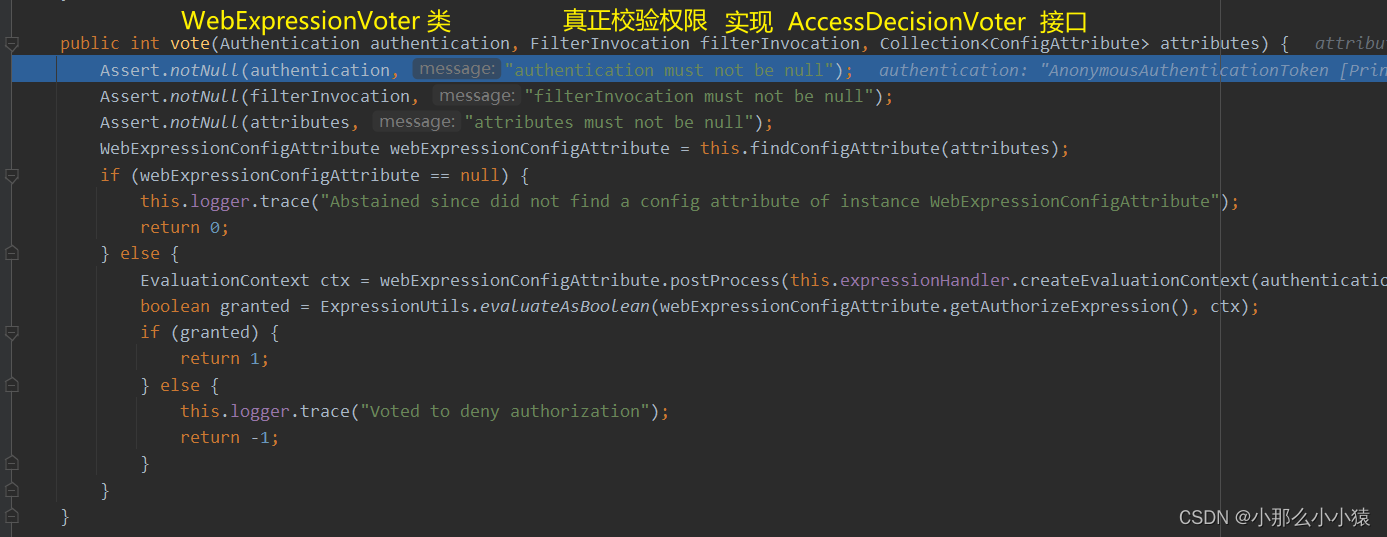
权限认证流程 投票过程无需改动,可视为透明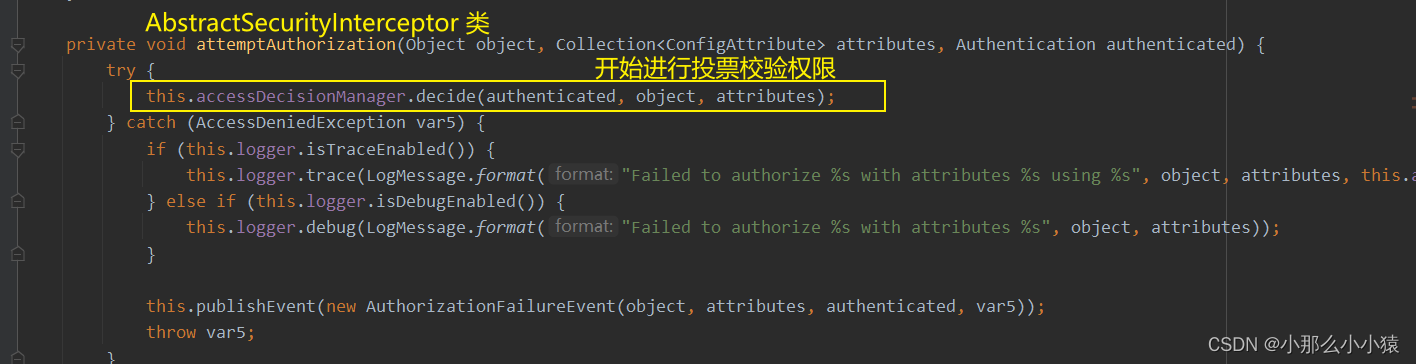
整体流程图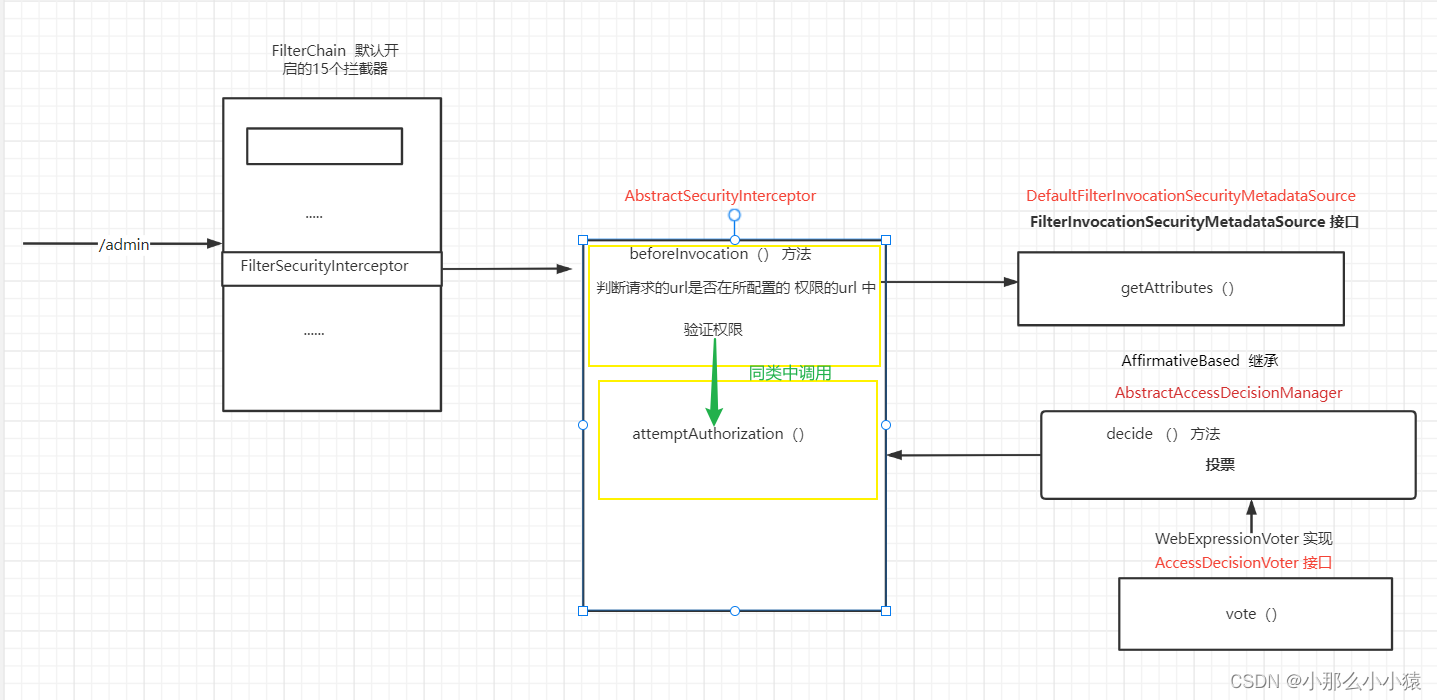
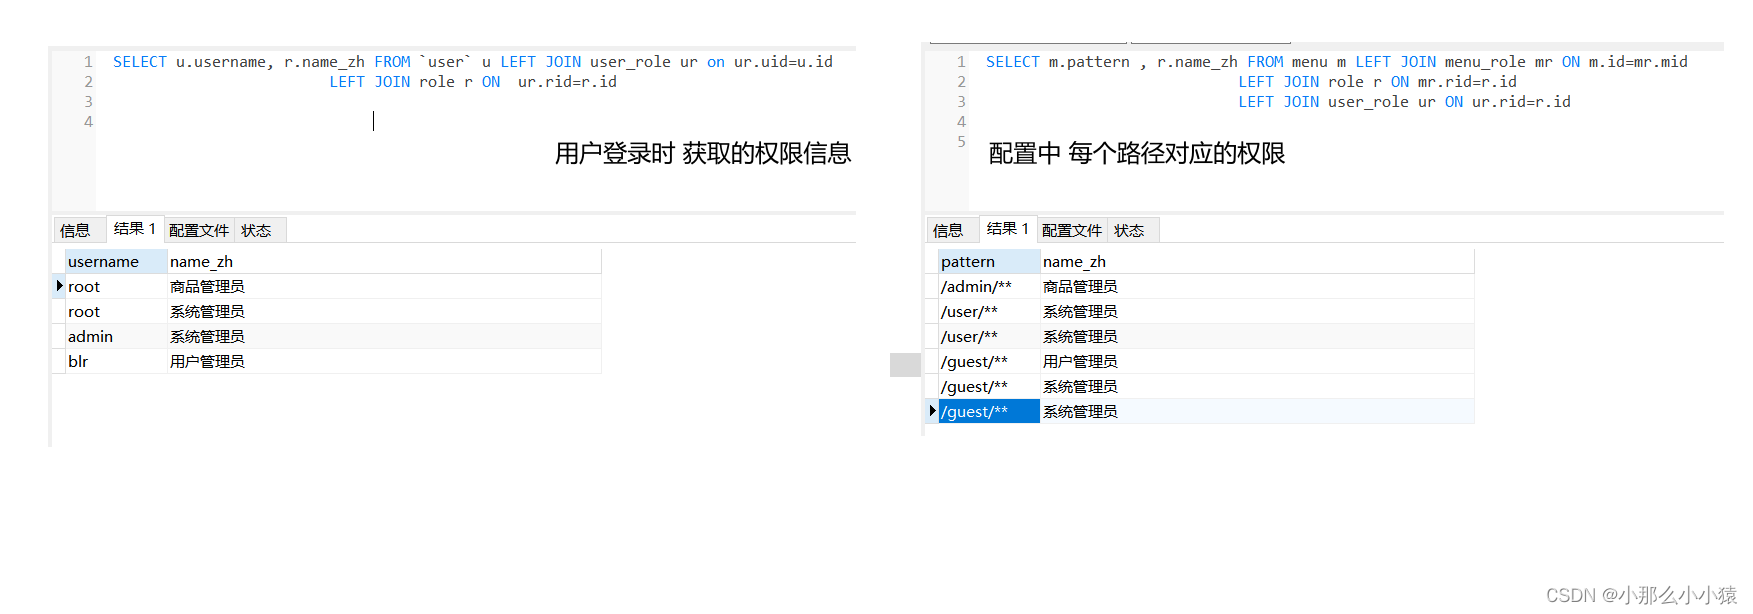
将url权限管理设为动态
将url配置保存在数据库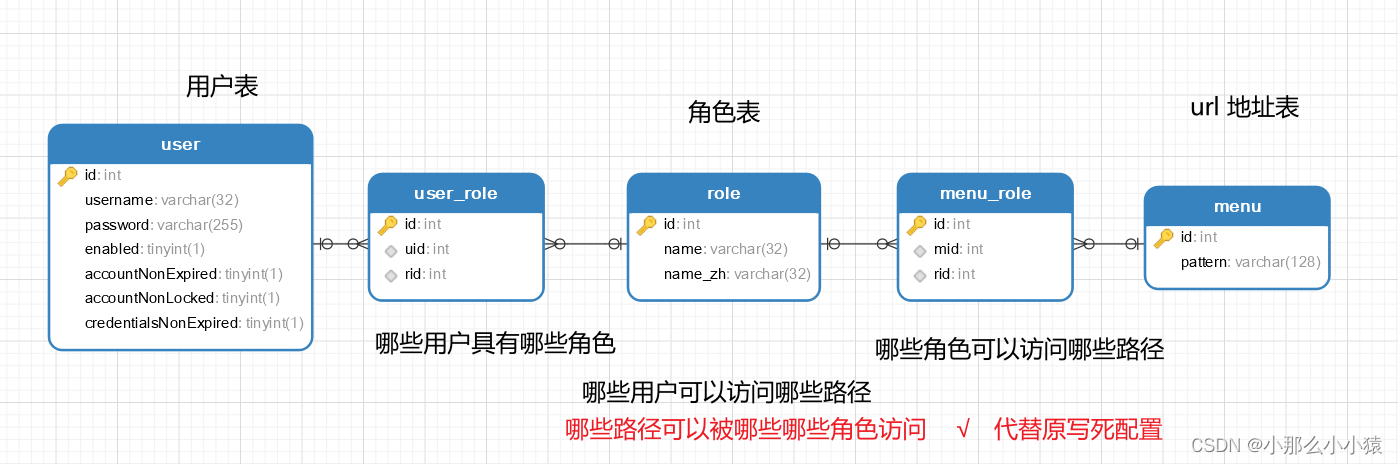
配置流程
- 创建数据库环境 在已有的用户登录认证的前提下(pojo:User、Role mapper:loadUserByUsername(),getUserRoleByUid),创建pojo类 Menu 、创建mapper : getAllMenu()
pojo
publicclassMenu{privateInteger id;privateString pattern;privateList<Role> roles;publicList<Role>getRoles(){return roles;}publicvoidsetRoles(List<Role> roles){this.roles = roles;}publicIntegergetId(){return id;}publicvoidsetId(Integer id){this.id = id;}publicStringgetPattern(){return pattern;}publicvoidsetPattern(String pattern){this.pattern = pattern;}}
@MapperpublicinterfaceMenuMapper{List<Menu>getAllMenu();}
MenuMapper.xml
<mapper namespace="xxx"><resultMap id="MenuResultMap" type="Menu"><id property="id" column="id"/><result property="pattern" column="pattern"></result><collection property="roles" ofType="com.blr.entity.Role"><id column="rid" property="id"/><result column="rname" property="name"/><result column="rnameZh" property="nameZh"/></collection></resultMap><select id="getAllMenu" resultMap="MenuResultMap">
        select m.*, r.id as rid, r.name as rname, r.nameZh as rnameZh
        from menu m
                 left join menu_role mr on m.`id` = mr.`mid`
                 left join role r on r.`id` = mr.`rid`
    </select></mapper>
service层
@ServicepublicclassMenuService{privatefinalMenuMapper menuMapper;@AutowiredpublicMenuService(MenuMapper menuMapper){this.menuMapper = menuMapper;}publicList<Menu>getAllMenu(){return menuMapper.getAllMenu();}}
- 继承 FilterInvocationSecurityMetadataSource 接口 ,代替 DefaultFilterInvocationSecurityMetadataSource类
@ComponentpublicclassCustomSecurityMetadataSourceimplementsFilterInvocationSecurityMetadataSource{privatefinalMenuService menuService;@AutowiredpublicCustomSecurityMetadataSource(MenuService menuService){this.menuService = menuService;}AntPathMatcher antPathMatcher =newAntPathMatcher();@OverridepublicCollection<ConfigAttribute>getAttributes(Object object)throwsIllegalArgumentException{String requestURI =((FilterInvocation) object).getRequest().getRequestURI();List<Menu> allMenu = menuService.getAllMenu();for(Menu menu : allMenu){if(antPathMatcher.match(menu.getPattern(), requestURI)){String[] roles = menu.getRoles().stream().map(r -> r.getName()).toArray(String[]::new);returnSecurityConfig.createList(roles);}}returnnull;}@OverridepublicCollection<ConfigAttribute>getAllConfigAttributes(){returnnull;}@Overridepublicbooleansupports(Class<?> clazz){returnFilterInvocation.class.isAssignableFrom(clazz);}}
- 对Security进行配置
privatefinalCustomSecurityMetadataSource customSecurityMetadataSource;@AutowiredpublicSecurityConfig(CustomSecurityMetadataSource customSecurityMetadataSource,UserService userService){this.customSecurityMetadataSource = customSecurityMetadataSource;}@Overrideprotectedvoidconfigure(HttpSecurity http)throwsException{ApplicationContext applicationContext = http.getSharedObject(ApplicationContext.class);
        http.apply(newUrlAuthorizationConfigurer<>(applicationContext)).withObjectPostProcessor(newObjectPostProcessor<FilterSecurityInterceptor>(){@Overridepublic<OextendsFilterSecurityInterceptor>OpostProcess(O object){
                        object.setSecurityMetadataSource(customSecurityMetadataSource);
                        object.setRejectPublicInvocations(true);// true代表不在请求配置中的 认证通过即可  false则相反 不在请求配置中的 全部没有权限return object;}});
        http.formLogin().and().csrf().disable();}
会话管理
会话即session
登录成功后 ,服务器端存在创建此用户的session,并给客户端返回cookie,cookie中防止该seesion的ID
当用户每次请求时携带cookie,服务器端找到cookie中sessionId去内存中找到对应的session,确认用户身份
默认session有效期30min。
在springSecurity中将session的获取委托给 SecurityContextHolder
会话并发管理
同一用户由于使用不同设备登录,无法携带相同的sessionID ,只能创建重新一个。因此,形成一个用户在服务器端有多个session
对一个用户可同时拥有session数目管理 可使得 用户可以同时使用多少个客户端登录 即会话并发管理
默认没有任何限制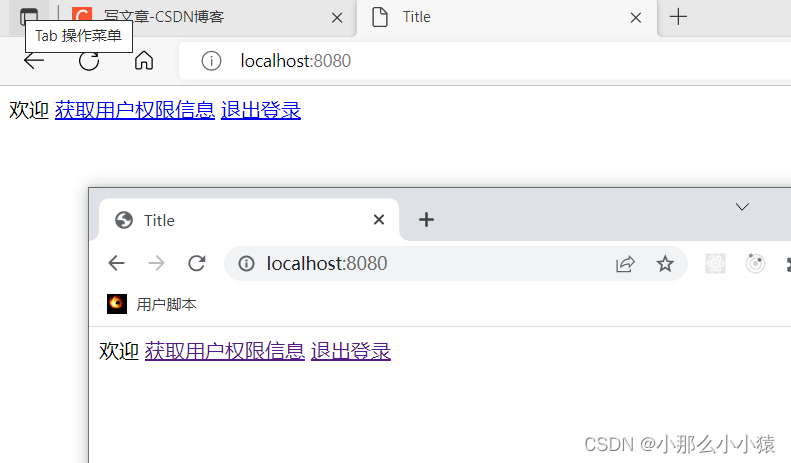
设置同时登录数为1 可选加入
可选加入
security底层是由Map维护的 , HtpSesionEvenPublisher 实现了 FttpSessionListener 接口,可以监听到 HtpSession 的创建和销毀事件,并将 Fltp Session 的创建/销毁事件发布出去,这样,当有 HttpSession 销毀时,Spring Security 就可以感知到该事件了。
@BeanpublicHttpSessionEventPublisherhttpSessionEventPublisher(){returnnewHttpSessionEventPublisher();}
效果:
只能同时登录一个用户,出现互挤现象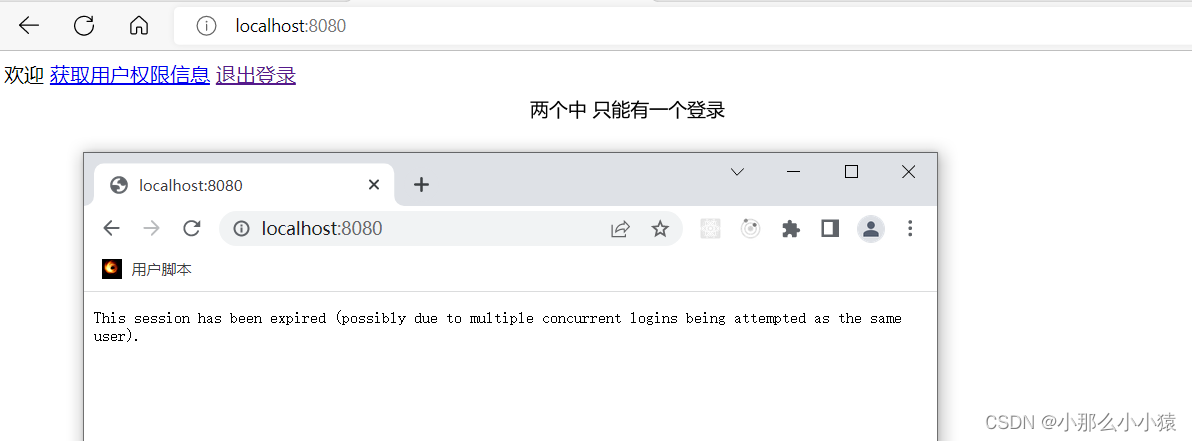
会话失效处理
传统web开发 页面跳转方式
前后端分离 返回对应json方式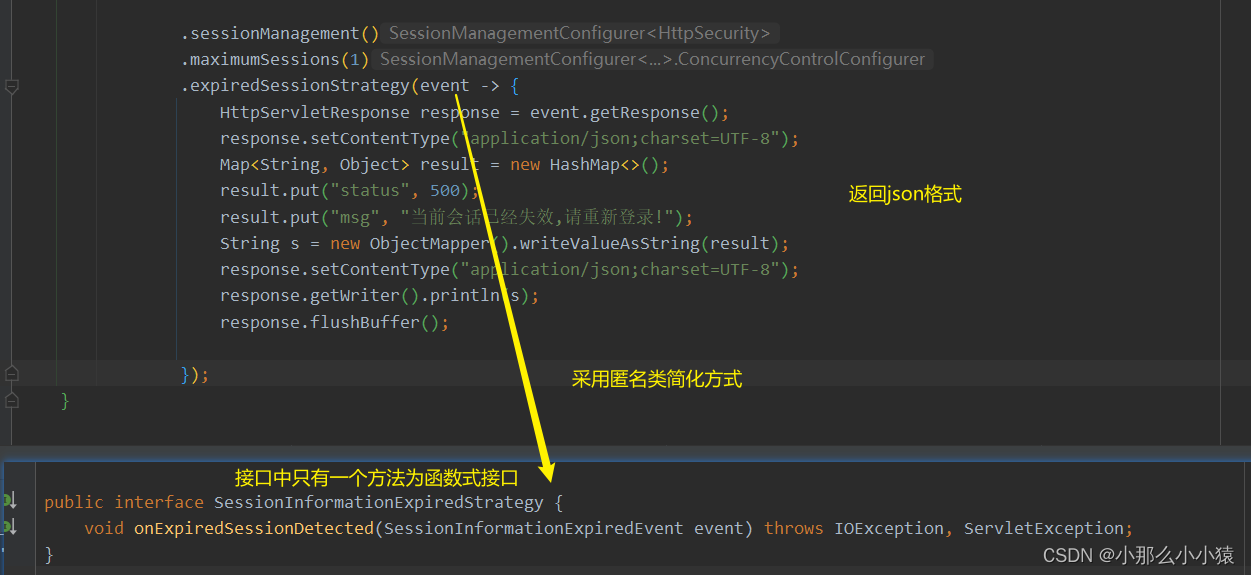
.expiredSessionStrategy(event ->{HttpServletResponse response = event.getResponse();
              response.setContentType("application/json;charset=UTF-8");Map<String,Object> result =newHashMap<>();
              result.put("status",500);
              result.put("msg","当前会话已经失效,请重新登录!");String s =newObjectMapper().writeValueAsString(result);
              response.setContentType("application/json;charset=UTF-8");
              response.getWriter().println(s);
              response.flushBuffer();});
禁止再次登录
当一个用户登录时,该账号就不会在其他设备登陆 (设备锁)。
后端只能有一个session。
默认方式:同一用户 在A登录后,在B登录 。在map中查找该用户的session,并替换成最新的session放入
禁止再次登录:同一用户 在A登录后,在B登录 。在map中查找该用户的session,如果有,则禁止该请求登录
可防止挤下线现象
会话共享
会话底层是用一个map维护,如果在分布式应用,每个应用都有各自的map,map不一致, 导致无法查找到该用户session
解决思路
将会话的维护都放在公共地方,每个单体应用共同维护同一个
例:使用redis
- 引入依赖
<dependency><groupId>org.springframework.boot</groupId><artifactId>spring-boot-starter-data-redis</artifactId></dependency><dependency><groupId>org.springframework.session</groupId><artifactId>spring-session-data-redis</artifactId></dependency>
- 配置文件中
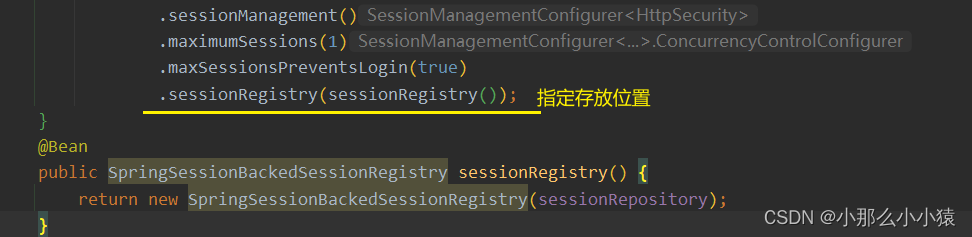
privatefinalFindByIndexNameSessionRepository sessionRepository;@AutowiredpublicSecurityConfig(FindByIndexNameSessionRepository sessionRepository){this.sessionRepository = sessionRepository;}@BeanpublicSpringSessionBackedSessionRegistrysessionRegistry(){returnnewSpringSessionBackedSessionRegistry(sessionRepository);}
同时,删除监听使用map的方法
@BeanpublicHttpSessionEventPublisherhttpSessionEventPublisher(){returnnewHttpSessionEventPublisher();}
源码分析
根据session的拦截器SessionManagementFilter
privatevoiddoFilter(HttpServletRequest request,HttpServletResponse response,FilterChain chain)throwsIOException,ServletException{if(request.getAttribute("__spring_security_session_mgmt_filter_applied")!=null){
            chain.doFilter(request, response);}else{
            request.setAttribute("__spring_security_session_mgmt_filter_applied",Boolean.TRUE);if(!this.securityContextRepository.containsContext(request)){Authentication authentication =SecurityContextHolder.getContext().getAuthentication();if(authentication !=null&&!this.trustResolver.isAnonymous(authentication)){try{this.sessionAuthenticationStrategy.onAuthentication(authentication, request, response);}catch(SessionAuthenticationException var6){SecurityContextHolder.clearContext();this.failureHandler.onAuthenticationFailure(request, response, var6);return;}this.securityContextRepository.saveContext(SecurityContextHolder.getContext(), request, response);}elseif(request.getRequestedSessionId()!=null&&!request.isRequestedSessionIdValid()){if(this.logger.isDebugEnabled()){this.logger.debug(LogMessage.format("Request requested invalid session id %s", request.getRequestedSessionId()));}if(this.invalidSessionStrategy !=null){this.invalidSessionStrategy.onInvalidSessionDetected(request, response);return;}}}

            chain.doFilter(request, response);}}
CSRF 跨站请求伪造
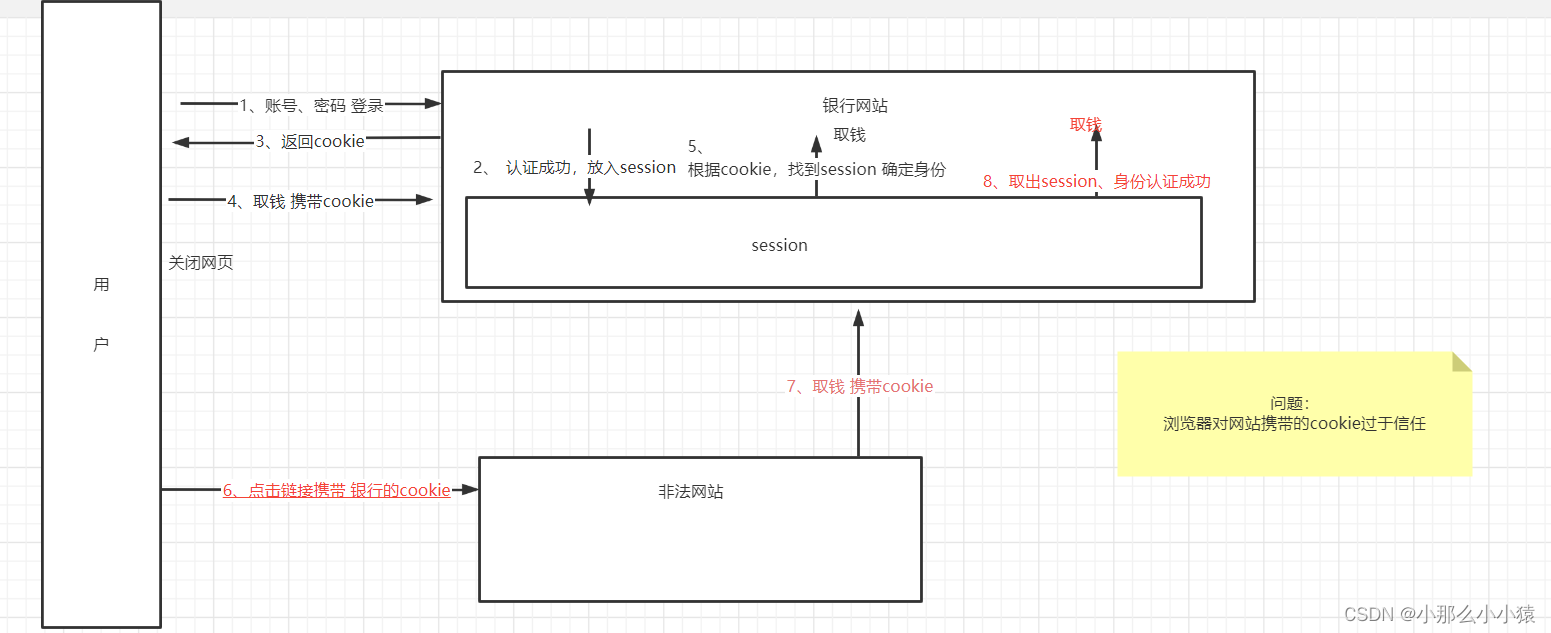
当用户成功登录A网站,A网站会给客户端返回cookie,并保存一段时间session。当用户关闭了A网站,此时若A网站服务器仍保留其session,当用户使用同一浏览器访问B非法网站时,B网站非法发送请求模拟该用户行为携带A网站cookie对A网站发出恶意请求,用户仍不知情
CSRF:利用了服务器端对用户端的信任,对正确cookie的请求没有防备。核心词: 利用 因为自己无法操作
CSRF的特点
- 攻击一般发起在第三方网站,而不是被攻击的网站。被攻击的网站无法防止攻击发生。
- 攻击利用受害者在被攻击网站的登录凭证,冒充受害者提交操作;而不是直接窃取数据。
- 整个过程攻击者并不能获取到受害者的登录凭证,仅仅是“冒用”。
- 跨站请求可以用各种方式:图片URL、超链接、CORS、Form提交等等。部分请求方式可以直接嵌入在第三方论坛、文章中,难以进行追踪。
 有关推荐 https://tech.meituan.com/2018/10/11/fe-security-csrf.html
搭建模拟攻击环境:
bank网站:
- 引入依赖
<dependency><groupId>org.springframework.boot</groupId><artifactId>spring-boot-starter-web</artifactId></dependency><dependency><groupId>org.springframework.boot</groupId><artifactId>spring-boot-starter-security</artifactId></dependency>
- 创建操作接口

@PostMapping("/withdraw")publicStringwithdraw(String name,String money){return name+"执行一次转账"+money+"操作";}
3, 配置springSecuity 并将csrf保护关闭
@ConfigurationpublicclassMyWebConfigureextendsWebSecurityConfigurerAdapter{@BeanpublicUserDetailsServiceuserDetailsServiceBean()throwsException{InMemoryUserDetailsManager inMemoryUserDetailsManager =newInMemoryUserDetailsManager();
        inMemoryUserDetailsManager.createUser(User.withUsername("root").password("{noop}123").roles("admin").build());return inMemoryUserDetailsManager;}@Overrideprotectedvoidconfigure(AuthenticationManagerBuilder auth)throwsException{
        auth.userDetailsService(userDetailsServiceBean());}@Overrideprotectedvoidconfigure(HttpSecurity http)throwsException{
        http.authorizeRequests().anyRequest().authenticated().and().formLogin().and().csrf().disable();}}
恶意网站
<form action="http://localhost:8080/withdraw" method="post"><input name="name" type="hidden" value="zs"/><input name="money" type="hidden" value="10000"><input type="submit" value="点我"></form>
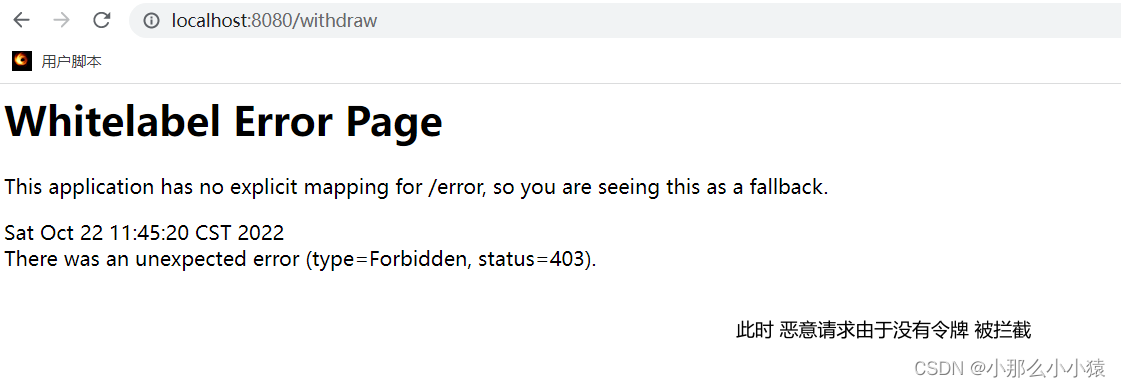
测试 结果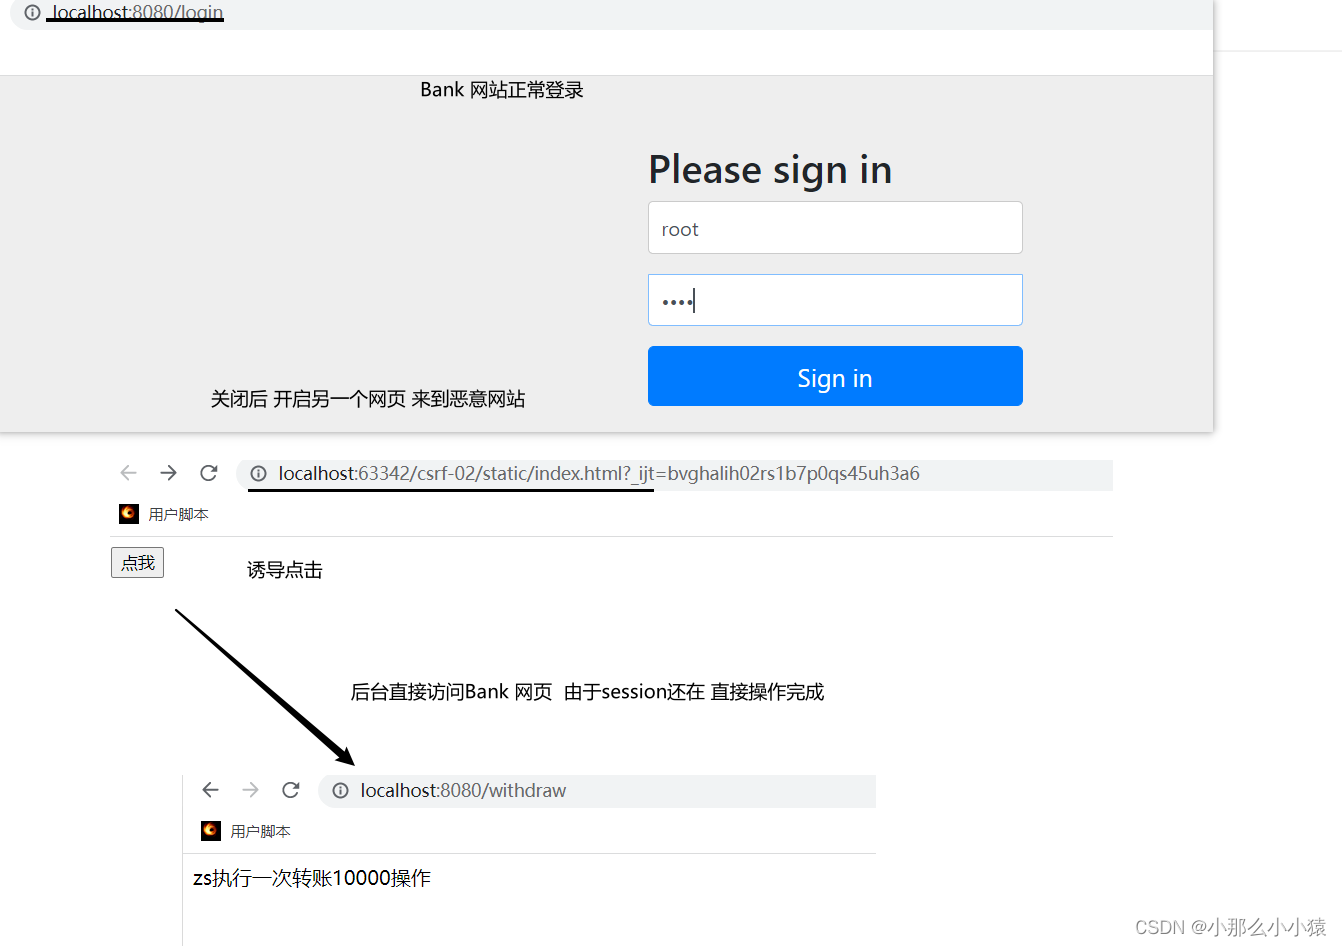
开启CSRF防御
由于恶意网站模拟用户发送的请求与真实请求没有差别,服务端无法判断 造成漏洞。但恶意请求特点:不是从正常页面发出的
主流的解决方式:令牌同步模式 核心目的:请求在合法页面发出才有效 ,将请求与页面绑定;利用csrf只能冒用cookies信息而不能获取特点
传统web开发
流程: 每次敏感请求,服务端生成令牌隐藏在用户页面的表单中,用户提交数据时,服务端校验自己留存的令牌是否由于用户传递的一致。确保请求来自此页面
使用方式
springSecurity默认开启CSRF保护
手动声明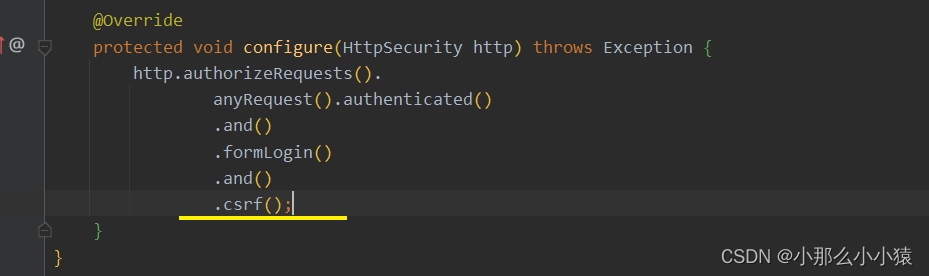
手动关闭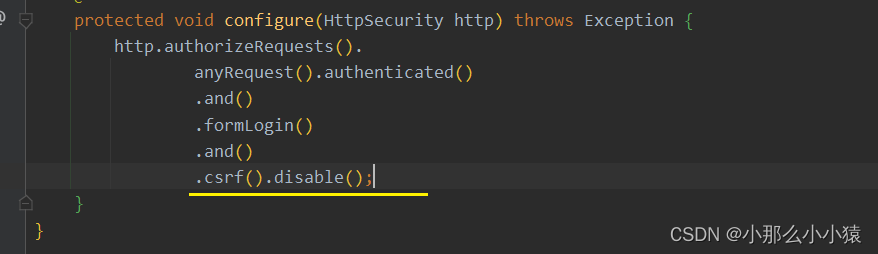
随着页面的刷新,令牌也随之刷新 ,将请求与页面紧紧绑定
测试:
<form th:action="@{/withdraw}" method="post"><input name="name"><input name="money"><input type="submit" value="取款"></form>
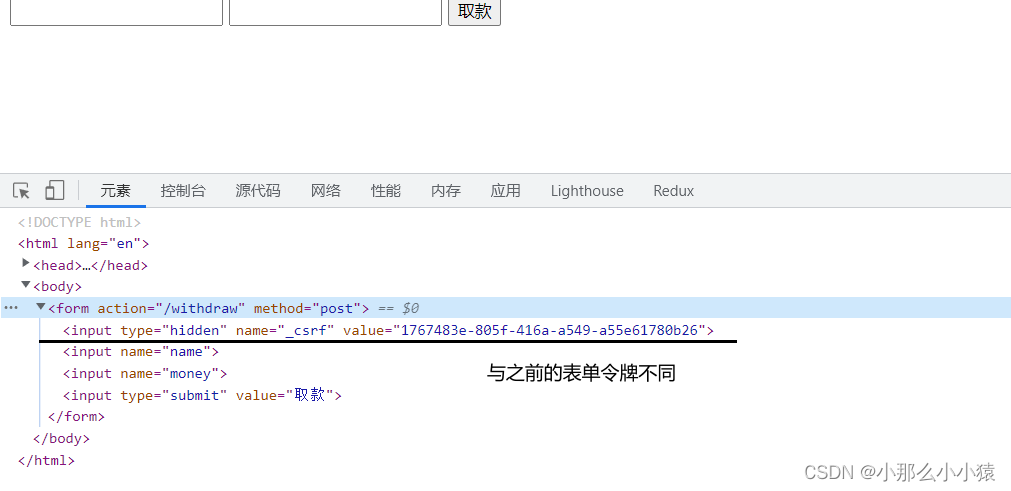
恶意网站只会获取cookie ,在后台发送恶意请求。由于bank的操作需要用户浏览的页面中的令牌以确保是在指定页面操作,恶意网站没有用户名、密码 无法获取用户每次操作页面的令牌(springSecurity会识别页面表单自动插入),只有cookie,所以无效
手动在页面添加同步令牌
<input type="hidden" th:name="${_csrf.parameterName}" th:value="${_csrf.token}"/>
前后端分离开启CSRF防护
由于前后端以json形式进行传递数据,数据获方式不同,导致默认令牌方式无效
前后端分离原理:
将令牌放入cookies中 ,请求时要将请求头(key为 “X-XSRF-TOKEN”)或者请求参数中(key为 "_csrf ")在携带令牌。 服务端不保留数据 ,只负责比较cookies中的令牌是否与请求参数中或 请求头中是否一致
Bank前端系统负责每次请求时,自动将cookies中取出令牌 动态拼接在请求中的header。 恶意网站诱导用户发送请求,但不是Bank页面,没有经过前端系统, 所以无法进行拼接 ,验证失败。也可以使得请求只能在前台发送
要是恶意网站中将请求中携带cookies查看并修改请求header怎么办?恶意网站无法获取其他网站cookies, 只能利用
两种方式区别
传统web开发需要每次页面刷新 后端负责生成输出在页面,并负责校验
前后端分离:后端生成一次 每次请求,前端负责拼接hearder 打上标识,后端负责校验
疑问:
能否登录成功后,前端可自行进行生成随机数一份放存在cookies中,一份放在默认axios中,每次请求前放入header;后端只负责校验?
使用方式
- 在springSecurity的配置中

2. 获取令牌后,将其拼接在Header 或 请求参数中 (由于前后端分离,放在 header中 )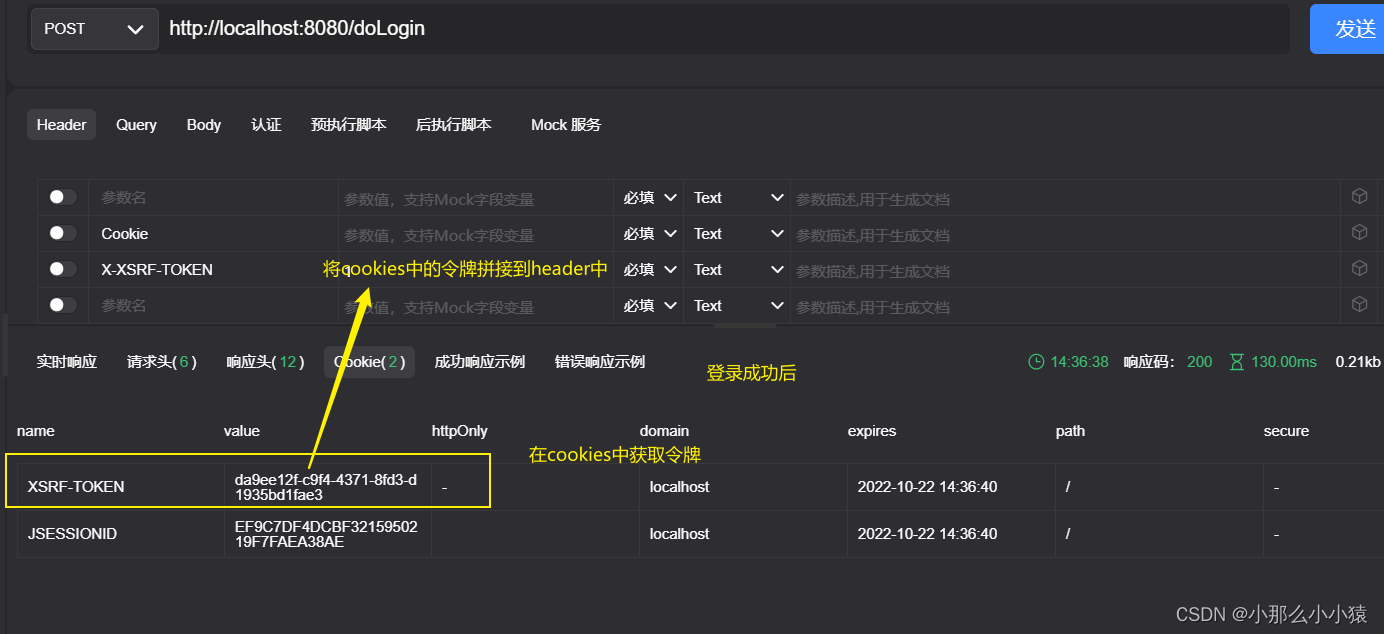
csrf防御过程
找到对应过滤器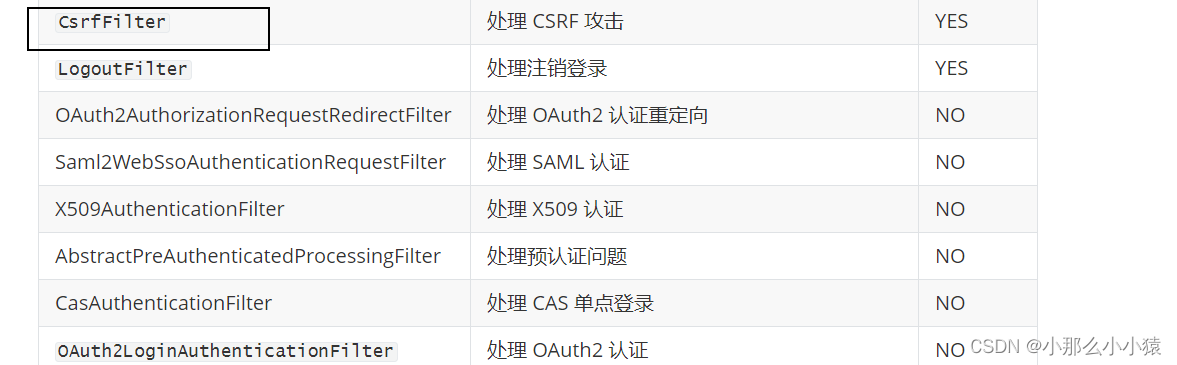
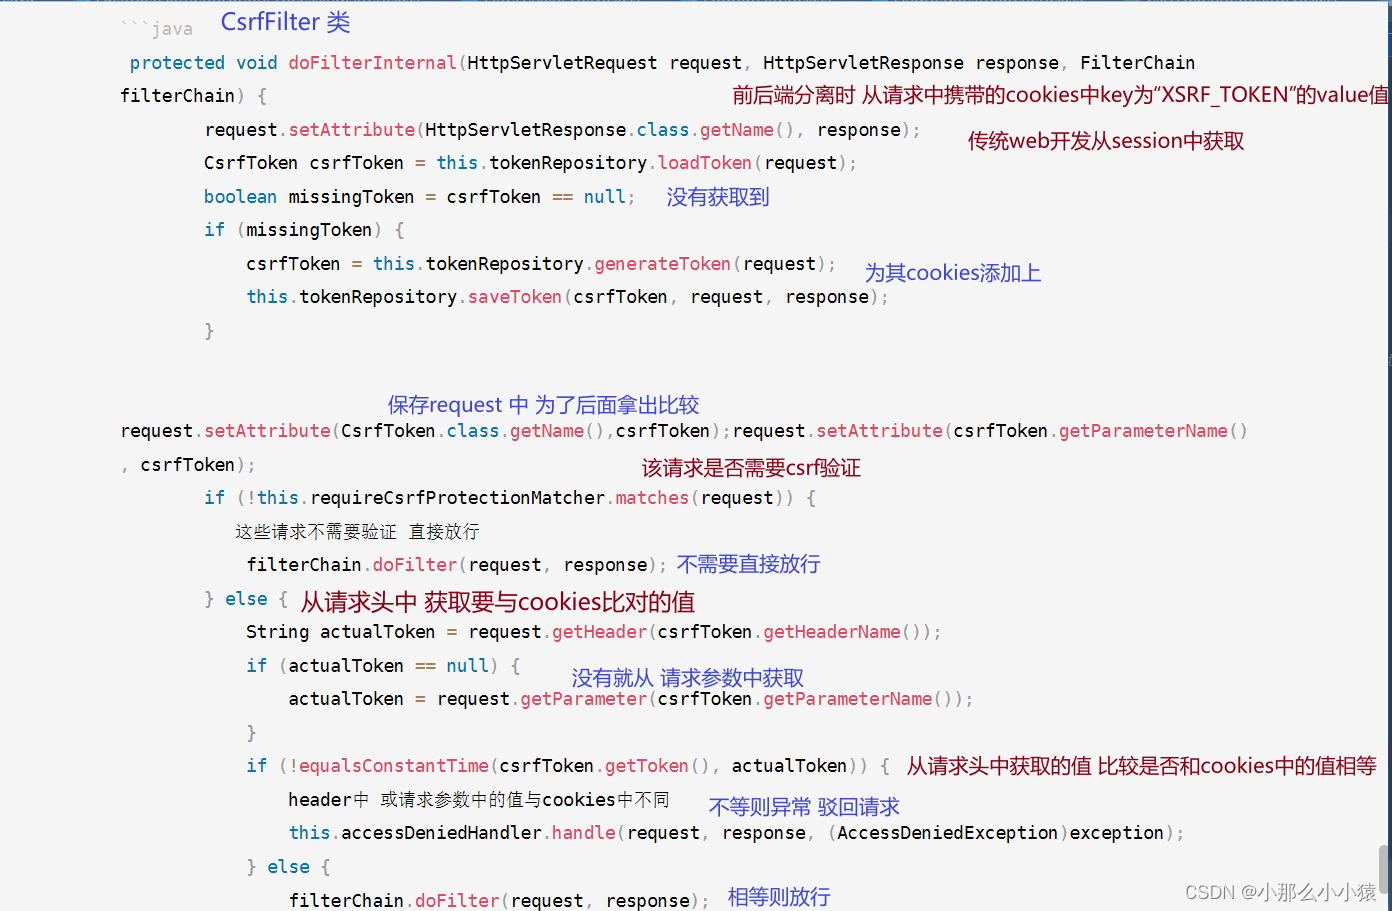
protectedvoiddoFilterInternal(HttpServletRequest request,HttpServletResponse response,FilterChain filterChain){
request.setAttribute(HttpServletResponse.class.getName(), response);CsrfToken csrfToken =this.tokenRepository.loadToken(request);boolean missingToken = csrfToken ==null;if(missingToken){
csrfToken =this.tokenRepository.generateToken(request);this.tokenRepository.saveToken(csrfToken, request, response);}
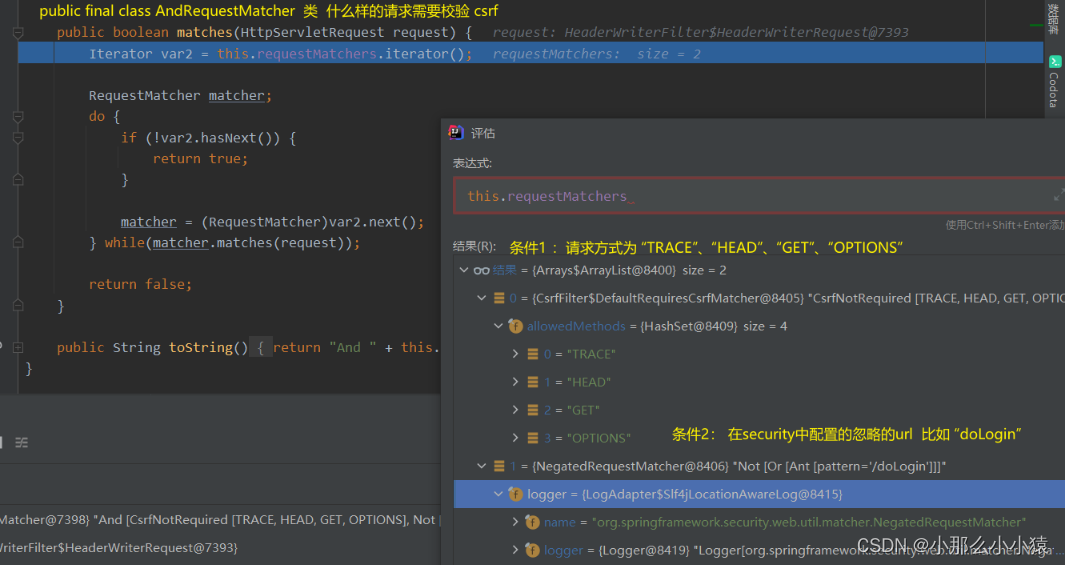
request.setAttribute(CsrfToken.class.getName(),csrfToken);request.setAttribute(csrfToken.getParameterName(), csrfToken);if(!this.requireCsrfProtectionMatcher.matches(request)){
这些请求不需要验证 直接放行
filterChain.doFilter(request, response);}else{String actualToken = request.getHeader(csrfToken.getHeaderName());if(actualToken ==null){
actualToken = request.getParameter(csrfToken.getParameterName());}if(!equalsConstantTime(csrfToken.getToken(), actualToken)){
header中 或请求参数中的值与cookies中不同
this.accessDeniedHandler.handle(request, response,(AccessDeniedException)exception);}else{
filterChain.doFilter(request, response);}}}
CsrfToken csrfToken = this.tokenRepository.loadToken(request);
前后端分离cookies中获取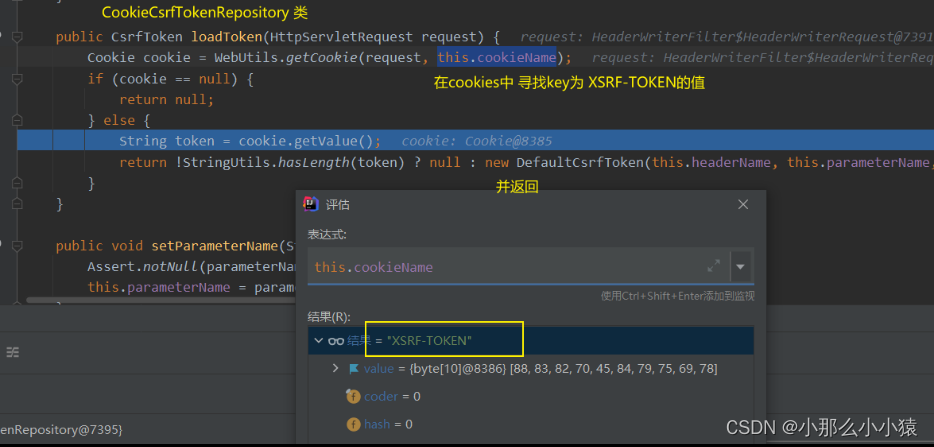
传统web开发从session中获取

if (!this.requireCsrfProtectionMatcher.matches(request))
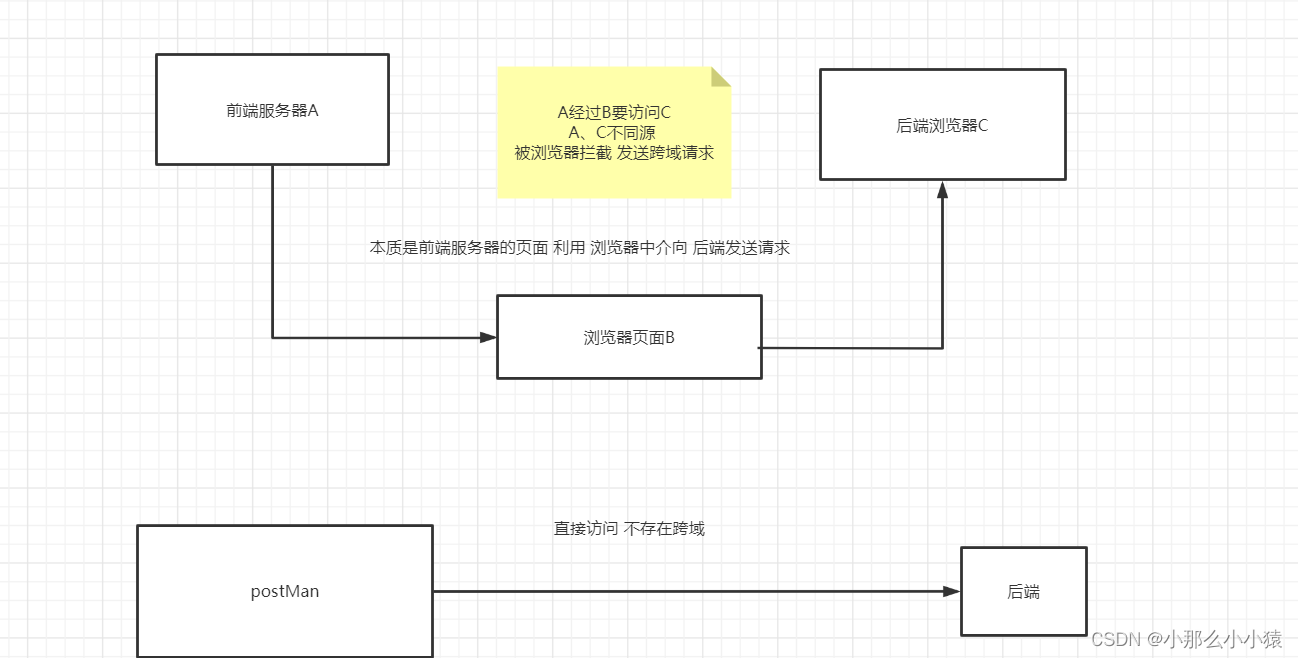
CORS 跨域问题
域=协议+ip+端口
有其中任意不同的两者之间的访问即跨域 ,是浏览器同源策略限制的!(运行在浏览器的js请求被浏览器拦截,而postMan不会 ,因为只是简单的访问一个资源,并不存在资源的相互访问,所有没有同源限制)
CORS解决不同域之间的访问方法:
增加一组HTTP 请求头字段,浏览器(提前检查前端请求方式)和服务器之间通过这个字段进行跨域交流
请求分为GET请求和其他请求,浏览器发送非get请求必须要发起两次请求 第一次预检获取 第二次请求
简单请求(Get请求) HTTP 字段
浏览器发送:
Host: localhost:8080            要进行访问的地址
Origin: http://localhost:8081   本次请求来自 协议://主机:端口
Referer:http://localhost:8081/index.html
服务端接收后 回应
Access-Control-Allow-Origin:http://localhost:8081 允许 此域 访问
客户端发现自己在 Access-Control-Allow-Origin 字段声明的域中,能够正常发送get请求,就不再对前端的跨域请求进行限制
非简单请求
客户端发送 第一次预检请求
OPTIONS /put HTTP/1.1
Host: localhost:8080
Connection: keep-alive
Accept: */*
Access-Control-Request-Method:PUT
Origin: http://localhost: 8081
Referer:http://localhost:8081/index.html
服务器端发送
HTTP/1.1200Access-Control-Allow-Origin:http://localhost:8081Access-Control-Request-Methods: PUT  允许的方法
Access-Control-Max-Age:3600   此次申请的有效期
第一次预检请求通过后,发送真正跨域请求
springBoot解决跨域的三种方式
方式一: 添加注解
@CrossOrigin 注解来标记支持跨域。
当添加在 Controller 上时,表示 Controller 中的所有接口都支持跨域 ;可以添加在方法上,表示只有此方法支持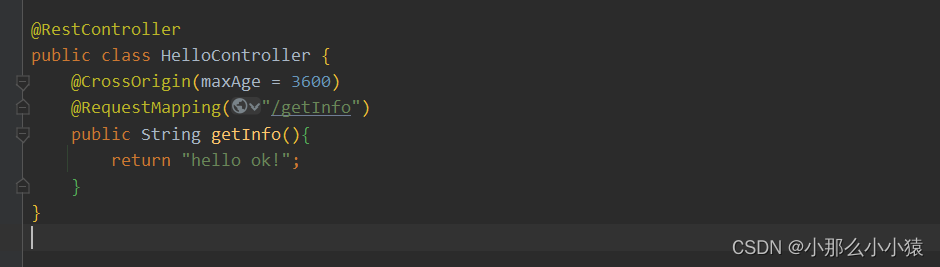
可选参数:
- origins:允许的域,
*表示允许所有域 - alowCredentials:浏览器是否应当发送凭证信息,如 Cookie。
- allowedHeaders: 请求被允许的请求头字段,
*表示所有字段。 - maxAge:预检请求的有效期,有效期内不必再次发送预检请求,默认是
1800秒。 - methods:允许的请求方法,
*表示允许所有方法。
方式二: 配置mvc
@ConfigurationpublicclassWebMvcConfigimplementsWebMvcConfigurer{@OverridepublicvoidaddCorsMappings(CorsRegistry registry){
        registry.addMapping("/**")//处理的请求地址.allowedMethods ("*").allowedHeaders ("*").allowCredentials (false).maxAge (3600);}}
方式三: 设置过滤器
@ConfigurationpublicclassWebMvcConfig{@BeanFilterRegistrationBean<CorsFilter>corsFilter(){FilterRegistrationBean<CorsFilter> registrationBean =newFilterRegistrationBean<>();CorsConfiguration corsConfiguration =newCorsConfiguration();
        corsConfiguration.setAllowedHeaders(Arrays.asList("*"));
        corsConfiguration.setAllowedMethods(Arrays.asList("*"));
        corsConfiguration.setAllowedOrigins(Arrays.asList("*"));
        corsConfiguration.setMaxAge(3600L);UrlBasedCorsConfigurationSource source =newUrlBasedCorsConfigurationSource();
        source.registerCorsConfiguration("/**", corsConfiguration);
        registrationBean.setFilter(newCorsFilter(source));
        registrationBean.setOrder(1);// 设置启动顺序return registrationBean;}}
springSecurity解决跨域
使用springsecurity后 springsecurity的过滤器拦截在spring外 。请求还没有到达spring处理,就已经被spiringSecurity跨域拦截器拦截住,使得原spring处理无效
以上springBoot的跨域方式中 ,只有方式三 提升拦截顺序赶在springSecurity之前可能有效 ,方式一、方式二都在springSecurity拦截器之后。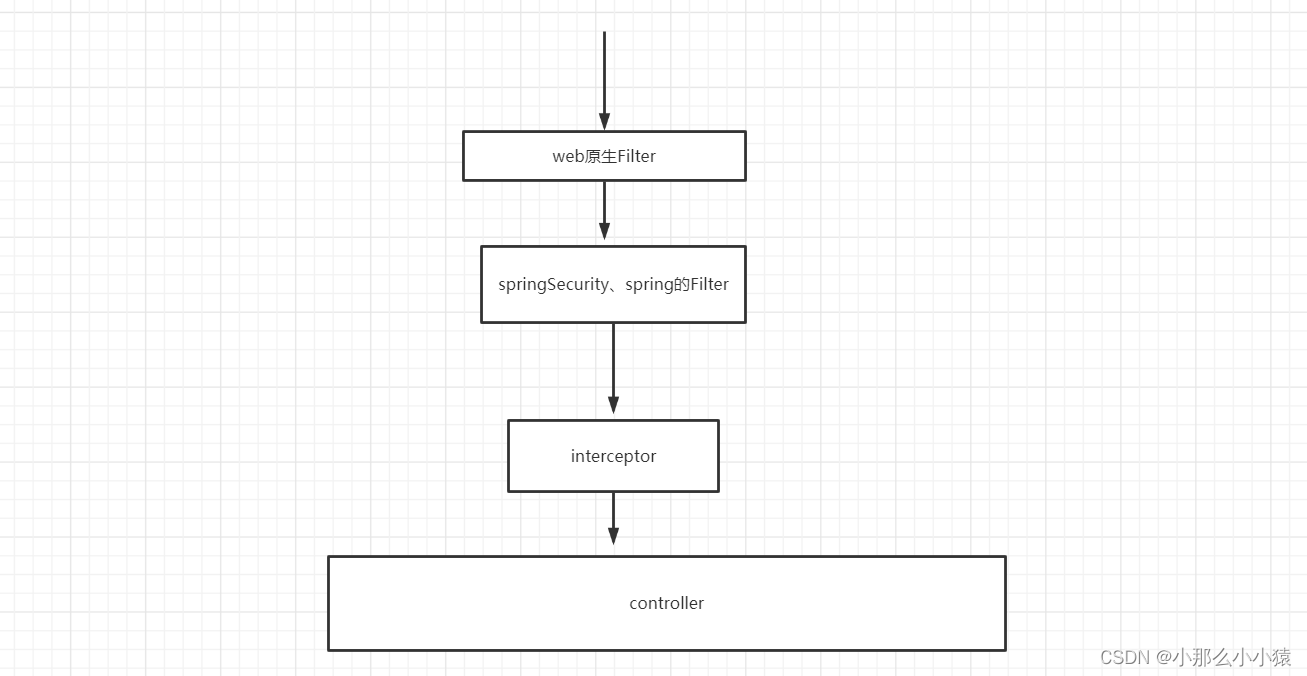
springSecurity跨域方式
在security配置类中
1.
CorsConfigurationSourceconfigurationSource(){CorsConfiguration corsConfiguration =newCorsConfiguration();
        corsConfiguration.setAllowedHeaders(Arrays.asList("*"));
        corsConfiguration.setAllowedMethods(Arrays.asList("*"));
        corsConfiguration.setAllowedOrigins(Arrays.asList("*"));
        corsConfiguration.setMaxAge(3600L);UrlBasedCorsConfigurationSource source =newUrlBasedCorsConfigurationSource();
        source.registerCorsConfiguration("/**", corsConfiguration);return source;}

版权归原作者 小那么小小猿 所有, 如有侵权,请联系我们删除。