
Controller、Service、Repository 层的单元测试
1.Controller 层的单元测试
下面通过实例演示如何在控制器中使用 MockMvc 进行单元测试。
1.1 创建一个用于测试的控制器
packagecom.example.demo.controller;importorg.springframework.web.bind.annotation.PostMapping;importorg.springframework.web.bind.annotation.RequestMapping;importorg.springframework.web.bind.annotation.RestController;@RestControllerpublicclassHelloController{@RequestMapping("/hello")publicStringhello(String name){return"hello "+ name;}}
- @RestController:代表这个类是 REST 风格的控制器,返回 JSON/XML 类型的数据。
- @RequestMapping:用于配置 URL 和方法之间的映射,可用在类和方法上。用于方法上,则其路径会继承用在类的路径上。
1.2 编写测试
packagecom.example.demo.controller;importorg.junit.Assert;importorg.junit.Before;importorg.junit.Test;importorg.junit.runner.RunWith;importorg.springframework.beans.factory.annotation.Autowired;importorg.springframework.boot.test.autoconfigure.web.servlet.WebMvcTest;importorg.springframework.boot.test.context.SpringBootTest;importorg.springframework.http.MediaType;importorg.springframework.test.context.junit4.SpringRunner;importorg.springframework.test.context.web.WebAppConfiguration;importorg.springframework.test.web.servlet.MockMvc;importorg.springframework.test.web.servlet.MvcResult;importorg.springframework.test.web.servlet.request.MockMvcRequestBuilders;importorg.springframework.test.web.servlet.result.MockMvcResultHandlers;importorg.springframework.test.web.servlet.result.MockMvcResultMatchers;importorg.springframework.test.web.servlet.setup.MockMvcBuilders;importorg.springframework.web.context.WebApplicationContext;importstaticorg.junit.Assert.*;@SpringBootTest@RunWith(SpringRunner.class)publicclassHelloControllerTest{//启用web上下文@AutowiredprivateWebApplicationContext webApplicationContext;privateMockMvc mockMvc;@BeforepublicvoidsetUp()throwsException{//使用上下文构建mockMvc
        mockMvc =MockMvcBuilders.webAppContextSetup(webApplicationContext).build();}@Testpublicvoidhello()throwsException{// 得到MvcResult自定义验证// 执行请求MvcResult mvcResult = mockMvc.perform(MockMvcRequestBuilders.get("/hello").contentType(MediaType.APPLICATION_JSON_UTF8)//传入参数.param("name","longzhonghua")//接收的类型.accept(MediaType.APPLICATION_JSON_UTF8))//等同于Assert.assertEquals(200,status);//判断接收到的状态是否是200.andExpect(MockMvcResultMatchers.status().isOk())//等同于 Assert.assertEquals("hello longzhonghua",content);.andExpect(MockMvcResultMatchers.content().string("hello longzhonghua")).andDo(MockMvcResultHandlers.print())//返回MvcResult.andReturn();//得到返回代码int status = mvcResult.getResponse().getStatus();//得到返回结果String content = mvcResult.getResponse().getContentAsString();//断言,判断返回代码是否正确Assert.assertEquals(200,status);//断言,判断返回的值是否正确Assert.assertEquals("hello longzhonghua",content);}}
- @SpringBootTest:是 Spring Boot 用于测试的注解,可指定入口类或测试环境等。
- @RunWith(SpringRunner.class):让测试运行于 Spring 的测试环境。
- @Test:表示一个测试单元。
- WebApplicationContext:启用 Web 上下文,用于获取 Bean 中的内容。
- @Before:表示在测试单元执行前执行。这里使用上下文构建 MockMvc。
- MockMvcRequestBuilders.get:指定请求方式是 GET。一般用浏览器打开网页就是 GET 方式。
运行测试,在控制器中会输出以下结果:
MockHttpServletRequest:HTTPMethod=GETRequestURI=/hello
       Parameters={name=[longzhonghua]}Headers=[Content-Type:"application/json;charset=UTF-8",Accept:"application/json;charset=UTF-8"]Body=nullSessionAttrs={}Handler:Type=com.example.demo.controller.HelloControllerMethod=publicjava.lang.Stringcom.example.demo.controller.HelloController.hello(java.lang.String)Async:Async started =falseAsync result =nullResolvedException:Type=nullModelAndView:View name =nullView=nullModel=nullFlashMap:Attributes=nullMockHttpServletResponse:Status=200Error message =nullHeaders=[Content-Type:"application/json;charset=UTF-8",Content-Length:"18"]Content type = application/json;charset=UTF-8Body= hello longzhonghua
    ForwardedURL=nullRedirectedURL=nullCookies=[]
在上述结果中可以看到 访问方式、路径、参数、访问头、ModelAndView、FlashMap、MockHttpServletResponse。
2.Service 层的单元测试
本实例演示如何在 Service 中使用 Assert 进行单元测试。
2.1 创建一个实体类
packagecom.example.demo.entity;importlombok.Data;importlombok.Getter;importlombok.Setter;@DatapublicclassUser{privateString name;privateint age;}
2.2 创建服务类
这里用 @Service 来标注服务类,并实例化一个 User 对象。
packagecom.example.demo.service;importcom.example.demo.entity.User;importorg.springframework.stereotype.Service;@ServicepublicclassUserService{publicUsergetUserInfo(){User user =newUser();
        user.setName("pipi");
        user.setAge(18);return user;}}
2.3 编写测试
编写测试用于比较实例化的实体 User 和测试预期值是否一样。
packagecom.example.demo.service;importcom.example.demo.entity.User;importorg.junit.Assert;importorg.junit.Test;importorg.junit.runner.RunWith;importorg.springframework.beans.factory.annotation.Autowired;importorg.springframework.boot.test.context.SpringBootTest;importorg.springframework.test.context.junit4.SpringJUnit4ClassRunner;importorg.springframework.test.context.junit4.SpringRunner;importorg.springframework.test.context.web.WebAppConfiguration;importstaticorg.hamcrest.CoreMatchers.*;//表明要在测试环境运行,底层使用的junit测试工具@RunWith(SpringRunner.class)// SpringJUnit支持,由此引入Spring-Test框架支持!//启动整个spring的工程@SpringBootTestpublicclassUserServiceTest{@AutowiredprivateUserService userService;@TestpublicvoidgetUserInfo(){User user = userService.getUserInfo();//比较实际的值和用户预期的值是否一样Assert.assertEquals(18, user.getAge());Assert.assertThat(user.getName(),is("pipixia"));}}
运行测试,结果显示出错,表示期望的值和实际的值不一样。

3.Repository
Repository 层主要用于对数据进行增加、删除、修改和查询操作、它相当于仓库管理员的进出货操作。
下面通过实例演示如何在 Repository 中进行单元测试,以及使用 @Transactional 注解进行回滚操作。
packagecom.example.demo.repository;importcom.example.demo.entity.Card;importorg.junit.After;importorg.junit.Before;importorg.junit.Test;importorg.junit.runner.RunWith;importorg.springframework.beans.factory.annotation.Autowired;importorg.springframework.boot.test.autoconfigure.orm.jpa.DataJpaTest;importorg.springframework.boot.test.context.SpringBootTest;importorg.springframework.test.annotation.Rollback;importorg.springframework.test.context.ContextConfiguration;importorg.springframework.test.context.junit4.SpringJUnit4ClassRunner;importorg.springframework.test.context.junit4.SpringRunner;importorg.springframework.transaction.annotation.Transactional;importorg.springframework.web.bind.annotation.GetMapping;importjava.util.List;importstaticorg.junit.Assert.*;@RunWith(SpringRunner.class)@SpringBootTest@TransactionalpublicclassCardRepositoryTest{@AutowiredprivateCardRepository cardRepository;@TestpublicvoidtestQuery(){// 查询操作List<Card> list = cardRepository.findAll();for(Card card : list){System.out.println(card);}}@TestpublicvoidtestRollBack(){// 查询操作Card card =newCard();
        card.setNum(3);
        cardRepository.save(card);//throw new RuntimeException();}}
- @Transactional:即回滚的意思。所有方法执行完之后哦,回滚成原来的样子。
testRollBack方法:执行添加一条记录。如果开启了 @Transactional,则会在添加之后进行回滚,删除刚添加的数据,如果注释掉 @Transactional,则完成添加后不回滚。大家在测试时可以尝试去掉或添加 @Transactional 状态下的不同效果。这里的 @Transactional 放在类上,也可以加在方法上作用于方法。
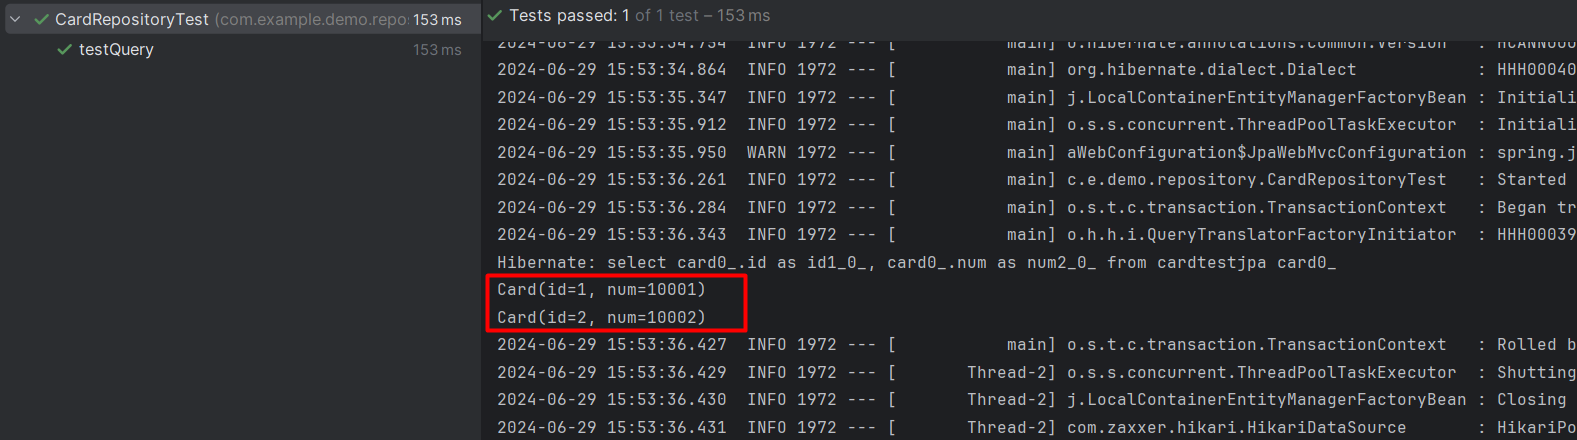
运行
testQuery
测试,控制台输出如下:

运行
testRollBack
测试,并添加 @Transactional,控制台输出如下:
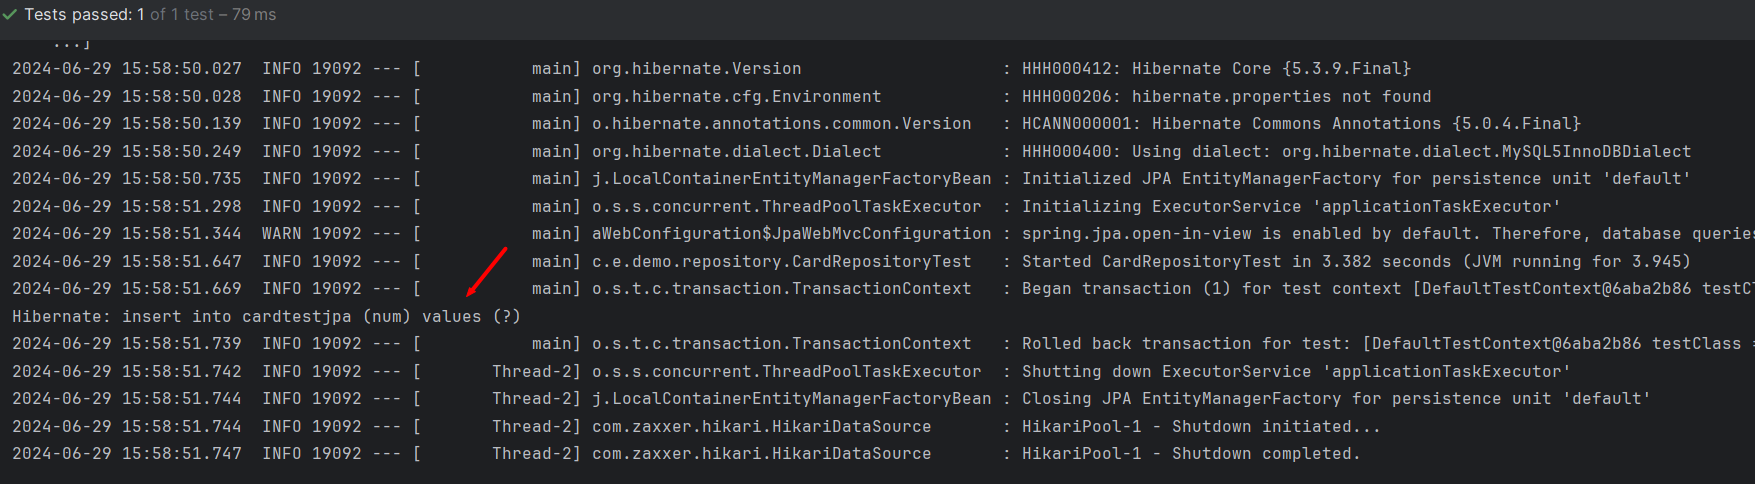
上述结果表示先添加,然后操作被立即回滚了。

运行
testRollBack
测试,去掉 @Transactional,控制台输出如下:


注:设置了
id
为自增键。
本文转载自: https://blog.csdn.net/be_racle/article/details/140062004
版权归原作者 G皮T 所有, 如有侵权,请联系我们删除。
版权归原作者 G皮T 所有, 如有侵权,请联系我们删除。