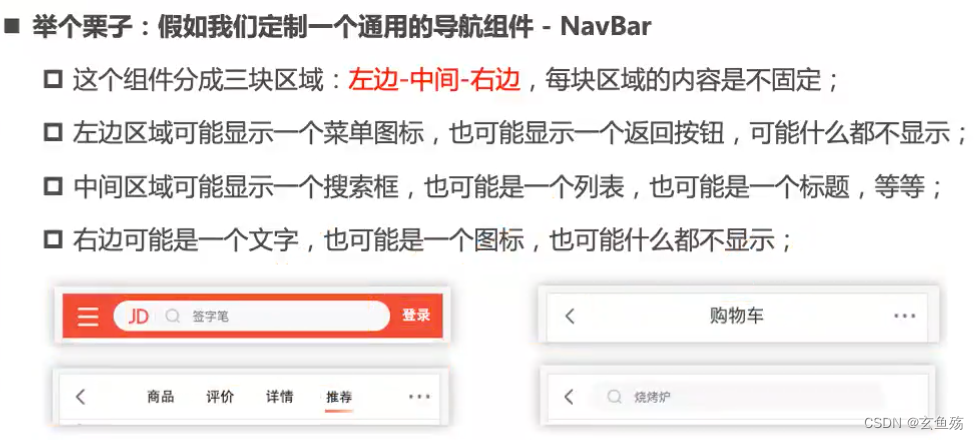
前言 : 在开发中,我们会经常封装一个个复用的组件,大部分都是传递不同的数据,让组件来进行展示,template结构都是固定的
那么,有没有一种可能,可以让使用者来决定某一块区域到底存放什么内容和元素呢

答案是有的,那就是使用插槽,根据传入的不同,显示特定的内容
一、 认识插槽

这个时候我们就可以使用插槽
- 插槽的使用过程其实是抽取共性、预留不同
- 将共同的元素、内容依然在组件内进行封装
- 将不同的元素使用slot作为占位,让外部决定到底显示什么元素
二、使用插槽
vue中将<slot>元素作为承载分发内容的出口,使用<slot>就可以为封装组件开启一个插槽
1.普通插槽
插槽组件
<template>
  <div>
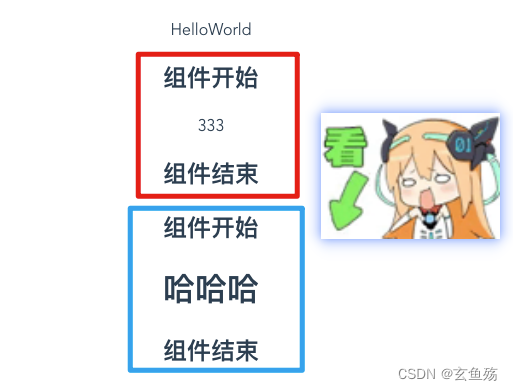
    <h2>组件开始</h2>
    <!-- 安放一个插槽,可以使用默认值,若没有东西插进来就显示这个-->
    <slot>333</slot>
    <h2>组件结束</h2>
  </div>
</template>

<script>
export default {};
</script>
<style scoped></style>
使用插槽
<template>
  <div class="HelloWorld-layout">
    <div>HelloWorld</div>
    <!-- 中间不写内容,显示默认内容 -->
    <my-slot></my-slot>
    <!-- 覆盖默认值 中间也可以插入文本、自定义组件,各种东西~ -->
    <my-slot>
      <h1>哈哈哈</h1>
    </my-slot>
  </div>
</template>
<script>
import MySlot from './mySlot.vue';
export default {
  name: 'HelloWorld',
  components: { MySlot }
};
</script>
<style scoped></style>
查看效果

2.具名插槽
给插槽绑定一个name属性,也就是取个名字,使用的时候可以找到对应的插槽把内容放入
插槽组件
<template>
  <div class="nav-bar">
    <div class="default">
      <!-- 其实这样默认名字是default  <slot name="default"></slot> -->
      <slot></slot>
    </div>
    <div class="left">
      <!-- 定义左边的插槽 -->
      <slot name="left"></slot>
    </div>
    <div class="center">
      <!-- 定义中间的插槽 -->
      <slot name="center"></slot>
    </div>
    <div class="right">
      <!-- 定义右边的插槽 , 使用传递过来的name值来动态绑定 -->
      <slot :name="dynamicSlotName"></slot>
    </div>
  </div>
</template>
<script>
export default {
  props: {
    // 接受父组件的传值
    dynamicSlotName: {
      type: String,
      default: ''
    }
  }
};
</script>
<style scoped>
.nav-bar {
  display: flex;
  text-align: center;
}
.default,
.left,
.center,
.right {
  flex: 1;
}
</style>
使用插****槽
<template>
  <div class="HelloWorld-layout">
    <!-- 传递一个动态的name过去 -->
    <my-slot :dynamic-slot-name="dynamicSlotName">
      <!-- 找到默认的插槽  和这个是一样的  <template v-slot:default> 我是left </template>-->
      <span>我找默认的插槽</span>
      <!-- 找到名称为left的插槽 -->
      <template v-slot:left> 我是left </template>
      <!-- 找到名称为center的插槽  这是语法糖(简便写法) -->
      <template #center> 我是center </template>
      <!-- 找到名称为right的插槽 , 使用变量来绑定 -->
      <template #[dynamicSlotName]> 我是right </template>
    </my-slot>
  </div>
</template>
<script>
import MySlot from './mySlot.vue';
export default {
  name: 'HelloWorld',
  components: { MySlot },
  data() {
    return {
      dynamicSlotName: 'right'
    };
  }
};
</script>
<style scoped></style>
查看效果

3.作用域插槽
在vue中有渲染作用域的概念
- 父级模版里的所有内容都是在父级作用域中编译的
- 子模版里的所有内容都是在子作用域中编译的
tip : 也就是说,在父组件中是访问不到子组件的内容的,虽然在父组件中使用了插槽,内容是插进了子组件中,但是还是不能访问子组件中定义的变量
插槽组件
<template>
  <div class="nav-bar">
    <!-- 注意,这里是子组件,给子组件的slot上绑定上一个数据 -->
    <slot name="bar" :title-arr="titleArr"></slot>

    <!-- 默认插槽 -->
    <slot :default-arr="defaultArr"></slot>
  </div>
</template>
<script>
export default {
  data() {
    return {
      titleArr: ['a', 'b', 'c', 'd'],
      defaultArr: ['d', 'e', 'f', 'a', 'u', 'l', 't']
    };
  }
};
</script>
<style scoped>
.nav-bar {
  display: flex;
  flex-direction: column;
  text-align: center;
}
</style>
使用插槽
<template>
  <div class="HelloWorld-layout">
    <my-slot>
      <!-- 使用具名插槽的同时,使用子组件中传递过来的数据,数据都放在slotProps这个对象中 -->
      <template #bar="slotProps">
        <!-- 取出slotProps中我们绑定的titleArr变量,进行使用 -->
        <ul class="nav">
          <li class="item" v-for="item in slotProps.titleArr" :key="item">{{ item }}</li>
        </ul>
        <!-- 从插槽里面拿出数据,可以在外部自己控制用什么来包裹 -->
        <div class="button-box">
          <button v-for="item in slotProps.titleArr" :key="item">{{ item }}</button>
        </div>
      </template>
    </my-slot>

    <!-- 当只使用默认插槽(没有取名字时),只使用一个,可以简写成这样(不写template)   官方名称 : 独占默认插槽的缩写-->
    <my-slot v-slot="slotProps">
      <div class="default-box">
        <span v-for="item in slotProps.defaultArr" :key="item">{{ item }}</span>
      </div>
    </my-slot>
  </div>
</template>
<script>
import MySlot from './mySlot.vue';
export default {
  name: 'HelloWorld',
  components: { MySlot }
};
</script>
<style scoped>
.nav {
  width: 100%;
  display: flex;
  padding: 0;
  margin-left: 8px;
  list-style: none;
}
.item,
.button-box button,
.default-box span {
  flex: 1;
  height: 60px;
  line-height: 60px;
  background-color: skyblue;
  margin-right: 8px;
  margin-top: 30px;
}
.button-box,
.default-box {
  width: 100%;
  display: flex;
  margin-left: 8px;
}
.button-box button {
  background-color: red;
  border: none;
  cursor: pointer;
}
</style>
查看效果

tip : 这边文章总的来说不难,不过细节还是挺多的

版权归原作者 玄鱼殇 所有, 如有侵权,请联系我们删除。