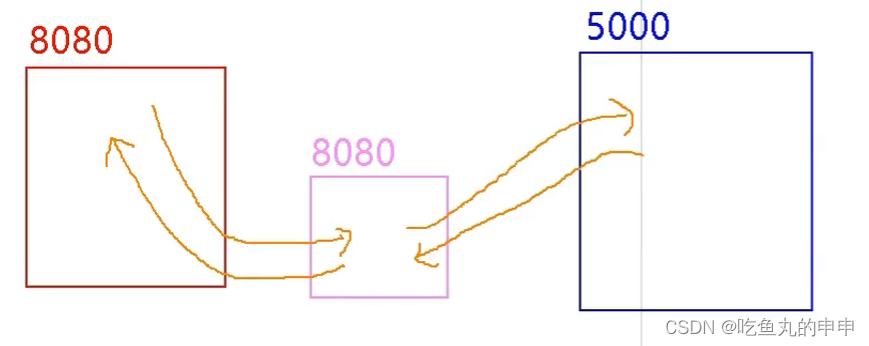
现在解决跨域主要有两种方式是CORS和Jsonp,但是在开发中用的比较多的是配置一个代理服务器。
上面那个图,左边是客户端所处位置,中间是代理服务器,要注意,红色框是客户所处位置,右边蓝色框是5000服务器,中间的粉色框因为是服务器和蓝色框服务器 之间进行数据请求阔以直接请求,因为不用ajax进行通信,直接http就阔以。
这个8080代理服务器可以借助脚手架vue-cli开启。
(1)配置代理方式1
配置代理服务器步骤:
1.先准备一个请求的服务器serve1.js,然后开启它:
const express = require('express');
const app = express();
app.get('/student', (req, res) => {
    const data = [
        { id: '001', name: 'tom', age: 18 },
        { id: '002', name: 'jerry', age: 19 },
        { id: '003', name: 'tony', age: 20 },
    ]
    res.send(JSON.stringify(data))
})
app.listen(5000, function() {
    console.log('running student');
})

2.打开vue.config.js配置代理服务器:
module.exports = {
    pages: {
        index: {
            // page 的入口
            entry: 'src/main.js',
        }
    },

    // 关闭语法检查
    lintOnSave: false,
    // 开启代理服务器
    devServer: {
        proxy: 'http://localhost:5000'
    }
}
注意这里只需要写到端口号,不要加student
3.客户端跨域请求服务器,App.vue中代码:
<template>
    <div>
        <button @click="btnstudent">获取学生信息</button>
    </div>
</template>

<script>
    import axios from 'axios'
    export default {
        name: 'App',
        methods: {
            btnstudent() {
                axios.get('http://localhost:8080/student').then(function(res) {
                    console.log('请求成功', res.data);
                }, function(error) {
                    console.log('请求失败', error.message);
                })
            }
        },
    }
</script>

<style scoped>

</style>
注意,这里端口号后面才写具体的路径
点击按钮输出结果:
这种配置代理服务器有两个缺点:
1.只能配置一个代理服务器
2.不能灵活控制走不走代理,比如我public文件夹里面要是有student文件它就不会走代理而是直接把student文件给我们
(2)配置代理服务器方式二
config.js代码:
module.exports = {
    pages: {
        index: {
            // page 的入口
            entry: 'src/main.js',
        }
    },

    // 关闭语法检查
    lintOnSave: false,
    // 开启代理服务器
    devServer: {
        proxy: {
            // 想走代理就在请求前缀加上一个api,不想走就不加
            '/sy': {
                target: 'http://localhost:5000',
                // 这样才能保证当代理服务器拿到/sy/student的时候转换成/student再发给5000端口的服务器
                pathRewrite: { '^/sy': '' }
                // ws: true,
                // changeOrigin: true
            },
            '/demo': {
                target: 'http://localhost:5001',
                // 这样才能保证当代理服务器拿到/sy/student的时候转换成/student再发给5000端口的服务器
                pathRewrite: { '^/demo': '' }
                // ws: true,
                // changeOrigin: true
            }
        }
    }
}
serve1.js代码:
const express = require('express');
const app = express();
app.get('/student', (req, res) => {
    const data = [
        { id: '001', name: 'tom', age: 18 },
        { id: '002', name: 'jerry', age: 19 },
        { id: '003', name: 'tony', age: 20 },
    ]
    res.send(JSON.stringify(data))
})
app.listen(5000, function() {
    console.log('running student');
})
serve2.js代码:
serve2.js代码:
const express = require('express');
const app = express();
app.get('/cars', (req, res) => {
    const data = [
        { id: '001', name: '奔驰', price: 199 },
        { id: '002', name: '马自达', price: 109 },
        { id: '003', name: '捷达', price: 120 },
    ]
    res.send(JSON.stringify(data))
})
app.listen(5001, function() {
    console.log('running cars');
})
App.vue代码:
<template>
    <div>
        <button @click="btnstudent">获取学生信息</button>
        <button @click="btncar">获取汽车信息</button>
    </div>
</template>

<script>
    import axios from 'axios'
    export default {
        name: 'App',
        methods: {
            btnstudent() {
                axios.get('http://localhost:8080/sy/student').then(function(res) {
                    console.log('请求成功', res.data);
                }, function(error) {
                    console.log('请求失败', error.message);
                })
            },
            btncar() {
                axios.get('http://localhost:8080/demo/cars').then(function(res) {
                    console.log('请求成功', res.data);
                }, function(error) {
                    console.log('请求失败', error.message);
                })
            }
        },
    }
</script>

<style scoped>

</style>
点击两个按钮都可以获取到信息:
版权归原作者 申申あ 所有, 如有侵权,请联系我们删除。