kibana索引表操作、文档操作
kibana索引表
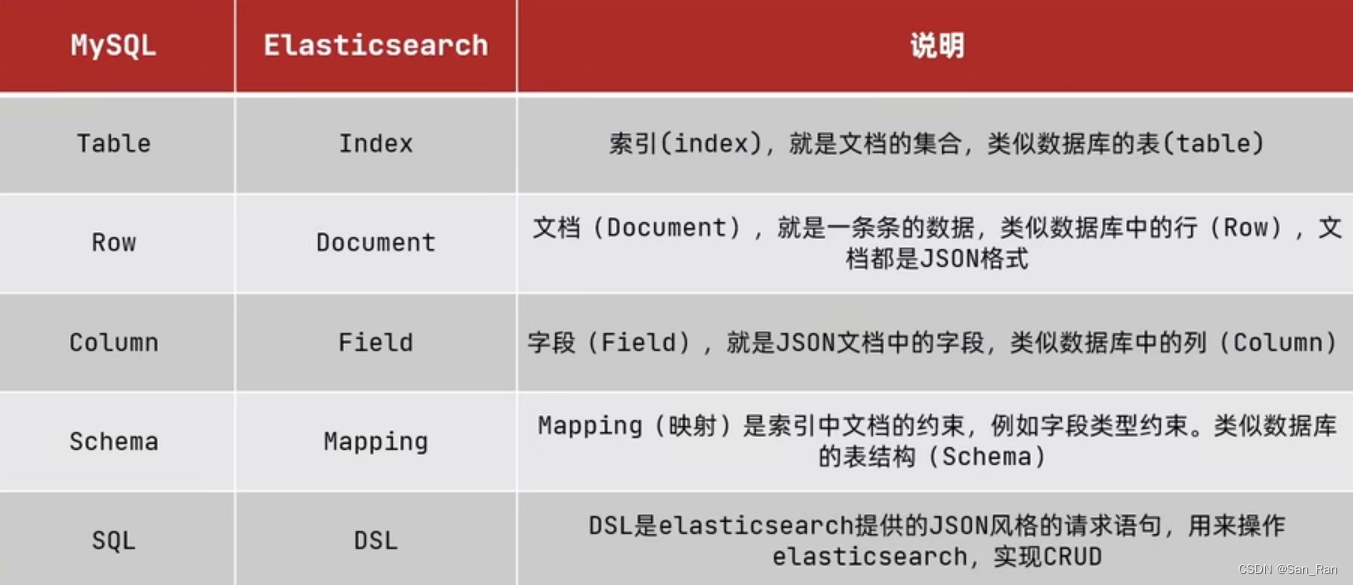
众所周知,es和数据库的操作十分相似,只是在一些称呼上有所不同,如图
因此,想要在es上存储文档,就得先创建索引(好比想要在数据库存储数据,就得先创建表,才能在表里插入数据)。这次笔者主要是通过kibana进行es相应操作,所以给出kibana对应的索引、文档操作。
索引创建
在创建索引之前,需要弄清楚索引能够定义什么类型的属性,其中常用的有:
- type:字段数据类型。常用的有:
字符串:text(可分词), keyword(精确值,不可分,如国家,ip地址)
数值、布尔、日期、对象
- index:是否创建索引,默认为true(即是否进行分词搜索)
- analyzer:使用哪个分词库,笔者常用的是ik分词器
- properties:一个字段的子字段(即可以在一个字段里创建多个子字段)
知道了这些常用的属性,就可以开始尝试创建索引了:
PUT /index_test
{
  "mappings": {
    "properties": {
      "name": {
        "type": "object",
        "properties": {
          "firstName": {
            "type": "keyword"
          },
          "lastName": {
            "type": "keyword"
          }
        }
      },
      "email": {
        "type": "keyword",
        "index": false
      },
      "info": {
        "type": "text",
        "analyzer": "ik_smart"
      }
    }
  }
}
开头的mappings的作用是实现映射,这里笔者定义了三个字段:
name(含有子字段且子字段不可拆分)、email(不可拆分,不参加索引)、info(通过ik分词器拆分)
执行之后可看到
成功创建索引且返回相应索引字段。
其中es的优势有一点在于,通过Restful风格开发,因此可以对索引、文档进行相应get, put ,delete操作。
可以通过get查看索引:
GET /index_test

#返回结果
{
  "index_test" : {
    "aliases" : { },
    "mappings" : {
      "properties" : {
        "email" : {
          "type" : "keyword",
          "index" : false
        },
        "info" : {
          "type" : "text",
          "analyzer" : "ik_smart"
        },
        "name" : {
          "properties" : {
            "firstName" : {
              "type" : "keyword"
            },
            "lastName" : {
              "type" : "keyword"
            }
          }
        }
      }
    },
    "settings" : {
      "index" : {
        "routing" : {
          "allocation" : {
            "include" : {
              "_tier_preference" : "data_content"
            }
          }
        },
        "number_of_shards" : "1",
        "provided_name" : "index_test",
        "creation_date" : "1679405762649",
        "number_of_replicas" : "1",
        "uuid" : "QvgWCEFxQZClB_iDUFX8FQ",
        "version" : {
          "created" : "7120199"
        }
      }
    }
  }
}
DELETE /index_test

#返回结果
{
  "acknowledged" : true
}

# 再次查询索引
GET /index_test

#返回结果
{
  "error" : {
    "root_cause" : [
      {
        "type" : "index_not_found_exception",
        "reason" : "no such index [index_test]",
        "resource.type" : "index_or_alias",
        "resource.id" : "index_test",
        "index_uuid" : "_na_",
        "index" : "index_test"
      }
    ],
    "type" : "index_not_found_exception",
    "reason" : "no such index [index_test]",
    "resource.type" : "index_or_alias",
    "resource.id" : "index_test",
    "index_uuid" : "_na_",
    "index" : "index_test"
  },
  "status" : 404
}
由于es对索引表无法修改已有字段,只能在索引新增字段,同样用PUT + /索引名,就不在此演示。
文档创建
文档也是类似Restful风格开发,因此可以通过GET,POST,PUT,DELETE进行增删改查操作
对文档操作的语法为: 关键词 + /索引表/_doc/文档id (如 POST /index_test/_doc_1 )
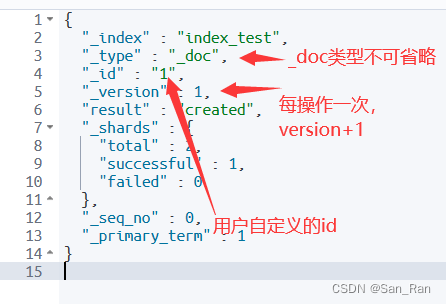
其中_doc为固定写法,不能省略或更改,文档id为自定义id,若不给出id,es会自动分配id。
文档创建:
POST /index_test/_doc/1
{
  "email" : "[email protected]",
  "info" : "kibana操作文档创建,还挺方便",
  "name" : {
    "firstName" : "Zhiyin",
    "LastName" : "IKUN"
  }
}
运行输出:
以及result:created说明创建文档成功,
查询文档: GET + /索引名/_doc/文档id
GET /index_test/_doc/1

# 返回结果
{
  "_index" : "index_test",
  "_type" : "_doc",
  "_id" : "1",
  "_version" : 3,
  "_seq_no" : 13,
  "_primary_term" : 1,
  "found" : true,
  "_source" : {
    "email" : "[email protected]",
    "info" : "kibana操作文档创建,还挺方便",
    "name" : {
      "firstName" : "Zhiyin",
      "LastName" : "IKUN"
    }
  }
}
删除文档: DELETE + /索引名/_doc/文档id
DELETE /index_test/_doc/1

#返回结果
{
  "_index" : "index_test",
  "_type" : "_doc",
  "_id" : "1",
  "_version" : 4,
  "result" : "deleted",
  "_shards" : {
    "total" : 2,
    "successful" : 1,
    "failed" : 0
  },
  "_seq_no" : 14,
  "_primary_term" : 1
}
修改文档:分为全量修改以及局部修改。
- 全量修改: PUT + /索引名/_doc/文档id {
"字段1" : "值1" , "字段2" : "值2" , "字段3" : "值3"
}
实例:
PUT /index_test/_doc/1
{
"email" : "[email protected]",
"info" : "kibana操作文档创建,还挺方便",
"name" : {
  "firstName" : "Zhiyin",
  "LastName" : "IKUN"
}
}
# 通过GET /index_test/_doc/1查询可得:
{
"_index" : "index_test",
"_type" : "_doc",
"_id" : "1",
"_version" : 5,
"_seq_no" : 11,
"_primary_term" : 1,
"found" : true,
"_source" : {
  "email" : "[email protected]",
  "info" : "kibana操作文档创建,还挺方便",
  "name" : {
    "firstName" : "Zhiyin",
    "LastName" : "IKUN"
  }
}
}
- 局部修改:POST+/索引名/_update/文档id { “doc” : {
"字段" : "新的值"} }
POST /index_test/_update/1
{
  "doc": {
    "email" : "[email protected]"
  }
}

#通过GET /index_test/_doc/1查询可得:
{
  "_index" : "index_test",
  "_type" : "_doc",
  "_id" : "1",
  "_version" : 6,
  "_seq_no" : 17,
  "_primary_term" : 1,
  "found" : true,
  "_source" : {
    "email" : "[email protected]",
    "info" : "kibana操作文档创建,还挺方便",
    "name" : {
      "firstName" : "Zhiyin",
      "LastName" : "IKUN"
    }
  }
}
至此,kibana创建索引和文档的基本操作就演示结束了。
版权归原作者 San_Ran 所有, 如有侵权,请联系我们删除。