
初识 Zookeeper
Zookeeper 是 Apache Hadoop 项目下的一个子项目,是一个树形目录服务(B树)。
Zookeeper 翻译过来就是 动物园管理员,他是用来管 Hadoop(大象)、Hive(蜜蜂)、Pig(小 猪)的管理员。简称zk
Zookeeper 是一个分布式的、开源的分布式应用程序的协调服务。
Zookeeper 提供的主要功能包括: 配置管理 分布式锁 集群管理
Zookeeper 安装与配置
1.1 下载安装
1、环境准备
ZooKeeper服务器是用Java创建的,它运行在JVM之上。需要安装JDK 7或更高版本。
2、上传
将下载的ZooKeeper放到/opt/ZooKeeper目录下
#上传zookeeper alt+p
put f:/setup/apache-zookeeper-3.5.6-bin.tar.gz
#打开 opt目录
cd /opt
#创建zooKeeper目录
mkdir  zooKeeper
#将zookeeper安装包移动到 /opt/zooKeeper
mv apache-zookeeper-3.5.6-bin.tar.gz /opt/zookeeper/
3、解压
将tar包解压到/opt/zookeeper目录下
tar -zxvf apache-ZooKeeper-3.5.6-bin.tar.gz
1.2 配置启动
1、配置zoo.cfg
进入到conf目录拷贝一个zoo_sample.cfg并完成配置
#进入到conf目录
cd /opt/zooKeeper/apache-zooKeeper-3.5.6-bin/conf/
#拷贝
cp  zoo_sample.cfg  zoo.cfg
修改zoo.cfg
#打开目录
cd /opt/zooKeeper/
#创建zooKeeper存储目录
mkdir  zkdata
#修改zoo.cfg
vim /opt/zooKeeper/apache-zooKeeper-3.5.6-bin/conf/zoo.cfg

修改存储目录:dataDir=/opt/zookeeper/zkdata
2、启动ZooKeeper
cd /opt/zooKeeper/apache-zooKeeper-3.5.6-bin/bin/
#启动
 ./zkServer.sh  start

看到上图表示ZooKeeper成功启动
3、查看ZooKeeper状态
./zkServer.sh status
zookeeper启动成功。standalone代表zk没有搭建集群,现在是单节点

zookeeper没有启动

Zookeeper 命令操作
Zookeeper 数据模型
ZooKeeper 是一个树形目录服务,其数据模型和Unix的文件系统目录树很类似,拥有一个层次化结构。


这里面的每一个节点都被称为: ZNode,每个节点上都会保存自己的数据和节点信息。
节点可以拥有子节点,同时也允许少量(1MB)数据存储在该节点之下。
节点可以分为四大类:
- PERSISTENT 持久化节点
- EPHEMERAL 临时节点 :-e
- PERSISTENT_SEQUENTIAL 持久化顺序节点 :-s
- EPHEMERAL_SEQUENTIAL 临时顺序节点 :-es
Zookeeper服务端常用命令
- 启动 ZooKeeper 服务: ./zkServer.sh start
- 查看 ZooKeeper 服务状态: ./zkServer.sh status
- 停止 ZooKeeper 服务: ./zkServer.sh stop
- 重启 ZooKeeper 服务: ./zkServer.sh restart
Zookeeper客户端常见命令
连接ZooKeeper服务器:./zkCli.sh –server ip:port
断开连接:quit
设置节点值:set /节点path value
查看命令帮助:help
删除单个节点:delete /节点path
显示指定目录下节点:ls 目录
删除带有子节点的节点:deleteall /节点path
创建节点:create /节点path value
获取节点值:get /节点path
Zookeeper JavaAPI 操作
建立连接
建立连接有两种方式,一种是调用工厂对象的newClient()方法,另一种就是调用工厂对象的builder(),通过链式调用的方法就连接信息传入工厂中。
下面是代码示例:
    /**
     * 建立连接
     */
    @Before
    public void testConnect() {

        /*
         *
         * @param connectString       连接字符串。zk server 地址和端口 "192.168.149.135:2181,192.168.149.136:2181"
         * @param sessionTimeoutMs    会话超时时间 单位ms
         * @param connectionTimeoutMs 连接超时时间 单位ms
         * @param retryPolicy         重试策略
         */
       /* //重试策略
        RetryPolicy retryPolicy = new ExponentialBackoffRetry(3000,10);
        //1.第一种方式
        CuratorFramework client = CuratorFrameworkFactory.newClient("192.168.149.135:2181",
                60 * 1000, 15 * 1000, retryPolicy);*/
        //重试策略
        RetryPolicy retryPolicy = new ExponentialBackoffRetry(3000, 10);
        //2.第二种方式
        //CuratorFrameworkFactory.builder();
        client = CuratorFrameworkFactory.builder()
                .connectString("192.168.149.135:2181")
                .sessionTimeoutMs(60 * 1000)
                .connectionTimeoutMs(15 * 1000)
                .retryPolicy(retryPolicy)
//命名空间,使创建的节点都在命名空间的路径下面
                .namespace("kjz")
                .build();

        //开启连接
        client.start();

    }
注意此方法需要加上@Before注解,表示其他测试方法执行前需要先执行加了**@Before注解**的方法。因为每次进行crud操作时都需要与ZooKeeper Server建立连接。
建立了连接,操作完毕后同时需要释放连接,在对应方法上面加一个**@After注解**,表示每次进行测试最后都要执行该方法。
    @After
    public void close() {
        if (client != null) {
            client.close();
        }
    }
添加节点
代码示例如下:
   /**
     * 创建节点:create 持久 临时 顺序 数据
     * 1. 基本创建 :create().forPath("")
     * 2. 创建节点 带有数据:create().forPath("",data)
     * 3. 设置节点的类型:create().withMode().forPath("",data)
     * 4. 创建多级节点  /app1/p1 :create().creatingParentsIfNeeded().forPath("",data)
     */
    @Test
    public void testCreate() throws Exception {
        //2. 创建节点 带有数据
        //如果创建节点,没有指定数据,则默认将当前客户端的ip作为数据存储
        String path = client.create().forPath("/app2", "hehe".getBytes());
        System.out.println(path);

    }

    @Test
    public void testCreate2() throws Exception {
        //1. 基本创建
        //如果创建节点,没有指定数据,则默认将当前客户端的ip作为数据存储
        String path = client.create().forPath("/app1");
        System.out.println(path);

    }

    @Test
    public void testCreate3() throws Exception {
        //3. 设置节点的类型
        //默认类型:持久化
        String path = client.create().withMode(CreateMode.EPHEMERAL).forPath("/app3");
        System.out.println(path);

    }

    @Test
    public void testCreate4() throws Exception {
        //4. 创建多级节点  /app1/p1
        //creatingParentsIfNeeded():如果父节点不存在,则创建父节点
        String path = client.create().creatingParentsIfNeeded().forPath("/app4/p1");
        System.out.println(path);
    }
Curator中提供了一个枚举类,里面定义了设置不同类型节点的常量
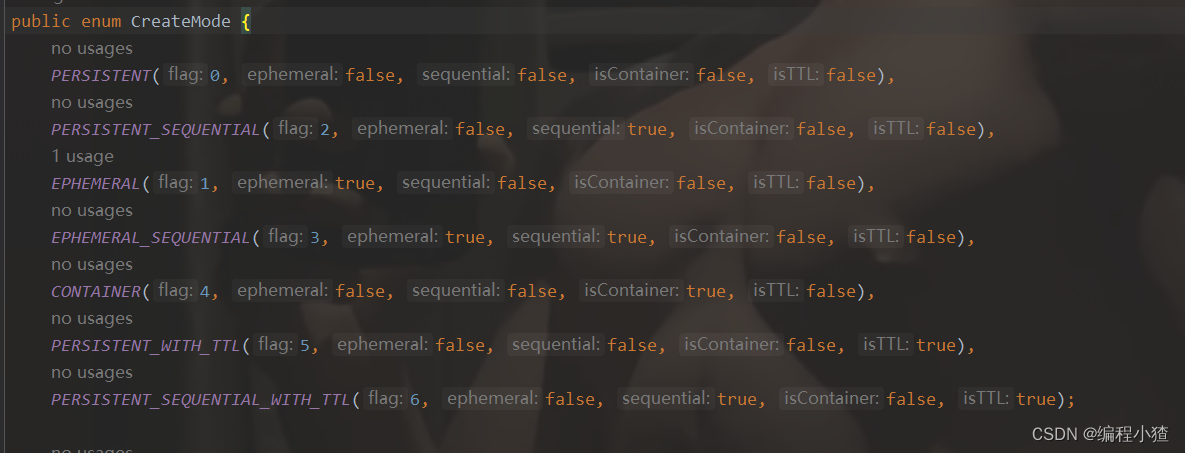
运行testCreate3()时我发现ZooKeeper中并没有保存我创建的节点,原因是在创建节点时指定的节点类型为临时节点,临时节点在会话结束后就会删除。我通过运行testCreate3()这个方法来创建一个节点,运行结束,说明会话也结束了,ZooKeeper就会把节点删除了。
删除节点
删除节点: delete deleteall
删除单个节点:delete().forPath("/app1");
删除带有子节点的节点:delete().deletingChildrenIfNeeded().forPath("/app1");
必须成功的删除:为了防止网络抖动。本质就是重试。client.delete().guaranteed().forPath("/app2");
回调:inBackground;
代码示例:
/**
     * 删除节点: delete deleteall
     * 1. 删除单个节点:delete().forPath("/app1");
     * 2. 删除带有子节点的节点:delete().deletingChildrenIfNeeded().forPath("/app1");
     * 3. 必须成功的删除:为了防止网络抖动。本质就是重试。  client.delete().guaranteed().forPath("/app2");
     * 4. 回调:inBackground
     * @throws Exception
     */

    @Test
    public void testDelete() throws Exception {
        // 1. 删除单个节点
        client.delete().forPath("/app1");
    }

    @Test
    public void testDelete2() throws Exception {
        //2. 删除带有子节点的节点
        client.delete().deletingChildrenIfNeeded().forPath("/app4");
    }
    @Test
    public void testDelete3() throws Exception {
        //3. 必须成功的删除
        client.delete().guaranteed().forPath("/app2");
    }

    @Test
    public void testDelete4() throws Exception {
        //4. 回调
        client.delete().guaranteed().inBackground(new BackgroundCallback(){

            @Override
            public void processResult(CuratorFramework client, CuratorEvent event) throws Exception {
                System.out.println("我被删除了~");
                System.out.println(event);
            }
        }).forPath("/app1");
    }
修改节点
基本修改数据 setData().forPath()
根据版本修改数据 setData().withVersion().forPath()
version 是通过查询出来的。目的就是为了让其他客户端或者线程不干扰我。
代码示例:
 /**
     * 修改数据
     * 1. 基本修改数据:setData().forPath()
     * 2. 根据版本修改: setData().withVersion().forPath()
     * * version 是通过查询出来的。目的就是为了让其他客户端或者线程不干扰我。
     *
     * @throws Exception
     */
    @Test
    public void testSet() throws Exception {
        client.setData().forPath("/app1", "itcast".getBytes());
    }

    @Test
    public void testSetForVersion() throws Exception {

        Stat status = new Stat();
        //3. 查询节点状态信息:ls -s
        client.getData().storingStatIn(status).forPath("/app1");

        int version = status.getVersion();//查询出来的 3
        System.out.println(version);
        client.setData().withVersion(version).forPath("/app1", "hehe".getBytes());
    }
查询节点
查询数据:get: getData().forPath()
查询子节点: ls: getChildren().forPath()
查询节点状态信息:ls -s:getData().storingStatIn(状态对象).forPath()
代码示例:
@Test
    public void testGet1() throws Exception {
        //1. 查询数据:get
        byte[] data = client.getData().forPath("/app1");
        System.out.println(new String(data));
    }

    @Test
    public void testGet2() throws Exception {
        // 2. 查询子节点: ls
        List<String> path = client.getChildren().forPath("/");

        System.out.println(path);
    }

    @Test
    public void testGet3() throws Exception {

        Stat status = new Stat();
        System.out.println(status);
        //3. 查询节点状态信息:ls -s
        client.getData().storingStatIn(status).forPath("/app1");

        System.out.println(status);

    }
Stat里面封装了节点的状态信息

完整代码如下:
package com.kjz.curator;

import org.apache.curator.RetryPolicy;
import org.apache.curator.framework.CuratorFramework;
import org.apache.curator.framework.CuratorFrameworkFactory;
import org.apache.curator.framework.api.BackgroundCallback;
import org.apache.curator.framework.api.CuratorEvent;
import org.apache.curator.retry.ExponentialBackoffRetry;
import org.apache.zookeeper.CreateMode;
import org.apache.zookeeper.data.Stat;
import org.junit.After;
import org.junit.Before;
import org.junit.Test;

import java.util.List;

public class CuratorTest {

    private CuratorFramework client;

    /**
     * 建立连接
     */
    @Before
    public void testConnect() {

        /*
         *
         * @param connectString       连接字符串。zk server 地址和端口 "192.168.149.135:2181,192.168.149.136:2181"
         * @param sessionTimeoutMs    会话超时时间 单位ms
         * @param connectionTimeoutMs 连接超时时间 单位ms
         * @param retryPolicy         重试策略
         */
       /* //重试策略
        RetryPolicy retryPolicy = new ExponentialBackoffRetry(3000,10);
        //1.第一种方式
        CuratorFramework client = CuratorFrameworkFactory.newClient("192.168.149.135:2181",
                60 * 1000, 15 * 1000, retryPolicy);*/
        //重试策略
        RetryPolicy retryPolicy = new ExponentialBackoffRetry(3000, 10);
        //2.第二种方式
        //CuratorFrameworkFactory.builder();
        client = CuratorFrameworkFactory.builder()
                .connectString("192.168.149.135:2181")
                .sessionTimeoutMs(60 * 1000)
                .connectionTimeoutMs(15 * 1000)
                .retryPolicy(retryPolicy)
                .namespace("kjz")
                .build();

        //开启连接
        client.start();

    }
//==============================create=============================================================================

    /**
     * 创建节点:create 持久 临时 顺序 数据
     * 1. 基本创建 :create().forPath("")
     * 2. 创建节点 带有数据:create().forPath("",data)
     * 3. 设置节点的类型:create().withMode().forPath("",data)
     * 4. 创建多级节点  /app1/p1 :create().creatingParentsIfNeeded().forPath("",data)
     */
    @Test
    public void testCreate() throws Exception {
        //2. 创建节点 带有数据
        //如果创建节点,没有指定数据,则默认将当前客户端的ip作为数据存储
        String path = client.create().forPath("/app2", "hehe".getBytes());
        System.out.println(path);

    }

    @Test
    public void testCreate2() throws Exception {
        //1. 基本创建
        //如果创建节点,没有指定数据,则默认将当前客户端的ip作为数据存储
        String path = client.create().forPath("/app1");
        System.out.println(path);

    }

    @Test
    public void testCreate3() throws Exception {
        //3. 设置节点的类型
        //默认类型:持久化
        String path = client.create().withMode(CreateMode.EPHEMERAL).forPath("/app3");
        System.out.println(path);

    }

    @Test
    public void testCreate4() throws Exception {
        //4. 创建多级节点  /app1/p1
        //creatingParentsIfNeeded():如果父节点不存在,则创建父节点
        String path = client.create().creatingParentsIfNeeded().forPath("/app4/p1");
        System.out.println(path);
    }
//===========================get================================================================================

    /**
     * 查询节点:
     * 1. 查询数据:get: getData().forPath()
     * 2. 查询子节点: ls: getChildren().forPath()
     * 3. 查询节点状态信息:ls -s:getData().storingStatIn(状态对象).forPath()
     */

    @Test
    public void testGet1() throws Exception {
        //1. 查询数据:get
        byte[] data = client.getData().forPath("/app1");
        System.out.println(new String(data));
    }

    @Test
    public void testGet2() throws Exception {
        // 2. 查询子节点: ls
        List<String> path = client.getChildren().forPath("/");

        System.out.println(path);
    }

    @Test
    public void testGet3() throws Exception {

        Stat status = new Stat();
        System.out.println(status);
        //3. 查询节点状态信息:ls -s
        client.getData().storingStatIn(status).forPath("/app1");

        System.out.println(status);

    }

    //===========================set================================================================================

    /**
     * 修改数据
     * 1. 基本修改数据:setData().forPath()
     * 2. 根据版本修改: setData().withVersion().forPath()
     * * version 是通过查询出来的。目的就是为了让其他客户端或者线程不干扰我。
     *
     * @throws Exception
     */
    @Test
    public void testSet() throws Exception {
        client.setData().forPath("/app1", "kjz".getBytes());
    }

    @Test
    public void testSetForVersion() throws Exception {

        Stat status = new Stat();
        //3. 查询节点状态信息:ls -s
        client.getData().storingStatIn(status).forPath("/app1");

        int version = status.getVersion();//查询出来的 3
        System.out.println(version);
        client.setData().withVersion(version).forPath("/app1", "hehe".getBytes());
    }

    //===========================delete================================================================================

    /**
     * 删除节点: delete deleteall
     * 1. 删除单个节点:delete().forPath("/app1");
     * 2. 删除带有子节点的节点:delete().deletingChildrenIfNeeded().forPath("/app1");
     * 3. 必须成功的删除:为了防止网络抖动。本质就是重试。  client.delete().guaranteed().forPath("/app2");
     * 4. 回调:inBackground
     * @throws Exception
     */

    @Test
    public void testDelete() throws Exception {
        // 1. 删除单个节点
        client.delete().forPath("/app1");
    }

    @Test
    public void testDelete2() throws Exception {
        //2. 删除带有子节点的节点
        client.delete().deletingChildrenIfNeeded().forPath("/app4");
    }
    @Test
    public void testDelete3() throws Exception {
        //3. 必须成功的删除
        client.delete().guaranteed().forPath("/app2");
    }

    @Test
    public void testDelete4() throws Exception {
        //4. 回调
        client.delete().guaranteed().inBackground(new BackgroundCallback(){

            @Override
            public void processResult(CuratorFramework client, CuratorEvent event) throws Exception {
                System.out.println("我被删除了~");
                System.out.println(event);
            }
        }).forPath("/app1");
    }

    @After
    public void close() {
        if (client != null) {
            client.close();
        }
    }

}
Watch事件监听
- ZooKeeper 允许用户在指定节点上注册一些Watcher,并且在一些特定事件触发的时候,ZooKeeper 服务端会将事件通知到感兴趣的客户端上去,该机制是 ZooKeeper 实现分布式协调服务的重要特性。
- ZooKeeper 中引入了Watcher机制来实现了发布/订阅功能能,能够让多个订阅者同时监听某一个对象,当一个对象自身状态变化时,会通知所有订阅者。
- ZooKeeper 原生支持通过注册Watcher来进行事件监听,但是其使用并不是特别方便 需要开发人员自己反复注册Watcher,比较繁琐。
- Curator引入了 Cache 来实现对 ZooKeeper 服务端事件的监听。
ZooKeeper提供了三种Watcher:
NodeCache : 只是监听某一个特定的节点PathChildrenCache : 监控一个ZNode的子节点.TreeCache : 可以监控整个树上的所有节点,类似于PathChildrenCache和NodeCache 的组合
演示 NodeCache:给指定一个节点注册监听器
    /**
     * 演示 NodeCache:给指定一个节点注册监听器
     */

    @Test
    public void testNodeCache() throws Exception {
        //1. 创建NodeCache对象
        final NodeCache nodeCache = new NodeCache(client,"/app1");
        //2. 注册监听
        nodeCache.getListenable().addListener(new NodeCacheListener() {
            @Override
            public void nodeChanged() throws Exception {
                System.out.println("节点变化了~");

                //获取修改节点后的数据
                byte[] data = nodeCache.getCurrentData().getData();
                System.out.println(new String(data));
            }
        });

        //3. 开启监听.如果设置为true,则开启监听是,加载缓冲数据
        nodeCache.start(true);

        while (true){

        }
    }
演示 PathChildrenCache:监听某个节点的所有子节点们
 /**
     * 演示 PathChildrenCache:监听某个节点的所有子节点们
     */

    @Test
    public void testPathChildrenCache() throws Exception {
        //1.创建监听对象
        PathChildrenCache pathChildrenCache = new PathChildrenCache(client,"/app2",true);

        //2. 绑定监听器
        pathChildrenCache.getListenable().addListener(new PathChildrenCacheListener() {
            @Override
            public void childEvent(CuratorFramework client, PathChildrenCacheEvent event) throws Exception {
                System.out.println("子节点变化了~");
                System.out.println(event);
                //监听子节点的数据变更,并且拿到变更后的数据
                //1.获取类型
                PathChildrenCacheEvent.Type type = event.getType();
                //2.判断类型是否是update
                if(type.equals(PathChildrenCacheEvent.Type.CHILD_UPDATED)){
                    System.out.println("数据变了!!!");
                    byte[] data = event.getData().getData();
                    System.out.println(new String(data));

                }
            }
        });
        //3. 开启
        pathChildrenCache.start();

        while (true){

        }
    }

数据变更类型的枚举类。
演示 TreeCache:监听某个节点自己和所有子节点们,相当于PathChildrenCache和NodeCache的组合
 /**
     * 演示 NodeCache:给指定一个节点注册监听器
     */

    @Test
    public void testNodeCache() throws Exception {
        //1. 创建NodeCache对象
        final NodeCache nodeCache = new NodeCache(client,"/app1");
        //2. 注册监听
        nodeCache.getListenable().addListener(new NodeCacheListener() {
            @Override
            public void nodeChanged() throws Exception {
                System.out.println("节点变化了~");
                //获取修改节点后的数据
                byte[] data = nodeCache.getCurrentData().getData();
                System.out.println(new String(data));
            }
        });

        //3. 开启监听.如果设置为true,则开启监听是,加载缓冲数据
        nodeCache.start(true);

        while (true){

        }
    }
完整代码如下:
package com.kjz.curator;

import org.apache.curator.RetryPolicy;
import org.apache.curator.framework.CuratorFramework;
import org.apache.curator.framework.CuratorFrameworkFactory;
import org.apache.curator.framework.api.BackgroundCallback;
import org.apache.curator.framework.api.CuratorEvent;
import org.apache.curator.framework.recipes.cache.*;
import org.apache.curator.retry.ExponentialBackoffRetry;
import org.apache.zookeeper.CreateMode;
import org.apache.zookeeper.data.Stat;
import org.junit.After;
import org.junit.Before;
import org.junit.Test;

import java.util.List;

public class CuratorWatcherTest {

    private CuratorFramework client;

    /**
     * 建立连接
     */
    @Before
    public void testConnect() {

        /*
         *
         * @param connectString       连接字符串。zk server 地址和端口 "192.168.149.135:2181,192.168.149.136:2181"
         * @param sessionTimeoutMs    会话超时时间 单位ms
         * @param connectionTimeoutMs 连接超时时间 单位ms
         * @param retryPolicy         重试策略
         */
       /* //重试策略
        RetryPolicy retryPolicy = new ExponentialBackoffRetry(3000,10);
        //1.第一种方式
        CuratorFramework client = CuratorFrameworkFactory.newClient("192.168.149.135:2181",
                60 * 1000, 15 * 1000, retryPolicy);*/
        //重试策略
        RetryPolicy retryPolicy = new ExponentialBackoffRetry(3000, 10);
        //2.第二种方式
        //CuratorFrameworkFactory.builder();
        client = CuratorFrameworkFactory.builder()
                .connectString("192.168.149.135:2181")
                .sessionTimeoutMs(60 * 1000)
                .connectionTimeoutMs(15 * 1000)
                .retryPolicy(retryPolicy)
                .namespace("kjz")
                .build();

        //开启连接
        client.start();

    }

    @After
    public void close() {
        if (client != null) {
            client.close();
        }
    }

    /**
     * 演示 NodeCache:给指定一个节点注册监听器
     */

    @Test
    public void testNodeCache() throws Exception {
        //1. 创建NodeCache对象
        final NodeCache nodeCache = new NodeCache(client,"/app1");
        //2. 注册监听
        nodeCache.getListenable().addListener(new NodeCacheListener() {
            @Override
            public void nodeChanged() throws Exception {
                System.out.println("节点变化了~");

                //获取修改节点后的数据
                byte[] data = nodeCache.getCurrentData().getData();
                System.out.println(new String(data));
            }
        });

        //3. 开启监听.如果设置为true,则开启监听是,加载缓冲数据
        nodeCache.start(true);

        while (true){

        }
    }

    /**
     * 演示 PathChildrenCache:监听某个节点的所有子节点们
     */

    @Test
    public void testPathChildrenCache() throws Exception {
        //1.创建监听对象
        PathChildrenCache pathChildrenCache = new PathChildrenCache(client,"/app2",true);

        //2. 绑定监听器
        pathChildrenCache.getListenable().addListener(new PathChildrenCacheListener() {
            @Override
            public void childEvent(CuratorFramework client, PathChildrenCacheEvent event) throws Exception {
                System.out.println("子节点变化了~");
                System.out.println(event);
                //监听子节点的数据变更,并且拿到变更后的数据
                //1.获取类型
                PathChildrenCacheEvent.Type type = event.getType();
                //2.判断类型是否是update
                if(type.equals(PathChildrenCacheEvent.Type.CHILD_UPDATED)){
                    System.out.println("数据变了!!!");
                    byte[] data = event.getData().getData();
                    System.out.println(new String(data));

                }
            }
        });
        //3. 开启
        pathChildrenCache.start();

        while (true){

        }
    }

    /**
     * 演示 TreeCache:监听某个节点自己和所有子节点们
     */

    @Test
    public void testTreeCache() throws Exception {
        //1. 创建监听器
        TreeCache treeCache = new TreeCache(client,"/app2");

        //2. 注册监听
        treeCache.getListenable().addListener(new TreeCacheListener() {
            @Override
            public void childEvent(CuratorFramework client, TreeCacheEvent event) throws Exception {
                System.out.println("节点变化了");
                System.out.println(event);
            }
        });

        //3. 开启
        treeCache.start();

        while (true){

        }
    }

}
分布式锁实现
在我们进行单机应用开发,涉及并发同步的时候,我们往往采用synchronized或者Lock的方式来解决多线程间的代码同步问题,这时多线程的运行都是在同一个JVM之下,没有任何问题。 但当我们的应用是分布式集群工作的情况下,属于多JVM下的工作环境,跨JVM之间已经无法通过多线程的锁解决同步问题。 那么就需要一种更加高级的锁机制,来处理种
跨机器的进程之间的数据同步问题——这就是分布式锁。

分布式锁常见的实现方式:

下面介绍ZooKeeper的实现方式:
Zookeeper分布式锁原理
核心思想:当客户端要获取锁,则创建节点,使用完锁,则删除该节点。
- 客户端获取锁时,在lock节点下创建临时顺序节点。临时:防止获取到锁的服务宕机了导致锁无法释放,临时节点会在会话结束后自动删除。顺序:找到最小节点,创建最小节点的服务获取到锁。
- 然后获取lock下面的所有子节点,客户端获取到所有的子节点之后,如果发现自己创建的子节点序号最小,那么就认为该客户端获取到了锁。使用完锁后,将该节点删除。
- 如果发现自己创建的节点并非lock所有子节点中最小的,说明自己还没有获取到锁,此时客户端需要找到比自己小的那个节点,同时对其注册事件监听器,监听删除事件。
- 如果发现比自己小的那个节点被删除,则客户端的 Watcher会收到相应通知,此时再次判断自己创建的节点 是否是lock子节点中序号最小的,如果是则获取到了锁,如果不是则重复以上步骤继续获取到比自己小的一个节点 并注册监听。
Curator实现分布式锁API
在Curator中有五种锁方案:
- InterProcessSemaphoreMutex:分布式排它锁(非可重入锁)
- InterProcessMutex:分布式可重入排它锁
- InterProcessReadWriteLock:分布式读写锁
- InterProcessMultiLock:将多个锁作为单个实体管理的容器
- InterProcessSemaphoreV2:共享信号量
案例:模拟12306售票
模拟12306服务
package com.kjz.curator;

import org.apache.curator.RetryPolicy;
import org.apache.curator.framework.CuratorFramework;
import org.apache.curator.framework.CuratorFrameworkFactory;
import org.apache.curator.framework.recipes.locks.InterProcessMutex;
import org.apache.curator.retry.ExponentialBackoffRetry;

import java.util.concurrent.TimeUnit;

public class Ticket12306 implements Runnable{

    private int tickets = 10;//数据库的票数

    private InterProcessMutex lock ;

    public Ticket12306(){
        //重试策略
        RetryPolicy retryPolicy = new ExponentialBackoffRetry(3000, 10);
        //2.第二种方式
        //CuratorFrameworkFactory.builder();
        CuratorFramework client = CuratorFrameworkFactory.builder()
                .connectString("192.168.149.135:2181")
                .sessionTimeoutMs(60 * 1000)
                .connectionTimeoutMs(15 * 1000)
                .retryPolicy(retryPolicy)
                .build();

        //开启连接
        client.start();

        lock = new InterProcessMutex(client,"/lock");
    }

    @Override
    public void run() {

        while(true){
            //获取锁
            try {
                lock.acquire(3, TimeUnit.SECONDS);
                if(tickets > 0){

                    System.out.println(Thread.currentThread()+":"+tickets);
                    Thread.sleep(100);
                    tickets--;
                }
            } catch (Exception e) {
                e.printStackTrace();
            }finally {
                //释放锁
                try {
                    lock.release();
                } catch (Exception e) {
                    e.printStackTrace();
                }
            }

        }

    }
}
模拟买票
package com.kjz.curator;

import org.apache.curator.RetryPolicy;
import org.apache.curator.framework.CuratorFramework;
import org.apache.curator.framework.CuratorFrameworkFactory;
import org.apache.curator.framework.recipes.cache.*;
import org.apache.curator.retry.ExponentialBackoffRetry;
import org.junit.After;
import org.junit.Before;
import org.junit.Test;

public class LockTest {

    public static void main(String[] args) {
        Ticket12306 ticket12306 = new Ticket12306();

        //创建客户端
        Thread t1 = new Thread(ticket12306,"携程");
        Thread t2 = new Thread(ticket12306,"飞猪");

        t1.start();
        t2.start();
    }

}
版权归原作者 编程小猹 所有, 如有侵权,请联系我们删除。