
原理与代码学习自B站霹雳吧啦Wz老师
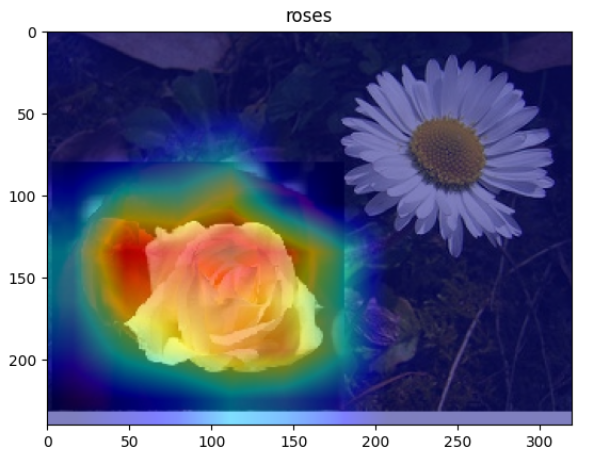
使用grad_cam对不同预测目标的图像做activate图。
效果见下图。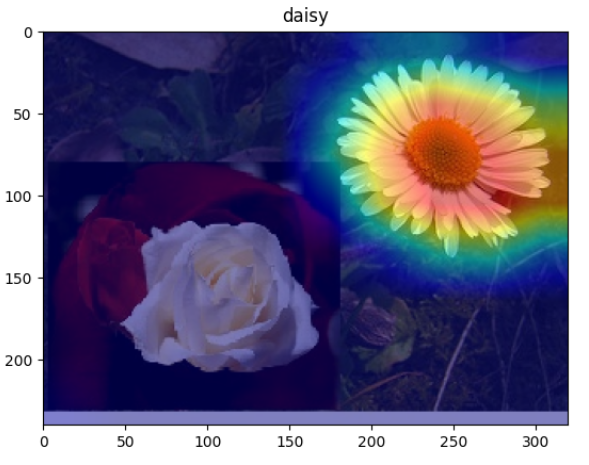
使用的是自己训练的MobileNetV2
需要模型feature的最后一层,模型训练权重。
代码如下:
import json
import os
import numpy as np
import torch
from PIL import Image
import matplotlib.pyplot as plt
from torchvision import models
from torchvision import transforms
from utils import GradCAM, show_cam_on_image, center_crop_img
from model_v2 import MobileNetV2

defmain():#----载入自己的模型,按照自己训练集训练的
    device = torch.device("cuda:0"if torch.cuda.is_available()else"cpu")
    model = MobileNetV2(num_classes=5)#.to(device)# load model weights
    model_weight_path ="./MobileNetV2.pth"
    model.load_state_dict(torch.load(model_weight_path, map_location=device))#加载权重
    model.eval()
    target_layers =[model.features[-1]]# 拿到最后一个层结构#载入模型,模型权重---载入的模型是按照ImageNet训练的(不是自己的模型是从torchvision中导入的)#model = models.mobilenet_v3_large(pretrained=True) #target_layers = [model.features[-1]] # model = models.vgg16(pretrained=True)# target_layers = [model.features]# model = models.resnet34(pretrained=True)# target_layers = [model.layer4]# model = models.regnet_y_800mf(pretrained=True)# target_layers = [model.trunk_output]# model = models.efficientnet_b0(pretrained=True)# target_layers = [model.features]

    data_transform = transforms.Compose([transforms.ToTensor(),
                                         transforms.Normalize([0.485,0.456,0.406],[0.229,0.224,0.225])])# load image
    img_path ="both.jpg"assert os.path.exists(img_path),"file: '{}' dose not exist.".format(img_path)
    img = Image.open(img_path).convert('RGB')
    img = np.array(img, dtype=np.uint8)# img = center_crop_img(img, 224)# [C, H, W]
    img_tensor = data_transform(img)# expand batch dimension# [C, H, W] -> [N, C, H, W]
    input_tensor = torch.unsqueeze(img_tensor, dim=0)#实例化,输出模型,要计算的层
    cam = GradCAM(model=model, target_layers=target_layers, use_cuda=False)#感兴趣的label
    target_category =0# tabby, tabby cat# target_category = 254  # pug, pug-dog#计算cam图
    grayscale_cam = cam(input_tensor=input_tensor, target_category=target_category)#实例化# 将只传入的一张图的cam图提取出来
    grayscale_cam = grayscale_cam[0,:]#变成彩色热力图的形式
    visualization = show_cam_on_image(img.astype(dtype=np.float32)/255.,#将原图缩放到[0,1]之间
                                      grayscale_cam,
                                      use_rgb=True)#展示出来
    json_path ='./class_indices.json'assert os.path.exists(json_path),"file: '{}' dose not exist.".format(json_path)withopen(json_path,"r")as f:
        class_indict = json.load(f)
    plt.title(class_indict[str(target_category)])
    plt.imshow(visualization)
    plt.show()if __name__ =='__main__':
    main()
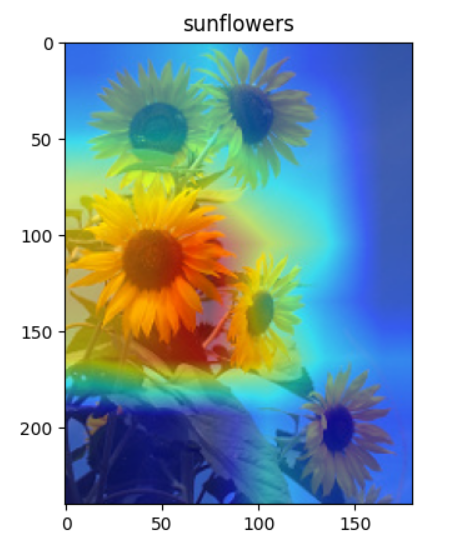
还有别的图的效果。总之没有很精细,但也不错了。
大概就是在将本张图片分为感兴趣类(指定的类)时的它注意到的那部分,不是整张图全部有关的地方,只要有一部分就行。
本文转载自: https://blog.csdn.net/weixin_44040169/article/details/128015567
版权归原作者 weixin_44040169 所有, 如有侵权,请联系我们删除。
版权归原作者 weixin_44040169 所有, 如有侵权,请联系我们删除。