
以上篇文章的代码为基准,继续扩展实现艾特@功能,没看过的可以点击链接查看前端实现输入框表情输入及发送,仿b站、qq小表情输入
此demo使用vue3
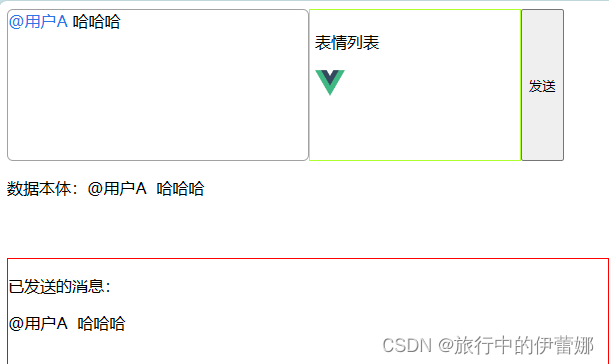
实现效果图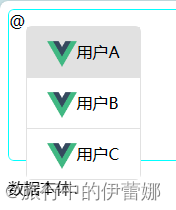
声明:这只是个demo,不涉及与后端交互,不过会在该交互的地方标记,如需实际应用于项目,请根据实际情况进行改造完善!
艾特列表组件定义
<template><!-- userGroupPosition父组件传递显示定位 --><divclass="user-group":style="{ left: userGroupPosition.x, top: userGroupPosition.y }"><ulclass="user-list"><liv-for="(user, index) in userGroup":key="user.id"class="user-item":class="{ active: activeIndex === index }"@click="selectAtUser(user)"><img:src="user.avatar"/><span>{{ user.name }}</span></li></ul></div></template><scriptsetup>import{ ref, defineProps, toRefs, onMounted, defineEmits }from"vue";/**
 * @param userGroup 聊天群员列表
 * @param userGroupPosition 列表组件显示定位
 */const props =defineProps(["userGroup","userGroupPosition"]);// 选择群员事件const emit =defineEmits(["atUser"]);const{ userGroup, userGroupPosition }=toRefs(props);// 此变量用来使用键盘上下按钮时,选择群员let activeIndex =ref(-1);// 给window挂载键盘事件,这样使用键盘上下键时可以选择群员onMounted(()=>{
  window.addEventListener("keydown", keyboardSelect);});// 键盘事件 通过修改activeIndex值,达到选择群员functionkeyboardSelect(e){if(e.key ==="ArrowDown"){if(activeIndex.value !== userGroup.value.length -1){
      activeIndex.value++;}else{
      activeIndex.value =0;}}elseif(e.key ==="ArrowUp"){if(activeIndex.value <=0){
      activeIndex.value = userGroup.value.length -1;}else{
      activeIndex.value--;}}elseif(e.key ==="Enter"){selectAtUser(userGroup.value[activeIndex.value]);}}// 给父组件传递选择的群员functionselectAtUser(user){emit("atUser", user);}</script><stylescoped>.user-group{position: fixed;}.user-list{list-style: none;padding: 0;border: 1px solid #e1e1e1;border-radius: 6px;}.user-item{height: 50px;line-height: 50px;padding: 0 20px;cursor: pointer;background-color: white;&:hover,
  &.active{background-color: #e1e1e1;}&:not(:last-of-type){border-bottom: 1px solid #e1e1e1;}img{width: 30px;vertical-align: middle;}}</style>
父组件主逻辑处理
首先修改消息输入框,增加输入事件,用以判断显示输入框。且在上篇中发送消息采用了@keydown.enter.prevent绑定事件的形式发送,直接改成@keydown,用判断的方式发送,因为显示艾特输入框时,按回车是要选择群员的
<!-- 消息输入框 --><divclass="msg-input"ref="msgInput"contenteditable@blur="getAfterBlurIndex"@keydown="msgInputKeyDown"@input="msgInputFun"></div><!-- 可艾特的聊天群员 --><userGroup:userGroup="userGroupData":userGroupPosition="userGroupPosition"v-if="showAtSelect"@at-user="selectAtUser"></userGroup>
定义相关变量,群员列表、列表组件定位坐标、是否显示艾特组件
// 群员列表const userGroupData =reactive([{name:"用户A",id:1,avatar:require("@/assets/logo.png")},{name:"用户B",id:2,avatar:require("@/assets/logo.png")},{name:"用户C",id:3,avatar:require("@/assets/logo.png")},]);// 用户列表定位const userGroupPosition =reactive({x:"0px",y:"0px",});let showAtSelect =ref(false);
定义输入事件,当输入@时,获取输入框光标相对页面坐标,并显示输入框组件。(失焦时,在失焦事件getAfterBlurIndex里,使用 setTimeout(() => {
showAtSelect.value = false;}, 100);隐藏艾特组件)
// 输入框输入事件functionmsgInputFun(e){if(e.data ==="@"){setTimeout(()=>{const{ x, y }=getCursorPosition();
      showAtSelect.value =true;
      userGroupPosition.x = x +"px";
      userGroupPosition.y = y +"px";},100);}else{
    showAtSelect.value =false;}}// 获取输入框中的光标相对页面的坐标functiongetCursorPosition(){let sel = window.getSelection();let range = document.createRange();
  range.selectNode(sel.focusNode);
  range.setStart(sel.focusNode, sel.focusOffset);const{ x, y }= range.getBoundingClientRect();return{ x, y };}
这个时候可以显示出来群员选择列表了,再来定义键盘事件,在列表组件显示时阻止上下按钮的默认行为。如果不显示且按下回车时发送消息
// 显示艾特选择组件时,阻止输入框默认上下按键及回车行为functionmsgInputKeyDown(e){if(showAtSelect.value &&["ArrowUp","ArrowDown","Enter"].includes(e.key)){return e.preventDefault();}if(e.key ==="Enter"){
    e.preventDefault();sendMsg();}}
然后编写选择群员事件,先获取并设置输入框选区,创建一个span标签节点,把被艾特人相关信息填入后插入到输入框子节点里。注意:创建的span标签里写了一个@,所以需要chatInputOffset.deleteContents()删除原@字符
functionselectAtUser(user){
showAtSelect.value =false;
msgInput.value.blur();getInputSelection();
chatInputOffset.setStart(focusNode, focusOffset.value -1);
chatInputOffset.setEnd(focusNode, focusOffset.value);
chatInputOffset.deleteContents();const atElement =`<span userId='${user.id}' userName='${user.name}' contentEditable="false" class="at-msg" style="color:#2E77E5">@${user.name} </span>`;
chatInputOffset.collapse(false);const node = chatInputOffset.createContextualFragment(atElement);let c = node.lastChild;
chatInputOffset.insertNode(node);if(c){
chatInputOffset.setEndAfter(c);
chatInputOffset.setStartAfter(c);}let j = window.getSelection();
j.removeAllRanges();
j.addRange(chatInputOffset);}
这个时候就可以把@消息发送出去了
let msgType =ref("text");// 发送的消息类型functionsendMsg(){
  console.log("msgInput:", msgInput);
  chatMsgRecord.value ="";// 先清空一下旧消息
  msgType.value ="text";// 初始化消息类型
  msgInput.value.childNodes.forEach((element)=>{// 如果是emoji表情图片的话,则转义if(element.nodeName ==="IMG"&& element.className ==="emoji"){
      chatMsgRecord.value += element.alt;}elseif(element.className ==="at-msg"){
      chatMsgRecord.value += element.innerText +" ";
      msgType.value ="groupChatAt";// 根据实际约束类型修改}else{
      chatMsgRecord.value += element.data;}});// 清空输入框中的内容
  msgInput.value.innerHTML ="";
  msgInput.value.innerText ="";// 在这里使用websocket把数据发送给后端// socketSend({text:chatMsgRecord,type:msgType})}
如有更好的意见欢迎在评论区指出!
本文转载自: https://blog.csdn.net/zzz18789/article/details/136510930
版权归原作者 旅行中的伊蕾娜 所有, 如有侵权,请联系我们删除。
版权归原作者 旅行中的伊蕾娜 所有, 如有侵权,请联系我们删除。