这里写自定义目录标题
推荐一款.net下开源人脸方案(ViewFaceCore)
最近发现一款在.net框架下的开源人脸方案,包括人脸识别、人脸比对、性别预测、年龄预测,功能还是比较多。支持.NET / .NET Core框架,版本支持(3.1、5.0、6.0、7.0等)。.NET 8 暂未尝试,理论上应该也支持,感兴趣的朋友可以自行尝试验证下。
该项目可以用于各种应用场景,例如人机交互、安全监控、智能家居等。

项目地址
https://github.com/ViewFaceCore/ViewFaceCore
经过本人验证,按照github上的说明操作下来,在Windows上运行没有问题,由于我希望让他运行在Docker上,但经过测试,Docker上运行会出现一些问题,经过本人摸索,解决了此问题。故本文详细描述,如何在保证即能在windows上运行,也能在Docker能运行此项目。如只需在window运行,可参考项目文档,不再累述。
快速开始
1、安装nuget包
1.1 安装包列表
(1)、ViewFaceCore
(2)、ViewFaceCore.all_models
(3)、ViewFaceCore.runtime.win.x64
(4)、ViewFaceCore.runtime.ubuntu.20.04.x64 或 ViewFaceCore.runtime.linux.arm 或 ViewFaceCore.runtime.linux.arm64。注:这里需要根据docker运行的宿主机的CPU架构进行选择,具体查看方法,参加 1.2 Linux下如何查看系统CPU架构
(5)、SkiaSharp.NativeAssets.Linux.NoDependencies 关键包:原文中的 ViewFaceCore.Extension.SkiaSharp 不需要引入,否则在docker或linux中会运行不成功。
1.2 Linux下如何查看系统CPU架构
常见CPU架构
ARM架构:aarch64、arm64
X86架构:x86_64、x64、AMD64
MIPS架构:mips
Linux下如何查看系统CPU架构可以用一下几种方法:
(1)、Arch命令:aarch64 就是 ARM 架构,x86_64 就是 X86 架构
(2)、uname -a uname -a 输出中有包含aarch64 就是 ARM 架构,包含x86_64 就是 X86 架构,像下图就是x86_64架构
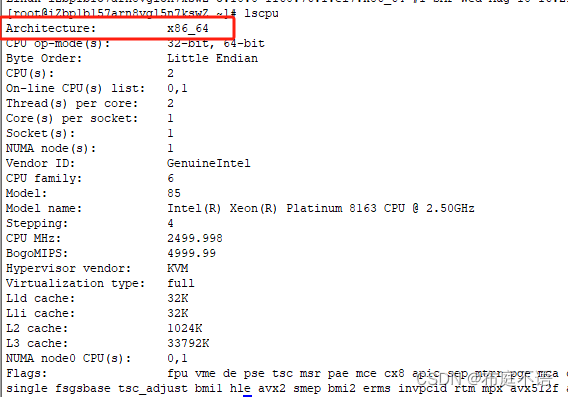
(3)、lscpu:查看CPU信息,查看Architecture
2、示例代码
本文主要演示人脸1v1比对,就是提供两张照片,判断两张照片是否为同一人
Stopwatch sw = Stopwatch.StartNew();

//文件地址就是测试图片实际存放路径
 string imagePath0 = @"images/0.jpg";
 string imagePath1 = @"images/1.jpg";

using var faceImage0 = SKBitmap.Decode(imagePath0).ToFaceImage();
using var faceImage1 = SKBitmap.Decode(imagePath1).ToFaceImage();
//检测人脸信息
using FaceDetector faceDetector = new FaceDetector();
FaceInfo[] infos0 = faceDetector.Detect(faceImage0);
FaceInfo[] infos1 = faceDetector.Detect(faceImage1);
//标记人脸位置
using FaceLandmarker faceMark = new FaceLandmarker();
FaceMarkPoint[] points0 = faceMark.Mark(faceImage0, infos0[0]);
FaceMarkPoint[] points1 = faceMark.Mark(faceImage1, infos1[0]);
//提取特征值
using FaceRecognizer faceRecognizer = new FaceRecognizer();
float[] data0 = faceRecognizer.Extract(faceImage0, points0);
float[] data1 = faceRecognizer.Extract(faceImage1, points1);
//对比特征值
bool isSelf = faceRecognizer.IsSelf(data0, data1);

Console.WriteLine($"识别到的人脸是否为同一人:{isSelf},对比耗时:{sw.ElapsedMilliseconds}ms");
Console.WriteLine();
sw.Stop();
注意:由于没有引入ViewFaceCore.Extension.SkiaSharp包,ToFaceImage方法会提示报错,解决方案是,项目中新建一个类ViewFaceSkiaSharpExtension.cs,然后从ViewFaceCore源文件中找到相关代码,复制到新建的ViewFaceSkiaSharpExtension.cs中。
下面代码直接可用,已经整理好。
 public static class ViewFaceSkiaSharpExtension
 {
     private const SKColorType targetColorType = SKColorType.Bgra8888;

     //
     // 摘要:
     //     SKBitmap convert to FaceImage
     //
     // 参数:
     //   image:
     public static FaceImage ToFaceImage(this SKBitmap image)
     {
         int width;
         int height;
         int channels;
         byte[] buffer = To24BGRByteArray(image, out width, out height, out channels);
         return new FaceImage(width, height, channels, buffer);
     }

     //
     // 摘要:
     //     SKBitmap convert to FaceImage
     //
     // 参数:
     //   obj:
     //
     // 类型参数:
     //   T:
     //     Only support type of SkiaSharp.SKBitmap
     //
     // 异常:
     //   T:System.NotImplementedException:
     public static FaceImage ToFaceImage<T>(this T obj) where T : class
     {
         if (obj == null)
         {
             throw new ArgumentNullException("obj");
         }

         if (obj is SKBitmap image)
         {
             return image.ToFaceImage();
         }

         throw new Exception($"Not support type:{obj.GetType()}");
     }

     //
     // 摘要:
     //     Bitmap 转为 3*8bit BGR System.Byte 数组。
     //
     // 参数:
     //   source:
     //     待转换图像
     //
     //   width:
     //     图像宽度
     //
     //   height:
     //     图像高度
     //
     //   channels:
     //     图像通道
     //
     // 返回结果:
     //     图像的 BGR System.Byte 数组
     private static byte[] To24BGRByteArray(SKBitmap source, out int width, out int height, out int channels)
     {
         if (source == null)
         {
             throw new ArgumentNullException("source");
         }

         channels = 3;
         if (source.ColorType != SKColorType.Bgra8888)
         {
             using (SKBitmap sKBitmap = ConvertToBgra8888(source))
             {
                 width = sKBitmap.Width;
                 height = sKBitmap.Height;
                 return ConvertToByte(sKBitmap, channels);
             }
         }

         width = source.Width;
         height = source.Height;
         return ConvertToByte(source, channels);
     }

     //
     // 摘要:
     //     转换图像格式
     //
     // 参数:
     //   source:
     //
     // 异常:
     //   T:System.Exception:
     private static SKBitmap ConvertToBgra8888(SKBitmap source)
     {
         if (!source.CanCopyTo(SKColorType.Bgra8888))
         {
             throw new Exception("Can not copy image color type to Bgra8888");
         }

         SKBitmap sKBitmap = new SKBitmap();
         source.CopyTo(sKBitmap, SKColorType.Bgra8888);
         if (sKBitmap == null)
         {
             throw new Exception("Copy image to Bgra8888 failed");
         }

         return sKBitmap;
     }

     //
     // 摘要:
     //     转为BGR Bytes
     //
     // 参数:
     //   source:
     //
     //   channels:
     //
     // 异常:
     //   T:System.Exception:
     private static byte[] ConvertToByte(SKBitmap source, int channels)
     {
         byte[] bytes = source.Bytes;
         if (bytes == null || bytes.Length == 0)
         {
             throw new Exception("SKBitmap data is null");
         }

         byte[] array = new byte[bytes.Length / 4 * channels];
         int num = 0;
         for (int i = 0; i < bytes.Length; i++)
         {
             if ((i + 1) % 4 != 0)
             {
                 array[num] = bytes[i];
                 num++;
             }
         }

         return array;
     }
 }
3、Dockerfile的编写
参考文件如下
下面展示一些
内联代码片
。
FROM mcr.microsoft.com/dotnet/aspnet:6.0 AS base
RUN apt-get update
RUN apt-get install wget libgdiplus -y
RUN apt-get install libgomp1
WORKDIR /app
COPY . .
EXPOSE 80
ENTRYPOINT ["dotnet", "TestFaceHost.dll"]
注:关键是要添加
RUN apt-get update
RUN apt-get install wget libgdiplus -y
RUN apt-get install libgomp1
其中,libgdiplus 是包括裁剪图片相关的功能,libgomp1是GCC(GNU Compiler Collection)所使用的自由软件编译器的一部分,也是GCC并行(OpenMP)库的一部分。它是一个可以与GCC链接的动态共享库,可以提供并行计算的支持。这两个都需要在镜像中安装。
4、项目部署
项目在docker上部署运行即可,这样的方式在window上也能正常运行。
版权归原作者 布庭不语 所有, 如有侵权,请联系我们删除。