前言:
最近在做公司项目中,有这么一件事情,很是头疼,就是同一套代码,不同项目,要改相同bug,改好多遍,改的都想吐,于是就想做一个组件库,这样更新一下就全都可以了,当然也是第一次主导组件库的搭建,有哪些不对的,还请各位大佬指出来哈。
准备:
** 1、node(18+)**
** 2、Verdaccio :是一个 Node.js创建的轻量的私有npm proxy registry,可以直接在你本地起一个私有库**
npm i verdaccio -g

启动:verdaccio
** 就会出现下面的页面**
可以直接创建一个用户:
npm adduser --registry http://localhost:4873/
会让你输入用户名和密码,这个要记好哈,后面上传的时候要用到
开始
看到网上大佬们用的是**Monorepo **方式,那咱们也用这种方式(虽然不太懂为啥要这样,总之随主流指定出错少,哈哈)
- 创建文件夹:
mkdir Monorepo # 初始化文件pnpm init - 在此目录下面创建.npmrc
# 和npm一样,将别的包的依赖都放在node_modules下,不加的话会放在.pnpm下shamefully-hoist = true - 新建pnpm-workspace.yaml文件
packages:
    # 将所有的项目都放到这里
    - 'packages/*'
    # 示例
    - 'examples'
   4.创建文件目录 packages、examples

    packages -- 将所有组件放到这里

    examples -- 测试组件

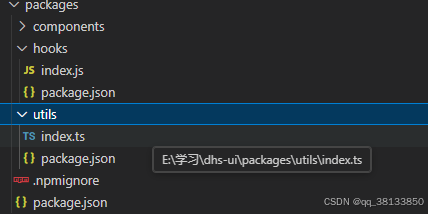
    packages文件目录,里面的所有文件夹都要进行初始化 pnpm init

5、进入到components里面,一定要安装相应的依赖呀
npm i vue typescript sass element-plus decimal.js @element-plus/icons-vue -D -w
-D 就不用介绍了
-w 是安装在根目录下
6、配置tsconfig.json文件
{
  "compilerOptions": {
    "allowJs": true, //允许编译器编译JS,JSX文件
    "target": "ES2015", //指定ECMAScript目标版本
    "useDefineForClassFields": true,
    "module": "ESNext", //设置程序的模块系统
    "moduleResolution": "Node", //模块解析策略。默认使用node的模块解析策略
    "strict": true, //启用所有严格类型检查选项
    "jsx": "preserve", //preserve模式,在preserve模式下生成代码中会保留JSX以供后续的转换操作使用
    "sourceMap": true, //生成目标文件的sourceMap文件
    "resolveJsonModule": true, //允许导入扩展名为“.json”的模块
    "esModuleInterop": false, //允许module.exports=xxx 导出,由import from 导入.因为很多老的js库使用了commonjs的导出方式,并且没有导出default属性
    "lib": [ //TS需要引用的库
      "ESNext",
      "DOM"
    ],
    "forceConsistentCasingInFileNames": true, //禁止对同一个文件的不一致的引用
    "allowSyntheticDefaultImports": true, //允许从没有设置默认导出的模块中默认导入
    "skipLibCheck": true, //忽略所有的声明文件( *.d.ts)的类型检查
    "baseUrl": "./", // 解析非相对模块的基地址,默认是当前目录
    "paths": { //模块名到基于 baseUrl的路径映射的列表
      "/@/*": [
        "src/*"
      ],
    },
    "types": [ //要包含的类型声明文件名列表
      "vite/client",
      "element-plus/global",
    ]
  },
  "include": [ //包含的文件
    "src/**/*.ts",
    "src/**/*.d.ts",
    "src/**/*.tsx",
    "src/**/*.js",
    "src/**/*.jsx",
    "src/**/*.vue",
  ]
}
7、初始化 examples 文件夹
1、初始化
pnpm init

2、安装 vite 和 @vitejs/plugin-vue
pnpm vite @vitejs/plugin-vue -D -w

3.新建vite.config.ts 并配置

import { defineConfig } from 'vite'
import vue from '@vitejs/plugin-vue'
export default defineConfig({
    plugins:[vue()]
})

4、新建index.html
<!DOCTYPE html>
<html lang="en">
  <head>
    <meta charset="UTF-8" />
    <meta http-equiv="X-UA-Compatible" content="IE=edge" />
    <meta name="viewport" content="width=device-width, initial-scale=1.0" />
    <title>Document</title>
  </head>
  <body>
    <div id="app"></div>
    <script src="main.ts" type="module"></script>
  </body>
</html>


注意: vite 是基于 esmodule 的 所以 type="module"
@vitejs/plugin-vue 会默认加载 examples 下的 index.html

5、新建app.vue

<template>
  <div>
    app
  </div>
</template>

<script setup lang="ts">
</script>

<style scoped>
</style>

6、新建main.ts

import {createApp} from 'vue'
import App from './app.vue'
const app = createApp(App)
app.mount('#app')

7、因为直接引入.vue 文件 TS 会找不到对应的类型声明;所以需要新建 typings(命名没有明确规定,TS 会自动寻找.d.ts 文件)文件夹来专门放这些声明文件。

declare module '*.vue' {
    import type { DefineComponent } from "vue";
    const component:DefineComponent<{},{},any>
}

8、在package.json 文件中配置 scripts 脚本
 "scripts": {
    "dev": "vite"
  },
9.pnpm run dev 启动项目
8、初始化packages/components 文件夹
components 文件夹

1.目录结构
-- components

  -- src
    -- index.ts
    -- input-number
     -- inputNumber.vue
     -- index.ts
-- index.ts
-- package.json


2.inputNumber.vue 如下代码

3.input-number/index.ts

import InputNumber from './inputNumber.vue'
InputNumber.install = (app) => {
  app.component(InputNumber.name, InputNumber)
}
export default InputNumber


4.components/index.ts
import InputNumber from "./src/input-number/inputNumber.vue";
// 将所有的组件都放到这里进行导出
const components = [
  InputNumber
]
// 定义install方法

const install = (app) => {
  // 之策所有组件
  components.forEach(item => {
    app.component(item.name, item)
  })
}

const DHSUI = {
  install
}

// 支持按需引入
export {
  InputNumber
}

// 导出install方法
export default DHSUI
以input框为例:
src/input-number/inputNumber.vue
<template>
    <el-input v-model="inputValue" class="customInput" v-bind="$attrs" :maxlength="props.maxlength" @input="handleInput">
        <template #suffix>
            <span class="iconBtn add" @click="add">
                <el-icon><ArrowUp /></el-icon>
            </span>
            <span class="iconBtn decrease" @click="decrease">
                <el-icon><ArrowDown /></el-icon>
            </span>
        </template>
        <template v-if="props.isAppend" #append>{{ props.appendText }}</template>
    </el-input>
</template>
<script lang="ts">
 export default {
  name: 'InputNumber'
}
</script>
<script setup lang="ts">
 import { ElInput, ElIcon } from 'element-plus'
 import 'element-plus/dist/index.css'
 import {ArrowUp, ArrowDown } from '@element-plus/icons-vue'
 import { Decimal } from "decimal.js";
 import { onlyNumOnePoint, canBeMinus } from "@dhs-ui/utils";
import { ref, watch } from 'vue';
 // 根据最长字符,生成最大值
const generateMaxString = (maxLength: any) => {
    const maxValue = "9".repeat(maxLength as unknown as number);
    return maxValue;
};
interface Props {
    modelValue: string;
    isAppend?: boolean;
    appendText?: string;
    min?: number;
    max?: number;
    step?: number;
    maxlength?: number | string;
    precision?: number;
}
const props = withDefaults(defineProps<Props>(), {
    modelValue: "",
    precision: 4,
    isAppend: false
});
const emits = defineEmits(["input", "update:modelValue"]);
const inputValue = ref(props.modelValue);
const add = () => {
    const step = props.step || 1;
    let val = inputValue.value;
    if (!val) {
        val = "0";
    }
    let decimalVal = new Decimal(val);
    if (maxNum() && new Decimal(maxNum()) <= decimalVal) {
        inputValue.value = decimalVal.toFixed();
    } else {
        inputValue.value = decimalVal.plus(step).toFixed();
    }
};
const decrease = () => {
    const step = props.step || 1;
    let val = inputValue.value;
    if (!val && parseFloat(val) !== 0) val = "0";
    if (props.min || props.min === 0) {
        if (parseFloat(val) <= props.min) {
            val = props.min.toFixed();
            inputValue.value = val;
            return;
        }
    }
    let decimalVal = new Decimal(val);
    inputValue.value = decimalVal.sub(step).toFixed();
};
// number 小数点位数
const vilidateNumberInput = (value: any, number: number) => {
    let result: any;
    if (props.min || props.min === 0) {
        result = onlyNumOnePoint(value, number, !!number);
    } else {
        result = canBeMinus(value, number);
    }
    return result;
};

const maxNum = () => {
    if (props.max) {
        return props.max.toFixed();
    } else {
        return props.maxlength ? generateMaxString(props.maxlength) : null;
    }
};
watch(
    () => props.modelValue,
    (    newValue: any) => {
        inputValue.value = newValue;
    },
    { deep: true }
);
watch(inputValue, (nv: any) => {
    emits("update:modelValue", nv);
});
const handleInput = (val: any) => {
    inputValue.value = vilidateNumberInput(val, props.precision);
    emits("input", val);
};
</script>

<style scoped lang="scss">
.customInput {
    .iconBtn {
        position: absolute;
        right: 1px;
        display: block;
        width: 32px;
        background-color: #f5f7fa;
        border-left: 1px solid var(--default-border-color);
        height: 15px;
        line-height: 15px;
        cursor: pointer;
    }
    .add {
        top: 1px;
        border-radius: 0 4px 0 0;
    }
    .decrease {
        border-top: 1px solid var(--default-border-color);
        bottom: 1px;
        border-radius: 0 0 4px 0;
    }
    &.is-disabled {
        .add,
        .decrease {
            pointer-events: none;
        }
    }
}
</style>
9、在examples/app.vue测试组件
<template>
  <div>
      <InputNumber :modelValue="inputValue" />
  </div>
</template>

<script setup lang="ts">
import { ref } from 'vue';
import {InputNumber} from '../packages/components/src/input-number/inputNumber.vue';

const inputValue = ref(0)
</script>

<style scoped>

</style>
出现了你所要的组件就说明可以进行打包了。
10、在components文件夹中打包组件
components 文件夹 新建vite.config.ts
这里我们选择打包cjs(CommonJS)和esm(ESModule)两种形式,cjs模式主要用于服务端引用(ssr),而esm就是我们现在经常使用的方式,它本身自带treeShaking而不需要额外配置按需引入(前提是你将模块分别导出),非常好用~
为了也能在ts项目中使用,还需要自动生成类型声明文件
pnpm add [email protected] -D -w
import { defineConfig } from "vite";
import vue from "@vitejs/plugin-vue";
import dts from "vite-plugin-dts";
export default defineConfig({
  build: {
    //打包文件目录
    outDir: "es",
    //压缩
    //minify: false,
    rollupOptions: {
      //忽略打包的文件
      external: ["vue", "element-plus"],
      input: ["index.ts"],
      output: [
        {
          //打包格式
          format: "es",
          //打包后文件名
          entryFileNames: "[name].mjs",
          //让打包目录和我们目录对应
          preserveModules: false,
          exports: "named",
          //配置打包根目录
          dir: "../DHS-UI/es",
        },
        {
          //打包格式
          format: "cjs",
          //打包后文件名
          entryFileNames: "[name].js",
          //让打包目录和我们目录对应
          preserveModules: false,
          exports: "named",
          //配置打包根目录
          dir: "../DHS-UI/lib",
        },
      ],
    },
    lib: {
      entry: "./index.ts",
    },
  },
  plugins: [
    vue(),
    dts({
      entryRoot: "./src",
      outputDir: ["../DHS-UI/es/src", "../DHS-UI/lib/src"],
      //指定使用的tsconfig.json为我们整个项目根目录下,如果不配置,你也可以在components下新建tsconfig.json
      tsConfigFilePath: "../../tsconfig.json",
    }),
  ],
});
配置同目录下的package.json文件
"scripts": {
    "build": "vite build"
  },
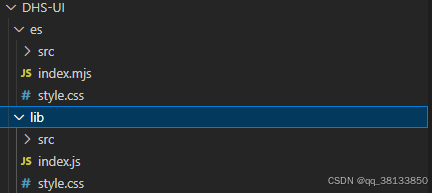
11、运行 build 进行打包,会在目录中生成打包好的包

11、打包好的文件,进行初始化
pnpm init
修改package.json 文件
{
  "name": "dhs-uii",
  "version": "1.0.2",
  "description": "",
  "main": "lib/index.js",
  "module": "es/index.mjs",
  "files": [
    "es",
    "lib"
  ],
  "scripts": {
    "test": "echo \"Error: no test specified\" && exit 1"
  },
  "sideEffects": [
    "**/*.css"
  ],
  "keywords": [
    "dhs-ui",
    "vue3组件库",
    "frontend",
    "element-plus"
  ],
  "author": "dengdeng",
  "license": "ISC",
  "typings": "lib/index.d.ts"
}
下一章进行发布,及遇到的问题。
感谢大佬文章:搭建一个组件库(vue3)_vue3组件库搭建-CSDN博客
版权归原作者 qq_38133850 所有, 如有侵权,请联系我们删除。