
Java在线办公系统(Yeb)项目总结
项目整体概述
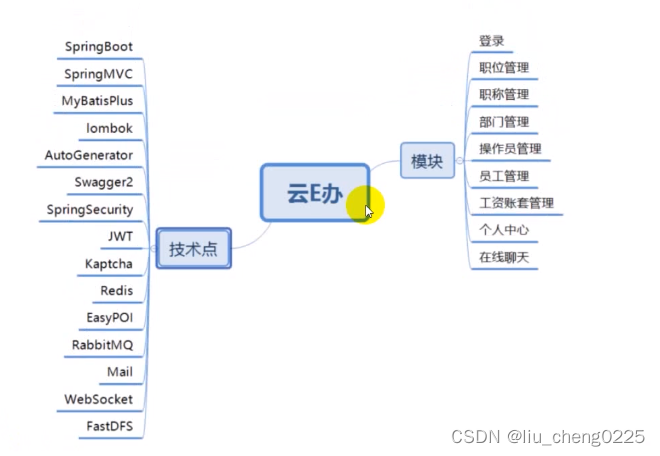
office_online(yeb)是一个在线办公的前后端分离项目。
- 整体基于Springboot+SpringMVC框架实现,用到的技术有:SpringBoot+SpringMVC+MybatisPlus+ lombok+AutoGenerator+Swagger+SpringSecurity+JWT+Kaptcha+Redis+EasyPOI+RabbitMQ+Mail+WebSocket+FastDfs+Nginx等
- 实现的功能模块有:JWT+SpringSecurity的登录验证、职位管理、职称管理、部门管理、操作员管理、员工管理、工资账套管理、个人中心、在线聊天等等
一、项目搭建
- 环境: IDEA + Mysql5.7 + JDK1.8 + Navicat + Redis + VMware
- 源码地址(前后端、sql文件): https://gitee.com/liu-cheng_com/offic_onlineo?_from=gitee_sea
- 创建Maven父项目office_online,在其下新建一个SpringBoot的子模块Server,负责实现主要的业务逻辑,在pom中导入基本的依赖,包括:Web、lombok、mysql、mybatis_Plus、swagger、bootstrap-ui等,如下
<dependency><groupId>org.springframework.boot</groupId><artifactId>spring-boot-starter-web</artifactId></dependency><!-- https://mvnrepository.com/artifact/org.projectlombok/lombok --><dependency><groupId>org.projectlombok</groupId><artifactId>lombok</artifactId><optional>true</optional></dependency><dependency><groupId>mysql</groupId><artifactId>mysql-connector-java</artifactId><scope>runtime</scope></dependency><!-- mybatisPuls--><dependency><groupId>com.baomidou</groupId><artifactId>mybatis-plus-boot-starter</artifactId><version>3.3.1</version></dependency><!-- swagger--><dependency><groupId>io.springfox</groupId><artifactId>springfox-swagger2</artifactId><version>2.7.0</version></dependency><!-- swagger第三方ui依赖--><dependency><groupId>com.github.xiaoymin</groupId><artifactId>swagger-bootstrap-ui</artifactId><version>1.9.6</version></dependency>
- 继续在创建一个SpringBoot的子模块Generator用作代码生成器,导入相关的依赖,编写代码生成器的配置类,如下:
publicclassCodeGenerator{/**
     * <p>
     * 读取控制台输入的表名
     * </p>
     */publicstaticStringscanner(String tip){Scanner scanner =newScanner(System.in);StringBuilder help =newStringBuilder();
        help.append("请输入"+ tip +":");System.out.println(help.toString());if(scanner.hasNext()){String ipt = scanner.next();if(StringUtils.isNotEmpty(ipt)){return ipt;}}thrownewMybatisPlusException("请输入正确的"+ tip +"!");}publicstaticvoidmain(String[] args){// 代码生成器AutoGenerator mpg =newAutoGenerator();// 全局配置GlobalConfig gc =newGlobalConfig();String projectPath =System.getProperty("user.dir");
        gc.setOutputDir(projectPath +"/generator/src/main/java");//作者
        gc.setAuthor("Liucheng");//打开输出目录
        gc.setOpen(false);//xml开启 BaseResultMap
        gc.setBaseResultMap(true);//xml 开启BaseColumnList
        gc.setBaseColumnList(true);// 实体属性 Swagger2 注解
        gc.setSwagger2(true);
        mpg.setGlobalConfig(gc);// 数据源配置DataSourceConfig dsc =newDataSourceConfig();
        dsc.setUrl("jdbc:mysql://localhost:3306/yeb?useUnicode=true&useSSL="+"false&characterEncoding=UTF-8&serverTimezone=Asia/Shanghai");
        dsc.setDriverName("com.mysql.cj.jdbc.Driver");
        dsc.setUsername("root");
        dsc.setPassword("123456");
        mpg.setDataSource(dsc);// 包配置PackageConfig pc =newPackageConfig();
        pc.setParent("edu.liuc.server").setEntity("pojo").setMapper("mapper").setService("service").setServiceImpl("service.impl").setController("controller");
        mpg.setPackageInfo(pc);// 自定义配置InjectionConfig cfg =newInjectionConfig(){@OverridepublicvoidinitMap(){// to do nothing}};// 如果模板引擎是 freemarkerString templatePath ="/templates/mapper.xml.ftl";// 如果模板引擎是 velocity// String templatePath = "/templates/mapper.xml.vm";// 自定义输出配置List<FileOutConfig> focList =newArrayList<>();// 自定义配置会被优先输出
        focList.add(newFileOutConfig(templatePath){@OverridepublicStringoutputFile(TableInfo tableInfo){// 自定义输出文件名 , 如果你 Entity 设置了前后缀、此处注意 xml 的名称会跟着发生变化!!return projectPath +"/generator/src/main/resources/mapper/"+ tableInfo.getEntityName()+"Mapper"+StringPool.DOT_XML;}});
        cfg.setFileOutConfigList(focList);
        mpg.setCfg(cfg);// 配置模板TemplateConfig templateConfig =newTemplateConfig();
        templateConfig.setXml(null);
        mpg.setTemplate(templateConfig);// 策略配置StrategyConfig strategy =newStrategyConfig();//数据库表映射到实体的命名策略
        strategy.setNaming(NamingStrategy.underline_to_camel);//数据库表字段映射到实体的命名策略
        strategy.setColumnNaming(NamingStrategy.no_change);//lombok模型
        strategy.setEntityLombokModel(true);//生成 @RestController 控制器
        strategy.setRestControllerStyle(true);
        strategy.setInclude(scanner("表名,多个英文逗号分割").split(","));
        strategy.setControllerMappingHyphenStyle(true);//表前缀
        strategy.setTablePrefix("t_");
        mpg.setStrategy(strategy);
        mpg.setTemplateEngine(newFreemarkerTemplateEngine());
        mpg.execute();}}
二、登录逻辑实现
2.1 使用SpringSecurity权限验证框架
Spring Security是一个能够为基于Spring的企业应用系统提供声明式的安全访问控制解决方案的安全框架。它提供了一组可以在Spring应用上下文中配置的Bean,充分利用了SpringIOC,DI(控制反转Inversion of Control ,DI:Dependency Injection 依赖注入)和AOP(面向切面编程)功能,为应用系统提供声明式的安全访问控制功能,减少了为企业系统安全控制编写大量重复代码的工作。
web应用的安全性包括用户认证(Authentication)和 用户授权(Authonization)两个部分,也是Spring Security总要核心功能。
2.2 SpringSecurity主要对象介绍
- UsernamePasswordAuthenticationFilter: 表单认证是最常用的一个认证方式,一个最直观的业务场景便是允许用户在表单中输入用户名和密码进行登录,其在整个Spring Security的认证体系中则扮演着至关重要的角色。
- SecurityContextHolder:SpringSecurity最基本的组件,是用来存放通过认证用户的SecurityContext对象,默认是使用ThreadLocal实现的,这样就保证了本线程内所有的方法都可以获得SecurityContext对象。
- UserDetails: 此接口它代表了最详细的用户信息,它涵盖了一些必要的用户信息字段,可以通过具体的实现类对它进行扩展。
- UsernamePasswordAuthenticationToken:继承了AbstractAuthenticationToken实现Authentication方法,所以当在页面中输入用户名和密码之后首先会进入到UsernamePasswordAuthenticationToken验证(Authentication),然后生成的Authentication会被交由AuthenticationManager来进行管理。
2.3 JWT简介
JWT(JSON Web Token)是一个开放的行业标准(RFC 7519),定义了一种简洁的、自包含的协议格式, 用于在通信双方传递json对象, 传递的信息经过数字签名可以被验证和信任, JWT可以使用HMAC算法或使用RSA的公钥/私钥来签名, 防止被篡改。
组成:JWT 实际上就是一个字符串,它由三部分组成:头部(对其最基本信息的描述)、荷载(存放有效信息)与签名(认证信息)。
- 优点: 1、jwt基于json,非常方便解析 2、可以在令牌中自定义丰富的内容,易扩展 3、通过非对称加密算法及数字签名技术,JWT防止篡改,安全性高 4、资源服务使用JWT可不依赖认证服务即可完成授权
- 缺点 1、JWT令牌较长,占存储空间比较大
2.4 JWT的工作流程

2.5 登录功能的主要代码
- LoginController登录控制器
@ApiOperation("登陆成功后返回token")@PostMapping("/login")publicRespBeanlogin(@RequestBodyAdminLoginParam adminLoginParam,HttpServletRequest request){return adminService.login(adminLoginParam.getUsername(),adminLoginParam.getPassword(),
                adminLoginParam.getCode(),request);}
- Service层的login方法
@OverridepublicRespBeanlogin(String username,String password,String code,HttpServletRequest request){//验证码逻辑String captcha =(String) request.getSession().getAttribute("captcha");System.out.println("captcha: "+captcha);if(StringUtils.isEmpty(code)||!captcha.equalsIgnoreCase(code)){//忽略大小写比较returnRespBean.error("验证码输出错误,请重新输入!");}//登录UserDetails userDetails = userDetailsService.loadUserByUsername(username);if(userDetails ==null||!passwordEncoder.matches(password,userDetails.getPassword())){returnRespBean.error("用户登录信息错误,请检查后重试!");}if(!userDetails.isEnabled()){//returnRespBean.error("账户被禁用,请联系管理员处理!");}//将当前的登录用户信息放入securityContext中方便下次使用UsernamePasswordAuthenticationToken authenticationToken =newUsernamePasswordAuthenticationToken(userDetails,null, userDetails.getAuthorities());//生成tokenString token = jwtTokenUtil.generateToken(userDetails);HashMap<String,Object> tokenMap =newHashMap<>();
        tokenMap.put("token",token);
        tokenMap.put("tokenHead",tokenHead);returnRespBean.success("登陆成功",tokenMap);}
- JWT登录授权拦截器
@OverrideprotectedvoiddoFilterInternal(HttpServletRequest request,HttpServletResponse response,FilterChain filterChain)throwsServletException,IOException{String authHeader = request.getHeader(tokenHeader);//存在tokenif(authHeader !=null&& authHeader.startsWith(tokenHead)){String authToken = authHeader.substring(tokenHead.length());String username = jwtTokenUtil.getUserNameFromToken(authToken);//存在token但没有登录if(null!= username &&SecurityContextHolder.getContext().getAuthentication()==null){//登录UserDetails userDetails = userDetailsService.loadUserByUsername(username);//验证token是否有效,重新设置用户对象if(jwtTokenUtil.validateToken(authToken,userDetails)){UsernamePasswordAuthenticationToken authenticationToken =newUsernamePasswordAuthenticationToken(userDetails,null, userDetails.getAuthorities());
                    authenticationToken.setDetails(newWebAuthenticationDetailsSource().buildDetails(request));SecurityContextHolder.getContext().setAuthentication(authenticationToken);}}}
        filterChain.doFilter(request,response);}
- 登录的主要流程 前端输入用户名和密码,服务端去判断这个用户名和密码是否正确,若不正确,则提示用户重新输入;若正确,服务端就生成一个唯一的Jwt令牌返回给前端。前端将这个令牌放到它的请求头里面,后面的每一次请求都会携带这个令牌,然后服务端会有一个对应的拦截器用于检验令牌是否正确,是否有效,是否过期等等,每次请求都会先走一遍这个拦截器,通过才可以访问相关接口。
2.6 Captcha验证码
- 导入pom.xml依赖
<!--google kaptcha 图像验证码依赖--><dependency><groupId>com.github.axet</groupId><artifactId>kaptcha</artifactId><version>0.0.9</version></dependency>
- Captcha验证码配置类
@ConfigurationpublicclassCaptchaConfig{@BeanpublicDefaultKaptchadefaultKaptcha(){//验证码生成器DefaultKaptcha defaultKaptcha =newDefaultKaptcha();//配置Properties properties =newProperties();//是否有边框
        properties.setProperty("kaptcha.border","yes");//设置边框颜色
        properties.setProperty("kaptcha.border.color","105,179,90");//边框粗细度,默认为1// properties.setProperty("kaptcha.border.thickness","1");//验证码
        properties.setProperty("kaptcha.session.key","code");//验证码文本字符颜色 默认为黑色
        properties.setProperty("kaptcha.textproducer.font.color","blue");//设置字体样式
        properties.setProperty("kaptcha.textproducer.font.names","宋体,楷体,微软雅 黑");//字体大小,默认40
        properties.setProperty("kaptcha.textproducer.font.size","30");//验证码文本字符内容范围 默认为abced2345678gfynmnpwx// properties.setProperty("kaptcha.textproducer.char.string", "");//字符长度,默认为5
        properties.setProperty("kaptcha.textproducer.char.length","4");//字符间距 默认为2
        properties.setProperty("kaptcha.textproducer.char.space","4");//验证码图片宽度 默认为200
        properties.setProperty("kaptcha.image.width","100");//验证码图片高度 默认为40
        properties.setProperty("kaptcha.image.height","40");Config config =newConfig(properties);
        defaultKaptcha.setConfig(config);return defaultKaptcha;}}
- 验证码的Controller
@RestControllerpublicclassCaptchaController{@AutowiredprivateDefaultKaptcha defaultKaptcha;@ApiOperation(value ="验证码")@GetMapping(value ="/captcha",produces ="image/jpeg")publicvoidcaptcha(HttpServletRequest request,HttpServletResponse response){// 定义response输出类型为image/jpeg类型
        response.setDateHeader("Expires",0);// Set standard HTTP/1.1 no-cache headers.
        response.setHeader("Cache-Control","no-store, no-cache, must-revalidate");// Set IE extended HTTP/1.1 no-cache headers (use addHeader).
        response.addHeader("Cache-Control","post-check=0, pre-check=0");// Set standard HTTP/1.0 no-cache header.
        response.setHeader("Pragma","no-cache");// return a jpeg
        response.setContentType("image/jpeg");//-------------------生成验证码 begin --------------------------// 获取验证码的文本内容String text = defaultKaptcha.createText();System.out.println("验证码:"+ text);// 将验证码放到session
        request.getSession().setAttribute("captcha", text);// 根据文本验证码内容创建图形验证码BufferedImage image = defaultKaptcha.createImage(text);ServletOutputStream servletOutputStream =null;try{
            servletOutputStream = response.getOutputStream();// 输出流输出图片, 格式为jpgImageIO.write(image,"jpg", servletOutputStream);// 发送到浏览器
            servletOutputStream.flush();}catch(IOException e){
            e.printStackTrace();}finally{if(servletOutputStream !=null){try{
                    servletOutputStream.close();}catch(IOException e){
                    e.printStackTrace();}}}//-------------------生成验证码 end ----------------------------}
三、根据用户查询菜单列表
3.1 数据库表结构
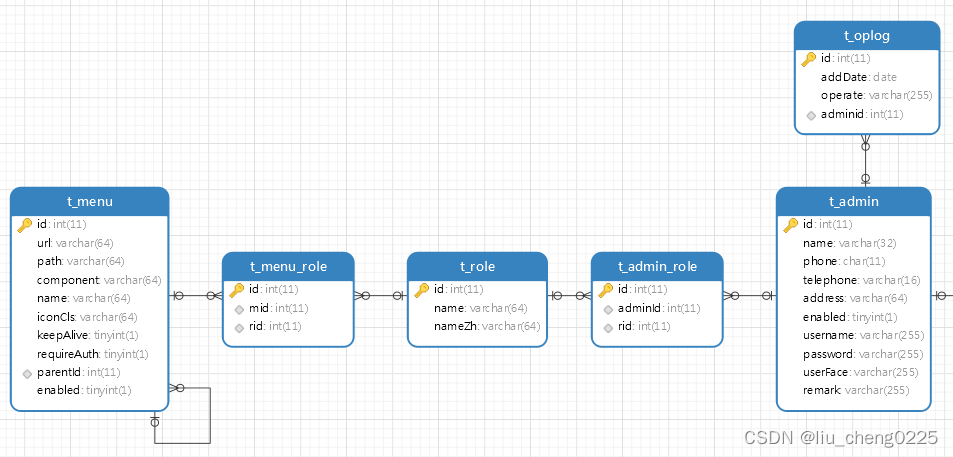
由图分析可知,每一个当前登录的用户(admin)实体对应一个(或多个)角色(role)实体,由关系表t_admin_role相关联,每一个角色则对应一个菜单(menu)实体,由关系表t_menu_role相关联。所以实现根据用户查询菜单列表这个功能,我们需要涉及三个实体表和两个关系表。需要注意的是,每一个菜单下面可能存在子菜单,所以在查询数据库时,需要判断当前菜单的id是否存在其他菜单的parentId与其相同,若存在则作为其子菜单,这里我们自定义resultMap来实现。
3.2 相关代码实现
- 前端控制器MenuController
@RestController@RequestMapping({"/system/config","/api/system/config"})publicclassMenuController{@AutowiredprivateIMenuService menuService;@ApiOperation(value ="通过用户id查询菜单列表")@GetMapping("/menu")publicList<Menu>getMenusByAdminId(){return menuService.getMenusByAdminId();}}
- MenuMapper的SQL语句
<resultMapid="Menus"type="edu.liuc.server.pojo.Menu"extends="BaseResultMap"><!--  除了BaseResultMap的属性,我们还在Menu设置了一个list用存放子菜单  --><collectionproperty="children"ofType="edu.liuc.server.pojo.Menu"><idcolumn="id2"property="id"/><resultcolumn="url2"property="url"/><resultcolumn="path2"property="path"/><resultcolumn="component2"property="component"/><resultcolumn="name2"property="name"/><resultcolumn="iconCls2"property="iconCls"/><resultcolumn="keepAlive2"property="keepAlive"/><resultcolumn="requireAuth2"property="requireAuth"/><resultcolumn="parentId2"property="parentId"/><resultcolumn="enabled2"property="enabled"/></collection></resultMap><!--根据id查询菜单列表--><selectid="getMenusByAdminId"resultMap="Menus">
        SELECT DISTINCT pm1.*,
                        m2.id id2, m2.url url2, m2.path path2, m2.component component2, m2.`name` name2,
                        m2.iconCls iconCls2, m2.keepAlive keepAlive2, m2.requireAuth requireAuth2,
                        m2.parentId parentId2, m2.enabled enabled2
        FROM  yeb.t_menu pm1, yeb.t_menu m2, yeb.t_admin_role ar, yeb.t_menu_role mr
        WHERE pm1.id = m2.parentId AND m2.id = mr.mid and mr.rid = ar.rid and ar.adminId = #{id} and m2.enabled = TRUE
    </select>
3.3 使用Redis做查询改进
- 由于这是一个前后端分离的项目,再结合本来数据库的表结构设计,一个角色(role)对应不同的菜单列表,且改动不大,为了加快查询速度和减轻数据库的压力,所以这里选择用Redis作为查询的缓存数据库。
- Redis的序列化配置类
@ConfigurationpublicclassRedisConfig{@BeanpublicRedisTemplate<String,Object>redisTemplate(RedisConnectionFactory connectionFactory){RedisTemplate<String,Object> redisTemplate =newRedisTemplate<>();//string
        redisTemplate.setKeySerializer(newStringRedisSerializer());
        redisTemplate.setValueSerializer(newGenericJackson2JsonRedisSerializer());//hash
        redisTemplate.setHashKeySerializer(newStringRedisSerializer());
        redisTemplate.setHashKeySerializer(newGenericJackson2JsonRedisSerializer());
        redisTemplate.setConnectionFactory(connectionFactory);return redisTemplate;}}
- MenuServiceImpl的查询优化处理
@OverridepublicList<Menu>getMenusByAdminId(){Integer adminId =AdminUtils.getCurrentAdmin().getId();ValueOperations<String,Object> valueOperations = redisTemplate.opsForValue();//先查redis缓存List<Menu> menus =(List<Menu>) valueOperations.get("menu_"+ adminId);//为空就去数据库if(CollectionUtils.isEmpty(menus)){
           menus = menuMapper.getMenusByAdminId(adminId);
           valueOperations.set("menu_"+ adminId,menus);}return menus;}
3.5 前端请求的权限控制
- 根据请求url分析所需要的角色 由于不同的菜单需要不同的权限才能访问,这里需要根据前端请求的url判断请求的菜单和已登录账号的权限是否匹配,若匹配则放行允许访问,否则提示权限不足!
- CustomFilter权限控制过滤器
@ComponentpublicclassCustomFilterimplementsFilterInvocationSecurityMetadataSource{@AutowiredprivateIMenuService menuService;AntPathMatcher antPathMatcher =newAntPathMatcher();@OverridepublicCollection<ConfigAttribute>getAttributes(Object object)throwsIllegalArgumentException{//获取请求的urlString requestUrl =((FilterInvocation) object).getRequestUrl();List<Menu> menus = menuService.getMenusWithRole();//查库获取urlfor(Menu menu : menus){//判断url和菜单角色是否匹配if(antPathMatcher.match(menu.getUrl(),requestUrl)){String[] str = menu.getRoles().stream().map(Role::getName).toArray(String[]::new);returnSecurityConfig.createList(str);}}//没匹配的url默认登录即可访问returnSecurityConfig.createList("ROLE_LOGIN");}}
- SpringSecurity的访问拦截
@Overrideprotectedvoidconfigure(HttpSecurity http)throwsException{//不需要csrf
        http.csrf().disable()//基于token不需要session.sessionManagement().sessionCreationPolicy(SessionCreationPolicy.STATELESS).and().authorizeRequests()//放行.antMatchers("/login","/logout").permitAll().anyRequest().authenticated()//动态权限配置.withObjectPostProcessor(newObjectPostProcessor<FilterSecurityInterceptor>(){@Overridepublic<OextendsFilterSecurityInterceptor>OpostProcess(O object){
                        object.setAccessDecisionManager(customUrlDecisionManager);
                        object.setSecurityMetadataSource(customFilter);return object;}}).and()//关闭缓存.headers().cacheControl();//添加jwt登录过滤器
        http.addFilterBefore(jwtAuthencationTokenFilter(),UsernamePasswordAuthenticationFilter.class);//添加自定义未授权和未登录结果返回
        http.exceptionHandling().accessDeniedHandler(restfulAccessDeniedHandler).authenticationEntryPoint(restAuthorizationEntryPoint);}
四、普通业务逻辑实现
4.1 职位管理
- PositionController前端控制器
@RestController@RequestMapping("/system/basic/pos")publicclassPositionController{@AutowiredprivateIPositionService positionService;@ApiModelProperty(value ="获取所有的职位信息")@GetMapping("/")publicList<Position>getAllPositions(){return positionService.list();//使用mybatisplus不用写service和mapper}@ApiModelProperty(value ="添加职位信息")@PostMapping("/")publicRespBeanaddPosition(@RequestBodyPosition position){
        position.setCreateDate(LocalDateTime.now());//以当前时间作为创建时间if(positionService.save(position)){returnRespBean.success("添加成功!");}returnRespBean.error("添加失败!");}@ApiModelProperty(value ="修改职位信息")@PutMapping("/")publicRespBeanupdatePosition(@RequestBodyPosition position){if(positionService.updateById(position)){returnRespBean.success("更新成功!");}returnRespBean.error("更新失败!");}@ApiModelProperty(value ="删除职位信息")@DeleteMapping("/{id}")publicRespBeandeletePosition(@PathVariableInteger id){if(positionService.removeById(id)){returnRespBean.success("删除成功!");}returnRespBean.error("删除失败!");}@ApiModelProperty(value ="批量删除职位信息")@DeleteMapping("/")publicRespBeandeletePositionsByIds(Integer[] ids){if(positionService.removeByIds(Arrays.asList(ids))){returnRespBean.success("删除成功!");}returnRespBean.error("删除失败!");}}
注:由于这个功能只涉及单个表的CRUD,直接调用Mybatis_Plus内部封装的方法就可以了。需要注意的是,在数据库设计中,职位表t_position的id和员工表t_employee的posId是有关联关系的,所以在删除职位表的数据时,需要先判断是否有其他数据和这个数据相关联,若有则不能删除,并给用户友好的提示信息,以提升用户体验感,所以这里针对这个问题做一个全局异常处理。
- GlobalException全局异常处理
@RestControllerAdvicepublicclassGlobalException{@ExceptionHandler(SQLException.class)publicRespBeanmySQLException(SQLException e){if(e instanceofSQLIntegrityConstraintViolationException){returnRespBean.error("该数据有关联数据,不能这样操作哦!");}returnRespBean.error("数据库异常,请检查后重试!");}}
4.2 职称管理
- JoblevelController前端控制器(单表)
@RestController@RequestMapping("/system/basic/joblevel")publicclassJoblevelController{@AutowiredprivateIJoblevelService joblevelService;@ApiOperation(value ="获取所有职称")@GetMapping("/")publicList<Joblevel>getAllJobLevels(){return joblevelService.list();}@ApiOperation(value ="添加一个职称")@PostMapping("/")publicRespBeanaddJobLevel(@RequestBodyJoblevel joblevel){
        joblevel.setCreateDate(LocalDateTime.now());System.out.println(joblevel);if(joblevelService.save(joblevel)){returnRespBean.success("添加职称成功");}returnRespBean.error("添加职称失败");}@ApiOperation(value ="修改职称信息")@PutMapping("/")publicRespBeanputJobLevel(@RequestBodyJoblevel joblevel){if(joblevelService.updateById(joblevel)){returnRespBean.success("修改职称信息成功");}returnRespBean.error("修改职称信息失败");}@ApiOperation(value ="删除一个职称")@DeleteMapping("/{id}")publicRespBeandeleteJoblevel(@PathVariableInteger id){if(joblevelService.removeById(id)){returnRespBean.success("删除一个职称成功");}returnRespBean.error("删除一个职称失败");}@ApiOperation(value ="删除一组职称")@DeleteMapping("/")publicRespBeandeleteJoblevels(Integer[] ids){if(joblevelService.removeByIds(Arrays.asList(ids))){returnRespBean.success("删除一组职称成功");}returnRespBean.success("删除一组职称失败");}}
4.3 部门管理
- 存储过程简介
存储过程(Stored Procedure)是一种在数据库中存储复杂程序,以便外部程序调用的一种数据库对象。MySQL 5.0 版本开始支持存储过程,存储过程是为了完成特定功能的SQL语句集,经编译创建并保存在数据库中,用户可通过指定存储过程的名字并给定参数(需要时)来调用执行。
存储过程思想上很简单,就是数据库 SQL 语言层面的代码封装与重用。
优点:
- 存储过程可封装,并隐藏复杂的商业逻辑。
- 存储过程可以回传值,并可以接受参数。
- 存储过程无法使用 SELECT 指令来运行,因为它是子程序,与查看表,数据表或用户定义函数不同。
- 存储过程可以用在数据检验,强制实行商业逻辑等。
缺点:
- 存储过程,往往定制化于特定的数据库上,因为支持的编程语言不同。当切换到其他厂商的数据库系统时,需要重写原有的存储过程。
- 存储过程的性能调校与撰写,受限于各种数据库系统。
- 部门管理问题分析
 当选择删除部门时,服务端需要先编写SQL语句找到这条记录,然后判断其下是否存在子部门,存在则不能删除,再判断该部门里是否存在员工,存在则不能删除;若都没有则可以删除,同时判断其父部门下是否存在其他子部门,若不存在子部门则修改其isParent字段为0,若存在则不变。这无疑是一个SQL语句集的操作,添加部门同理,所以我们选择用存储过程来解决这个问题。
 - 删除部门(deleteDep)的存储过程
CREATEDEFINER=`root`@`localhost`PROCEDURE`deleteDep`(in did int,out result int)begindeclare ecount int;declare pid int;declare pcount int;declare a int;selectcount(*)into a from t_department where id=did and isParent=false;if a=0thenset result=-2;elseselectcount(*)into ecount from t_employee where departmentId=did;if ecount>0thenset result=-1;elseselect parentId into pid from t_department where id=did;deletefrom t_department where id=did and isParent=false;select row_count()into result;selectcount(*)into pcount from t_department where parentId=pid;if pcount=0thenupdate t_department set isParent=falsewhere id=pid;endif;endif;endif;end
- 添加部门(addDep)的存储过程
CREATEDEFINER=`root`@`localhost`PROCEDURE`addDep`(in depName varchar(32),in parentId int,in enabled boolean,out result int,out result2 int)begindeclare did int;declare pDepPath varchar(64);insertinto t_department set name=depName,parentId=parentId,enabled=enabled;select row_count()into result;select last_insert_id()into did;set result2=did;select depPath into pDepPath from t_department where id=parentId;update t_department set depPath=concat(pDepPath,'.',did)where id=did;update t_department set isParent=truewhere id=parentId;end
- DepartmentMapper调用存储体添加、删除部门
<!--    调用存储过程,添加部门--><selectid="addDep"statementType="CALLABLE">
        call addDep(#{name,mode=IN,jdbcType=VARCHAR},#{parentId,mode=IN,jdbcType=INTEGER},#{enabled,mode=IN,jdbcType=BOOLEAN},
                    #{result,mode=OUT,jdbcType=INTEGER},#{id,mode=OUT,jdbcType=INTEGER})
    </select><!--    调用存储过程,删除部门--><selectid="delDep"statementType="CALLABLE">
        call deleteDep(#{id,mode=IN,jdbcType=INTEGER},#{result,mode=OUT,jdbcType=INTEGER})
    </select>
4.4 员工管理
1、整体效果截图

2、查询所有员工(模糊查询和高级搜索)
- EmployeeController前端控制器
@ApiOperation(value ="获取所有员工(分页)")@GetMapping("/")publicRespPageBeangetEmployee(@RequestParam(defaultValue ="1")Integer currentPage,@RequestParam(defaultValue ="10")Integer size,Employee employee,LocalDate[] beginDateScope){return employeeService.getEmployee(currentPage,size,employee,beginDateScope);}@ApiOperation(value ="获取所有政治面貌")@GetMapping("/politicsStatus")publicList<PoliticsStatus>getAllPoliticsStatus(){return politicsStatusService.list();}@ApiOperation(value ="获取所有职称")@GetMapping("/joblevels")publicList<Joblevel>getAllJoblevels(){return joblevelService.list();}@ApiOperation(value ="获取所有民族")@GetMapping("/nations")publicList<Nation>getAllNations(){return nationService.list();}@ApiOperation(value ="获取所有职位")@GetMapping("/positions")publicList<Position>getAllPositions(){return positionService.list();}@ApiOperation(value ="获取所有部门")@GetMapping("/deps")publicList<Department>getAllDep(){return departmentService.getAllDepartments();}@ApiOperation(value ="获取当前工号")@GetMapping("/maxWorkID")publicRespBeanmaxWorkId(){return employeeService.maxWorkId();}
- EmployeeMapper查询数据库(分页使用Mybatis_Plus的PaginationInterceptor)
<selectid="getEmployeeWithPage"resultMap="EmployeeInfo">
        SELECT
        e.*,
        n.id as nid,
        n.name as nname,
        p.id as pid,
        p.name as pname,
        d.id as did,
        d.name as dname,
        j.id as jid,
        j.name as jname,
        pos.id as posid,
        pos.name as posname
        FROM
        yeb.t_employee e,
        yeb.t_nation n,
        yeb.t_politics_status p,
        yeb.t_department d,
        yeb.t_joblevel j,
        yeb.t_position pos
        WHERE
        e.nationId = n.id
        AND e.politicId = p.id
        AND e.departmentId = d.id
        AND e.jobLevelId = j.id
        AND e.posId = pos.id

        <iftest="null!=employee.name and ''!=employee.name">
            AND e.`name` LIKE CONCAT('%',#{employee.name}, '%')
        </if><iftest="null!=employee.politicId">
            AND e.politicId = #{employee.politicId}
        </if><iftest="null!=employee.nationId">
            AND e.nationId = #{employee.nationId}
        </if><iftest="null!=employee.jobLevelId">
            AND e.jobLevelId = #{employee.jobLevelId}
        </if><iftest="null!=employee.posId">
            AND e.posId = #{employee.posId}
        </if><iftest="null!=employee.engageForm and ''!=employee.engageForm">
            AND e.engageForm = #{employee.engageForm}
        </if><iftest="null!=employee.departmentId">
            AND e.departmentId = #{employee.departmentId}
        </if><iftest="null!=beginDateScope and 2==beginDateScope.length">
            AND e.beginDate BETWEEN #{beginDateScope[0]} and #{beginDateScope[1]}
        </if>
        ORDER BY e.id
    </select>
- 使用EasyPOI导出员工数据
@ApiOperation(value ="导出员工数据")@GetMapping(value ="/export",produces ="application/octet-stream")publicvoidexportEmployee(HttpServletResponse response){List<Employee> list = employeeService.getEmployeeTable(null);//查出数据ExportParams params =newExportParams("员工表","员工表",ExcelType.HSSF);//(文件标题,sheet名,文件类型)Workbook workbook =ExcelExportUtil.exportExcel(params,Employee.class,list);ServletOutputStream out =null;try{//流形式
            response.setHeader("content-type","application/octet-stream");//防止中文乱码
            response.setHeader("content-disposition","attachment;filename="+URLEncoder.encode("员工表.xls","UTF-8"));
            out = response.getOutputStream();
            workbook.write(out);}catch(IOException e){
            e.printStackTrace();}finally{if(out !=null){try{
                    out.close();}catch(IOException e){
                    e.printStackTrace();}}}}
- 使用EasyPOI导入员工数据
@ApiOperation(value ="导入员工数据")@PostMapping("/import")publicRespBeanimportEmployee(MultipartFile file){ImportParams params =newImportParams();//去掉标题行
        params.setTitleRows(1);List<Nation> nationList = nationService.list();List<PoliticsStatus> politicsStatusList = politicsStatusService.list();List<Department> departmentList = departmentService.list();List<Joblevel> joblevelList = joblevelService.list();List<Position> positionList = positionService.list();try{List<Employee> list =ExcelImportUtil.importExcel(file.getInputStream(),Employee.class, params);
            list.forEach(employee ->{//民族id
                employee.setNationId(nationList.get(nationList.indexOf(newNation(employee.getNation().getName()))).getId());//政治面貌id
                employee.setPoliticId(politicsStatusList.get(politicsStatusList.indexOf(newPoliticsStatus(employee.getPoliticsStatus().getName()))).getId());//部门id
                employee.setDepartmentId(departmentList.get(departmentList.indexOf(newDepartment(employee.getDepartment().getName()))).getId());//职称id
                employee.setJobLevelId(joblevelList.get(joblevelList.indexOf(newJoblevel(employee.getJoblevel().getName()))).getId());//职位id
                employee.setPosId(positionList.get(positionList.indexOf(newPosition(employee.getPosition().getName()))).getId());});if(employeeService.saveBatch(list)){returnRespBean.success("导入成功!");}}catch(Exception e){
            e.printStackTrace();}returnRespBean.error("导入失败!");}
3、增删改员工数据
- 添加员工数据
@ApiOperation(value ="添加员工")@PostMapping("/")publicRespBeanaddEmp(@RequestBodyEmployee employee){return employeeService.addEmp(employee);}
- 删除员工数据
@ApiOperation("删除员工")@DeleteMapping("/{id}")publicRespBeandelEmp(@PathVariableInteger id){if(employeeService.removeById(id)){returnRespBean.success("删除成功!");}returnRespBean.error("删除失败!");}
- 更新员工数据
@ApiOperation("更新员工信息")@PutMapping("/")publicRespBeanupdateEmp(@RequestBodyEmployee employee){if(employeeService.updateById(employee)){returnRespBean.success("更新成功!");}returnRespBean.error("更新失败!");}
五、提升业务功能
5.1 RabbitMQ简介
RabbitMQ是实现了高级消息队列协议(AMQP)的开源消息代理软件(亦称面向消息的中间件)。RabbitMQ服务器是用Erlang语言编写的,而集群和故障转移是构建在开放电信平台框架上的。所有主要的编程语言均有与代理接口通讯的客户端库。
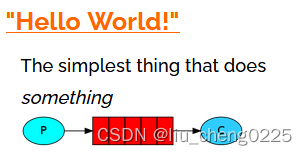
- RabbitMq的四种模式 1、简单队列:一个生产者P发送消息到队列Q,一个消费者C接收生产者。
 2、工作队列(轮询、公平):一个生产者,多个消费者,每个消费者获取到的消息唯一,多个消费者只有一个队列。
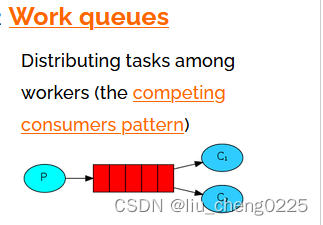 3、发布/订阅模式:生产者只能把消息发送给一个exchange,exchange只做一件简单的事情:一方面它们接收从生产者发送过来的消息,另一方面,它们把接收到的消息推送给队列。一个Exchage必须清楚地知道如何处理一条消息。
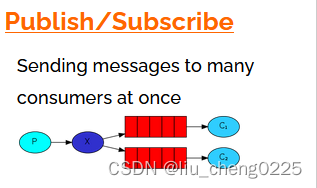 4、路由模式:路由模式是在使用交换机的同时,生产者指定路由发送数据,消费者绑定路由接受数据。与发布/订阅模式不同的是,发布/订阅模式只要是绑定了交换机的队列都会收到生产者向交换机推送过来的数据。而路由模式下加了一个路由设置,生产者向交换机发送数据时,会声明发送给交换机下的那个路由,并且只有当消费者的队列绑定了交换机并且声明了路由,才会收到数据。
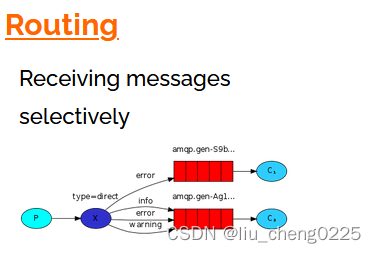
- Rabbit的优点: 1、解耦:系统A在代码中直接调用系统B和系统C的代码,如果将来D系统接入,系统A还需要修改大量代码,过于麻烦。 2、异步:将消息写入消息队列,非必要的业务逻辑以异步的方式运行,加快系统响应速度,提升用户使用体验。 3、削峰:并发量大的时候,所有的请求直接怼到数据库,可能会造成数据库连接异常。
5.2 员工入职邮件实现
- EmployeeServiceImpl添加员工后发送邮件
@OverridepublicRespBeanaddEmp(Employee employee){//合同期限特殊处理,保留有两位小数LocalDate beginContract = employee.getBeginContract();LocalDate endContract = employee.getEndContract();long days = beginContract.until(endContract,ChronoUnit.DAYS);DecimalFormat decimalFormat =newDecimalFormat("##.00");
        employee.setContractTerm(Double.parseDouble(decimalFormat.format(days/365.00)));if(employeeMapper.insert(employee)==1){Employee emp = employeeMapper.getEmployeeTable(employee.getId()).get(0);//数据库记录发送信息String msgId = UUID.randomUUID().toString();MailLog mailLog =newMailLog();
            mailLog.setMsgId(msgId);
            mailLog.setEid(employee.getId());
            mailLog.setStatus(0);
            mailLog.setRouteKey(MailConstants.MAIL_ROUTING_KEY);
            mailLog.setExchange(MailConstants.MAIL_EXCHANGE);
            mailLog.setCount(0);
            mailLog.setTryTime(LocalDateTime.now().plusMinutes(MailConstants.MSG_TIMEOUT));
            mailLog.setCreateTime(LocalDateTime.now());
            mailLog.setUpdateTime(LocalDateTime.now());
            mailLogMapper.insert(mailLog);//发送信息
            rabbitTemplate.convertAndSend(MailConstants.MAIL_EXCHANGE,MailConstants.MAIL_ROUTING_KEY,emp,newCorrelationData(msgId));returnRespBean.success("添加成功!");}returnRespBean.error("添加失败!");}
- 信道的邮件接收者MailReceiver
@RabbitListener(queues =MailConstants.MAIL_QUEUE)publicvoidhandler(Employee employee){MimeMessage msg = javaMailSender.createMimeMessage();MimeMessageHelper helper =newMimeMessageHelper(msg);try{//发件人
            helper.setFrom(mailProperties.getUsername());//收件人
            helper.setTo(employee.getEmail());//主题
            helper.setSubject("入职欢迎邮件");//发送日期
            helper.setSentDate(newDate());//邮件内容Context context =newContext();
            context.setVariable("name",employee.getName());
            context.setVariable("posName",employee.getPosition().getName());
            context.setVariable("joblevelName",employee.getJoblevel().getName());
            context.setVariable("departmentName",employee.getDepartment().getName());String mail = templateEngine.process("mail",context);//发送
            helper.setText(mail,true);//设置html格式
            javaMailSender.send(msg);}catch(MessagingException e){
            LOGGER.error("邮件发送失败========>",e.getMessage());}}
- 生产端可靠性投递方案-----消息落库 具体实现流程: 1、发送消息时,将当前信息数据存入数据库,投递状态设置为投递中; 2、开启信息确认回调机制,若确认成功,则更新更新投递状态为投递成功; 3、开启定时任务,重新投递失败的信息,若重试超过3次,则更新投递状态为投递失败。
消息确认回调和失败回调
@BeanpublicRabbitTemplaterabbitTemplate(){RabbitTemplate rabbitTemplate =newRabbitTemplate(cachingConnectionFactory);/*
         *消息确认回调
         *data:消息唯一标识
         *ack:确认结果(boolean)
         * cause:失败原因
         */
        rabbitTemplate.setConfirmCallback((data,ack,cause)->{String msgId = data.getId();//消息唯一id,存到数据库if(ack){
                LOGGER.info("消息发送成功====>",msgId);
                mailLogService.update(newUpdateWrapper<MailLog>().set("status",1).eq("msgId",msgId));}else{
                LOGGER.error("消息发送失败====>",msgId);}});/**
         * 消息失败回调
         * msg:消息主体
         * repCode:响应码
         * repText:相应描述
         * exchange:交换机
         * routingkey:路由键
         */
        rabbitTemplate.setReturnCallback((msg,repCode,repText,exchange,routingkey)->{
            LOGGER.error("消息发送queue时失败====>",msg.getBody());});return rabbitTemplate;}
开启定时任务(重发消息和更新投递状态)
/**
     * 定时任务  10s重试一次
     */@Scheduled(cron ="0/10 * * * * ?")publicvoidmailTask(){List<MailLog> list = mailLogService.list(newQueryWrapper<MailLog>().eq("status",0).lt("tryTime",LocalDateTime.now()));
        list.forEach(mailLog ->{//重试次数超过三次则失败,更新状态if(mailLog.getCount()>=3){
                mailLogService.update(newUpdateWrapper<MailLog>().set("status",2).eq("msgId",mailLog.getMsgId()));}
            mailLogService.update(newUpdateWrapper<MailLog>().set("count",mailLog.getCount()+1).set("updateTime",LocalDateTime.now()).set("tryTime",LocalDateTime.now().plusMinutes(MailConstants.MSG_TIMEOUT)).eq
                    ("msgId",mailLog.getMsgId()));Employee emp = employeeService.getEmployeeTable(mailLog.getEid()).get(0);
            rabbitTemplate.convertAndSend(MailConstants.MAIL_EXCHANGE,MailConstants.MAIL_ROUTING_KEY,
                    emp,newCorrelationData(mailLog.getMsgId()));});}
- 消费端的幂等性保证-----“唯一ID+指纹码” 消费端实现幂等性,就意味着,我们的消息永远不会被消费多次,即使我们收到了多条相同的消息。这里选择将生成的特定信息存到Redis缓存中,消费端每次拿到消息,先去缓存里检查是否已经消费过这个消息,以保证消息不会被重复消费。
MailReceiver的改进
@RabbitListener(queues =MailConstants.MAIL_QUEUE_NAME)publicvoidhandler(Message message,Channel channel){Employee employee =(Employee) message.getPayload();MessageHeaders headers = message.getHeaders();//消息序号long tag =(long) headers.get(AmqpHeaders.DELIVERY_TAG);String msgId =(String) headers.get("spring_returned_message_correlation");HashOperations hashOperations = redisTemplate.opsForHash();try{if(hashOperations.entries("mail_log").containsKey(msgId)){
                LOGGER.error("消息已经被消费=============>{}",msgId);/**
                 * 手动确认消息
                 * tag:消息序号
                 * multiple:是否确认多条
                 */
                channel.basicAck(tag,false);return;}MimeMessage msg = javaMailSender.createMimeMessage();MimeMessageHelper helper =newMimeMessageHelper(msg);//发件人
            helper.setFrom(mailProperties.getUsername());//收件人
            helper.setTo(employee.getEmail());//主题
            helper.setSubject("入职欢迎邮件");//发送日期
            helper.setSentDate(newDate());//邮件内容Context context =newContext();
            context.setVariable("name", employee.getName());
            context.setVariable("posName", employee.getPosition().getName());
            context.setVariable("joblevelName", employee.getJoblevel().getName());
            context.setVariable("departmentName", employee.getDepartment().getName());String mail = templateEngine.process("mail", context);
            helper.setText(mail,true);//发送邮件
            javaMailSender.send(msg);
            LOGGER.info("邮件发送成功");//将消息id存入redis
            hashOperations.put("mail_log", msgId,"OK");//手动确认消息
            channel.basicAck(tag,false);}catch(Exception e){/**
             * 手动确认消息
             * tag:消息序号
             * multiple:是否确认多条
             * requeue:是否退回到队列
             */try{
                channel.basicNack(tag,false,true);}catch(IOException ex){
                LOGGER.error("邮件发送失败=========>{}", e.getMessage());}
            LOGGER.error("邮件发送失败=========>{}", e.getMessage());}}
5.3 工资账套功能实现
- SalaryController前端控制器(单表直接使用Mybatis_Plus内部方法)
@RestController@RequestMapping("/salary/sob")publicclassSalaryController{@AutowiredprivateISalaryService salaryService;@ApiOperation(value ="获取所有工资账套")@GetMapping("/")publicList<Salary>getAllSalaries(){return salaryService.list();}@ApiOperation(value ="添加工资账套")@PostMapping("/")publicRespBeanaddSalary(@RequestBodySalary salary){
        salary.setCreateDate(LocalDateTime.now());if(salaryService.save(salary)){returnRespBean.success("添加成功!");}returnRespBean.error("添加失败!");}@ApiOperation(value ="删除工资账套")@DeleteMapping("/{id}")publicRespBeandelSalary(@PathVariableInteger id){if(salaryService.removeById(id)){returnRespBean.success("删除成功!");}returnRespBean.error("删除失败!");}@ApiOperation(value ="更新工资账套")@PutMapping("/")publicRespBeanupdateSalary(@RequestBodySalary salary){if(salaryService.updateById(salary)){returnRespBean.success("更新成功!");}returnRespBean.error("更新失败!");}}
5.4 聊天功能实现
1、WebSocket简介
WebSocket是一种在单个TCP连接上进行全双工通信的协议。WebSocket通信协议于2011年被IETF定为标准RFC 6455,并由RFC7936补充规范。WebSocket API也被W3C定为标准。
WebSocket使得客户端和服务器之间的数据交换变得更加简单,允许服务端主动向客户端推送数据。在WebSocket API中,浏览器和服务器只需要完成一次握手,两者之间就直接可以创建持久性的连接,并进行双向数据传输。
解决了传统轮询(Traditional Polling)、长轮询(Long Polling)带来的问题(服务端负载、延迟等)。
2、WebSocket的优缺点
- Websocket协议相比http优势很明显,首先在效率上有多方面的提升。 1、传统的http请求,其并发能力都是依赖同时发起多个TCP连接访问服务器实现的(因此并发数受限于浏览器允许的并发连接数),而websocket则允许我们在一条ws连接上同时并发多个请求,即在A请求发出后A响应还未到达,就可以继续发出B请求。由于TCP的慢启动特性(新连接速度上来是需要时间的),以及连接本身的握手损耗,都使得websocket协议的这一特性有很大的效率提升。 2、http协议的头部太大,且每个请求携带的几百上千字节的头部大部分是重复的,很多时候可能响应都远没有请求中的header空间大。如此多无效的内容传递是因为无法利用上一条请求内容,websocket则因为复用长连接而没有这一问题。 3、websocket支持服务器推送消息,这带来了及时消息通知的更好体验,也是ajax请求无法达到的。
- Websocket缺点 1、服务器长期维护长连接需要一定的成本。 2、各个浏览器支持程度不一。 3、websocket 是长连接,受网络限制比较大,需要处理好重连,比如用户进电梯或电信用户打个电话网断了,这时候就需要重连。
3、使用WebSocket实现聊天功能
- WebSocketConfig配置类(配合JWT令牌验证)
@OverridepublicvoidconfigureClientInboundChannel(ChannelRegistration registration){

        registration.interceptors(newChannelInterceptor(){@OverridepublicMessage<?>preSend(Message<?> message,MessageChannel channel){StompHeaderAccessor accessor =MessageHeaderAccessor.getAccessor(message,StompHeaderAccessor.class);//判断是否为连接,如果是,需要获取token,并设置用户对象if(StompCommand.CONNECT.equals(accessor.getCommand())){String token = accessor.getFirstNativeHeader("Auth-Token");if(!StringUtils.isEmpty(token)){String authToken = token.substring(token.length());String username = jwtTokenUtil.getUserNameFromToken(authToken);//若token中存在用户名if(!StringUtils.isEmpty(username)){//登录UserDetails userDetails = userDetailsService.loadUserByUsername(username);//验证token是否有效,重新设置用户对象if(jwtTokenUtil.validateToken(authToken,userDetails)){UsernamePasswordAuthenticationToken authenticationToken =newUsernamePasswordAuthenticationToken(userDetails,null, userDetails.getAuthorities());SecurityContextHolder.getContext().setAuthentication(authenticationToken);
                                accessor.setUser(authenticationToken);}}}}return message;}});}
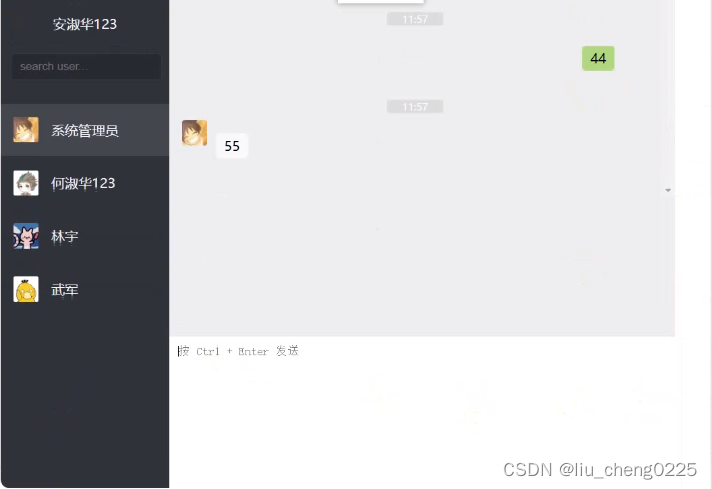
- 聊天功能页面截图
5.5 个人中心功能
1、更新基本用户信息
- 更新当前用户信息
@ApiOperation(value ="更新当前用户信息")@PutMapping("/admin/info")publicRespBeanupdateAdmin(@RequestBodyAdmin admin,Authentication authentication){if(adminService.updateById(admin)){SecurityContextHolder.getContext().setAuthentication(newUsernamePasswordAuthenticationToken(admin,null,authentication.getAuthorities()));returnRespBean.success("更新成功!");}returnRespBean.error("更新失败!");}
- 更新用户密码
@ApiOperation(value ="更新用户密码")@PutMapping("/admin/pass")publicRespBeanupdateAdminPassword(@RequestBodyMap<String,Object> info){String oldPass =(String) info.get("oldPass");String pass =(String) info.get("pass");Integer adminId =(Integer) info.get("adminId");return adminService.updateAdminPassword(oldPass,pass,adminId);}
2、FastDFS简介
- 基本介绍
FastDFS是一个开源的轻量级分布式文件系统,它对文件进行管理,功能包括:文件存储、文件同步、文件访问(文件上传、文件下载)等,解决了大容量存储和负载均衡的问题。特别适合以文件为载体的在线服务,如相册网站、视频网站等等。
FastDFS为互联网量身定制,充分考虑了冗余备份、负载均衡、线性扩容等机制,并注重高可用、高性能等指标,使用FastDFS很容易搭建一套高性能的文件服务器集群提供文件上传、下载等服务。
- 内部逻辑 1、FastDFS服务端有两个角色:跟踪器(tracker)和存储节点(storage)。跟踪器主要做调度工作,在访问上起负载均衡的作用。 2、跟踪器和存储节点都可以由一台或多台服务器构成。跟踪器和存储节点中的服务器均可以随时增加或下线而不会影响线上服务。其中跟踪器中的所有服务器都是对等的,可以根据服务器的压力情况随时增加或减少。 3、存储节点存储文件,完成文件管理的所有功能:就是这样的存储、同步和提供存取接口,FastDFS同时对文件的metadata进行管理。所谓文件的meta data就是文件的相关属性,以键值对(key value)方式表示,如:width=1024,其中的key为width,value为1024。文件metadata是文件属性列表,可以包含多个键值对。 4、当存储空间不足或即将耗尽时,可以动态添加卷。只需要增加一台或多台服务器,并将它们配置为一个新的卷,这样就扩大了存储系统的容量。
3、实现文件上传
- FastDFSUtils工具类
publicclassFastDFSUtils{privatestaticLogger logger =LoggerFactory.getLogger(FastDFSUtils.class);/**
     * 初始化客户端
     * ClientGlobal.init(filePath): 读取配置文件,并初始化对应的属性
     */static{try{// 获取绝对路径String filePath =newClassPathResource("fdfs_client.conf").getFile().getAbsolutePath();ClientGlobal.init(filePath);}catch(Exception e){// 输出到日志
            logger.error("初始化fastDFS失败:", e);}}/**
     * uploadResults是一个字符串数组, 第一个元素是组名, 第二个元素是在该组下文件路径
     * @param file
     * @return
     */publicstaticString[]upload(MultipartFile file){String name = file.getOriginalFilename();
        logger.info("文件名:",name);StorageClient storageClient =null;String[] uploadResults =null;try{// 获取storage客户端
            storageClient =getStorageClient();// 上传
            uploadResults = storageClient.upload_file(file.getBytes(), name.substring(name.lastIndexOf(".")+1),null);}catch(Exception e){
            logger.error("文件上传失败:", e);}if(null== uploadResults){
            logger.error("上传失败", storageClient.getErrorCode());}return uploadResults;}/**
     * 获取文件信息
     * @param groupName
     * @param remoteFileName
     * @return
     */publicstaticFileInfogetFileInfo(String groupName,String remoteFileName){StorageClient storageClient =null;try{
            storageClient =getStorageClient();return storageClient.get_file_info(groupName, remoteFileName);}catch(Exception e){
            logger.error("文件信息获取失败:", e);}returnnull;}
- AdminInfoController接口
@ApiOperation(value ="更新用户头像")@PostMapping("/userface")publicRespBeanupdateAdminUserFace(MultipartFile multipartFile,Integer id,Authentication authentication){String[] filePath =FastDFSUtils.upload(multipartFile);String url =FastDFSUtils.getTrackerUrl()+ filePath[0]+"/"+ filePath[1];return adminService.updateAdminUserFace(url, id, authentication);}
- 结果测试截图 1、更新前
 2、更新后
2、更新后
六、总结
- 个人心得 offie_online(Yeb)的初步学习已经完结,不过里面还有很多东西值得我去深入学习的,写博客的目的是做一个学习记录,方便自己在以后的工作和学习中回过头来复习。文中也许会有一些错误的地方,欢迎各网友的指正!
- 参考链接 1、BiliBili【优极限】:https://www.bilibili.com/video/BV14K411F7HJp=328&vd_source=273b71bac5b066ac3c6f3a3bc7c1b095 2、百度百科:https://baike.baidu.com/ 3、https://zhuanlan.zhihu.com/p/158186278?from_voters_page=true 4、https://blog.csdn.net/simplemeet/article/details/105444783 5、https://blog.csdn.net/qq_39903567/article/details/115385466
版权归原作者 liu_cheng0225 所有, 如有侵权,请联系我们删除。