一、什么是SpringBoot starter机制
SpringBoot中的starter是一种非常重要的机制(自动化配置),能够抛弃以前繁杂的配置,将其统一集成进starter,应用者只需要在maven中引入starter依赖,SpringBoot就能自动扫描到要加载的信息并启动相应的默认配置。
starter让我们摆脱了各种依赖库的处理,需要配置各种信息的困扰。SpringBoot会自动通过classpath路径下的类发现需要的Bean,并注册进IOC容器。SpringBoot提供了针对日常企业应用研发各种场景的spring-boot-starter依赖模块。
所有这些依赖模块都遵循着约定成俗的默认配置,并允许我们调整这些配置,即遵循“约定大于配置”的理念。
二、为什么要自定义starter
在我们的日常开发工作中,经常会有一些独立于业务之外的配置模块,我们经常将其放到一个特定的包下,然后如果另一个工程需要复用这块功能的时候,需要将代码硬拷贝到另一个工程,重新集成一遍,麻烦至极。
如果我们将这些可独立于业务代码之外的功配置模块封装成一个个starter,复用的时候只需要将其在pom中引用依赖即可,SpringBoot为我们完成自动装配,简直不要太爽
三、什么时候需要创建自定义starter
在我们的日常开发工作中,可能会需要开发一个通用模块,以供其它工程复用。SpringBoot就为我们提供这样的功能机制,我们可以把我们的通用模块封装成一个个starter,这样其它工程复用的时候只需要在pom中引用依赖即可,由SpringBoot为我们完成自动装配。
常见场景:
1.通用模块-短信发送模块
2.基于AOP技术实现日志切面3.分布式雪花ID,Long-->string,解决精度问题
jackson2/fastjson4.微服务项目的数据库连接池配置
5.微服务项目的每个模块都要访问redis数据库,每个模块都要配置redisTemplate
也可以通过starter解决
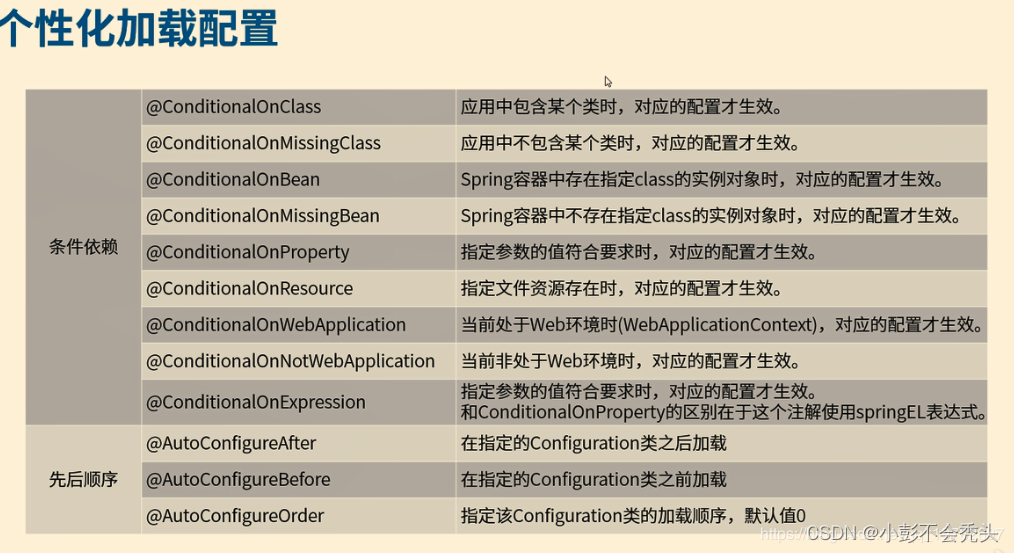
四、自动加载核心注解说明
starter 组件开发,核心是自动注解类的注解顺序,即根据条件进行注解
关于自动加载核心注解,详情可见:https://blog.csdn.net/qq_19782697/article/details/100727302
五、自定义starter的开发流程
那么前面对自定义 starter 机制简单介绍了一下,接下来就进入正题!
自定义starter的开发流程:
1.创建Starter项目(spring-initl 2.1.14)
2.定义Starter需要的配置类(Properties)
3.编写Starter项目的业务功能
4.编写自动配置类
5.编写spring.factories文件加载自动配置类
6.打包安装
7.其它项目引用
案例一:为短信发送功能创建一个starter
1.创建Starter项目
starter项目和SpringBoot工程结构没有什么区别,下面就把一些特殊的要求罗列一下
1.1.命名规范
SpringBoot官方命名方式
格式:spring-boot-starter-{模块名}
举例:spring-boot-starter-web
自定义命名方式
格式:{模块名}-spring-boot-starter
举例:mystarter-spring-boot-starter
1.2.必须引入的依赖<!--表示两个项目之间依赖不传递;不设置optional或者optional是false,表示传递依赖--> <!--例如:project1依赖a.jar(optional=true),project2依赖project1,则project2不依赖a.jar--> <dependency> <groupId>org.springframework.boot</groupId> <artifactId>spring-boot-configuration-processor</artifactId> <optional>true</optional> </dependency>如果我们刚刚创建项目时选择了Spring Configuration Processor,在pom.xml文件中就会有上面的依赖
2.编写相关属性类(XxxProperties):SmsProperties.java
--@ConfigurationProperties注解基本用法
前缀定义了哪些外部属性将绑定到类的字段上
根据 Spring Boot 宽松的绑定规则,类的属性名称必须与外部属性的名称匹配
我们可以简单地用一个值初始化一个字段来定义一个默认值
类本身可以是包私有的
类的字段必须有公共 setter 方法注意:SmsProperties代码写完后会报如下错误,这是正常的,因为 还有配置类AutoConfig和一个注解@EnableConfigurationProperties没有加 (Not registered via @EnableConfigurationProperties or marked as Spring component)package com.zking.zzcloudspringbootstarter.sms; import org.springframework.boot.context.properties.ConfigurationProperties; import java.io.Serializable; @ConfigurationProperties("zzcloud.sms") public class SmsProperties implements Serializable { private String accessKeyId;//访问ID、即帐号 private String accessKeySecret;//访问凭证,即密码 public String getAccessKeyId() { return accessKeyId; } public void setAccessKeyId(String accessKeyId) { this.accessKeyId = accessKeyId; } public String getAccessKeySecret() { return accessKeySecret; } public void setAccessKeySecret(String accessKeySecret) { this.accessKeySecret = accessKeySecret; } }**3.编写Starter项目的业务功能 **
ISmsService和SmsServiceImpl相关代码如下:package com.zking.zzcloudspringbootstarter.sms; public interface ISmsService { /** * 发送短信 * * @param phone 要发送的手机号 * @param signName 短信签名-在短信控制台中找 * @param templateCode 短信模板-在短信控制台中找 * @param data 要发送的内容 */ void send(String phone, String signName, String templateCode, String data); }package com.zking.zzcloudspringbootstarter.sms; import com.zking.zzcloudspringbootstarter.sms.ISmsService; public class SmsServiceImpl implements ISmsService { private String accessKeyId;//访问ID、即帐号 private String accessKeySecret;//访问凭证,即密码 public SmsServiceImpl(String accessKeyId, String accessKeySecret) { this.accessKeyId = accessKeyId; this.accessKeySecret = accessKeySecret; } @Override public void send(String phone, String signName, String templateCode, String data) { System.out.println("接入短信系统,accessKeyId=" + accessKeyId + ",accessKeySecret=" + accessKeySecret); System.out.println("短信发送,phone=" + phone + ",signName=" + signName + ",templateCode=" + templateCode + ",data=" + data); } }**4.编写自动配置类AutoConfig **
4.1. @Configuration:
定义一个配置类
4.2. @EnableConfigurationProperties:
@EnableConfigurationProperties注解的作用是@ConfigurationProperties注解生效。
如果只配置@ConfigurationProperties注解,在IOC容器中是获取不到properties配置文 件转化的bean的package com.zking.zzcloudspringbootstarter.config; import com.zking.zzcloudspringbootstarter.sms.SmsProperties; import com.zking.zzcloudspringbootstarter.sms.SmsServiceImpl; import org.springframework.boot.context.properties.EnableConfigurationProperties; import org.springframework.context.annotation.Bean; import org.springframework.context.annotation.Configuration; import javax.annotation.Resource; @Configuration //表示这个类为配置类 @EnableConfigurationProperties({SmsProperties.class}) public class SmsAutoConfig { @Resource private SmsProperties smsProperties; @Bean public SmsServiceImpl smsServiceImpl(){ return new SmsServiceImpl(smsProperties.getAccessKeyId(),smsProperties.getAccessKeySecret()); } }5.编写spring.factories文件加载自动配置类
5.1.在resources下新建META-INF文件夹,然后创建spring.factories文件
5.2.在该文件中加入如下配置,该配置指定上步骤中定义的配置类为自动装配的配置org.springframework.boot.autoconfigure.EnableAutoConfiguration=\ com.zking.zzcloudspringbootstarter.config.SmsAutoConfig注1:其中AutoConfig是starter配置文件的类限定名,多个之间逗号分割,还可以\进行转义即相当于去掉后面换行和空格符号,如下所示
# Auto Configure org.springframework.boot.autoconfigure.EnableAutoConfiguration=\ com.baomidou.mybatisplus.autoconfigure.MybatisPlusLanguageDriverAutoConfiguration,\ com.baomidou.mybatisplus.autoconfigure.MybatisPlusAutoConfiguration6.打包安装
打包时需要注意一下,SpringBoot项目打包的JAR是可执行JAR,它的类放在BOOT-INF目录下,如果直接作为其他项目的依赖,会找不到类。可以通过修改pom文件来解决,代码如下:
<plugin> <groupId>org.springframework.boot</groupId> <artifactId>spring-boot-maven-plugin</artifactId> <configuration> <classifier>exec</classifier> </configuration> </plugin>
打包前,先查看我们maven仓库的位置,并设置到自己本地仓库位置中去,再打包。过程如下:
成功后,我们可以发现我们本地仓库就会有刚刚我们打包完的项目:
到这里为止,我们的整个自定义starter的准备工作就做完了,如下是我的整个自定义starter文件的结构:
**7.在其他项目中的应用 **
7.1.首先在其他项目的pom.xml中引入相关依赖:
7.2.在application.yml文件中添加配置
为了展示效果,我们写一个测试类,看能否看到我们想要的效果,测试代码如下:
package com.zking.springboot02.service.impl; import com.zking.springboot02.Springboot02Application; import com.zking.springboot02.model.Book; import com.zking.springboot02.service.IBookService; import com.zking.springboot02.utils.PageBean; import com.zking.zzcloudspringbootstarter.sms.ISmsService; import org.junit.jupiter.api.AfterEach; import org.junit.jupiter.api.BeforeEach; import org.junit.jupiter.api.Test; import org.springframework.boot.test.context.SpringBootTest; import org.springframework.data.redis.core.RedisTemplate; import javax.annotation.Resource; import java.util.List; @SpringBootTest(classes = Springboot02Application.class) class SmsServiceImplTest { @Resource private ISmsService smsService; @BeforeEach void setUp() { } @AfterEach void tearDown() { } @Test void testRedis() { smsService.send("15575488448","pengying","1","小彭不会秃头加油干!"); } }控制台效果如下:
如果控制台有如上效果,说明我们整个自定义starter的过程就成功了!
案例二:AOP方式统一服务日志
原先实现统一日志都是放到每个工程中以AOP方式实现,现在有了starter方式,就可以将公司的日志规范集中到这里来统一管理。
这里我们使用之前创建好的项目进行案例二的编写,步骤与上同理:
1.导入aop相关依赖
<!--aop相关依赖--> <dependency> <groupId>org.springframework.boot</groupId> <artifactId>spring-boot-starter-aop</artifactId> </dependency>2.编写相关属性类(XxxProperties):WebLogProperties.java
package com.zking.zzcloudspringbootstarter.sms; import org.springframework.boot.context.properties.ConfigurationProperties; import java.io.Serializable; @ConfigurationProperties("zzcloud.weblog") public class WebLogProperties implements Serializable { public Boolean enabled; //Boolean封装类,默认为null public Boolean getEnabled() { return enabled; } public void setEnabled(Boolean enabled) { this.enabled = enabled; } }**3.编写Starter项目的业务功能 **
package com.zking.zzcloudspringbootstarter.weblog; import lombok.extern.slf4j.Slf4j; import org.aspectj.lang.JoinPoint; import org.aspectj.lang.annotation.AfterReturning; import org.aspectj.lang.annotation.Aspect; import org.aspectj.lang.annotation.Before; import org.aspectj.lang.annotation.Pointcut; import org.springframework.stereotype.Component; import org.springframework.web.context.request.RequestContextHolder; import org.springframework.web.context.request.ServletRequestAttributes; import javax.servlet.http.HttpServletRequest; import java.util.Arrays; @Aspect @Component @Slf4j public class WebLogAspect { //@Pointcut("execution(public * com.zking..controller.*.*(..))") @Pointcut("execution(* *..*Controller.*(..))") public void webLog(){} @Before("webLog()") public void doBefore(JoinPoint joinPoint) throws Throwable { // 接收到请求,记录请求内容 ServletRequestAttributes attributes = (ServletRequestAttributes) RequestContextHolder.getRequestAttributes(); HttpServletRequest request = attributes.getRequest(); // 记录下请求内容 log.info("开始服务:{}", request.getRequestURL().toString()); log.info("客户端IP :{}" , request.getRemoteAddr()); log.info("参数值 :{}", Arrays.toString(joinPoint.getArgs())); } @AfterReturning(returning = "ret", pointcut = "webLog()") public void doAfterReturning(Object ret) throws Throwable { // 处理完请求,返回内容 log.info("返回值 : {}" , ret); } }**4.编写自动配置类AutoConfig **
4.1.@ConditionalOnProperty(prefix = "zzcloud.weblog",value = "enabled", matchIfMissing = true):
matchIfMissing属性:默认情况下matchIfMissing为false,也就是说如果未进行属性配置,则自动配置不生效。如果matchIfMissing为true,则表示如果没有对应的属性配置,则自动配置默认生效
4.2.@ConditionalOnMissingBean:
在@bean定义上,它的作用就是在容器加载它作用的bean时,检查容器中是否存在目标类型(ConditionalOnMissingBean注解的value值)的bean了,如果存在这跳过原始bean的BeanDefinition加载动作。package com.zking.zzcloudspringbootstarter.config; import com.zking.zzcloudspringbootstarter.sms.SmsProperties; import com.zking.zzcloudspringbootstarter.sms.SmsServiceImpl; import com.zking.zzcloudspringbootstarter.sms.WebLogProperties; import com.zking.zzcloudspringbootstarter.weblog.WebLogAspect; import org.springframework.boot.autoconfigure.condition.ConditionalOnMissingBean; import org.springframework.boot.autoconfigure.condition.ConditionalOnProperty; import org.springframework.boot.context.properties.EnableConfigurationProperties; import org.springframework.context.annotation.Bean; import org.springframework.context.annotation.Configuration; import javax.annotation.Resource; @Configuration //表示这个类为配置类 @EnableConfigurationProperties({WebLogProperties.class}) @ConditionalOnProperty(prefix = "zzcloud.weblog",value = "enabled",matchIfMissing = true) public class WebLogAutoConfig { @Bean @ConditionalOnMissingBean public WebLogAspect webLogAspect(){ return new WebLogAspect(); } }5.编写spring.factories文件加载自动配置类
org.springframework.boot.autoconfigure.EnableAutoConfiguration=\ com.zking.zzcloudspringbootstarter.config.SmsAutoConfig,\ com.zking.zzcloudspringbootstarter.config.WebLogAutoConfig6.打包,操作同上
7.在其他项目中引用
7.1.导入依赖,由于这里我们使用的是之前的那个项目,这里就不需要重复导入依赖了
7.2.在application.yml文件中添加配置
测试如下:这里我用该项目里的方法进行测试
如果我不使用日志,效果如下:
反之如果我使用日志,就会拿到我请求的路径、我的客户端以及我的参数值,效果如下:
如果由以上效果,说明我的案例二:AOP方式统一服务日志就成功了!
今天的学习记录就到这了,拜拜!
说明:学习记录,若有错误,欢迎指正,若有疑问,欢迎评论
版权归原作者 小彭不会秃头 所有, 如有侵权,请联系我们删除。


