
一、延迟队列的基本概念
1、基本理解
    一般队列当中的消息都是按照“先进先出”的规律,排序执行的,在rabbitMQ当中,消息队列在收到消费方的确认消息之后,就会把消息从队列当中删除掉;

    而延迟队列,里边的消息也是有序的,和一般消息队列最大的区别就体现在延时属性上,队列当中的消息是希望在指定时间前或者时间后,将消息取出,放到私信队列当中做处理。延迟**队列当中存放的全部都是期望在指定时间被处理的消息**。
2、使用场景
    订单超时未支付,就执行取消订单操作;

    用户申请退款之后,如果三天内没有得到处理就通知相关人员操作;

    用户签收订单之后,超过5天没有签收,就会自动签收;

    预定会议之后,在预定时间节点前半小时通知参会人员,会议信息;

    等等。。。。
3、在指定时间去处理任务的方式对比
对比内容
处理方案
定时任务
延迟队列
操作
使用定时任务,一秒钟轮询一次队列,到达指定时间就将消息取出来做处理
将所有需要在指定时间完成的消息放到队列当中,有专门的消费方在指定时间前或者指定时间后取出消息消费
难度分析
队列消息不多的时候,可以实现;
但是一旦数据非常庞大,而且对时效要求比较高,轮询一圈数据都不知道需要多长时间,比如“双十一活动”当中存在海量的订单需要执行“订单10分钟没有支付就失效”,使用轮询的方式就非常繁琐而且性能低;
比定时任务的性能、耗时要好很多
二、代码方式去实现延迟队列
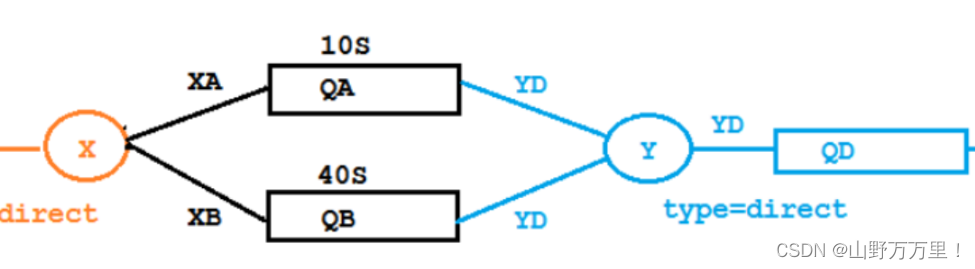
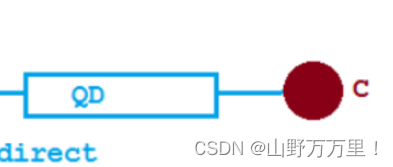
1、代码架构图

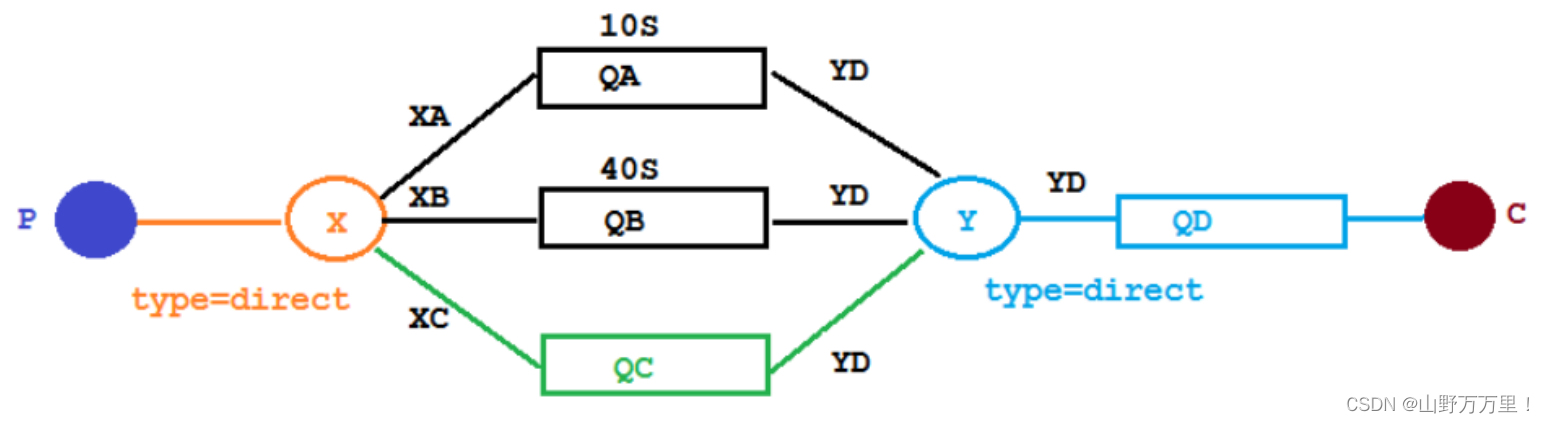
角色介绍:
p:消息发布者
X,Y:都是direct类型的交换机,分别代表普通交换机和死信交换机
XA,XB:路由到指定队列的规则,routing key
YD:路由到死信交换机/死信队列的规则
QA,QB:都是延迟队列,队列的ttl时间分别是10s,40s
QD:死信队列
C:消息消费者
2、具体实现
(1)准备工具类
依赖:spring-boot-starter-web,spring-boot-starter-amqp,lombok
用bean的方式去将队列、交换机,binding等交给ioc管理:
/*
用于对延迟队列当中涉及到的队列、交换机、绑定关系进行管理
 */
@Configuration
public class TTLQueueConfiguration {
    public static final String normal_exchangeX = "X";
    public static final String dead_exchange = "Y";
    public static final String ttlQueueA = "QA";
    public static final String ttlQueueB = "QB";
    public static final String deadQueueD = "QD";
    public static final String routTTLQueueA = "XA";
    public static final String routTTLQueueB = "XB";
    public static final String routDead = "YD";

    //声明普通交换机
    @Bean(normal_exchangeX)
    public DirectExchange getNormalExchange(){
        return new DirectExchange(normal_exchangeX);
    }

    //声明死信交换机
    @Bean(dead_exchange)
    public DirectExchange getDeadExchange(){
        return new DirectExchange(dead_exchange);
    }

    //声明延迟队列QA,并绑定死信交换机
    @Bean(ttlQueueA)
    public Queue getTTLQueueA(){
        //存储死信交换机和死信队列以及路由key的信息,所有key都是固定写法
        Map<String,Object> params = new HashMap<>();
        params.put("x-dead-letter-exchange",dead_exchange);
        params.put("x-dead-letter-queue",deadQueueD);
        params.put("x-dead-letter-routing-key",routDead);
        //声明延迟队列QA的ttl时间为10s(x-message-ttl固定写法,单位ms)
        params.put("x-message-tll",10000);
        /*
        延时队列就是让队列不要失效,durable参数为指定队列的名字
         */
        return QueueBuilder.durable(ttlQueueA).withArguments(params).build();
    }

    //声明延迟队列QB,并绑定死信交换机
    @Bean(ttlQueueB)
    public Queue getTTLQueueB(){
        Map<String,Object> params = new HashMap<>();
        params.put("x-dead-letter-exchange",dead_exchange);
        params.put("x-dead-letter-queue",deadQueueD);
        params.put("x-dead-letter-routing-key",routDead);
        params.put("x-message-ttl",40000);
        return QueueBuilder.durable(ttlQueueB).withArguments(params).build();
    }

    //声明死信队列
    @Bean(deadQueueD)
    public Queue getDeadQueueD(){
        return new Queue(deadQueueD);
    }

    //声明死信队列和死信队列的绑定关系
    @Bean
    public Binding deadQueueDBindDeadExchange(
            @Qualifier(deadQueueD) Queue deadQueue,
            @Qualifier(dead_exchange) DirectExchange deadExchange){
        return BindingBuilder.bind(deadQueue).to(deadExchange).with(routDead);
    }

    //声明ttlQueueA和普通交换机X的绑定关系
    @Bean
    public Binding ttlQueueABindingNormalExchangeX(
            @Qualifier(ttlQueueA) Queue ttlQA,
            @Qualifier(normal_exchangeX) DirectExchange exchange){
        return BindingBuilder.bind(ttlQA).to(exchange).with(routTTLQueueA);
    }

    //声明ttlQueueB和普通交换机X的绑定关系
    @Bean
    public Binding ttlQueueBBindingNormalExchangeX(
            @Qualifier(ttlQueueB) Queue ttlQB,
            @Qualifier(normal_exchangeX) DirectExchange exchange){
        return BindingBuilder.bind(ttlQB).to(exchange).with(routTTLQueueB);
    }
}
(2)准备消息发布者
任务图示:

代码:
/*
消费方只需要将消息发送给普通交换机X即可
 */
@RestController
@RequestMapping("/publish")
@Slf4j
public class Publisher {

    @Autowired
    private RabbitTemplate rabbitTemplate;

    @GetMapping("/send/{message}")
    public String send(@PathVariable("message")String message){
        //发布消息
        rabbitTemplate.convertAndSend("X","XA","消息来着ttl为10s的独队列QA--->"+message);
        rabbitTemplate.convertAndSend("X","XB","消息来着ttl为40s的独队列QB--->"+message);
        return "消息发布者成功发布了一条消息--->"+message;
    }
}
(3)消息消费者
说明:由于所有的交换机、队列、绑定关系都已经交给ioc进行管理了,所以消费者只需要从死信队列当中获取消息消费即可;
代码:
@Component
@Slf4j
public class RabbitMQListener {

    @RabbitListener(queues = {"QD"})//监听器模式去监听收取消息
    public void consumeMessage(Message message, Channel channel){
        String msg = new String(message.getBody())
        log.info("当前时间:{},收到死信队列信息--->  {}",new Date().toString(),msg);
    }
}
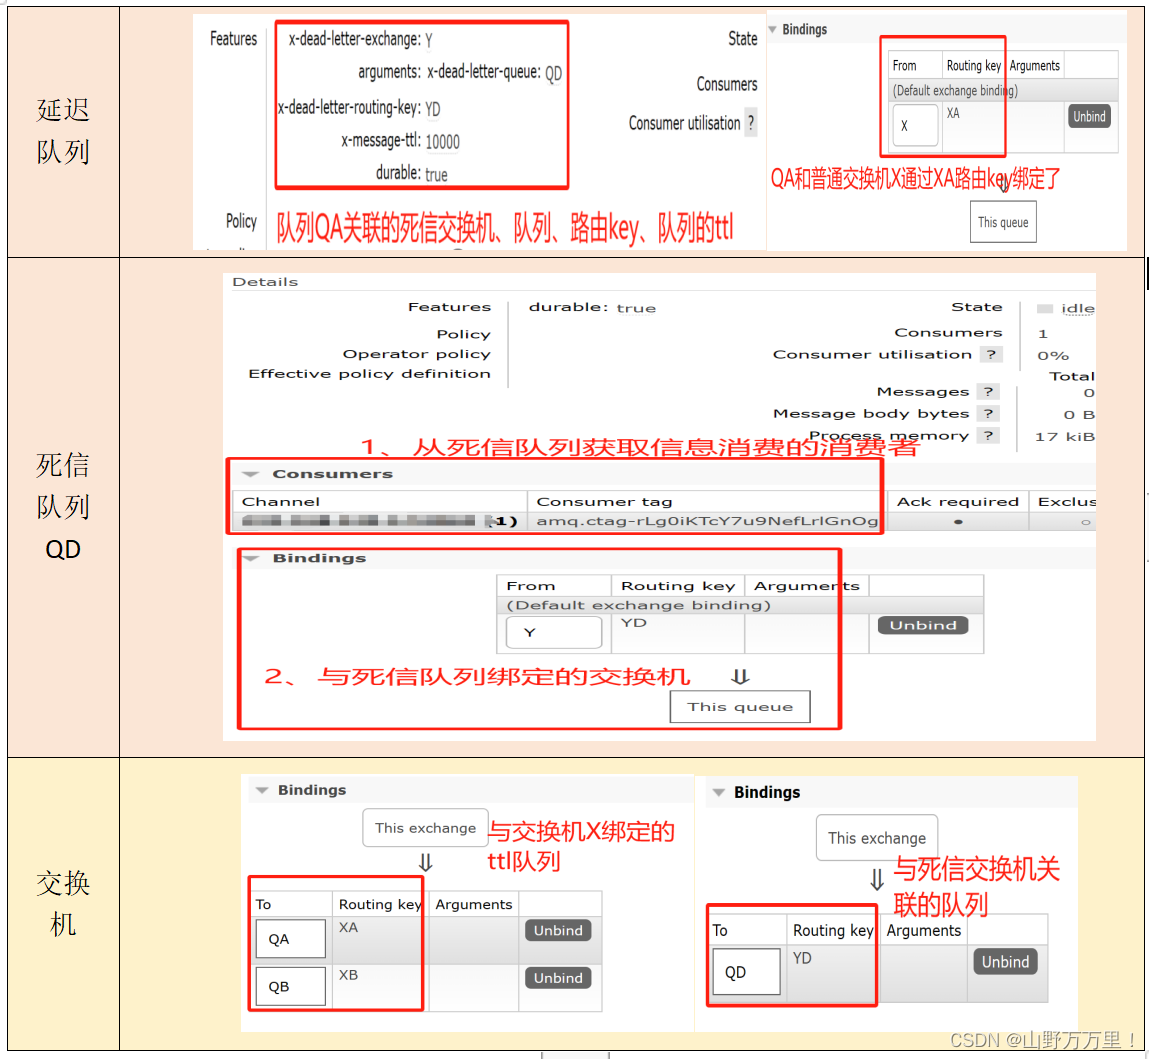
(4)查看队列、交换机、binding是否生效
先启动springboot配置类:

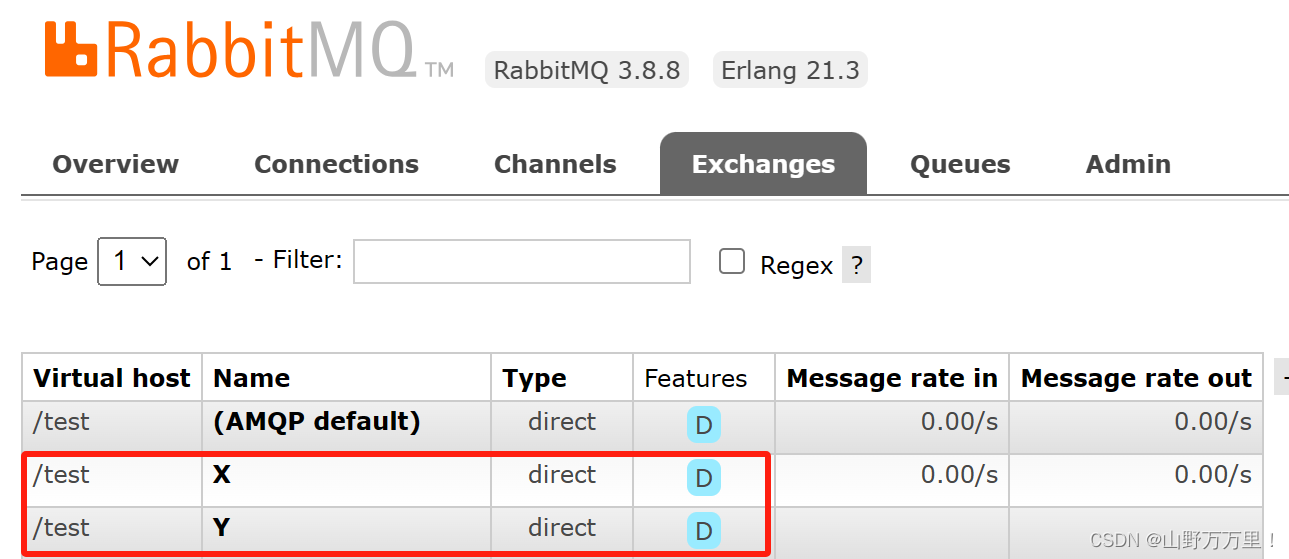
分别点进不同的交换机和队列,查看配置和绑定信息:
(5)验证结果
springboot项目启动的前提下,浏览器输入:当前服务的ip:端口/publish/send/world
MQ控制台显示:

过10s钟之后,由于QB的延时时间比QA多30s,所以QA当中的信息去死信队列当中之后,QB的信息依然存在:

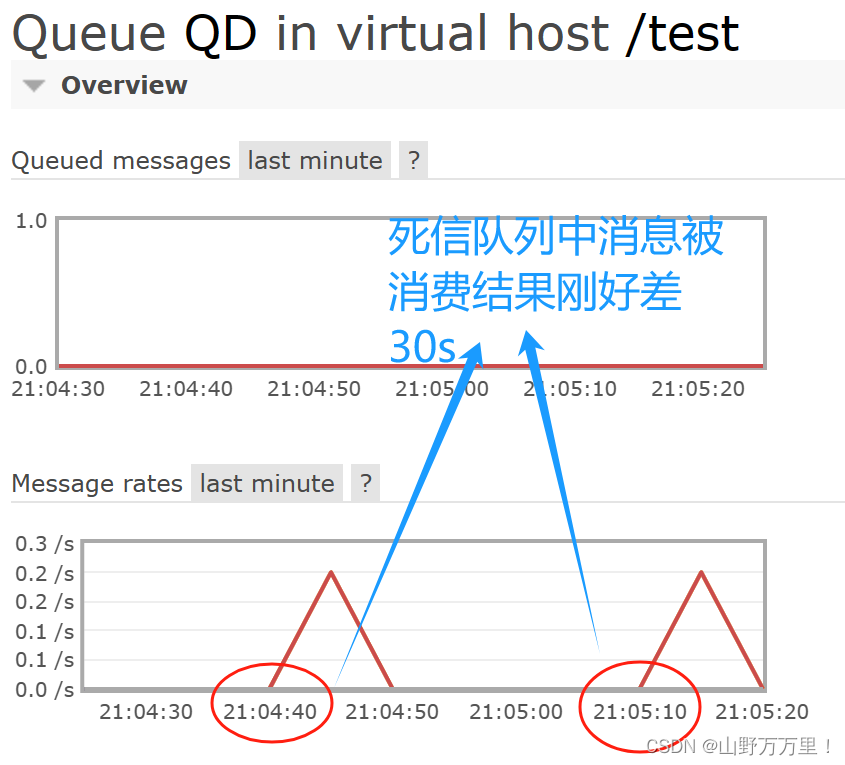 刚好验证了,延迟队列的消息到时间过期之后,会被死信交换机路由到死信队列当中,在死信队列被消费者消费,说明延迟队列生效了;

三、代码方式实现延迟队列案例
1、新增需求
要求:随机设置TTL时间,保证延迟队列当中的消息定时进入死信队列当中被消费?
上一个延迟队列不足之处分析:
一旦需要新增一个延迟队列,每次都需要提前设置好队列的ttl时间,岂不是每增加一个时间需求,就得重新去做:声明队列、交换机、绑定队列交换机等繁琐操作?
解决思路:将ttl的设置时间,交给消息发布者去决定,不再提前设定了,这样只需要在ioc当中管理一个普通的队列,然后每次需要新增时间需求的时候,就再让发布者把这个队列变成延迟队列使用即可!
2、改造架构
注意,新增的队列QC目前只是个普通消息队列,只有再需要增加新的时间需求时,发布者设置TTL时间,才会变成延迟队列!
3、改造配置类
在管理所有交换机、队列、绑定关系的配置类当中,新增普通队列QC及QC和交换机X的绑定关系的代码:
//新增一个绑定了死信交换机的普通队列
    public static final String normalQueueC = "QC";
    @Bean(normalQueueC)
    public Queue normalQueueC(){
        //绑定与死信相关的信息
        Map<String,Object> params = new HashMap<>();
        params.put("x-dead-letter-exchange",dead_exchange);
        params.put("x-dead-letter-queue",deadQueueD);
        params.put("x-dead-letter-routing-key",routDead);
        //声明队列
        return QueueBuilder.durable(normalQueueC).withArguments(params).build();
    }
    //将新增队列QC与交换机X绑定
    @Bean
    public Binding normalQueueCBindingNormalExchangeX(
            @Qualifier(normalQueueC) Queue queue,
            @Qualifier(normal_exchangeX) DirectExchange exchange) {
        return BindingBuilder.bind(queue).to(exchange).with("XC");
    }
4、改造发布方
让发布方可以在发送消息的时候,自由设置队列当中消息的TTL时间:
@GetMapping("/send/{message}/{ttlTime}")
    public String sendMessageAndSetTTL(
            @PathVariable("message")String message,
            @PathVariable("ttlTime")String time) {
        //发布消息
        /*
        参数1:交换机名字,参数2:路由规则,参数3:消息内容,参数4:消息的附带条件
         */
        rabbitTemplate.convertAndSend("X", "XC", message, msg -> {
            msg.getMessageProperties().setExpiration(time);
            return msg;
        });
        log.info("当前时间:"+new Date().toString()+",消息发布者成功发布了一条消息--->" + message + ",队列的TTL时间为:" + time);
        return "消息发布者成功发布了一条消息--->" + message + ",队列的TTL时间为:" + time;
    }
5、验证结果
启动核心配置类,然后在浏览器输入请求localhost:8000/publish/send/{message}/{ttltime}
TTL时间分别设为:20s和2s;
idea控制台显示结果:

原因分析:
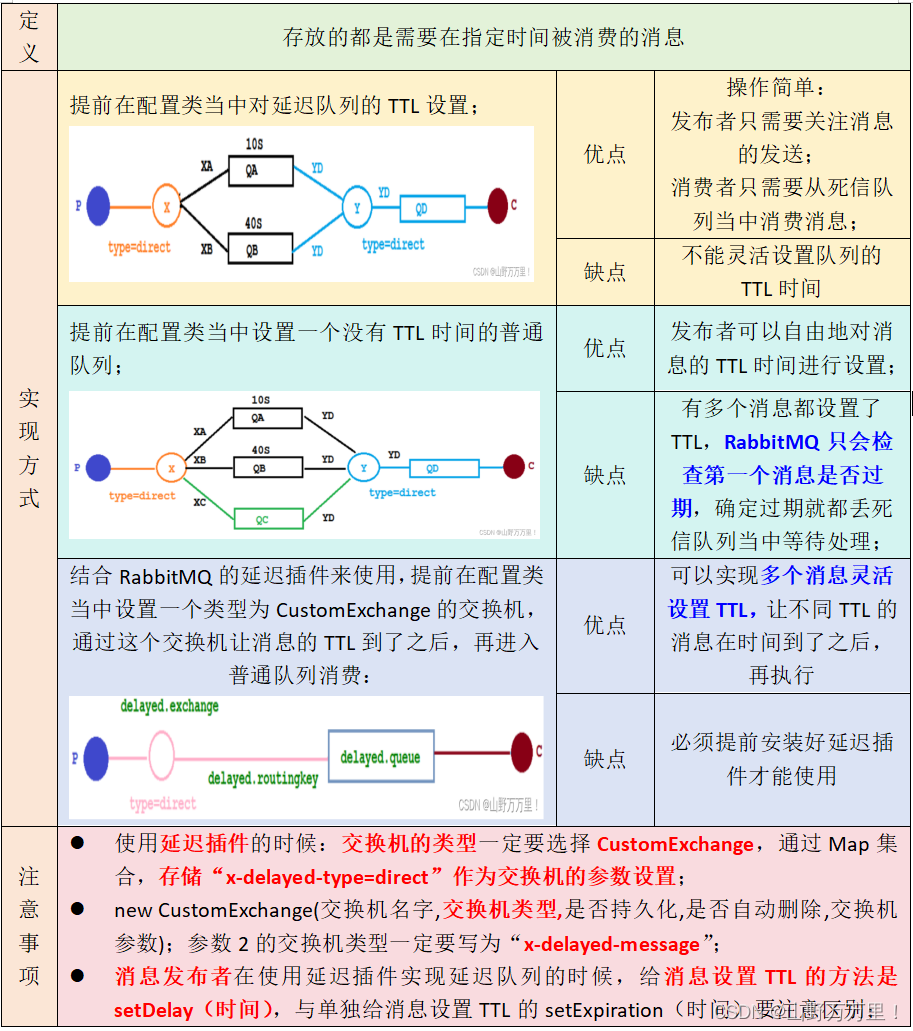
两个明明TTL时间不一致的消息,却在同一时间被消费了,并且被消费的时间还都以第一个TTL时间为主!也就是说,设定的每个消息延迟时间不同,但是实际消息并没有按照设定的TTL时间进入死信队列被消费,原因就在于-----有多个**消息在属性上都设置了TTL,RabbitMQ只会去检查第一个消息是否过期,一旦过期就会放到死信队列当中**,**如果第一个消息的TTL时间很长,即便第二个消息的TTL很短,第二个消息也不会被优先执行。**
四、使用插件实现延迟队列
1、RabbitMQ插件引入
为了解决消息粒度上边TTL到了,消息却不能“按时死亡”问题,让TTL时间短的消息能优先被执行,需要引入RabbitMQ的插件来实现通用的延迟队列;
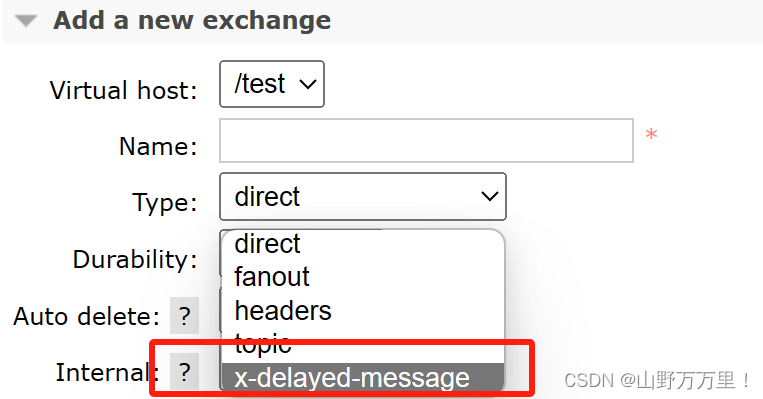
在网上有很多教怎么安装延迟插件的方法,在这里就不过多赘述了,接下来讲插件安装好之后,怎么实现延迟队列!一旦安装成功,在RabbitMQ控制台的交换机位置,就可以看到出现了以下:
2、代码架构图

分析:新增一个自定义的交换机和普通队列,让原本放在队列上边设置的TTL,放到专门的交换机上去设置,等待延迟时间一到,再把消息投递到目标队列。
3、定义配置类代码
自定义的交换机是一种新的交换类型(CustomExchange),这种类型消息支持延迟投递机制消息传递之后不会立即投递到目标队列当中,而是存储在mnesia(一个分布式数据系统)表当中,当到达投递时间之后,才会投递到目标队列当中。
@Configuration
public class DelayedQueueConfig {
    private static final String delayed_exchange = "delayed.exchange";
    private static final String delayed_queue = "delayed.queue";
    private static final String delayed_routing_key = "delayed.routingKey";

    //声明目标队列
    @Bean(delayed_queue)
    public Queue delayedQueue(){
        return new Queue(delayed_queue);
    }

    //声明基于插件实现的交换机
    /*@Bean(delayed_exchange)
    public DirectExchange delayedExchange(){
        return new DirectExchange(delayed_exchange);
    }*/
    //基于插件实现的交换机,必须是CustomExchange类型,标识这是一个延时类型的交换机
    @Bean(delayed_exchange)
    public CustomExchange delayedExchange(){
        Map<String,Object> params = new HashMap<>();
        params.put("x-delayed-type","direct");
        /*
        参数1:交换机名字,参数2:交换机的类型,参数3:是否持久化,参数4:是否自动删除队列,参数5:交换机的额外参数设置
         */
        return new CustomExchange(delayed_exchange,"x-delayed-message",true,false,params);
    }

    //绑定延时交换机和目标队列
    @Bean
    public Binding delayedQueueBindingDelayedExchange(
            @Qualifier(delayed_queue) Queue queue,
            @Qualifier(delayed_exchange) Exchange exchange){
        return BindingBuilder.bind(queue).to(exchange).with(delayed_routing_key).noargs();
    }
}
4、定义生产者
注意:设置TTL的方式是.setDelay(time),之前给消息设置TTL是.setExpiration(time);
private static final String delayed_exchange = "delayed.exchange";
    private static final String delayed_queue = "delayed.queue";
    private static final String delayed_routing_key = "delayed.routingKey";
    @GetMapping("sendDelayedMessage/{message}/{delayedTime}")
    public String sendDelayedMessage(
            @PathVariable("message")String message,
            @PathVariable("delayedTime")Integer time){
        Date date = new Date();
        String rightNow = date.toString();
        log.info("当前时间:{},发送了一条消息:{},延迟时间:{}毫秒", rightNow,message,time);
        //发送消息
        rabbitTemplate.convertAndSend(delayed_exchange,delayed_routing_key,message,
                msg->{msg.getMessageProperties().setDelay(time);
                        return msg;});
        return "当前时间:"+ rightNow+",发送了一条延迟时间为:"+time+"毫秒的消息-----"+message;
    }
5、定义消费者
private static final String delayed_queue = "delayed.queue";
    //从delayed.queue当中获取消息
    @RabbitListener(queues = {delayed_queue})
    public void consumeMessageFromDelayedQueue(Message message){
        String msg = new String(message.getBody());
        log.info("当前时间:{},收到了消息:{}",new Date().toString(),msg);
    }
6、结果分析
启动springboot项目,在浏览器输入两次请求:
eg:
localhost:8000/publish/sendDelayedMessage/hello/20000
localhost:8000/publish/sendDelayedMessage/hello/2000
查看控制台结果:

延迟时间为20秒的请求是在43:12的时候发送,在43:32的时候被消费;
延迟时间为2s的请求,在43:14的时候发送,在43:16的时候被消费,刚好满足了我们的消息延迟需求,说明-------延迟时间到了之后,消息才进入目标队列当中被消费!
五、关于延迟队列小结
版权归原作者 山野万万里! 所有, 如有侵权,请联系我们删除。