
一、版本
doris:doris-1.2.3-rc02
flink:flink1.4.6
dinky:0.7.2
jdk:1.8.0_191
mysql:5.7
二、安装doris
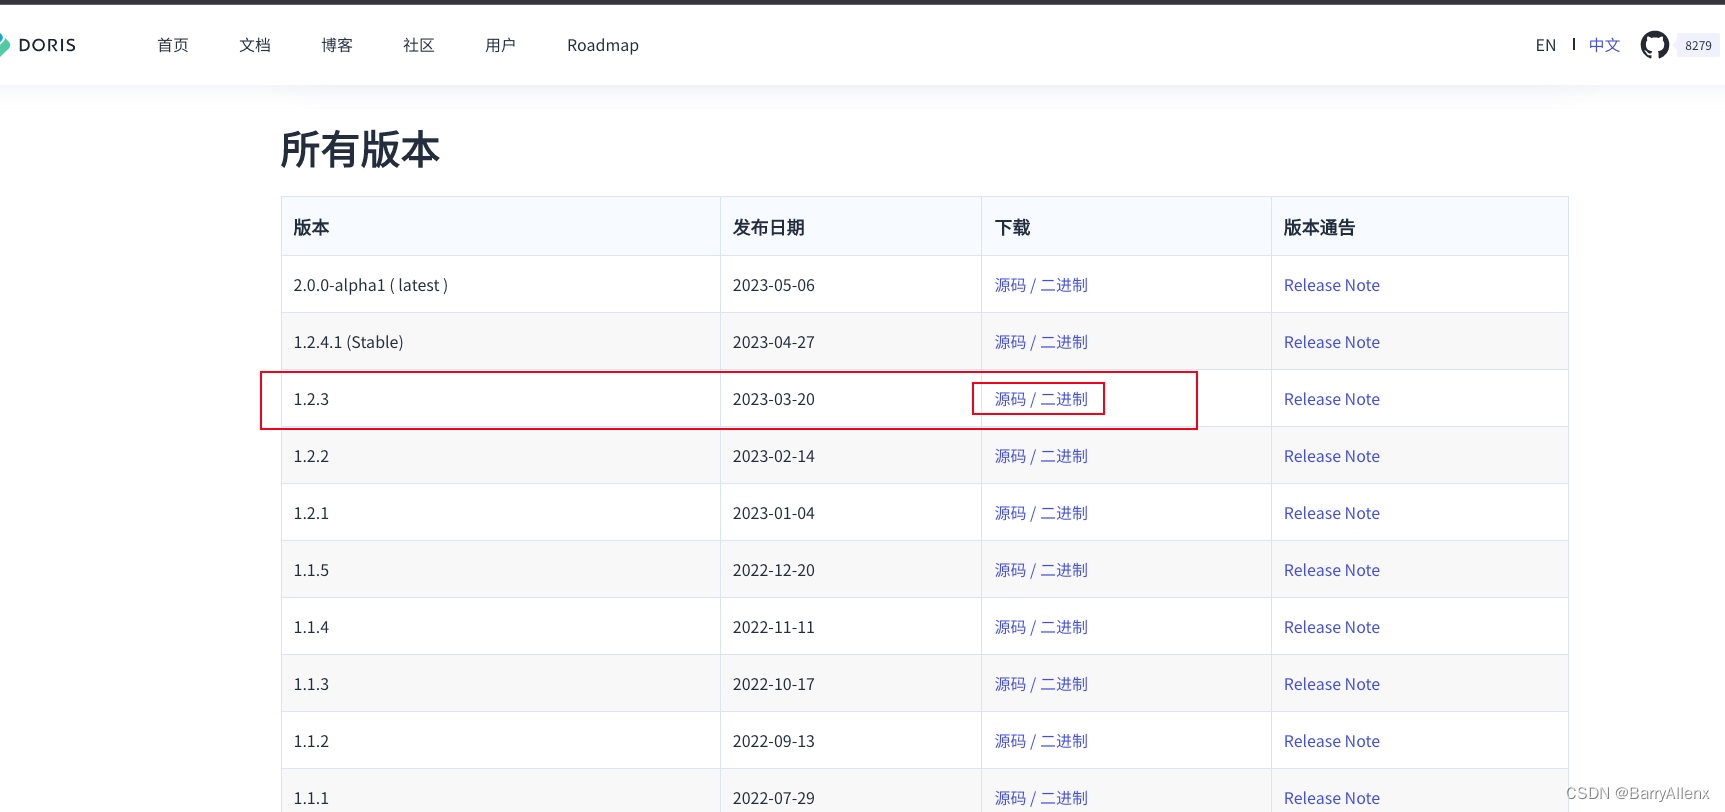
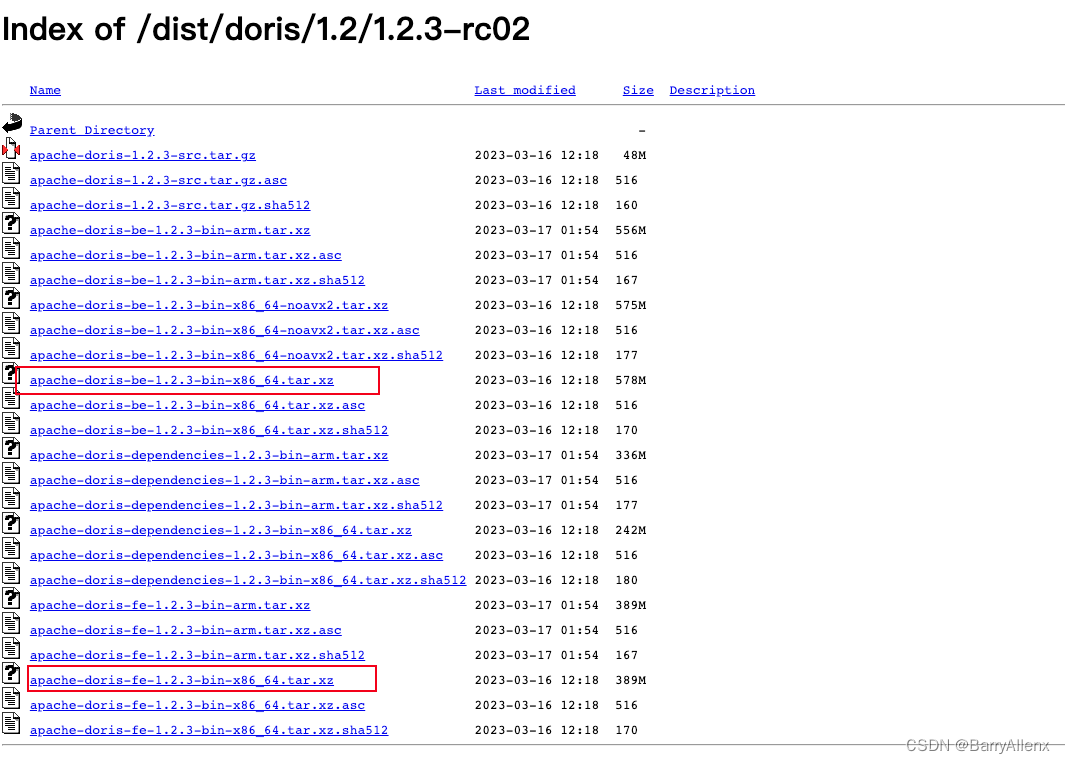
官网下载地址:https://archive.apache.org/dist/doris/1.2/1.2.3-rc02/
#doris单机部署
#创建doris目录
mkdir /opt/module/doris
tar zxvf apache-doris-fe-1.2.3-bin-x86_64.tar.xz -C /opt/module/doris
tar zxvf apache-doris-be-1.2.3-bin-x86_64.tar.xz -C /opt/module/doris

#修改be、fe目录名称
cd /opt/module/doris/
mv apache-doris-be-1.2.3-bin-x86_64 doris_be
mv apache-doris-fe-1.2.3-bin-x86_64 doris_fe
#配置FE
#FE 配置文件 conf/fe.conf,这里我们主要修改两个参数:priority_networks 及 meta_dir

meta_dir = /opt/module/doris/doris-fe/doris-meta
priority_networks=192.168.20.0/24

#端口根据自己需求调整(以防端口冲突)

http_port = 18030
rpc_port = 19020
query_port = 19030
edit_log_port = 19010

#启动FE
/opt/module/doris/doris-fe/bin/start_fe.sh --daemon

#查看 FE 运行状态
#你可以通过下面的命令来检查 Doris 是否启动成功
curl http://127.0.0.1:18030/api/bootstrap
返回如下代表成功:
{"msg":"success","code":0,"data":{"replayedJournalId":0,"queryPort":0,"rpcPort":0,"version":""},"count":0}

#你也可以通过 Doris FE 提供的Web UI 来检查,在浏览器里输入地址
#默认用户 root 进行登录,密码是空
http:// fe_ip:18030
#配置 BE
#修改 BE 配置文件 conf/be.conf ,这里我们主要修改两个参数:priority_networks 及 storage_root

vim /opt/module/doris/doris-be/conf/be.conf
#修改如下内容
priority_networks=192.168.20.0/24
storage_root_path = /opt/module/doris/doris-be/storage

#端口根据自己需求调整(以防端口冲突)
be_port = 19060
webserver_port = 18040
heartbeat_service_port = 19050
brpc_port = 18060

#启动FE
/opt/module/doris/doris-be/bin/start_be.sh --daemon

#添加 BE 节点到集群
#通过MySQL 客户端连接到 FE 之后执行下面的 SQL,将 BE 添加到集群中

mysql -uroot -P19030 -h127.0.0.1

mysql>ALTER SYSTEM ADD BACKEND "be_host_ip:19050";
mysql>SHOW BACKENDS\G

#Alive : true表示节点运行正常

三、安装Flink
#下载地址:Index of /dist/flink/flink-1.14.6

#Flink单机部署
#解压:
tar -zxvf flink-1.14.6-bin-scala_2.12.tgz -C /opt/module

#配置flink
vim /opt/module/flink-1.14.6/conf/flink-conf.yaml
#修改配置如下:
rest.bind-address: 0.0.0.0

#配置环境变量
vim /etc/profile
#FLINK_HOME
export FLINK_HOME=/opt/module/flink-1.14.6
export PATH=$PATH:$FLINK_HOME/bin
#相关依赖包下载
#基础依赖包下载:
https://download.csdn.net/download/qq_41060328/87818060
#其余依赖按需自行下载
https://mvnrepository.com/

#将flink自带lib目录备份并用下载的目录替换
mv /opt/module/flink-1.14.6/lib /opt/module/flink-1.14.6/lib_bak
mv flink_lib/ /opt/module/flink-1.14.6/lib
#启动
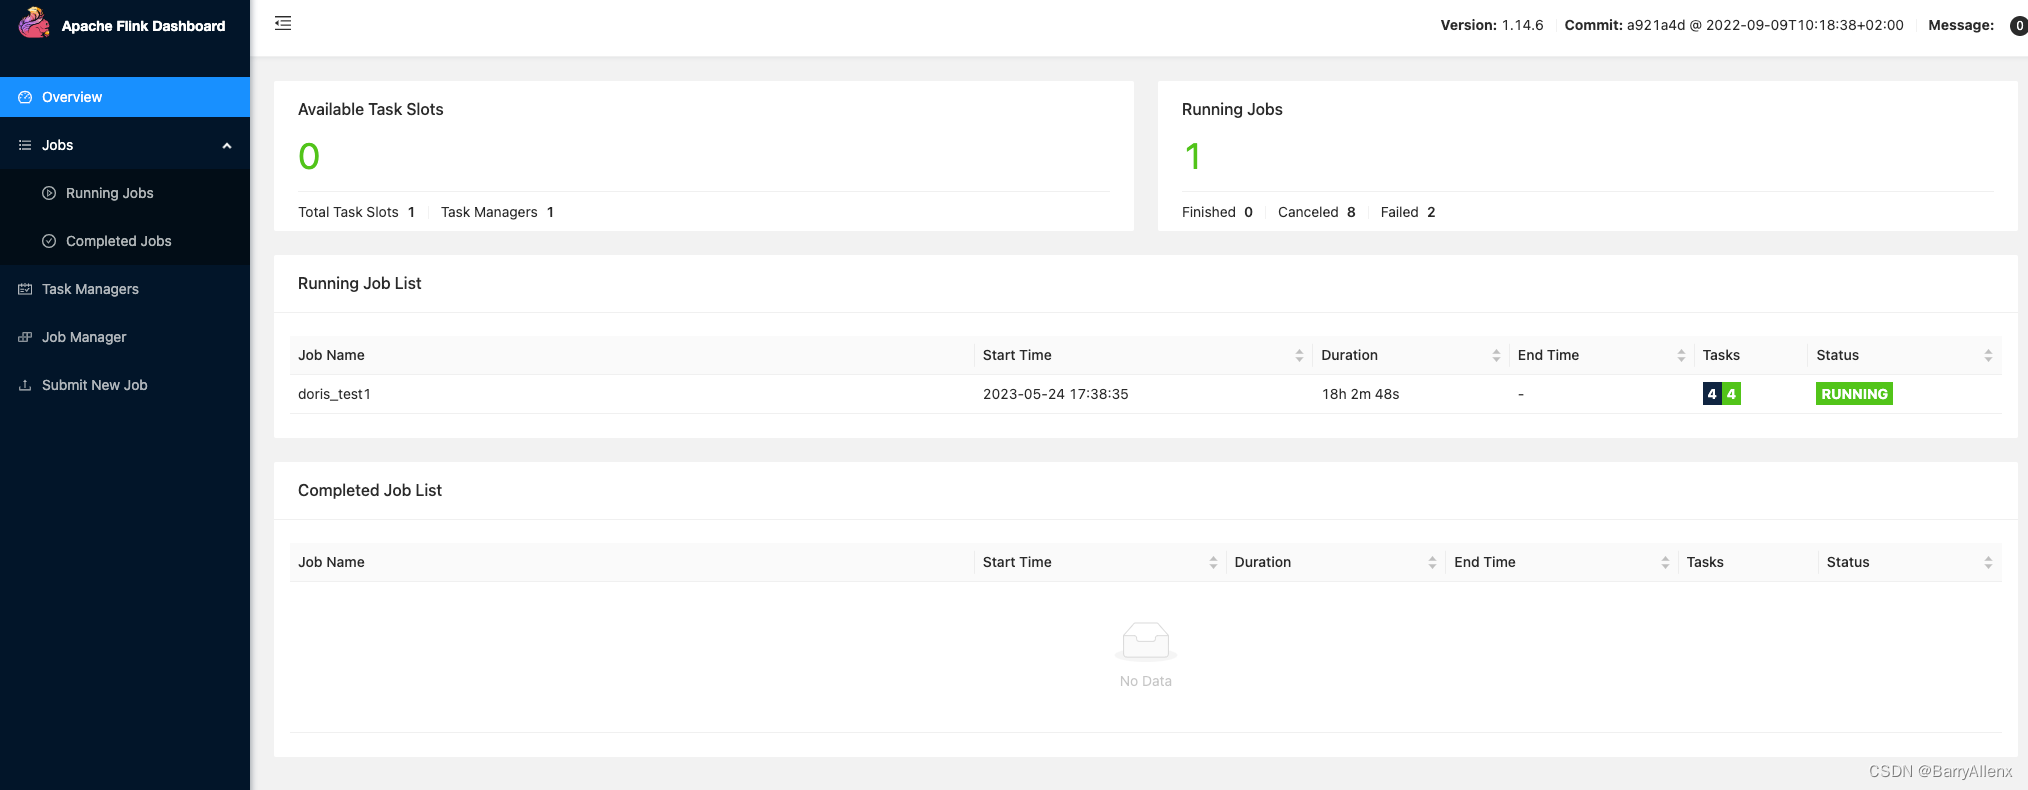
/opt/module/flink-1.14.6/bin/start-cluster.sh
#访问
flink默认的web ui界面的端口为8081
浏览器访问:http://ip:8081
四、安装Dinky
#下载
http://www.dlink.top/download/dinky-0.7.2

#Dinky单机部署
#解压
tar zxvf dlink-release-0.7.2.tar.gz -C /opt/module/

#将解压文件修改为dinky

#Mysql创建数据库,root用户登陆
mysql>create database dinky;

mysql>grant all privileges on dinky.* to 'dinky'@'%' identified by '密码' with grant option;
mysql>flush privileges;

#dinky用户登陆Mysql
mysql -h xx.xx.xx.xx -udinky -p密码
#初始化数据
mysql>use dinky;
mysql> source /opt/module/dinky/sql/dinky.sql
#配置dinky
#修改 Dinky 连接 mysql 的配置文件。
cd /opt/module/dinky/config/
vim application.yml

spring:
  datasource:
    url: jdbc:mysql://xx.xx.xx.xx:3306/dinky?useUnicode=true&characterEncoding=UTF-8&autoReconnect=true&useSSL=false&zeroDateTimeBehavior=convertToNull&serverTimezone=Asia/Shanghai&allowPublicKeyRetrieval=true
    username: dinky
    password: xxxx
#如果mysql是8.0版本。需要改为com.mysql.cj.jdbc.Driver
    driver-class-name: com.mysql.jdbc.Driver
#添加依赖
依赖下载:https://download.csdn.net/download/qq_41060328/87817727
备份opt/module/dinky/plugins/flink1.14,将下载后的文件上传至/opt/module/dinky/plugins
#启动:
sh /opt/module/dinky/auto.sh start 1.14
浏览器访问 ip:8888

五、Dinky+Flink+Doris构建流计算
数据流程:

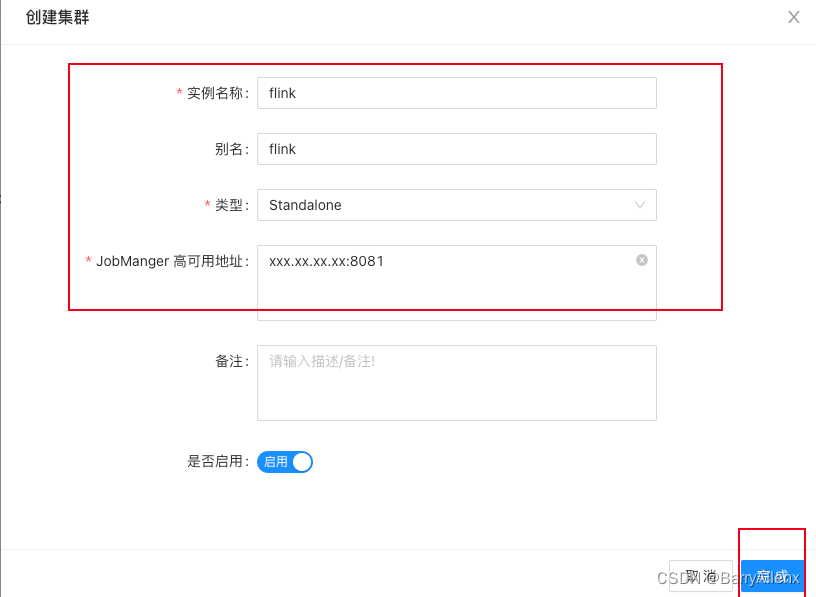
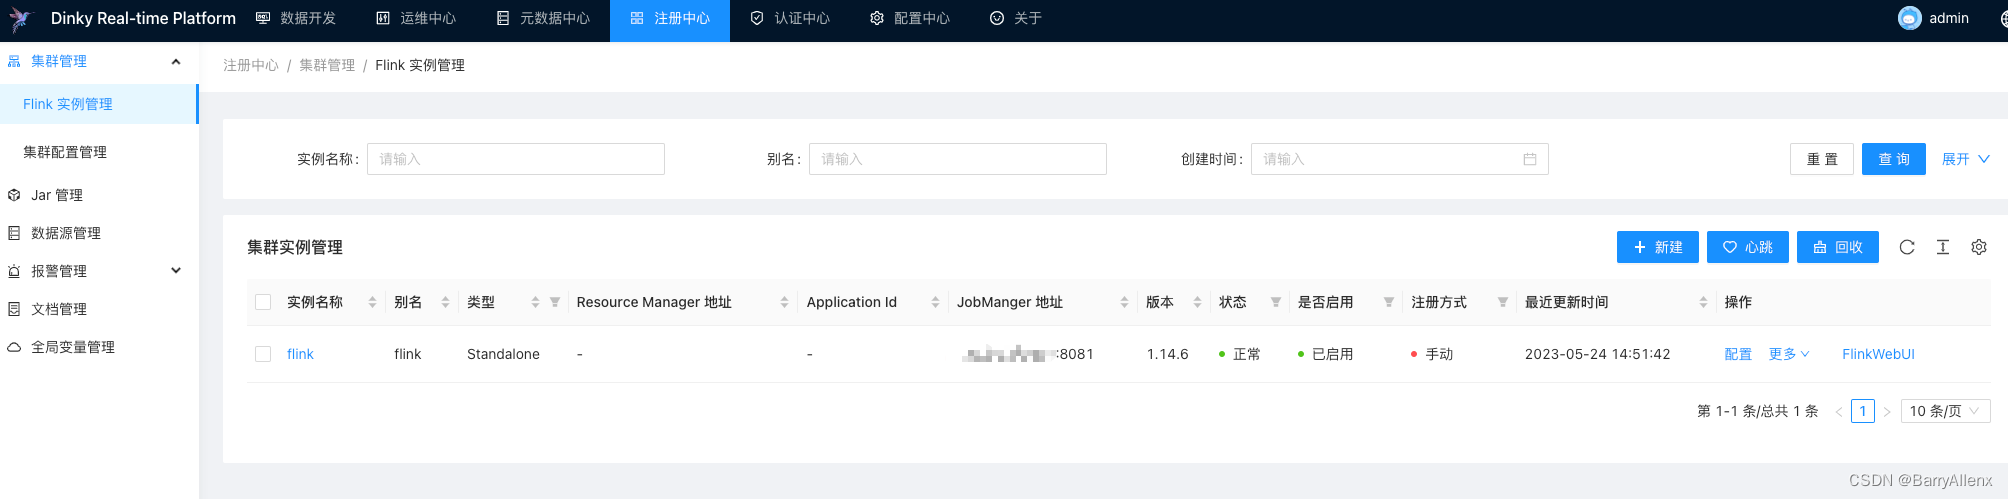
dinky添加flink集群

mysql建表
-- Mysql学生表
DROP TABLE IF EXISTS `student`;
CREATE TABLE `student`  (
  `sid` int(11) NOT NULL,
  `name` varchar(255) CHARACTER SET utf8 COLLATE utf8_general_ci NULL DEFAULT NULL,
  PRIMARY KEY (`sid`) USING BTREE
) ENGINE = InnoDB CHARACTER SET = utf8 COLLATE = utf8_general_ci ROW_FORMAT = Dynamic;

INSERT INTO `student` VALUES (1, '小红');
INSERT INTO `student` VALUES (2, '小黑');
INSERT INTO `student` VALUES (3, '小黄');

-- Mysql成绩表
DROP TABLE IF EXISTS `score`;
CREATE TABLE `score`  (
  `cid` int(11) NOT NULL,
  `sid` int(11) NULL DEFAULT NULL,
  `cls` varchar(255) CHARACTER SET utf8 COLLATE utf8_general_ci NULL DEFAULT NULL,
  `score` int(11) NULL DEFAULT NULL,
  PRIMARY KEY (`cid`) USING BTREE
) ENGINE = InnoDB CHARACTER SET = utf8 COLLATE = utf8_general_ci ROW_FORMAT = Dynamic;

INSERT INTO `score` VALUES (1, 1, 'chinese', 90);
INSERT INTO `score` VALUES (2, 1, 'math', 95);
INSERT INTO `score` VALUES (3, 1, 'english', 93);
INSERT INTO `score` VALUES (4, 2, 'chinese', 92);
INSERT INTO `score` VALUES (5, 2, 'math', 75);
INSERT INTO `score` VALUES (6, 2, 'english', 80);
INSERT INTO `score` VALUES (7, 3, 'chinese', 100);
INSERT INTO `score` VALUES (8, 3, 'math', 60);
doris建表
-- Doris学生成绩宽表
CREATE TABLE scoreinfo
(
    cid INT,
    sid INT,
    name VARCHAR(32),
    cls VARCHAR(32),
    score INT
)
UNIQUE KEY(cid)
DISTRIBUTED BY HASH(cid) BUCKETS 10
PROPERTIES("replication_num" = "1");
配置作业:
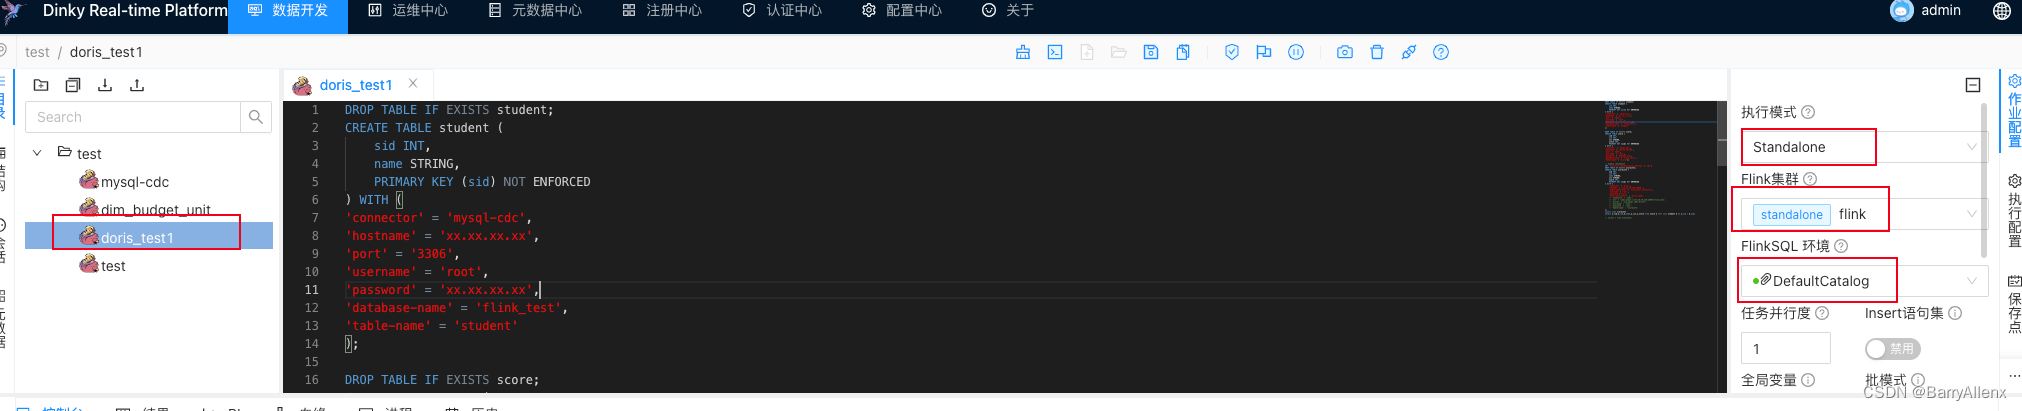
DROP TABLE IF EXISTS student;
CREATE TABLE student (
    sid INT,
    name STRING,
    PRIMARY KEY (sid) NOT ENFORCED
) WITH (
'connector' = 'mysql-cdc',
'hostname' = 'xx.xx.xx.xx',
'port' = '3306',
'username' = 'root',
'password' = 'xxxxxx',
'database-name' = 'flink_test',
'table-name' = 'student'
);

DROP TABLE IF EXISTS score;
CREATE TABLE score (
    cid INT,
    sid INT,
    cls STRING,
    score INT,
    PRIMARY KEY (cid) NOT ENFORCED
) WITH (
'connector' = 'mysql-cdc',
'hostname' = 'xx.xx.xx.xx',
'port' = '3306',
'username' = 'root',
'password' = 'xxxxxx',
'database-name' = 'flink_test',
'table-name' = 'score');

-- enable checkpoint
SET 'execution.checkpointing.interval' = '10s';
DROP TABLE IF EXISTS scoreinfo;
CREATE TABLE scoreinfo (
    cid INT,
    sid INT,
    name STRING,
    cls STRING,
    score INT,
    PRIMARY KEY (cid) NOT ENFORCED
) WITH (
    'connector' = 'doris',
    'fenodes' = 'xx.xx.xx.xx:18030' ,
    'table.identifier' = 'flink_test.scoreinfo',
    'username' = 'root',
    'password'='xxxxxx',
    'sink.label-prefix' = 'doris_label'

);
insert into scoreinfo
select a.cid,a.sid,b.name,a.cls,a.score from score a left join student b on a.sid = b.sid;
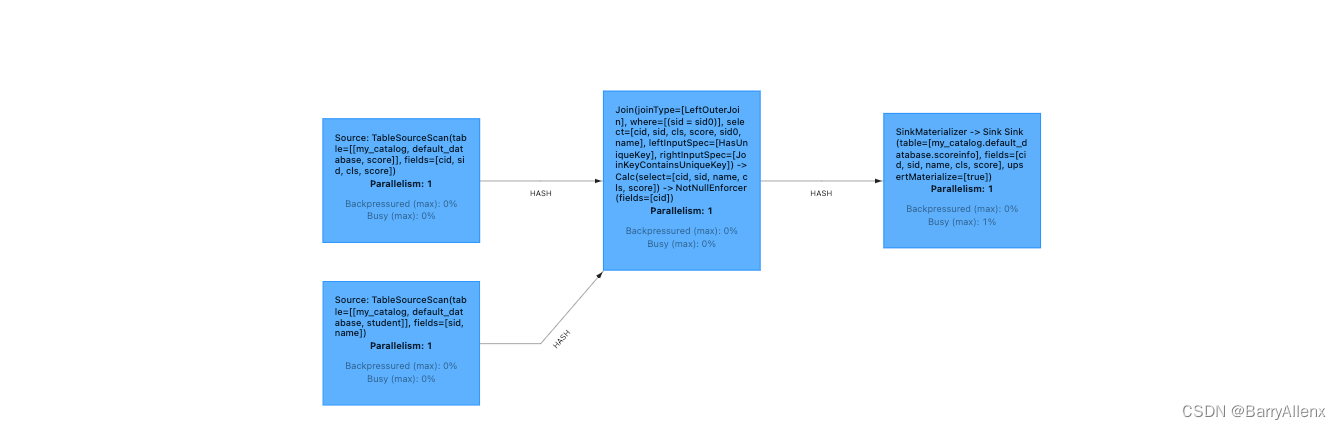
运行后在flink端查看任务状态

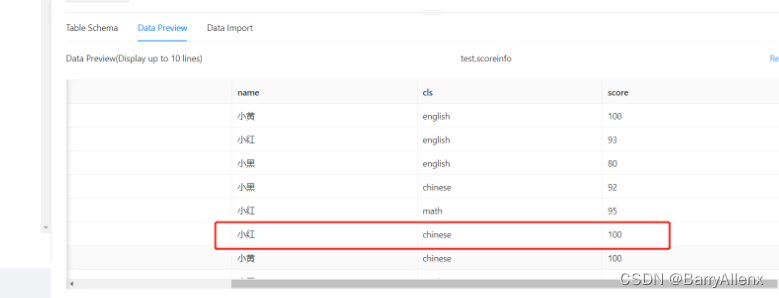
doris结果验证

增量测试
在 Mysql 中执行新增语句:
INSERT INTO `score` VALUES (9, 3, 'english', 100);

变动测试
在 Mysql 中执行新增语句:
update score set score = 100 where cid = 1
本文转载自: https://blog.csdn.net/qq_41060328/article/details/130852626
版权归原作者 BarryAllenx 所有, 如有侵权,请联系我们删除。
版权归原作者 BarryAllenx 所有, 如有侵权,请联系我们删除。