
目录
Spring JDBC 和 事务控制主要内容
![(img-5c8BLbvZ-1682531464765)(03-Spring JDBC和事务控制.assets/SpringJDBC-19.png)]](https://img-blog.csdnimg.cn/ae36cb8fc8fd44c790343cbe4d5d3b9c.png)
Spring 整合 JDBC 环境
Spring 框架除了提供 IOC 与 AOP 核心功能外,同样提供了基于JDBC 的数据访问功能,使得访问持久层数据更加方便。想要使用 Spring JDBC 环境,需要将JDBC整合到Spring中。
构建项目添加依赖坐标
构建项目:普通的java项目即可
<!-- 添加相关的依赖坐标 --><!-- spring 依赖--><dependency><groupId>org.springframework</groupId><artifactId>spring-context</artifactId><version>6.0.5</version></dependency><!-- spring jdbc --><dependency><groupId>org.springframework</groupId><artifactId>spring-jdbc</artifactId><version>6.0.5</version></dependency><!-- 用mysql数据库,就需要 mysql 驱动包 --><dependency><groupId>mysql</groupId><artifactId>mysql-connector-java</artifactId><version>8.0.19</version></dependency><!-- c3p0 连接池
初识为什么要用连接池:
对于一个简单的数据库引用,如果对数据库的访问不是很频繁,这种情况可以简单的在需要访问数据库时,创建一个链接,用完关闭它,这样做不会有太明显的性能上的开销。但是对于复杂的数据库引用,情况就截然不同了,频繁的建立、关闭连接,会极大的减低系统的性能,这是对于连接的使用造成系统性能的瓶颈。

连接池的作用:
连接池的作用是为了提高性能,避免重复多次的打开数据库连接而造成性能的下降和系统资源的浪费;连接池是将已经创建好的连接保存在池中,当有请求来时,直接使用已经创建好的连接对数据库进行访问。这样省略了创建和销毁的过程。这样以提高系统的性能。
--><dependency><groupId>com.mchange</groupId><artifactId>c3p0</artifactId><version>0.9.5.5</version></dependency>
添加 jdbc 配置文件
在src/main/resources目录下新建db.properties配置文件,并设置对应的配置信息
放在配置文件的目的:后续修改的时候直接到配置文件中修改即可。
# 驱动名
jdbc.driver=com.mysql.cj.jdbc.Driver
# 数据库连接
jdbc.url=jdbc:mysql://127.0.0.1:3306/(数据库名称)?useSSL=false&useUnicode=true&characterEncoding=UTF-8&serverTimezone=Asia/Shanghai&allowPublicKeyRetrieval=true
# 数据库用户名称
jdbc.user=(数据库账号)
# 数据库用户密码
jdbc.password=(数据库密码)
以下为可选配置
# 指定连接池的初始化连接数。取值应在minPoolSize 与 maxPoolSize 之间.Default:3个,可以自己设置为20个:
initialPoolSize=20
# 指定连接池中保留的最大连接数. Default:15个,可以自己设置为100个:
maxPoolSize=100
# 指定连接池中保留的最小连接数
minPoolSize=10
# 最大空闲时间,60秒内未使用则连接被丢弃。若为0则永不丢弃。 Default:0秒,可以自己设置为60秒:
maxIdleTime=60
# 当连接池中的连接耗尽的时候c3p0一次同时获取的连接数. Default:3个,可以自己设置为5个:
acquireIncrement=5
# JDBC的标准,用以控制数据源内加载的PreparedStatements数量。
maxStatements=5
# 每60秒检查所有连接池中的空闲连接,因为它本身是有回收机制的,Default:0,可以自己设置为60:
idleConnectionTestPeriod=60
编写 spring 配置文件
编写spring配置文件:applicationcontext.xml
<?xml version="1.0" encoding="UTF-8"?><beansxmlns="http://www.springframework.org/schema/beans"xmlns:xsi="http://www.w3.org/2001/XMLSchema-instance"xmlns:context="http://www.springframework.org/schema/context"xsi:schemaLocation="http://www.springframework.org/schema/beans
        https://www.springframework.org/schema/beans/spring-beans.xsd
        http://www.springframework.org/schema/context
        https://www.springframework.org/schema/context/spring-context.xsd"><!--加载db.properties属性文件,用来读取db.properties中的数据--><context:property-placeholderlocation="db.properties"></context:property-placeholder></beans>
配置数据源
由于建立数据库连接是一个非常耗时耗资源的行为,所以通过连接池预先同数据库建立一些连接,放在内存中,应用程序需要建立数据库连接时直接到连接池中申请一个就行,用完后再放回去。
C3P0 与 DBCP 二选一即可
DBCP(DataBase connection pool),数据库连接池。是 apache 上的一个 java 连接池项目,也是 tomcat 使用的连接池组件。单独使用dbcp需要2个包:commons-dbcp.jar,commons-pool.jar dbcp,没有自动回收空闲连接的功能。
C3P0是一个开源的JDBC连接池,它实现了数据源,支持JDBC3规范和JDBC2的标准扩展。目前使用它的开源项目有Hibernate,Spring等,c3p0有自动回收空闲连接功能。
我们一般使用的是:C3P0。
C3P0 数据源配置
在applicationContext.xml文件中加入如下配置:
<!-- 配置 c3p0 数据源 --><beanid="dataSource"class="com.mchange.v2.c3p0.ComboPooledDataSource"><!-- property标签的value属性对应的是jdbc.properties中的值 --><propertyname="driverClass"value="${jdbc.driver}"></property><propertyname="jdbcUrl"value="${jdbc.url}"></property><propertyname="user"value="${jdbc.user}"></property><propertyname="password"value="${jdbc.password}"></property></bean>
C3P0 其他额外配置(对应的值在jdbc.properties文件中指定)
<!-- 指定连接池中保留的最大连接数。 Default:15--><propertyname="maxPoolSize"value="${maxPoolSize}"/><!-- 指定连接池中保留的最小连接数。--><propertyname="minPoolSize"value="${minPoolSize}"/><!-- 指定连接池的初始化连接数。取值应在minPoolSize 与 maxPoolSize 之间.Default:3--><propertyname="initialPoolSize"value="${initialPoolSize}"/><!-- 最大空闲时间,60秒内未使用则连接被丢弃。若为0则永不丢弃。 Default:0--><propertyname="maxIdleTime"value="${maxIdleTime}"/><!-- 当连接池中的连接耗尽的时候c3p0一次同时获取的连接数。 Default:3--><propertyname="acquireIncrement"value="${acquireIncrement}"/><!-- JDBC的标准,用以控制数据源内加载的PreparedStatements数量。
但由于预缓存的statements属于单个connection,而不是整个连接池所以设置这个参数需要考虑到多方面的因数。如果maxStatements与maxStatementsPerConnection均为0,则缓存被关闭。Default:0--><propertyname="maxStatements"value="${maxStatements}"/><!-- 每60秒检查所有连接池中的空闲连接。Default:0 --><propertyname="idleConnectionTestPeriod"value="${idleConnectionTestPeriod}"/>
DBCP 数据源配置
在applicationContext.xml文件中加入如下配置:
<!-- 配置dbcp数据源--><beanid="myDataSource"class="org.apache.commons.dbcp2.BasicDataSource"><propertyname="driverClassName"value="${jdbc.driver}"/><propertyname="url"value="${jdbc.url}"/><propertyname="username"value="${jdbc.user}"/><propertyname="password"value="${jdbc.password}"/><!-- 连接池启动时的初始值 --><propertyname="initialSize"value="1"/><!-- 最大空闲值.当经过一个高峰时间后,连接池可以将已经用不到的连接慢慢释放一部分,一直减少到maxIdle为止 --><propertyname="maxIdle"value="2"/><!-- 最小空闲值.当空闲的连接数少于阀值时,连接池就会预申请一些连接,以避免洪峰来时再申请而造成的性能开销 --><propertyname="minIdle"value="1"/></bean>
模板类配置
创建JDBC的模板,我们会通过模板进行JDBC相关的操作。
Spring把 JDBC 中重复的操作建立成了一个模板类:org.springframework.jdbc.core.JdbcTemplate 。
<!-- 配置JdbcTemplate模板实例,并注入一个dataSource数据源--><beanid="jdbcTemplate"class="org.springframework.jdbc.core.JdbcTemplate"><propertyname="dataSource"ref="dataSource"></property></bean>
Spring JDBC 测试 (入门)
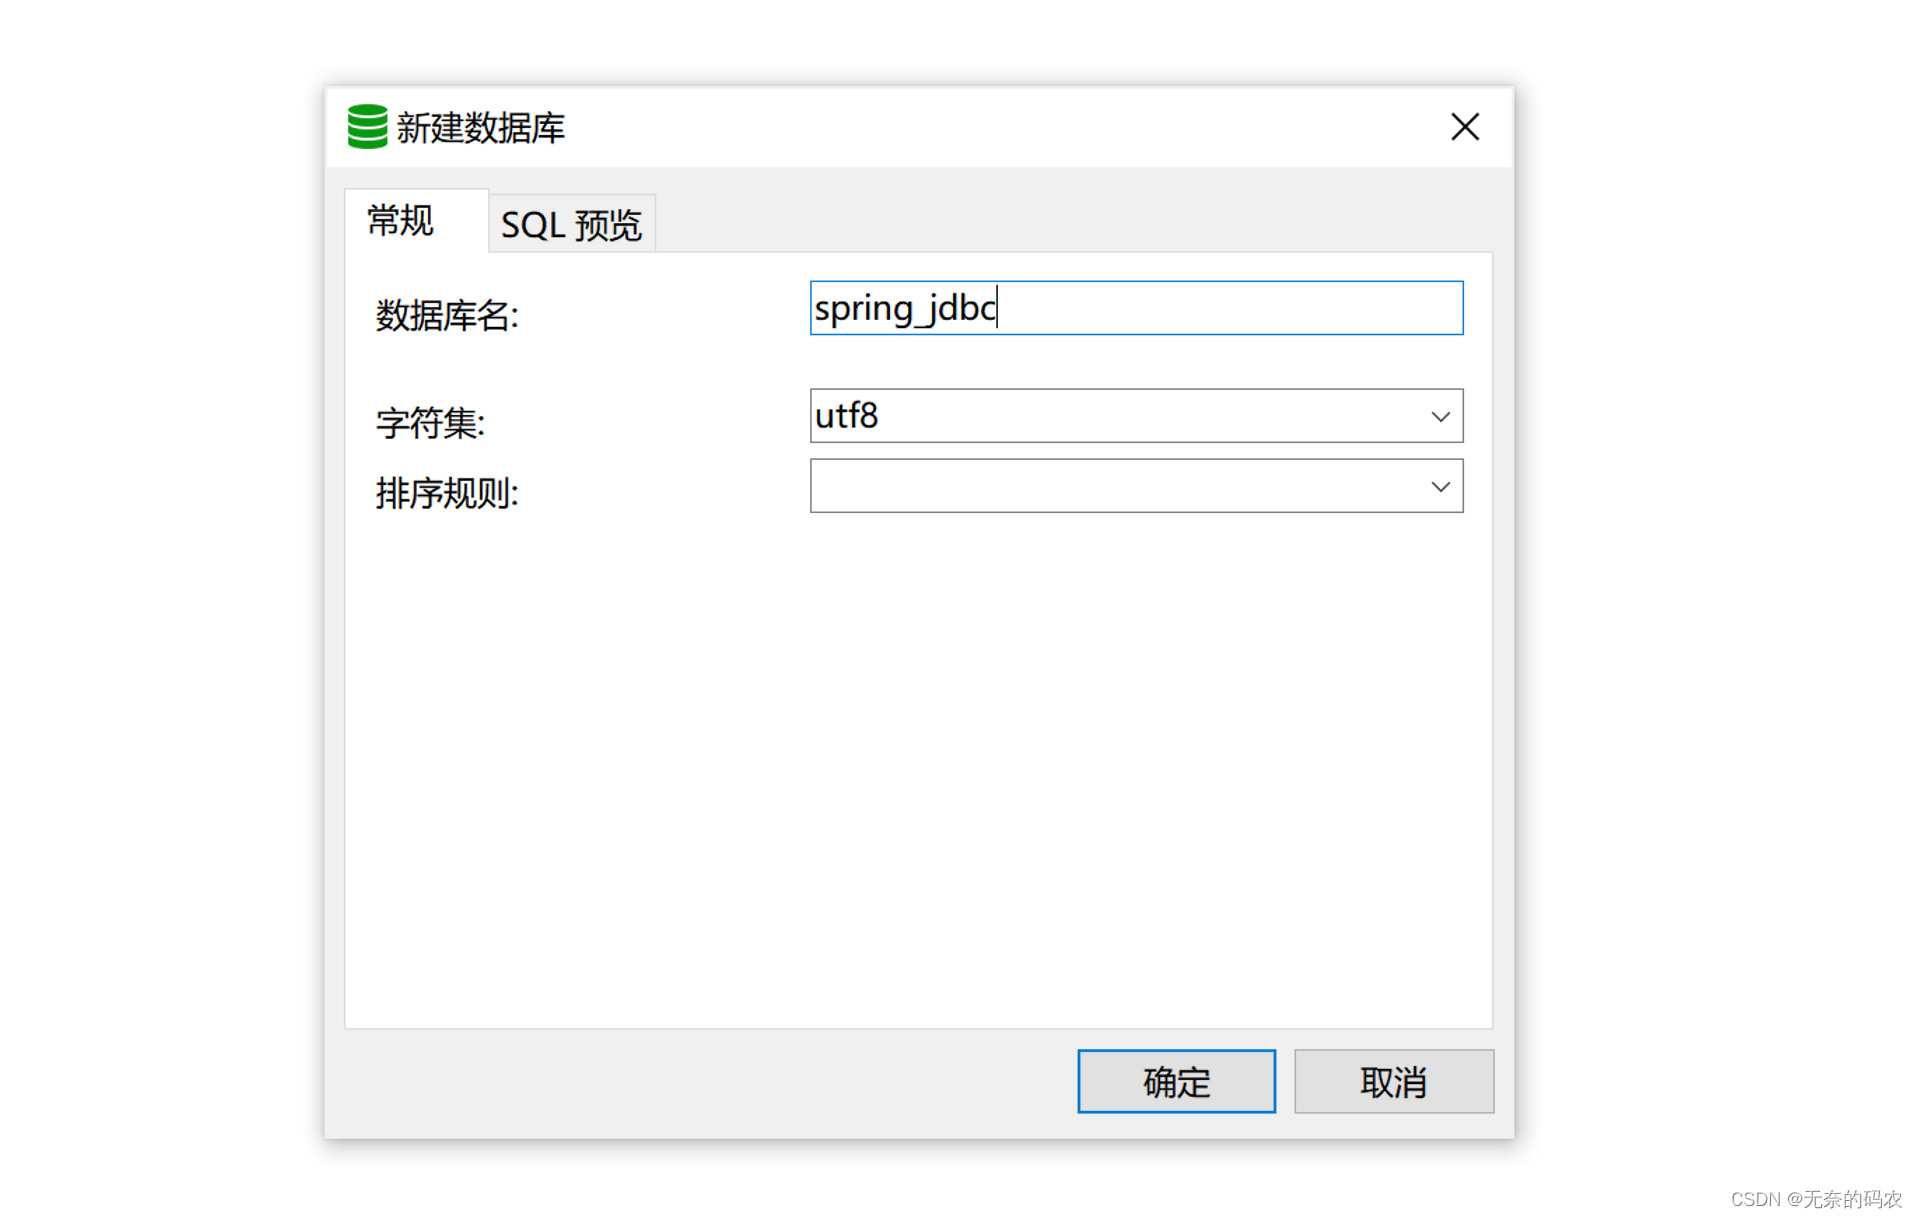
创建指定数据库
选择连接,右键选择"新建数据库",设置数据库的名称和编码格式
创建数据表
创建账户表:tb_account:
![[外链图片转存失败,源站可能有防盗链机制,建议将图片保存下来直接上传(img-3lGPLbL5-1682531464768)(03-Spring JDBC和事务控制.assets/SpringJDBC-02.png)]](https://img-blog.csdnimg.cn/f529a9f64475494cb4b8d7f5663d799e.png)
创建表以后表中加入数据:
使用 JUnit 测试
进行 junit 测试,解析applicationContext.xml,获取 jdbcTemplate bean
如果使用junit,需要将junit依赖加入到pom.xml中:
<dependency><groupId>junit</groupId><artifactId>junit</artifactId><version>4.13.2</version><scope>test</scope><!--只能在test目录下进行单元测试,在main->java目录下就无法使用--></dependency>
JUnit 测试
在test/java目录下新建com.msb.test包,构建测试类和方法:
packagecom.msb.test;importorg.junit.Test;importorg.springframework.context.ApplicationContext;importorg.springframework.context.support.ClassPathXmlApplicationContext;importorg.springframework.jdbc.core.JdbcTemplate;/**
 * @Author: zhaoss
 */publicclassSpringJdbcTest01{@TestpublicvoidtestQueryCount(){// 获取spring上下文环境ApplicationContext ctx =newClassPathXmlApplicationContext("applicationContext.xml");// 得到模板类 JdbcTemplate对象JdbcTemplate jdbcTemplate =(JdbcTemplate) ctx.getBean("jdbcTemplate");// 通过模板进行CRUD操作// 定义sql语句:案例:查询总计有多少个账户String sql ="select count(1) from tb_account";// 执行查询操作(无参数)Integer total= jdbcTemplate.queryForObject(sql,Integer.class);System.out.println("总记录数:"+ total);}@TestpublicvoidtestQueryCountByUserId(){// 获取spring上下文环境ApplicationContext ctx =newClassPathXmlApplicationContext("applicationContext.xml");// 得到模板类 JdbcTemplate对象JdbcTemplate jdbcTemplate =(JdbcTemplate) ctx.getBean("jdbcTemplate");// 通过模板进行CRUD操作// 定义sql语句:案例:查询指定用户有多少个账户String sql =" select count(1) from tb_account where user_id = ?";// 执行查询操作(有参数)第一个参数Integer total = jdbcTemplate.queryForObject(sql,Integer.class,1);System.out.println("总记录数:"+ total);}}
JdbcTemplate模板如何使用呢,可以通过官网查看:
![[外链图片转存失败,源站可能有防盗链机制,建议将图片保存下来直接上传(img-EBAqZVNu-1682531464769)(03-Spring JDBC和事务控制.assets/SpringJDBC-04.png)]](https://img-blog.csdnimg.cn/38670734ee554e1ea46bc5f89398e2cf.png)
![[外链图片转存失败,源站可能有防盗链机制,建议将图片保存下来直接上传(img-BlFdDBLD-1682531464770)(03-Spring JDBC和事务控制.assets/SpringJDBC-05.png)]](https://img-blog.csdnimg.cn/57017b3409fb4f47a48eaa2673addbd7.png)
优化JUnit单元测试-传统单元测试方式
在上面入门测试案例中,可以看到:testQueryCount()方法和testQueryCountByUserId()方法有很多重复的东西,那么重复的东西能否做到简单的封装呢?基于单元测试的特性,可以使用 @Before注解:(在执行单元测试方法之前可以执行的代码)
packagecom.msb.test;importorg.junit.Before;importorg.junit.Test;importorg.springframework.context.ApplicationContext;importorg.springframework.context.support.ClassPathXmlApplicationContext;importorg.springframework.jdbc.core.JdbcTemplate;/**
 * @Author: zhaoss
 */publicclassSpringJdbcTest01{privateJdbcTemplate jdbcTemplate;@Beforepublicvoidinit(){// 获取spring上下文环境ApplicationContext ctx =newClassPathXmlApplicationContext("applicationContext.xml");// 得到模板类 JdbcTemplate对象
        jdbcTemplate =(JdbcTemplate) ctx.getBean("jdbcTemplate");}@TestpublicvoidtestQueryCount(){// 通过模板进行CRUD操作// 定义sql语句:案例:查询总计有多少个账户String sql ="select count(1) from tb_account";// 执行查询操作(无参数)Integer total= jdbcTemplate.queryForObject(sql,Integer.class);System.out.println("总记录数:"+ total);}@TestpublicvoidtestQueryCountByUserId(){// 通过模板进行CRUD操作// 定义sql语句:案例:查询指定用户有多少个账户String sql =" select count(1) from tb_account where user_id = ?";// 执行查询操作(有参数)第一个参数Integer total = jdbcTemplate.queryForObject(sql,Integer.class,1);System.out.println("总记录数:"+ total);}}
优化JUnit单元测试-Spring Test 模块
Spring可以让单元测试用起来更加简单,Spring提供了Spring Test 模块,该模块整合了一些常见的单元测试工具,例如Junit。
整合后可以在测试类中直接使用Spring容器中的内容,相当于把测试类也放入到Spring容器中,测试类里面可以直接使用注解注入一些bean对象。
同时也可以通过@ContextConfigration注解指定配置文件路径,让测试方法在启动的时候直接加载配置文件。
添加依赖
spring-context核心依赖无论使用哪个模块都必须导入的。(这个我们已经添加过了)
需要导入junit依赖的,现在使用的就是Spring Test模块整合的junit。(这个我们已经添加过了)
spring-test 表示spring test模块的依赖,导入后才能有@ContextConfiguration这些注解 (这个需要现在添加)
<dependency><groupId>org.springframework</groupId><artifactId>spring-test</artifactId><version>6.0.5</version><scope>test</scope></dependency>
代码中加入注解
packagecom.msb.test;importorg.junit.Before;importorg.junit.Test;importorg.junit.runner.RunWith;importorg.springframework.beans.factory.annotation.Autowired;importorg.springframework.context.ApplicationContext;importorg.springframework.context.support.ClassPathXmlApplicationContext;importorg.springframework.jdbc.core.JdbcTemplate;importorg.springframework.test.context.ContextConfiguration;importorg.springframework.test.context.junit4.SpringJUnit4ClassRunner;/**
 * @Author: zhaoss
 */// 使用Spring整合Junit4的类启动当前测试类 (这个注解必须要用4.12以上版本的junit)// RunWith、ContextConfiguration这些注解不用扫描,@RunWith就会自动去构建测试类对象@RunWith(SpringJUnit4ClassRunner.class)// 启动时加载的配置文件,里面要包含classpath@ContextConfiguration(locations ="classpath:applicationContext.xml")publicclassSpringJdbcTest02{// 将容器中的jdbcTemplate注入进来@AutowiredprivateJdbcTemplate jdbcTemplate;@TestpublicvoidtestQueryCount(){// 通过模板进行CRUD操作// 定义sql语句:案例:查询总计有多少个账户String sql ="select count(1) from tb_account";// 执行查询操作(无参数)Integer total= jdbcTemplate.queryForObject(sql,Integer.class);System.out.println("总记录数:"+ total);}@TestpublicvoidtestQueryCountByUserId(){// 通过模板进行CRUD操作// 定义sql语句:案例:查询指定用户有多少个账户String sql =" select count(1) from tb_account where user_id = ?";// 执行查询操作(有参数)第一个参数Integer total = jdbcTemplate.queryForObject(sql,Integer.class,1);System.out.println("总记录数:"+ total);}}
PS:上面的注解生效,并没有在applicationContext.xml中配置扫描,因为Spring整合Junit4的类会帮我们处理,无需我们考虑扫描问题。
优化JUnit单元测试-Spring Test 模块-通用封装
如果有n多个测试类,每次都要写@RunWith和@ContextConfiguration注释,如果配置文件修改,那么每个文件中的classpath都要修改,很麻烦,所以我们可以再次提取:
- 定义一个父类,设置通用的配置信息
/** * @Author: zhaoss */// 使用Spring整合Junit4的类启动当前测试类 (这个注解必须要用4.12以上版本的junit)// RunWith、ContextConfiguration这些注解不用扫描,@RunWith就会自动去构建测试类对象@RunWith(SpringJUnit4ClassRunner.class)// 启动时加载的配置文件,里面要包含classpath@ContextConfiguration(locations ="classpath:applicationContext.xml")publicclassBaseTest{} - 继承通用的测试类
publicclassSpringJdbcTest03extendsBaseTest{// 将容器中的jdbcTemplate注入进来@AutowiredprivateJdbcTemplate jdbcTemplate;@TestpublicvoidtestQueryCount(){// 通过模板进行CRUD操作// 定义sql语句:案例:查询总计有多少个账户String sql ="select count(1) from tb_account";// 执行查询操作(无参数)Integer total= jdbcTemplate.queryForObject(sql,Integer.class);System.out.println("总记录数:"+ total);}@TestpublicvoidtestQueryCountByUserId(){// 通过模板进行CRUD操作// 定义sql语句:案例:查询指定用户有多少个账户String sql =" select count(1) from tb_account where user_id = ?";// 执行查询操作(有参数)第一个参数Integer total = jdbcTemplate.queryForObject(sql,Integer.class,1);System.out.println("总记录数:"+ total);}}
持久层(dao层)- 账户模块 - 操作
当完成 Spring Jdbc 环境集成后,这里使用spring jdbc 完成账户单表tb_account的crud 操作。但是实际开发中还是使用框架来操作,比如Mybatis。
定义实体类
创建com.msb.pojo包,定义Account.java
packagecom.msb.entity;importjava.util.Date;/**
 * 用户账户类
 */publicclassAccount{privateInteger accountId;// 账户ID,主键privateString accountName;// 账户名称privateString accountType;// 账户类型privateDouble money;// 账户金额privateString remark;// 账户备注privateInteger userId;// 用户ID,账户所属用户privateDate createTime;// 创建时间privateDate updateTime;// 修改时间publicAccount(){}// 构造器中不需要加:账户ID(利用主键自增即可)、创建时间、修改时间(这个时间通过sql操作即可)publicAccount(String accountName,String accountType,Double money,String remark,Integer userId){this.accountName = accountName;this.accountType = accountType;this.money = money;this.remark = remark;this.userId = userId;}@OverridepublicStringtoString(){return"Account{"+"accountId="+ accountId +", accountName='"+ accountName +'\''+", accountType='"+ accountType +'\''+", money="+ money +", remark='"+ remark +'\''+", userId="+ userId +", createTime="+ createTime +", updateTime="+ updateTime +'}';}publicIntegergetAccountId(){return accountId;}publicvoidsetAccountId(Integer accountId){this.accountId = accountId;}publicStringgetAccountName(){return accountName;}publicvoidsetAccountName(String accountName){this.accountName = accountName;}publicStringgetAccountType(){return accountType;}publicvoidsetAccountType(String accountType){this.accountType = accountType;}publicDoublegetMoney(){return money;}publicvoidsetMoney(Double money){this.money = money;}publicStringgetRemark(){return remark;}publicvoidsetRemark(String remark){this.remark = remark;}publicIntegergetUserId(){return userId;}publicvoidsetUserId(Integer userId){this.userId = userId;}publicDategetCreateTime(){return createTime;}publicvoidsetCreateTime(Date createTime){this.createTime = createTime;}publicDategetUpdateTime(){return updateTime;}publicvoidsetUpdateTime(Date updateTime){this.updateTime = updateTime;}}
dao层中账户接口及方法定义
定义接口类
AccountDao.java
packagecom.msb.dao;importcom.msb.pojo.Account;importjava.util.List;/**
 * @Author: zhaoss
 * 用户模块 接口定义
 *      1. 添加账户
 *          添加账户记录,返回受影响的行数
 *          添加账户记录,返回记录的主键
 *          批量添加账户记录,返回受影响的行数
 *      2. 查询账户
 *          查询指定用户的账户总记录数,返回该记录数
 *          通过账户主键id,查询指定账户的记录详情,返回账户信息
 *          多条件查询指定用户的账户列表,返回账户集合
 *      3. 更新账户
 *          更新账户记录,返回受影响的行数
 *          批量更新账户记录,返回受影响的行数
 *      4. 删除账户
 *          删除账户记录,返回受影响的行数
 *          批量删除账户记录,返回受影响的行数
 */publicinterfaceAccountDao{// 添加操作:添加账户记录,返回受影响的行数:intaddAccount(Account account);// 添加操作:添加账户记录,返回记录的主键:intaddAccountReturnKey(Account account);// 添加操作:批量添加账户记录,返回受影响的行数:intaddAccountBatch(List<Account> accounts);// 查询操作:查询指定用户的账户总记录数,返回账户总记录数:intqueryAccountCount(Integer userId);// 查询操作:通过账户的主键id,查询对应的账户的信息:AccountqueryAccountById(Integer accountId);/**
     查询操作:多条件查询指定用户的账户列表,返回账户集合:
     @param userId 指定的账户的id
     @param accountName 账户名称 (利用模糊查询)
     @param createTime 创建时间  (查询大于当前时间)
     */List<Account>queryAccountByParams(Integer userId,String accountName,String createTime);// 更新操作:更新账户记录,返回受影响的行数:intupdateAccountById(Account account);// 更新操作:批量更新账户记录,返回受影响的行数:intupdateAccountBatch(List<Account> accounts);// 删除操作:根据主键id删除对应的账户,返回受影响的行数:intdeleteAccountById(Integer accountId);// 删除操作:批量删除-根据主键id删除对应的账户,返回受影响的行数:intdeleteAccountBatch(Integer[] accountIds);}
定义接口实现类
packagecom.msb.dao.impl;importcom.msb.dao.AccountDao;importcom.msb.pojo.Account;importorg.springframework.beans.factory.annotation.Autowired;importorg.springframework.jdbc.core.JdbcTemplate;importorg.springframework.stereotype.Repository;importjava.util.List;/**
 * @Author: zhaoss
 * AccountDaoImpl对象的构建,我们交给ioc容器去管理,加入@Repository注解:
 */@RepositorypublicclassAccountDaoImplimplementsAccountDao{// 注入JdbcTemplate模板对象:@AutowiredJdbcTemplate jt;@OverridepublicintaddAccount(Account account){return0;}@OverridepublicintaddAccountReturnKey(Account account){return0;}@OverridepublicintaddAccountBatch(List<Account> accounts){return0;}@OverridepublicintqueryAccountCount(Integer userId){return0;}@OverridepublicAccountqueryAccountById(Integer accountId){returnnull;}@OverridepublicList<Account>queryAccountByParams(Integer userId,String accountName,String createTime){returnnull;}@OverridepublicintupdateAccountById(Account account){return0;}@OverridepublicintupdateAccountBatch(List<Account> accounts){return0;}@OverridepublicintdeleteAccountById(Integer accountId){return0;}@OverridepublicintdeleteAccountBatch(Integer[] accountIds){return0;}}
如果想要@Repository注解和 @Autowired注解起作用,必须要在applicationContext.xml中进行扫描,加入配置:
<?xml version="1.0" encoding="UTF-8"?><beansxmlns="http://www.springframework.org/schema/beans"xmlns:xsi="http://www.w3.org/2001/XMLSchema-instance"xmlns:context="http://www.springframework.org/schema/context"xsi:schemaLocation="http://www.springframework.org/schema/beans
        https://www.springframework.org/schema/beans/spring-beans.xsd
        http://www.springframework.org/schema/context
        https://www.springframework.org/schema/context/spring-context.xsd"><context:property-placeholderlocation="db.properties"></context:property-placeholder><beanid="dataSource"class="com.mchange.v2.c3p0.ComboPooledDataSource"><propertyname="driverClass"value="${jdbc.driver}"></property><propertyname="jdbcUrl"value="${jdbc.url}"></property><propertyname="user"value="${jdbc.user}"></property><propertyname="password"value="${jdbc.password}"></property></bean><beanid="jdbcTemplate"class="org.springframework.jdbc.core.JdbcTemplate"><propertyname="dataSource"ref="dataSource"></property></bean><!--扫描注解--><context:component-scanbase-package="com.msb.dao"></context:component-scan></beans>
账户记录添加实现
在企业项目开发时,对于记录的添加可能涉及到多种添加方式,比如添加单条记录,批量添加多条记录等情况。这里对于账户记录添加方式分为三种方式:添加单条记录返回受影响行数、添加单条记录返回主键、批量添加多条记录。
添加账户记录
AccountDaoImpl.java中重写方法:
/**
  * 添加单条记录,返回受影响的行数
  * @param account
  * @return
  */@OverridepublicintaddAccount(Account account){String sql ="insert into tb_account(account_name,account_type,money,remark,"+"user_id,create_time,update_time) values (?,?,?,?,?,now(),now())";Object[] objs ={account.getAccountName(),account.getAccountType(),
                     account.getMoney(),account.getRemark(),account.getUserId()};return jdbcTemplate.update(sql,objs);}
测试方法
packagecom.msb.test;importcom.msb.dao.AccountDao;importcom.msb.pojo.Account;importorg.junit.Test;importorg.springframework.beans.factory.annotation.Autowired;importorg.springframework.jdbc.core.JdbcTemplate;/**
 * @Author: zhaoss
 */publicclassTestSpringJDBCAddTestextendsBaseTest{// 注入持久层对象(dao层)对象@AutowiredAccountDao accountDao;@TestpublicvoidtestAddAccount(){// 准备你要添加的数据:Account account =newAccount("账号3","工商银行",400.0,"奖金",1);// 调用AccountDaoImpl对象的addAccount方法,传入上面要添加的数据account:int row = accountDao.addAccount(account);System.out.println("添加账户,受影响的行数为:"+ row);}}
参照:
![[外链图片转存失败,源站可能有防盗链机制,建议将图片保存下来直接上传(img-hZAckNJ5-1682531464771)(03-Spring JDBC和事务控制.assets/SpringJDBC-10.png)]](https://img-blog.csdnimg.cn/9427a16a8de042aea7b6efc352e924ad.png)
添加记录返回主键
@OverridepublicintaddAccountReturnKey(Account account){// 添加操作:添加账户记录,返回记录的主键:// 定义sql:String sql ="insert into tb_account "+"(account_name,account_type,money,remark,create_time,update_time,user_id) "+"values (?,?,?,?,now(),now(),?)";// 利用模板调用方法,返回主键:// 定义KeyHolder对象,获取记录的主键值:KeyHolder keyHolder =newGeneratedKeyHolder();// 利用模板调用方法:/*jt.update(new PreparedStatementCreator() {
            @Override
            public PreparedStatement createPreparedStatement(Connection con) throws SQLException {
                // 预编译sql语句,并设置返回主键:
                PreparedStatement ps = con.prepareStatement(sql, Statement.RETURN_GENERATED_KEYS);
                // 设置参数:
                ps.setString(1,account.getAccountName());
                ps.setString(2,account.getAccountType());
                ps.setDouble(3,account.getMoney());
                ps.setString(4,account.getRemark());
                ps.setInt(5,account.getUserId());
                return ps;
            }
        }, keyHolder);*/// 利用lambda表达式的写法:
        jt.update(con ->{// 预编译sql语句,并设置返回主键:PreparedStatement ps = con.prepareStatement(sql,Statement.RETURN_GENERATED_KEYS);// 设置参数:
                ps.setString(1,account.getAccountName());
                ps.setString(2,account.getAccountType());
                ps.setDouble(3,account.getMoney());
                ps.setString(4,account.getRemark());
                ps.setInt(5,account.getUserId());return ps;}, keyHolder);// 通过keyHolder对象来获取主键:int key = keyHolder.getKey().intValue();return key;}
测试方法
/**
  * 添加账户记录,返回主键
  */@TestpublicvoidtestAddAccount2(){// 准备你要添加的数据:Account account =newAccount("账号4","招商银行",1400.0,"兼职费用",2);// 调用AccountDaoImpl对象的addAccount方法,传入上面要添加的数据account:int key = accountDao.addAccountReturnKey(account);System.out.println("对应的主键为:"+ key);}
参照:
![[外链图片转存失败,源站可能有防盗链机制,建议将图片保存下来直接上传(img-IGbwOY7y-1682531464772)(03-Spring JDBC和事务控制.assets/SpringJDBC-07.png)]](https://img-blog.csdnimg.cn/65261ed52bc14f508cd1765661e0778c.png)
批量添加账户记录
/**
  * 添加多条记录,返回受影响的行数
  * @param accounts
  * @return
  */@OverridepublicintaddAccountBatch(List<Account> accounts){// 添加操作:批量添加账户记录,返回受影响的行数:// 定义sql:String sql ="insert into tb_account "+"(account_name,account_type,money,remark,create_time,update_time,user_id) "+"values (?,?,?,?,now(),now(),?)";// 通过模板进行批量增加操作:int[] nums = jt.batchUpdate(sql,newBatchPreparedStatementSetter(){@OverridepublicvoidsetValues(PreparedStatement ps,int i)throwsSQLException{// 必须获取每一条记录,给每一条记录赋值:Account account = accounts.get(i);// 给参数设置值:
            ps.setString(1,account.getAccountName());
            ps.setString(2,account.getAccountType());
            ps.setDouble(3,account.getMoney());
            ps.setString(4,account.getRemark());
            ps.setInt(5,account.getUserId());}@OverridepublicintgetBatchSize(){// 可以得到一共操作多少条记录return accounts.size();}});// 获取影响几行记录:return nums.length;}
测试方法
/**
  * 批量添加数据,返回受影响的行数
  */@TestpublicvoidtestAddAccountBatch(){// 准备你要添加的数据:Account account1 =newAccount("账号8","招商银行",13450.0,"兼职费用",3);Account account2 =newAccount("账号9","工商银行",1670.0,"奖金",3);Account account3 =newAccount("账号10","建设银行",7400.0,"工资",3);// 上面的三个账户添加到集合中,以便以后传入批量添加的方法中:List<Account> accouts =newArrayList<>();
    accouts.add(account1);
    accouts.add(account2);
    accouts.add(account3);// 调用AccountDaoImpl对象的addAccountBatch方法,传入上面要添加的数据accouts:int row = accountDao.addAccountBatch(accouts);System.out.println("添加账户,受影响的行数为:"+ row);}
参考:
![[外链图片转存失败,源站可能有防盗链机制,建议将图片保存下来直接上传(img-vKWWcl24-1682531464773)(03-Spring JDBC和事务控制.assets/SpringJDBC-08.png)]](https://img-blog.csdnimg.cn/32261d126f3d45979ad3ed86e85a8b08.png)
账户记录查询实现
账户记录查询这里提供了三种查询方式,查询指定用户所有账户记录数,查询单条账户记录详情,多条件查询指定用户账户记录。
查询用户的账户总记录数
/**
  * 查询指定用户的账户总记录数,返回记录数
  * @param userId
  * @return
  */@OverridepublicintqueryAccountCount(Integer userId){String sql ="select count(1) from tb_account where user_id = ?";int count = jdbcTemplate.queryForObject(sql,Integer.class,userId);return count;}
测试方法
/**
  * 查询用户的账户总记录数,返回总记录数
  */@TestpublicvoidtestQueryAccountCount(){// 查询ID为1的用户的账户总记录数int total = accountDao.queryAccountCount(1);System.out.println("总记录数:"+ total);}
参考:
![[外链图片转存失败,源站可能有防盗链机制,建议将图片保存下来直接上传(img-PYw7TQ8e-1682531464774)(03-Spring JDBC和事务控制.assets/SpringJDBC-09.png)]](https://img-blog.csdnimg.cn/25925dbb5bd8496f84621594695ddc39.png)
查询指定账户记录详情
/**
  * 查询某个账户记录详情,返回账户对象
  * @param accountId
  * @return
  */@OverridepublicAccountqueryAccountById(Integer accountId){// 查询操作:通过账户的主键id,查询对应的账户的信息:// 定义sql:String sql ="select * from tb_account where account_id = ?";// 利用模板调用方法操作:/*Account account = jt.queryForObject(sql, new RowMapper<Account>() {
            @Override
            public Account mapRow(ResultSet rs, int rowNum) throws SQLException {
                // 创建一个Account对象,接收数据库中查询的数据:
                Account a = new Account();
                a.setAccountId(accountId);
                a.setAccountName(rs.getString("account_name"));
                a.setAccountType(rs.getString("account_type"));
                a.setMoney(rs.getDouble("money"));
                a.setRemark(rs.getString("remark"));
                a.setCreateTime(rs.getDate("create_time"));
                a.setUpdateTime(rs.getDate("update_time"));
                a.setUserId(rs.getInt("user_id"));
                return a;
            }
        }, accountId);*/// 利用lambda表达式简化:Account account = jt.queryForObject(sql,(ResultSet rs,int rowNum)->{// 创建一个Account对象,接收数据库中查询的数据:Account a =newAccount();
                a.setAccountId(accountId);
                a.setAccountName(rs.getString("account_name"));
                a.setAccountType(rs.getString("account_type"));
                a.setMoney(rs.getDouble("money"));
                a.setRemark(rs.getString("remark"));
                a.setCreateTime(rs.getDate("create_time"));
                a.setUpdateTime(rs.getDate("update_time"));
                a.setUserId(rs.getInt("user_id"));return a;}, accountId);return account;}
测试方法
/**
  * 查询指定账户的记录详情,返回账户对象
  */@Testpublicvoidtestquery02(){// 调用accountDao中的queryAccountById:查询操作:通过账户的主键id,查询对应的账户的信息:Account account = accountDao.queryAccountById(10);System.out.println("该用户的账户信息为:"+ account.toString());}
参考:
![[外链图片转存失败,源站可能有防盗链机制,建议将图片保存下来直接上传(img-VqzW89ZG-1682531464775)(03-Spring JDBC和事务控制.assets/SpringJDBC-11.png)]](https://img-blog.csdnimg.cn/736bea08d73f4bcf96434f0b1463f930.png)
多条件查询用户账户记录
/**
     查询操作:多条件查询指定用户的账户列表,返回账户集合:
     @param userId 指定的账户的用户id
     @param accountName 账户名称 (利用模糊查询)
     @param createTime 创建时间  (查询大于当前时间)
     */@OverridepublicList<Account>queryAccountByParams(Integer userId,String accountName,String createTime){// 定义sql :String sql ="select * from tb_account where user_id = ?";// 定义参数列表:案例我们不用那么多参数,只用userId先测试,参数列表可以先不定义。// 如果案例中有多个参数,那么就需要定义数组,然后传入可变参数位置:--->直接定义数组方案不可取,因为数组长度不能改变:// 将数组改为集合:// Object[] params = {userId};List params =newArrayList();
        params.add(userId);// 根据参数是否为空将sql进行拼接:if(accountName !=null&&!"".equals(accountName)){// 模糊查询  注意:and前面一定要加空格,否则报错
            sql +=" and account_name like concat('%',?,'%')";
            params.add(accountName);}if(createTime !=null&&!"".equals(createTime)){
            sql +=" and create_time < ?";
            params.add(createTime);}// 将集合转为数组:Object[] objects = params.toArray();// 使用模板:List<Account> accountList = jt.query(sql,(ResultSet rs,int rowNum)->{// 创建一个Account对象,接收数据库中查询的数据:// 查询出来的每个数据,利用一个Account对象做接收,然后query方法内部会将对象放入List集合中返回Account a =newAccount();
            a.setAccountId(rs.getInt("account_id"));
            a.setAccountName(rs.getString("account_name"));
            a.setAccountType(rs.getString("account_type"));
            a.setMoney(rs.getDouble("money"));
            a.setRemark(rs.getString("remark"));
            a.setCreateTime(rs.getDate("create_time"));
            a.setUpdateTime(rs.getDate("update_time"));
            a.setUserId(rs.getInt("user_id"));return a;}, objects);return accountList;}
测试方法
@Testpublicvoidtestquery03(){// 调用accountDao中的queryAccountByParams:List<Account> accountList = accountDao.queryAccountByParams(1,null,null);/*System.out.println(accountList.toString());
        System.out.println(accountList.size());*/List<Account> accountList2 = accountDao.queryAccountByParams(1,"1",null);/*System.out.println(accountList2.toString());
        System.out.println(accountList2.size());*/List<Account> accountList3 = accountDao.queryAccountByParams(1,null,"2023-3-20");System.out.println(accountList3.toString());System.out.println(accountList3.size());}
参考:如果有参数就传入参数。
![[外链图片转存失败,源站可能有防盗链机制,建议将图片保存下来直接上传(img-Ot3an8UX-1682531464776)(03-Spring JDBC和事务控制.assets/SpringJDBC-12.png)]](https://img-blog.csdnimg.cn/54a79886d0b24828880e25e2c221b65f.png)
账户记录更新实现
更新账户记录
/**
  * 更新指定账户记录,返回受影响的行数
  * @param account
  * @return
  */@OverridepublicintupdateAccountById(Account account){String sql ="update tb_account set account_name = ?, account_type = ?, "+" money = ? ,remark = ?,user_id = ? ,update_time = now() "+" where account_id = ? ";Object[] objs ={account.getAccountName(),account.getAccountType(),
                     account.getMoney(), account.getRemark(),account.getUserId(),
                     account.getAccountId()};return jdbcTemplate.update(sql,objs);}
测试方法
/**
  * 更新指定账户记录,返回受影响的行数
  */@TestpublicvoidtestUpdateAccount(){// 准备要修改的数据Account account =newAccount("张三1","建设银行1",500.0,"零花钱加倍",1);
    account.setAccountId(1);int row = accountDao.updateAccountById(account);System.out.println("修改账户返回受影响的行数:"+ row);}
参考:
![[外链图片转存失败,源站可能有防盗链机制,建议将图片保存下来直接上传(img-oLvkCG4B-1682531464777)(03-Spring JDBC和事务控制.assets/SpringJDBC-13.png)]](https://img-blog.csdnimg.cn/cc3d21f8c2d94a7890a15aaf33d161f1.png)
批量更新账户记录
/**
  * 批量新账户记录,返回受影响的行数
  * @param accounts
  * @return
  */@OverridepublicintupdateAccountBatch(List<Account> accounts){// 更新操作:批量更新账户记录,返回受影响的行数:// 定义sql:String sql ="update tb_account set account_name = ?,account_type = ?,money = ?,remark = ?,"+"update_time = now(),user_id = ? where account_id = ?";// 通过模板进行批量更新操作:int[] nums = jt.batchUpdate(sql,newBatchPreparedStatementSetter(){@OverridepublicvoidsetValues(PreparedStatement ps,int i)throwsSQLException{// 必须获取每一条记录,给每一条记录赋值:Account account = accounts.get(i);// 给参数设置值:
            ps.setString(1,account.getAccountName());
            ps.setString(2,account.getAccountType());
            ps.setDouble(3,account.getMoney());
            ps.setString(4,account.getRemark());
            ps.setInt(5,account.getUserId());
            ps.setInt(6,account.getAccountId());}@OverridepublicintgetBatchSize(){// 可以得到一共操作多少条记录return accounts.size();}});// 获取影响几行记录:return nums.length;}
测试方法
/**
  * 批量更新账户记录,返回受影响的行数
  */@Testpublicvoidtestupdate02(){// 调用accountDao中的updateAccountBatch// 封装Account对象:Account ac1 =newAccount("账户66","农业银行",220.0,"奖金",1);
    ac1.setAccountId(9);Account ac2 =newAccount("账户77","农业银行",240.0,"奖金",1);
    ac2.setAccountId(10);Account ac3 =newAccount("账户88","农业银行",290.0,"奖金",1);
    ac3.setAccountId(11);// 上面的数据要放入List集合中:List list =newArrayList();
    list.add(ac1);
    list.add(ac2);
    list.add(ac3);int row = accountDao.updateAccountBatch(list);System.out.println("更新操作影响行数为:"+ row);}
参考:
![[外链图片转存失败,源站可能有防盗链机制,建议将图片保存下来直接上传(img-o8fofDMa-1682531464778)(03-Spring JDBC和事务控制.assets/SpringJDBC-14.png)]](https://img-blog.csdnimg.cn/8f9fe41e51e44f0c91ab3234374d05b6.png)
账户记录删除实现
删除账户记录
/**
  * 删除账户记录,返回受影响的行数
  * @param accountId
  * @return
  */@OverridepublicIntegerdeleteAccoutById(Integer accountId){String sql ="delete from tb_account where account_id= ? ";Object[] objs ={accountId};return jdbcTemplate.update(sql,objs);}
测试方法
/**
  * 删除账户记录,返回受影响的行数
  */@TestpublicvoidtestDeleteAccount(){// 删除ID为1的账户记录int row = accountDao.deleteAccoutById(1);System.out.println("删除账户记录返回受影响的行数:"+ row);}
批量删除账户记录
/**
   * 批量删除账户记录,返回受影响的行数
   * @param ids
   * @return
   */@OverridepublicintdeleteAccountBatch(Integer[] ids){String sql ="delete from tb_account where account_id = ?";int row = jdbcTemplate.batchUpdate(sql,newBatchPreparedStatementSetter(){@OverridepublicvoidsetValues(PreparedStatement ps,int i)throwsSQLException{
            ps.setInt(1,ids[i]);}@OverridepublicintgetBatchSize(){return ids.length;}}).length;return row;}
测试方法
/**
  * 批量删除账户记录,返回受影响的行数
  */@TestpublicvoidtestDeleteAccountBatch(){// 删除多个id的账户记录Integer[] ids =newInteger[]{2,3};int rows = accountDao.deleteAccountBatch(ids);System.out.println("批量删除账户记录返回受影响的行数:"+ rows);}
Spring 事务控制
通过转账操作案例来引入事务管理。
转账场景模拟实现
项目搭建与SpringJDBC中一致,这里不重复赘述。
接口方法定义
dao层定义接口: 对于转账涉及到双方账户以及对应转账金额,所以有入账和出账两个方法。
packagecom.msb.dao;/**
 * @Author: zhaoss
 */publicinterfaceAccountDao{/**
      * 收入
      * @param tarAid 收入金额的账户ID
      * @param money 收入金额
      * @return
      */publicabstractintinAccount(Integer accountId,Double money);/**
      * 支出
      * @param outAid 支出金额的账户ID
      * @param money  支出金额
      * @return
      */publicabstractintoutAccount(Integer accountId,Double money);}
实现对应接口
packagecom.msb.dao.impl;importcom.msb.dao.AccountDao;importorg.springframework.beans.factory.annotation.Autowired;importorg.springframework.jdbc.core.JdbcTemplate;importorg.springframework.stereotype.Repository;/**
 * @Author: zhaoss
 */@RepositorypublicclassAccountDaoImplimplementsAccountDao{// 注入JdbcTemplate模板对象:@AutowiredJdbcTemplate jt;@OverridepublicintinAccount(Integer accountId,Double money){// 定义sql:String sql ="update tb_account set money = money + ? where account_id = ?";// 参数:Object[] params ={money,accountId};// 使用模板:int i = jt.update(sql, params);return i;}@OverridepublicintoutAccount(Integer accountId,Double money){// 定义sql:String sql ="update tb_account set money = money - ? where account_id = ?";// 参数:Object[] params ={money,accountId};// 使用模板:int i = jt.update(sql, params);return i;}}
转账方法业务层实现
service层中实现:
packagecom.msb.service;importcom.msb.dao.AccountDao;importorg.springframework.beans.factory.annotation.Autowired;importorg.springframework.stereotype.Service;/**
 * @Author: zhaoss
 */@ServicepublicclassAccountService{@AutowiredprivateAccountDao ad;// 定义业务方法:转账操作:返回值为int类型,在方法内部可以定义一个状态码:成功返回1,失败返回0publicintupdateAccount(Integer outid,Integer inid,Double money){// 定义状态码:成功1,失败0,初始化状态下 code是0int code =0;// 账户A(id为6)给账户B(id为10)转100 :// 账户A支出100:int outRow = ad.outAccount(outid, money);// 账户B收入100:int inRow = ad.inAccount(inid, money);// 如果收入和支出两个操作都执行成功的话,表示转账成功:if(outRow ==1&& inRow ==1){
            code =1;// 转账成功}// 状态码作为方法的返回值:return code;}}
需加入事务控制
我们在上述的代码中人为制造错误,使账户A支出成功,但是账户B收入失败:
packagecom.msb.service;importcom.msb.dao.AccountDao;importorg.springframework.beans.factory.annotation.Autowired;importorg.springframework.stereotype.Service;/**
 * @Author: zhaoss
 */@ServicepublicclassAccountService{@AutowiredprivateAccountDao ad;// 定义业务方法:转账操作:返回值为int类型,在方法内部可以定义一个状态码:成功返回1,失败返回0publicintupdateAccount(Integer outid,Integer inid,Double money){// 定义状态码:成功1,失败0,初始化状态下 code是0int code =0;// 账户A(id为6)给账户B(id为10)转100 :// 账户A支出100:int outRow = ad.outAccount(outid, money);// 加入异常代码:int a =1/0;// 账户B收入100:int inRow = ad.inAccount(inid, money);// 如果收入和支出两个操作都执行成功的话,表示转账成功:if(outRow ==1&& inRow ==1){
            code =1;// 转账成功}// 状态码作为方法的返回值:return code;}}
再次执行测试类发现,程序报错,账户A损失100,但是账户B并没有加100元操作。
出现上述现象的原因:
默认MySQL的事务是自动提交的,也就是说,当执行一条DML语句,MySQL会立即隐式提交事务,也就是说在执行账户A的转账操作的时候,事务提交,然后出现异常,转账B的操作没有执行
PS:事务:是一组操作的集合,它是一个不可分割的工作单位,事务会把所有的操作作为一个整体一起向系统提交或撤销操作请求,即这些操作要么同时成功,要么同时失效。
解决:
将转账操作放入同一事务中进行处理。
方式1:编程式事务。(事务代码由程序员自己书写)
截取以前代码:
![[外链图片转存失败,源站可能有防盗链机制,建议将图片保存下来直接上传(img-6eks3oY5-1682531464779)(03-Spring JDBC和事务控制.assets/SpringJDBC-15.png)]](https://img-blog.csdnimg.cn/8ab282f7fd924932a1064b7f84d37409.png)
仔细思考代码会发现,在程序运行中无法保证 service 层业务代码不发生异常,如果通过 jdbc 的方式处理事务,此时需要手动方式控制事务,这样的话凡是涉及到事务控制的业务方法均需要开发人员手动来进行事务处理,无法满足生产的需要。
(在业务层加、在dao层加都不合适,即便加进去了,凡是涉及到事务控制的方法都需要处理,太麻烦了,所以需要方式2)
方式2:声明式事务。(事务代码由框架负责,程序员进行声明和简单配置即可。)
Spring就提供了事务的处理方式,将所需内容全部封装,程序员只需要简单的配置即可。封装在哪里呢?如下:
![[外链图片转存失败,源站可能有防盗链机制,建议将图片保存下来直接上传(img-XtKVv0Z0-1682531464779)(03-Spring JDBC和事务控制.assets/SpringJDBC-17.png)]](https://img-blog.csdnimg.cn/08662a3c73494485a3d89aca38f8fa25.png)
怎么去理解呢?
![[外链图片转存失败,源站可能有防盗链机制,建议将图片保存下来直接上传(img-Ji1BFs6F-1682531464780)(03-Spring JDBC和事务控制.assets/SpringJDBC-18.png)]](https://img-blog.csdnimg.cn/ba1e8dcd3ed743b7a6cb0a2a11cf92b8.png)
Spring 事务核心接口
Spring 并不直接管理事务,而是提供了多种事务管理器,他们将事务管理的职责委托给 Hibernate 或者 JTA 等持久化机制所提供的相关平台框架的事务来实现。
Spring 事务管理器的接口是org.springframework.transaction.PlatformTransactionManager,通过这个接口,Spring 为各个平台如 JDBC、Hibernate 等都提供了对应的事务管理器,但是具体的实现就是各个平台自己的事情了。此接口的内容如下:
publicinterfacePlatformTransactionManager(){// 由 TransactionDefinition 得到 TransactionStatus 对象 TransactionStatusgetTransaction(TransactionDefinition definition)throwsTransactionException;// 提交 voidcommit(TransactionStatus status)throwsTransactionException;// 回滚 voidrollback(TransactionStatus status)throwsTransactionException;}
从这里可知具体的具体的事务管理机制对 Spring 来说是透明的,它并不关心那些,那些是对应各个平台需要关心的,所以 Spring 事务管理的一个优点就是为不同的事务 API 提供一致的编程模型,如 JTA、JDBC、Hibernate、JPA。下面分别介绍各个平台框架实现事务管理的机制。
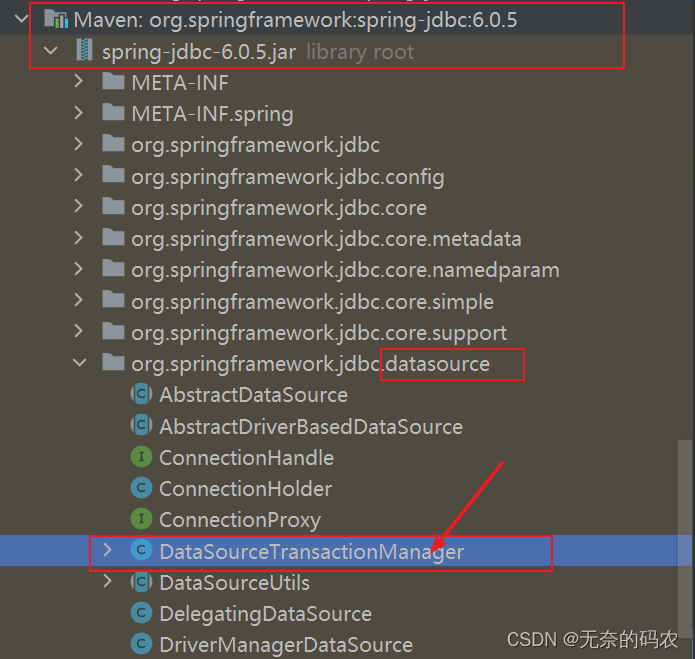
JDBC 事务
如果应用程序中直接使用 JDBC 来进行持久化,此时使用 DataSourceTransactionManager 来处理事务边界。为了使用DataSourceTransactionManager,需要使用如下的 XML 将其装配到应用程序的上下文定义中:
<beanid="transactionManager"class="org.springframework.jdbc.datasource.DataSourceTransactionManager"><propertyname="dataSource"ref="dataSource"/></bean>
实际上,DataSourceTransactionManager 是通过调用 java.sql.Connection 来管理事务,而后者是通过 DataSource 获取到的。通过调用连接的 commit() 方法来提交事务,同样,事务失败则通过调用 rollback() 方法进行回滚。
Hibernate 事务
如果应用程序的持久化是通过 Hibernate 实现的,那么你需要使用 HibernateTransactionManager。对于 Hibernate3,需要在 Spring 上下文定义中添加如下的声明:
<beanid="transactionManager"class="org.springframework.orm.hibernate3.HibernateTransactionManager"><propertyname="sessionFactory"ref="sessionFactory"/></bean>
sessionFactory 属性需要装配一个 Hibernate 的 session 工厂,HibernateTransactionManager 的实现细节是它将事务管理的职责委托给 org.hibernate.Transaction 对象,而后者是从 Hibernate Session 中获取到的。当事务成功完成时,HibernateTransactionManager 将会调用 Transaction 对象的 commit() 方法,反之,将会调用 rollback() 方法。
Java 持久化 API 事务(JPA)
Hibernate 多年来一直是 Java 持久化标准,但是现在 Java 持久化 API 作为真正的 Java 持久化标准进入大家的视野。如果你计划使用 JPA 的话,那你需要使用 Spring 的 JpaTransactionManager 来处理事务。你需要在 Spring 中这样配置 JpaTransactionManager:
<beanid="transactionManager"class="org.springframework.orm.jpa.JpaTransactionManager"><propertyname="sessionFactory"ref="sessionFactory"/></bean>
JpaTransactionManager 只需要装配一个 JPA 实体管理工厂(javax.persistence.EntityManagerFactory 接口的任意实现)。 JpaTransactionManager 将与由工厂所产生的 JPA EntityManager 合作来构建事务。
Java 原生 API 事务
如果应用程序没有使用以上所述的事务管理,或者是跨越了多个事务管理源(比如两个或者是多个不同的数据源),此时需要使用 JtaTransactionManager:
<beanid="transactionManager"class="org.springframework.transaction.jta.JtaTransactionManager"><propertyname="transactionManagerName"value="java:/TransactionManager"/></bean>
JtaTransactionManager 将事务管理的责任委托给 javax.transaction.UserTransaction 和javax.transaction.TransactionManager 对象,其中事务成功完成通过 UserTransaction.commit() 方法提交,事务失败通过 UserTransaction.rollback() 方法回滚。
Spring 事务控制配置
通过 jdbc 持久化事务,对于事务配置实现由两种方式即:Xml 配置,注解配置。
XML 配置
导入命名空间依赖
<dependency><groupId>org.aspectj</groupId><artifactId>aspectjweaver</artifactId><version>1.9.9.1</version><!--<scope>runtime</scope>--></dependency>
添加命名空间
在spring.xml配置文件的添加事务tx和aop的命名空间
事务
xmlns:tx="http://www.springframework.org/schema/tx"

http://www.springframework.org/schema/tx
http://www.springframework.org/schema/tx/spring-tx.xsd
AOP
xmlns:aop="http://www.springframework.org/schema/aop"

http://www.springframework.org/schema/aop
http://www.springframework.org/schema/aop/spring-aop.xsd
配置如下
<?xml version="1.0" encoding="UTF-8"?><beansxmlns="http://www.springframework.org/schema/beans"xmlns:xsi="http://www.w3.org/2001/XMLSchema-instance"xmlns:context="http://www.springframework.org/schema/context"xmlns:aop="http://www.springframework.org/schema/aop"xmlns:tx="http://www.springframework.org/schema/tx"xsi:schemaLocation="http://www.springframework.org/schema/beans
        https://www.springframework.org/schema/beans/spring-beans.xsd
        http://www.springframework.org/schema/context
        https://www.springframework.org/schema/context/spring-context.xsd
        http://www.springframework.org/schema/aop
        https://www.springframework.org/schema/aop/spring-aop.xsd
        http://www.springframework.org/schema/tx
        https://www.springframework.org/schema/tx/spring-tx.xsd"><context:property-placeholderlocation="db.properties"></context:property-placeholder><beanid="dataSource"class="com.mchange.v2.c3p0.ComboPooledDataSource"><propertyname="driverClass"value="${jdbc.driver}"></property><propertyname="jdbcUrl"value="${jdbc.url}"></property><propertyname="user"value="${jdbc.user}"></property><propertyname="password"value="${jdbc.password}"></property></bean><beanid="jdbcTemplate"class="org.springframework.jdbc.core.JdbcTemplate"><propertyname="dataSource"ref="dataSource"></property></bean><context:component-scanbase-package="com.msb.dao,com.msb.service"></context:component-scan><!--配置声明式事务--><!--配置事务管理器:封装事务固定套路代码的类--><beanid="transactionManager"class="org.springframework.jdbc.datasource.DataSourceTransactionManager"><!--注入数据源:原因:因为调用封装的方法,需要用Connection,需要靠数据源获取--><propertyname="dataSource"ref="dataSource"></property></bean><!--配置事务通知  transaction-manager属性表示这个事务通知是哪个事务管理器管理的--><tx:adviceid="t"transaction-manager="transactionManager"><!--具体给哪个方法加入通知呢?把方法写在这
            updateAccount是一个事务单元
            注意:该方法出现异常就会触发异常通知实现事务回滚,所以在该方法内部决不能加入try-catch对异常处理
        --><tx:attributes><tx:methodname="updateAccount"/></tx:attributes></tx:advice><!--配置事务切面--><aop:config><!--设置哪个方法需要被声明式事务管理,通过切点定义需要声明式事务管理的方法,但是这里表达式的范围写大一些,不能定位到具体方法,需要配合上面事务通知一起才会生效--><aop:pointcutid="pt"expression="execution(* com.msb.service.*.*(..))"/><!--advice-ref指向上面的通知id--><aop:advisoradvice-ref="t"pointcut-ref="pt"></aop:advisor></aop:config></beans>
备注:默认 spring 事务只在发生未被捕获的 runtimeexcetpion 时才回滚。
spring aop 异常捕获原理:
被拦截的方法需显式抛出异常,并不能经任何处理,这样aop 代理才能捕获到方法的异常,才能进行回滚,默认情况下 aop 只捕获 runtimeexception 的异常,但可以通过配置来捕获特定的异常并回滚换句话说在 service 的方法中不使用 try catch 或者在 catch 中最后加上 throw new RunTimeexcetpion(),这样程序异常时才能被 aop 捕获进而回滚.
声明式事务属性介绍
<tx:method>
标签有下面属性的配置
name属性
配置哪些方法需要有事务控制,支持*通配符
<tx:adviceid="t"transaction-manager="transactionManager"><tx:attributes><!-- 表示所有以update开头的方法需要进行事务管理 --><tx:methodname="update*"/><!-- 表示所有方法需要进行事务管理--><!-- <tx:method name="*"/>--></tx:attributes></tx:advice>
readonly属性(true|false)
是否是只读事务.如果为true,告诉数据库此事务为只读事务.底层支持查询的代码逻辑,不走提交事务和回滚事务的代码,会对性能有一定提升,所以只要是查询的方法,建议设置readonly=“true”.如果为false(默认值),事务需要提交的事务.建议新增,删除,修改不设置readonly属性或设置readonly=“false”.
<tx:adviceid="t"transaction-manager="transactionManager"><tx:attributes><!-- 所有select开头的方法执行查询逻辑 --><tx:methodname="select*"read-only="true"></tx:method></tx:attributes></tx:advice>
timeout
超过时间事务提交失败
<tx:adviceid="t"transaction-manager="transactionManager"><tx:attributes><tx:methodname="select*"timeout="5"></tx:method></tx:attributes></tx:advice>
rollback-for属性
异常类型全限定路径,表示出现什么类型的异常进行数据回滚。
<tx:adviceid="t"transaction-manager="transactionManager"><tx:attributes><!-- 定义只要方法出现了ArithmeticException类型异常及子类型异常都需要进行回滚 --><tx:methodname="select*"rollback-for="java.lang.ArithmeticException"></tx:method></tx:attributes></tx:advice>
与之对应的属性:no-rollback-for 出现什么类型的异常不回滚,与rollback-for属性配置一个即可
propagation属性
事务传播行为, 包括:
REQUIRED,SUPPORTS,MANDATORY,NEVER
REQUIRES_NEW,NOT_SUPPORTED,NESTED
我们一般使用: **REQUIRED:**默认值。如果有事务就用,如果没有事务则新增事务。
<tx:adviceid="t"transaction-manager="transactionManager"><tx:attributes><tx:methodname="select*"propagation="REQUIRED"></tx:method></tx:attributes></tx:advice>
isolation属性
该属性控制事务的隔离级别,默认值DEFAULT,表示用数据库的隔离级别(MySQL8默认的事务隔离级别REPEATABLE_READ)
注解配置
之前在利用xml配置声明式事务的时候,其实就是完成了一件事:给方法加入事务,那么这么简单的操作用了那么复杂的xml没必要,所以可以通过注解来简化配置。
配置事务管理器
在applicationContext.xml中注释掉配置事务通知、配置事务切面的配置
<?xml version="1.0" encoding="UTF-8"?><beansxmlns="http://www.springframework.org/schema/beans"xmlns:xsi="http://www.w3.org/2001/XMLSchema-instance"xmlns:context="http://www.springframework.org/schema/context"xmlns:aop="http://www.springframework.org/schema/aop"xmlns:tx="http://www.springframework.org/schema/tx"xsi:schemaLocation="http://www.springframework.org/schema/beans
        https://www.springframework.org/schema/beans/spring-beans.xsd
        http://www.springframework.org/schema/context
        https://www.springframework.org/schema/context/spring-context.xsd
        http://www.springframework.org/schema/aop
        https://www.springframework.org/schema/aop/spring-aop.xsd
        http://www.springframework.org/schema/tx
        https://www.springframework.org/schema/tx/spring-tx.xsd"><context:property-placeholderlocation="db.properties"></context:property-placeholder><beanid="dataSource"class="com.mchange.v2.c3p0.ComboPooledDataSource"><propertyname="driverClass"value="${jdbc.driver}"></property><propertyname="jdbcUrl"value="${jdbc.url}"></property><propertyname="user"value="${jdbc.user}"></property><propertyname="password"value="${jdbc.password}"></property></bean><beanid="jdbcTemplate"class="org.springframework.jdbc.core.JdbcTemplate"><propertyname="dataSource"ref="dataSource"></property></bean><context:component-scanbase-package="com.msb.dao,com.msb.service"></context:component-scan><!--配置声明式事务--><!--配置事务管理器--><beanid="transactionManager"class="org.springframework.jdbc.datasource.DataSourceTransactionManager"><propertyname="dataSource"ref="dataSource"></property></bean><!--配置事务通知--><!--<tx:advice id="t" transaction-manager="transactionManager">
        <tx:attributes>
            <tx:method name="update*" timeout="5" no-rollback-for="java.lang.ArithmeticException" propagation="REQUIRED" isolation="DEFAULT"/>
        </tx:attributes>
    </tx:advice>--><!--配置事务切面--><!--<aop:config>
        <aop:pointcut id="pt" expression="execution(* com.msb.service.*.*(..))"/>
        <aop:advisor advice-ref="t" pointcut-ref="pt"></aop:advisor>
    </aop:config>--></beans>
加入配置注解扫描
<?xml version="1.0" encoding="UTF-8"?><beansxmlns="http://www.springframework.org/schema/beans"xmlns:xsi="http://www.w3.org/2001/XMLSchema-instance"xmlns:context="http://www.springframework.org/schema/context"xmlns:aop="http://www.springframework.org/schema/aop"xmlns:tx="http://www.springframework.org/schema/tx"xsi:schemaLocation="http://www.springframework.org/schema/beans
        https://www.springframework.org/schema/beans/spring-beans.xsd
        http://www.springframework.org/schema/context
        https://www.springframework.org/schema/context/spring-context.xsd
        http://www.springframework.org/schema/aop
        https://www.springframework.org/schema/aop/spring-aop.xsd
        http://www.springframework.org/schema/tx
        https://www.springframework.org/schema/tx/spring-tx.xsd"><context:property-placeholderlocation="db.properties"></context:property-placeholder><beanid="dataSource"class="com.mchange.v2.c3p0.ComboPooledDataSource"><propertyname="driverClass"value="${jdbc.driver}"></property><propertyname="jdbcUrl"value="${jdbc.url}"></property><propertyname="user"value="${jdbc.user}"></property><propertyname="password"value="${jdbc.password}"></property></bean><beanid="jdbcTemplate"class="org.springframework.jdbc.core.JdbcTemplate"><propertyname="dataSource"ref="dataSource"></property></bean><context:component-scanbase-package="com.msb.dao,com.msb.service"></context:component-scan><!--配置声明式事务--><!--配置事务管理器--><beanid="transactionManager"class="org.springframework.jdbc.datasource.DataSourceTransactionManager"><propertyname="dataSource"ref="dataSource"></property></bean><!--配置事务通知--><!--<tx:advice id="t" transaction-manager="transactionManager">
        <tx:attributes>
            <tx:method name="update*" timeout="5" no-rollback-for="java.lang.ArithmeticException" propagation="REQUIRED" isolation="DEFAULT"/>
        </tx:attributes>
    </tx:advice>--><!--配置事务切面--><!--<aop:config>
        <aop:pointcut id="pt" expression="execution(* com.msb.service.*.*(..))"/>
        <aop:advisor advice-ref="t" pointcut-ref="pt"></aop:advisor>
    </aop:config>--><!--加入配置注解扫描--><tx:annotation-driven/></beans>
方法上加入事务注解
Service 方法上在需要添加事务的方法上加入事务注解,如需配置属性在参数位置设置即可
@Transactional(propagation=Propagation.REQUIRED)publicintupdateAccount(Integer outid,Integer inid,Double money){// 定义状态码:成功1,失败0,初始化状态下 code是0int code =0;// 账户A(id为6)给账户B(id为10)转100 :// 账户A支出100:int outRow = ad.outAccount(outid, money);// 制造异常://int a = 1 / 0;// 账户B收入100:int inRow = ad.inAccount(inid, money);// 如果收入和支出两个操作都执行成功的话,表示转账成功:if(outRow ==1&& inRow ==1){
            code =1;// 转账成功}// 状态码作为方法的返回值:return code;}
PS:如果很多方法都需要事务处理,那么可以直接将这个注解放在类上,代表这个类的所有方法都被事务管控。
y>
<bean id="jdbcTemplate" class="org.springframework.jdbc.core.JdbcTemplate">
    <property name="dataSource" ref="dataSource"></property>
</bean>

<context:component-scan base-package="com.msb.dao,com.msb.service"></context:component-scan>

<!--配置声明式事务-->
<!--配置事务管理器-->
<bean id="transactionManager" class="org.springframework.jdbc.datasource.DataSourceTransactionManager">
    <property name="dataSource" ref="dataSource"></property>
</bean>
<!--配置事务通知-->
<!--<tx:advice id="t" transaction-manager="transactionManager">
    <tx:attributes>
        <tx:method name="update*" timeout="5" no-rollback-for="java.lang.ArithmeticException" propagation="REQUIRED" isolation="DEFAULT"/>
    </tx:attributes>
</tx:advice>-->

<!--配置事务切面-->
<!--<aop:config>
    <aop:pointcut id="pt" expression="execution(* com.msb.service.*.*(..))"/>
    <aop:advisor advice-ref="t" pointcut-ref="pt"></aop:advisor>
</aop:config>-->

<!--加入配置注解扫描-->
<tx:annotation-driven />
##### 方法上加入事务注解

Service 方法上在需要添加事务的方法上加入事务注解,如需配置属性在参数位置设置即可

```java
    @Transactional(propagation=Propagation.REQUIRED)
    public int updateAccount(Integer outid,Integer inid,Double money){
        // 定义状态码:成功1,失败0,初始化状态下 code是0
        int code = 0;
        // 账户A(id为6)给账户B(id为10)转100 :
        // 账户A支出100:
        int outRow = ad.outAccount(outid, money);
        // 制造异常:
        //int a = 1 / 0;
        // 账户B收入100:
        int inRow = ad.inAccount(inid, money);
        // 如果收入和支出两个操作都执行成功的话,表示转账成功:
        if (outRow == 1 && inRow == 1){
            code = 1;// 转账成功
        }

        // 状态码作为方法的返回值:
        return code;
    }
PS:如果很多方法都需要事务处理,那么可以直接将这个注解放在类上,代表这个类的所有方法都被事务管控。
版权归原作者 无奈的码农 所有, 如有侵权,请联系我们删除。