学习内容
一、flume拓扑结构
1.简单串联
这种模式是将多个 flume 顺序连接起来了,从最初的 source 开始到最终 sink 传送的目的存储系统。此模式不建议桥接过多的 flume 数量, flume 数量过多不仅会影响传输速率,而且一旦传输过程中某个节点 flume 宕机,会影响整个传输系统
2.复制和多路复用
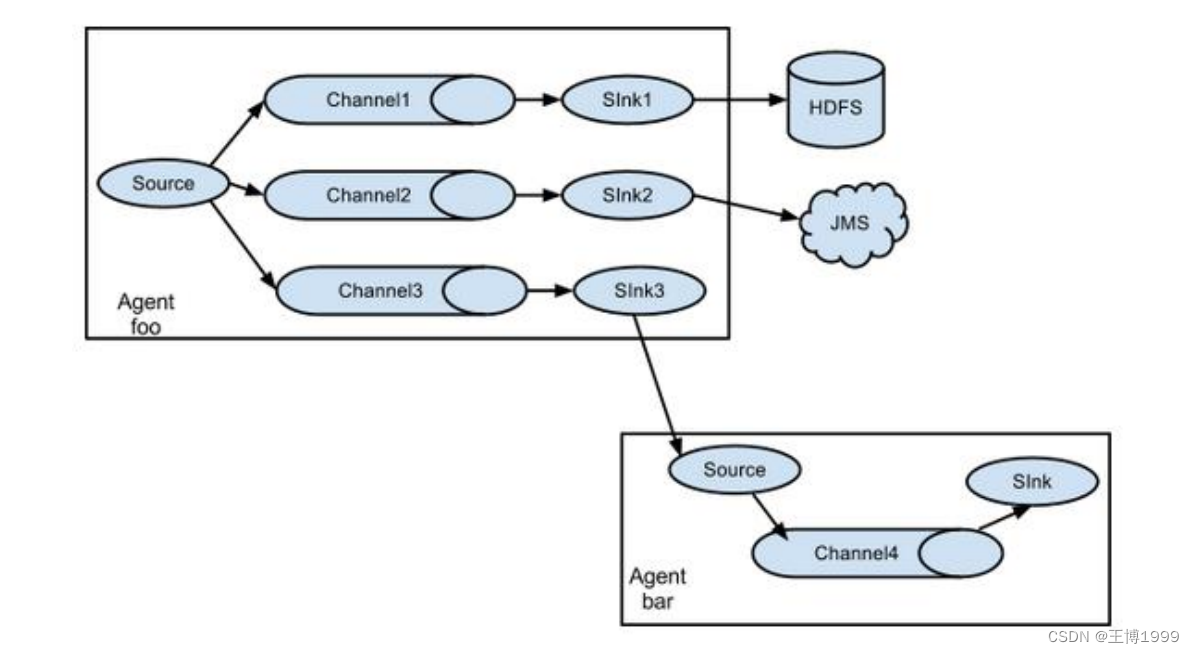
Flume 支持将事件流向一个或者多个目的地。这种模式可以将相同数据复制到多个channel 中,或者将不同数据分发到不同的 channel 中,sink 可以选择传送到不同的目的地
3.负载均衡和故障转移
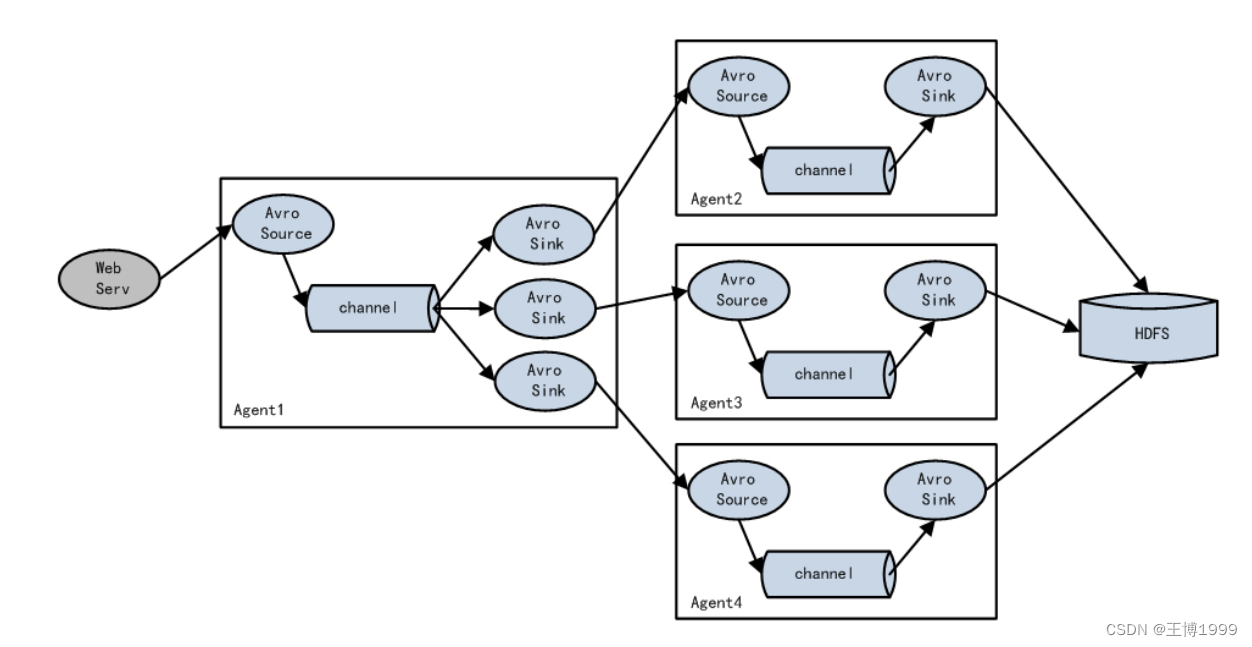
Flume支持使用将多个sink逻辑上分到一个sink组,sink组配合不同的SinkProcessor可以实现负载均衡和错误恢复的功能
4.聚合
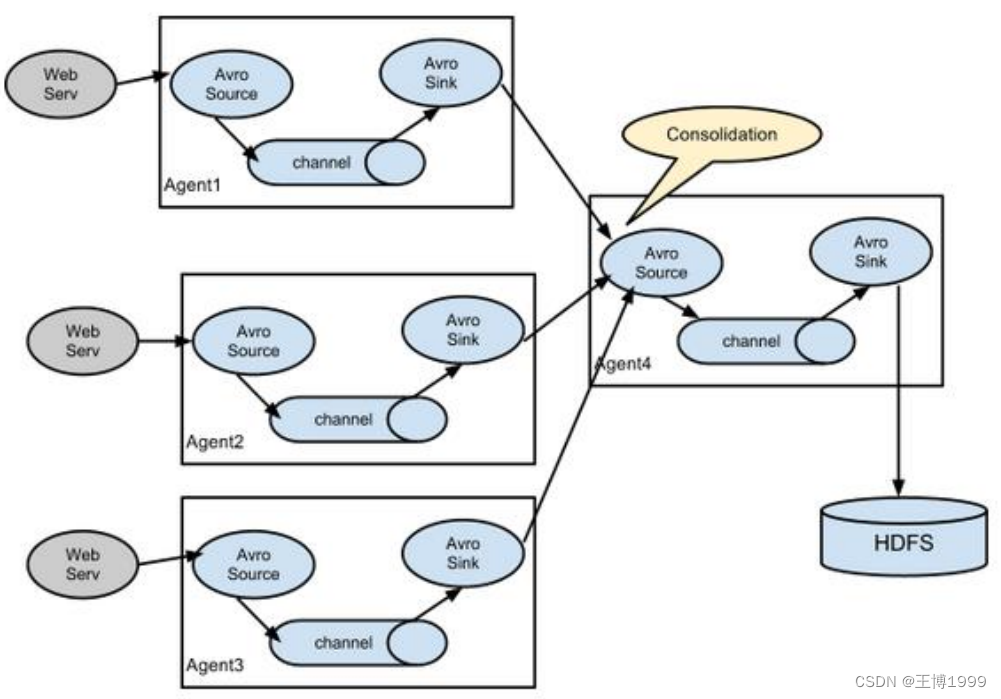
这种模式是我们最常见的,也非常实用,日常 web 应用通常分布在上百个服务器,大者甚至上千个、上万个服务器。产生的日志,处理起来也非常麻烦。用 flume 的这种组合方式能很好的解决这一问题,每台服务器部署一个 flume 采集日志,传送到一个集中收集日志的flume,再由此 flume 上传到 hdfs、hive、hbase 等,进行日志分析
二、复制案例
案例需求:
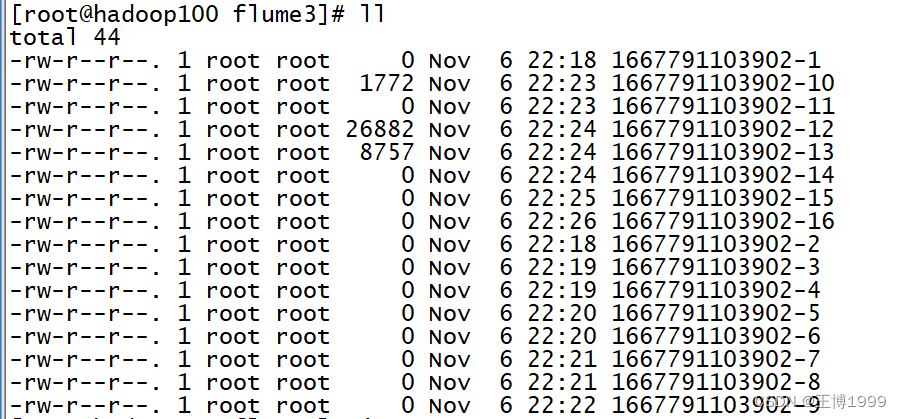
使用 Flume-1 监控hive日志文件的变动,Flume-1 将变动内容传递给 Flume-2,Flume-2 负责存储到 HDFS。同时 Flume-1 将变动内容传递给 Flume-3,Flume-3 负责存储到/opt/module/datas/flume3文件夹下(提前创建好)
在flume文件夹下创建job/group1目录,创建flume-file-flume.conf,flume-flume-dir.conf,flume-flume-hdfs.conf三个文件
flume-file-flume.conf
# Name the components on this agent
a1.sources = r1
a1.sinks = k1 k2
a1.channels = c1 c2

# 将数据流复制给所有 channel,不配默认就是
a1.sources.r1.selector.type = replicating

# Describe/configure the source
a1.sources.r1.type = exec
a1.sources.r1.command = tail -F /tmp/root/hive.log
a1.sources.r1.shell = /bin/bash -c

# Describe the sink# sink 端的 avro 是一个数据发送者
a1.sinks.k1.type = avro
a1.sinks.k1.hostname = hadoop100
a1.sinks.k1.port = 4141
a1.sinks.k2.type = avro
a1.sinks.k2.hostname = hadoop100
a1.sinks.k2.port = 4142

# Describe the channel
a1.channels.c1.type = memory
a1.channels.c1.capacity = 1000
a1.channels.c1.transactionCapacity = 100
a1.channels.c2.type = memory
a1.channels.c2.capacity = 1000
a1.channels.c2.transactionCapacity = 100

# Bind the source and sink to the channel
a1.sources.r1.channels = c1 c2
a1.sinks.k1.channel = c1
a1.sinks.k2.channel = c2
flume-flume-hdfs.conf
# Name the components on this agent
a2.sources = r1
a2.sinks = k1
a2.channels = c1

# Describe/configure the source# source 端的 avro 是一个数据接收服务
a2.sources.r1.type = avro
a2.sources.r1.bind = hadoop100
a2.sources.r1.port = 4141

# Describe the sink
a2.sinks.k1.type = hdfs
a2.sinks.k1.hdfs.path = hdfs://hadoop100:8020/flume2/%Y%m%d/%#上传文件的前缀
a2.sinks.k1.hdfs.filePrefix = flume2-
#是否按照时间滚动文件夹
a2.sinks.k1.hdfs.round = true
#多少时间单位创建一个新的文件夹
a2.sinks.k1.hdfs.roundValue = 1
#重新定义时间单位
a2.sinks.k1.hdfs.roundUnit = hour
#是否使用本地时间戳
a2.sinks.k1.hdfs.useLocalTimeStamp = true
#积攒多少个 Event 才 flush 到 HDFS 一次
a2.sinks.k1.hdfs.batchSize = 100
#设置文件类型,可支持压缩
a2.sinks.k1.hdfs.fileType = DataStream
#多久生成一个新的文件
a2.sinks.k1.hdfs.rollInterval = 60
#设置每个文件的滚动大小大概是 128M
a2.sinks.k1.hdfs.rollSize = 134217700
#文件的滚动与 Event 数量无关
a2.sinks.k1.hdfs.rollCount = 0

# Describe the channel
a2.channels.c1.type = memory
a2.channels.c1.capacity = 1000
a2.channels.c1.transactionCapacity = 100

# Bind the source and sink to the channel
a2.sources.r1.channels = c1
a2.sinks.k1.channel = c1
flume-flume-dir.conf
# Name the components on this agent
a3.sources = r1
a3.sinks = k1
a3.channels = c2

# Describe/configure the source
a3.sources.r1.type = avro
a3.sources.r1.bind = hadoop100
a3.sources.r1.port = 4142

# Describe the sink
a3.sinks.k1.type = file_roll
a3.sinks.k1.sink.directory = /opt/module/datas/flume3

# Describe the channel
a3.channels.c2.type = memory
a3.channels.c2.capacity = 1000
a3.channels.c2.transactionCapacity = 100

# Bind the source and sink to the channel
a3.sources.r1.channels = c2
a3.sinks.k1.channel = c2
启动注意事项
- 启动前需要启动hadoop集群和hive
- 先启动服务端flume-flume-dir.conf和flume-flume-hdfs.conf,再启动flume-file-flume.conf端,否则会报错,连接不上端口4141和4142
- 本案例三个文件都要同时启动,所以agent的名字需要不一样,如a1、a2、a3
hdfs结果文件: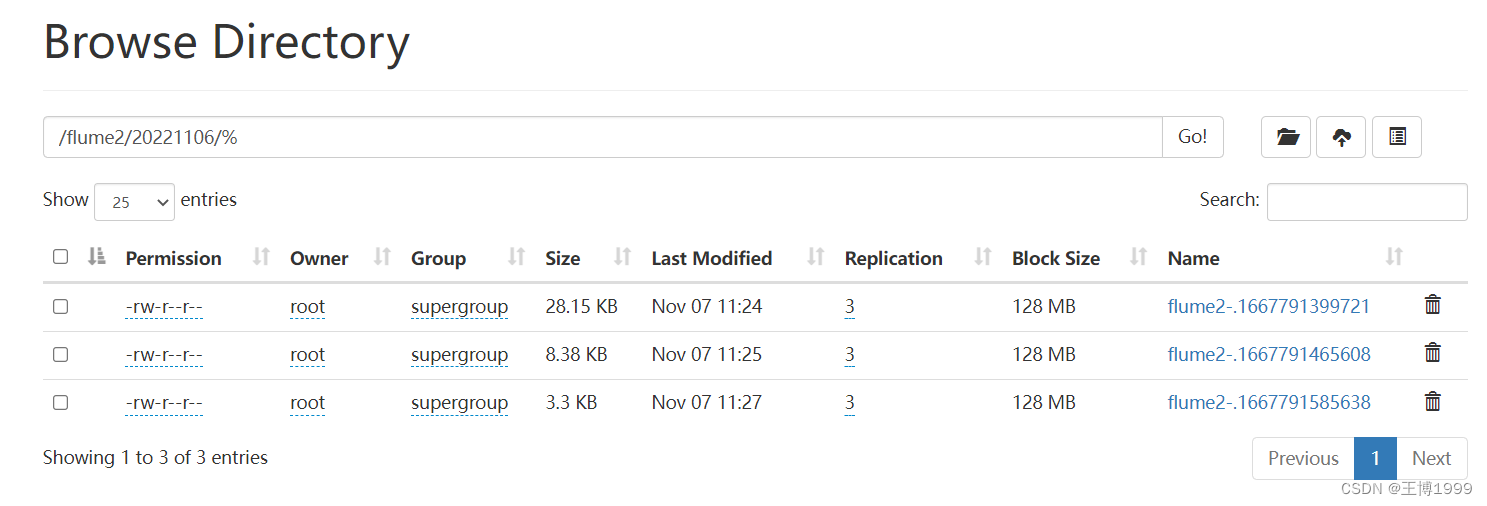
本地结果文件:
三、故障转移案例
使用 Flume1 监控一个端口,其 sink 组中的 sink 分别对接 Flume2 和 Flume3将数据打印在控制台上,采用FailoverSinkProcessor,实现故障转移的功能
说明:
其中涉及到sinkgroups优先级问题,sink优先级高去拉去数据,如果该sink挂掉了那么优先级排第二的去拉去数据,故实现了故障转移功能,如果挂掉的sink恢复了,那么将继续上位
在flume文件夹下创建job/group2目录,进入文件夹 创建flume-netcat-flume.conf,flume-flume-console1.conf,flume-flume-console2.conf三个文件
flume-netcat-flume.conf
启动命令:[root@hadoop100 flume-1.9.0]# bin/flume-ng agent -n a1 -c conf/ -f job/group2/flume-netcat-flume.conf
# Name the components on this agent
a1.sources = r1
a1.channels = c1
a1.sinkgroups = g1
a1.sinks = k1 k2

# Describe/configure the source
a1.sources.r1.type = netcat
a1.sources.r1.bind = localhost
a1.sources.r1.port = 44444
a1.sinkgroups.g1.processor.type = failover
# k1优先级为5,k2优先级为10
a1.sinkgroups.g1.processor.priority.k1 = 5
a1.sinkgroups.g1.processor.priority.k2 = 10
a1.sinkgroups.g1.processor.maxpenalty = 10000

# Describe the sink
a1.sinks.k1.type = avro
a1.sinks.k1.hostname = hadoop100
a1.sinks.k1.port = 4141

a1.sinks.k2.type = avro
a1.sinks.k2.hostname = hadoop100
a1.sinks.k2.port = 4142

# Describe the channel
a1.channels.c1.type = memory
a1.channels.c1.capacity = 1000
a1.channels.c1.transactionCapacity = 100

# Bind the source and sink to the channel
a1.sources.r1.channels = c1
a1.sinkgroups.g1.sinks = k1 k2
a1.sinks.k1.channel = c1
a1.sinks.k2.channel = c1
flume-flume-console1.conf
启动命令:[root@hadoop100 flume-1.9.0]# bin/flume-ng agent -n a2 -c conf/ -f job/group2/flume-flume-console1.conf -Dflume.root.logger=INFO,console
-Dflume.root.logger=INFO,console表示将数据打印在控制台
# Name the components on this agent
a2.sources = r1
a2.sinks = k1
a2.channels = c1

# Describe/configure the source
a2.sources.r1.type = avro
a2.sources.r1.bind = hadoop100
a2.sources.r1.port = 4141

# Describe the sink
a2.sinks.k1.type = logger

# Describe the channel
a2.channels.c1.type = memory
a2.channels.c1.capacity = 1000
a2.channels.c1.transactionCapacity = 100

# Bind the source and sink to the channel
a2.sources.r1.channels = c1
a2.sinks.k1.channel = c1
flume-flume-console2.conf
启动命令:[root@hadoop100 flume-1.9.0]# bin/flume-ng agent -n a3 -c conf/ -f job/group2/flume-flume-console2.conf -Dflume.root.logger=INFO,console
# Name the components on this agent
a3.sources = r1
a3.sinks = k1
a3.channels = c2

# Describe/configure the source
a3.sources.r1.type = avro
a3.sources.r1.bind = hadoop100
a3.sources.r1.port = 4142

# Describe the sink
a3.sinks.k1.type = logger

# Describe the channel
a3.channels.c2.type = memory
a3.channels.c2.capacity = 1000
a3.channels.c2.transactionCapacity = 100

# Bind the source and sink to the channel
a3.sources.r1.channels = c2
a3.sinks.k1.channel = c2
启动注意事项
- 先启动服务端flume-flume-console1.conf和flume-flume-console2.conf,再启动客户端flume-netcat-flume.conf
- 该案例使用的是nc中的44444端口,所以开启该端口输入数据
四、负载均衡案例
只需要将flume-netcat-flume.conf内容该成如下即可
# Name the components on this agent
a1.sources = r1
a1.channels = c1
a1.sinkgroups = g1
a1.sinks = k1 k2

# Describe/configure the source
a1.sources.r1.type = netcat
a1.sources.r1.bind = localhost
a1.sources.r1.port = 44444
a1.sinkgroups.g1.processor.type = load_balance
a1.sinkgroups.g1.processor.backoff = true

# Describe the sink
a1.sinks.k1.type = avro
a1.sinks.k1.hostname = hadoop100
a1.sinks.k1.port = 4141

a1.sinks.k2.type = avro
a1.sinks.k2.hostname = hadoop100
a1.sinks.k2.port = 4142

# Describe the channel
a1.channels.c1.type = memory
a1.channels.c1.capacity = 1000
a1.channels.c1.transactionCapacity = 100

# Bind the source and sink to the channel
a1.sources.r1.channels = c1
a1.sinkgroups.g1.sinks = k1 k2
a1.sinks.k1.channel = c1
a1.sinks.k2.channel = c1
五、聚合案例
案例要求:
首先准备集群:hadoop100、hadoop102、hadoop103,都要装上flume,在对/opt/module/flume-1.9.0/job/group3文件夹下创建对应的文件。
在hadoop100创建Flume-1文件:flume1-netcat-flume.conf
在hadoop102创建Flume-2文件:flume2-logger-flume.conf
在hadoop102创建Flume-3文件:flume3-flume-logger.conf
- hadoop100 上的 Flume-1 监控某一个端口的数据流 如:netcat 44444端口
- hadoop102 上的 Flume-2 监控文件/opt/module/group.log
- Flume-1 与 Flume-2 将数据发送给 hadoop103 上的 Flume-3,Flume-3 将最终数据打印到控制台
flume1-netcat-flume.conf
启动命令:[root@hadoop100 flume-1.9.0]# bin/flume-ng agent -n a2 -c conf/ -f job/group3/flume1-netcat-flume.conf
# Name the components on this agent
a2.sources = r1
a2.sinks = k1
a2.channels = c1

# Describe/configure the source
a2.sources.r1.type = netcat
a2.sources.r1.bind = hadoop100
a2.sources.r1.port = 44444

# Describe the sink
a2.sinks.k1.type = avro
a2.sinks.k1.hostname = hadoop103
a2.sinks.k1.port = 4141

# Use a channel which buffers events in memory
a2.channels.c1.type = memory
a2.channels.c1.capacity = 1000
a2.channels.c1.transactionCapacity = 100

# Bind the source and sink to the channel
a2.sources.r1.channels = c1
a2.sinks.k1.channel = c1
flume2-logger-flume.conf
启动命令:[root@hadoop102 flume-1.9.0]# bin/flume-ng agent -n a1 -c conf/ job/group3/flume2-logger-flume.conf
me the components on this agent
a1.sources = r1
a1.sinks = k1
a1.channels = c1

# Describe/configure the source
a1.sources.r1.type = exec
a1.sources.r1.command = tail -F /opt/module/group.log
a1.sources.r1.shell = /bin/bash -c

# Describe the sink
a1.sinks.k1.type = avro
a1.sinks.k1.hostname = hadoop103
a1.sinks.k1.port = 4141

# Describe the channel
a1.channels.c1.type = memory
a1.channels.c1.capacity = 1000
a1.channels.c1.transactionCapacity = 100

# Bind the source and sink to the channel
a1.sources.r1.channels = c1
a1.sinks.k1.channel = c1
flume3-flume-logger.conf
启动命令:[root@hadoop103 flume-1.9.0]# bin/flume-ng agent -n a3 -c conf/ -f job/group3/flume3-flume-logger.conf -Dflume.root.logger=INFO,console
# Name the components on this agent
a3.sources = r1
a3.sinks = k1
a3.channels = c1

# Describe/configure the source
a3.sources.r1.type = avro
a3.sources.r1.bind = hadoop103
a3.sources.r1.port = 4141

# Describe the sink
a3.sinks.k1.type = logger

# Describe the channel
a3.channels.c1.type = memory
a3.channels.c1.capacity = 1000
a3.channels.c1.transactionCapacity = 100

# Bind the source and sink to the channel
a3.sources.r1.channels = c1
a3.sinks.k1.channel = c1
启动说明:
- 首先先启动hadoop103服务端flume3-flume-logger.conf文件,其次在hadoop100启动客户端flume1-netcat-flume.conf,在hadoop102启动客户端flume2-logger-flume.conf,观察客户端是否连接上服务端
- 另起窗口在hadoop100上启动netcat 44444 端口 发送数据
- 另起窗口在hadoop102上对/opt/module/group.log文件追加数据 echo ‘hello’ > group.log
- 观察hadoop103是否接收到数据
版权归原作者 王博1999 所有, 如有侵权,请联系我们删除。