
在本文中,您将学习如何实现通过 gRPC 通信的 Spring Boot 应用程序。gRPC 是一个现代开源远程过程调用 (RPC) 框架,可以在任何环境中运行。默认情况下,它使用 Google 的 Protocol Buffer 来序列化和反序列化结构化数据。当然,我们也可以切换为其他数据格式,例如JSON。为了简化我们对 gRPC 和 Spring Boot 的探索,我们将为此使用专用的启动器gRPC Spring Boot starter。
由于 gRPC 和 Spring Boot 之间的集成没有官方支持的启动器,因此我们将选择最流行的第三方项目。它在GitHub上有大约 3100 颗星。您可以在此处找到有关其功能的详细文档。
源代码
如果您想自己尝试一下,可以随时查看我的源代码。为此,您需要克隆我的 GitHub 存储库。它包含四个应用程序。其中两个
account-service
与
customer-service
我之前的文章相关,该文章介绍了 Java 中的 Protocol Buffers。当前文章请参考另外两个app
account-service-grpc
和
customer-service-grpc
。它们与相应的应用程序非常相似,但使用我们的第三方 Spring Boot 和 gRPC 通信而不是 REST。另外,他们需要使用 Spring Boot 2,因为我们的第三方启动器仍然不支持 Spring Boot 3。无论如何,一旦您克隆了存储库,只需按照我的说明操作即可!
为 gRPC 生成模型类和服务
第一步,我们将使用
.proto
清单生成模型类和 gRPC 服务。我们需要包含一些额外的 Protobuf 模式才能使用
google.protobuf.*
包**(1)。我们的 gRPC 服务将提供使用各种条件搜索帐户的方法以及添加新帐户的单一方法(2)**。这些方法将使用文件
google.protobuf.*
中定义的包和模型类中的原
.proto
语作为消息。定义了两条消息。该
Account
消息代表单个模型类。它包含三个字段:
id
、
number
和
customer_id
**(3)**。该消息包含对象
Accounts
列表**(4)**。
Account
syntax = "proto3";
package model;
option java_package = "pl.piomin.services.grpc.account.model";
option java_outer_classname = "AccountProto";
// (1)
import "empty.proto";
import "wrappers.proto";
// (2)
service AccountsService {
  rpc FindByNumber(google.protobuf.StringValue) returns (Account) {}
  rpc FindByCustomer(google.protobuf.Int32Value) returns (Accounts) {}
  rpc FindAll(google.protobuf.Empty) returns (Accounts) {}
  rpc AddAccount(Account) returns (Account) {}
}
// (3)
message Account {
  int32 id = 1;
  string number = 2;
  int32 customer_id = 3;
}
// (4)
message Accounts {
  repeated Account account = 1;
}
您可能还记得,有两个示例 Spring Boot 应用程序。让我们看一下
.proto
第二个应用程序的架构
customer-service-grpc
。它比之前的定义稍微复杂一些。我们的 gRPC 服务还将提供多种用于搜索对象的方法和一种用于添加新客户的方法**(1)**。正在
customer-service-grpc
与应用程序通信
account-service-grpc
,因此我们需要生成
Account
消息
Accounts
( **2)**。当然,您可以使用生成的 Protobuf 类创建一个额外的接口模块,并在我们的两个示例应用程序之间共享它。最后,我们必须定义我们的模型类。该类
Customer
包含三个原始字段
id
,
pesel
,
name
, 枚举
type
,以及分配给特定客户的帐户列表**(3)**。还有
Customers
包含对象列表
Customer
(4) 的消息。
syntax = "proto3";
package model;
option java_package = "pl.piomin.services.grpc.customer.model";
option java_outer_classname = "CustomerProto";
import "empty.proto";
import "wrappers.proto";
// (1)
service CustomersService {
  rpc FindByPesel(google.protobuf.StringValue) returns (Customer) {}
  rpc FindById(google.protobuf.Int32Value) returns (Customer) {}
  rpc FindAll(google.protobuf.Empty) returns (Customers) {}
  rpc AddCustomer(Customer) returns (Customer) {}
}
// (2)
message Account {
  int32 id = 1;
  string number = 2;
  int32 customer_id = 3;
}
message Accounts {
  repeated Account account = 1;
}
// (3)
message Customer {
  int32 id = 1;
  string pesel = 2;
  string name = 3;
  CustomerType type = 4;
  repeated Account accounts = 5;
  enum CustomerType {
    INDIVIDUAL = 0;
    COMPANY = 1;
  }
}
// (4)
message Customers {
  repeated Customer customers = 1;
}
为了从
.proto
模式生成 Java 类,我们将使用 Maven 插件。您可以使用一些可用的插件来实现这一点。我的选择落在了
protoc-jar-maven-plugin
插件上。在配置中,我们需要将 .proto 架构的默认位置覆盖为
src/main/proto
. 我们还需要
.proto
使用
includeDirectories
标签包含在清单中使用的其他 Protobuf 模式。这些清单位于
src/main/proto-imports
目录内。输出目标目录为
src/main/generated
. 默认情况下,该插件不生成 gRPC 服务。为了启用它,我们需要在类型
outputTarget
中包含
grpc-java
。为了生成类,我们将使用该
protoc-gen-grpc-java
库。
<plugin>
  <groupId>com.github.os72</groupId>
  <artifactId>protoc-jar-maven-plugin</artifactId>
  <version>3.11.4</version>
  <executions>
    <execution>
      <phase>generate-sources</phase>
      <goals>
        <goal>run</goal>
      </goals>
      <configuration>
        <addProtoSources>all</addProtoSources>
        <includeMavenTypes>direct</includeMavenTypes>
        <outputDirectory>src/main/generated</outputDirectory>
        <inputDirectories>
          <include>src/main/proto</include>
        </inputDirectories>
        <includeDirectories>
          <include>src/main/proto-imports</include>
        </includeDirectories>
        <outputTargets>
           <outputTarget>
             <type>java</type>
             <outputDirectory>src/main/generated</outputDirectory>
           </outputTarget>
           <outputTarget>
             <type>grpc-java</type>
             <pluginArtifact>io.grpc:protoc-gen-grpc-java:1.57.2</pluginArtifact>
             <outputDirectory>src/main/generated</outputDirectory>
          </outputTarget>
        </outputTargets>
      </configuration>
    </execution>
  </executions>
</plugin>
我们还将
src/main/generated
使用 Maven 插件将生成的 Java 代码附加到源目录下
build-helper-maven-plugin
。
<plugin>
  <groupId>org.codehaus.mojo</groupId>
  <artifactId>build-helper-maven-plugin</artifactId>
  <executions>
    <execution>
      <id>add-source</id>
      <phase>generate-sources</phase>
      <goals>
        <goal>add-source</goal>
      </goals>
      <configuration>
        <sources>
          <source>src/main/generated</source>
        </sources>
      </configuration>
    </execution>
  </executions>
</plugin>
一旦执行
mvn clean package
命令,Maven 将生成所需的 Java 类。
account-service-grpc
这是生成 Java 类后应用程序中的最终目录结构。
$ tree
.
├── pom.xml
└── src
    ├── main
    │   ├── generated
    │   │   └── pl
    │   │       └── piomin
    │   │           └── services
    │   │               └── grpc
    │   │                   └── account
    │   │                       └── model
    │   │                           ├── AccountProto.java
    │   │                           └── AccountsServiceGrpc.java
    │   ├── java
    │   │   └── pl
    │   │       └── piomin
    │   │           └── services
    │   │               └── grpc
    │   │                   └── account
    │   │                       ├── AccountApplication.java
    │   │                       ├── repository
    │   │                       │   └── AccountRepository.java
    │   │                       └── service
    │   │                           └── AccountsService.java
    │   ├── proto
    │   │   └── account.proto
    │   ├── proto-imports
    │   │   ├── empty.proto
    │   │   └── wrappers.proto
    │   └── resources
    └── test
        └── java
            └── pl
                └── piomin
                    └── services
                        └── grpc
                            └── account
                                └── AccountServicesTests.java
使用 gRPC Spring Boot 启动器
一旦我们生成了所需的 Protobuf 模型类和 gRPC 存根,我们就可以继续实施。第一步,我们需要包含以下 Spring Boot 启动器:
<dependency>
  <groupId>net.devh</groupId>
  <artifactId>grpc-server-spring-boot-starter</artifactId>
  <version>2.14.0.RELEASE</version>
</dependency>
然后我们必须创建gRPC服务实现类。
AccountsServiceImplBase
它需要根据声明扩展生成
.proto
。
@GrpcService
**我们还需要用(1)注释整个类。之后,我们将重写通过 gRPC 公开的所有方法。我们的服务使用一个简单的内存存储库(2)**。每个方法都提供一个参数对象和
io.grpc.stub.StreamObserver
用于以反应方式返回响应的类**(3)** **(4)**。
@GrpcService // (1)
public class AccountsService extends AccountsServiceGrpc.AccountsServiceImplBase {
    @Autowired
    AccountRepository repository; // (2)
    @Override
    public void findByNumber(StringValue request, StreamObserver<AccountProto.Account> responseObserver) { // (3)
        AccountProto.Account a = repository.findByNumber(request.getValue());
        responseObserver.onNext(a); # (4)
        responseObserver.onCompleted();
    }
    @Override
    public void findByCustomer(Int32Value request, StreamObserver<AccountProto.Accounts> responseObserver) {
        List<AccountProto.Account> accounts = repository.findByCustomer(request.getValue());
        AccountProto.Accounts a = AccountProto.Accounts.newBuilder().addAllAccount(accounts).build();
        responseObserver.onNext(a);
        responseObserver.onCompleted();
    }
    @Override
    public void findAll(Empty request, StreamObserver<AccountProto.Accounts> responseObserver) {
        List<AccountProto.Account> accounts = repository.findAll();
        AccountProto.Accounts a = AccountProto.Accounts.newBuilder().addAllAccount(accounts).build();
        responseObserver.onNext(a);
        responseObserver.onCompleted();
    }
    @Override
    public void addAccount(AccountProto.Account request, StreamObserver<AccountProto.Account> responseObserver) {
        AccountProto.Account a = repository.add(request.getCustomerId(), request.getNumber());
        responseObserver.onNext(a);
        responseObserver.onCompleted();
    }
}
这是
AccountRepository
实现:
public class AccountRepository {
    List<AccountProto.Account> accounts;
    AtomicInteger id;
    public AccountRepository(List<AccountProto.Account> accounts) {
        this.accounts = accounts;
        this.id = new AtomicInteger();
        this.id.set(accounts.size());
    }
    public List<AccountProto.Account> findAll() {
        return accounts;
    }
    public List<AccountProto.Account> findByCustomer(int customerId) {
        return accounts.stream().filter(it -> it.getCustomerId() == customerId).toList();
    }
    public AccountProto.Account findByNumber(String number) {
        return accounts.stream()
                .filter(it -> it.getNumber().equals(number))
                .findFirst()
                .orElseThrow();
    }
    public AccountProto.Account add(int customerId, String number) {
        AccountProto.Account a = AccountProto.Account.newBuilder()
                .setId(id.incrementAndGet())
                .setCustomerId(customerId)
                .setNumber(number)
                .build();
        return a;
    }
}
我们在启动时添加一些测试数据。这是我们的应用程序主类:
@SpringBootApplication
public class AccountApplication {
    public static void main(String[] args) {
        SpringApplication.run(AccountApplication.class, args);
    }
    @Bean
    AccountRepository repository() {
        List<AccountProto.Account> accounts = new ArrayList<>();
        accounts.add(AccountProto.Account.newBuilder().setId(1).setCustomerId(1).setNumber("111111").build());
        accounts.add(AccountProto.Account.newBuilder().setId(2).setCustomerId(2).setNumber("222222").build());
        accounts.add(AccountProto.Account.newBuilder().setId(3).setCustomerId(3).setNumber("333333").build());
        accounts.add(AccountProto.Account.newBuilder().setId(4).setCustomerId(4).setNumber("444444").build());
        accounts.add(AccountProto.Account.newBuilder().setId(5).setCustomerId(1).setNumber("555555").build());
        accounts.add(AccountProto.Account.newBuilder().setId(6).setCustomerId(2).setNumber("666666").build());
        accounts.add(AccountProto.Account.newBuilder().setId(7).setCustomerId(2).setNumber("777777").build());
        return new AccountRepository(accounts);
    }
}
在启动应用程序之前,我们还将包含 Spring Boot Actuator 以公开一些与 gRPC 相关的指标。我们将在与 gRPC 服务不同的端口下公开,因此我们还需要包含 Spring Boot Web starter:
<dependency>
  <groupId>org.springframework.boot</groupId>
  <artifactId>spring-boot-starter-web</artifactId>
</dependency>
<dependency>
  <groupId>org.springframework.boot</groupId>
  <artifactId>spring-boot-starter-actuator</artifactId>
</dependency>
在
application.yml
文件中我们应该启用
metrics
端点:
spring.application.name: account-service-grpc
management.endpoints.web.exposure.include: metrics
management.endpoint.metrics.enabled: true
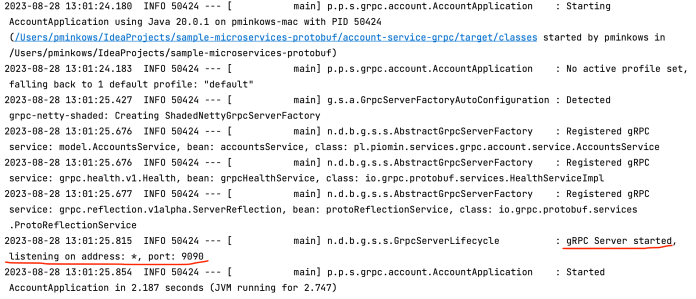
默认情况下,gRPC服务在该端口下可用
9090
。我们可以使用该
grpc.server.port
属性覆盖该数字。将端口设置为
0
使用空闲的随机端口。让我们开始我们的示例应用程序:
调用gRPC服务
我们可以使用
grpcurl
CLI 工具来调用示例应用程序公开的 gRPC 服务。
9090
默认情况下,gRPC 服务器将在端口使用 模式下启动
PLAINTEXT
。为了打印可用服务的列表,我们需要执行以下命令:
$ grpcurl --plaintext localhost:9090 list
grpc.health.v1.Health
grpc.reflection.v1alpha.ServerReflection
model.AccountsService
然后,让我们打印 所公开的方法列表
model.AccountService
:
$ grpcurl --plaintext localhost:9090 list model.AccountsService
model.AccountsService.AddAccount
model.AccountsService.FindAll
model.AccountsService.FindByCustomer
model.AccountsService.FindByNumber
我们还可以使用
describe
命令中的关键字打印有关每个方法的详细信息:
$ grpcurl --plaintext localhost:9090 describe model.AccountsService.FindByNumber
model.AccountsService.FindByNumber is a method:
rpc FindByNumber ( .google.protobuf.StringValue ) returns ( .model.Account );
现在,让我们调用上面可见的命令所描述的端点。我们的方法的名称是
model.AccountsService.FindByNumber
。我们还使用
111111
值设置输入字符串参数。
$ grpcurl --plaintext -d '"111111"' localhost:9090 model.AccountsService.FindByNumber
{
  "id": 1,
  "number": "111111",
  "customer_id": 1
}
之后我们就可以看一下
model.AccountsService.FindByNumber
gRPC方法了。它接受一个整数作为输入参数并返回一个对象列表。
$ grpcurl --plaintext -d '1' localhost:9090 model.AccountsService.FindByCustomer
{
  "account": [
    {
      "id": 1,
      "number": "111111",
      "customer_id": 1
    },
    {
      "id": 5,
      "number": "555555",
      "customer_id": 1
    }
  ]
}
最后我们就可以调用添加新账户的方法了。它以 JSON 对象作为输入参数。然后它将返回一个新创建的
Account
带有增量
id
字段的对象。
$ grpcurl --plaintext -d '{"customer_id": 6, "number": "888888"}' localhost:9090 model.AccountsService.AddAccount
{
  "id": 8,
  "number": "888888",
  "customer_id": 6
}
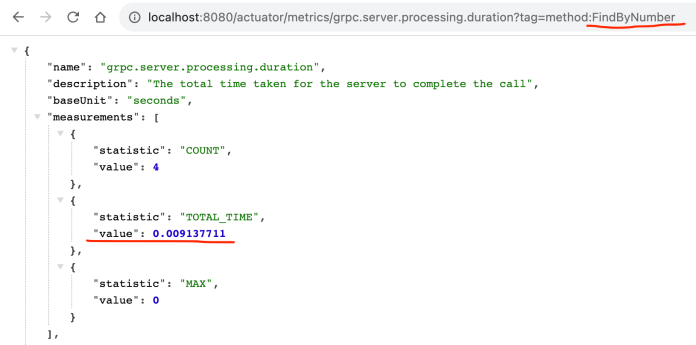
gRPC Spring Boot 启动器向执行器添加了三个附加指标。

我们可以显示每个 gRPC 方法的请求数量。这是该方法的请求和响应
FindByNumber
。

我们还可以显示每种方法的平均处理时间,如下所示。
测试 gRPC 服务
在上一节中,我们使用 CLI 工具手动运行应用程序并测试 gRPC 服务
grpcurl
。不过,我们也可以基于Spring Boot Test模块来实现单元或集成测试。我们将为我们的应用程序与 gRPC 客户端创建集成测试。为此,我们需要在 Maven 中包含以下三个依赖项
pom.xml
:
<dependency>
  <groupId>io.grpc</groupId>
  <artifactId>grpc-testing</artifactId>
  <version>1.51.0</version>
  <scope>test</scope>
</dependency>
<dependency>
  <groupId>org.springframework.boot</groupId>
  <artifactId>spring-boot-starter-test</artifactId>
  <scope>test</scope>
</dependency>
<dependency>
  <groupId>net.devh</groupId>
  <artifactId>grpc-client-spring-boot-starter</artifactId>
  <version>2.14.0.RELEASE</version>
  <scope>test</scope>
</dependency>
在下面可见的测试实现中,我们需要启用“进程内”服务器**(1)并禁用外部服务器(2)**。然后我们必须配置客户端连接到“进程内服务器” **(3)**。我们将使用 Maven 构建期间已生成的 gRPC 客户端。它可以作为
AccountsServiceBlockingStub
类使用。我们只需使用
@GrpcClient
**(4)对其进行正确注入和注释。之后,我们可以使用客户端存根来调用我们的 gRPC 服务(5)**。
@SpringBootTest(properties = {
"grpc.server.inProcessName=test", // (1)
"grpc.server.port=-1", // (2)
"grpc.client.inProcess.address=in-process:test" // (3)
})
@DirtiesContext
public class AccountServicesTests {
@GrpcClient("inProcess") // (4)
AccountsServiceGrpc.AccountsServiceBlockingStub service;
@Test
void shouldFindAll() {
AccountProto.Accounts a = service.findAll(Empty.newBuilder().build()); // (5)
assertNotNull(a);
assertFalse(a.getAccountList().isEmpty());
}
@Test
void shouldFindByCustomer() {
AccountProto.Accounts a = service.findByCustomer(Int32Value.newBuilder().setValue(1).build());
assertNotNull(a);
assertFalse(a.getAccountList().isEmpty());
}
@Test
void shouldFindByNumber() {
AccountProto.Account a = service.findByNumber(StringValue.newBuilder().setValue("111111").build());
assertNotNull(a);
assertNotEquals(0, a.getId());
}
@Test
void shouldAddAccount() {
AccountProto.Account a = AccountProto.Account.newBuilder()
.setNumber("123456")
.setCustomerId(10)
.build();
a = service.addAccount(a);
assertNotNull(a);
assertNotEquals(0, a.getId());
}
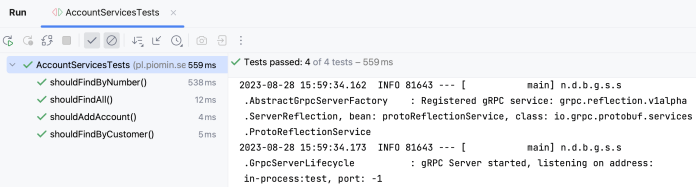
}
以下是我们的测试结果:
gRPC 微服务之间的通信
在本节中,我们将切换到
customer-service-grpc
应用程序。与之前的应用程序相同,我们需要使用 Maven 命令生成类和 gRPC 服务存根
mvn clean package
。服务实现也与
account-service-grpc
. 不过,这一次,我们使用客户端来调用外部 gRPC 方法。下面是 的实现
@GrpcService
。如您所见,我们注入
AccountClient
bean,然后使用它来调用
account-service-grpc
应用程序**(1)公开的 gRPC 方法。然后我们使用客户端 bean 查找分配给特定客户的帐户(2)**。
@GrpcService
public class CustomersService extends CustomersServiceGrpc.CustomersServiceImplBase {
    @Autowired
    CustomerRepository repository;
    @Autowired
    AccountClient accountClient; // (1)
    @Override
    public void findById(Int32Value request, StreamObserver<CustomerProto.Customer> responseObserver) {
        CustomerProto.Customer c = repository.findById(request.getValue());
        CustomerProto.Accounts a = accountClient.getAccountsByCustomerId(c.getId()); // (2)
        List<CustomerProto.Account> l = a.getAccountList();
        c = CustomerProto.Customer.newBuilder(c).addAllAccounts(l).build();
        responseObserver.onNext(c);
        responseObserver.onCompleted();
    }
    @Override
    public void findByPesel(StringValue request, StreamObserver<CustomerProto.Customer> responseObserver) {
        CustomerProto.Customer c = repository.findByPesel(request.getValue());
        responseObserver.onNext(c);
        responseObserver.onCompleted();
    }
    @Override
    public void findAll(Empty request, StreamObserver<CustomerProto.Customers> responseObserver) {
        List<CustomerProto.Customer> customerList = repository.findAll();
        CustomerProto.Customers c = CustomerProto.Customers.newBuilder().addAllCustomers(customerList).build();
        responseObserver.onNext(c);
        responseObserver.onCompleted();
    }
    @Override
    public void addCustomer(CustomerProto.Customer request, StreamObserver<CustomerProto.Customer> responseObserver) {
        CustomerProto.Customer c = repository.add(request.getType(), request.getName(), request.getPesel());
        responseObserver.onNext(c);
        responseObserver.onCompleted();
    }
}
现在,我们来看看该类的实现
AccountClient
。我们使用生成的客户端存根来调用外部 gRPC 方法**(1)**。请注意注释内的值。这是我们客户的名字。
@Service
public class AccountClient {
    private static final Logger LOG = LoggerFactory.getLogger(AccountClient.class);
    @GrpcClient("account-service-grpc") // (1)
    AccountsServiceGrpc.AccountsServiceBlockingStub stub;
    public CustomerProto.Accounts getAccountsByCustomerId(int customerId) {
        try {
            return stub.findByCustomer(Int32Value.newBuilder().setValue(customerId).build());
        } catch (final StatusRuntimeException e) {
            LOG.error("Error in communication", e);
            return null;
        }
    }
}
我们需要做的最后一件事是提供目标服务的地址。幸运的是,gRPC Spring Boot 支持使用 Spring Cloud 进行服务发现。我们将使用 Eureka 作为发现服务器。因此,我们的两个示例应用程序都需要包含 Spring Cloud Eureka 客户端。
<dependency>
  <groupId>org.springframework.cloud</groupId>
  <artifactId>spring-cloud-starter-netflix-eureka-client</artifactId>
</dependency>
我们还需要添加包含我们使用的 Spring Cloud 版本的
dependencyManagement
部分。
pom.xml
<dependencyManagement>
  <dependencies>
    <dependency>
     <groupId>org.springframework.cloud</groupId>
       <artifactId>spring-cloud-dependencies</artifactId>
       <version>2021.0.8</version>
       <type>pom</type>
       <scope>import</scope>
    </dependency>
  </dependencies>
</dependencyManagement>
为了避免与端口冲突,
account-service-grpc
我们将覆盖默认的 gRPC 和 HTTP(执行器)端口。我们还需要为
@GrpcClient
. 首先,我们应该与类
@GrpcClient
中注释中设置的名称相同
AccountClient
。客户端通过明文协议进行通信,并根据字段中设置的名称从发现服务器读取目标服务的地址
discovery:///
。
server.port: 8081
grpc.server.port: 9091
grpc:
  client:
    account-service-grpc:
      address: 'discovery:///account-service-grpc'
      enableKeepAlive: true
      keepAliveWithoutCalls: true
      negotiationType: plaintext
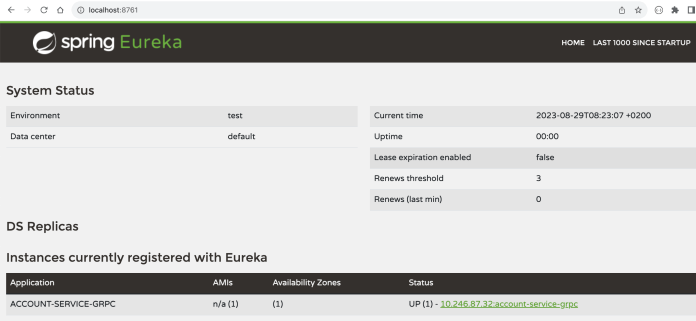
最后,我们可以运行发现服务器和两个示例微服务。Eureka 服务器可在我们的存储库中的 discovery-server 目录中找到。运行后,您可以转到http://localhost:8761地址下可用的 UI 仪表板。
然后运行我们的两个示例 Spring Boot gRPC 微服务。您可以使用以下 Maven 命令运行所有应用程序:
$ mvn spring-boot:run
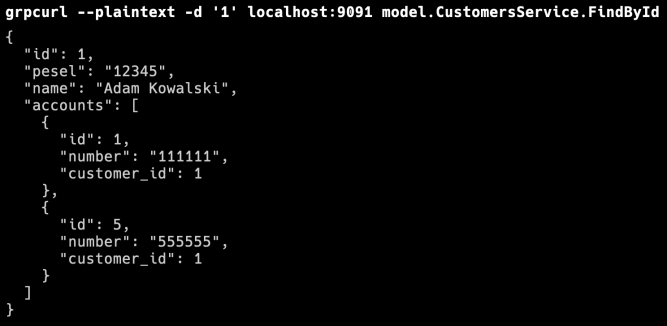
最后,我们来调用
customer-service-grpc
与 通信的方法
account-service-grpc
。
grpcurl
我们再次使用该工具。正如您所看到的,它返回对象内的帐户列表
Customer
:
最后的想法
gRPC Spring Boot Starter 提供了一些有用的功能来简化开发人员的工作。我们可以轻松地使用 来创建服务
@GrpcService
,使用 来创建客户端
@GrpcClient
,或者将 gRPC 与 Spring Boot Actuator 指标和 Spring Cloud 发现集成。然而,也存在一些缺点。该库的开发不是很积极。每年大概有2-3个版本发布,目前还没有对Spring Boot 3的支持。
更多Spring Boot 3文章:https://www.jdon.com/tag-34038/
版权归原作者 极道Jdon 所有, 如有侵权,请联系我们删除。