文章目录
一、官网下载压缩包
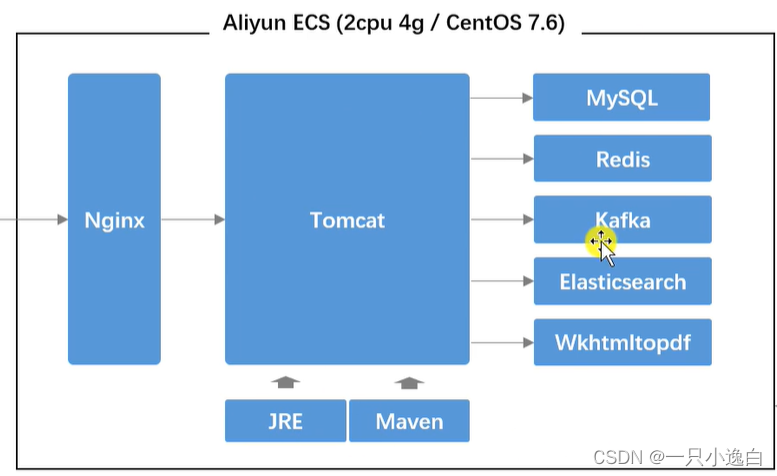
部署项目所需软件,这是按照我的项目来的,大差不差,自己项目所需要的软件再下载配置一下就行
第一种:wget 压缩包地址
第二种:本地下载压缩包,从xshell端:
rz //直接拉取压缩包

二、配置安装
JDK:
jdk 12官网没找到安装包 yum也没有
推荐安装教程:https://blog.csdn.net/tswc_byy/article/details/121193607
maven:
- 下载地址:https://maven.apache.org/download.cgi
- 解压:
tar -zxvf apache-maven-3.6.3-bin.tar.gz -C /opt - 配置环境变量:直接看这篇文章https://www.cnblogs.com/fuzongle/p/12825048.html
mysql:
yum install mysql80-release-el7-5.noarch.rpm
yum install -y mysql-server.x86_64                    //mysql服务

systemctl start mysqld                                //启动mysql
systemctl status mysqld

grep 'password'/var/log/mysqld.log                   //查看初始密码
mysql -u root -p                                    //#进入数据库,输入初始密码
alter user root@localhost identified by '密码';//不能太简单,英文_数字

unzip -d /root init-sql-1.5.zip it                     //解压数据库文件
mysql -u root -p                                    //进入数据库,输入初始密码
create database 数据库名;
user 数据库名;//创建数据库
source /root/init-sql-1.5/init_schema.sql;//导入数据
source /root/init-sql-1.5/....


redis:
yum安装redis时,建议使用Remi repository源。因为Remi源提供了目前最新版本的Redis,可以通该源使用YUM安装目前最新版本的Redis。另外还提供了PHP和MySQL的最新yum源,以及相关服务程序。
1. Remi repository源依赖于epel源,因此需要先安装epel源
    yum -y install epel-release
2. 安装Remi repository源
    yum -y install http://rpms.remirepo.net/enterprise/remi-release-7.rpm
    ls /etc/yum.repos.d///下载完成后会出现许多remi的yum源,这里要用到的是remi.repo这个源3. 使用指定的yum源安装Redis
    yum --enablerepo=remi install -y redis          //--enablerepo指定yum源
    redis-cli --version                              //安装完成后使用命令查看一下版本4. 启动Redis并设置开机自启
    systemctl start redis
    systemctl enable redis
其他配置推荐文章:https://www.cnblogs.com/diantong/p/11255019.html
kafka:
tar -zvxf kafka_2.13-3.1.0.tgz -C /opt                 //解压
cd /opt/kafka_2.13-3.1.0/[root@localhost kafka_2.13-3.1.0]# bin/zookeeper-server-start.sh -daemon config/zookeeper.properties
[nowcoder1@localhost kafka_2.13-3.1.0]$ nohup bin/kafka-server-start.sh config/server.properties &//这个启动不成功[root@localhost kafka_2.13-3.1.0]# nohup bin/kafka-server-start.sh config/server.properties 1>/dev/null 2>&1 &[1]7448[root@localhost kafka_2.13-3.1.0]# bin/kafka-topics.sh --list --bootstrap-server localhost:9092
elasticsearch:
root@localhost nowcoder]# wget -y https://artifacts.elastic.co/downloads/elasticsearch/elasticsearch-7.17.3-linux-x86_64.tar.gz
tar -zvxf elasticsearch-7.16.3-linux-x86_64.tar.gz -C /opt
unzip -d /opt/elasticsearch-7.16.3/plugins/ik elasticsearch-analysis-ik-7.17.0.zip
cd /opt/elasticsearch-7.16.3/plugins/ik/
[root@localhost config]# cd /opt/elasticsearch-7.17.0/config/
[root@localhost config]# vim elasticsearch.yml

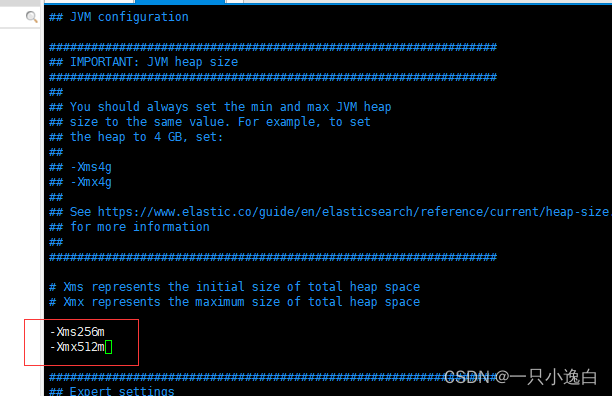
[root@localhost config]# vim jvm.options

elasticsearch不允许root用户启动,所以用普通用户
// 创建用户分配权限[root@localhost config]# useradd nowcoder1 -p 123456-g nowcoder
[root@localhost config]# cd /opt
[root@localhost opt]# chown -R nowcoder1:nowcoder *[root@localhost opt]# cd /tmp
[root@localhost tmp]# chown -R nowcoder1:nowcoder *[root@localhost tmp]# su - nowcoder1

// 启动[nowcoder1@localhost ~]$ cd /opt/elasticsearch-6.4.3/[nowcoder1@localhost elasticsearch-6.4.3]$ bin/elasticsearch -d
[nowcoder1@localhost elasticsearch-6.4.3]$ su -[root@localhost ~]# curl -X GET "localhost:9200/_cat/health?v"
epoch      timestamp cluster  status node.total node.data shards pri relo init unassign pending_tasks max_task_wait_time active_shards_percent
164439402516:07:05  nowcoder green           11000000-100.0%
wkhtmltopdf:
[root@localhost /]# yum list wkhtmltopdf*//复制 wkhtmltopdf.x86_64[root@localhost /]# yum install -y wkhtmltopdf.x86_64

[root@localhost /]# yum list *xvfb*[root@localhost /]# yum install xorg-x11-server-Xvfb.x86_64

// 生成即安装成功[root@localhost test]# xvfb-run --server-args="-screen 0, 1024x768x24" wkhtmltoimage https://www.baidu.com 1.png// 将wkhtmltoimage命令封装到脚本里[root@localhost test]# cd /opt/[root@localhost opt]# vim wkhtmltoimage.sh
xvfb-run --server-args="-screen 0, 1024x768x24" wkhtmltoimage "$@"//写入脚本// 加上权限[root@localhost opt]# chmod +x wkhtmltoimage.sh
// 测试[root@localhost opt]# cd /root/test/[root@localhost test]# /opt/wkhtmltoimage.sh https://www.baidu.com 2.png
tomcat:
安装前要把JDK安装好
[root@localhost nowcoder]# tar -zvxf apache-tomcat-10.0.16.tar.gz  -C /opt     //解压[root@localhost apache-tomcat-10.0.16]# cd /opt/apache-tomcat-10.0.16/bin

[root@localhost bin]# vim /etc/profile
export PATH=$PATH:/opt/apache-tomcat-9.0.22/bin
[root@localhost bin]# source /etc/profile
//启动tomcat[root@localhost bin]# startup.sh
//关闭tomcat[root@localhost bin]# shutdown.sh
//杀死进程
kill -9 进程
虚拟机需要关闭防火墙,windows才能访问
systemctl stop firewalld    //关闭防火墙
systemctl disable firewalld    //永久关闭防火墙

nginx:
[root@localhost /]# yum install nginx.x86_64
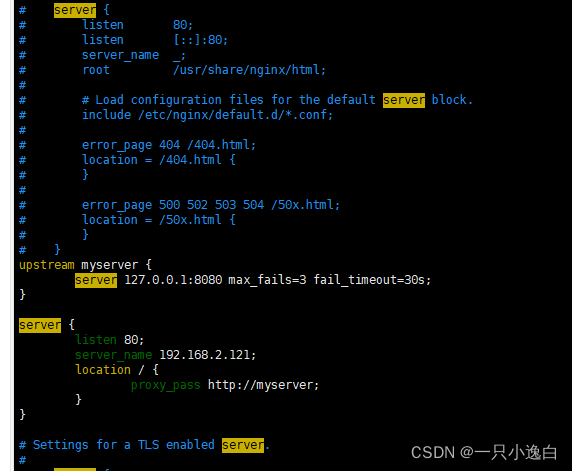
[root@localhost /]# vim /etc/nginx/nginx.conf               //修改服务
如图注释server 然后加上myserver
[root@localhost /]# systemctl start nginx.service        //启动服务[root@localhost /]# systemctl status nginx               //查看是否运行

发现错误,这个搞了一晚上死活搞不定,用了原配置就成了,日了狗了草,这视频教学有问题
正确配置
后来把localhost:8080换成baidu.com居然可以访问,就发现是tomcat访问不了
最后只需要关闭SeLinux就行
setsebool -P httpd_can_network_connect 1
成功心态炸裂!!!
三、打包发布
- application.properties, global.js里将下面两个项目名路径更改为空
server.servlet.context-path=var CONTEXT_PATH ="";
- HomeController 加上根路径
@RequestMapping(path ="/", method =RequestMethod.GET)publicStringroot(){return"forward:/index";}
- pom,xml
<description></description> 下加上下面这段话
<packaging>war</packaging><build> 里加上下面这句话
<finalName>ROOT</finalName>
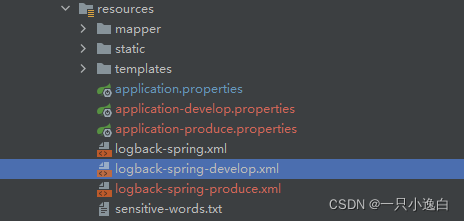
- 将源文件都复制两份 application-develop.properties,application-produce.properties logback-spring-develop.xml,logback-spring-produce.xml

application.properties
# profile
spring.profiles.active=produce

# logback
logging.config=classpath:logback-spring-${spring.profiles.active}.xml
application-produce.properties
更改服务器名称以及d盘下的路径更改为服务器路径,数据库密码
# DataSourceProperties
spring.datasource.password=Nowcoder_123
# community
community.path.domain=http://192.168.2.121
community.path.upload=/tmp/uploads
# wk
wk.image.command=/opt/wkhtmltoimage.sh
wk.image.storage=/tmp/wk-images
logback-spring-produce.xml
<propertyname="LOG_PATH"value="/tmp"/>
- 创建CommunityServletInitializer
packagecom.nowcoder.community;importorg.springframework.boot.builder.SpringApplicationBuilder;importorg.springframework.boot.web.servlet.support.SpringBootServletInitializer;publicclassCommunityServletInitializerextendsSpringBootServletInitializer{@OverrideprotectedSpringApplicationBuilderconfigure(SpringApplicationBuilder builder){return builder.sources(CommunityApplication.class);}}
- clean一下,直接将项目压缩成zip,上传到服务器,
[root@localhost nowcoder]# unzip -d /root/nowcoder/ community.zip
[root@localhost nowcoder]# cd community/[root@localhost community]# mvn package-Dmaven.test.skip=true// 不测试直接打包[root@localhost community]# cd target/[root@localhost target]# mv ROOT.war /opt/apache-tomcat-10.0.16/webapps/[root@localhost target]# cd /opt/apache-tomcat-10.0.16/webapps///查看是否只有ROOT.war一个,删除其他文件
运行tomcat即可打开网页查看
netstat  -anp  |grep   端口号          // 查看某端口号运行情况
netstat   -nultp                      //(此处不用加端口号)该命令是查看当前所有已经使用的端口情况
版权归原作者 一只小逸白 所有, 如有侵权,请联系我们删除。
