文章目录
概要
在目前互联网发展形势下,有非常多的业务需求要从互联网或者VPN之类的非安全区域来访问企业内部的业务生产系统。这给网络框架和网络安全提出了很大的挑战。这种需求相信每一位运维人员都遇到过,而且也深思过。
在这种需求下,怎么去构建一种生产环境下的安全有效的访问途径。本人作为有某三甲医院多年运维经验的工作人员,分享自己的一整套改造经验之谈。有需求的同学们可以借鉴,有高工看见了,也提提建议。
背景
先交代下背景:目前医院信息化作为互联网信息化的一部分,总感觉太保守,一来也是发展迟,发展快,二来是思想不够解放。导致现在信息孤岛严重,发展受限。
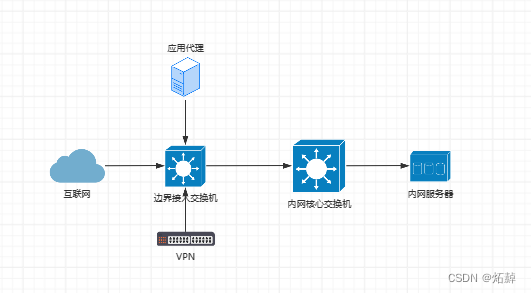
相信这张图是医院互联网应用下的普遍网络构架吧。对于网闸这种东西,我是深恶痛绝,太死板,业务限制太大。谁用谁知道
我的思路是这样的,所有非安全域的访问(互联网、VPN)只能访问应用代理服务器(可搭配),而应用代理服务器通过四层、七层代理方式访问真正的内网服务器(涵盖99%的业务访问流程)。 优势是代理配置更灵活、业务应用拓展更灵活。
应用代理架构
nginx+keepalived+nginxwebui 这三款软件可以自行百度下,都是主流稳定产品,具体不介绍了,都是神一样的存在。而且不用花钱的。。。
nginx:反向代理四层、七层应用。
keepalived:对nginx做双活避免宕机。
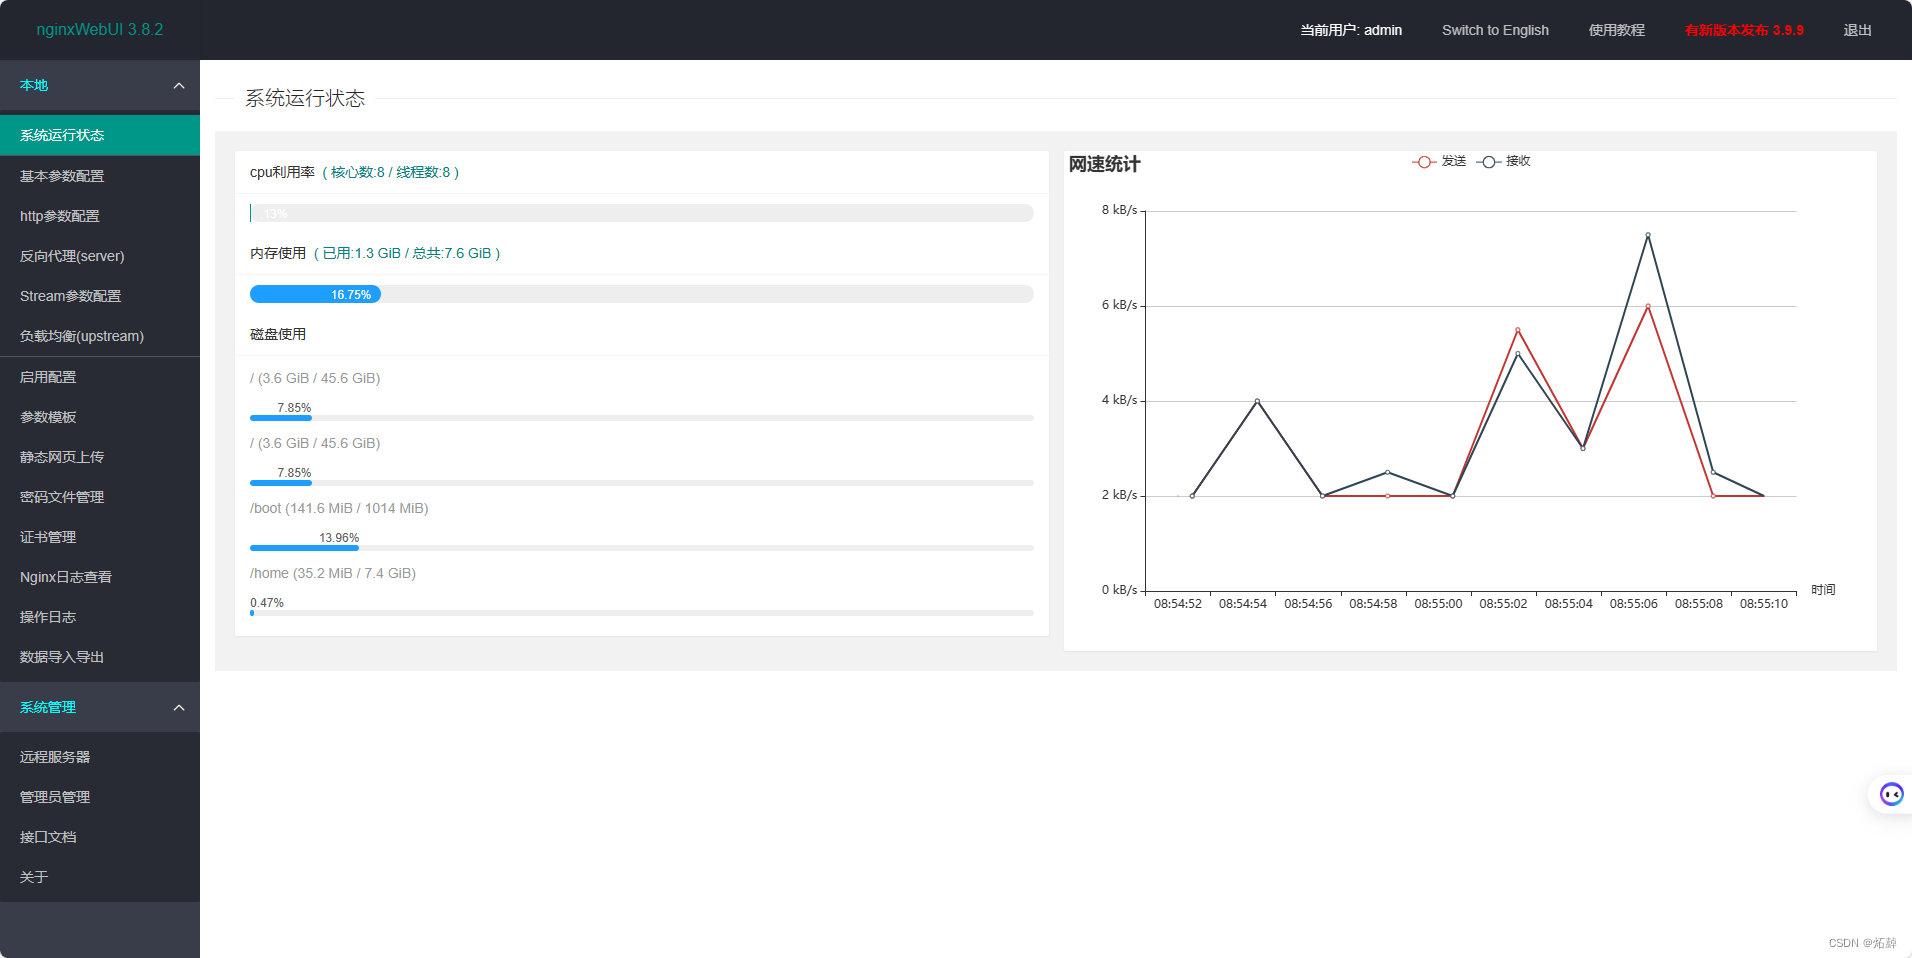
nginxwebui:图形界面管理nginx(更方便、更安全)。
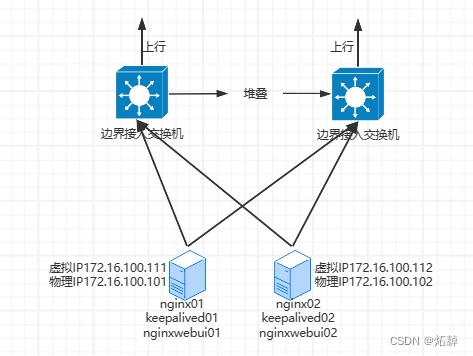
整体架构拓扑

准备工作:
1、准备两台交换机,最好做个堆叠。
2、准备两台物理服务器(看你预算,生产环境中不建议单台)。安装centos或者openEuler操作系统,,,看你情况。
3、两台物理服务器网卡可以做个bond0做个。
思路
1、基础环境配置
2、编译安装nginx
3、安装nginx图形管理页面nginxwebui
4、配置双活keepalived
5、测试方法
6、升级须知
安装开始
1、基础环境配置 (两个节点配置相同)
① selinux关闭,yum阿里云网络源配置。
② 操作系统防火墙配置:
[root@localhost ~]#firewall-cmd --zone=public --add-port=80/tcp --permanent[root@localhost ~]#firewall-cmd --zone=public --add-port=443/tcp --permanent[root@localhost ~]#firewall-cmd --zone=public --add-port=10240/tcp --permanent[root@localhost ~]#firewall-cmd --direct --permanent --add-rule ipv4 filter INPUT 0 --destination 224.0.0.18 --protocol vrrp -j ACCEPT[root@localhost ~]#firewall-cmd --direct --permanent --add-rule ipv4 filter OUTPUT 0 --destination 224.0.0.18 --protocol vrrp -j ACCEPT[root@localhost ~]#firewall-cmd --reload
其中80、443端口是常用业务端口,10240是nginxwebui管理页面端口。后两条是因为keepalived使用vrrp协议实现主主,必须得放开。最后重新加载防火墙。。。。
提示:如果你有硬件防火墙,操作系统的防火墙也可以直接关闭。如下:
[root@localhost ~]#systemctl stop firewalld[root@localhost ~]#systemctl disable firewalld
③yum安装列表:keepalived java-1.8.0-openjdk net-tools curl wget gcc gcc-c++ autoconf automake make openssl openssl-devel pcre pcre-devel zlib-devel 其中包括了keepalived、nginxwebui的环境java包、还有nginx及编译的包等。
可以一次性安装,也可以单个安装,例如
[root@localhost ~]#yum install -y keepalived
2、编译安装nginx(两个节点配置相同)
提示:这里强烈建议编译安装nginx,对于后期nginx的升级、增加模块等有重要作用
①下载nginx(最好选个最新的稳定版本,我这里以“1.22.1”做演示)
http://nginx.org/download
[root@localhost ~]#mkdir /usr/local/nginx #创建一个nginx安装目录[root@localhost ~]#cp nginx-1.22.1.tar.gz /usr/local/nginx/ #将下载的tar包拷贝进去[root@localhost ~]#cd /usr/local/nginx/[root@localhost ~]#tar zxvf nginx-1.22.1.tar.gz #解压tar包[root@localhost ~]#cd nginx-1.22.1[root@localhost ~]#./configure --prefix=/usr/local/nginx --with-http_ssl_module --with-http_stub_status_module --with-http_realip_module --with-http_secure_link_module --with-http_ssl_module --with-http_sub_module --with-http_v2_module --with-stream --with-stream_realip_module --with-stream_ssl_module --with-stream_ssl_preread_module #先configure 后面跟着安装路径 --with-是需要的模块。。。。基础的模块都带上了,基本够用。[root@localhost ~]#make & make install #编译及安装------------------这就算装完了,可以在浏览器中输入http://IP 就能验证了。--------------[root@localhost ~]#cd /usr/local/nginx/sbin/ #进入nginx安装目录[root@localhost ~]#./nginx #启动nginx[root@localhost ~]#./nginx -V #查看版本及模块及安装情况-----------------下边为了便捷操作,将nginx服务安装到系统服务中去-----------------------[root@localhost ~]#echo "export PATH=/usr/local/nginx/sbin:$PATH" > /etc/profile.d/nginx.sh #增加环境变量,随处可使用nginx命令[root@localhost ~]#source /etc/profile #加载环境变量,使之生效[root@localhost ~]#vi /etc/init.d/nginx #这个nginx内容如下黑框,直接copy进去,不用改什么[root@localhost ~]#chmod a+x /etc/init.d/nginx
↓↓↓↓↓↓↓↓↓↓↓↓↓下面的脚本就是上面nginx中的内容。为了展示方便,单独列举↓↓↓↓↓↓↓↓↓
#!/bin/sh## nginx - this script starts and stops the nginx daemon## chkconfig:   - 85 15# description:  NGINX is an HTTP(S) server, HTTP(S) reverse \#               proxy and IMAP/POP3 proxy server# processname: nginx# config:      /etc/nginx/nginx.conf# config:      /etc/sysconfig/nginx# pidfile:     /usr/local/nginx/logs/nginx.pid# Source function library.. /etc/rc.d/init.d/functions

# Source networking configuration.. /etc/sysconfig/network

# Check that networking is up.["$NETWORKING"="no"]&&exit0nginx="/usr/local/nginx/sbin/nginx"prog=$(basename $nginx)NGINX_CONF_FILE="/usr/local/nginx/conf/nginx.conf"[-f /etc/sysconfig/nginx ]&&. /etc/sysconfig/nginx

lockfile=/var/lock/subsys/nginx

make_dirs(){# make required directoriesuser=`$nginx -V2>&1|grep"configure arguments:.*--user="|sed's/[^*]*--user=\([^ ]*\).*/\1/g' -`if[-n"$user"];thenif[-z"`grep $user /etc/passwd`"];thenuseradd-M-s /bin/nologin $userfioptions=`$nginx -V2>&1|grep'configure arguments:'`foroptin$options;doif[`echo $opt |grep'.*-temp-path'`];thenvalue=`echo $opt |cut-d"="-f2`if[!-d"$value"];then# echo "creating" $valuemkdir-p$value&&chown-R$user$valuefifidonefi}start(){[-x$nginx]||exit5[-f$NGINX_CONF_FILE]||exit6
    make_dirs
    echo-n $"Starting $prog: "
    daemon $nginx-c$NGINX_CONF_FILEretval=$?echo[$retval-eq0]&&touch$lockfilereturn$retval}stop(){echo-n $"Stopping $prog: "
    killproc $prog-QUITretval=$?echo[$retval-eq0]&&rm-f$lockfilereturn$retval}restart(){
    configtest ||return$?
    stop
    sleep1
    start
}reload(){
    configtest ||return$?echo-n $"Reloading $prog: "
    killproc $prog-HUPretval=$?echo}force_reload(){
    restart
}configtest(){$nginx-t-c$NGINX_CONF_FILE}rh_status(){
    status $prog}rh_status_q(){
    rh_status >/dev/null 2>&1}case"$1"in
    start)
        rh_status_q &&exit0$1;;
    stop)
        rh_status_q ||exit0$1;;
    restart|configtest)$1;;
    reload)
        rh_status_q ||exit7$1;;
    force-reload)
        force_reload
        ;;
    status)
        rh_status
        ;;
    condrestart|try-restart)
        rh_status_q ||exit0;;
    *)echo $"Usage: $0 {start|stop|status|restart|condrestart|try-restart|reload|force-reload|configtest}"exit2esac
提示:nginx的安装就算正式结束了
测试内容:
systemctl start nginx.service 启动nginx
systemctl stop nginx.service 关闭nginx
systemctl status nginx.service 查看nginx状态
浏览器中输入http://IP 看能否打开。
3、安装nginx图形管理页面nginxwebui(两个节点配置相同)
本项目可以使用WebUI配置nginx的各项功能, 包括http协议转发, tcp协议转发, 反向代理, 负载均衡, ssl证书自动申请、续签、配置等, 最终生成nginx.conf文件并覆盖nginx的默认配置文件, 完成nginx的最终功能配置。
下载地址:https://www.nginxwebui.cn/ 并上传至服务器
基本功能可以在官网上查下,,,我觉得这是目前最好用的nginx配置工具。
nginxWebUI的环境依赖包是java-1.8.0-openjdk、net-tools是运行需要的组件,,,都已经安装了。
#mkdir /nginxWebUI   #创建nginxwebui安装目录,安装很简单。我这里下载的是3.4.6版本#cp nginxWebUI-3.4.6.jar /nginxWebUI/nginxWebUI.jar    #复制并改名jar包#cd /nginxWebUI#vi start-service.sh  #用于快捷启动nginxwebui
nohup java -jar -Dfile.encoding=UTF-8 /nginxWebUI/nginxWebUI.jar --server.port=10240 --project.home=/nginxWebUI/ > /dev/null &
#vi stop-service.sh   #用于快捷关闭nginxwebui
pkill java
#vi  /etc/rc.d/rc.local  #编辑启动项,将nginxwebui加入开机启动
su - root -c '/nginxWebUI/start-service.sh'#chmod a+x /etc/rc.d/rc.local   #增加rc.local执行权限
好了可以登录了http://IP:10240 至于使用方法,其实也不难,看看就会。
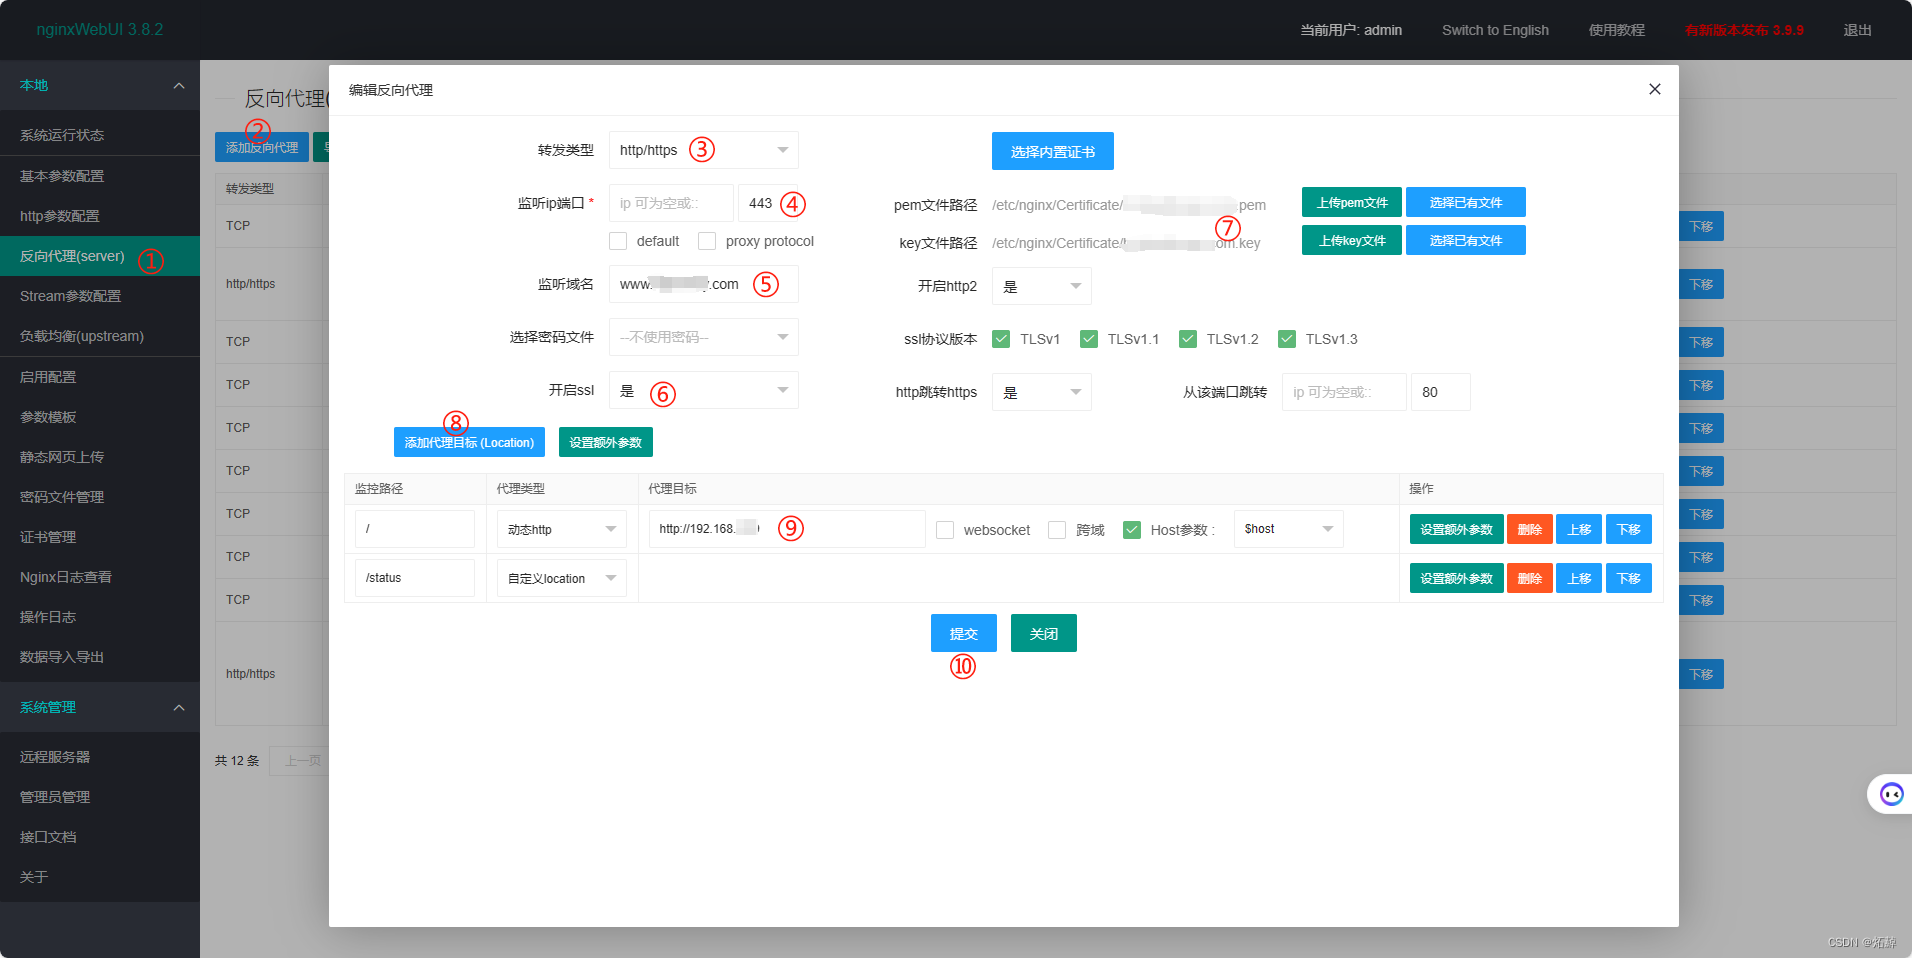
基本使用从左侧反向代理开始,以发布一个https网站为例:
①至③略
④—如果没有证书就填80。如果有证书,就填443。即使你的网站是http的也没有关系。必填
⑤—填写域名。选填
⑥—如果没有证书就选否。如果有证书,就选是,并完成第⑦项。
⑧—添加代理目标,指的是正式web服务器的访问url。
⑨—动态http、代理目标(如果不是80或443,就得填端口号)格式如:http://192.168.0.1:8080
⑩—提交
如上就是添加一个需要nginx反向七层代理的网站,你还可以摸索下添加一个代理四层的站点,涉及“负载均衡(upstream)”、“反向代理(server)”。。。。。
如上操作完之后还是不能通过VIP的ip去访问的,因为你只是对nginxWebUI这个工具做了预配置,还没有实际应用到nginx中去。
进入启用配置→目标配置文件(按上文的路径去填)→对比(向你提供更改内容的对比页面,检查用的)→校验文件(检查nignx配置语法等有无错误,如有就得改错,直到显示ok和successful)→替换文件(将正确的配置替换到nginx中去)→重新装载(相当于加载nginx配置使其生效。等同命令nginx -s reload。 但不同于systemctl restart nginx哦)
这算是通过nginxWebUI完成了nginx的配置。你可以通过访问VIP的形式去访问反向代理的站点了。
4、配置双活keepalived(分别配置)
提示:本方案使用双活架构,keepalived正确安装及配置后,每台服务器除了一个本地ip外,还会生成一个虚拟IP地址简称VIP,这两个VIP承担外部访问的任务。使用中可以将不同业务分摊到这两个VIP上去,,,,我的做法是将四层“IP+端口”访问指向第一个VIP上去,将七层“http/https”访问指向第二个VIP上去,,,最终形成两个服务器分别承担一部分应用,达到一定程度的负载作用。在极端情况下,其中一台节点出现问题,它上面的VIP会漂移到正常运行的节点上去,达到nginx及业务可用,处理好故障节点后,VIP会自动回迁。
最开始安装环境时,keepalived已经安装,配置文件是/etc/keepalived/keepalived.conf 常用命令如下:
systemctl start keepalived.service #启动keepalived
systemctl stop keepalived.service #关闭keepalived
systemctl restart keepalived.service #重启keepalived
①首先添加个nginx检测脚本。用于keepalived检测nginx状态,如果nginx服务停了,会自动启动nginx,,如果nginx启动不了,就开始虚拟地址(VIP)漂移了,也就是常说的故障转移了。
#touch /etc/keepalived/check_nginx.sh         #创建nginx检测脚本文件,键入如下内容,#!/bin/bash
run=`ps-C nginx --no-header | wc -l`
if[$run-eq 0 ]
then
systemctl stop nginx.service
systemctl start nginx.service
sleep 3
if[ `ps-C nginx --no-header | wc -l` ]
then
systemctl stop keepalived.service
fi
fi

#chmod a+x /etc/keepalived/check_nginx.sh    #并更改文件的可执行权限
②配置keepalived
配置要素:state virtual_router_id auth_pass virtual_ipaddress track_script
根据最上面拓扑图中的IP,自行推理一下各个参数的用途,最简单的使用方法就是更改virtual_ipaddress中的IP地址就可以套用了。
node1配置如下:
! Configuration File for keepalived

global_defs {
   notification_email {
     [email protected]
     [email protected]
     [email protected]
   }
   notification_email_from [email protected]
   smtp_server 192.168.200.1
   smtp_connect_timeout 30
   router_id LVS_DEVEL
   vrrp_skip_check_adv_addr
  # vrrp_strict
   vrrp_garp_interval 0
   vrrp_gna_interval 0
}

 vrrp_script chk_nginx {
    script "/etc/keepalived/check_nginx.sh"
    interval 2
    weight 2
 }

vrrp_instance VI_1 {
    state MASTER
    interface ens192
    virtual_router_id 51
    priority 100
    advert_int 1
    authentication {
        auth_type PASS
        auth_pass 1024
    }
    virtual_ipaddress {
        172.16.100.111
    }
    track_script {
         chk_nginx
    }}

vrrp_instance VI_2 {
    state BACKUP
    interface ens192
    virtual_router_id 52
    priority 50
    advert_int 1
    authentication {
        auth_type PASS
        auth_pass 4201
    }
    virtual_ipaddress {
        172.16.100.112
    }
       track_script {
        chk_nginx
    }}
node2配置如下:
! Configuration File for keepalived

global_defs {
   notification_email {
     [email protected]
     [email protected]
     [email protected]
   }
   notification_email_from [email protected]
   smtp_server 192.168.200.1
   smtp_connect_timeout 30
   router_id LVS_DEVEL
   vrrp_skip_check_adv_addr
  # vrrp_strict
   vrrp_garp_interval 0
   vrrp_gna_interval 0
}

 vrrp_script chk_nginx {
    script "/etc/keepalived/check_nginx.sh"
    interval 2
    weight 2
 }

vrrp_instance VI_1 {
    state BACKUP
    interface ens192
    virtual_router_id 51
    priority 50
    advert_int 1
    authentication {
        auth_type PASS
        auth_pass 1024
    }
    virtual_ipaddress {
        172.16.100.111
    }
    track_script {
         chk_nginx
    }}

vrrp_instance VI_2 {
    state MASTER
    interface ens192
    virtual_router_id 52
    priority 100
    advert_int 1
    authentication {
        auth_type PASS
        auth_pass 4201
    }
    virtual_ipaddress {
        172.16.100.112
    }
       track_script {
        chk_nginx
    }}
最后使用 systemctl start keepalived.service就可以启动了。
#systemctl start keepalived.service #启动#systemctl enable keepalived.service #设置开机启动
做完以上部分,,,这个配置过程就算完了。
5、测试方法
如果这个搭建过程没有问题,就可以通过停止keepalived服务,去模拟节点故障。
举例:
停止节点1上的keepalived服务,那节点2上的IP地址就会有三个,172.16.100.102 172.16.100.112 172.16.100.111
恢复节点1上的keepalived服务,那节点2上的172.16.100.111就会回到节点1上。
更深层次的测试,可以自行再做做!
5、升级须知
一般需要升级的只有nginx 和 nginxwebui
nginx升级:
①、下载新编译版本nginx包nginx-1.99.99.tar.gz,解压至/usr/local/nginx/nginx-1.99.99并进入
②、./configure --prefix=/usr/local/nginx --XXXX (注意添加原有模块)
③、make 不要make install
④、mv /usr/local/nginx/sbin/nginx /usr/local/nginx/sbin/nginx.old 备份nginx主文件并删除原nginx
⑤、cp /usr/local/nginx/nginx-1.99.99/objs/nginx /usr/local/nginx 将编译好的nginx移动到主目录
⑥、可用systemctl restart nginx.service重启加载新文件。或不用管也可以,nginx会自动完成平滑升级
nginxwebui升级:
①、关闭nginxWebUI主进程 pkill java 运行: ./nginxWebUI/stop-service.sh
②、下载新的nginxWebUI-3.99.99.jar 覆盖nginxWebUI.jar
③、启动nginxWebUI服务。 ./nginxWebUI/start-service.sh
技术细节
提示:nginxWebUI的使用自己琢磨,,,头快炸了,不说了
两台nginxWebUI中添加正向配置后,记得在“启用配置”菜单中-对比文件-校验文件-替换文件-重新装载,,最后在“远程服务器”中同步配置和批量运行,以保持两台nginx配置相同。要不然VIP漂移后有空配置
版权归原作者 炻繛 所有, 如有侵权,请联系我们删除。