Spring MVC阶段测试
1.新建Maven项目,静态资源文件,如JS、CSS、图片应存放在( C )目录下。
A、src/main/java
B、src/test/java
C、src/main/resources/static
D、src/main/resources/templates
2.新建Maven项目,Web的模板文件应存放在( A )目录下。
A、src/main/java
B、src/test/java
C、src/main/resources/static
D、src/main/resources/templates
3.Spring Booot项目的全局配置文件application.properties存放的目录为( C )。
A、src/main/java
B、src/test/java
C、src/main/resources
D、src/main/resources/static
4.控制器中有一个成员变量,已经在Spring配置文件中声明,要将这个成员变量注入的注解是(C )。
A、@RequestMapping
B、@RequestParam
C、@Autowired
D、@Controller
解析:成员变量:在类体的变量部分中定义的变量,也称为属性。
成员变量:定义在类中,方法体之外。变量在创建对象时实例化。成员变量可被类中的方法、构造方法以及特定类的语句块访问。
public interface IUserService { 成员变量 public boolean insertUser(User user);{ // 其他代码 }}
 @Autowired
    private IUserService IUserService = null;
5.用于从请求URL中获取参数并映射到方法参数中的注解是( B)。
A、@RequestMapping
B、@RequestParam
C、@PathVariable
D、@RequestBody
解析:
@RequestParam
每个参数都已Key=Value的形式跟在url的后方,@RequestParam可以获取url后面参数中与自己所定义的参数名的值并注入到所注解的参数中。

//  url:xxx?name=值&age=值
    @GetMapping("test")
    public String test2(@RequestParam("name")String name){
        return name;
    }
6.将一个请求URL指向一个类的方法的注解是( D )。
A、@Autowired
B、@Controller
C、@RequestParam
D、@RequestMapping
解析:
@Controller
public class MainController {
    @RequestMapping("/main")
    //具体代码
}
7.将前台form表单input控件中的name属性,绑定到控制器类中的方法参数所使用的注解是( A )。
A、@RequestParam
B、@Controller
C、@RequestMapping
D、@Autowired
解析:
public ModelAndView login(@RequestParam("loginName") String loginName, @RequestParam("password") String password, ModelAndView mv)
8.下面关于Model 和ModelAndView说法不正确的是( D )。
A、ModelAndView类用来存储处理完后的结果数据,以及显示该数据的视图。
B、Model类只是用来传输数据
C、ModelAndView类使用addObject方法存储数据
D、Model类使用addObject方法存储数据
解析:C:
//
// Source code recreated from a .class file by IntelliJ IDEA
// (powered by FernFlower decompiler)
//
package org.springframework.ui;
import java.util.Collection;
import java.util.Map;
import org.springframework.lang.Nullable;
public interface Model {
    Model addAttribute(String var1, @Nullable Object var2);
    Model addAttribute(Object var1);
    Model addAllAttributes(Collection<?> var1);
    Model addAllAttributes(Map<String, ?> var1);
    Model mergeAttributes(Map<String, ?> var1);
    boolean containsAttribute(String var1);
    @Nullable
    Object getAttribute(String var1);
    Map<String, Object> asMap();
}
D:
//
// Source code recreated from a .class file by IntelliJ IDEA
// (powered by FernFlower decompiler)
//
package org.springframework.web.servlet;
import java.util.Map;
import org.springframework.http.HttpStatus;
import org.springframework.lang.Nullable;
import org.springframework.ui.ModelMap;
import org.springframework.util.CollectionUtils;
public class ModelAndView {
    @Nullable
    private Object view;
    @Nullable
    private ModelMap model;
    @Nullable
    private HttpStatus status;
    private boolean cleared = false;
    public ModelAndView() {
    }
    public ModelAndView(String viewName) {
        this.view = viewName;
    }
    public ModelAndView(View view) {
        this.view = view;
    }
    public ModelAndView(String viewName, @Nullable Map<String, ?> model) {
        this.view = viewName;
        if (model != null) {
            this.getModelMap().addAllAttributes(model);
        }
    }
    public ModelAndView(View view, @Nullable Map<String, ?> model) {
        this.view = view;
        if (model != null) {
            this.getModelMap().addAllAttributes(model);
        }
    }
    public ModelAndView(String viewName, HttpStatus status) {
        this.view = viewName;
        this.status = status;
    }
    public ModelAndView(@Nullable String viewName, @Nullable Map<String, ?> model, @Nullable HttpStatus status) {
        this.view = viewName;
        if (model != null) {
            this.getModelMap().addAllAttributes(model);
        }
        this.status = status;
    }
    public ModelAndView(String viewName, String modelName, Object modelObject) {
        this.view = viewName;
        this.addObject(modelName, modelObject);
    }
    public ModelAndView(View view, String modelName, Object modelObject) {
        this.view = view;
        this.addObject(modelName, modelObject);
    }
    public void setViewName(@Nullable String viewName) {
        this.view = viewName;
    }
    @Nullable
    public String getViewName() {
        return this.view instanceof String ? (String)this.view : null;
    }
    public void setView(@Nullable View view) {
        this.view = view;
    }
    @Nullable
    public View getView() {
        return this.view instanceof View ? (View)this.view : null;
    }
    public boolean hasView() {
        return this.view != null;
    }
    public boolean isReference() {
        return this.view instanceof String;
    }
    @Nullable
    protected Map<String, Object> getModelInternal() {
        return this.model;
    }
    public ModelMap getModelMap() {
        if (this.model == null) {
            this.model = new ModelMap();
        }
        return this.model;
    }
    public Map<String, Object> getModel() {
        return this.getModelMap();
    }
    public void setStatus(@Nullable HttpStatus status) {
        this.status = status;
    }
    @Nullable
    public HttpStatus getStatus() {
        return this.status;
    }
    public ModelAndView addObject(String attributeName, @Nullable Object attributeValue) {
        this.getModelMap().addAttribute(attributeName, attributeValue);
        return this;
    }
    public ModelAndView addObject(Object attributeValue) {
        this.getModelMap().addAttribute(attributeValue);
        return this;
    }
    public ModelAndView addAllObjects(@Nullable Map<String, ?> modelMap) {
        this.getModelMap().addAllAttributes(modelMap);
        return this;
    }
    public void clear() {
        this.view = null;
        this.model = null;
        this.cleared = true;
   }
    public boolean isEmpty() {
        return this.view == null && CollectionUtils.isEmpty(this.model);
    }
    public boolean wasCleared() {
        return this.cleared && this.isEmpty();
    }
    public String toString() {
        return "ModelAndView [view=" + this.formatView() + "; model=" + this.model + "]";
    }
    private String formatView() {
        return this.isReference() ? "\"" + this.view + "\"" : "[" + this.view + "]";
    }
}
9.在MVC模式中执行数据库操作,访问数据库的功能类属于MVC中哪一个组件( A )。
A、M-模型
B、V-视图
C、C-控制器
D、M-控制器
解析:目前市面上流行的实际分层方式[ S - D(M) - V - C ]:
以前,很多人认为可以直接在Controller层就调用model层来进行数据库的交互。但是这是不严谨的,耦合性太强,违背了MVC的初衷,即解耦。所以随着MVC学习的深入,慢慢地又加入到了业务层Service和数据访问层Dao:
D(Dao)数据访问对象——与数据库建立连接,封装了对数据库的CURD操作
S(Service)业务逻辑模型——做一些业务逻辑地处理,并给Controller返回结果
V(View)视图——是展示给用户的最终页面。视图负责将数据以用户友好的形式展现出来,负责收集展示数据。
C(Controller)控制器——接收用户传递过来的数据,将数据封装到实体类中,调用业务逻辑模型,进行业务逻辑的处理,根据业务逻辑模型返回的结果,进行不同的视图跳转。
10.在MVC模式中负责接收用户请求并将请求转发的组件是( C )。
A、M-模型
B、V-视图
C、C-控制器
D、M-控制器
11.下列关于@RequestMapping注解,正确的说法是( C )。
A、只能作用在方法上
B、只能作用在类上
C、 既可以作用在方法上,也可作用在类上
D、以上说法均不正确
解析:
@Controller
@RequestMapping(value = "/user")
public class UserController {
    // 注入用户服务类
    @Autowired
    private IUserService IUserService = null;
    //测试thymeleaf
    //URL:http://127.0.0.1:3000/user/hello
    @RequestMapping(value = "/hello")
    public String index(Model model) {
        model.addAttribute("name", "cai4");
        return "index";
    }

    //显示数据 URL:http://127.0.0.1:3000/user/list
    @RequestMapping(value = "/list")
    @ResponseBody
    public List<User> list(){
        //访问模型层得到数据
        List<User> users = IUserService.showUserAll();
        return users;
    }
    }
以下controller方法,可以在下划线处插入并且能够在浏览器端输出“hello,world”字符串的是(   A   )。
@RequestMapping("/hello")
public                 String  say( ){
    return  " hello,world ";
}
A、@ResponseBody
B、@Autowired
C、ModelAndView
D、Model
13.访问以下controller类代码中的getById方法,假设输入参数id值为2,正确的访问路径是( B )。
@RequestMapping(path="/user/{id}",method=RequestMethod.GET)
public @ResponseBody User getById(@PathVariable  Integer id){
 return  userService.getUserById(id);
}
A、/user/id=2
B、/user/2
C、/user?id=2
D、/user/{id}=2
解析:
http://127.0.0.1:3000/user/1
14.实现重定向到“main.html”页面正确的代码是(A )。
A、@RequestMapping("/login")
@ResponseBody
public String login( ){  return  "redirect:/ main.html"; }
B、@RequestMapping("/login")
public String login( ){  return  "redirect:/ main.html"; }
C、@RequestMapping("/login")
public String login( ){  return  "main.html"; }
D、@RequestMapping("/login")
@ResponseBody
 public String login( ){  return  "main.html"; }
解析:
@ResponseBody注解
在Handler方法上添加该注解之后,方法的返回值将以字符串的形式直接响应给浏览器。
重定向
方式一:使用 "redirect" 关键字(不是指java关键字),注意:类的注解不能使用@RestController,要用@Controller;因为@RestController内含@ResponseBody,解析返回的是json串。不是跳转页面

@RequestMapping(value="/test/test01/{name}" , method = RequestMethod.GET)
public String test(@PathVariable String name) {
  return "redirect:/ceng/hello.html";
}
方式二:使用servlet 提供的API,注意:类的注解可以使用@RestController,也可以使用@Controller

@RequestMapping(value="/test/test01/{name}" , method = RequestMethod.GET)
public void test(@PathVariable String name, HttpServletResponse response) throws IOException {
  response.sendRedirect("/ceng/hello.html");
}
请求转发
方式一:使用 "forward" 关键字(不是指java关键字),注意:类的注解不能使用@RestController 要用@Controller

@RequestMapping(value="/test/test01/{name}" , method = RequestMethod.GET)
public String test(@PathVariable String name) {
  return "forword:/ceng/hello.html";
  }
方式二:使用servlet 提供的API,注意:类的注解可以使用@RestController,也可以使用@Controller
方式二:使用servlet 提供的API,注意:类的注解可以使用@RestController,也可以使用@Controller
@RequestMapping(value="/test/test01/{name}" , method = RequestMethod.GET)
public void test(@PathVariable String name, HttpServletRequest request, HttpServletResponse response) throws Exception {
  request.getRequestDispatcher("/ceng/hello.html").forward(request,response);
}
15.自定义拦截器要实现( C )接口。
A、Interceptor
B、AbstractInterceptor
C、HandlerInterceptor
D、Validator
解析:
public class Interceptor1 implements HandlerInterceptor{}
16.以下关于拦截器方法说法错误的是( D)。
A、preHandle方法在调用Controller方法前会调用此方法。
B、postHandle方法在调用Controller方法后、页面渲染之前调用此方法
C、afterCompletion方法在页面渲染之后调用
D、postHandle方法在页面渲染之后调用
解析:
preHandle
调用时间:Controller方法处理之前
执行顺序:链式Intercepter情况下,Intercepter按照声明的顺序一个接一个执行
若返回false,则中断执行,注意:不会进入afterCompletion

postHandle
调用前提:preHandle返回true
调用时间:Controller方法处理完之后,DispatcherServlet进行视图的渲染之前,也就是说在这个方法中你可以对ModelAndView进行操作
执行顺序:链式Intercepter情况下,Intercepter按照声明的顺序倒着执行。
备注:postHandle虽然post打头,但post、get方法都能处理

afterCompletion
调用前提:preHandle返回true
调用时间:DispatcherServlet进行视图的渲染之后
多用于清理资源
17.以下代码清单为控制器类实现,启动Spring Boot应用后,在浏览器中输入请求URL:http://localhost:8080/user1/1,运行结果如图所示。
请补充完整代码。(注意:输入答案时区分大小写,标点符号为英文状态下输入。)
@GetMapping("(1)     ")
  //响应为JSON数据集
(2)
  public User get((3)     Integer id) {
   return userService.getUser(id);
  }
1、/user1/{id}
2、@ResponseBody
3、@PathVariable("id")
{id}的注解是@PathVariable("id")
而如果是?id=1则使用@RequestParam(value = "id")
18.以下代码清单实现单文件上传,运行结果如图所示,请补充完整代码。(注意:输入答案时区分大小写,标点符号为英文状态下输入。)
URL地址栏输入 http://localhost:8080/upload/page
图1 文件上传页面
图2 选择文件

图3 文件上传结果
1)上传文件JSP /WEB-INF/jsp/file/upload.jsp
<%@ page language="java" contentType="text/html; charset=UTF-8"
  pageEncoding="UTF-8"%>
<html>
<body>
    <form method="(1)     "
        action="/upload /multipart" enctype="(2)     ">
    <input type="file" name="photo" value="请选择上传的文件" />
     <input type="submit" value="提交" />
   </form>
  </body>
</html>
2)文件上传控制器
package com.springmvc.chapter0320191007.controller;
(3)
public class FileController {
(4)
public  (5)       Map<String, Object> upload((6)     ("photo") (7)     photo)

{
   String path = "d:/uploaded/";//保存路径
   String filename = new SimpleDateFormat("yyyyMMddHHmmssSSS").format(new Date());
   //获取上传文件的后缀suffix
   String suffix = photo.getOriginalFilename().substring(photo.getOriginalFilename().lastIndexOf("."));
   try {
   //Spring提供了文件操作类FileCopyUtils
     FileCopyUtils.copy(photo.getInputStream(), new FileOutputStream(path + filename + suffix));
   } catch (IOException e) {
    // TODO Auto-generated catch block
     e.printStackTrace();
     return (8)     (false, "上传失败");
   }
     return (9)     (true, "上传成功");
}
// 处理上传文件结果
  private Map<String, Object> dealResultMap(boolean success, String msg) {
    Map<String, Object> result = new HashMap<String, Object>();
    result.put("success", success);
    result.put("msg", msg);
    return (10)     ;
  }
}
1、post
2、multipart/form-data
3、@Controller
4、@PostMapping("/upload/page")
5、@ResponseBody
6、@RequestParam
7、MultipartFile[]
8、dealResultMap
9、dealResultMap
10、result
以下代码清单为拦截器的使用,请补充完整代码。(注意:输入答案时区分大小写,标点符号为英文状态下输入。)
// 自定义简单拦截器Interceptor1
public class Interceptor1 implements (1)         {
   @Override
   public boolean (2)         (HttpServletRequest request, HttpServletResponse response, Object handler)
          throws Exception {
      // TODO Auto-generated method stub
      System.out.println("处理器前方法");
      // 返回true,不会拦截后续的处理
      return true;
   }
   @Override
   public void (3)         (HttpServletRequest request, HttpServletResponse response, Object handler,
          ModelAndView modelAndView) throws Exception {
      // TODO Auto-generated method stub
      System.out.println("处理器后方法");
   }
   @Override
   public void (4)         (HttpServletRequest request, HttpServletResponse response, Object handler, Exception ex)
          throws Exception {
      // TODO Auto-generated method stub
      System.out.println("处理器完成方法");
   }
}
//注册拦截器
@Configuration
@SpringBootApplication(scanBasePackages="com.springmvc.chapter0320191007")
public class App1 implements WebMvcConfigurer {
   public static void main(String[] args) {
      // TODO Auto-generated method stub
     SpringApplication.run(App1.class, args);
   }
   @Override
   public void (5)         (InterceptorRegistry registry) {
      // TODO Auto-generated method stub
      InterceptorRegistration ir=registry.addInterceptor((6)         );
// 拦截interceptor路径下所有请求
       ir.addPathPatterns("(7)         ");
   }
}
1、HandlerInterceptor
2、preHandle
3、postHandle
4、afterCompletion
5、addInterceptors
6、new Interceptor1()
7、/**
20.程序实现如下功能。在浏览器中输入URL测试应用
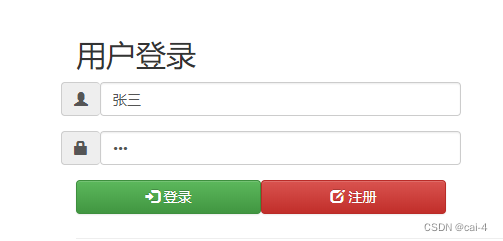
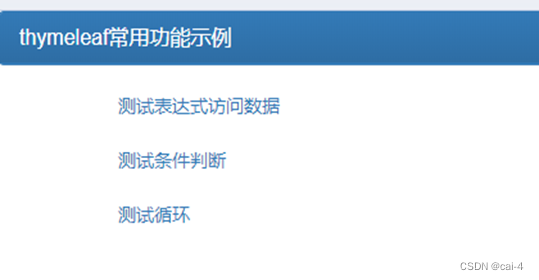
显示用户登录页面,如图1所示,登录成功后跳转到图2所示页面。请补充完整代码。(注意:输入答案时区分大小写,标点符号为英文状态下输入。)

图1 用户登录页面

图2 登录成功后跳转的页面
1) 静态页面index.html 核心代码:
<html xmlns:th="http://www.thymeleaf.org">
<head>
。。。。。
<script type="text/javascript">
$(function(){
$("#loginbtn").click(function(){
var loginName = $("#loginName");
var password = $("#password");
var msg = "";
if(loginName.val() == ""){
msg = "登录名不能为空!";
loginName.focus();
}else if(password.val() == ""){
msg = "密码不能为空!";
password.focus();
}
if(msg != ""){
alert(msg);
}else{
$("#loginform").submit();
}
})
})
</script>
</head>
<body>
用户登录
<form  action="login"  method="post"  id="loginform">
  <input  th="text" name="loginName"  id="loginName" />
   <input  th="password" name="password"  id="password" />
  <button th="button"  id="loginbtn">  登录</button>
  <button th="button"  id="registerbtn"> 注册</button>
</body>

</html>
2) 通过控制类访问index.html
package nuc.edu.cn.chapter03.controller;
/***Import***/
(1)
public class IndexController {
  //Spring MVC会自动生成视图,并且绑定数据模型
  public String index(Model model) {
   System.out.println("IndexController index方法被调用。。。。");
   return "index";
  }
}
3)处理请求的控制类LoginController
package nuc.edu.cn.chapter03.controller;
/***Import***/
(2)
public class LoginController {
 @PostMapping("(3)     ")
 public ModelAndView login(
         (4)      String loginName,
         (5)      String password,
        ModelAndView mv) {
     System.out.println("LoginController login方法被调用。。。");
     System.out.println("LoginController 登录名 :"+loginName+
            "  密码:"+password);
     mv.setViewName("redirect:/main");
     return mv;
 }
}
4)处理请求的控制类 MainController
package nuc.edu.cn.chapter03.controller;
/***Import***/
@Controller
public class MainController {
  @RequestMapping("  (6)  ")
  public String main() {
   System.out.println("MainController main方法被调用。。。");
   //根据Thymeleaf默认模板,将返回resources/templates/main.html
   return  "main";
  }
}
5)静态页面main.html 核心代码:
<html xmlns:th="http://www.thymeleaf.org">
<head>
。。。。
</head>
<body>
     <a th:href=" #">测试表达式访问数据</a><br/>
     <a th:href=" #">测试条件判断</a><br/>
     <a th:href=" #">测试循环</a><br/>
</body>
</html>
1、@Controller
2、@Controller
3、/main
4、@RequestParam("loginName")
5、@RequestParam("password")
6、/main
版权归原作者 cai-4 所有, 如有侵权,请联系我们删除。