
🍓系列专栏:Spring系列专栏
🍉个人主页:个人主页
一、案例:业务层接口执行效率
1.需求分析
这个需求也比较简单,前面我们在介绍AOP的时候已经演示过:
需求:任意业务层接口执行均可显示其执行效率(执行时长)
这个案例的目的是查看每个业务层执行的时间,这样就可以监控出哪个业务比较耗时,将其查找出来方便优化。
具体实现的思路:
(1) 开始执行方法之前记录一个时间
(2) 执行方法
(3) 执行完方法之后记录一个时间
(4) 用后一个时间减去前一个时间的差值,就是我们需要的结果。
所以要在方法执行的前后添加业务,经过分析我们将采用环绕通知。
说明**:**原始方法如果只执行一次,时间太快,两个时间差可能为0,所以我们要执行万次来计算时间
差
2.环境准备
- 创建一个Maven项目
- pom.xml添加Spring依赖
<?xml version="1.0" encoding="UTF-8"?>

<project xmlns="http://maven.apache.org/POM/4.0.0" xmlns:xsi="http://www.w3.org/2001/XMLSchema-instance"
  xsi:schemaLocation="http://maven.apache.org/POM/4.0.0 http://maven.apache.org/xsd/maven-4.0.0.xsd">
  <modelVersion>4.0.0</modelVersion>

  <groupId>com.itheima</groupId>
  <artifactId>spring_21_case_interface_run_speed</artifactId>
  <version>1.0-SNAPSHOT</version>

  <dependencies>
    <dependency>
      <groupId>org.springframework</groupId>
      <artifactId>spring-context</artifactId>
      <version>5.2.10.RELEASE</version>
    </dependency>

    <dependency>
      <groupId>org.springframework</groupId>
      <artifactId>spring-jdbc</artifactId>
      <version>5.2.10.RELEASE</version>
    </dependency>

    <dependency>
      <groupId>org.springframework</groupId>
      <artifactId>spring-test</artifactId>
      <version>5.2.10.RELEASE</version>
    </dependency>

    <dependency>
      <groupId>org.aspectj</groupId>
      <artifactId>aspectjweaver</artifactId>
      <version>1.9.4</version>
    </dependency>

    <dependency>
      <groupId>mysql</groupId>
      <artifactId>mysql-connector-java</artifactId>
      <version>5.1.47</version>
    </dependency>

    <dependency>
      <groupId>com.alibaba</groupId>
      <artifactId>druid</artifactId>
      <version>1.1.16</version>
    </dependency>

    <dependency>
      <groupId>org.mybatis</groupId>
      <artifactId>mybatis</artifactId>
      <version>3.5.6</version>
    </dependency>

    <dependency>
      <groupId>org.mybatis</groupId>
      <artifactId>mybatis-spring</artifactId>
      <version>1.3.0</version>
    </dependency>

    <dependency>
      <groupId>junit</groupId>
      <artifactId>junit</artifactId>
      <version>4.12</version>
      <scope>test</scope>
    </dependency>
  </dependencies>
</project>
添加AccountService、AccountServiceImpl、AccountDao与Account类
public interface AccountService {

    void save(Account account);

    void delete(Integer id);

    void update(Account account);

    List<Account> findAll();

    Account findById(Integer id);

}
@Service
public class AccountServiceImpl implements AccountService {

    @Autowired
    private AccountDao accountDao;

    public void save(Account account) {
        accountDao.save(account);
    }

    public void update(Account account){
        accountDao.update(account);
    }

    public void delete(Integer id) {
        accountDao.delete(id);
    }

    public Account findById(Integer id) {
        return accountDao.findById(id);
    }

    public List<Account> findAll() {
        return accountDao.findAll();
    }
}
public interface AccountDao {

    @Insert("insert into tbl_account(name,money)values(#{name},#{money})")
    void save(Account account);

    @Delete("delete from tbl_account where id = #{id} ")
    void delete(Integer id);

    @Update("update tbl_account set name = #{name} , money = #{money} where id = #{id} ")
    void update(Account account);

    @Select("select * from tbl_account")
    List<Account> findAll();

    @Select("select * from tbl_account where id = #{id} ")
    Account findById(Integer id);
}
import java.io.Serializable;

public class Account implements Serializable {

    private Integer id;
    private String name;
    private Double money;

    public Integer getId() {
        return id;
    }

    public void setId(Integer id) {
        this.id = id;
    }

    public String getName() {
        return name;
    }

    public void setName(String name) {
        this.name = name;
    }

    public Double getMoney() {
        return money;
    }

    public void setMoney(Double money) {
        this.money = money;
    }

    @Override
    public String toString() {
        return "Account{" +
                "id=" + id +
                ", name='" + name + '\'' +
                ", money=" + money +
                '}';
    }
}
resources下提供一个jdbc.properties
jdbc.driver=com.mysql.jdbc.Driver
jdbc.url=jdbc:mysql://localhost:3306/spring_db?useSSL=false
jdbc.username=root
jdbc.password=root
创建相关配置类
@Configuration
@ComponentScan("com.itheima")
@PropertySource("classpath:jdbc.properties")
@Import({JdbcConfig.class,MybatisConfig.class})

public class SpringConfig {
}
public class JdbcConfig {
    @Value("${jdbc.driver}")
    private String driver;
    @Value("${jdbc.url}")
    private String url;
    @Value("${jdbc.username}")
    private String userName;
    @Value("${jdbc.password}")
    private String password;

    @Bean
    public DataSource dataSource(){
        DruidDataSource ds = new DruidDataSource();
        ds.setDriverClassName(driver);
        ds.setUrl(url);
        ds.setUsername(userName);
        ds.setPassword(password);
        return ds;
    }
}
public class MybatisConfig {

    @Bean
    public SqlSessionFactoryBean sqlSessionFactory(DataSource dataSource){
        SqlSessionFactoryBean ssfb = new SqlSessionFactoryBean();
        ssfb.setTypeAliasesPackage("com.itheima.domain");
        ssfb.setDataSource(dataSource);
        return ssfb;
    }

    @Bean
    public MapperScannerConfigurer mapperScannerConfigurer(){
        MapperScannerConfigurer msc = new MapperScannerConfigurer();
        msc.setBasePackage("com.itheima.dao");
        return msc;
    }
}
编写Spring整合Junit的测试类
@RunWith(SpringJUnit4ClassRunner.class)
@ContextConfiguration(classes = SpringConfig.class)
public class AccountServiceTestCase {
    @Autowired
    private AccountService accountService;

    @Test
    public void testFindById(){
        Account ac = accountService.findById(2);
    }

    @Test
    public void testFindAll(){
        List<Account> all = accountService.findAll();
    }

}
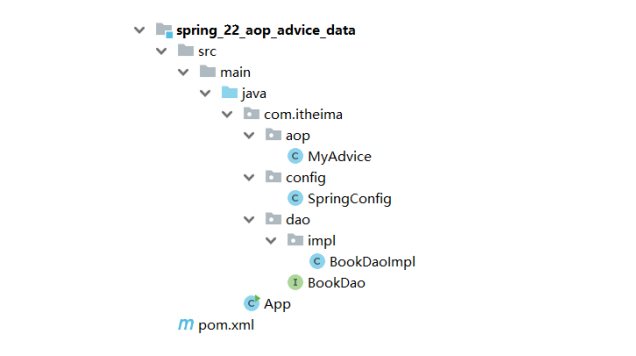
最终创建好的项目结构如下:

3.功能开发
*步骤*1:开启SpringAOP**的注解功能 **
在Spring的主配置文件SpringConfig类中添加注解
@EnableAspectJAutoProxy
*步骤*2:创建AOP**的通知类 **
该类要被Spring管理,需要添加@Component
要标识该类是一个AOP的切面类,需要添加@Aspect
配置切入点表达式,需要添加一个方法,并添加@Pointcut
@Component
@Aspect
public class ProjectAdvice {
    //匹配业务层的所有方法
    @Pointcut("execution(* com.itheima.service.*Service.*(..))")
    private void servicePt(){}

}
*步骤***3:****添加环绕通知 **
在runSpeed()方法上添加@Around,完成核心业务,记录万次执行的时间
@Component
@Aspect
public class ProjectAdvice {
    //匹配业务层的所有方法
    @Pointcut("execution(* com.itheima.service.*Service.*(..))")
    private void servicePt(){}

    //设置环绕通知,在原始操作的运行前后记录执行时间
    @Around("ProjectAdvice.servicePt()")
    public void runSpeed(ProceedingJoinPoint pjp) throws Throwable {
        //获取执行的签名对象
        Signature signature = pjp.getSignature();
        String className = signature.getDeclaringTypeName();
        String methodName = signature.getName();

        long start = System.currentTimeMillis();
        for (int i = 0; i < 10000; i++) {
           pjp.proceed();
        }
        long end = System.currentTimeMillis();
        System.out.println("万次执行:"+ className+"."+methodName+"---->" +(end-start) + "ms");
    }

}
步骤4**:**运行单元测试类


**补充说明 **
当前测试的接口执行效率仅仅是一个理论值,并不是一次完整的执行过程。
这块只是通过该案例把AOP的使用进行了学习,具体的实际值是有很多因素共同决定的。
二、AOP通知获取数据
目前我们写AOP仅仅是在原始方法前后追加一些操作,接下来我们要说说AOP中数据相关的内容,我们将从获取参数、获取返回值和获取异常三个方面来研究切入点的相关信息。
前面我们介绍通知类型的时候总共讲了五种,那么对于这五种类型都会有参数,返回值和异常吗?
我们先来一个个分析下:
获取切入点方法的参数,所有的通知类型都可以获取参数
- JoinPoint:适用于前置、后置、返回后、抛出异常后通知
- ProceedingJoinPoint:适用于环绕通知
获取切入点方法返回值,前置和抛出异常后通知是没有返回值,后置通知可有可无,所以不做研究
- 返回后通知
- 环绕通知
获取切入点方法运行异常信息,前置和返回后通知是不会有,后置通知可有可无,所以不做研究
- 抛出异常后通知
- 环绕通知
1.环境准备
- 创建一个Maven项目
- pom.xml添加Spring依赖
  <dependencies>
    <dependency>
      <groupId>org.springframework</groupId>
      <artifactId>spring-context</artifactId>
      <version>5.2.10.RELEASE</version>
    </dependency>
    <dependency>
      <groupId>org.aspectj</groupId>
      <artifactId>aspectjweaver</artifactId>
      <version>1.9.4</version>
    </dependency>
  </dependencies>
添加BookDao和BookDaoImpl类
public interface BookDao {
 public String findName(int id);
 }
 @Repository
 public class BookDaoImpl implements BookDao {

 public String findName(int id) {
 System.out.println("id:"+id);
 return "itcast";
 }
 }
创建Spring的配置类
@Configuration
@ComponentScan("com.itheima")

public class SpringConfig {
}
编写通知类
@Component
 @Aspect
 public class MyAdvice {
 @Pointcut("execution(* com.itheima.dao.BookDao.findName(..))")
 private void pt(){}

 @Before("pt()")
 public void before() {
 System.out.println("before advice ..." );
 }

 @After("pt()")
 public void after() {
 System.out.println("after advice ...");
 }

 @Around("pt()")
 public Object around() throws Throwable{
 Object ret = pjp.proceed();
 return ret;
 }
 @AfterReturning("pt()")
 public void afterReturning() {
 System.out.println("afterReturning advice ...");
 }

 @AfterThrowing("pt()")
 public void afterThrowing() {
 System.out.println("afterThrowing advice ...");
 }
 }
编写App运行类
public class App {
    public static void main(String[] args) {
        ApplicationContext ctx = new AnnotationConfigApplicationContext(SpringConfig.class);
        BookDao bookDao = ctx.getBean(BookDao.class);
        String name = bookDao.findName(100);
        System.out.println(name);
    }
}
最终创建好的项目结构如下:
2.获取参数
**非环绕通知获取方式 **
在方法上添加JoinPoint,通过JoinPoint来获取参数
@Component
@Aspect
public class MyAdvice {
@Pointcut("execution(* com.itheima.dao.BookDao.findName(..))")
private void pt(){}
@Before("pt()")
public void before(JoinPoint jp)
Object[] args = jp.getArgs();
System.out.println(Arrays.toString(args));
System.out.println("before advice ..." );
}
//...其他的略
}
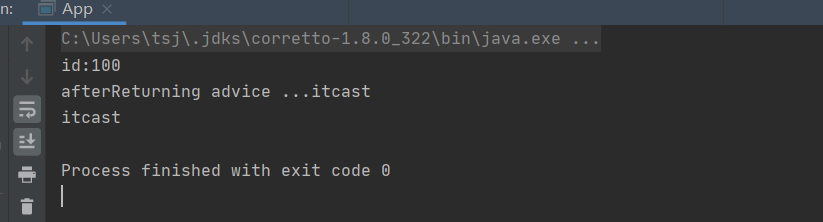
运行App类,可以获取如下内容,说明参数100已经被获取
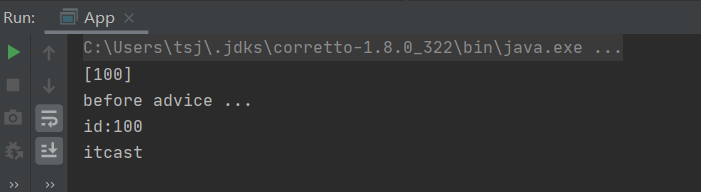
思考**:方法的参数只有一个,为什么获取的是一个数组? **
因为参数的个数是不固定的,所以使用数组更通配些。
如果将参数改成两个会是什么效果呢?
(1)修改BookDao接口和BookDaoImpl实现类
public interface BookDao {
public String findName(int id,String password);
}
@Repository
public class BookDaoImpl implements BookDao {
public String findName(int id,String password) {
System.out.println("id:"+id);
return "itcast";
}
}
(2)修改App类,调用方法传入多个参数
public class App {
public static void main(String[] args) {
ApplicationContext ctx = new
AnnotationConfigApplicationContext(SpringConfig.class);
BookDao bookDao = ctx.getBean(BookDao.class);
String name = bookDao.findName(100,"itheima");
System.out.println(name);
}
}
(3)运行App,查看结果,说明两个参数都已经被获取到
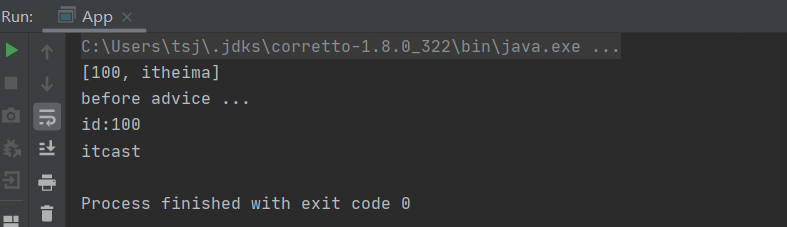
说明**: **
使用JoinPoint的方式获取参数适用于前置、后置、返回后、抛出异常后通知。
**环绕通知获取方式 **
环绕通知使用的是ProceedingJoinPoint,因为ProceedingJoinPoint是JoinPoint类的子
类,所以对于ProceedingJoinPoint类中应该也会有对应的getArgs()方法,我们去验证下:
@Component
@Aspect
public class MyAdvice {
@Pointcut("execution(* com.itheima.dao.BookDao.findName(..))")
private void pt(){}
@Around("pt()")
public Object around(ProceedingJoinPoint pjp)throws Throwable {
Object[] args = pjp.getArgs();
System.out.println(Arrays.toString(args));
Object ret = pjp.proceed();
return ret;
}
//其他的略
}
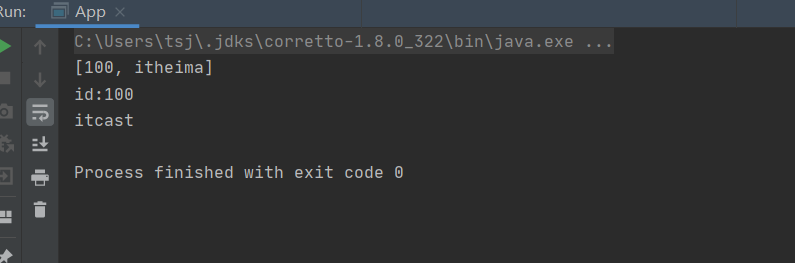
运行App后查看运行结果,说明ProceedingJoinPoint也是可以通过getArgs()获取参数
注意**: **
pjp.proceed()方法是有两个构造方法,分别是:

- 调用无参数的proceed,当原始方法有参数,会在调用的过程中自动传入参数
- 所以调用这两个方法的任意一个都可以完成功能
- 但是当需要修改原始方法的参数时,就只能采用带有参数的方法,如下:
@Component
@Aspect
public class MyAdvice {
@Pointcut("execution(* com.itheima.dao.BookDao.findName(..))")
private void pt(){}
@Around("pt()")
public Object around(ProceedingJoinPoint pjp) throws Throwable{
Object[] args = pjp.getArgs();
System.out.println(Arrays.toString(args));
args[0] = 666;
Object ret = pjp.proceed(args);
return ret;
}
//其他的略
}
有了这个特性后,我们就可以在环绕通知中对原始方法的参数进行拦截过滤,避免由于参数的
问题导致程序无法正确运行,保证代码的健壮性。
3.**获取返回值 **
对于返回值,只有返回后AfterReturing和环绕Around这两个通知类型可以获取,具体如何获取?
**环绕通知获取返回值 **
@Component
@Aspect
public class MyAdvice {
@Pointcut("execution(* com.itheima.dao.BookDao.findName(..))")
private void pt(){}
@Around("pt()")
public Object around(ProceedingJoinPoint pjp) throws Throwable{
Object[] args = pjp.getArgs();
System.out.println(Arrays.toString(args));
args[0] = 666;
Object ret = pjp.proceed(args);
return ret;
}
//其他的略
}
上述代码中,ret就是方法的返回值,我们是可以直接获取,不但可以获取,如果需要还可以进行修改。
返回后通知获取返回值
@Component
@Aspect
public class MyAdvice {
@Pointcut("execution(* com.itheima.dao.BookDao.findName(..))")
private void pt(){}
@AfterReturning(value = "pt()",returning = "ret")
public void afterReturning(Object ret) {
System.out.println("afterReturning advice ..."+ret);
}
//其他的略
}
注意**: **
(1)参数名的问题

(2)afterReturning方法参数类型的问题
参数类型可以写成String,但是为了能匹配更多的参数类型,建议写成Object类型
(3)afterReturning方法参数的顺序问题

运行App后查看运行结果,说明返回值已经被获取到
4.获取异常
对于获取抛出的异常,只有抛出异常后AfterThrowing和环绕Around这两个通知类型可以获取,具
体如何获取?
**环绕通知获取异常 **
这块比较简单,以前我们是抛出异常,现在只需要将异常捕获,就可以获取到原始方法的异常信息了
@Component
@Aspect
public class MyAdvice {
@Pointcut("execution(* com.itheima.dao.BookDao.findName(..))")
private void pt(){}
@Around("pt()")
public Object around(ProceedingJoinPoint pjp){
Object[] args = pjp.getArgs();
System.out.println(Arrays.toString(args));
args[0] = 666;
Object ret = null;
try{
ret = pjp.proceed(args);
}catch(Throwable throwable){
t.printStackTrace();
}
return ret;
}
//其他的略
}
在catch方法中就可以获取到异常,至于获取到异常以后该如何处理,这个就和你的业务需求有关
了。
抛出异常后通知获取异常
@Component
@Aspect
public class MyAdvice {
@Pointcut("execution(* com.itheima.dao.BookDao.findName(..))")
private void pt(){}
@AfterThrowing(value = "pt()",throwing = "t")
public void afterThrowing(Throwable t) {
System.out.println("afterThrowing advice ..."+t);
}
//其他的略
}
如何让原始方法抛出异常,方式有很多,
@Repository
public class BookDaoImpl implements BookDao {
public String findName(int id,String password) {
System.out.println("id:"+id);
if(true){
throw new NullPointerException();
}
return "itcast";
}
}
注意:

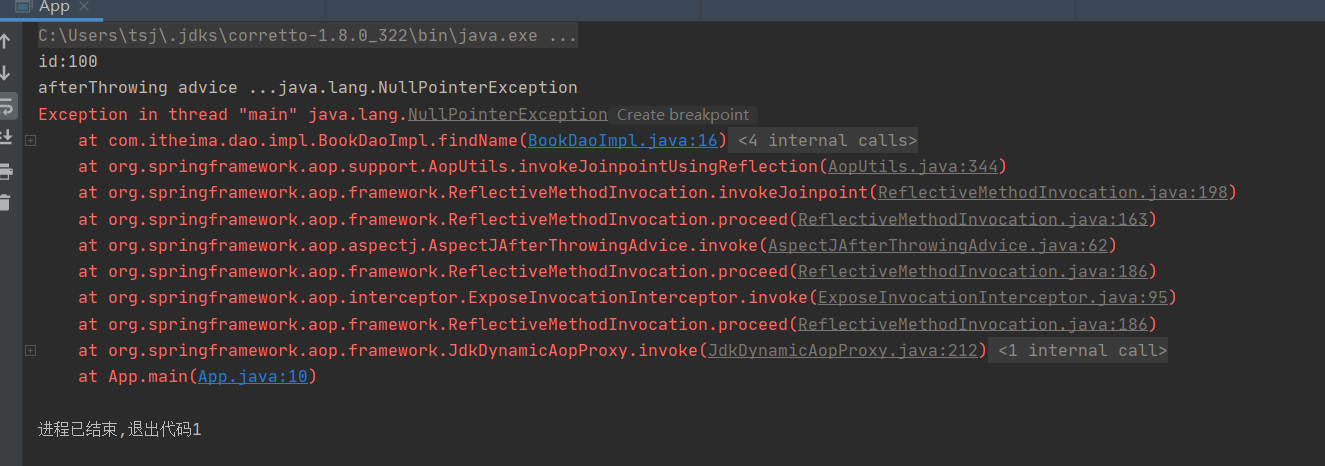
运行App后,查看控制台,就能看的异常信息被打印到控制台
至此,AOP通知如何获取数据就已经讲解完了,数据中包含参数、返回值、异常(了解)。
三、百度网盘密码数据兼容处理
1.需求分析
需求: 对百度网盘分享链接输入密码时尾部多输入的空格做兼容处理。

问题描述:
点击链接,会提示,请输入提取码,如下图所示
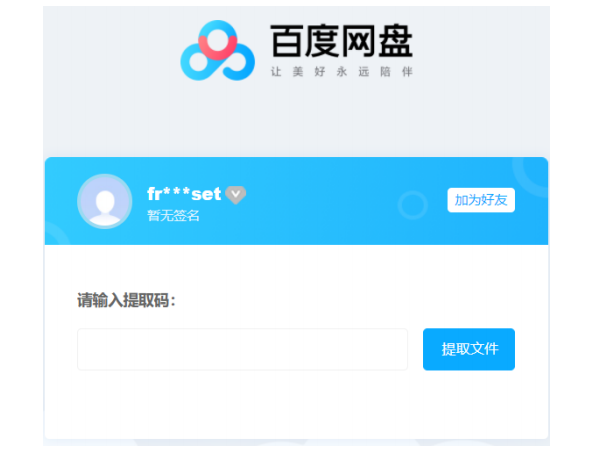
- 当我们从别人发给我们的内容中复制提取码的时候,有时候会多复制到一些空格,直接粘贴到百度的提取码输入框
- 但是百度那边记录的提取码是没有空格的
- 这个时候如果不做处理,直接对比的话,就会引发提取码不一致,导致无法访问百度盘上的内容
- 所以多输入一个空格可能会导致项目的功能无法正常使用。
此时我们就想能不能将输入的参数先帮用户去掉空格再操作呢?
答案是可以的,我们只需要在业务方法执行之前对所有的输入参数进行格式处理——trim() 是对所有的参数都需要去除空格么?
也没有必要,一般只需要针对字符串处理即可。
以后涉及到需要去除前后空格的业务可能会有很多,这个去空格的代码是每个业务都写么?
可以考虑使用AOP来统一处理。
AOP有五种通知类型,该使用哪种呢?
我们的需求是将原始方法的参数处理后在参与原始方法的调用,能做这件事的就只有环绕通知。
综上所述,我们需要考虑两件事:
①:在业务方法执行之前对所有的输入参数进行格式处理—— trim()
②:使用处理后的参数调用原始方法——环绕通知中存在对原始方法的调用
2.具体实现
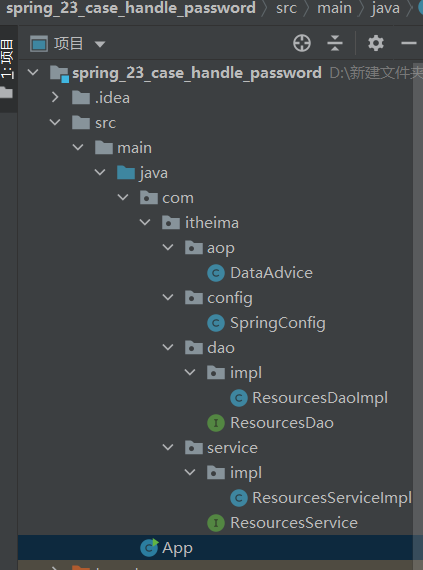
添加ResourcesService,ResourcesServiceImpl,ResourcesDao和ResourcesDaoImpl
类
public interface ResourcesService {
    public boolean openURL(String url ,String password);

}
@Service
public class ResourcesServiceImpl implements ResourcesService {
    @Autowired
    private ResourcesDao resourcesDao;

    public boolean openURL(String url, String password) {
        return resourcesDao.readResources(url,password);
    }
}
public interface ResourcesDao {

    boolean readResources(String url, String password);
}
@Repository
public class ResourcesDaoImpl implements ResourcesDao {
    public boolean readResources(String url, String password) {
        System.out.println(password.length());
        //模拟校验
        return password.equals("root");
    }
}
创建Spring的配置类
@Configuration
@ComponentScan("com.itheima")
@EnableAspectJAutoProxy
public class SpringConfig {
}
AOP
@Component
@Aspect
public class DataAdvice {
    @Pointcut("execution(boolean com.itheima.service.*Service.*(*,*))")
    private void servicePt(){}

    @Around("DataAdvice.servicePt()")
    public Object trimStr(ProceedingJoinPoint pjp) throws Throwable {
        Object[] args = pjp.getArgs();
        for (int i = 0; i < args.length; i++) {
            //判断参数是不是字符串
            if(args[i].getClass().equals(String.class)){
                args[i] = args[i].toString().trim();
            }
        }
        Object ret = pjp.proceed(args);
        return ret;
    }

}
编写App运行类
public class App {
    public static void main(String[] args) {
        ApplicationContext ctx = new AnnotationConfigApplicationContext(SpringConfig.class);
        ResourcesService resourcesService = ctx.getBean(ResourcesService.class);
        boolean flag = resourcesService.openURL("http://pan.baidu.com/haha", "root ");
        System.out.println(flag);
    }
}
四、AOP总结
AOP的知识就已经讲解完了,接下来对于AOP的知识进行一个总结:
1.AOP****的核心概念
概念:AOP(Aspect Oriented Programming)面向切面编程,一种编程范式
作用:在不惊动原始设计的基础上为方法进行功能**增强 **
核心概念
- 代理(Proxy):SpringAOP的核心本质是采用代理模式实现的
- 连接点(JoinPoint):在SpringAOP中,理解为任意方法的执行
- 切入点(Pointcut):匹配连接点的式子,也是具有共性功能的方法描述
- 通知(Advice):若干个方法的共性功能,在切入点处执行,最终体现为一个方法
- 切面(Aspect):描述通知与切入点的对应关系
- 目标对象(Target):被代理的原始对象成为目标对象
2.切入点表达式
切入点表达式标准格式:动作关键字(访问修饰符 返回值 包名.类/接口名.方法名(参数)异常
名)
execution(* com.itheima.service.*Service.*(..))
切入点表达式描述通配符:
- 作用:用于快速描述,范围描述
- *:匹配任意符号(常用)
- .. :匹配多个连续的任意符号(常用)
- +:匹配子类类型
切入点表达式书写技巧
1.按标准规范开发
2.查询操作的返回值建议使用*匹配
3.减少使用..的形式描述包
4.对接口****进行描述,使用表示模块名,例如UserService的匹配描述为Service
5.方法名书写保留动词,例如get,使用表示名词,例如getById匹配描述为getBy
6.参数根据实际情况灵活调整
3.五种通知类型
- 前置通知
- 后置通知
- 环绕通知(重点)
- 环绕通知依赖形参ProceedingJoinPoint才能实现对原始方法的调用
- 环绕通知可以隔离原始方法的调用执行
- 环绕通知返回值设置为Object类型
- 环绕通知中可以对原始方法调用过程中出现的异常进行处理
- 返回后通知
- 抛出异常后通知
4.通知中获取参数
获取切入点方法的参数,所有的通知类型都可以获取参数
- JoinPoint:适用于前置、后置、返回后、抛出异常后通知
- ProceedingJoinPoint:适用于环绕通知
获取切入点方法返回值,前置和抛出异常后通知是没有返回值,后置通知可有可无,所以不做研究
- 返回后通知
- 环绕通知
获取切入点方法运行异常信息,前置和返回后通知是不会有,后置通知可有可无,所以不做研究
- 抛出异常后通知
- 环绕通知
笔记来自: 黑马程序员SSM框架教程
版权归原作者 热爱编程的小白白 所有, 如有侵权,请联系我们删除。