1. 延迟队列使用场景
延迟队列一般可用于具有时间限制的任务,例如:限时优惠,超时的订单处理等。
对于这种场景,传统的处理方式是任务轮询:通过一个后台任务不断的扫描订单信息,发现有超时订单则进行处理,这种处理方式的优点是实现思路简单,容易把握,缺点是对服务器及数据的压力比较大(因为通常需要扫描大量的数据)。
处理这种场景的第二种方式就是通过延迟队列。消息生产者生成消息并放入队列后,要经过指定的延时时间后消息的消费者才能消费消息。
2. RabbitMQ中的延迟队列实现思路
在RabbitMQ中并没有直接支持延迟队列,没有对应的属性可以设置,在RabbitMQ中实现延迟队列的基本思路是:通过死信队列(DXL)和过期时间(TTL)来实现延迟队列。
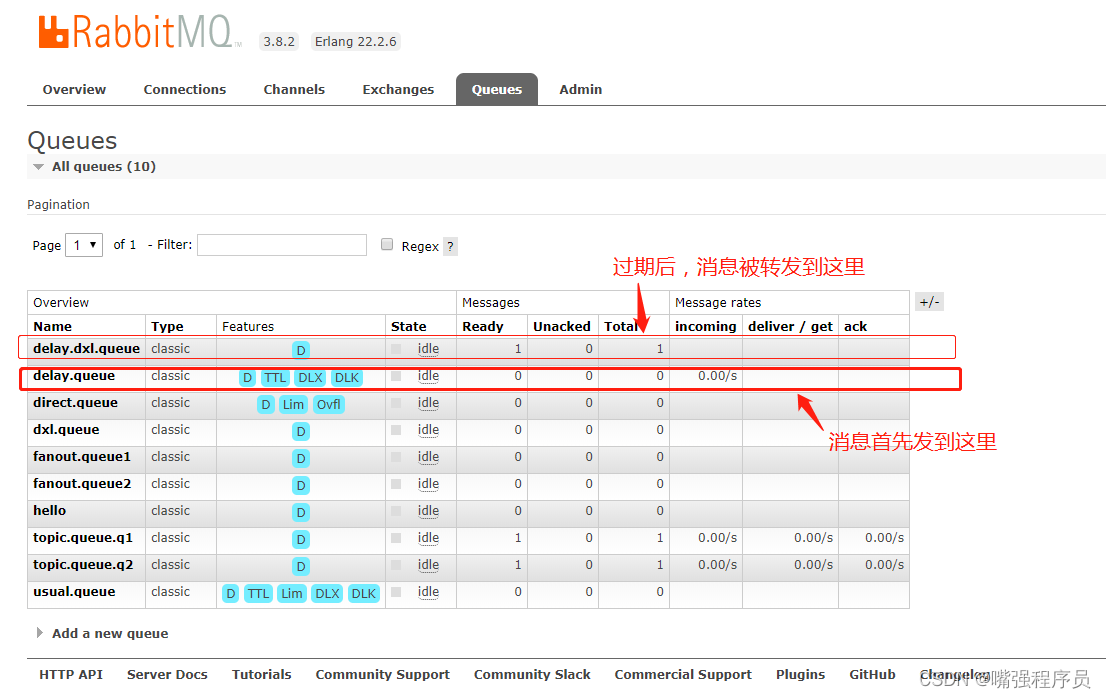
即:给队列设置一个过期时间并指定一个死信交换机与其关联,消息生产者的消息发送给队列,但不指定消息消费者,等待消息过期,消息过期后会被转发到相关联的死信队列中,而消息消费者则从死信队列中消费消息。
3. 实现示例
总体思路:
- 声明死信交换机,队列, 并将队列绑定到死信交换机。
- 声明发送消息的交换机,队列(按照业务需求设置队列的过期时间,但该队列不需要消息消费者),并将队列与交换机关联。
- 编写业务代码通过第2步创建的交换机发送消息到队列。( 观察消息过期后将过期的消息转存到死信队列中)
- 编写消息消费者,消费死信队列中的消息。(在实际项目中该消息消费者就是延迟任务的处理程序)
具体步骤
准备工作
首先准配RabbitMQ服务器 具体步骤
有道云笔记
springboot 版本2.7.7
<dependency>
    <groupId>org.springframework.boot</groupId>
    <artifactId>spring-boot-starter-amqp</artifactId>
</dependency>
<dependency>
    <groupId>org.springframework.boot</groupId>
    <artifactId>spring-boot-starter-web</artifactId>
</dependency>

<dependency>
    <groupId>org.projectlombok</groupId>
    <artifactId>lombok</artifactId>
    <optional>true</optional>
</dependency>
<dependency>
    <groupId>org.springframework.boot</groupId>
    <artifactId>spring-boot-starter-test</artifactId>
    <scope>test</scope>
</dependency>
<dependency>
    <groupId>org.springframework.amqp</groupId>
    <artifactId>spring-rabbit-test</artifactId>
    <scope>test</scope>
</dependency>
application.properties 配置文件
server.port=8081
## rabbitmq config
spring.rabbitmq.host=192.168.164.128
spring.rabbitmq.port=5672
spring.rabbitmq.username=xhz
spring.rabbitmq.password=123
spring.rabbitmq.virtual-host=my_vhost
## 消费者数量
spring.rabbitmq.listener.simple.concurrency=10
spring.rabbitmq.listener.simple.max-concurrency=10
#消费者每次从队列中获取的消息数量
spring.rabbitmq.listener.simple.prefetch=1
#消费者自动启动
spring.rabbitmq.listener.simple.auto-startup=true
#消费失败,自动重新入队
spring.rabbitmq.listener.simple.default-requeue-rejected=true
#启用发送重试
spring.rabbitmq.template.retry.enabled=true
spring.rabbitmq.template.retry.initial-interval=1000
spring.rabbitmq.template.retry.max-attempts=3
spring.rabbitmq.template.retry.max-interval=10000
spring.rabbitmq.template.retry.multiplier=1.0
1)声明死信交换机,队列, 并将队列绑定到死信交换机。
在@Configuration类中进行交换机(如:RabbitMQConfig),队列的声明,及绑定操作。
package com.rabbitmq.provider.rabbitmqprovider.config;

import org.springframework.amqp.core.*;
import org.springframework.beans.factory.annotation.Qualifier;
import org.springframework.context.annotation.Bean;
import org.springframework.context.annotation.Configuration;

import java.util.HashMap;
import java.util.Map;

@Configuration
public class RabbitDLXConfig {
    public final static String NORMAL_QUEUE="normal_queue";
    public final static String NORMAL_ROUTING_KEY = "normal_routing_key";
    public final static String NORMAL_EXCHANGE = "normal_exchange";

    public final static String DELAY_QUEUE = "delay_queue";
    public final static String DELAY_ROUTING_KEY = "delay_routing_key";
    public final static String DELAY_EXCHANGE = "delay_exchange";

    //写法一
    //    普通交换机以及普通队列
    @Bean
    public Queue normalQueue(){
        Map map = new HashMap();
        map.put("x-message-ttl", 20000);//message在该队列queue的存活时间最大为10秒
        map.put("x-dead-letter-exchange", DELAY_EXCHANGE); //x-dead-letter-exchange参数是设置该队列的死信交换器(DLX)
        map.put("x-dead-letter-routing-key", DELAY_ROUTING_KEY);//x-dead-letter-routing-key参数是给这个DLX指定路由键

        return new Queue(NORMAL_QUEUE, true, false, false, map);
    }
  //写法二
    /**
     * 声明队列,用于实现延迟队列,该队列指定超时时间
     * @return
     */
 /*   @Bean(name="normalQueue")
    public Queue normalQueue() {
        return QueueBuilder
                .durable(NORMAL_QUEUE)
                .withArgument("x-message-ttl", 1000*60*1)
                .withArgument("x-dead-letter-exchange", DELAY_EXCHANGE)
                .withArgument("x-dead-letter-routing-key",DELAY_ROUTING_KEY)
                .build();
    }*/

    @Bean
    public DirectExchange normalExchange(){
        return new DirectExchange(NORMAL_EXCHANGE, true, false);
    }

    @Bean
    public Binding normalBinding(@Qualifier("normalExchange") DirectExchange exchange,
                                 @Qualifier("normalQueue") Queue queue){
        return BindingBuilder.bind(queue)
                .to(exchange)
                .with(NORMAL_ROUTING_KEY);
    }

    //    死信交换机及延迟队列
    @Bean
    public Queue delayQueue(){
        return new Queue(DELAY_QUEUE);
    }

    @Bean
    public DirectExchange delayExchange(){
        return new DirectExchange(DELAY_EXCHANGE);
    }

    @Bean
    public Binding delayBinding(){
        return BindingBuilder.bind(delayQueue())
                .to(delayExchange())
                .with(DELAY_ROUTING_KEY);
    }

}
2)编写发送消息的程序代码
package com.rabbitmq.provider.rabbitmqprovider.web;

import com.rabbitmq.provider.rabbitmqprovider.config.RabbitDLXConfig;
import org.springframework.amqp.rabbit.core.RabbitTemplate;
import org.springframework.beans.factory.annotation.Autowired;
import org.springframework.web.bind.annotation.RequestMapping;
import org.springframework.web.bind.annotation.RestController;

import java.time.LocalDateTime;
import java.time.format.DateTimeFormatter;
import java.util.HashMap;
import java.util.Map;

@RestController
public class SenderController {

    @Autowired
    private RabbitTemplate rabbitTemplate;

    @RequestMapping("sendDLX")
    public Map sendDLX(){
        Map msg = new HashMap();
        msg.put("msg","这是通过死信交换机投递的消息");
        msg.put("now", LocalDateTime.now().format(DateTimeFormatter.ofPattern("yyyy-MM-dd HH:mm:ss")));
        rabbitTemplate.convertAndSend(RabbitDLXConfig.NORMAL_EXCHANGE,RabbitDLXConfig.NORMAL_ROUTING_KEY,msg);

        Map res = new HashMap();
        res.put("msg","投递成功");
        res.put("code",200);
        return res;
    }

}
3。运行项目测试
访问地址:http://localhost:8081/sendDirect
验证:发送的消息会先发到“delay.queue”队列中,在消息过期后,会将消息发送到“delay.dxl.queue”(死信队列)。

版权归原作者 嘴强程序员 所有, 如有侵权,请联系我们删除。