
文章目录
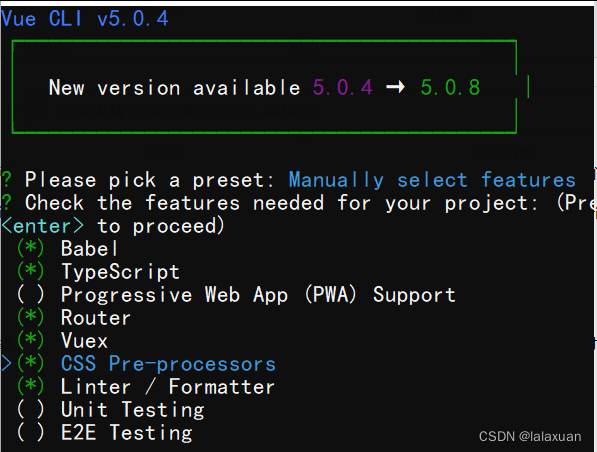
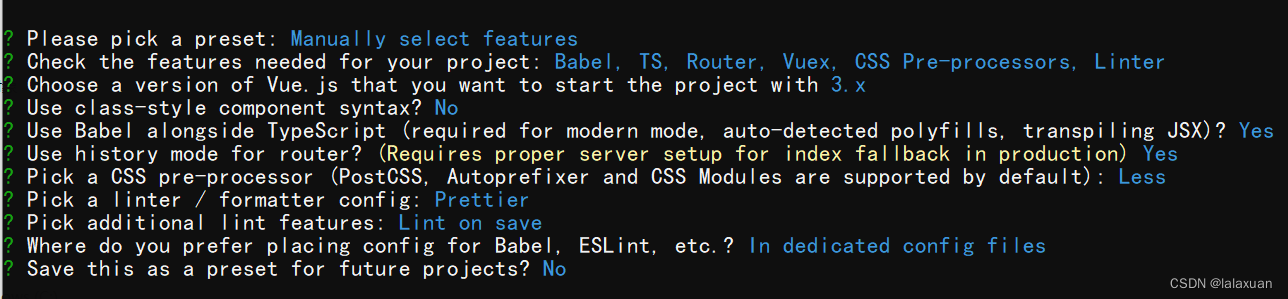
创建项目
vue create vue3-ts-cms

一. 代码规范
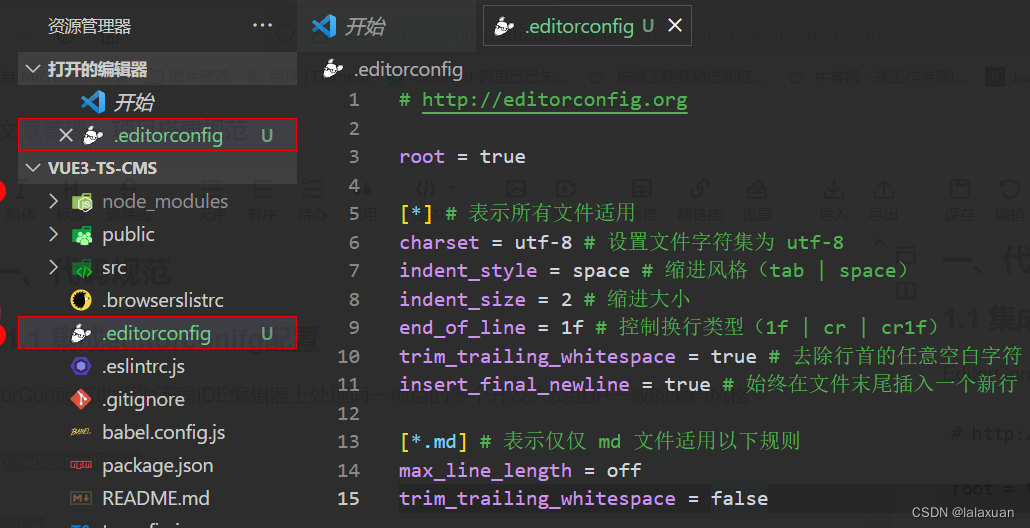
1.1. 集成editorconfig配置
EditorConfig 有助于为不同 IDE 编辑器上处理同一项目的多个开发人员维护一致的编码风格。
# http://editorconfig.org

root =true[*] # 表示所有文件适用
charset = utf-8 # 设置文件字符集为 utf-8
indent_style = space # 缩进风格(tab | space)
indent_size =2 # 缩进大小
end_of_line = lf # 控制换行类型(lf | cr | crlf)
trim_trailing_whitespace =true # 去除行首的任意空白字符
insert_final_newline =true # 始终在文件末尾插入一个新行

[*.md] # 表示仅 md 文件适用以下规则
max_line_length = off
trim_trailing_whitespace =false
VScode需要安装插件:
EditorConfig for VS Code

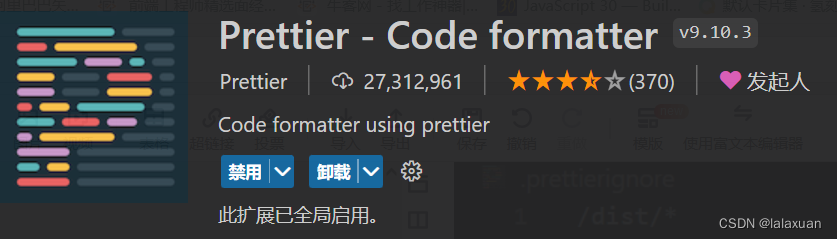
1.2 使用prettier工具
Prettier是一款强大的代码格式化工具,支持javascript、TypeScript、CSS、SCSS、Less、JSX、Angular、Vue、GraphQL、JSON、Markdown等语言,基本前端能用到的文件格式它都可以搞定,是当下最流行的代码格式化工具
⭐️(1)安装prettier
npm install prettier -D | yarn add prettier -D
⭐️(2) 配置
.prettierrc
文件:
useTabs
: 适用tab缩进还是空格缩进,选择false
tabWidth
: tab是空格的情况下,是几个空格,选择2个
printWidth
: 当行字符的长度,推荐80, 也有人喜欢100或者120
singleQuote
: 使用单引号还是双引号,选择true,使用单引号
trailingComma
: 在多行输入的尾逗号是否添加,设置为none
semi
: 语句末尾是否加分号,默认值是true,选择false表示不加
{"useTabs":false,"tabWidth":2,"printWidth":80,"singleQuote":true,"trailingComma":"none","semi":false}

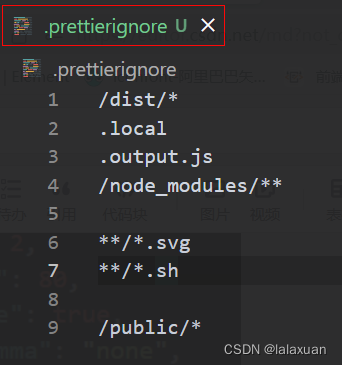
- 创建
.prettierignore忽略文件/dist/*.local.output.js/node_modules/****/*.svg**/*.sh/public/*
- VS Code安装所需要的插件
5. 测试prettier是否生效
测试一: 在代码中保存代码
测试二: 配置一次性修改的命令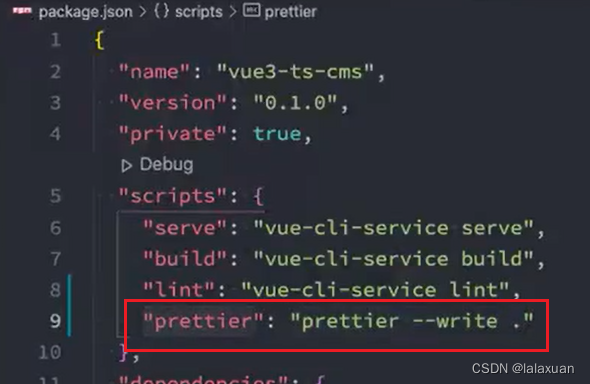
1.3 使用ESLint检测
在创建项目的时候,选择了ESLint,所以Vue默认帮助我们配置了需要的ESLint环境
VSCode需要安装ESLint插件: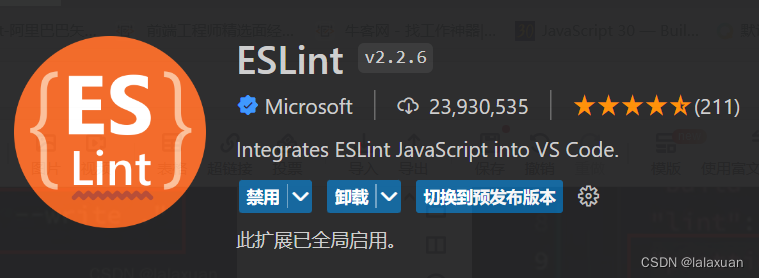
解决eslint和prettier冲突的问题:
安装插件:(Vue创建项目时,如果选择了prettier),那么这两个插件会自动安装
npm i eslint-plugin-prettier eslint-config-prettier -D
yarn add eslint-plugin-prettier eslint-config-prettier -D
添加prettier插件(在.eslintrc.js中)
extends: {
    “plugin:vue/vue3-essential”,
    "eslint:recommended",
    "@vue/typescript/recommended",
    "@vue/prettier",
    "@vue/prettier/@typescript-eslint",
    "plugin: prettier/recommended"
}
1.4 git Husky和eslint
虽然已经要求项目使用eslint,但是不能保证组员提交代码之前都将eslint中的问题都解决掉了。
也就是说希望保证代码仓库中的代码都是符合eslint规范的
那么需要在组员执行
git commit
命令的时候对其进行校验,如果不符合eslint规范,那么自动通过规范进行修复;
如何做到这一点? 可以通过Husky工具:
husky是一个git hook工具,可以帮助我们触发git提交的各个阶段:pre-commit、commit-msg、pre-push
如何使用husky呢?
这里可以使用自动配置命令:
npx husky-init && npm install
这里我直接使用
npx husky-init
即可
这里会做三件事:
安装husky相关的依赖:
在项目目录下创建
.husky
文件夹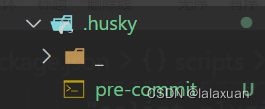
在
package.json
中添加一个脚本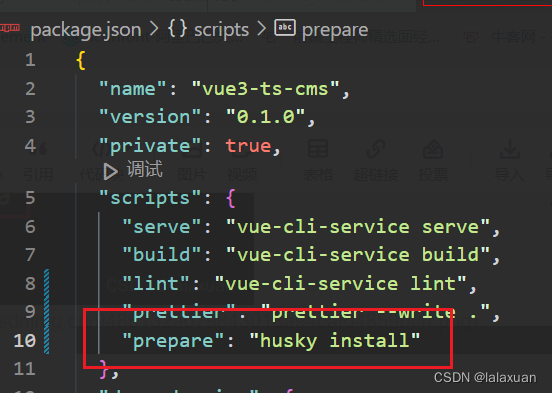
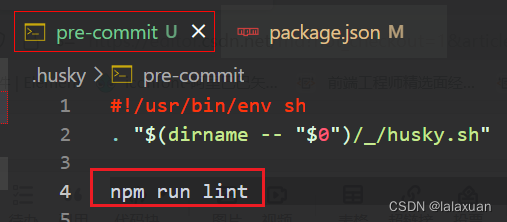
接下来 我们需要去完成一个操作,在进行commit时,执行lint脚本
1.5 git commit 规范
1.5.1 代码提交风格
通常我们的git commit会按照统一的风格来提交,这样可以快速定位每次提交的内容,方便之后对版本进行控制。
但是如果每次手动来编写这些是比较麻烦的事情,我们可以使用一个工具:Commitizen
Commitizen 是一个帮助我们编写规范 commit message 的工具;
- 安装Commitizen
npm install commitizen -D
- 安装cz-conventional-changelog,并且初始化cz-conventional-changelog:
npx commitizen init cz-conventional-changelog --save-dev --save-exact
这个命令会帮助我们安装cz-conventional-changelog:

并且在package.json中进行配置: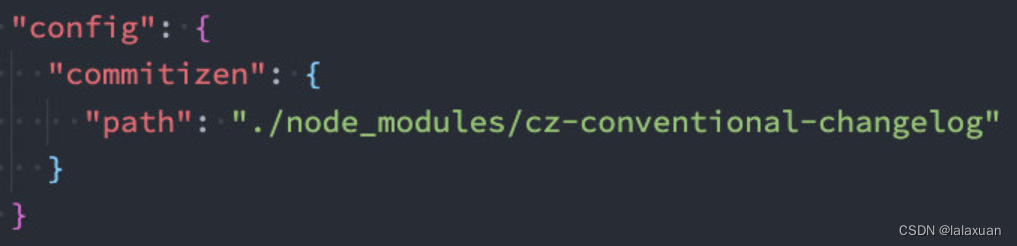
这个时候我们提交代码需要使用 npx cz:
第一步是选择type,本次更新的类型
Type作用feat新增特性 (feature)fix修复 Bug(bug fix)docs修改文档 (documentation)style代码格式修改(white-space, formatting, missing semi colons, etc)refactor代码重构(refactor)perf改善性能(A code change that improves performance)test测试(when adding missing tests)build变更项目构建或外部依赖(例如 scopes: webpack、gulp、npm 等)ci更改持续集成软件的配置文件和 package 中的 scripts 命令,例如 scopes: Travis, Circle 等chore变更构建流程或辅助工具(比如更改测试环境)revert代码回退第二步选择本次修改的范围(作用域)

- 第三步选择提交的信息

- 第四步提交详细的描述信息

- 第五步是否是一次重大的更改

- 第六步是否影响某个open issue

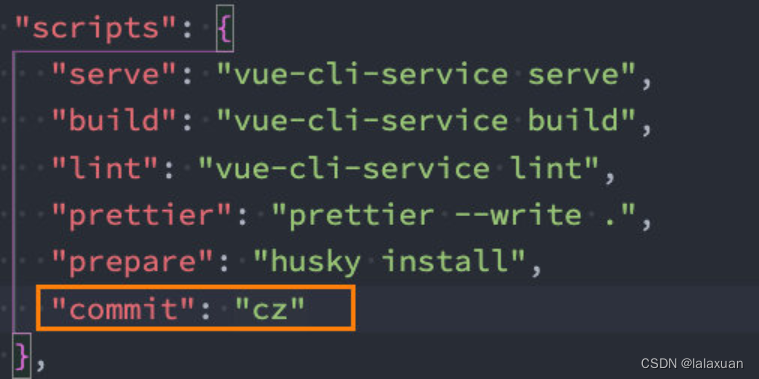
我们也可以在scripts中构建一个命令来执行 cz:
1.5.2 代码提交验证
如果我们按照cz来规范了提交风格,但是依然有同事通过 git commit 按照不规范的格式提交应该怎么办呢?
- 我们可以通过commitlint来限制提交;
- 安装 @commitlint/config-conventional 和 @commitlint/cli
npm i @commitlint/config-conventional @commitlint/cli -D
- 在根目录创建commitlint.config.js文件,配置commitlint
module.exports ={extends:['@commitlint/config-conventional']}
- 使用husky生成commit-msg文件,验证提交信息:
npx husky add .husky/commit-msg "npx --no-install commitlint --edit $1"
报错:
Error: Failed to load config "@vue/prettier" to extend from.
解决方法: vue 问题汇总(持续更新自用)
二、第三方库集成
2.1 vue.config.js配置
vue.config.js
有三种配置方式:
- 方式一:直接通过CLI提供给我们的选项来配置:
比如
publicPath
:配置应用程序部署的子目录(默认是 /,相当于部署在
https://www.my-app.com/
);
比如outputDir:修改输出的文件夹;
- 方式二:通过
configureWebpack修改webpack的配置:
可以是一个对象,直接会被合并;
可以是一个函数,会接收一个config,可以通过config来修改配置;
- 方式三:通过chainWebpack修改webpack的配置:
是一个函数,会接收一个基于 webpack-chain 的config对象,可以对配置进行修改;
const path =require('path')

module.exports ={outputDir:'./build',// configureWebpack: {//   resolve: {//     alias: {//       views: '@/views'//     }//   }// }// configureWebpack: (config) => {//   config.resolve.alias = {//     '@': path.resolve(__dirname, 'src'),//     views: '@/views'//   }// },chainWebpack:(config)=>{
    config.resolve.alias.set('@', path.resolve(__dirname,'src')).set('views','@/views')}}
2.2 vue-router集成
安装vue-router的最新版本:
npm install vue-router@next
创建router对象:
import{ createRouter, createWebHashHistory }from'vue-router'import{ RouteRecordRaw }from'vue-router'constroutes: RouteRecordRaw[]=[{path:'/',redirect:'/main'},{path:'/main',component:()=>import('../views/main/main.vue')},{path:'/login',component:()=>import('../views/login/login.vue')}]const router =createRouter({
  routes,history:createWebHashHistory()})exportdefault router
安装router:
import router from'./router'createApp(App).use(router).mount('#app')
在App.vue中配置跳转:
<template><div id="app"><router-link to="/login">登录</router-link><router-link to="/main">首页</router-link><router-view></router-view></div></template>
2.3 vuex集成
安装vuex:
npm install vuex@next
创建store对象:
import{ createStore }from'vuex'const store =createStore({state(){return{name:'coderwhy'}}})exportdefault store
安装store:
createApp(App).use(router).use(store).mount('#app')
在App.vue中使用:
<h2>{{ $store.state.name }}</h2>
$store
报错
类型“{$: ComponentInternalInstance; $data:{}; $props: Partial<{}>& Omit<Readonly<ExtractPropTypes<{}>>& VNodeProps & AllowedComponentProps & ComponentCustomProps, never>;...10 more ...;$watch(source: string | Function,cb: Function, options?: WatchOptions<...>|undefined): WatchStopHandle;}& Readonly<...>& Sha...”上不存在属性“$store”
解决方法:
shims-vue.d.ts
declarelet $store:any
2.4 element-plus集成
Element Plus,一套为开发者、设计师和产品经理准备的基于 Vue 3.0 的桌面端 组件库:
- 相信很多同学在Vue2中都使用过element-ui,而element-plus正是element-ui针对于vue3开发的一个UI组件库;
- 它的使用方式和很多其他的组件库是一样的,所以学会element-plus,其他类似于ant-design-vue、NaiveUI、VantUI都是差不多的;
安装element-plus
npm install element-plus
报错
vue3报错:找不到模块“element-plus”或其相应的类型说明
typescript 只能理解 .ts 文件,无法理解 .vue文件。
shims-vue.d.ts
文件中加入
declaremodule"element-plus";
2.4.1 全局引入
一种引入element-plus的方式是全局引入,代表的含义是所有的组件和插件都会被自动注册:
import ElementPlus from'element-plus'import'element-plus/theme-chalk/index.css'
app.use(ElementPlus)
如果出现路径错误是因为element-plus更新快,可能路径已更改
2.4.2 局部引入
也就是在开发中用到某个组件对某个组件进行引入:
<template><divid="app"><router-linkto="/login">登录</router-link><router-linkto="/main">首页</router-link><router-view></router-view><h2>{{ $store.state.name }}</h2><el-button>默认按钮</el-button><el-buttontype="primary">主要按钮</el-button><el-buttontype="success">成功按钮</el-button><el-buttontype="info">信息按钮</el-button><el-buttontype="warning">警告按钮</el-button><el-buttontype="danger">危险按钮</el-button></div></template><scriptlang="ts">import{ defineComponent }from'vue'import{ ElButton }from'element-plus/lib/index'import'element-plus/theme-chalk/el-button.css'import'element-plus/theme-chalk/base.css'exportdefaultdefineComponent({name:'App',components:{
    ElButton
  }})</script><stylelang="less"></style>
但是我们会发现是没有对应的样式的,引入样式有两种方式:
- 全局引用样式(像之前做的那样);
- 局部引用样式(通过babel的插件);
- 安装babel的插件:
npm install babel-plugin-import-D
- 配置babel.config.js
module.exports ={plugins:[['import',{libraryName:'element-plus',customStyleName:(name)=>{return`element-plus/lib/theme-chalk/${name}.css`}}]],presets:['@vue/cli-plugin-babel/preset']}
但是这里依然有个弊端:
- 这些组件我们在多个页面或者组件中使用的时候,都需要导入并且在components中进行注册;
- 所以我们可以将它们在全局注册一次;
import{
  ElButton,
  ElTable,
  ElAlert,
  ElAside,
  ElAutocomplete,
  ElAvatar,
  ElBacktop,
  ElBadge,}from'element-plus/lib/index'const app =createApp(App)const components =[
  ElButton,
  ElTable,
  ElAlert,
  ElAside,
  ElAutocomplete,
  ElAvatar,
  ElBacktop,
  ElBadge
]for(const cpn of components){
  app.component(cpn.name, cpn)}
新版本element-plus的局部引入都是
'element-plus/lib/index'
2.5 axios集成
安装axios:
npm install axios
不同版本的路径选择:
- 条件判断
//config.tsletBASE_URL=''letBASE_NAME=''if(process.env.NODE_ENV==='development'){;(BASE_NAME='dev'),(BASE_URL='http://coderwhy.org/dev')}elseif(process.env.NODE_ENV==='product'){;(BASE_NAME='prod'),(BASE_URL='http://coderwhy.org/prod')}else{;(BASE_NAME='test'),(BASE_URL='http://coderwhy.org/test')}export{BASE_NAME,BASE_URL}
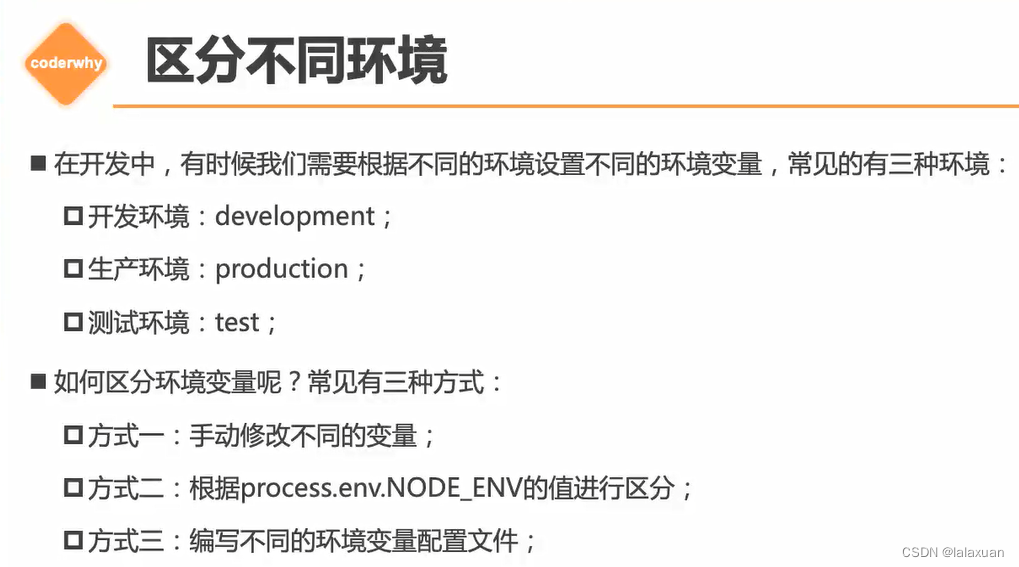
- 只有
NODE_ENV,BASE_URL和以VUE_APP_开头的变量将通过webpack.DefinePlugin静态地嵌入到客户端侧的代码中。这是为了避免意外公开机器上可能具有相同名称的私钥。(创建.env.development文件来声明变量)如果使用的时候报错,要在shims-vue.d.ts声明该变量,访问的时候要process.env.VUE_APP_xxx
封装axios:
import axios from'axios'import type { AxiosInstance }from'axios'import type { PUBRequestInterceptors, PUBRequestConfig }from'./type'import{ ElLoading }from'element-plus/lib/index'import{ LoadingInstance }from'element-plus/lib/components/loading/src/loading.js'constDEFAULT_LOADING=trueclassPUBRequest{instance: AxiosInstance
  interceptors?: PUBRequestInterceptors
  showLoading: boolean
  loading?: LoadingInstance
  constructor(config: PUBRequestConfig){// 创建axios实例this.instance = axios.create(config)// 保存基本信息this.showLoading = config.showLoading ??DEFAULT_LOADINGthis.interceptors = config.interceptors

    // 使用拦截器// 从config中取出的拦截器是对应的实例的拦截器this.instance.interceptors.request.use(this.interceptors?.requestInterceptor,this.interceptors?.requestInterceptorCatch
    )this.instance.interceptors.response.use(this.interceptors?.responseInterceptor,this.interceptors?.responseInterceptorCatch
    )// 所有实例的都有的拦截器this.instance.interceptors.request.use((config)=>{
        console.log('所有实例的拦截器:请求成功')if(this.showLoading){this.loading = ElLoading.service({lock:true,text:'正在请求数据~~~',background:'rgba(0, 0, 0.5)'})}return config
      },(err)=>{
        console.log('所有实例的拦截器:请求失败')return err
      })this.instance.interceptors.response.use((res)=>{const data = res.data
        console.log('所有实例的拦截器:响应成功')this.loading?.close()if(data.returnCode ==='-1001'){
          console.log('请求失败——————')}else{return data
        }},(err)=>{
        console.log('所有实例的拦截器:响应失败')if(err.response.status ===404){
          console.log('404--------err!!')}return err
      })}
  request<T>(config: PUBRequestConfig<T>): Promise<T>{returnnewPromise((resolve, reject)=>{// 1.单个请求对config的处理if(config.interceptors?.requestInterceptor){
        config = config.interceptors.requestInterceptor(config)}// 2.判断是否需要显示loadingif(config.showLoading ===false){this.showLoading = config.showLoading
      }this.instance.request<any,T>(config).then((res)=>{// 1.单个请求对数据的处理if(config.interceptors?.responseInterceptor){
            res = config.interceptors.responseInterceptor(res)// 此时获取到的是原来res.data,不能成功答应返回数据状态等内容}// 2. 将showloading设置true,不会影响下一个请求this.showLoading =DEFAULT_LOADING// 3.将返回结果resolve返回出去resolve(res)},(err)=>{this.showLoading =DEFAULT_LOADINGreject(err)return err
        })})}

  get<T= any>(config: PUBRequestConfig<T>): Promise<T>{returnthis.request({...config,method:'GET'})}

  post<T= any>(config: PUBRequestConfig<T>): Promise<T>{returnthis.request({...config,method:'POST'})}

  patch<T= any>(config: PUBRequestConfig<T>): Promise<T>{returnthis.request({...config,method:'PATCH'})}delete<T= any>(config: PUBRequestConfig<T>): Promise<T>{returnthis.request({...config,method:'DELETE'})}}exportdefault PUBRequest
//main.tsimport{ createApp }from'vue'import{ registerApp }from'./global'import'normalize.css'import'./assets/css/index.less'import rootApp from'./App.vue'import router from'./router'import store from'./store'import'element-plus/theme-chalk/index.css'import pubRequest from'./service/index'import*as ElementPlusIconsVue from'@element-plus/icons-vue'const app =createApp(rootApp)for(const[key, component]of Object.entries(ElementPlusIconsVue)){
  app.component(key, component)}registerApp(app)
app.use(router)
app.use(store)// app.use(ElementPlus)interfaceDataType{data: any
  returnCode: string
  success: boolean
}

pubRequest
  .request<DataType>({url:'/home/multidata',method:'GET',interceptors:{requestInterceptor:(config)=>{
        console.log('单独请求config')return config
      },responseInterceptor:(res)=>{
        console.log('单独响应res')return res.data
      }}// showLoading: false}).then((res)=>{
    console.log(res.data)
    console.log(res.returnCode)
    console.log(res.success)})

pubRequest.request({url:'/home/multidata',method:'GET'})
app.mount('#app')
//type.tsimport type { AxiosRequestConfig, AxiosResponse }from'axios'exportinterfacePUBRequestInterceptors<T= AxiosResponse>{
  requestInterceptor?:(config: AxiosRequestConfig)=> AxiosRequestConfig
  requestInterceptorCatch?:(error: any)=> any
  responseInterceptor?:(res:T)=>T
  responseInterceptorCatch?:(error: any)=> any
}exportinterfacePUBRequestConfig<T= AxiosResponse>extendsAxiosRequestConfig{
  interceptors?: PUBRequestInterceptors<T>
  showLoading?: boolean
}
httpbin.org
可以模拟不同请求
关掉any类型的警告’
@typescript-eslint/no-explicit-any':'off'
就简单举例axios:axiosdemo
import axios from'axios'
axios.defaults.baseURL ='http://httpbin.org'
axios.defaults.timeout =1000

axios.get('http://123.207.32.32:8000/home/multidata').then((res)=>{
  console.log(res)})

axios
  .get('/get',{params:{name:'gagag',age:19}}).then((res)=>{
    console.log(res)})

axios
  .post('/post',{data:{name:'lalala',age:20}}).then((res)=>{
    console.log(res)})

axios
  .all([
    axios.get('/get',{params:{name:'hahah'}}),
    axios.post('/post',{data:{name:'xixixi'}})]).then((res)=>{
    console.log(res[0].data)
    console.log(res[1].data)})
axios.interceptors.request.use((config)=>{
    console.log(config)return config
  },(err)=>{
    console.log(err)return err
  })
2.6. VSCode配置
{"workbench.iconTheme":"vscode-great-icons","editor.fontSize":17,"eslint.migration.2_x":"off","[javascript]":{"editor.defaultFormatter":"dbaeumer.vscode-eslint"},"files.autoSave":"afterDelay","editor.tabSize":2,"terminal.integrated.fontSize":16,"editor.renderWhitespace":"all","editor.quickSuggestions":{"strings":true},"debug.console.fontSize":15,"window.zoomLevel":1,"emmet.includeLanguages":{"javascript":"javascriptreact"},"explorer.confirmDragAndDrop":false,"workbench.tree.indent":16,"javascript.updateImportsOnFileMove.enabled":"always","editor.wordWrap":"on","path-intellisense.mappings":{"@":"${workspaceRoot}/src"},"hediet.vscode-drawio.local-storage":"eyIuZHJhd2lvLWNvbmZpZyI6IntcImxhbmd1YWdlXCI6XCJcIixcImN1c3RvbUZvbnRzXCI6W10sXCJsaWJyYXJpZXNcIjpcImdlbmVyYWw7YmFzaWM7YXJyb3dzMjtmbG93Y2hhcnQ7ZXI7c2l0ZW1hcDt1bWw7YnBtbjt3ZWJpY29uc1wiLFwiY3VzdG9tTGlicmFyaWVzXCI6W1wiTC5zY3JhdGNocGFkXCJdLFwicGx1Z2luc1wiOltdLFwicmVjZW50Q29sb3JzXCI6W1wiRkYwMDAwXCIsXCIwMENDNjZcIixcIm5vbmVcIixcIkNDRTVGRlwiLFwiNTI1MjUyXCIsXCJGRjMzMzNcIixcIjMzMzMzM1wiLFwiMzMwMDAwXCIsXCIwMENDQ0NcIixcIkZGNjZCM1wiLFwiRkZGRkZGMDBcIl0sXCJmb3JtYXRXaWR0aFwiOjI0MCxcImNyZWF0ZVRhcmdldFwiOmZhbHNlLFwicGFnZUZvcm1hdFwiOntcInhcIjowLFwieVwiOjAsXCJ3aWR0aFwiOjExNjksXCJoZWlnaHRcIjoxNjU0fSxcInNlYXJjaFwiOnRydWUsXCJzaG93U3RhcnRTY3JlZW5cIjp0cnVlLFwiZ3JpZENvbG9yXCI6XCIjZDBkMGQwXCIsXCJkYXJrR3JpZENvbG9yXCI6XCIjNmU2ZTZlXCIsXCJhdXRvc2F2ZVwiOnRydWUsXCJyZXNpemVJbWFnZXNcIjpudWxsLFwib3BlbkNvdW50ZXJcIjowLFwidmVyc2lvblwiOjE4LFwidW5pdFwiOjEsXCJpc1J1bGVyT25cIjpmYWxzZSxcInVpXCI6XCJcIn0ifQ==","hediet.vscode-drawio.theme":"Kennedy","editor.fontFamily":"Source Code Pro, 'Courier New', monospace","editor.smoothScrolling":true,"editor.formatOnSave":true,"editor.defaultFormatter":"esbenp.prettier-vscode","workbench.colorTheme":"Atom One Dark","vetur.completion.autoImport":false,"security.workspace.trust.untrustedFiles":"open","eslint.lintTask.enable":true,"eslint.alwaysShowStatus":true,"editor.codeActionsOnSave":{"source.fixAll.eslint":true}}
三. 接口文档
https://documenter.getpostman.com/view/12387168/TzsfmQvw
baseURL的值:
http://152.136.185.210:5000
设置全局token的方法:
const res = pm.response.json();
pm.globals.set("token", res.data.token);
接口文档v2版本:(有部分更新)
https://documenter.getpostman.com/view/12387168/TzzDKb12
————————————————
版权归原作者 lalaxuan 所有, 如有侵权,请联系我们删除。