
k8s生产中常用的volumes挂载方式有:hostPath、pv,pvc、nfs
1.hostPath挂载
hostPath是将主机节点文件系统上的文件或目录挂载到Pod 中,同时pod中的目录或者文件也会实时存在宿主机上,如果pod删除,hostpath中的文件不会被删除。(生成的pod只能在同一个节点上,调度到其他节点就不会挂载)
配置文件:
[root@master1 k8s-nginx]# cat nginx-test.yaml
apiVersion: v1
kind: Service
metadata:
labels:
app: nginx-service
name: nginx-service
namespace: default
spec:
ports:
#对外暴露端口30003
- nodePort: 30003
port: 8010
protocol: TCP
targetPort: 8010
selector:
app: nginx-web
#NodePort对外暴露端口
type: NodePort
---
apiVersion: apps/v1
kind: Deployment
metadata:
labels:
app: nginx-web
name: nginx-web
namespace: default
spec:
replicas: 1
selector:
matchLabels:
app: nginx-web
template:
metadata:
labels:
app: nginx-web
namespace: default
spec:
imagePullSecrets:
- name: secret-key
containers:
- image: registry.cn-zhangjiakou.aliyuncs.com/ymku/nginx:v2
name: nginx
env:
- name: TZ
value: Asia/Shanghai
imagePullPolicy: Always
ports:
- containerPort: 8010
resources:
requests:
cpu: 100m
memory: 512Mi
limits:
cpu: 1000m
memory: 1Gi
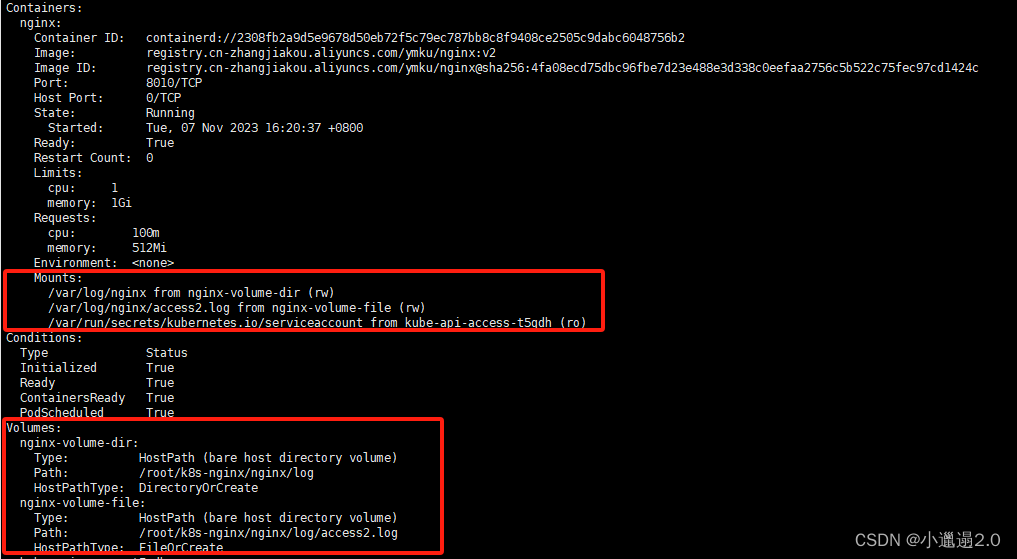
volumeMounts:
- name: nginx-volume-dir
mountPath: /var/log/nginx
- name: nginx-volume-file
mountPath: /var/log/nginx/access2.log
volumes:
- name: nginx-volume-dir
hostPath:
path: /root/k8s-nginx/nginx/log
type: DirectoryOrCreate #如果目录不存在就创建
- name: nginx-volume-file
hostPath:
path: /root/k8s-nginx/nginx/log/access2.log
type: FileOrCreate ## 如果文件不存在则创建
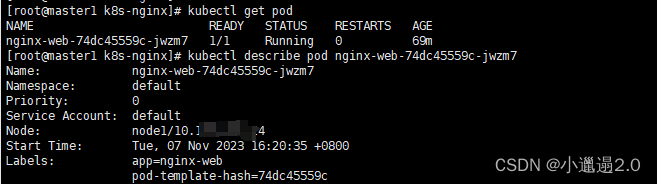
这个是master1节点创建的,pod是在node1节点上运行的,所以日志是存储在node1节点上
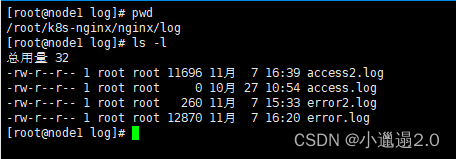
需要登录到node1节点上查看挂载的情况:
在node1节点上查看是否目录和日志文件:
2.nfs挂载
nfs挂载是hostPath挂载的升级版,优点是在不同的node节点上的日志,文件都可以挂载到nfs的机器上,只需要配置上nfs挂载的机器ip和挂载的路径就行。
安装nfs,建立共享服务器(单独服务器安装nfs挂载,ip:10.10.10.25)
[root@localhost ~]# yum -y install nfs-utils
...
创建存储目录:
[root@localhost ~]# mkdir -p /data/nfs/{conf,dist,log}   #可以创建多个存储目录

[root@localhost ~]# vim /etc/exports
/data/nfs 10.10.10.24(rw,no_root_squash)  #可以添加多个存储目录
#将共享目录以读写权限给node1机器,因为pod是跑在node1节点上:10.10.10.24

启动nfs应用:
[root@localhost ~]# systemctl start nfs

查看进程:
[root@localhost ~]# ps -ef |grep nfs
root     104715      2  0 15:56 ?        00:00:00 [nfsd4_callbacks]
root     104721      2  0 15:56 ?        00:00:00 [nfsd]
root     104722      2  0 15:56 ?        00:00:00 [nfsd]
root     104723      2  0 15:56 ?        00:00:00 [nfsd]
root     104724      2  0 15:56 ?        00:00:00 [nfsd]
root     104725      2  0 15:56 ?        00:00:00 [nfsd]
root     104726      2  0 15:56 ?        00:00:00 [nfsd]
root     104727      2  0 15:56 ?        00:00:00 [nfsd]
root     104728      2  0 15:56 ?        00:00:00 [nfsd]
root     104750 103971  0 15:56 pts/0    00:00:00 grep --color=auto nfs

修改/etc/exports后,使文件生效:
[root@localhost ~]# exportfs -r
/data/nfs    10.10.10.24

查看挂载目录:
[root@localhost nfs]# exportfs
/data/nfs/conf    10.10.10.24
/data/nfs/log     10.10.10.24
/data/nfs/dist    10.10.10.24
[root@localhost nfs]# exportfs -v
/data/nfs/conf    10.10.10.24(sync,wdelay,hide,no_subtree_check,sec=sys,rw,secure,no_root_squash,no_all_squash)
/data/nfs/log     10.10.10.24(sync,wdelay,hide,no_subtree_check,sec=sys,rw,secure,no_root_squash,no_all_squash)
/data/nfs/dist    10.10.10.24(sync,wdelay,hide,no_subtree_check,sec=sys,rw,secure,no_root_squash,no_all_squash)
** 编写pod的yaml文件:**
vim nginx-nfs.yaml
apiVersion: v1
kind: Service
metadata:
  labels:
    app: nginx-service
  name: nginx-service
  namespace: default
spec:
  ports:
    #对外暴露端口30003
  - nodePort: 30003
    port: 8010
    protocol: TCP
    targetPort: 8010
  selector:
    app: nginx-web
  #NodePort对外暴露端口
  type: NodePort
---
apiVersion: apps/v1
kind: Deployment
metadata:
  labels:
    app: nginx-web
  name: nginx-web
  namespace: default
spec:
  replicas: 1
  selector:
    matchLabels:
      app: nginx-web
  template:
    metadata:
      labels:
        app: nginx-web
      namespace: default
    spec:
      imagePullSecrets:
      - name: secret-key
      containers:
      - image: registry.cn-zhangjiakou.aliyuncs.com/ymku/nginx:v2
        name: nginx
        env:
        - name: TZ
          value: Asia/Shanghai
        imagePullPolicy: Always
        ports:
        - containerPort: 8010
        resources:
          requests:
            cpu: 100m
            memory: 512Mi
          limits:
            cpu: 1000m
            memory: 1Gi
        volumeMounts:
        - name: nginx-volume-dir
          mountPath: /var/log/nginx
        #- name: nginx-volume-file
        #  mountPath: /var/log/nginx/access2.log
        #- name: nginx-config
        #  mountPath: /etc/nginx/conf.d
      volumes:
      - name: nginx-volume-dir
        nfs:
          server: 10.10.10.25
          path: /data/nfs
      #- name: nginx-volume-file
      #    server: 10.10.10.25
      #    path: /data/nfs
      #- name: nginx-config
      #  nfs:
      #    server: 10.10.10.25
      #    path: /data/nfs
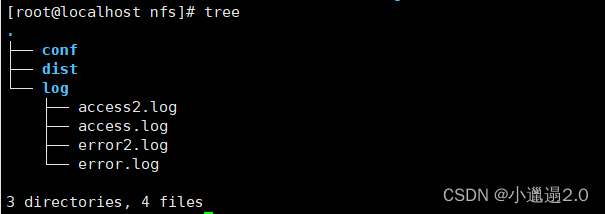
验证:到安装nfs机器上的/data/nfs/log目录查看是否有文件
问题:单独nfs挂载好像只能挂载一个目录,挂载多个目录不生效并且导致部分文件消失?
/etc/exports 配置:

yaml配置:
        volumeMounts:
        - name: nginx-dir
          mountPath: /etc/nginx/dist
        - name: nginx-log
          mountPath: /var/log/nginx
        - name: nginx-config
          mountPath: /etc/nginx/conf.d
      volumes:
      - name: nginx-dir
        nfs:
          server: 10.10.10.25
          path: /data/nfs/dist
      - name: nginx-log
        nfs:
          server: 10.10.10.25
          path: /data/nfs/log
      - name: nginx-config
        nfs:
          server: 10.10.10.25
          path: /data/nfs/conf
待续...
3.pv、pvc挂载
pv,pvc挂载是基于nfs挂载的高级方式(如果不搭配nfs使用,侧配置的pv,pvc默认是pod所在node节点上),通过PV和PVC,Kubernetes可以实现存储资源的动态供给、自动扩展和缩减,以及共享和负载均衡等高级特性。PV和PVC的出现使得应用容器可以随时地挂载或卸载存储资源,而无需手动管理存储卷的创建、挂载和卸载等操作。
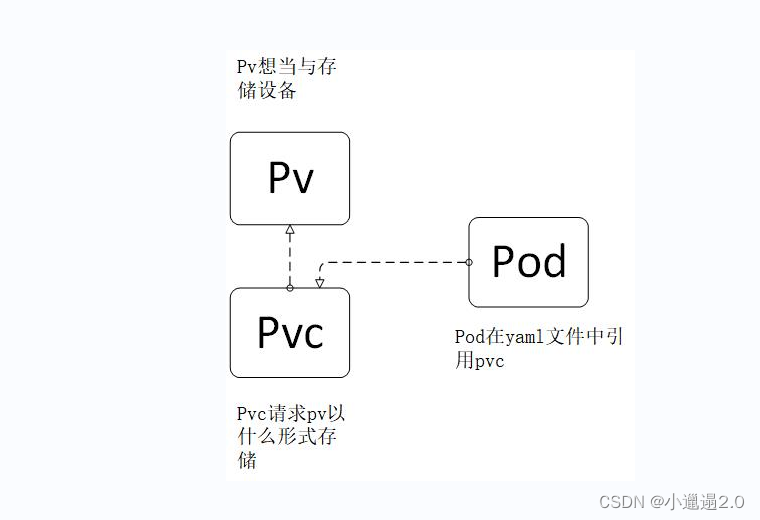
1.创建pv(相当于存储设备)
vim pv.yaml
apiVersion: v1
kind: PersistentVolume
metadata:
  name: pv
  labels:
    pv: pv-nfs
spec:
  capacity:
    storage: 10Gi
  accessModes:
    - ReadWriteMany
  volumeMode: Filesystem
  persistentVolumeReclaimPolicy: Retain
  storageClassName: nfs
  nfs:
    server: 10.10.10.25
    path: /data/nfs
kubectl apply -f pv.yaml
2.创建pvc(相当于调度存储设备资源的)
vim nginx-pvc.yaml
apiVersion: v1
kind: PersistentVolumeClaim
metadata:
  name: pvc
spec:
  accessModes:
    - ReadWriteMany
  volumeMode: Filesystem
  resources:
    requests:
      storage: 2Gi
  storageClassName: nfs
  selector:
    matchLabels:
      pv: pv-nfs
kubectl apply -f pvc.yaml
3.创建pod(去请求pvc的)
vim nginx-pod.yaml
apiVersion: v1
kind: Service
metadata:
  labels:
    app: nginx-service
  name: nginx-service
  namespace: default
spec:
  ports:
    #对外暴露端口30003
  - nodePort: 30003
    port: 8010
    protocol: TCP
    targetPort: 8010
  selector:
    app: nginx-web
  #NodePort对外暴露端口
  type: NodePort
---
apiVersion: apps/v1
kind: Deployment
metadata:
  labels:
    app: nginx-web
  name: nginx-web
  namespace: default
spec:
  replicas: 1
  selector:
    matchLabels:
      app: nginx-web
  template:
    metadata:
      labels:
        app: nginx-web
      namespace: default
    spec:
      imagePullSecrets:
      - name: secret-key
      containers:
      - image: registry.cn-zhangjiakou.aliyuncs.com/ymku/nginx:v2
        name: nginx
        env:
        - name: TZ
          value: Asia/Shanghai
        imagePullPolicy: Always
        ports:
        - containerPort: 8010
        resources:
          requests:
            cpu: 100m
            memory: 512Mi
          limits:
            cpu: 1000m
            memory: 1Gi
        volumeMounts:
        - name: nginx-log
          mountPath: /var/log/nginx
        #- name: nginx-conf
        #  mountPath: /etc/nginx/conf.d
        #- name: nginx-dist
        #  mountPath: /etc/nginx/dist
      volumes:
      - name: nginx-log
        persistentVolumeClaim:
          claimName: pvc
      #- name: nginx-conf
      #  persistentVolumeClaim:
      #    claimName: pvc
      #- name: nginx-dist
      #  persistentVolumeClaim:
      #    claimName: pvc
kubectl apply -f nginx-pod.yaml
查看运行状态:

kubectl describe pod nginx-web-6665c66698-fxhzl
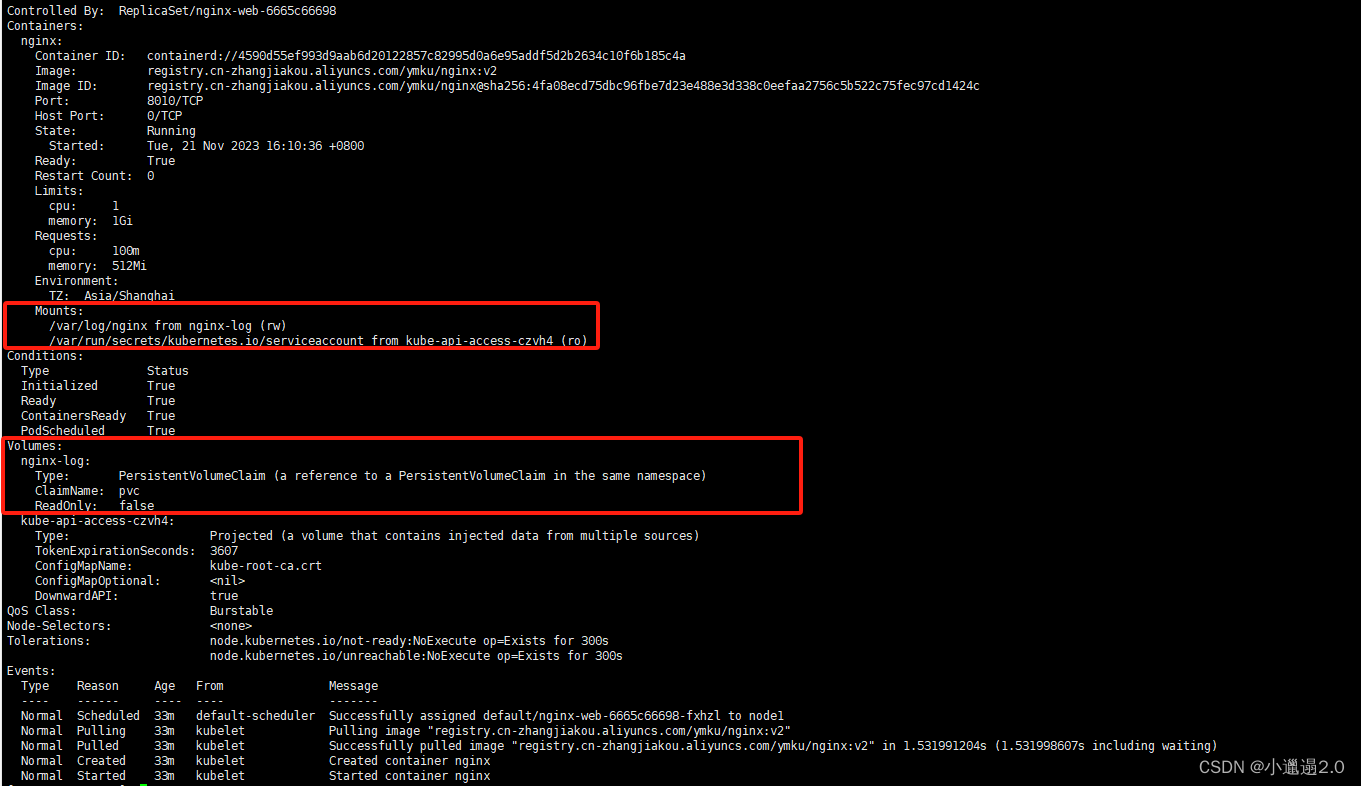
验证:
登录到nfs的服务器,进到挂载路径下看是否有文件

本文转载自: https://blog.csdn.net/weixin_46627652/article/details/134272325
版权归原作者 小邋遢2.0 所有, 如有侵权,请联系我们删除。
版权归原作者 小邋遢2.0 所有, 如有侵权,请联系我们删除。