
文章目录
【作者主页】:吴秋霖
【作者介绍】:Python领域优质创作者、阿里云博客专家、华为云享专家。长期致力于Python与爬虫领域研究与开发工作!
【作者推荐】:对JS逆向感兴趣的朋友可以关注《爬虫JS逆向实战》,对分布式爬虫平台感兴趣的朋友可以关注《分布式爬虫平台搭建与开发实战》
还有未来会持续更新的验证码突防、APP逆向、Python领域等一系列文章
1. 写在前面
Scrapy是爬虫非常经典的一个框架,深受开发者喜爱!因其简洁高效的设计,被广泛选用于构建强大的爬虫工程。很多人会选择使用它来开发自己的爬虫工程。今天我将用一个论坛网站的示例来全面讲述Scrapy框架的使用
以前都是底层开始,现在不一样了,一上来都是框架。导致很多人是知其然,但不知其所以然。而忽略了底层原理的理解
目标网站(感兴趣的可以练练手):
aHR0cHM6Ly9mb3J1bS5heGlzaGlzdG9yeS5jb20v
这是一个国外的BBS论坛,随手挑的一个曾经写过的案例。前几年做舆情相关的项目,写的爬虫真的是很多,境内外社交媒体、论坛、新闻资讯
2. 抓包分析
首先,我们打开这个网站,这个网站是要登陆的。我们先解决登陆这块,简单的构造一下登陆请求抓个包分析一下:
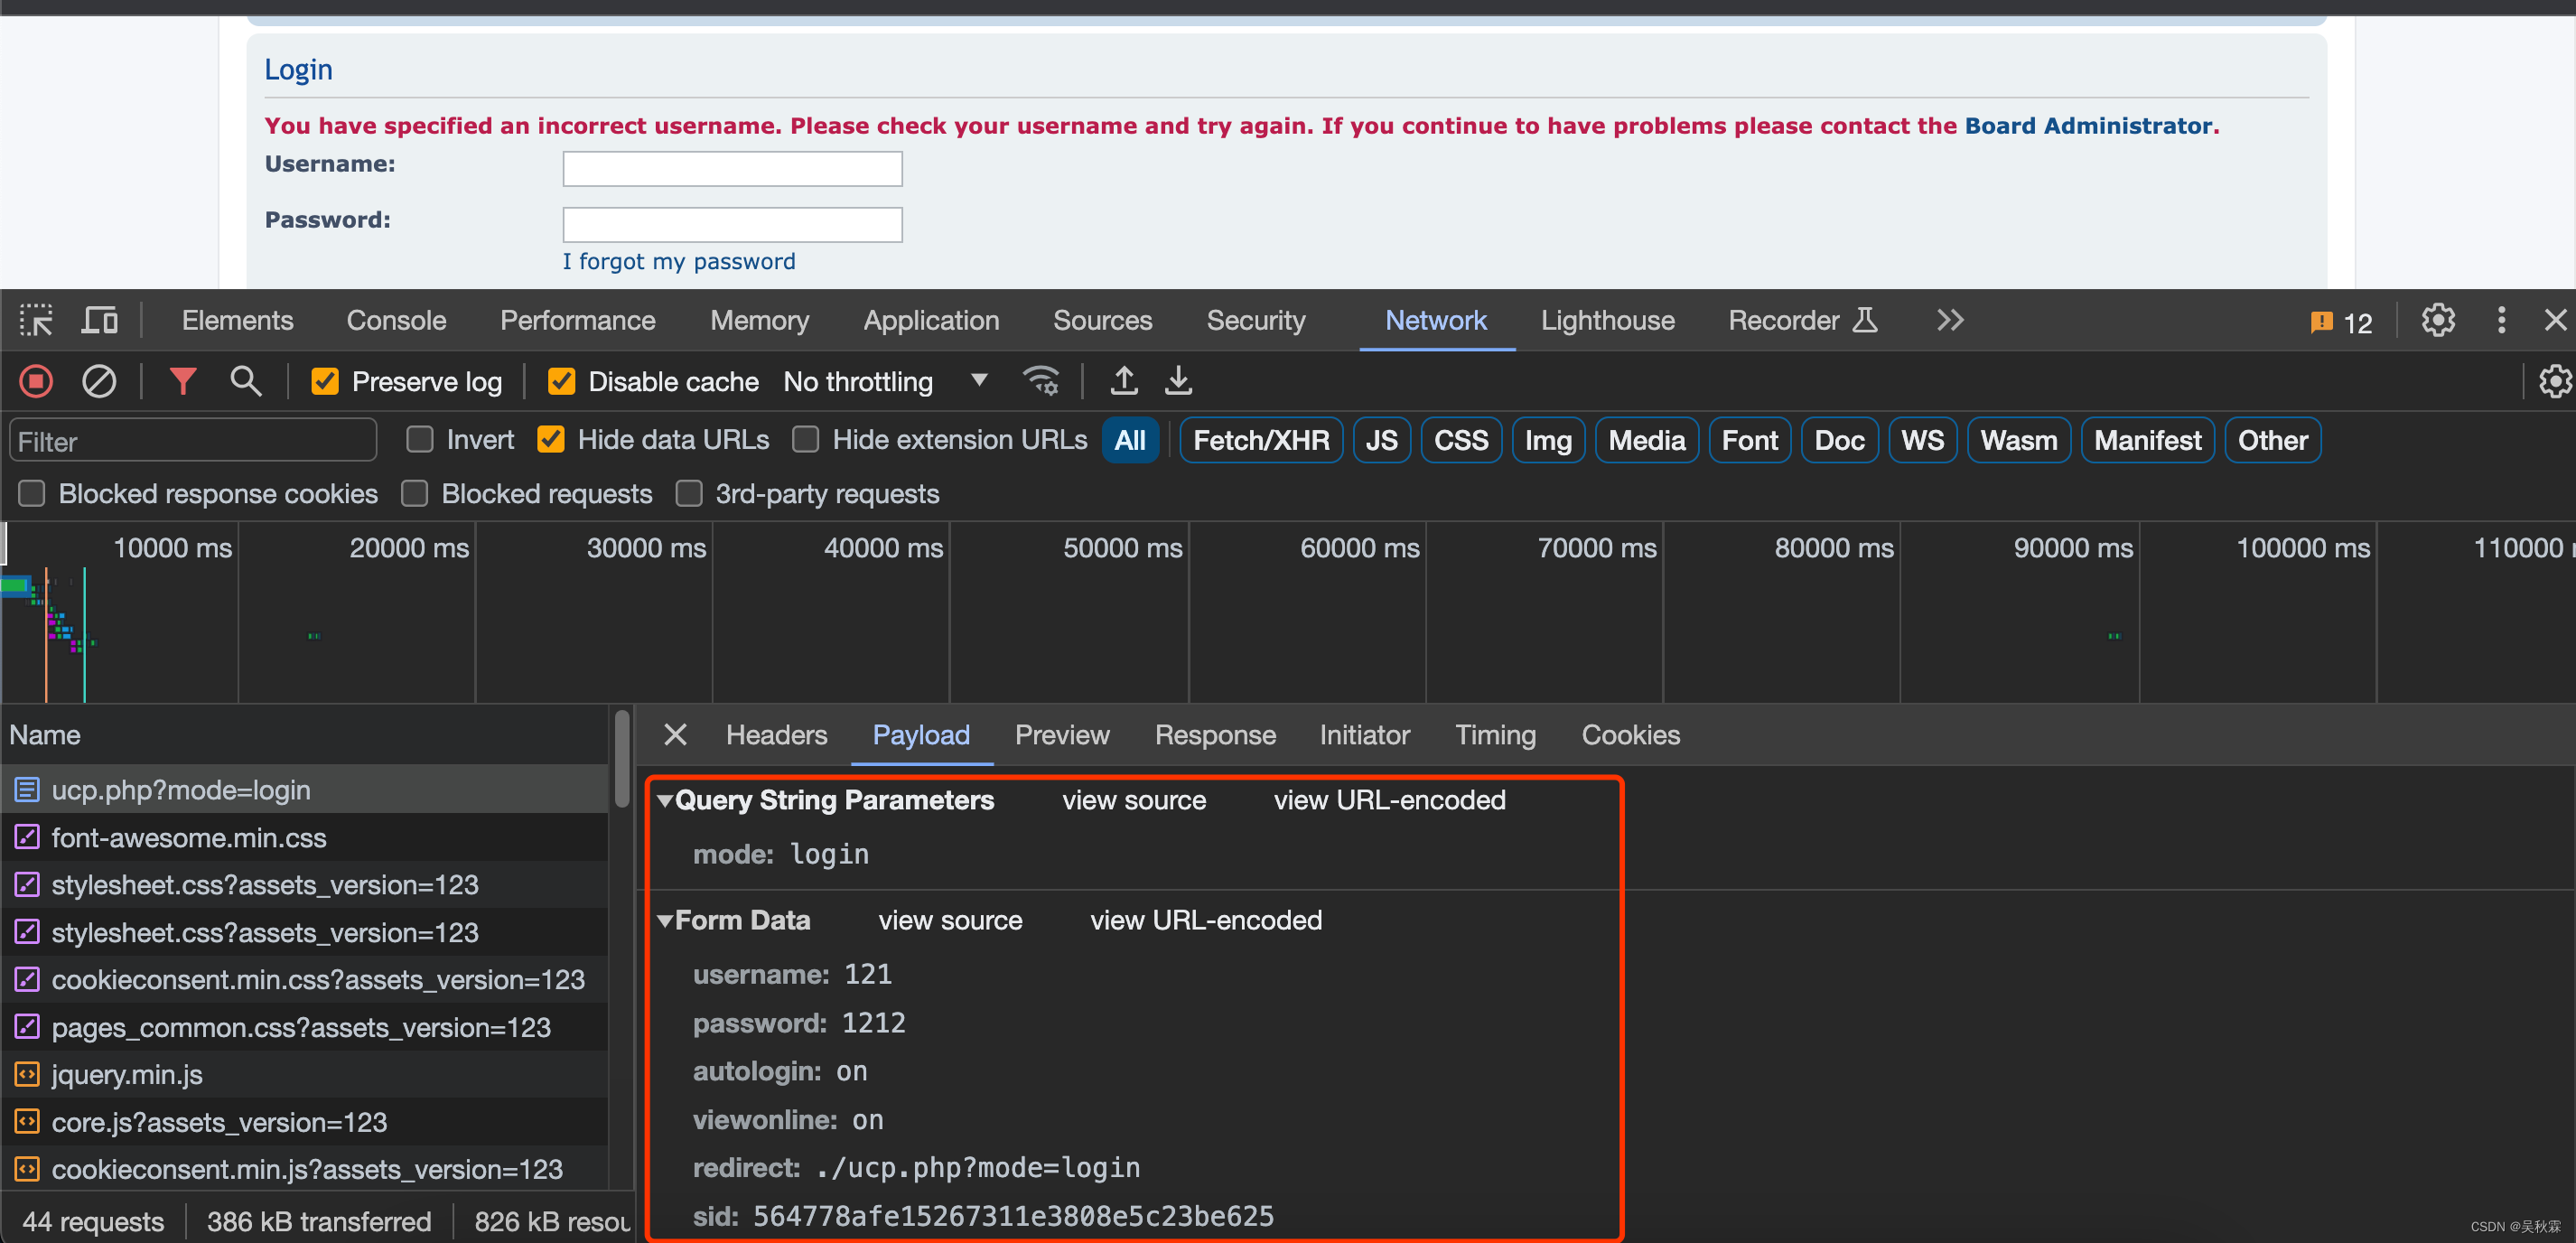
上图就是登陆请求提交的参数,接下来我们需要在Scrapy爬虫工程的Spider中构造并实现登陆功能
3. Scrapy提交登陆请求
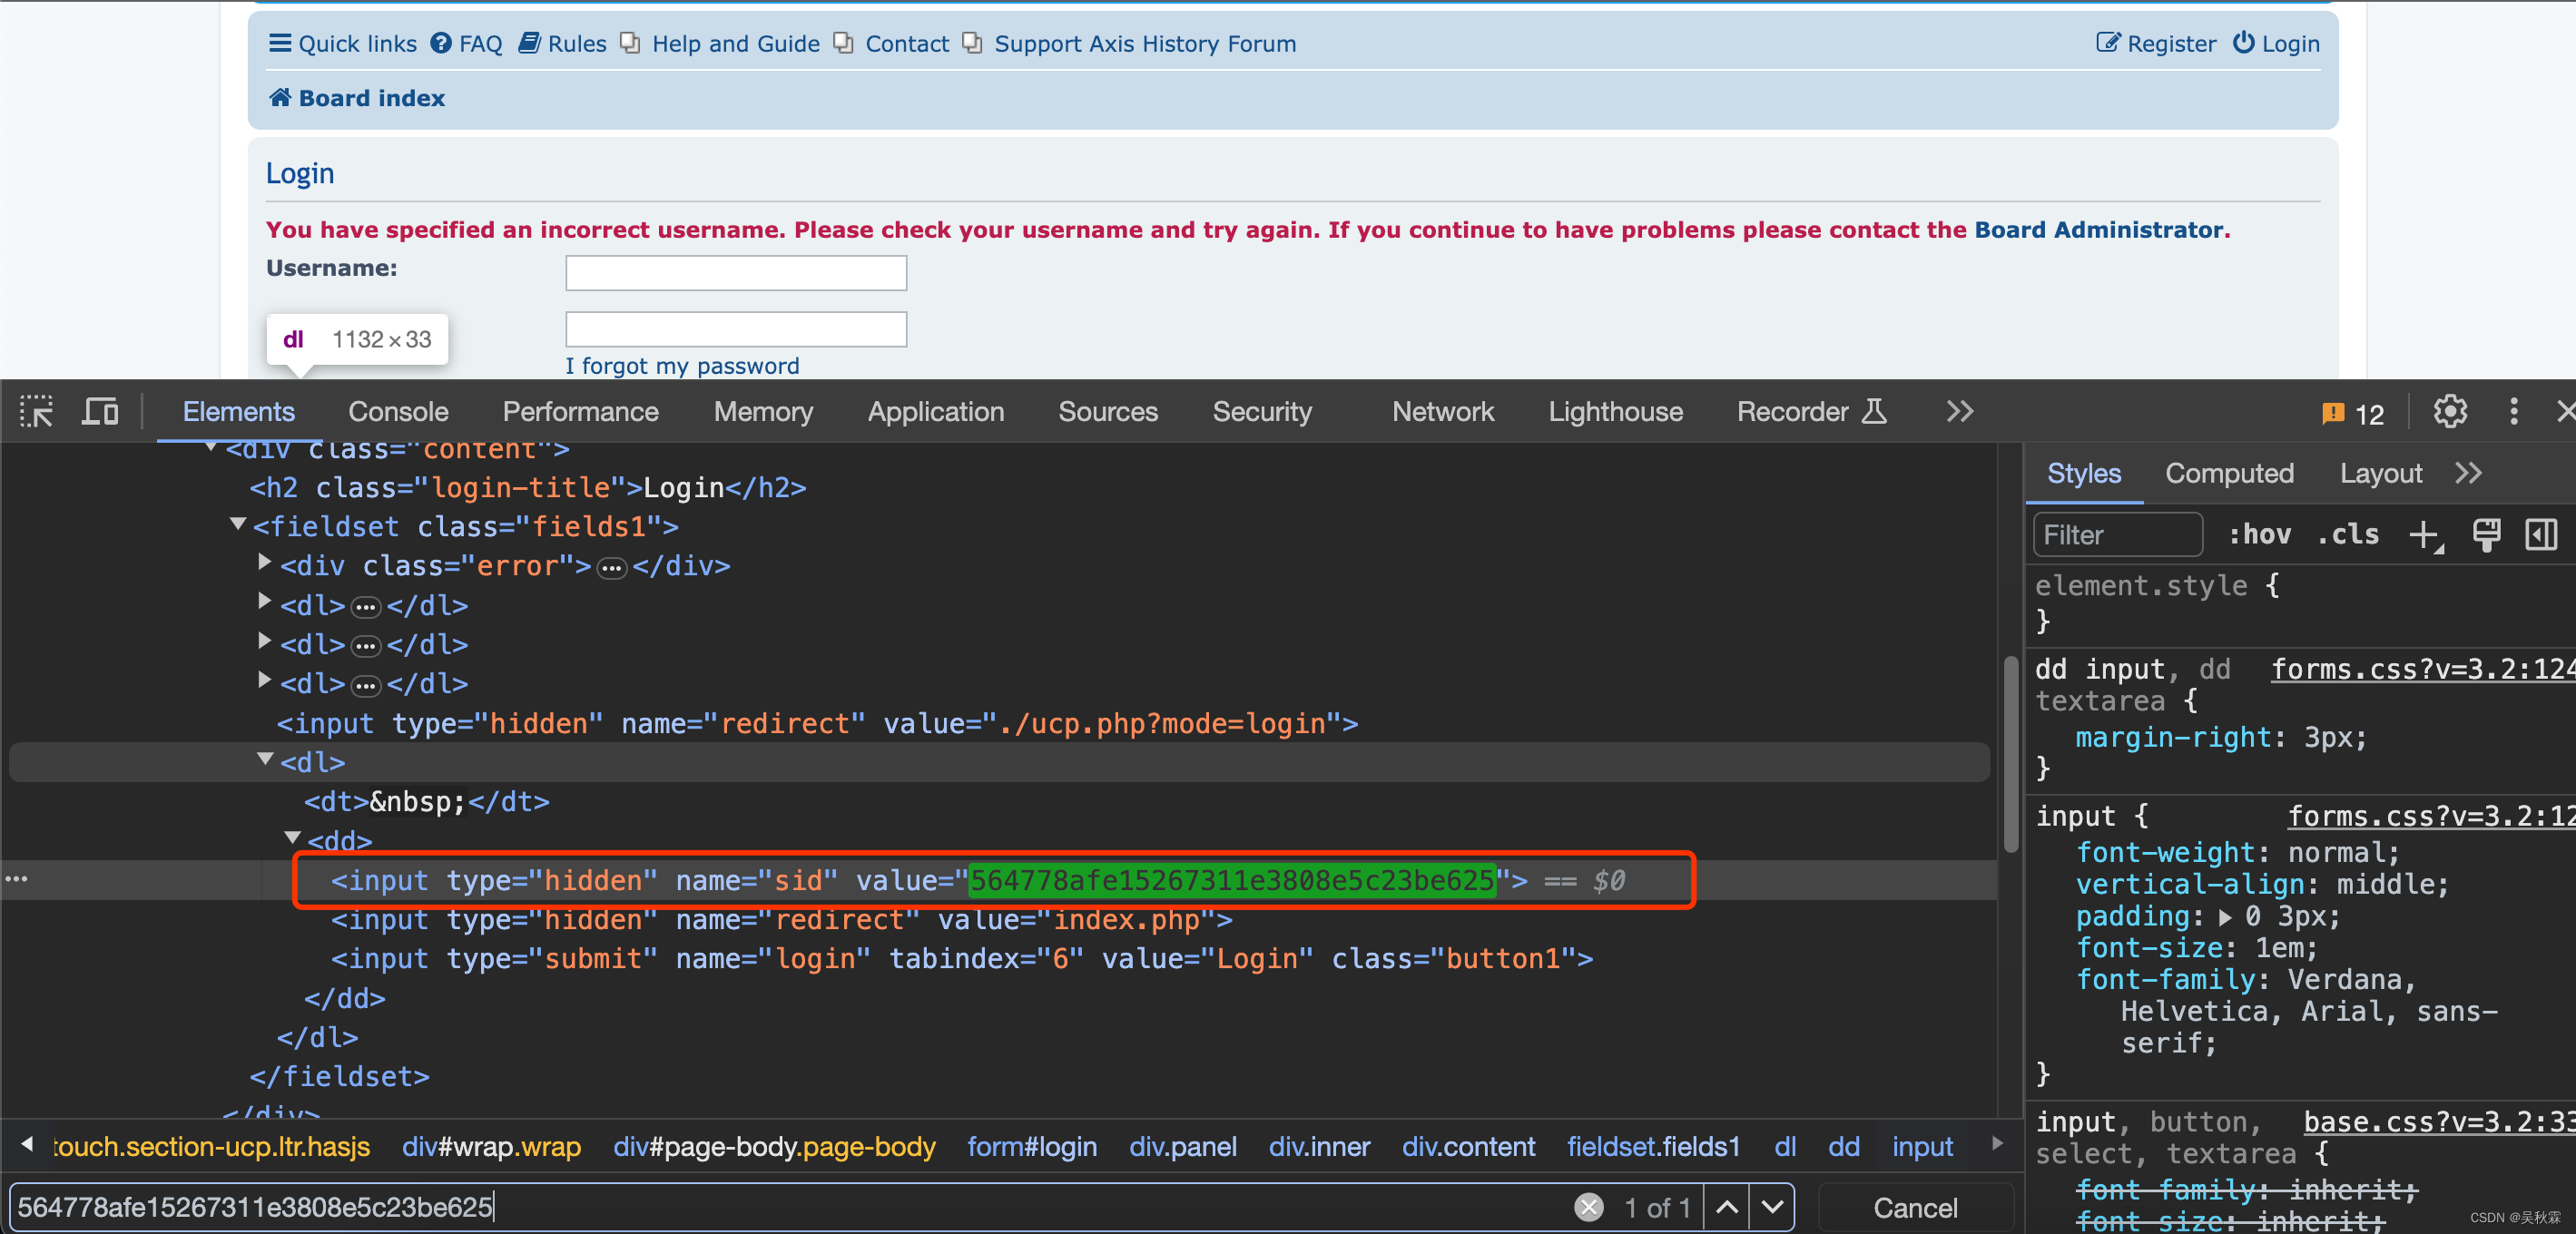
参数都都是明文的比较简单,唯一的一个sid也不是加密生成的,在HTML中就能够拿到
很多时候一些接口某些参数,你看起来是密文,但是并不一定就是加密算法生成的,很有可能在HTML或者其它接口响应中就能获取的到
sid获取如下:
现在我们开始编写Scrapy爬虫中登陆的这部分代码,实现代码如下所示:
defparse(self, response):
    text = response.headers['Set-Cookie']
    pa = re.compile("phpbb3_lzhqa_sid=(.*?);")
    sid = pa.findall(text)[0]
    response.meta['sid']= sid
    login_url ='https://forum.axishistory.com/ucp.php?mode=login'yield Request(login_url, meta=response.meta, callback=self.parse_login)defparse_login(self, response):
    sid=response.meta['sid']
    username ='用户名'
    password ='密码'
    formdata ={"username": username,"password": password,"sid": sid,"redirect":"index.php","login":"Login",}yield FormRequest.from_response(response, formid='login', formdata=formdata, callback=self.parse_after_login)
首先我们它通过parse函数从start_urls请求所响应的response中获取sid的值,然后继续交给parse_login的登陆函数实现模拟登陆
另外说一下formid这个参数,在HTML文档中,表单通常通过标签定义,并且可以包含id属性,这个id属性就是表单的ID,如下一个HTML的示例:
<formid="login"method="post"action="/login"><!-- 表单的其他字段 --><inputtype="text"name="username"><inputtype="password"name="password"><!-- 其他表单字段 --><inputtype="submit"value="Login"></form>
在上面的这个例子中,标签有一个id属性,其值为“login”。所以,formid这个参数用于指定表单,去构造登陆提交请求
4. 列表与详情页面数据解析
登陆处理完以后,我们就可以使用Scrapy爬虫继续对列表跟详情页构造请求并解析数据,这一部分的无非就是写XPATH规则了,基本对技术的要求并不高,如下使用XPATH测试工具编写列表页链接提取的规则:
Scrapy列表页代码实现如下:
defparse_page_list(self, response):
    pagination = response.meta.get("pagination",1)
    details = response.xpath("//div[@class='inner']/ul/li")for detail in details:
        replies = detail.xpath("dl/dd[@class='posts']/text()").extract_first()
        views = detail.xpath("dl/dd[@class='views']/text()").extract_first()
        meta = response.meta
        meta["replies"]= replies
        meta["views"]= views
        detail_link = detail.xpath("dl//div[@class='list-inner']/a[@class='topictitle']/@href").extract_first()
        detail_title = detail.xpath("dl//div[@class='list-inner']/a[@class='topictitle']/text()").extract_first()
        meta["detail_title"]= detail_title
        yield Request(response.urljoin(detail_link), callback=self.parse_detail, meta=response.meta)
    next_page = response.xpath("//div[@class='pagination']/ul/li/a[@rel='next']/@href").extract_first()if next_page and pagination < self.pagination_num:
        meta = response.meta
        meta['pagination']= pagination+1yield Request(response.urljoin(next_page), callback=self.parse_page_list, meta=meta)
self.pagination_num是一个翻页最大采集数的配置,这个自行设定即可
通过列表页我们拿到了所有贴文的链接,我们并在代码的最后使用了yield对列表页发起了请求,<font 并通过color=#ff0033 size=3>callback=self.parse_detail交给解析函数去提取数据
首先我们定义在项目的items.py文件中定义Item数据结构,主要帖子跟评论的,如下所示:
classAccountItem(Item):
    account_url = Field()# 账号url
    account_id = Field()# 账号id
    account_name = Field()# 账号名称
    nick_name = Field()# 昵称
    website_name = Field()# 论坛名
    account_type = Field()# 账号类型,固定forum
    level = Field()# 账号等级
    account_description = Field()# 账号描述信息
    account_followed_num = Field()# 账号关注数
    account_followed_list = Field()# 账号关注id列表
    account_focus_num = Field()# 账号粉丝数
    account_focus_list = Field()# 账号粉丝id列表
    regist_time = Field()# 账号注册时间
    forum_credits = Field()# 论坛积分/经验值
    location = Field()# 地区
    post_num = Field()# 发帖数
    reply_num = Field()# 跟帖数
    msg_type = Field()
    area = Field()classPostItem(Item):type= Field()# "post"
    post_id = Field()# 帖子id
    title = Field()# 帖子标题
    content = Field()# 帖子内容
    website_name = Field()# 论坛名
    category = Field()# 帖子所属版块
    url = Field()# 帖子url
    language = Field()# 语种, zh_cn|en|es
    release_time = Field()# 发布时间
    account_id = Field()# 发帖人id
    account_name = Field()# 发帖人账号名
    page_view_num = Field()# 帖子浏览数
    comment_num = Field()# 帖子回复数
    like_num = Field()# 帖子点赞数
    quote_from =Field()# 被转载的帖子id
    location_info = Field()# 发帖地理位置信息
    images_url = Field()# 帖子图片链接
    image_file = Field()# 帖子图片存储路径
    msg_type = Field()
    area = Field()classCommentItem(Item):type= Field()# "comment"
    website_name = Field()# 论坛名
    post_id = Field()
    comment_id = Field()
    content = Field()# 回帖内容
    release_time = Field()# 回帖时间
    account_id = Field()# 帖子回复人id
    account_name = Field()# 回帖人名称
    comment_level = Field()# 回帖层级
    parent_id = Field()# 回复的帖子或评论id
    like_num = Field()# 回帖点赞数
    comment_floor = Field()# 回帖楼层
    images_url = Field()# 评论图片链接
    image_file = Field()# 评论图片存储路径
    msg_type = Field()
    area = Field()
接下来我们需要编写贴文内容的数据解析代码,解析函数代码实现如下所示:
defparse_detail(self, response):
    dont_parse_post = response.meta.get("dont_parse_post")
    category =" < ".join(response.xpath("//ul[@id='nav-breadcrumbs']/li//span[@itemprop='title']/text()").extract()[1:])if dont_parse_post isNone:
        msg_ele = response.xpath("//div[@id='page-body']//div[@class='inner']")[0]
        post_id = msg_ele.xpath("div//h3/a/@href").extract_first(default='').strip().replace("#p","")
        post_item = PostItem()
        post_item["url"]= response.url
        post_item['area']= self.name
        post_item['msg_type']=u"贴文"
        post_item['type']=u"post"
        post_item["post_id"]= post_id
        post_item["language"]='en'
        post_item["website_name"]= self.allowed_domains[0]
        post_item["category"]= category
        post_item["title"]= response.meta.get("detail_title")
        post_item["account_name"]= msg_ele.xpath("div//strong/a[@class='username']/text()").extract_first(default='').strip()
        post_item["content"]="".join(msg_ele.xpath("div//div[@class='content']/text()").extract()).strip()
        post_time ="".join(msg_ele.xpath("div//p[@class='author']/text()").extract()).strip()
        post_item["release_time"]= dateparser.parse(post_time).strftime('%Y-%m-%d %H:%M:%S')
        post_item["collect_time"]= dateparser.parse(str(time.time())).strftime('%Y-%m-%d %H:%M:%S')
        user_link =msg_ele.xpath("div//strong/a[@class='username']/@href").extract_first(default='').strip()
        account_id ="".join(re.compile("&u=(\d+)").findall(user_link))
        post_item["account_id"]= account_id
        post_item["comment_num"]= response.meta.get("replies")
        post_item["page_view_num"]= response.meta.get("views")
        images_urls = msg_ele.xpath("div//div[@class='content']//img/@src").extract()or""
        post_item["images_url"]=[response.urljoin(url)for url in images_urls]
        post_item["image_file"]= self.image_path(post_item["images_url"])
        post_item["language"]='en'
        post_item["website_name"]= self.name
        response.meta["post_id"]= post_id
        response.meta['account_id']= post_item["account_id"]
        response.meta["account_name"]= post_item["account_name"]
        full_user_link = response.urljoin(user_link)yield Request(full_user_link, meta=response.meta, callback=self.parse_account_info)for comment_item in self.parse_comments(response):yield comment_item
    comment_next_page = response.xpath(u"//div[@class='pagination']/ul/li/a[@rel='next']/@href").extract_first()if comment_next_page:
        response.meta["dont_parse_post"]=1
        next_page_link = response.urljoin(comment_next_page)yield Request(next_page_link, callback=self.parse_detail, meta=response.meta)
贴文内容的下方就是评论信息,上面代码中我们拿到评论的链接comment_next_page,直接继续发送请求解析评论内容:
defparse_comments(self, response):
    comments = response.xpath("//div[@id='page-body']//div[@class='inner']")if response.meta.get("dont_parse_post")isNone:
        comments = comments[1:]for comment in comments:
        comment_item = CommentItem()
        comment_item['type']="comment"
        comment_item['area']= self.name
        comment_item['msg_type']=u"评论"
        comment_item['post_id']= response.meta.get("post_id")
        comment_item["parent_id"]= response.meta.get("post_id")
        comment_item["website_name"]= self.allowed_domains[0]
        user_link =comment.xpath("div//strong/a[@class='username']/@href").extract_first(default='').strip()
        account_id ="".join(re.compile("&u=(\d+)").findall(user_link))
        comment_item['comment_id']= comment.xpath("div//h3/a/@href").extract_first(default='').strip().replace("#p","")
        comment_item['account_id']= account_id
        comment_item['account_name']= comment.xpath("div//strong/a[@class='username']/text()").extract_first(default='').strip()
        comment_time ="".join(comment.xpath("div//p[@class='author']/text()").extract()).strip()ifnot comment_time:continue
        comment_level_text = comment.xpath("div//div[@id='post_content%s']//a[contains(@href,'./viewtopic.php?p')]/text()"% comment_item['comment_id']).extract_first(default='')
        comment_item['comment_level']="".join(re.compile("\d+").findall(comment_level_text))
        comment_item['release_time']= dateparser.parse(comment_time).strftime('%Y-%m-%d %H:%M:%S')
        comment_content_list ="".join(comment.xpath("div//div[@class='content']/text()").extract()).strip()
        comment_item['content']="".join(comment_content_list)
        response.meta['account_id']= comment_item["account_id"]
        response.meta["account_name"]= comment_item["account_name"]
        full_user_link = response.urljoin(user_link)yield Request(full_user_link, meta=response.meta, callback=self.parse_account_info)
评论信息采集中还有一个针对评论用户信息采集的功能,通过调用parse_account_info函数进行采集,实现代码如下所示:
defparse_account_info(self, response):
    about_item = AccountItem()
    about_item["account_id"]= response.meta["account_id"]
    about_item["account_url"]= response.url
    about_item["account_name"]= response.meta["account_name"]
    about_item["nick_name"]=""
    about_item["website_name"]= self.allowed_domains[0]
    about_item["account_type"]="forum"
    about_item["level"]=""
    account_description ="".join(response.xpath("//div[@class='inner']/div[@class='postbody']//text()").extract())
    about_item["account_description"]= account_description
    about_item["account_followed_num"]=""
    about_item["account_followed_list"]=""
    about_item["account_focus_num"]=""
    about_item["account_focus_list"]=""
    regist_time ="".join(response.xpath("//dl/dt[text()='Joined:']/following-sibling::dd[1]/text()").extract())
    about_item["regist_time"]= dateparser.parse(regist_time).strftime('%Y-%m-%d %H:%M:%S')
    about_item["forum_credits"]=""
    location ="".join(response.xpath("//dl/dt[text()='Location:']/following-sibling::dd[1]/text()").extract())
    about_item["location"]= location
    post_num_text = response.xpath("//dl/dt[text()='Total posts:']/following-sibling::dd[1]/text()[1]").extract_first(default='')
    post_num = post_num_text.replace(",",'').strip("|").strip()
    about_item["post_num"]= post_num
    about_item["reply_num"]=""
    about_item["msg_type"]='account'
    about_item["area"]= self.name
    yield about_item
最后从帖子到评论再到账号信息,层层采集与调用拿到完整的一个JSON结构化数据,进行yield到数据库
5. 中间件Middleware配置
因为是国外的论坛网站案例,所以这里我们需要使用我们的Middleware来解决这个问题:
classProxiesMiddleware():
    logfile = logging.getLogger(__name__)defprocess_request(self, request, spider):
        self.logfile.debug("entry ProxyMiddleware")try:# 依靠meta中的标记,来决定是否需要使用proxy
            proxy_addr = spider.proxy
            if proxy_addr:if request.url.startswith("http://"):
                    request.meta['proxy']="http://"+ proxy_addr  # http代理elif request.url.startswith("https://"):
                    request.meta['proxy']="https://"+ proxy_addr  # https代理except Exception as e:
            exc_type, exc_obj, exc_tb = sys.exc_info()
            fname = os.path.split(exc_tb.tb_frame.f_code.co_filename)[1]
            self.logfile.warning(u"Proxies error: %s, %s, %s, %s"%(exc_type, e, fname, exc_tb.tb_lineno))
settings文件中配置开启Middleware:
DOWNLOADER_MIDDLEWARES ={'forum.middlewares.ProxiesMiddleware':100,}
好了,到这里又到了跟大家说再见的时候了。创作不易,帮忙点个赞再走吧。你的支持是我创作的动力,希望能带给大家更多优质的文章
版权归原作者 吴秋霖 所有, 如有侵权,请联系我们删除。