
文章目录
前言
有没有在入行后直接基于 SpringBoot 开发项目,没有 spring、servlet 开发经历的?
有没有用 SpringBoot 开发项目,但是第一次听说 Starter 或者听过却不知道是干嘛的?
有没有知道 Starter 是干嘛的,但不知其原理的?
有没有想了解 Starter 原理或想自己实现一个 Starter 提供别人使用的?
如果有以上情况的,希望通过本文可以帮助你了解 Starter 。
一、什么是 Starter
大家都知道基于 SpringBoot 开发项目可以简化 Spring 应用的搭建以及开发过程,提高程序员开发效率,这是由于其“约定大约配置”的策略及其自动装配的特点。
约定大约配置是指 SpringBoot 指定了特定的方式进行配置(application.properties/yam/yaml),开发人员不需要像在 Spring 框架开发时定义配置文件。
自动装配是指在使用某个组件或框架时需要引用其依赖、配置类、配置文件等工作时,SpringBoot 帮我们做了这些工作。
那跟 Starter 有关系吗?答案是:有! Starter 就是自动装配的具体实现,其就是一个 maven 项目,对某个组件的依赖、配置进行管理。通过导入 “Starter” 模块更容易使用这个组件。
二、Starter 的作用
我们通过对比 mybatis-spring 和 mybatis-spring-boot-starter 代码示例,了解 Starter 的作用。
三、spring 整合组件
先看下在 spring 项目中如何使用 mybatis 的。大概有以下几个步骤:
- 引入 spring、mybatis、jdbc 等相关依赖。
- 创建 mybatis-config.xml 配置文件。 - 声明数据源 DataSource。- 声明 SqlSessionFactoryBean。- 声明 MapperScannerConfigurer。- 声明等等配置。
- 编写 xxxMapper.xml 及 xxMapper.java 文件。
- 业务编码调用。
相关依赖
<dependency><groupId>org.springframework</groupId><artifactId>spring-context</artifactId><version>5.2.5.RELEASE</version></dependency><dependency><groupId>org.mybatis</groupId><artifactId>mybatis</artifactId><version>3.5.1</version></dependency><dependency><groupId>org.mybatis</groupId><artifactId>mybatis-spring</artifactId><version>1.3.0</version></dependency><dependency><groupId>mysql</groupId><artifactId>mysql-connector-java</artifactId><version>5.1.9</version></dependency><dependency><groupId>xxx</groupId><artifactId>xxxx</artifactId><version>xxx</version></dependency>
...
mybatis-config.xml 配置文件
<?xml version="1.0" encoding="UTF-8" ?><!DOCTYPEconfigurationPUBLIC"-//mybatis.org//DTD Config 3.0//EN""http://mybatis.org/dtd/mybatis-3-config.dtd"><configuration><context:property-placeholderlocation="classpath:jdbc.properties"/><settings><settingname="logImpl"value="STDOUT_LOGGING"/></settings><mappers><packagename="com.xxx.dao"/></mappers><beanid="myDataSource"class="com.alibaba.druid.pool.DruidDataSource"init-method="init"destroy-method="close"><propertyname="url"value="${jdbc.url}"/><propertyname="username"value="${jdbc.username}"/><propertyname="password"value="${jdbc.password}"/></bean><beanid="sqlSessionFactory"class="org.mybatis.spring.SqlSessionFactoryBean"><propertyname="dataSource"ref="dataSource"/><propertyname="mapperLocations"value="classpath:xxxx/*.xml"/></bean><beanclass="org.mybatis.spring.mapper.MapperScannerConfigurer"><propertyname="basePackage"value="com.xxx.dao"/></bean><beanclass=".xxxxxx.xxx"><!-- 指定SqlSessionFactory对象的名称 --><propertyname="sqlSessionFactoryBeanName"value="factory"/><!-- 指定基本包,dao接口所在的包名 --><propertyname="basePackage"value="com.xxx.dao"/></bean><beanclass=".xxxxxx.xxx">
         ...
    </bean></configuration>
业务编码调用
@AutowiredprivateXxxDao xxxDao;

xxxDao.insert(xx);
作为一个开发人员是否觉得很麻烦?答案一定是的,如果稍不留神少了哪个配置或依赖,那就排查问题吧。
四、spring-boot 整合组件
这时候我们如果用基于 SpringBoot 开发,那 mybatis-spring-boot-starter 就可以帮助我们做这些事。
那我们继续看下在 SpringBoot 项目中如何使用 Mybatis 的。大概有以下几个步骤:
- 引入 mybatis-spring-boot-starter 依赖。
- application.properties 文件中添加相关配置。 3。 编写 xxxMapper.xml 及 xxMapper.java 文件。
- 业务编码调用。
引入 mybatis-spring-boot-starter 依赖
<dependency><groupId>org.mybatis.spring.boot</groupId><artifactId>mybatis-spring-boot-starter</artifactId><version>2.1.1</version></dependency>
application.properties 文件中添加相关配置。
spring.datasource.username=x********
spring.datasource.password=********
spring.datasource.url=********
spring.datasource.driver-class-name=********
mybatis.mapper-locations=classpath:mapper/*.xml
编写 xxxMapper.xml 及 xxMapper.java 文件
@MapperpublicinterfaceXXXMapper{List<XXX>list(xxx);}
业务编码调用
@AutowiredprivateXxxDao xxxDao;

xxxDao.insert(xx);
通过以上的代码比较可以明显的感觉到利用 Starter 后,我们编写的代码更少了,特别是 1、2 步骤,这就是 Starter 的作用。 mybatis-spring-boot-starter 帮助我们做了以下几件事:
- 整合了组件相关的依赖,使我们直接引入 mybatis-spring-boot-starter 依赖即可,也避免了版本冲突问题。
- 自动发现存在的 DataSource,做到自动配置。
- 帮我们创建并注册SqlSessionFactory、SqlSessionTemplate等,减少了配置类、配置项。
- 自动扫描映射器(Mapper),注入到 Spring Bean 中。
五、Starter 原理
那 mybatis-spring-boot-starter 是如何做这些事的,我们扒开裤子看个究竟。
首先看 mybatis-spring-boot-starter 项目结构,其只有一个pom.xml文件,文件中已经帮我们引入相关依赖,跟上面 Spring 整合 Mybatis 的依赖是不是差不多。
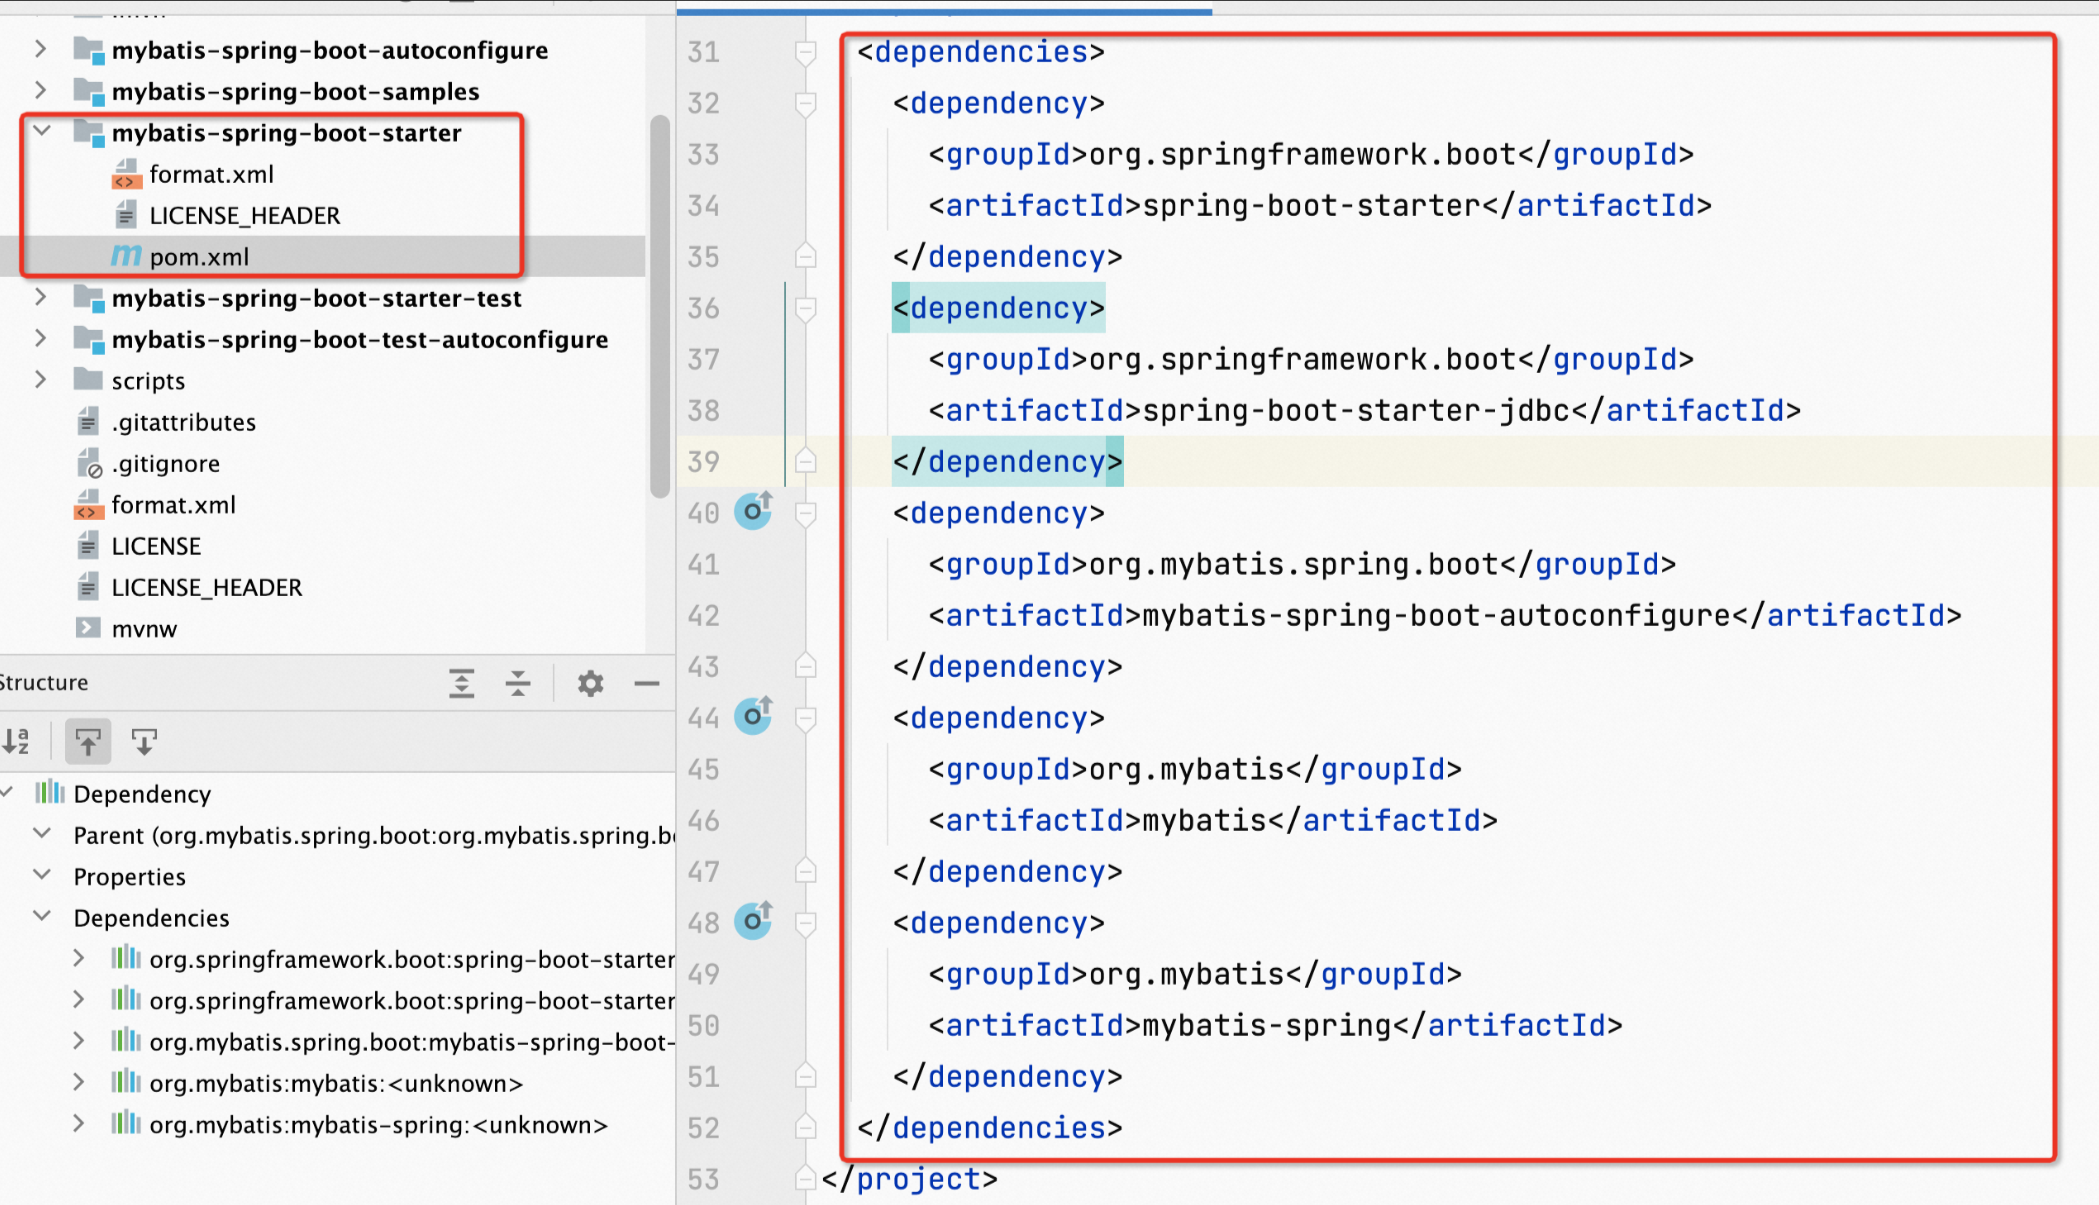
其中有一个 mybatis-spring-boot-autoconfigure 依赖,我们看下其项目结构
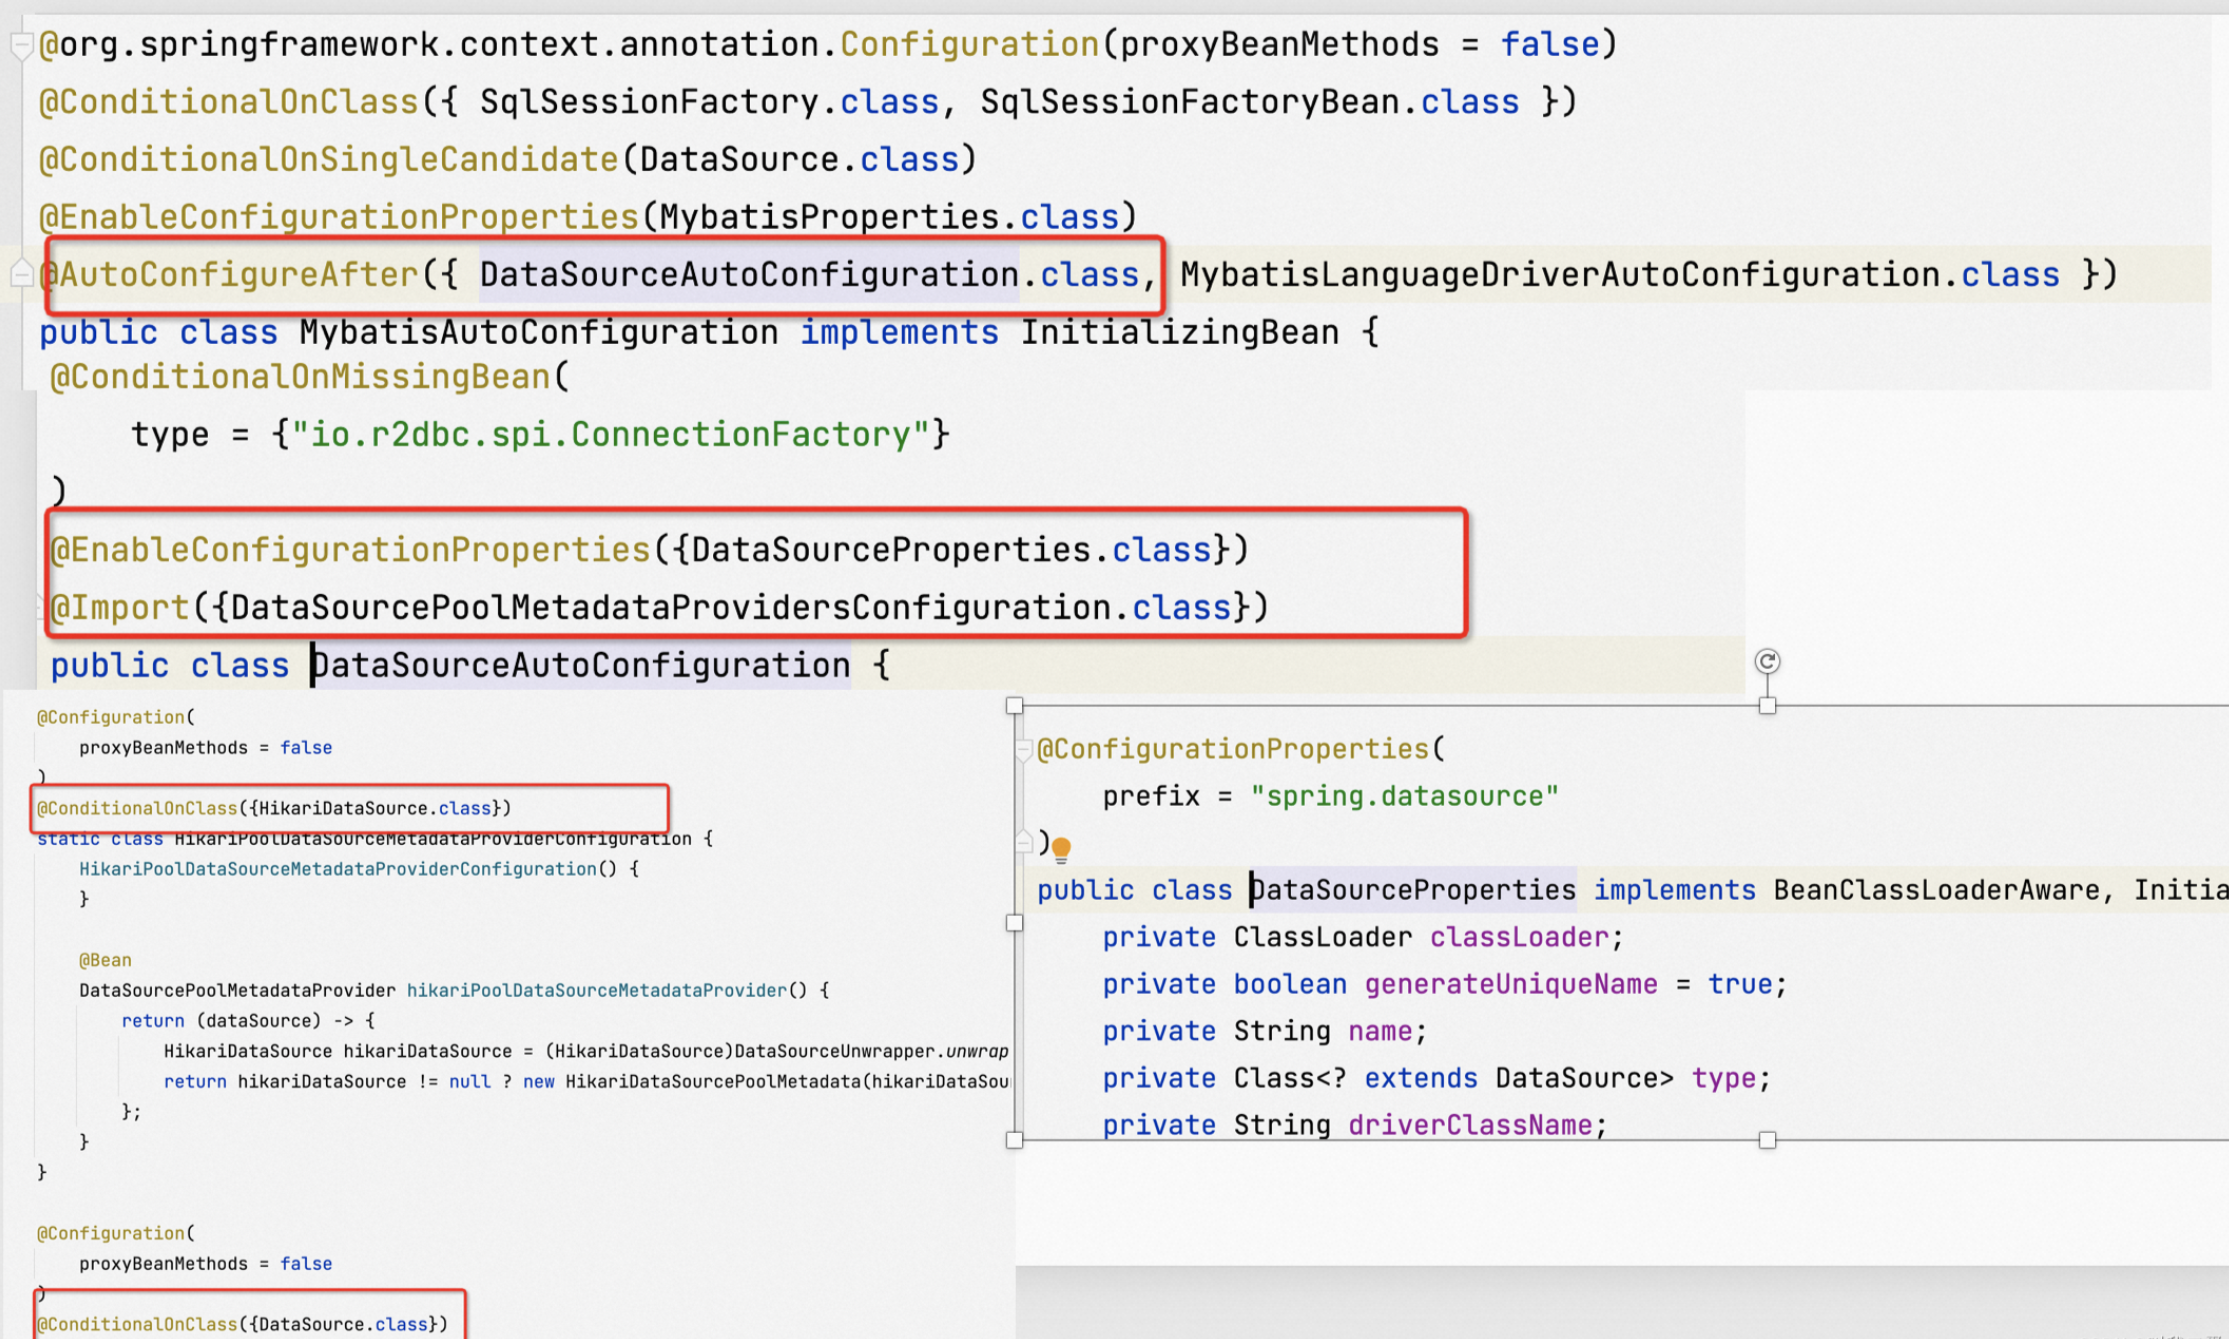
其通过 SPI 机制引入了 MybatisAutoConfiguration 配置类,该类帮我们做了以下几件事:
- 发现存在的 DataSource 并注入配置。

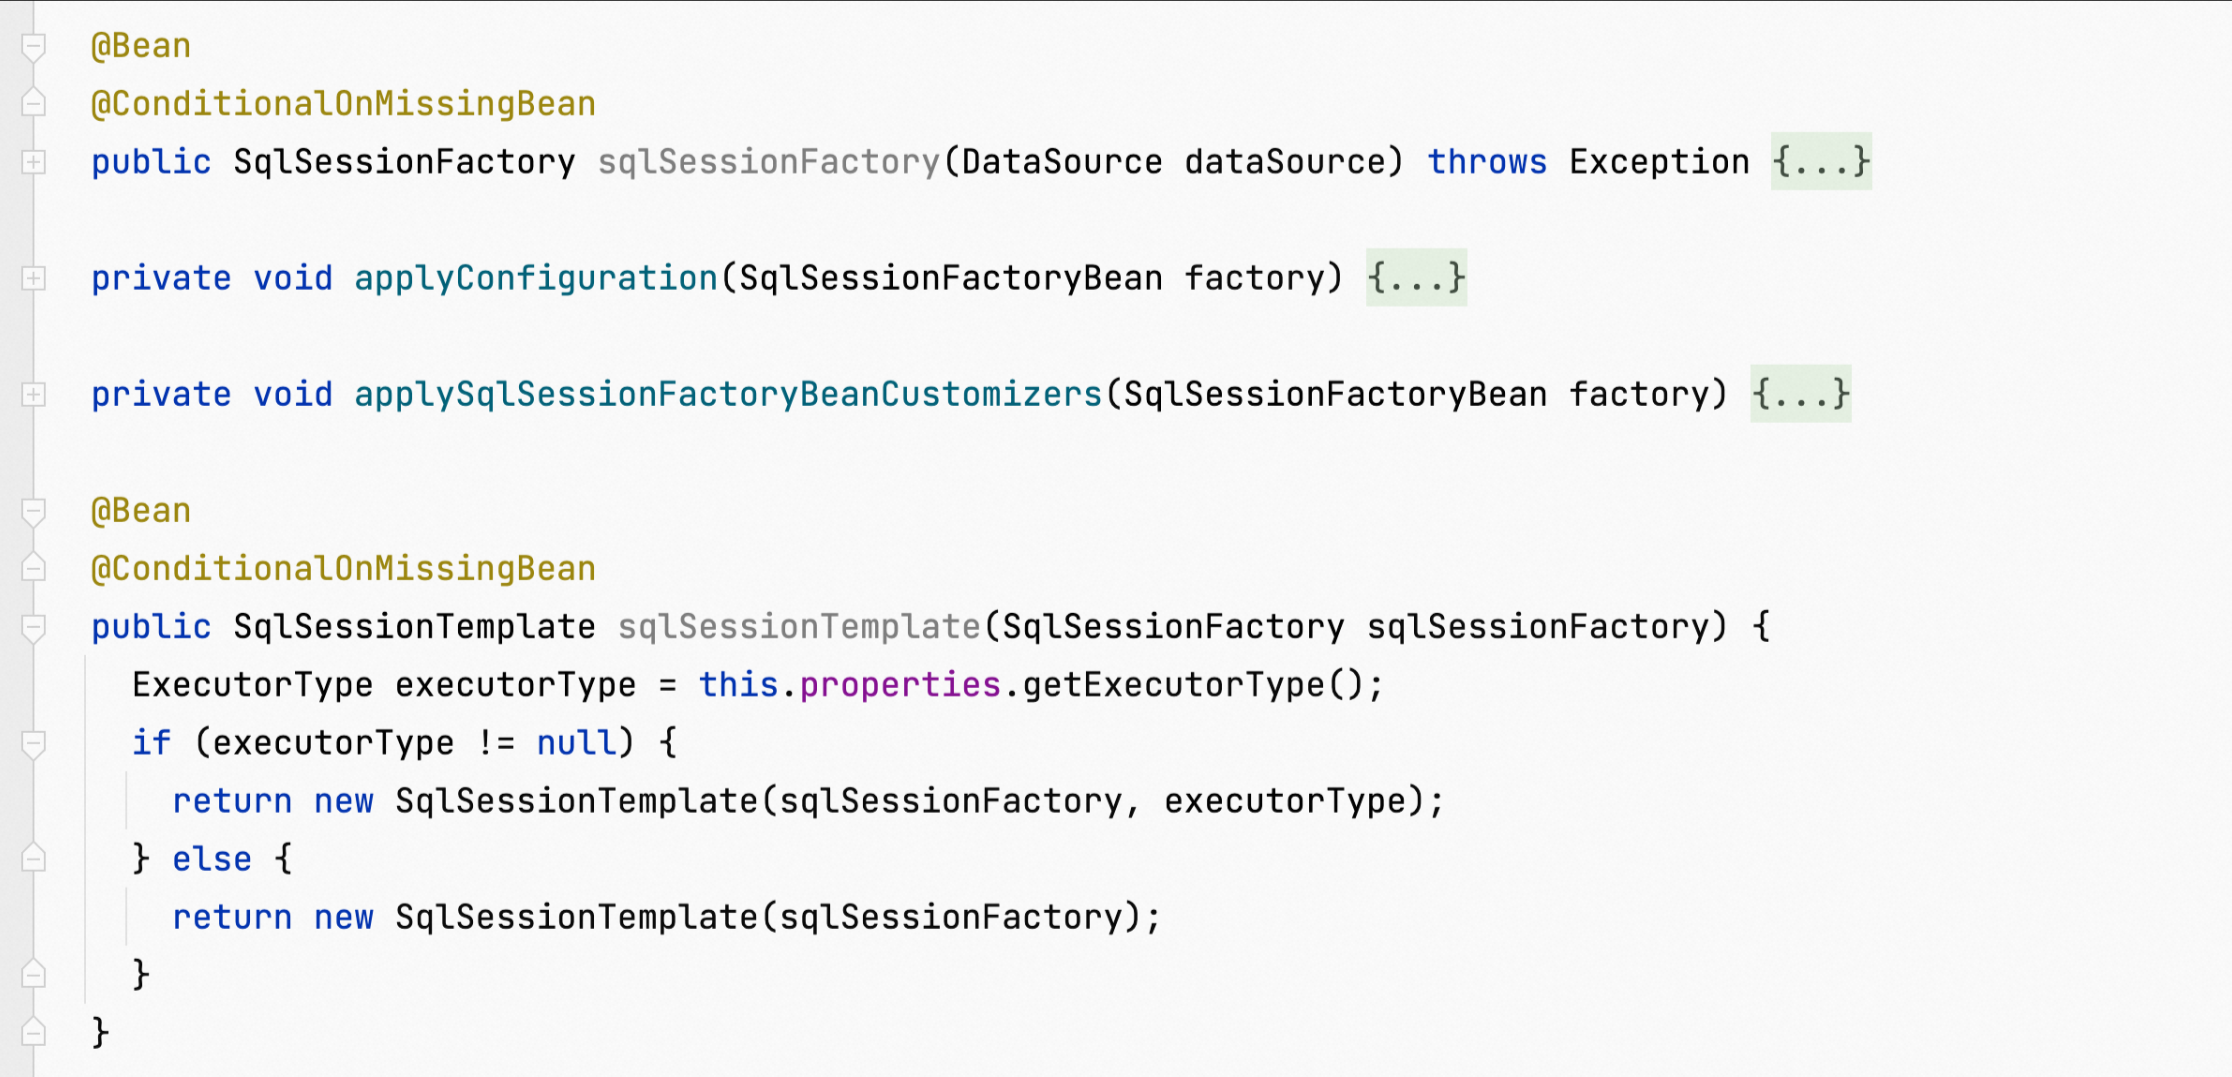
- 注册 SqlSessionFactory、SqlSessionTemplate 到 Spring 容器中。
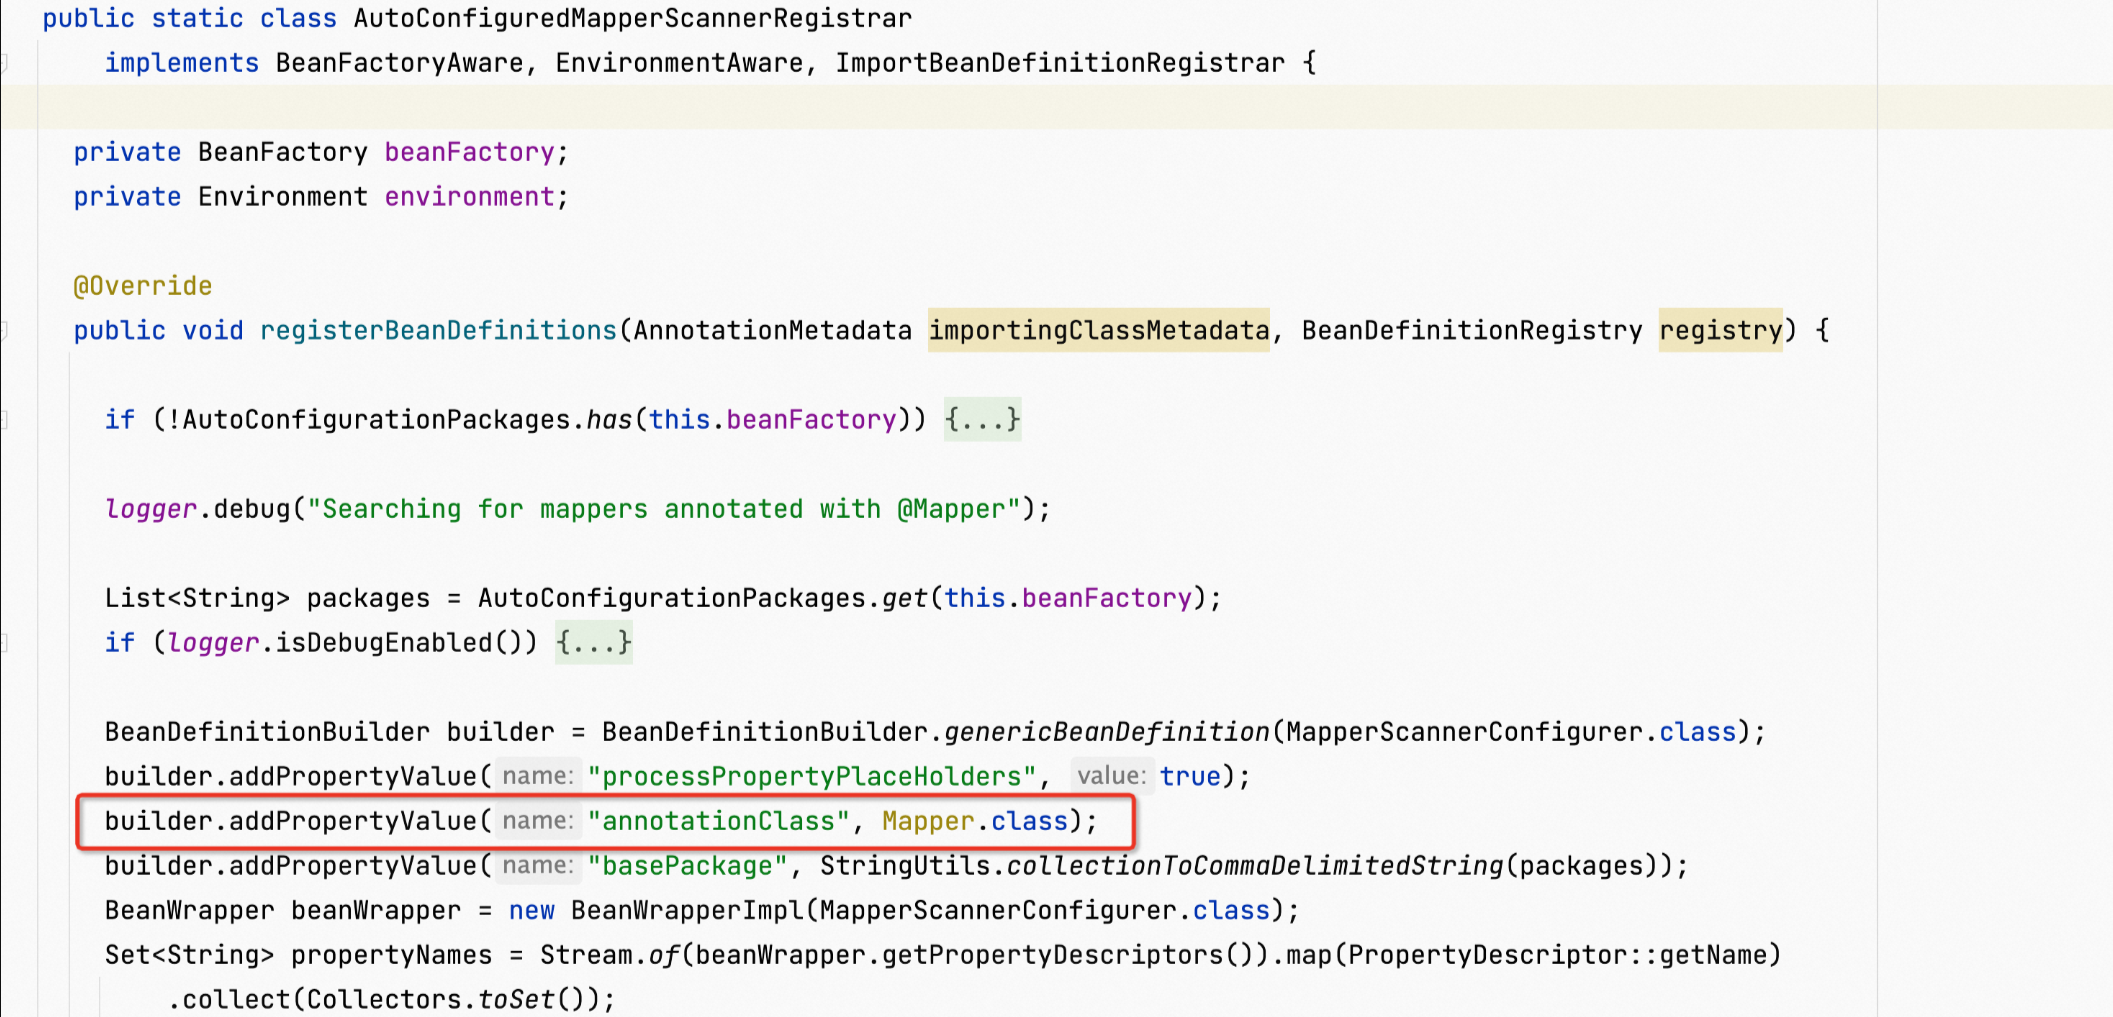
- 内部类 AutoConfiguredMapperScannerRegistrar 扫描存在 @Mapper 注解类转化为 BeanDefinition 并注册到 Spring 容器中。
版权归原作者 逆流°只是风景-bjhxcc 所有, 如有侵权,请联系我们删除。