如果你现在还在使用BeanUtils,看了本文,也会像我一样,从此改用Mapstruct。
对象之间的属性拷贝,之前用的是Spring的BeanUtils,有一次,在学习领域驱动设计的时候,看了一位大佬的文章,他在文章中提到使用Mapstruct做DO和Entity的相互转换,出于好奇,后来就去了解了一下Mapstruct,发现这个工具确实优秀,所以果断弃用BeanUtils。
如果你现在还在使用BeanUtils,看了本文,也会像我一样,从此改用Mapstruct。
先上结论,Mapstruct的性能远远高于BeanUtils,这应该是大佬使用Mapstruct的主要原因,下面是我的测试结果,可以看出随着属性个数的增加,BeanUtils的耗时也在增加,并且BeanUtils的耗时跟属性个数成正比,而Mapstruct的耗时却一直是1秒,所以从对比数据可以看出Mapstruct是非常优秀的,其性能远远超过BeanUtils。
下文会讲到Mapstruct性能好的根本原因。
对象转换次数
属性个数
BeanUtils耗时
Mapstruct耗时
5千万次
6
14秒
1秒
5千万次
15
36秒
1秒
5千万次
25
55秒
1秒
Mapstruct 依赖
使用Mapstruct需要依赖的包如下,mapstruct、mapstruct-processor、lombok,可以去仓库中查看最新版本。
<dependency>
            <groupId>org.mapstruct</groupId>
            <artifactId>mapstruct</artifactId>
            <version>1.5.0.Final</version>
        </dependency>
        <dependency>
            <groupId>org.mapstruct</groupId>
            <artifactId>mapstruct-processor</artifactId>
            <version>1.5.0.Final</version>
        </dependency>
        <dependency>
            <groupId>org.projectlombok</groupId>
            <artifactId>lombok</artifactId>
            <version>1.18.12</version>
        </dependency>
简单的属性拷贝
下面我们先来看下Mapstruct最简单的使用方式。
当两个对象的属性类型和名称完全相同时,Mapstruct会自动拷贝;假设我们现在需要把UserPo的属性值拷贝到UserEntity中,我们需要做下面几件事情:
- 定义UserPo和UserEntity
- 定义转换接口
- 编写测试main方法
▐** **首先定义UserPo和UserEntity
UserPo和UserEntity的属性类型和名称完全相同。
package mapstruct;

import lombok.AllArgsConstructor;
import lombok.Builder;
import lombok.Data;
import lombok.NoArgsConstructor;

import java.util.Date;

@Data
@Builder
@AllArgsConstructor
@NoArgsConstructor
public class UserPo {
    private Long id;
    private Date gmtCreate;
    private Date createTime;
    private Long buyerId;
    private Long age;
    private String userNick;
    private String userVerified;
}
package mapstruct;

import lombok.Data;

import java.util.Date;

@Data
public class UserEntity {
    private Long id;
    private Date gmtCreate;
    private Date createTime;
    private Long buyerId;
    private Long age;
    private String userNick;
    private String userVerified;
}
▐** **定义转换接口
定义mapstruct接口,在接口上打上@Mapper注解。
接口中有一个常量和一个方法,常量的值是接口的实现类,这个实现类是Mapstruct默认帮我们实现的,下文会讲到。定义了一个po2entity的转换方法,表示把入参UserPo对象,转换成UserEntity。
注意@Mapper是Mapstruct的注解,不要引错了。
package mapstruct;

import org.mapstruct.Mapper;
import org.mapstruct.factory.Mappers;

@Mapper
public interface IPersonMapper {
    IPersonMapper INSTANCT = Mappers.getMapper(IPersonMapper.class);
    UserEntity po2entity(UserPo userPo);
}
▐** 测试类**
创建一个UserPo对象,并使用Mapstruct做转化。
package mapstruct;

import org.springframework.beans.BeanUtils;

import java.util.Date;
public class MapStructTest {
    public static void main(String[] args) {
        testNormal();
    }

    public static void testNormal() {
        System.out.println("-----------testNormal-----start------");
        UserPo userPo = UserPo.builder()
                .id(1L)
                .gmtCreate(new Date())
                .buyerId(666L)
                .userNick("测试mapstruct")
                .userVerified("ok")
                .age(18L)
                .build();
        System.out.println("1234" + userPo);
        UserEntity userEntity = IPersonMapper.INSTANCT.po2entity(userPo);
        System.out.println(userEntity);
        System.out.println("-----------testNormal-----ent------");
    }
}
▐** 测试结果**
可以看到,所有赋值的属性都做了处理,且两边的值都一样,结果符合预期。

Mapstruct 性能优于 BeanUtils 的原因
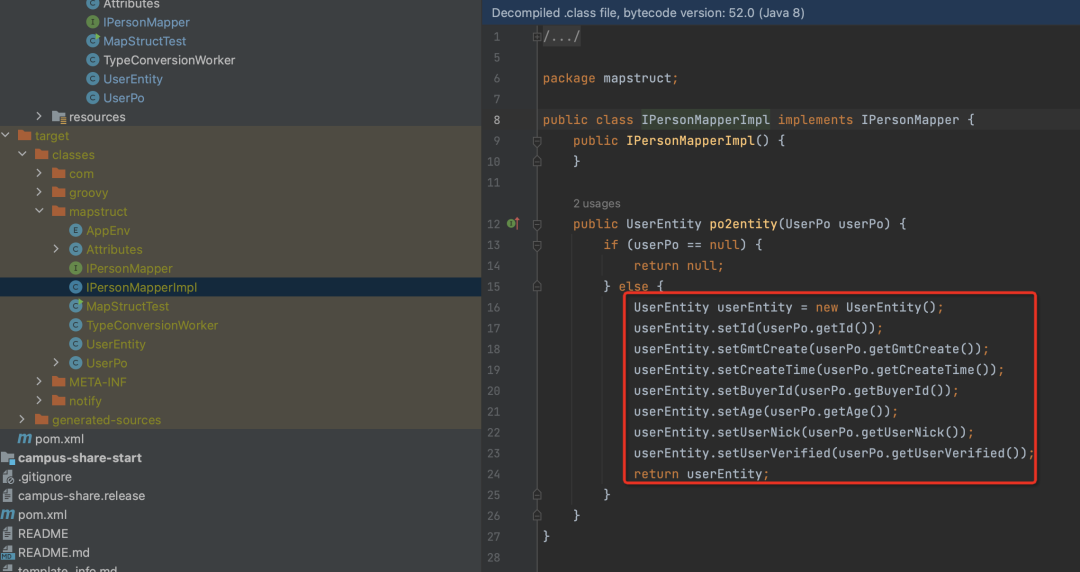
Java程序执行的过程,是由编译器先把java文件编译成class字节码文件,然后由JVM去解释执行class文件。Mapstruct正是在java文件到class这一步帮我们实现了转换方法,即做了预处理,提前编译好文件,如果用过lombok的同学一定能理解其好处,通过查看class文件,可以看出IPersonMapper被打上org.mapstruct.Mapper注解后,编译器自动会帮我们生成一个实现类IPersonMapperImpl,并实现了po2entity这个方法,看下面的截图。
▐** **IPersonMapperImpl代码
从生成的代码可以看出,转化过程非常简单,只使用了UserPo的get方法和UserEntity的set方法,没有复杂的逻辑处理,清晰明了,所以性能很高。
下面再去看BeanUtils的默认实现。

▐** Spring的BeanUtils源码**
BeanUtils部分源码如下,转换的原理是使用的反射,反射的效率相对来说是低的,因为jvm优化在这种场景下有可能无效,所以在对性能要求很高或者经常被调用的程序中,尽量不要使用。我们平时在研发过程中,也会遵守这个原则,非必要,不反射。
从下面的BeanUtils代码中可以看出,转化逻辑非常复杂,有很多的遍历,去获取属性,获取方法,设置方法可访问,然后执行,所以执行效率相对Mapstruct来说,是非常低的。回头看Mapstruct自动生成的实现类,简洁、高效。
private static void copyProperties(Object source, Object target, Class<?> editable, String... ignoreProperties)
      throws BeansException {

    Assert.notNull(source, "Source must not be null");
    Assert.notNull(target, "Target must not be null");

    Class<?> actualEditable = target.getClass();
    if (editable != null) {
      if (!editable.isInstance(target)) {
        throw new IllegalArgumentException("Target class [" + target.getClass().getName() +
            "] not assignable to Editable class [" + editable.getName() + "]");
      }
      actualEditable = editable;
    }
    PropertyDescriptor[] targetPds = getPropertyDescriptors(actualEditable);
    List<String> ignoreList = (ignoreProperties != null ? Arrays.asList(ignoreProperties) : null);

    for (PropertyDescriptor targetPd : targetPds) {
      Method writeMethod = targetPd.getWriteMethod();
      if (writeMethod != null && (ignoreList == null || !ignoreList.contains(targetPd.getName()))) {
        PropertyDescriptor sourcePd = getPropertyDescriptor(source.getClass(), targetPd.getName());
        if (sourcePd != null) {
          Method readMethod = sourcePd.getReadMethod();
          if (readMethod != null &&
              ClassUtils.isAssignable(writeMethod.getParameterTypes()[0], readMethod.getReturnType())) {
            try {
              if (!Modifier.isPublic(readMethod.getDeclaringClass().getModifiers())) {
                readMethod.setAccessible(true);
              }
              Object value = readMethod.invoke(source);
              if (!Modifier.isPublic(writeMethod.getDeclaringClass().getModifiers())) {
                writeMethod.setAccessible(true);
              }
              writeMethod.invoke(target, value);
            }
            catch (Throwable ex) {
              throw new FatalBeanException(
                  "Could not copy property '" + targetPd.getName() + "' from source to target", ex);
            }
          }
        }
      }
    }
属性类型相同名称不同
对于属性名称不同的属性进行处理时,需要使用@Mapping,比如修改UserEntity中的userNick为userNick1,然后进行转换。
▐** **修改UserEntity属性userNick1
package mapstruct;

import lombok.Data;

import java.util.Date;

@Data
public class UserEntity {
    private Long id;
    private Date gmtCreate;
    private Date createTime;
    private Long buyerId;
    private Long age;
    private String userNick1;
    private String userVerified;
}
▐** ****@Mapping注解指定source和target字段名称对应关系**
@Mapping(target = "userNick1", source = "userNick"),此处的意思就是在转化的过程中,将UserPo的userNick属性值赋值给UserEntity的userNick1属性。
package mapstruct;

import org.mapstruct.Mapper;
import org.mapstruct.Mapping;
import org.mapstruct.factory.Mappers;
@Mapper
public interface IPersonMapper {
    IPersonMapper INSTANCT = Mappers.getMapper(IPersonMapper.class);
    @Mapping(target = "userNick1", source = "userNick")
    UserEntity po2entity(UserPo userPo);
}
▐** **执行结果
可以看到,正常映射,符合预期。

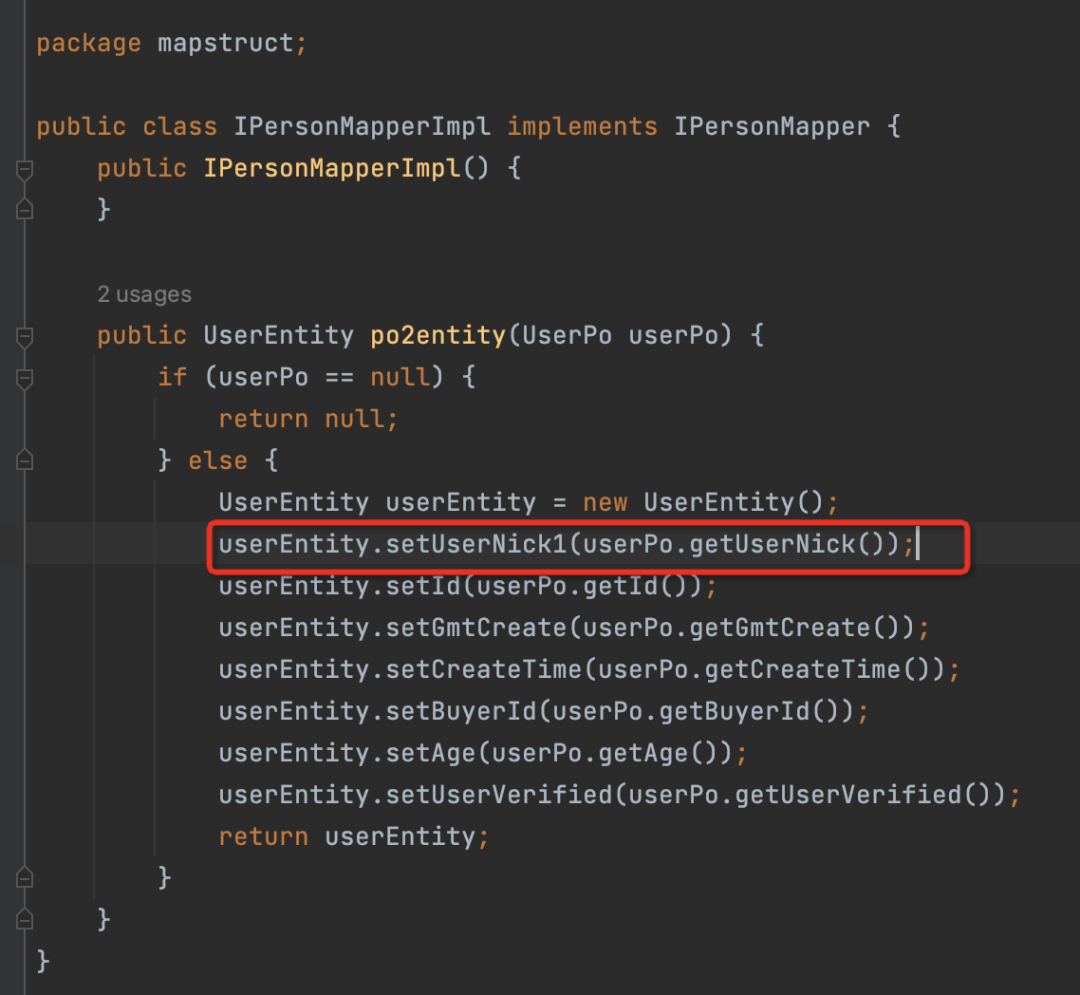
▐** **查看class文件
我们再来看实现类,可以看到,Mapstruct帮我们做了处理,把po的userNick属性赋值给了entity的userNick1。

String转日期&String转数字&忽略某个字端&给默认值等
@Mapping(target = "createTime", source = "createTime", dateFormat = "yyyy-MM-dd")
@Mapping(target = "age", source = "age", numberFormat = "#0.00")
@Mapping(target = "id", ignore = true)
@Mapping(target = "userVerified", defaultValue = "defaultValue-2")
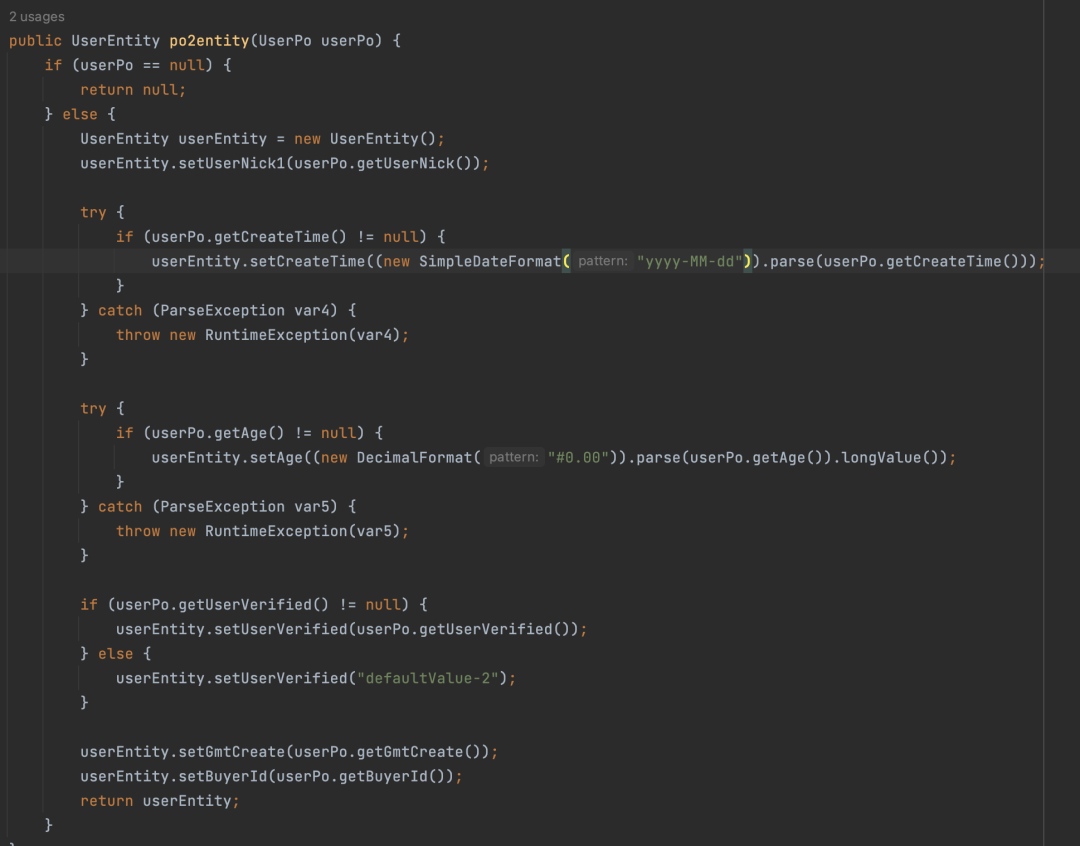
▐** **查看class实现类
- createTime:可以看到对日期使用了SimpleDateFormat进行转换,这里建议不要使用这个,因为每次都创建了一个SimpleDateFormat,可以参考《阿里巴巴Java开发手册》关于日期转换的建议。
- age:字符串转数字,也是帮忙做了处理
- id:字段赋值没有了
- userVerified:如果为null赋值默认值

自定义转换
如果现有的能力都不能满足需要,可以自定义一个转换器,比如我们需要把一个字符串使用JSON工具转换成对象。
▐** **添加属性
我们在po中加入一个字符串的attributes属性,在entity中加入Attributes类型的属性
package mapstruct;

import lombok.AllArgsConstructor;
import lombok.Builder;
import lombok.Data;
import lombok.NoArgsConstructor;

@Data
@Builder
@AllArgsConstructor
@NoArgsConstructor
public class Attributes {
    private Long id;
    private String name;
}
package mapstruct;

import lombok.AllArgsConstructor;
import lombok.Builder;
import lombok.Data;
import lombok.NoArgsConstructor;

import java.util.Date;

@Data
@Builder
@AllArgsConstructor
@NoArgsConstructor
public class UserPo {
    private Long id;
    private Date gmtCreate;
    private String createTime;
    private Long buyerId;
    private String age;
    private String userNick;
    private String userVerified;
    private String attributes;
}
package mapstruct;

import lombok.Data;

import java.util.Date;

@Data
public class UserEntity {
    private Long id;
    private Date gmtCreate;
    private Date createTime;
    private Long buyerId;
    private Long age;
    private String userNick1;
    private String userVerified;
    private Attributes attributes;
}
▐** **编写自定义转换处理类
转换器很简单,就是一个普通的Java类,只要在方法上打上Mapstruct的注解@Named。
package mapstruct;

import com.alibaba.fastjson.JSONObject;
import org.apache.commons.lang3.StringUtils;
import org.mapstruct.Named;

public class AttributeConvertUtil {
    /**
     * json字符串转对象
     *
     * @param jsonStr
     * @return
     */
    @Named("jsonToObject")
    public Attributes jsonToObject(String jsonStr) {
        if (StringUtils.isEmpty(jsonStr)) {
            return null;
        }
        return JSONObject.parseObject(jsonStr, Attributes.class);
    }
}
▐** **修改转换接口
- 在@Mapper上引用我们的自定义转换代码类AttributeConvertUtil
- 使用qualifiedByName指定我们使用的自定义转换方法
package mapstruct;

import org.mapstruct.Mapper;
import org.mapstruct.Mapping;
import org.mapstruct.factory.Mappers;

/**
 * @author jiangzhengyin
 */
@Mapper(uses = AttributeConvertUtil.class)
public interface IPersonMapper {
    IPersonMapper INSTANCT = Mappers.getMapper(IPersonMapper.class);
    @Mapping(target = "attributes", source = "attributes", qualifiedByName = "jsonToObject")
    @Mapping(target = "userNick1", source = "userNick")
    @Mapping(target = "createTime", source = "createTime", dateFormat = "yyyy-MM-dd")
    @Mapping(target = "age", source = "age", numberFormat = "#0.00")
    @Mapping(target = "id", ignore = true)
    @Mapping(target = "userVerified", defaultValue = "defaultValue-2")
    UserEntity po2entity(UserPo userPo);
}
▐** **测试类及结果
可以看出我们将把String转成了JSON对象
public class MapStructTest {
    public static void main(String[] args) {
        testNormal();
    }

    public static void testNormal() {
        System.out.println("-----------testNormal-----start------");
        String attributes = "{\"id\":2,\"name\":\"测试123\"}";
        UserPo userPo = UserPo.builder()
                .id(1L)
                .gmtCreate(new Date())
                .buyerId(666L)
                .userNick("测试mapstruct")
                .userVerified("ok")
                .age("18")
                .attributes(attributes)
                .build();
        System.out.println("1234" + userPo);
        UserEntity userEntity = IPersonMapper.INSTANCT.po2entity(userPo);
        System.out.println(userEntity);
        System.out.println("-----------testNormal-----ent------");
    }
 }

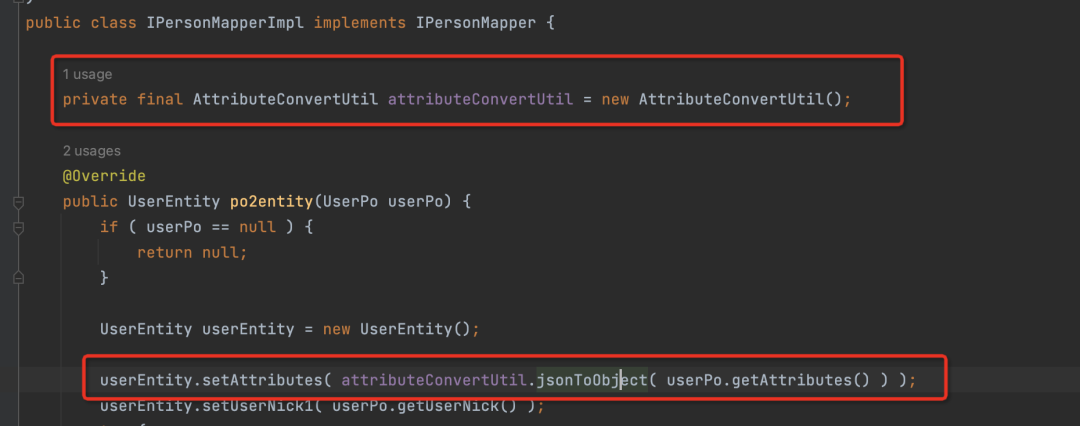
▐** **查看实现类
可以看到,在实现类中Mapstruct帮我们new了一个AttributeConvertUtil的对象,并调用了该对象的jsonToObject方法,将字符串转成JSON,最终赋值给了UserEntity的attributes属性,实现很简单,也是我们可以猜到的。

性能对比
代码很简单,循环的创建UserPo对象,使用两种方式,转换成UserEntity对象,最终输出两种方式的执行耗时。可以加减属性或者修改转换次数,对比不同场景下的执行耗时。
public static void testTime() {
        System.out.println("-----------testTime-----start------");
        int times = 50000000;
        final long springStartTime = System.currentTimeMillis();
        for (int i = 0; i < times; i++) {
            UserPo userPo = UserPo.builder()
                    .id(1L)
                    .gmtCreate(new Date())
                    .buyerId(666L)
                    .userNick("测试123")
                    .userVerified("ok")
                    .build();
            UserEntity userEntity = new UserEntity();
            BeanUtils.copyProperties(userPo, userEntity);
        }
        final long springEndTime = System.currentTimeMillis();
        for (int i = 0; i < times; i++) {
            UserPo userPo = UserPo.builder()
                    .id(1L)
                    .gmtCreate(new Date())
                    .buyerId(666L)
                    .userNick("测试123")
                    .userVerified("ok")
                    .build();
            UserEntity userEntity = IPersonMapper.INSTANCT.po2entity(userPo);
        }
        final long mapstructEndTime = System.currentTimeMillis();
        System.out.println("BeanUtils use time=" + (springEndTime - springStartTime) / 1000 + "秒" +
                "; Mapstruct use time=" + (mapstructEndTime - springEndTime) / 1000 + "秒");
        System.out.println("-----------testTime-----end------");
    }

总结
通过本次调研,Mapstruct的高性能是毋庸置疑的,这也是我选择使用他的根本原因。在使用方式上和BeanUtils对比,Mapstruct需要创建mapper接口和自定义转换工具类,其实上手成本并不高,但是我们换取了高性能,这是非常值得的,所以强烈推荐大家使用Mapstruct,是时候和BeanUtils说再见了。
保持好奇,不断探索,让程序更友好!
团队介绍
TMALL CAMPUS (天猫校园) 是阿里巴巴旗下重要的业务单元,天猫校园整合阿里巴巴大生态,将新理念、新技术、新业态、新模式落地到校园,为师生提供多方位、多形态的服务,协助高校后勤服务升级;致力于打造购物、学习、生活、实践为一体的校园生活新方式,实现校园商业的服务育人。
天猫校园,让校园学习生活更美好
✿ 拓展阅读
作者|****蒋政印(不习)
**编辑|**橙子君

版权归原作者 阿里巴巴淘系技术团队官网博客 所有, 如有侵权,请联系我们删除。